
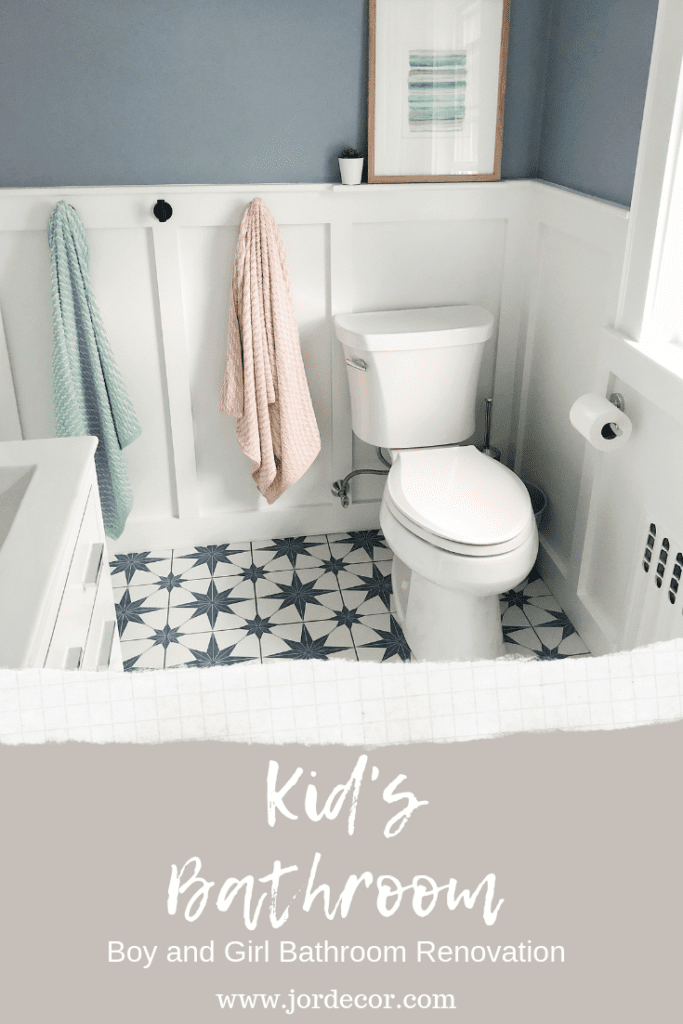
Design & DIY

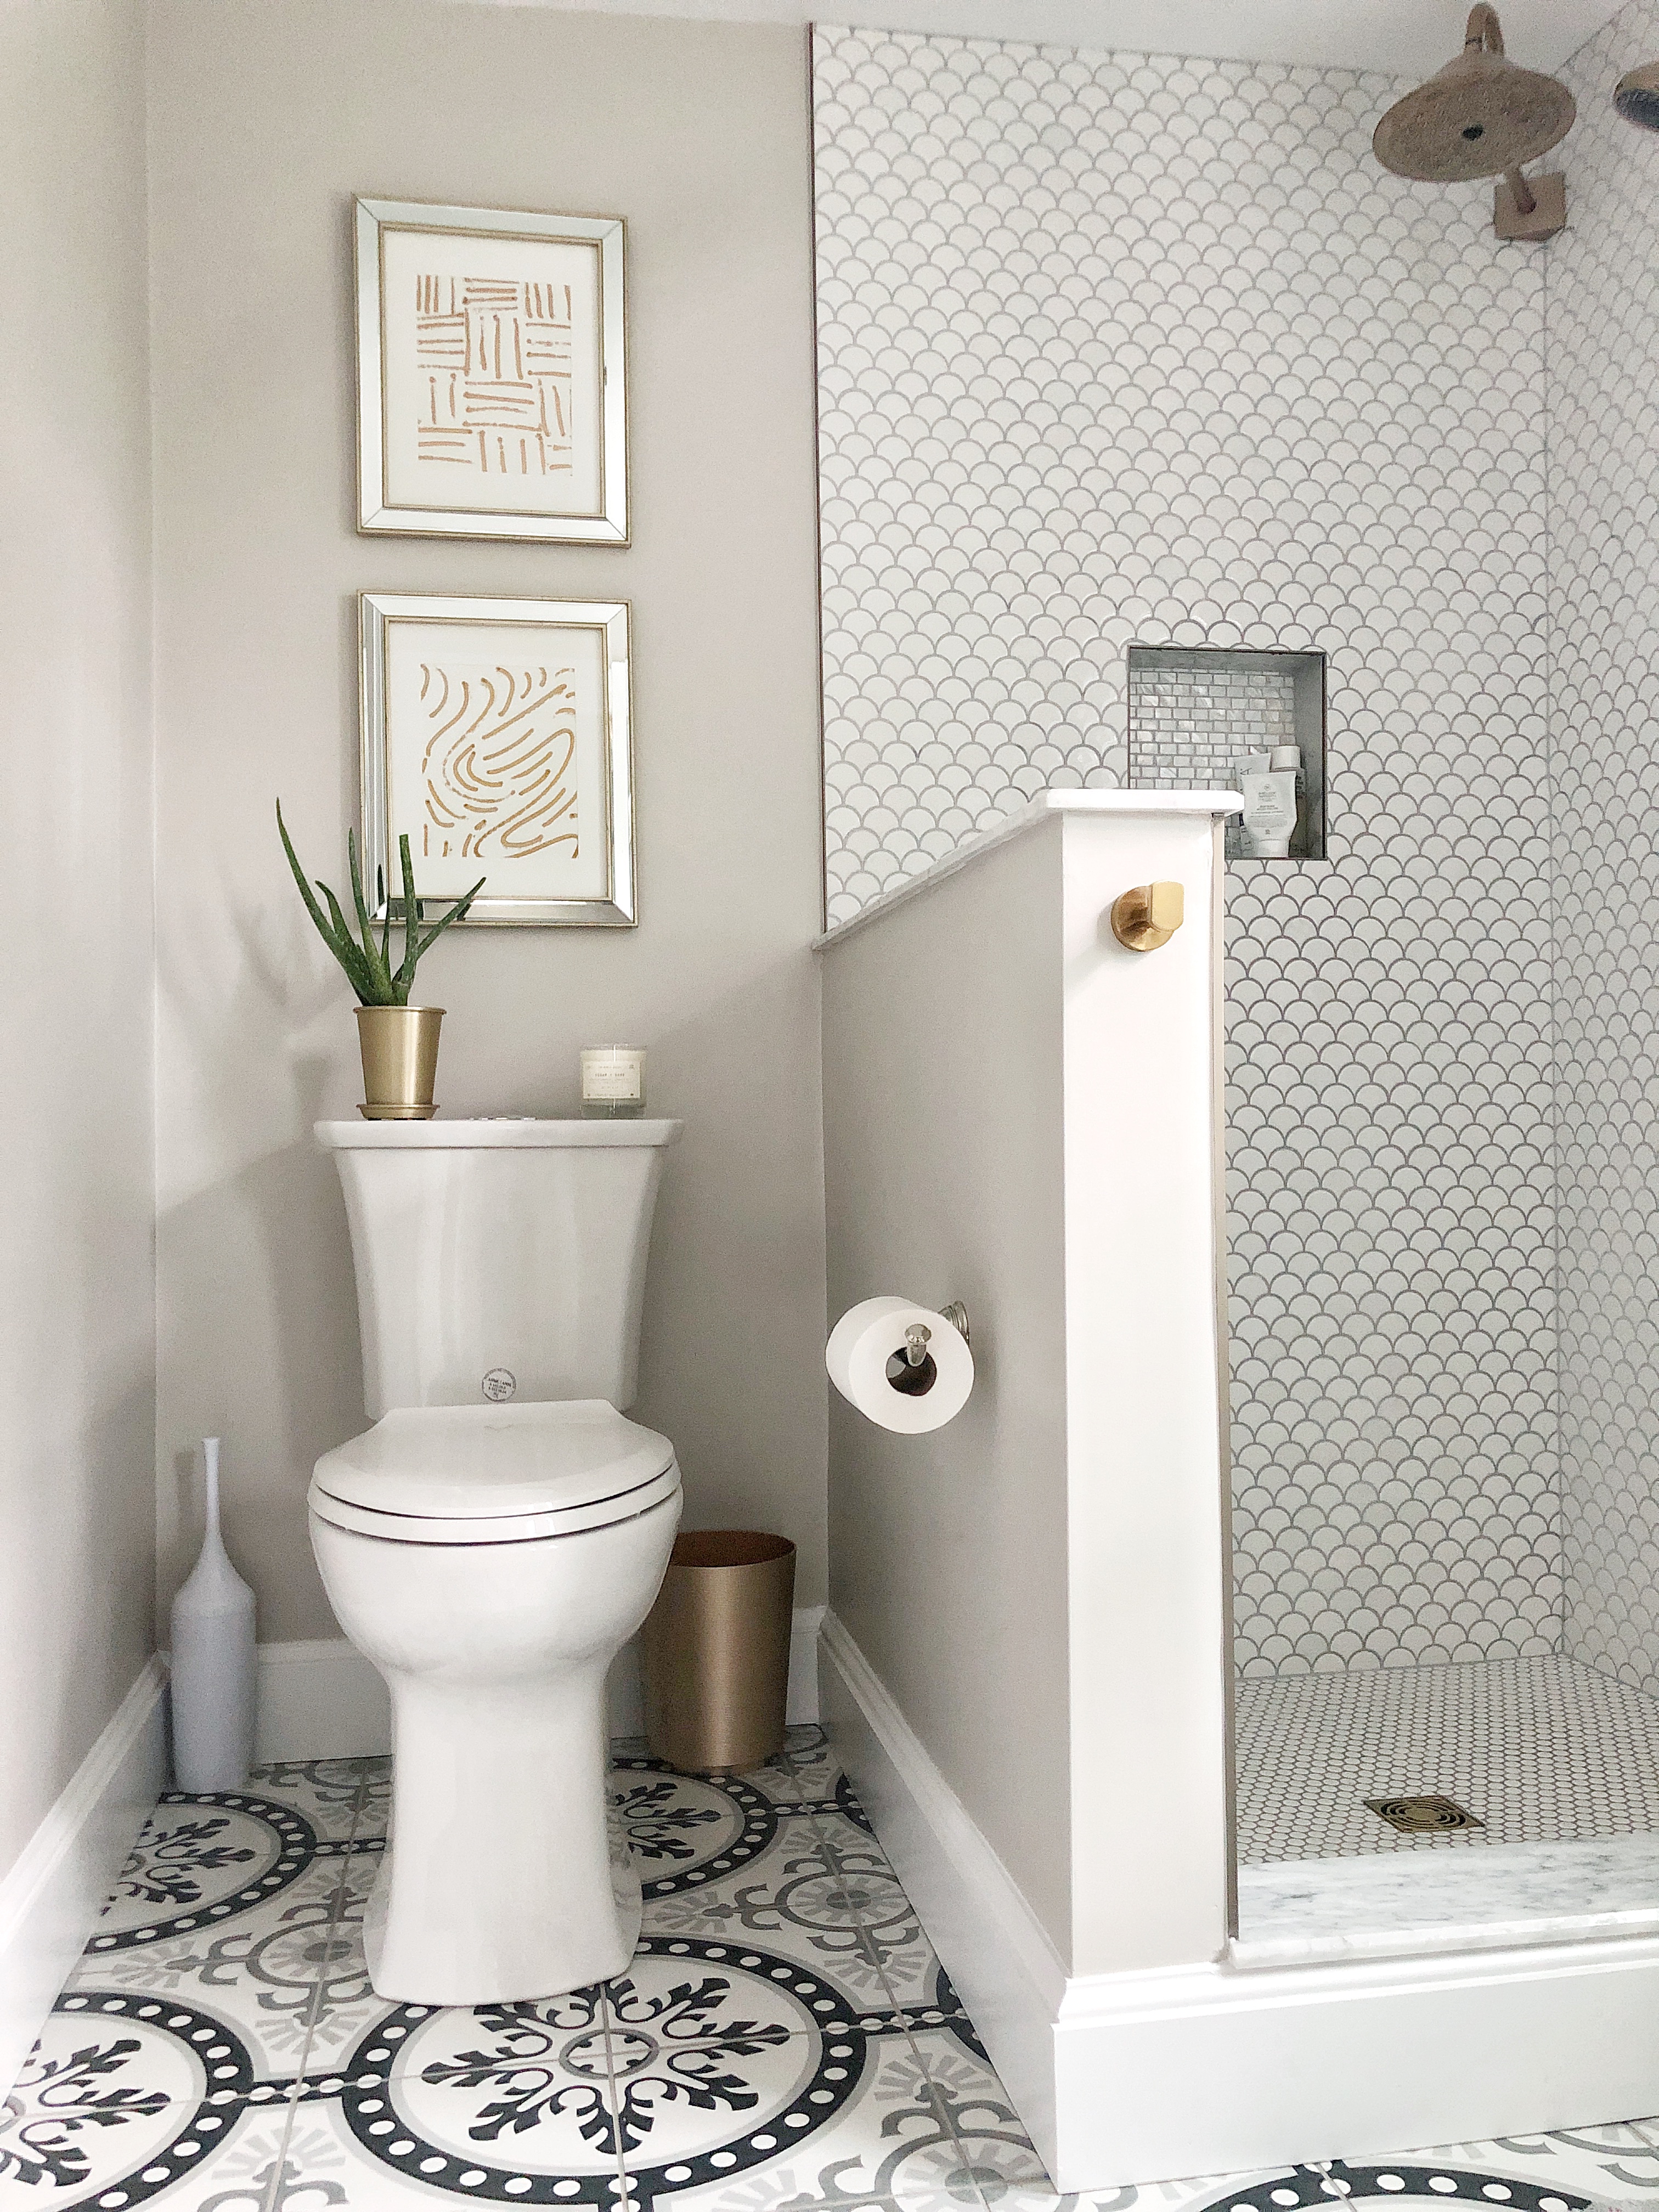
This is not the official reveal of our new master bathroom- this is the I must create affordable art for this little bathroom of ours to make me feel like it’s finally complete. I’m going to share how I made simple, modern and inexpensive gold art designs for our bathroom. But you will also get a sense of how our master bathroom turned out from this post! All that is left is the glass to be installed around our shower. There was an issue with the sizing due to the marble thresholds. It is literally getting fixed today or tomorrow, so we are excited for that!

I’ve been searching and trying to find some artwork that would complete this little wall over our toilet. I went back and forth between different art medium ideas; photography, watercolor, fabric, pen and ink sketch… I knew I wanted something simple and modern looking. The idea of a lot of color or pattern made me worry it would be too much with the bold floor pattern and fun shower tile. I also didn’t want to spend a lot of money.
I found these beautiful frames from Homesense which is similar to Home Goods. They had the luxurious classic feel I was going for. I loved the mirror inlay detail added some reflection and the edging of the brass would look great across from our shower that has some aged brass looking fixtures.
I knew I wanted something graphic and simple to put inside. I remembered I had this “rub and buff” product I was going to use to rub on the mirror I purchased to make it a little bit more aged looking. I decided to use some paper and this gold paint product I had on hand to make my own art.
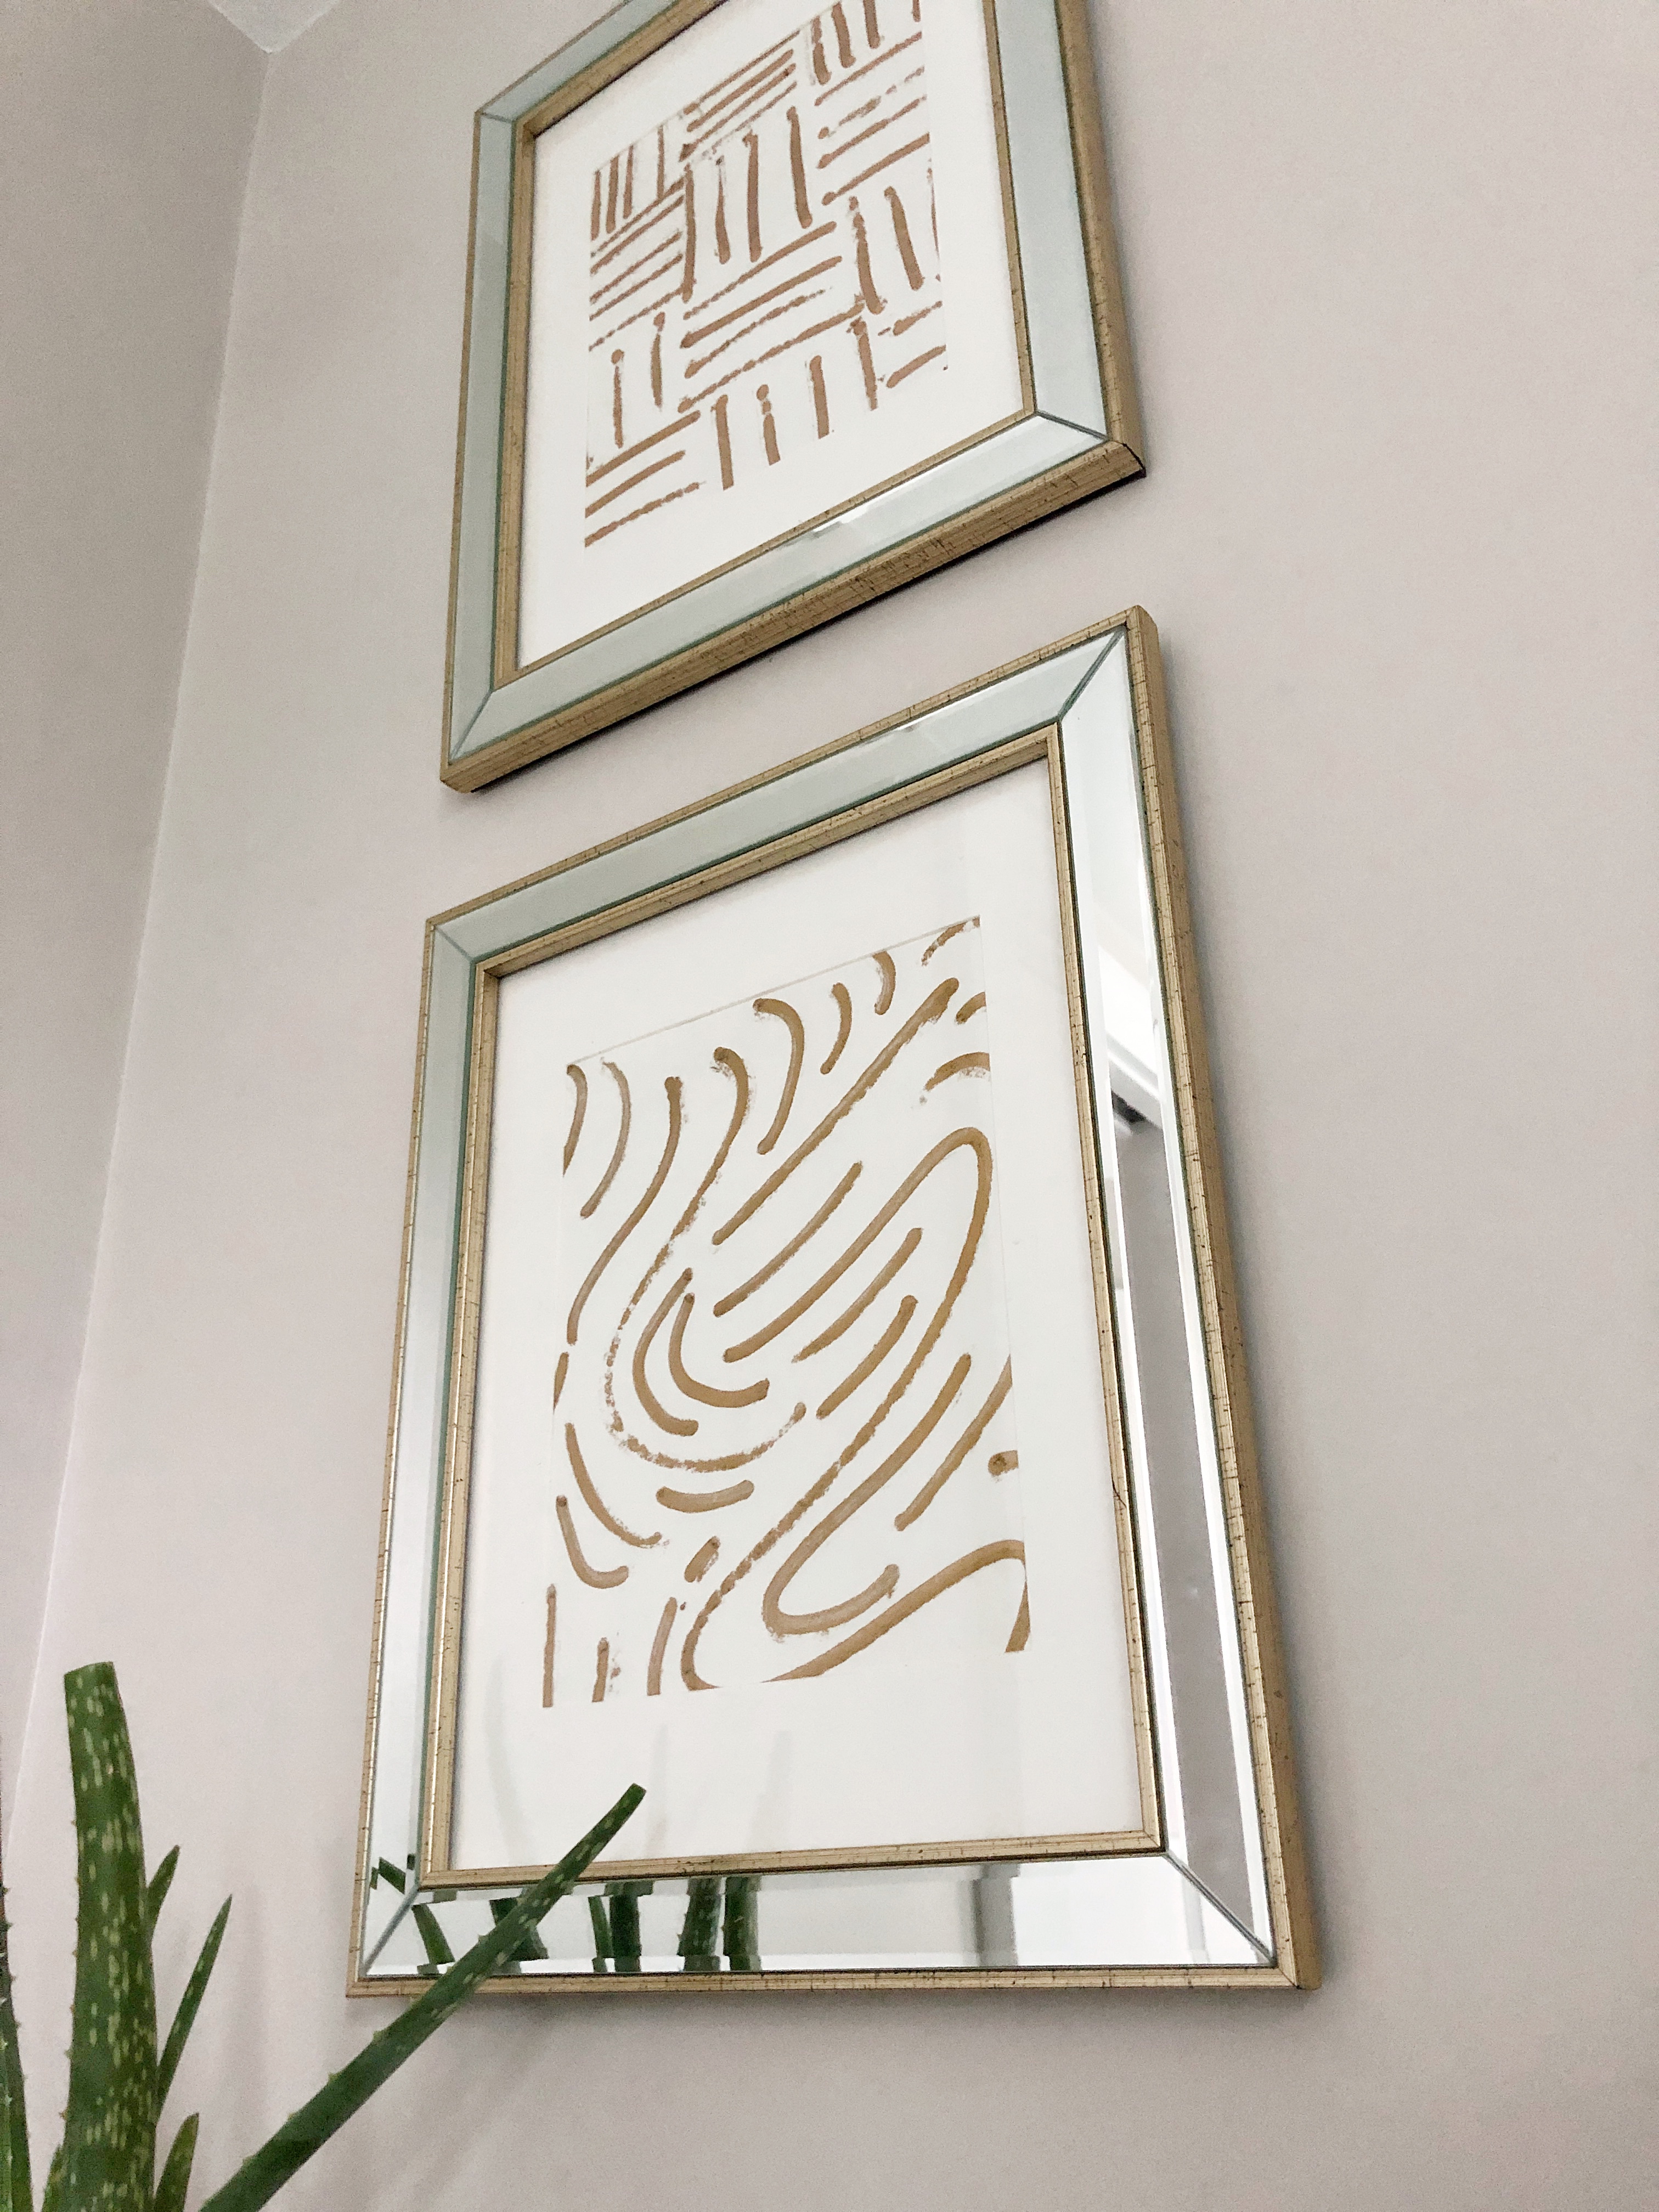
Instead of a brush I used the tube of paint like a marker or pen and made different lines on the paper to create a graphic effect. I purposely didn’t over think this or make it to practiced, I like that this “paint” is thick and has a texture to it. I’ll be honest it has an odor to it so I recommend doing this outside or opening all the windows. It is mean to be rubbed on a metal to make it a gold-ish finish but I like experimenting with different products so this was fun to try.


GRAPHIC GOLD LINE ART TUTORIAL:
The process is really easy- just gently squeeze the tube as you are applying pressure and make one mark/line at a time on a piece of paper. I used this Mixed Media paper that has a little thickness. Start with a curve than add another curve around that, maybe smaller in size. Repeat this several times with varying line size. Keep making small curved lines that eventually go off the paper. There is no right or wrong. I probably made 10 different line designs, to decide which I liked best as a set. I created one with a checker line pattern. I did one with all circles, one with a hex pattern and a bunch of others. I may change them out with some of the other designs I made. If the line comes out of the tube a little chunky or a little not so thick that’s even better! All the variations is what makes it look cool, I think!
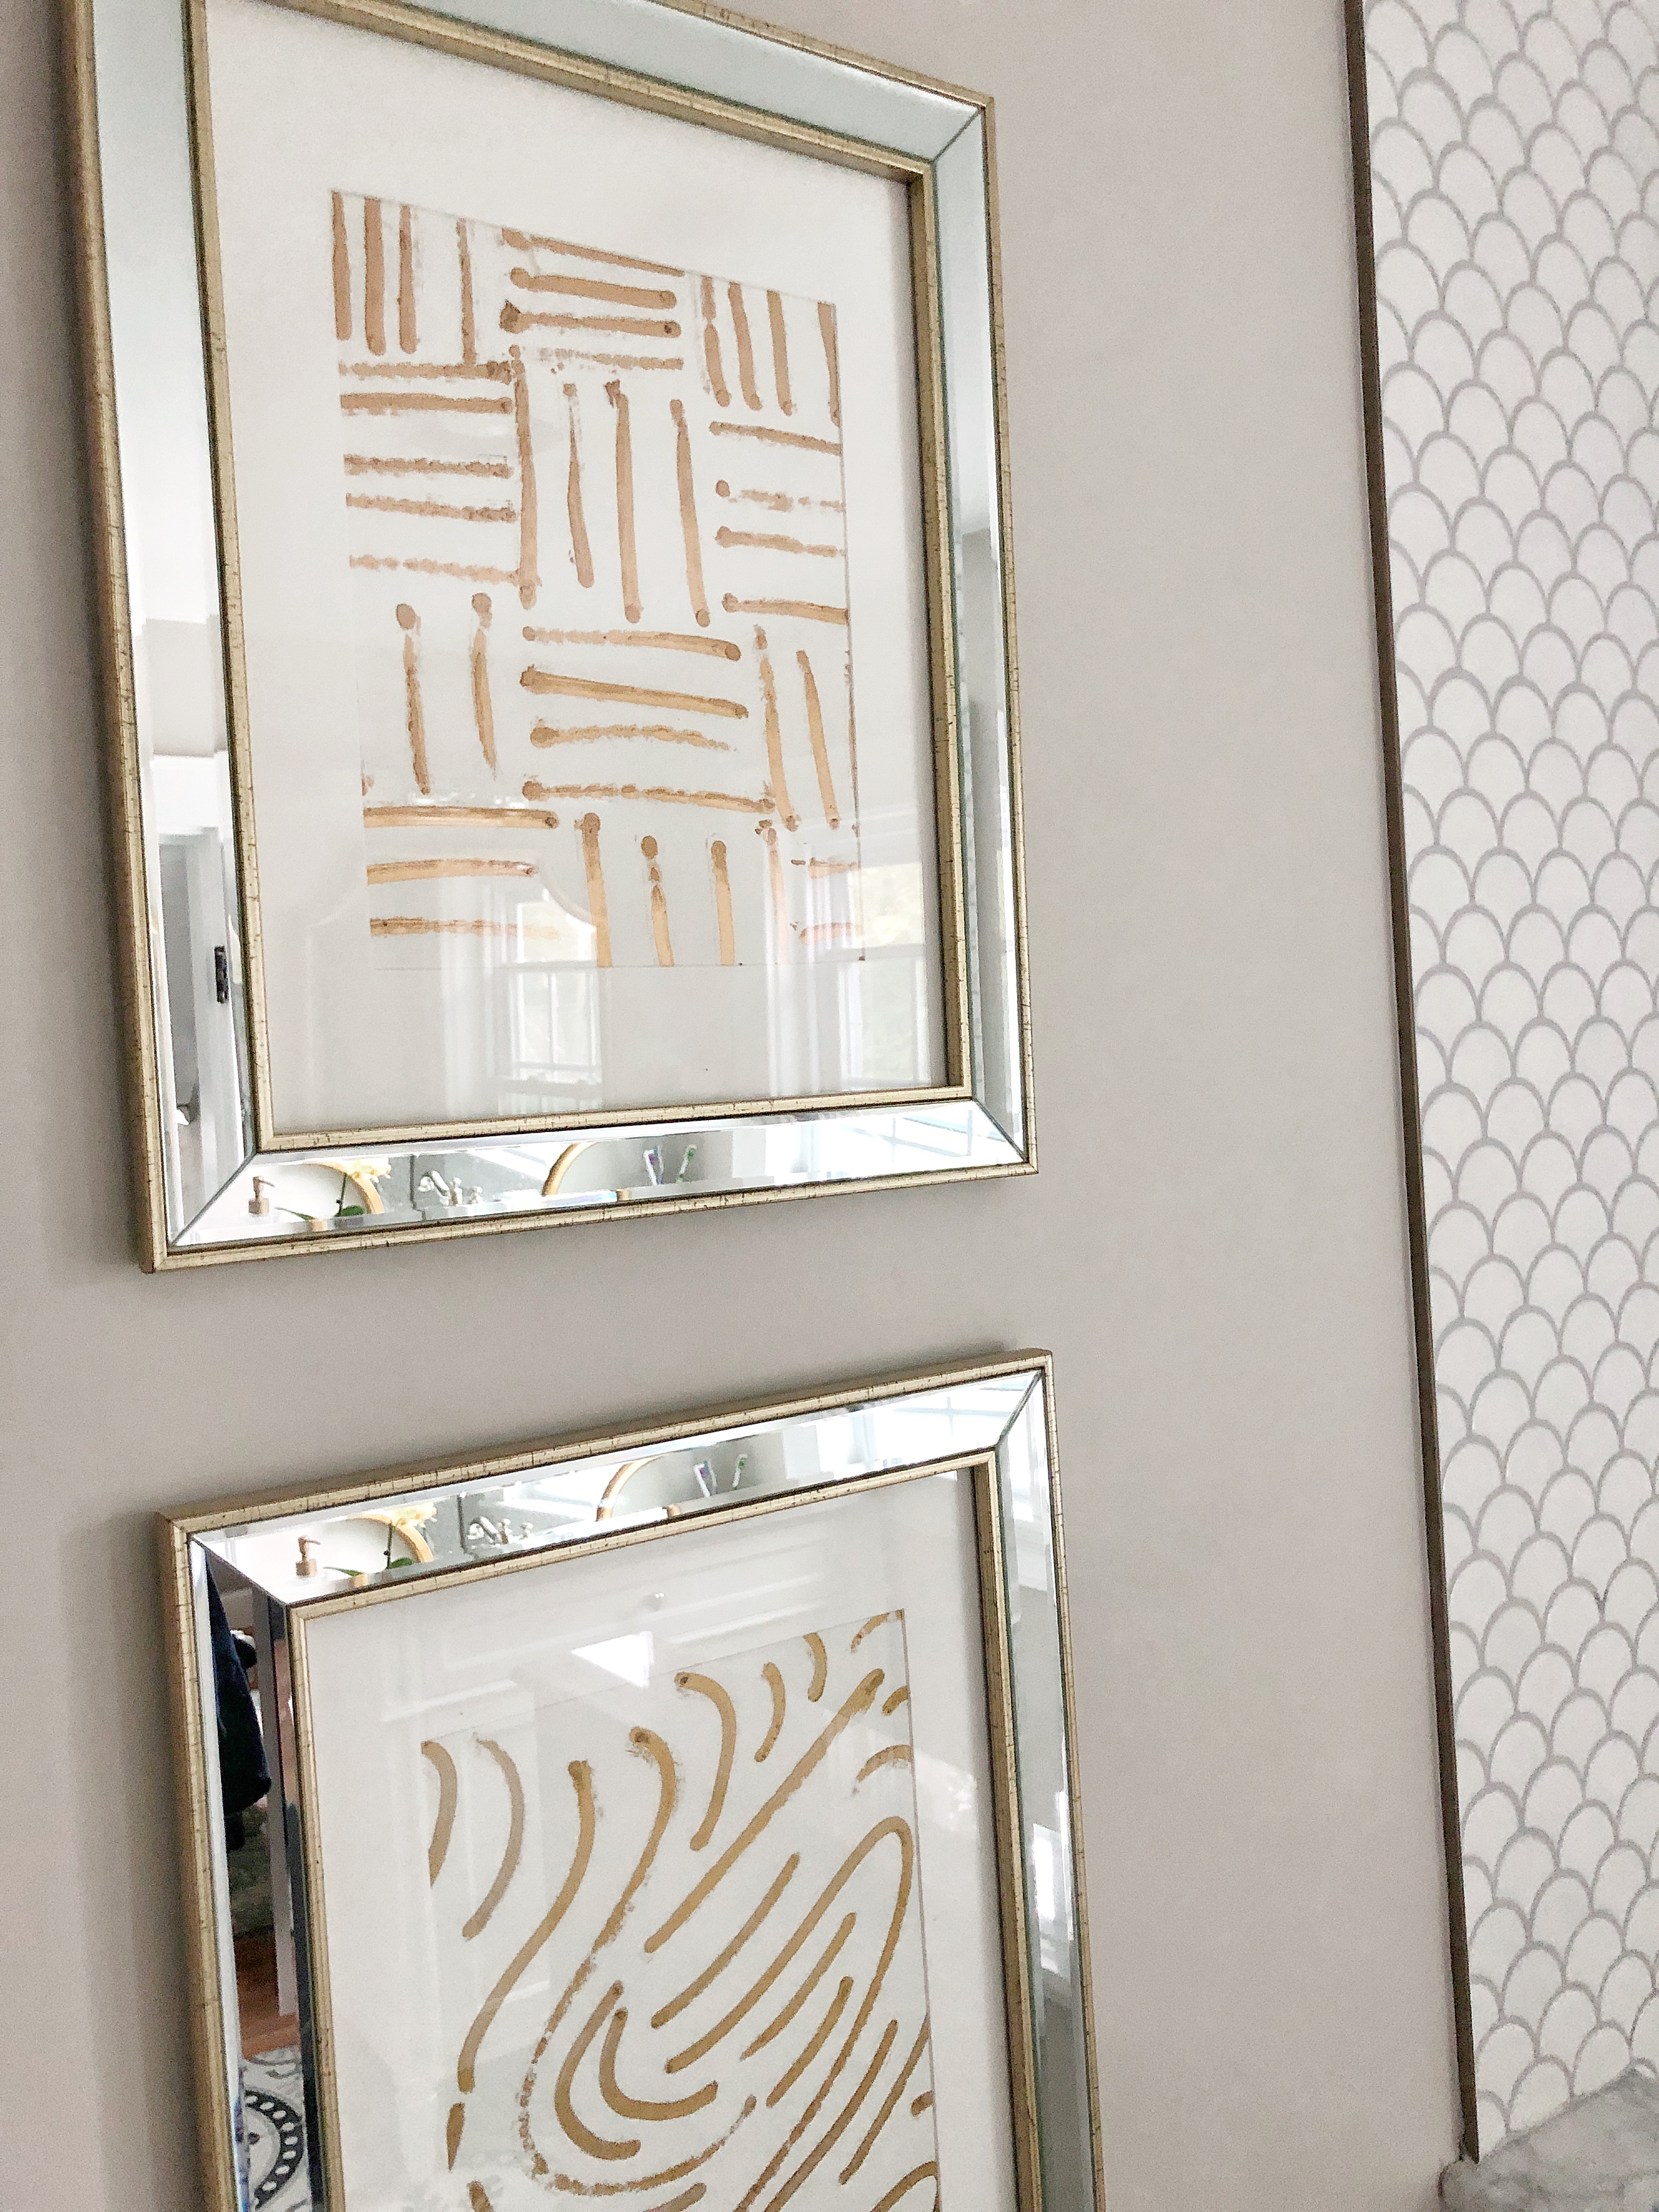
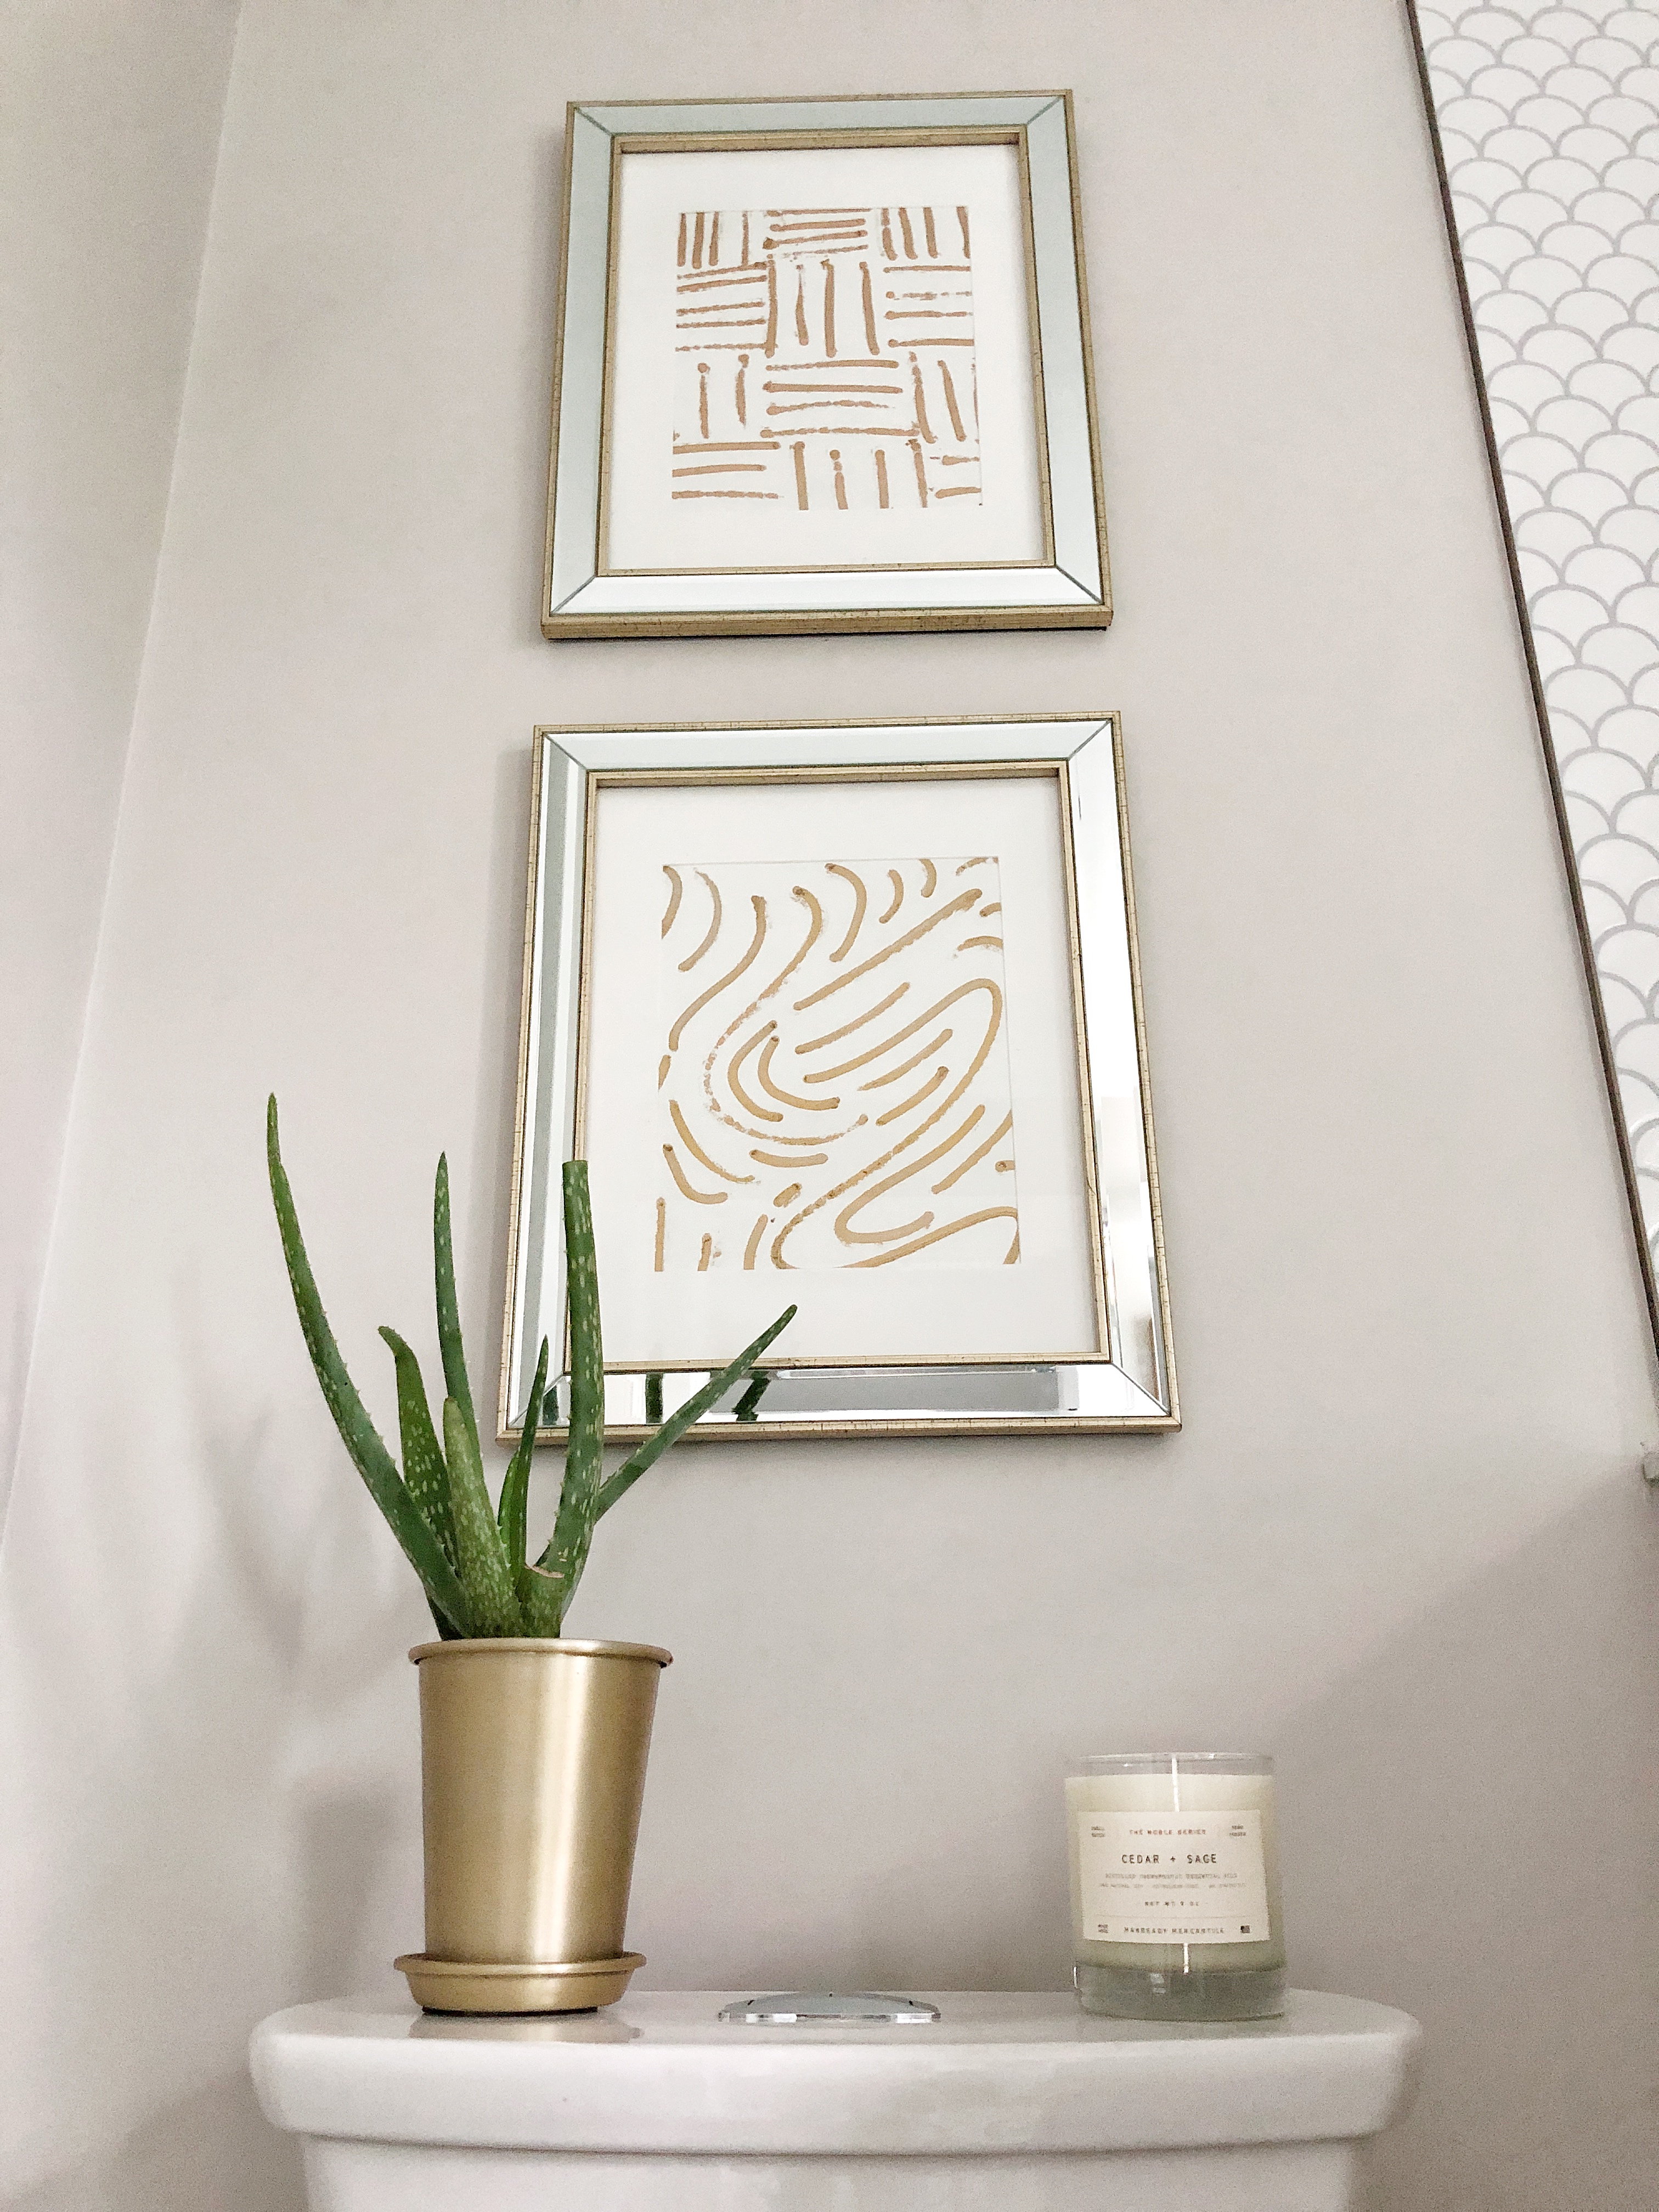
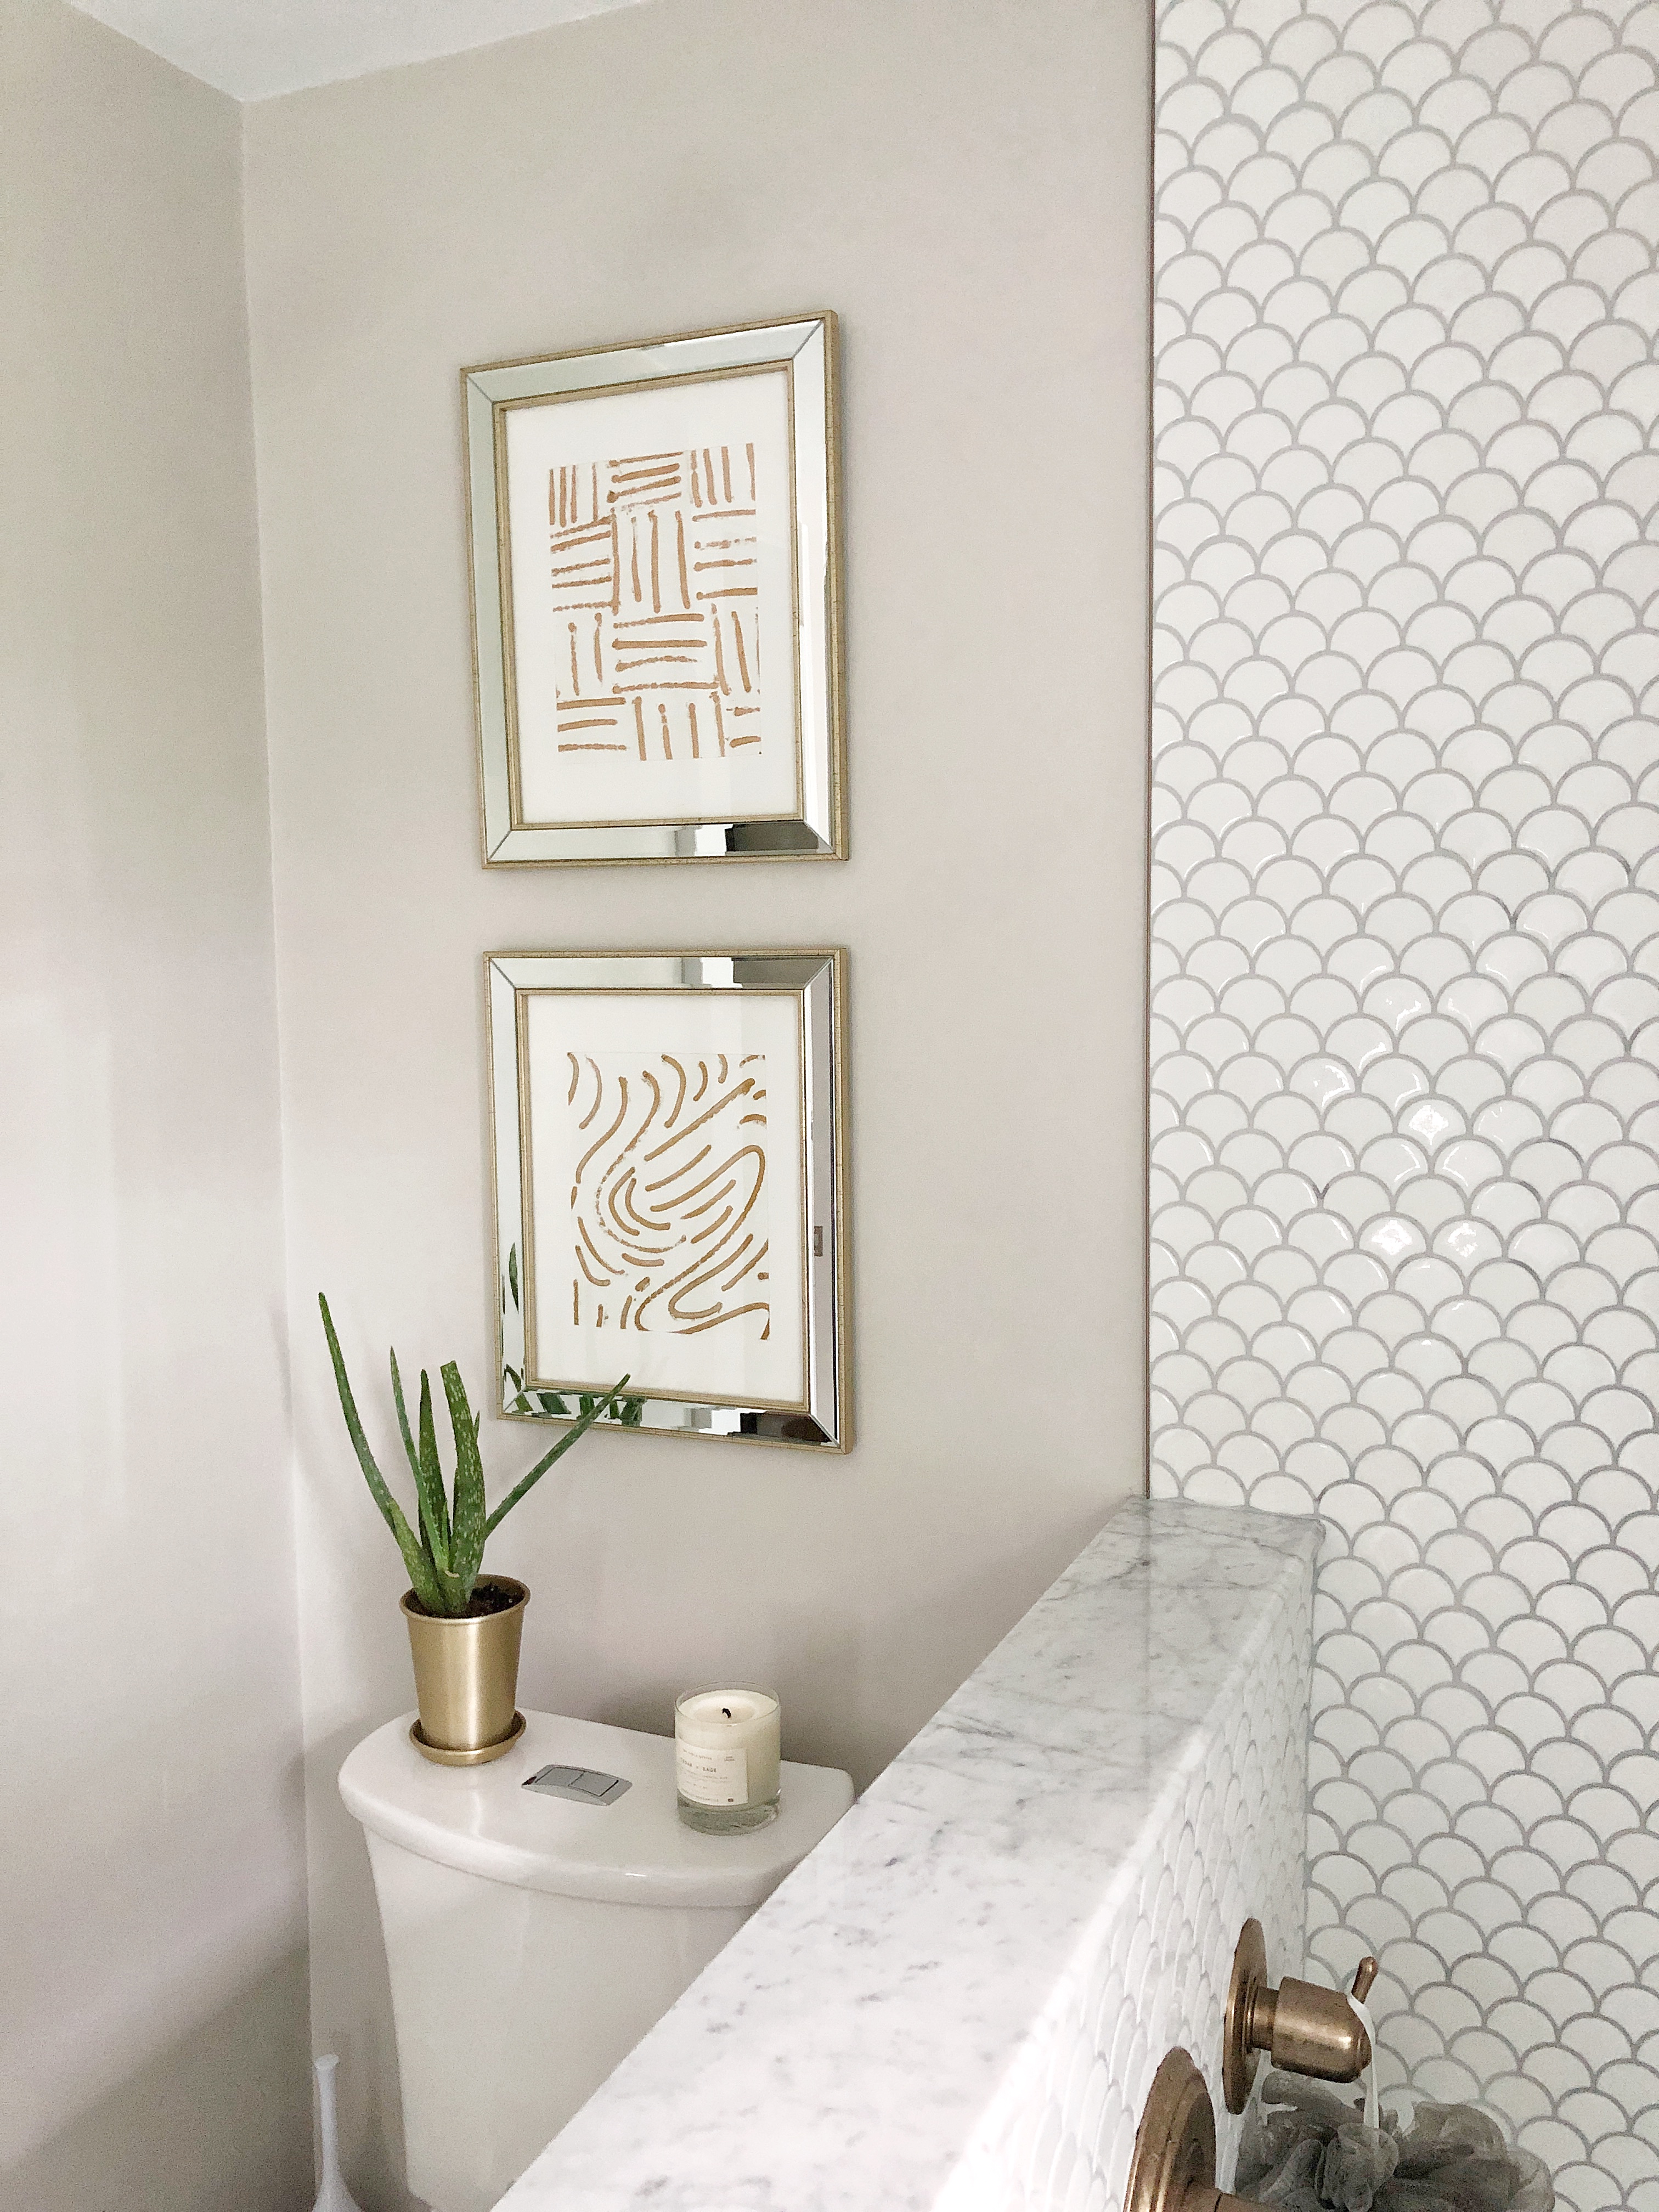
What do you think of these Graphic Gold Line prints? I wasn’t expecting this to work out at all, I actually thought I’d throw them all out! I was pleasantly surprised that I ended up really liking them and the fact that they were free also helps too 😉 The set also really dresses up this wall with out stealing the show from the tile and mixed metals I have going on in here. I think the reflection of the mirror inlay bounces the light around the room even more!
I’m so happy with this fun little project. Thanks for stopping by and checking out this little art DIY.
Jordan
Shop this post:

Pin for later:
read the full post >
* This post contains affiliate links that cost nothing additional and help support my blog. I always appreciate whenever you purchase something that I’ve recommended, love or use in my own home.

I’m so excited to finally share the reveal of our kids bathroom renovation that was just completed! After almost 8 weeks and a full summer of showering at family’s houses, our gym, escaping to my parents beach house and other little getaways we made it work without a tub/shower in our house for the entire summer. And let me just say it wasn’t always easy or fun but it was TOTALLY WORTH IT. (I will link as many products as I can that we used in this bathroom at the bottom of this post).
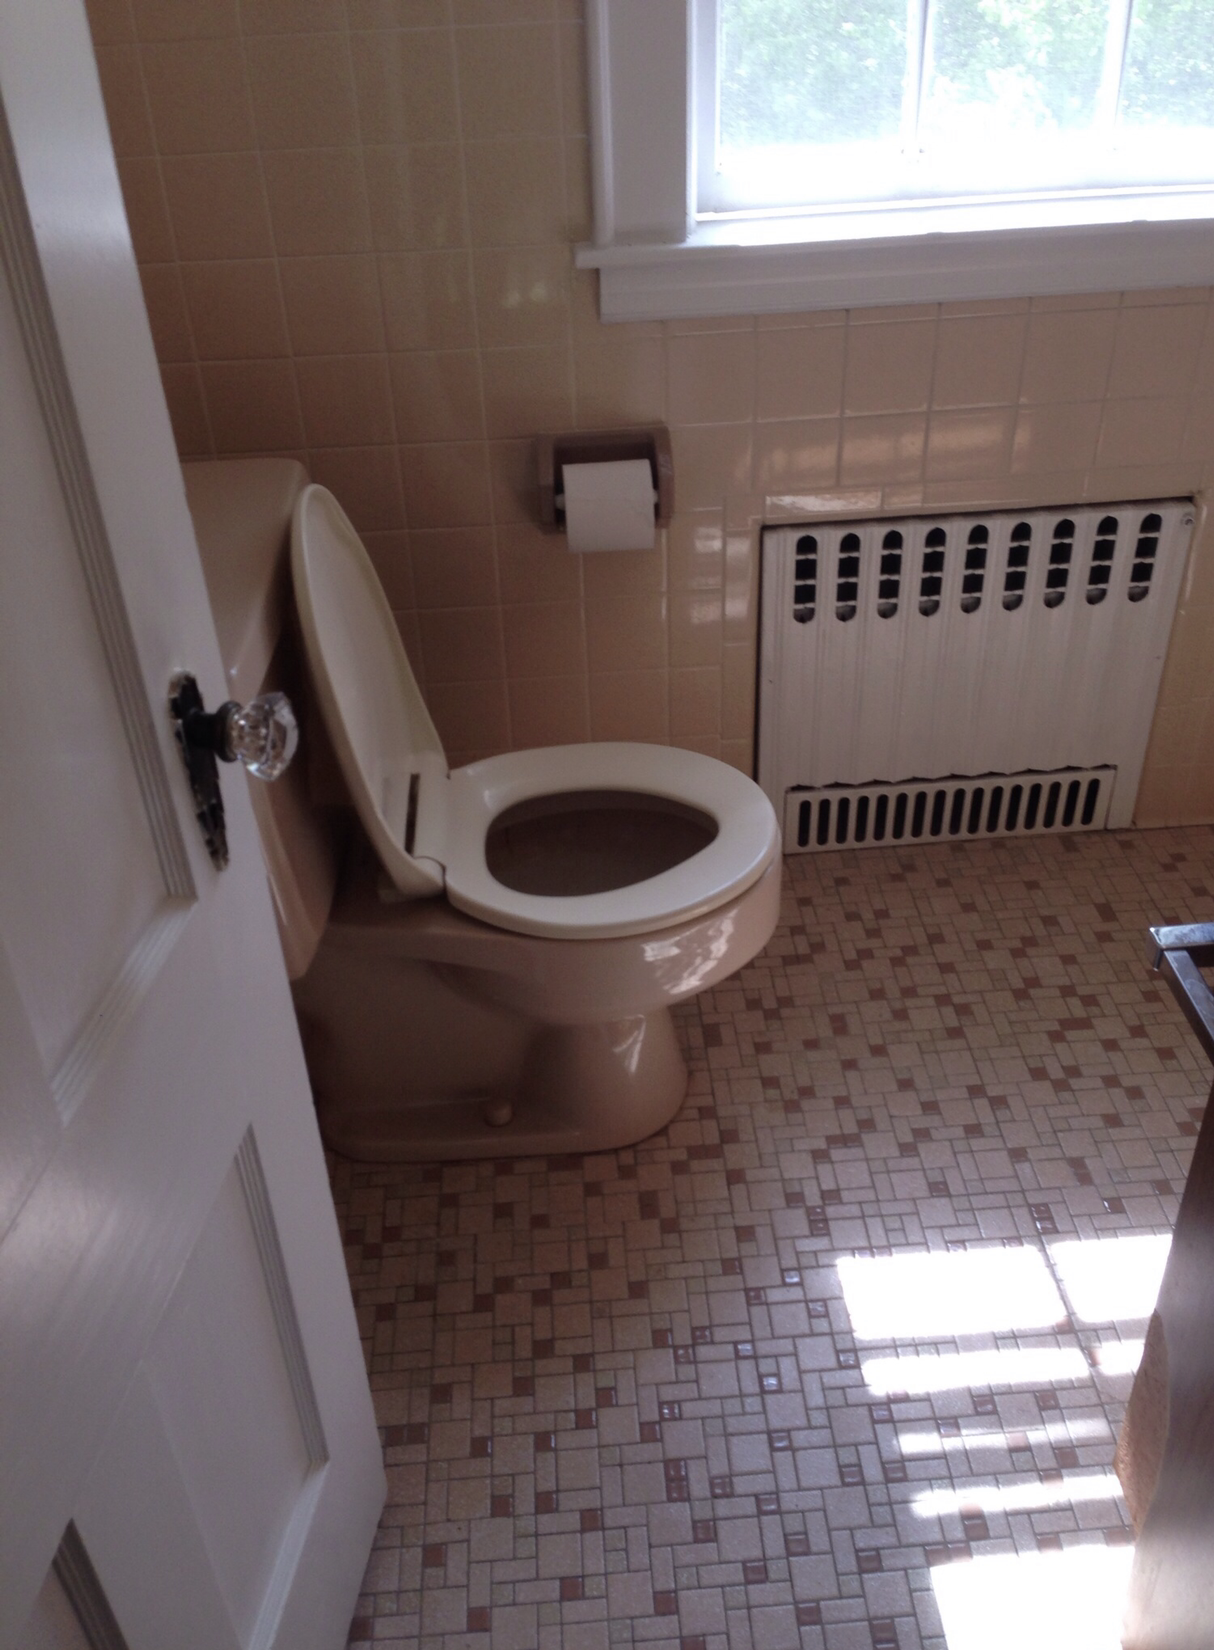
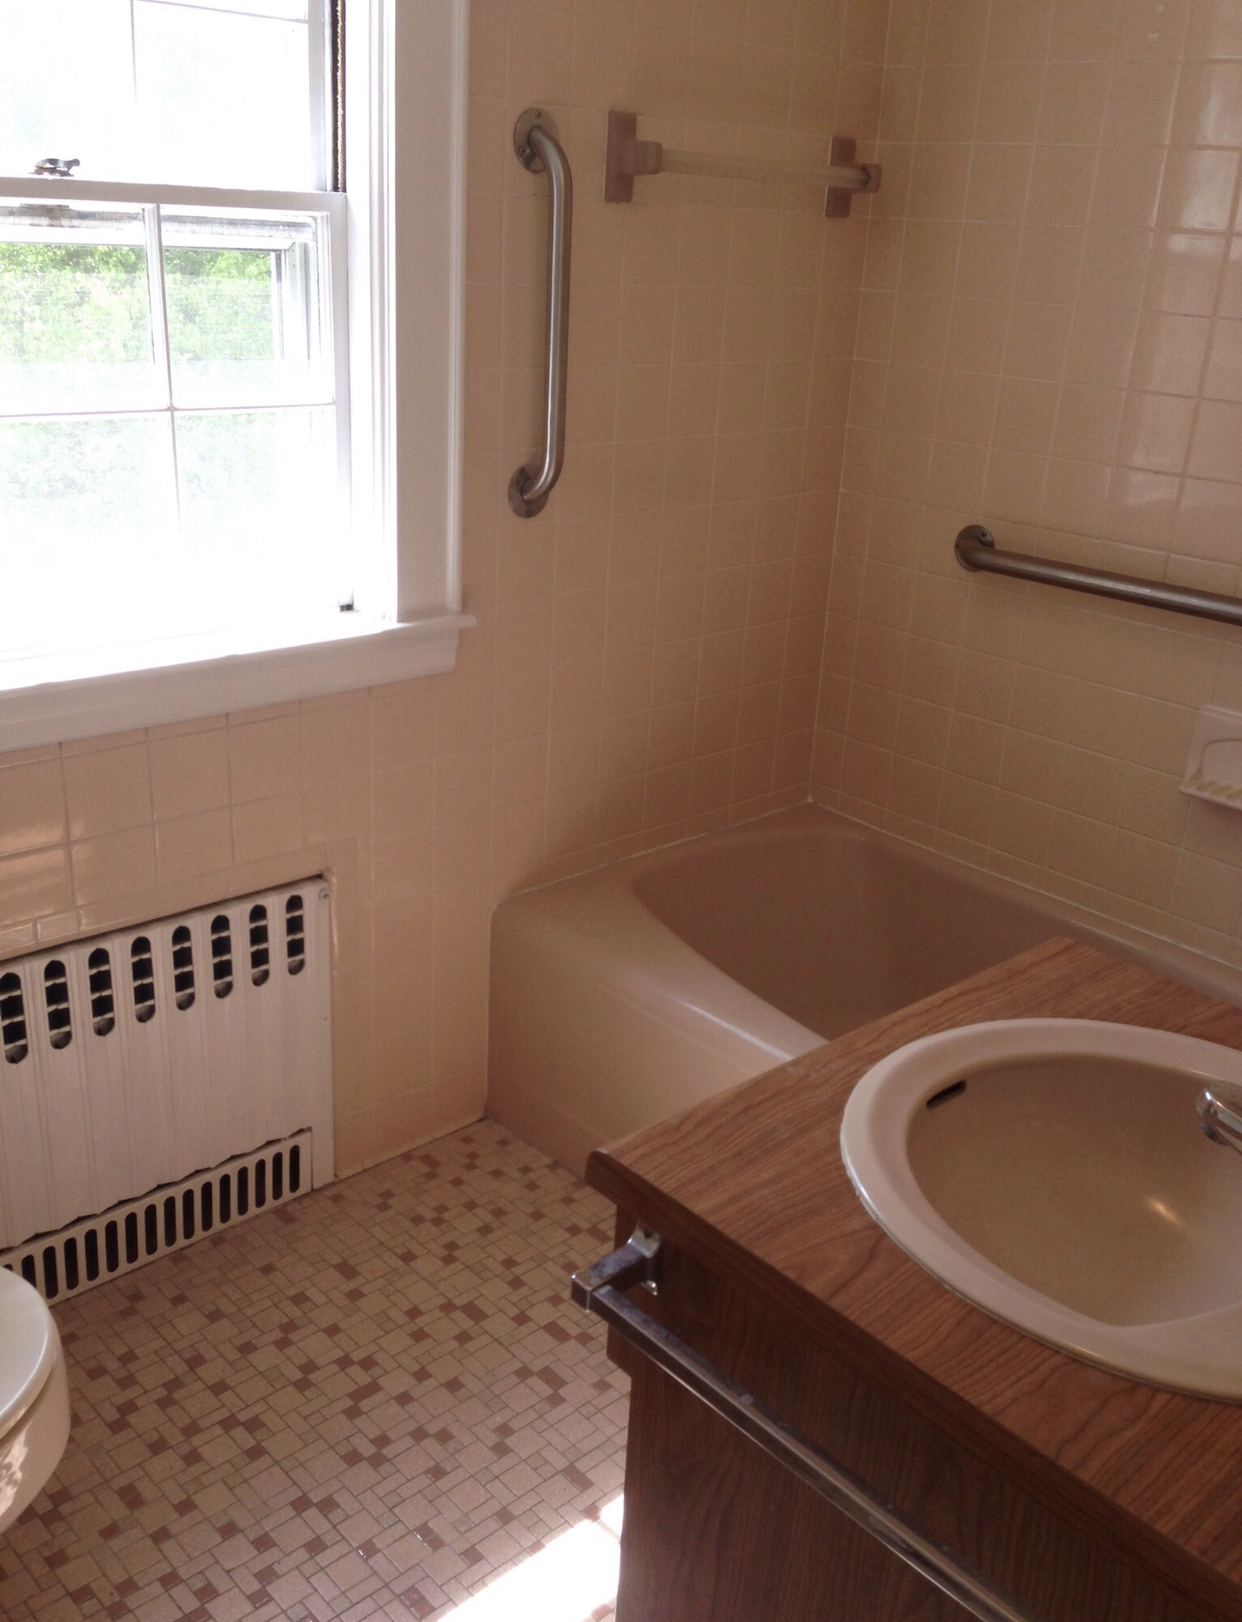
Before I get to the after photos, let’s go back down memory lane and see what the bathroom looked like when we first bought the home over 5 years ago. Keep in mind this was the original bathroom of the home! We did a couple small updates like refinishing the tub white, tiling over those classic pink tiles with aqua penny rounds and adding a pedestal sink. We also took down the rails and never got around to replacing the crumbling tile that was removed when the rails came out. Yes, I showered in a bathroom with missing tiles from the 30’s for almost 5 years. Overall our updates made the bathroom tolerable for me for awhile. After living with it that way we knew we wanted to completely gut the bathroom and start from scratch. We also realized we all wouldn’t be able to survive with just one bathroom, we were running out of space. So with this decision I knew I could make this bathroom a little playful and fun for the kids. Another important feature I wanted to add was a small vanity for the kids to store their toiletries and I just wanted it to feel brighter, fresh and cool!
BATHROOM BEFORE:

BATHROOM AFTER:
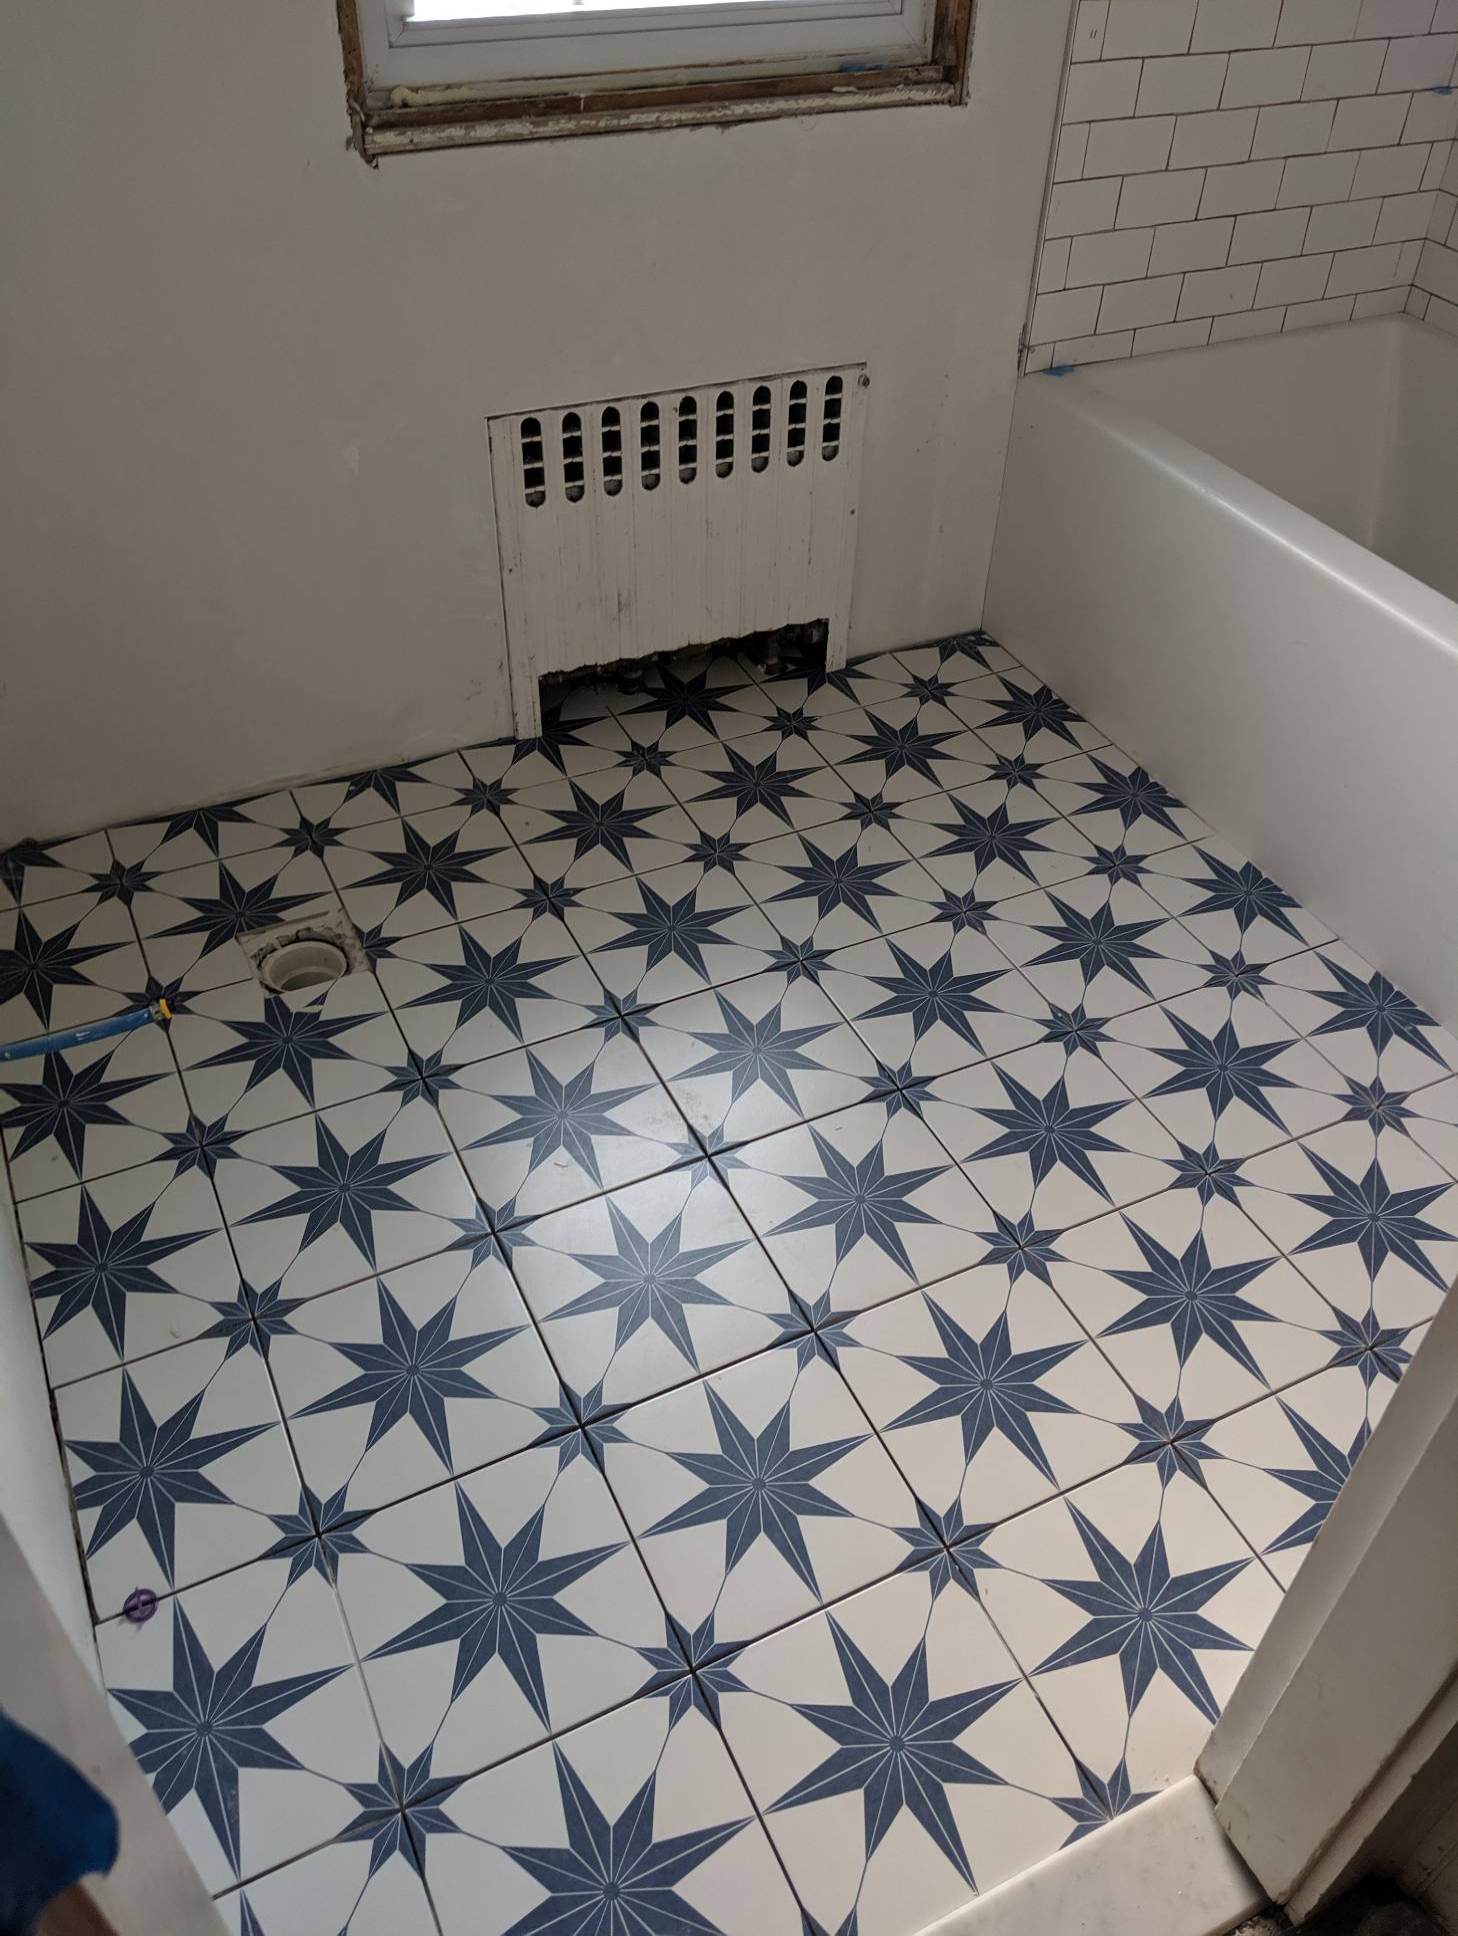
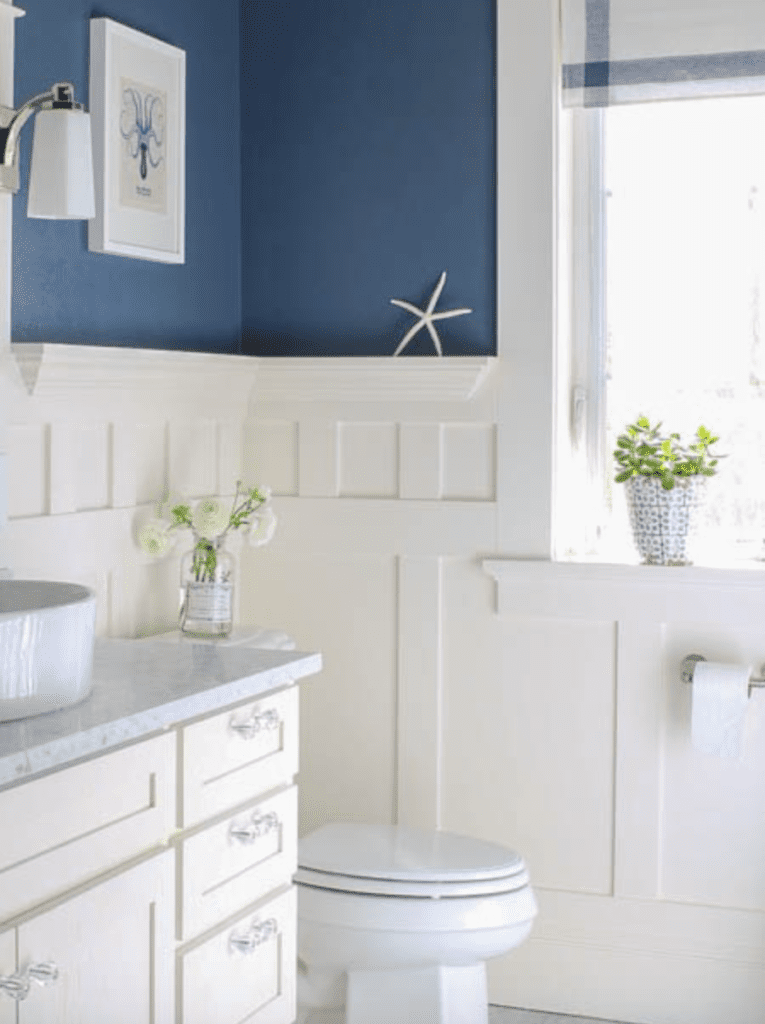
The statement and focal point of the kids new and improved bathroom is the beautiful star tile from Merola Tile, it has a stunning deep blue pattern that creates a dramatic point of interest on the floor. I chose a dark navy grout to compliment the star color and to help prevent lots of stains and dirt from showing.
The board and batten is a beautiful balance to the deep pop of color on the wall. The color I chose is called Comet by Benjamin Moore and absolutely love the contrast with the white and how it picks up the star color on the floor. Coincidently the name just works so well with the tile too. Love when that happens. The white is all Decorator’s White by Benjamin Moore because I wanted something clean and crisp.


I had our contractor build out a little ledge over the toilet to act as a mini shelf for a piece of art to lean or to add a little plant/vase. It’s very sweet and subtle. I love this for now, however I like switching things up so down the road I may hang art over the hooks and play around with the ledge maybe a set of little succulents? But for now this looks good to me and I love my art from local artist Carolyn Mackin it really ties all the color of the room.

Since this bathroom is for our son and daughter I wanted some masculine and feminine touches but I wanted to keep this bathroom with out themes, and with out the match- matchy that you may say in stores. I really mixed a lot of purchases from a lot of different places. You’ll see many shades of blues/greens and peach/pinks.
The metals you’ll see, I mixed in this bathroom are chrome and flat black. I think keeping only one metal in a room can be a little boring. I like to mix things up and I think these fun black hooks just add a modern flare to the space instead of a traditional towel bar.


The light fixture was so fun and different and I loved that it brought in the flat black and chrome together. It’s such a nice juxstaposition with the wood too. I may still look for a mirror that is a little longer to fill that space more but this works for now and it adds a really cool and rustic touch.


Little details like this “Brush your teeth” toothbrush holder was too cute and colorful to pass up. I like adding kid items in small doses so that as they do grow I can easily swap that out. I ordered all the faucets and shower nozzles from Build.com and I love that you can purchase something from a whole line there, I made a last minute change to the style of the kids faucets and it was so easy to return and get refunded via mail (head to the bottom of the post to see the line of faucets/shower head I went with).


The vanity was an affordable option that I’m going to really see how it holds up. I like the look of it and the fact that both bottom drawers pull out and have storage for the kids toiletries but I’m a little worried with the quality. So I will keep you posted and update you on that. I will still link it at the bottom. I thought about doing a colored vanity or gray vanity but with a small bathroom I think it’s best to keep things bright with lighter colors. However the bold top half is just enough contrast that it doesn’t feel too subdued.

I’m still trying out towels I have some turkish hand towels that I love, but grabbed these kids towels for under $10 each at Walmart they are part of the Better Homes and Garden Collection, they may just be temporary until I figure out a longer term towel- I’d rather invest in our towels at this point vs. the kids, they don’t even know the difference! I will see how they hold up in the wash for sure.

The niche is everything. I absolutely love the little hex tiles, and I love the simplicity of the bath bodywash/shampoo and conditioner from Honest in their new scent which smells so good. Perfect for kids! My kids are sensitive and don’t like getting harsh stuff in their eyes. The salts are for me! I can’t wait to test them out, they smell so good!
Let’s chat about the subway tiles from Merola Tile they are just gorgeous and each one has a little un-eveness to the surface that makes it feel special and handmade. I knew that I wanted something classic and simple on the walls and these tiles are perfect. I want with a soft light gray grout and it defines them just enough with out being too dark or bold.

I kept the textiles simple and the patterns to a minimum in the shower curtain and towels. However this bathmat was such a fun pop of all the blues and super soft that I figured it would be fun to try and it really just livens up the room even more! Found the bathmat recently At Home stores.

There you have it! Our kids bathroom is complete! We are so thrilled with the beautiful tile, the amazing fixtures and the wall color that ties it all together! Thanks to Mike at Chaiss Construction and all the amazing sub contractors that came in and did their hard work to make our bathroom look so wonderful.
What do you all think of this space?! Thanks for stopping by!
Jordan
Kids Bathroom Products:

PIN FOR LATER:
read the full post >
Are you thinking of renovating your home? Are you wondering what life will be like through a major disturbance like home renovation? Then continue reading on as I share my 5 go- to- tips to surviving and thriving during home renovation.

We are in week 7 of bathroom renovation. How have we survived almost an entire summer with out having a full bathroom you may wonder? Read on to learn more. I know this may not even be THAT long compared to some who have spent several months renovating. But when your home isn’t functioning as your sanctuary, a week can feel like a month. Any amount of time that your house doesn’t feel like your own personal space, is too long and can throw off your whole life. It can cause feelings of stress, anxiety and complete loss of control. I know this because I’ve experienced all these emotions in some way.
Let me start by saying we’ve been extremely fortunate to spend majority of our home renovation at my parents house in Cape Cod. Now, this took some planning ahead and foresight on my part. I knew, with young kids, to spend 4-8 weeks with out a shower/tub would be an insane move in the winter. When the kids are in school and we are stuck indoors all the time would be an extra challenge. Plus, traveling to shower at relatives or a friends house in the freezing cold would have been torture.
Summer has been the perfect time for us as a family to do a bathroom remodel and addition. However that was achieved with a little planning ahead. I started meeting with contractors in the fall, several months before I had any intention of starting our bathroom renovations. Don’t expect to book a contractor a few weeks or even a month out, sometimes you need to get the ball rolling really far ahead of schedule, to secure the time frame that is most ideal for you or your family to go through a home renovation.
So let’s dive in to some of the ways we made the best of our shower-less summer. Ways we coped when things got tricky and just some things we learned along the way that you may find helpful if you ever go with out a bathroom.

Coordinate with Friends & Relatives
That’s what friends are for…. right? To help you, even when you are shower-less. Especially when you are shower-less I mean who wants stinky friends? It’s so helpful to have family and/or friends that live close by to let you use their shower when you are going through renovations. I remember one day after soccer camp another mother was doing pick up and bringing the kids back to her house and that’s where we were all do to pick up. I didn’t want to sound strange but I was desperate and I knew it would make life so much easier if Griffin just took a shower at their house. I sent out the random text explain the situation and of course they were so nice they let him take a quick shower. Luckily he is 8 and completely able to shower independently. You’ll find yourself in these situations and you literally just have to laugh and make the best of it.
Gym Membership
You may already have a membership to a gym, and if your going with out a shower during a renovation you’ll definitely want to take advantage of their amenities. Ben took advantage of our gym membership and would often times work out, then shower at the gym before starting his work day. This was so helpful on days that going to a relatives house or being in Cape Cod with us wasn’t possible. It would be SO worth it to join a gym if you are doing a bathroom renovation just for the shower convenience!

To-Go Travel Sets
Living with out a full bathroom for almost two months means living on the go a lot. We kept all our toiletries and weekend bags by the back door, always. There was no reason to have any of it upstairs (we were bathroom less up there). We kept all of our stuff right by the door so we could go into the first floor bathroom to brush our teeth and wash up at night. If we were going to a friend or relatives house we had a towel by the hook on the way out the door or in our weekend bag. We kept our favorite toiletries ready for traveling to and from Cape Cod, on a family trip or to the gym, & so on. The trick was having it all organized together in a way that made life a little more manageable on the go.
These are some of my favorite weekend bags and toiletry cases. I think it would have been great to have one specifically for the kids as their stuff got lost at different houses a lot.
Shop Travel Sets

Shop Kids Travel Sets
Create Order
Are you renovating a kitchen? Then maybe it’s time to freshen up your bedroom or organize the laundry room. Maybe tidy up your bathroom. Create order in the other areas of the home so they function well and put you at ease. This will help you focus on something else. For example if you are renovating a kitchen, and don’t have storage or counters, set up a place in the dining room that holds all your paper plates, cutlery and napkins. Put together a little binder of all your favorite take out places. Organize and clean the areas of the home you still have control over. Honestly, one day I was so overwhelmed with the state of my house that I focused on cleaning up my kitchen and then lit a bunch of candles on the first floor. After that I was completely relaxed and honestly forget that my upstairs was a horrid construction zone.
Take Time to Relax
Now is the time to take care of yourself and ease your stress. Book yourself that hair blow out ( I did this multiple times and it saved me). Showering so many places was giving my hair a beating. I would skip days of washing my hair of course but treating myself to a blow out just gave me a little confidence and made me feel good. Try a new facial or grab a manicure (not all in the same day, well not that there’s anything wrong with that!). Spread out the treatments so you have a little way to unwind on the days that are just very overwhelming. Home renovation can be very overwhelming at times.
Do little things that will calm you down plus get you out of the chaos happening at your house. We faced a really big decision in the midst of our renovation that forced us to consider potentially spending another 5k and adding another two weeks to our renovation. It was a small blemish in the ceiling that caused an imperfection and we didn’t know if we should live with it or fix it. It was all cosmetic. We went back and forth for almost two days – there was no clear right or wrong. It drove me crazy. Finally we made our decision and I booked a relaxation acupuncture treatment (one of my new favorite forms of relaxing and health and wellness for myself.) I felt SO SO much better after I left my treatment. Then we completely moved on.
REMEMBER,
Somethings don’t always go as planned in home renovation, but the good news is it will come to an end. I always love the saying “this too shall pass’. It will come to an end and before you know it, it will all be a memory. Take a deep, deep breath and trust that it’s all going to come together and your home will be even more amazing because of it.
I really hope that you find this helpful if you’re thinking of renovating or are in the midst of it. You can and will get through it! Make the best of it, treat yourself at times and you will be rewarded with a beautiful home! Have you ever gone through a home reno? Any more tips to add? Thanks for stopping by!
Jordan

read the full post >
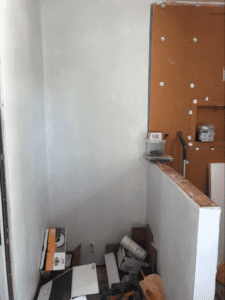
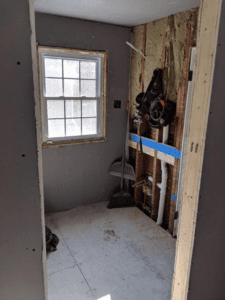
Hey Friends! We are about halfway through our summer bathroom renovation, which is good timing because we are about half way through summer. My goal was to have everything back to normal (ish) by the time school starts in September. If you didn’t see on Instagram in early July we gutted our one and only full bathroom and are converting our old master closet into a master bathroom! So far it’s been going smoothly. We have an amazing contractor that is kicking butt and moving the project along! We have GC’ed our own projects before, like when we did a basement over at our first home but now with two kids and busy work schedules we knew we needed someone that could handle all the permits and all the sub contractors. Plus, all the unforseen issues that can come up when renovating an older home.
This week the walls are going up and the plaster is being done. So far all the permits have passed and the rooms are really starting to take shape. As we move closer to the plaster phase and the tile phase I know the choosing paint color phase is also getting closer. I’m gitty with excitement to finally have updated bathrooms AND our own master bath! Sharing a bathroom with two growing kids was getting a bit challenging (to say the least).
UPDATES:

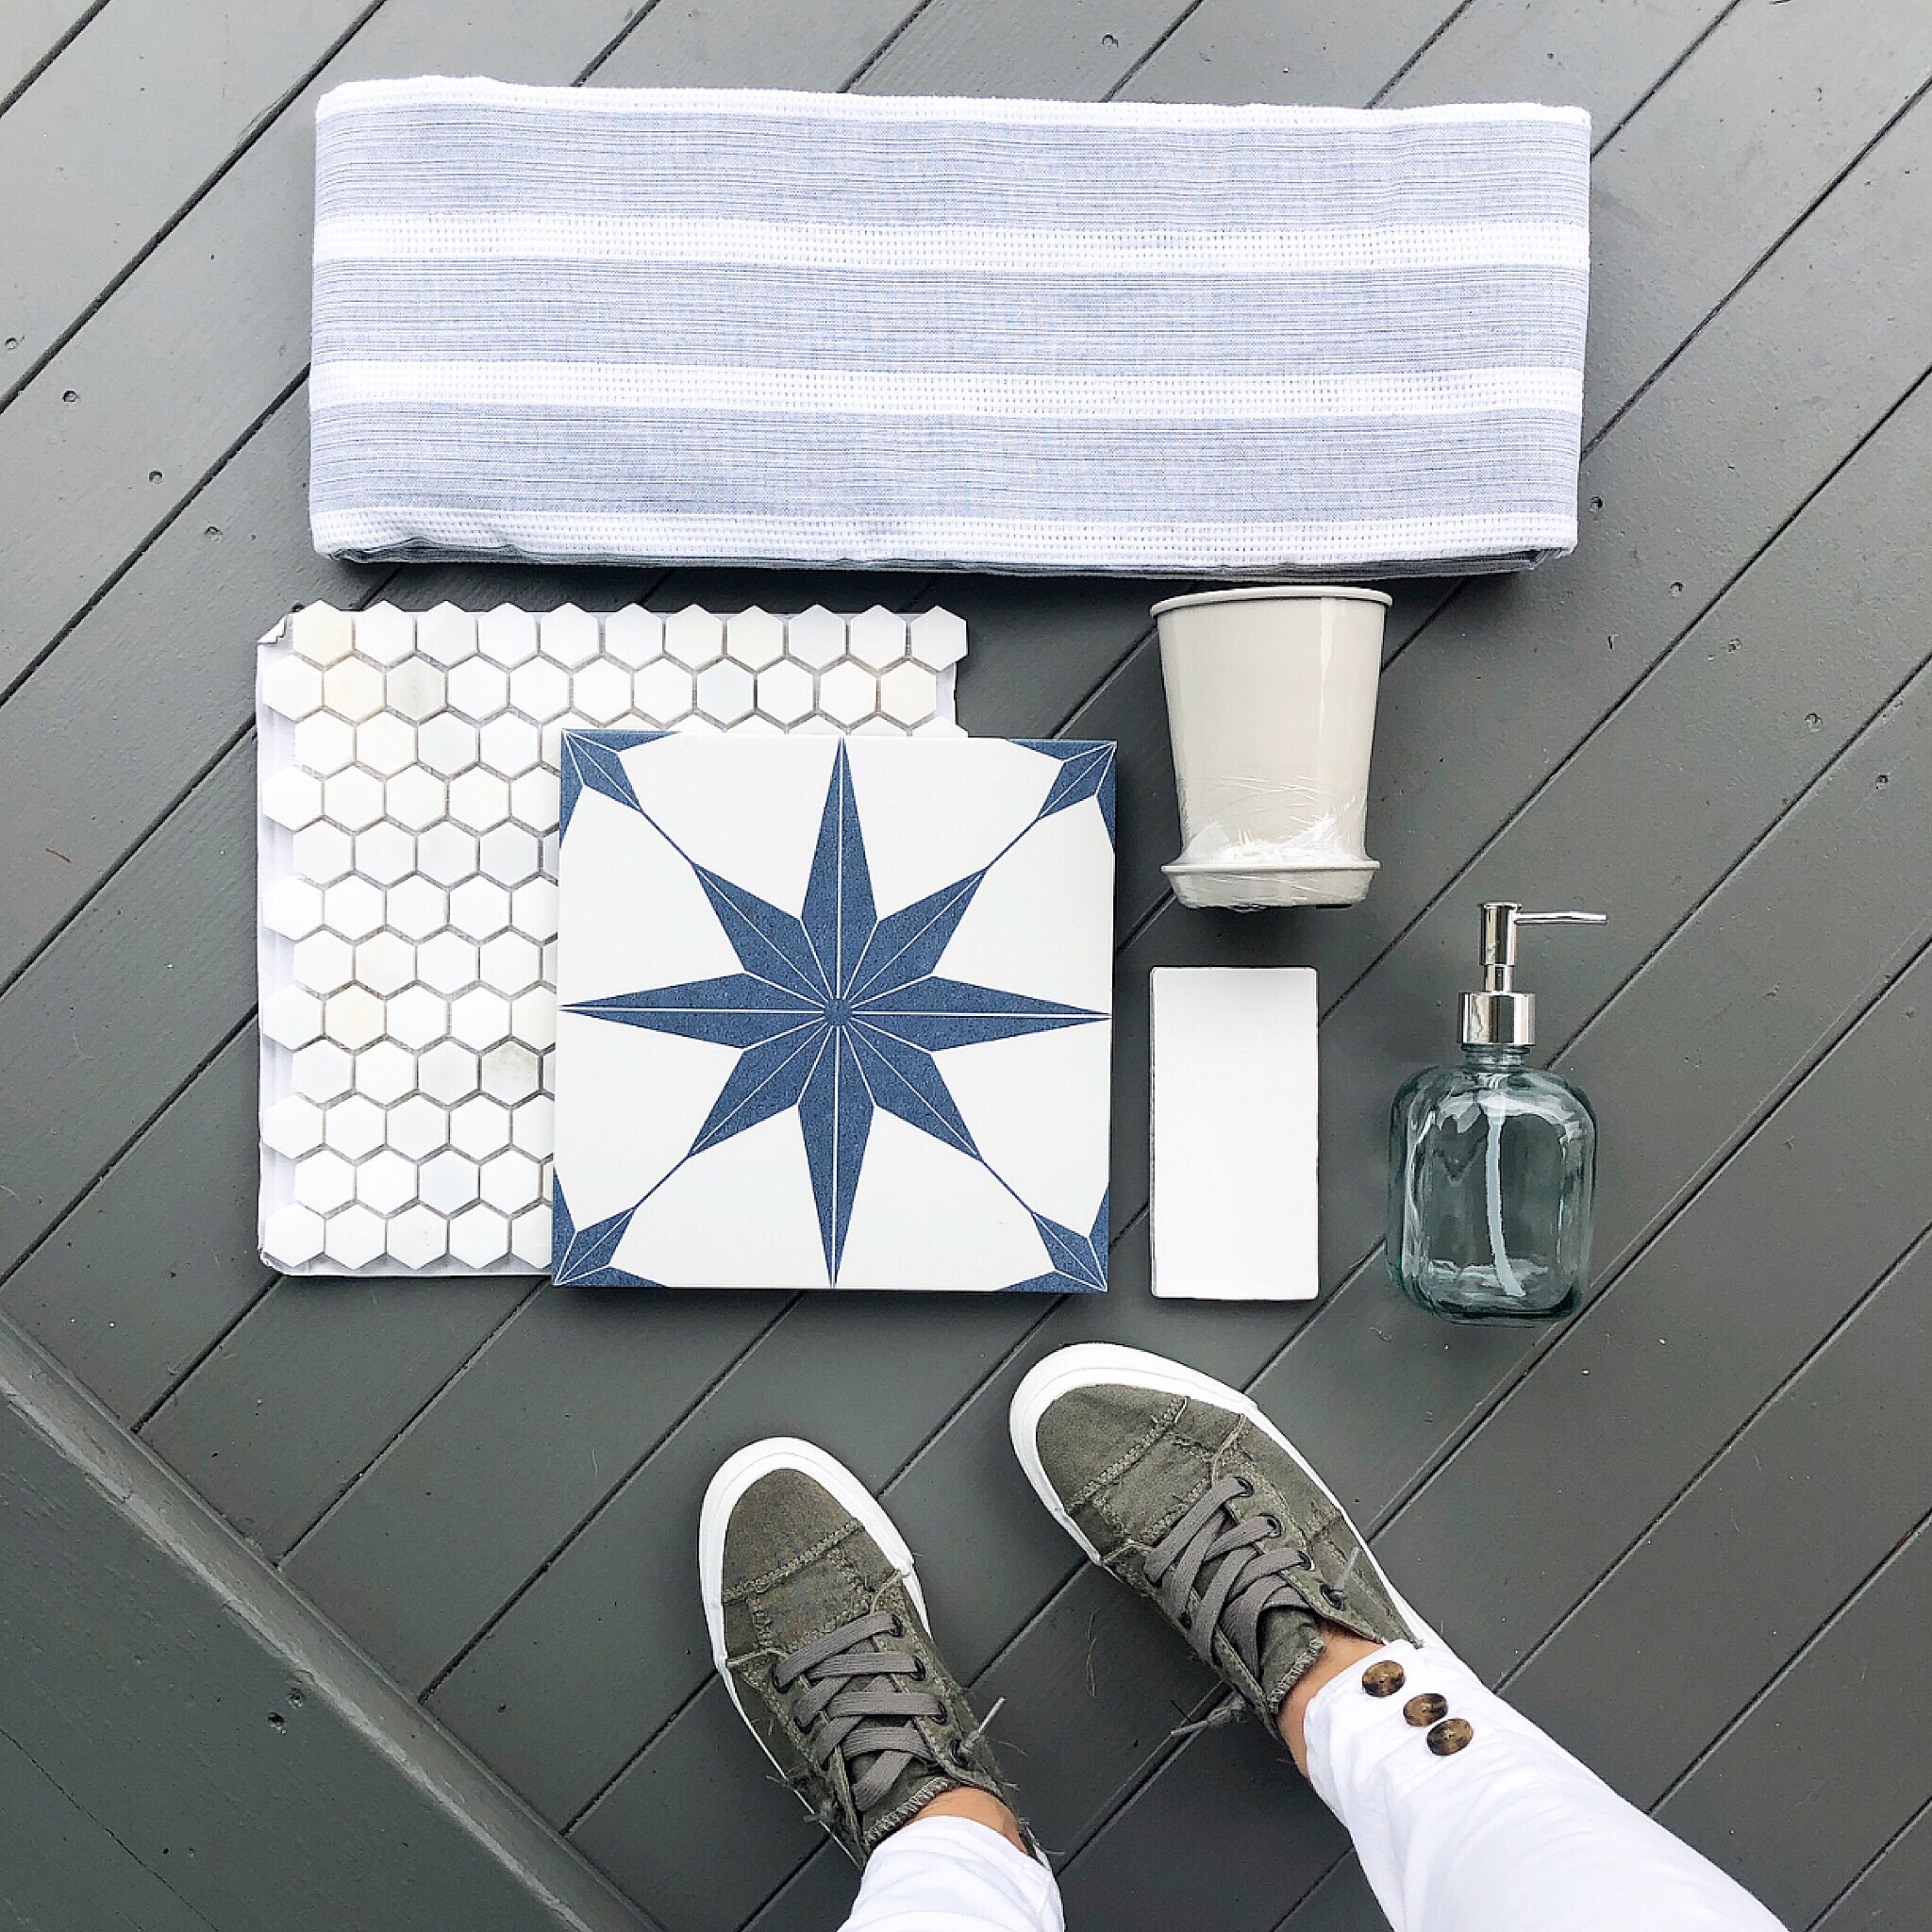
Kids Bathroom Tile:
All the tile for the bathroom projects are from Merola Tile which can be found at Home Depot and I’ll link them below for you so you have the names for them. The kids bathroom will feature this cool navy blue start pattern on the floor, an organic looking subway tile and then a hex pattern inside the niche wall. I’m going to bring in other touches of blue with accessories, some flat black in the vanity light and wall hooks as well as chrome finishes.

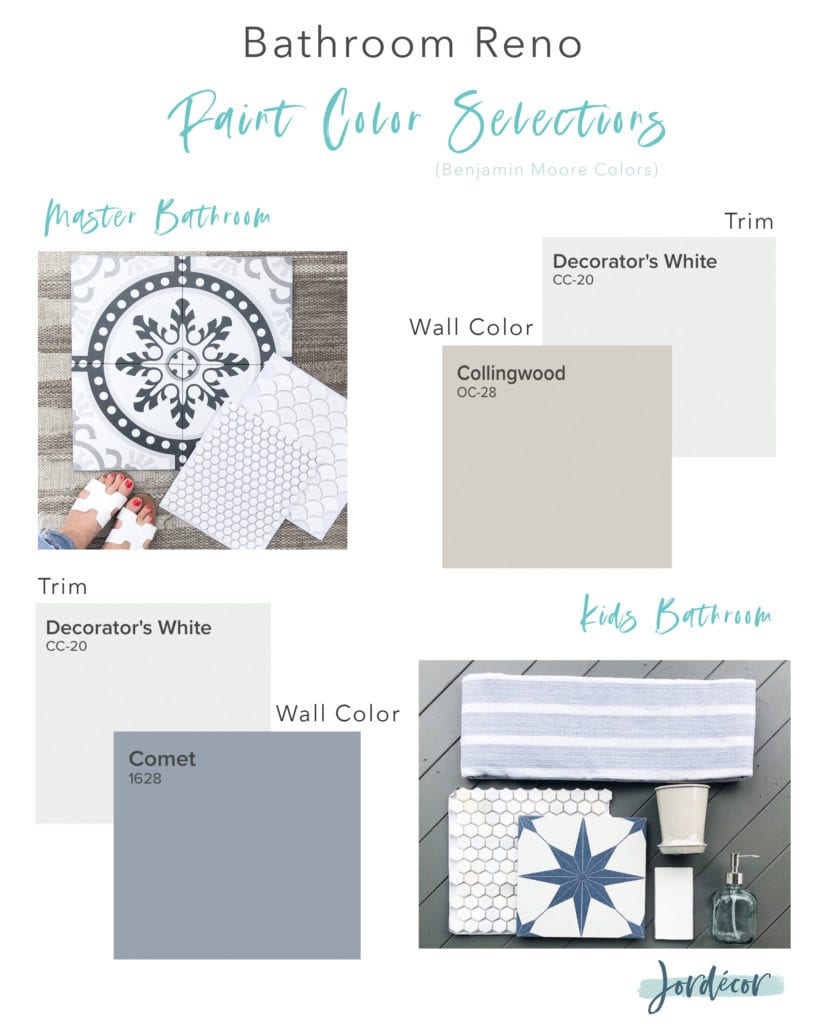
Master Bathroom Tile:
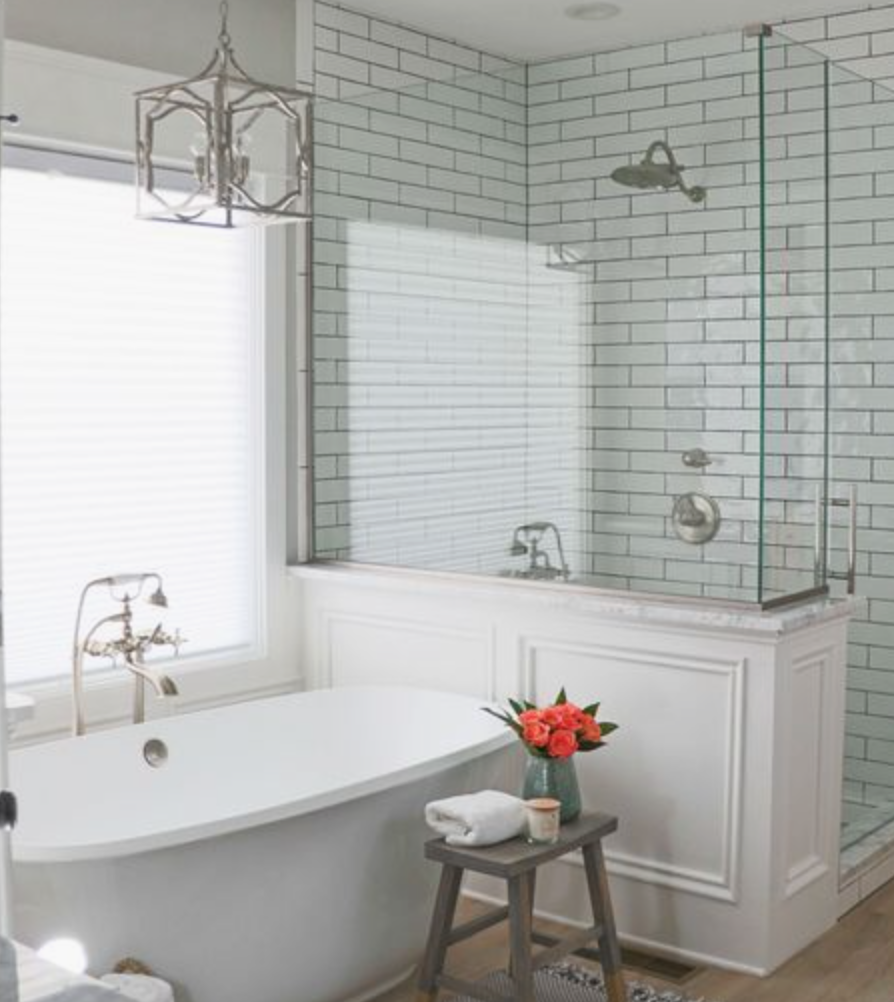
The tile for the master bath is a bit more sophisticated and timeless. My goal and vision for our bathroom was to create a luxurious feel in a small bathroom. To accomplish this I choose statement fixtures in champagne bronze (which I’ll link again at the bottom of the post) and then I will mix in some polished nickle in the vanity light and faucet. Both of those finishes have warm tones so they will mix together very nicely! The tile is neutral and I plan to keep the color scheme neutral as well to let the tile be the focal point. I chose this beautiful design for the floor and the scallop for the shower walls with a soft gray grout to keep the design subtle. A simple white penny for the floor with dark gray grout colors to carry in that contrast from the field tile.

Bathroom Wood Accent Inspiration:
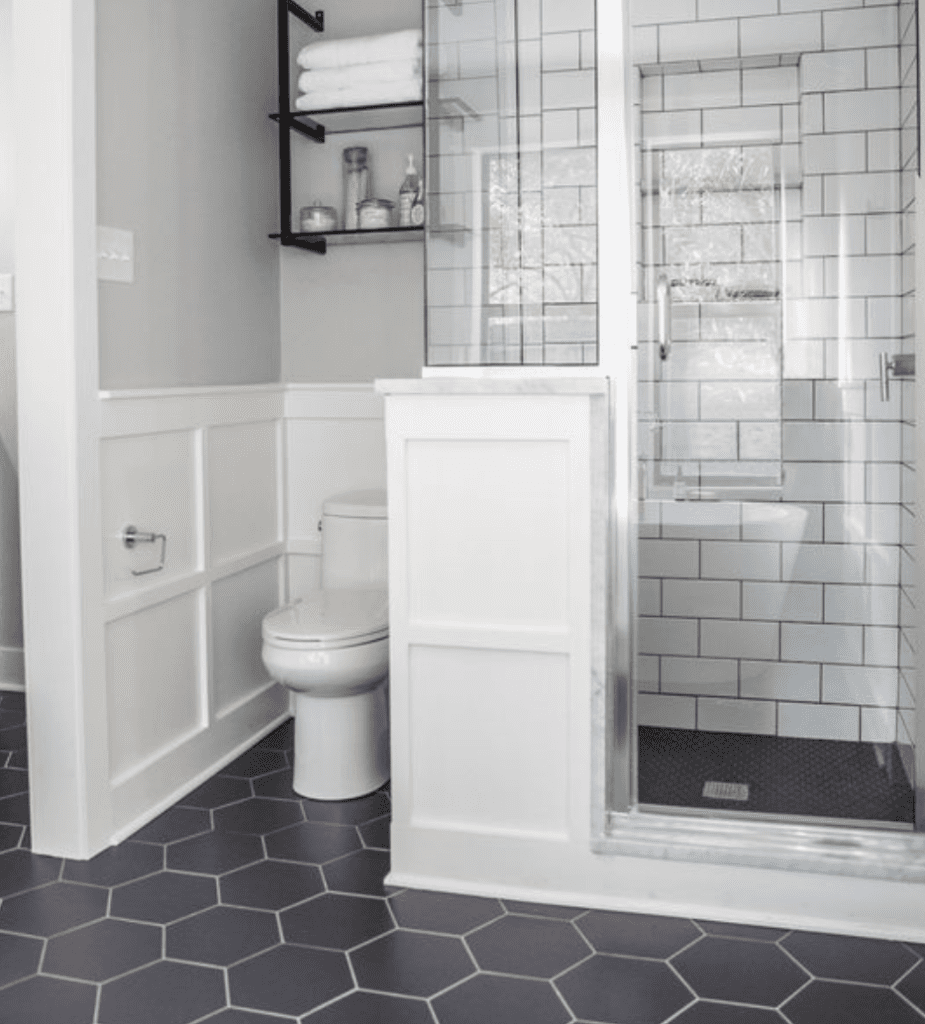
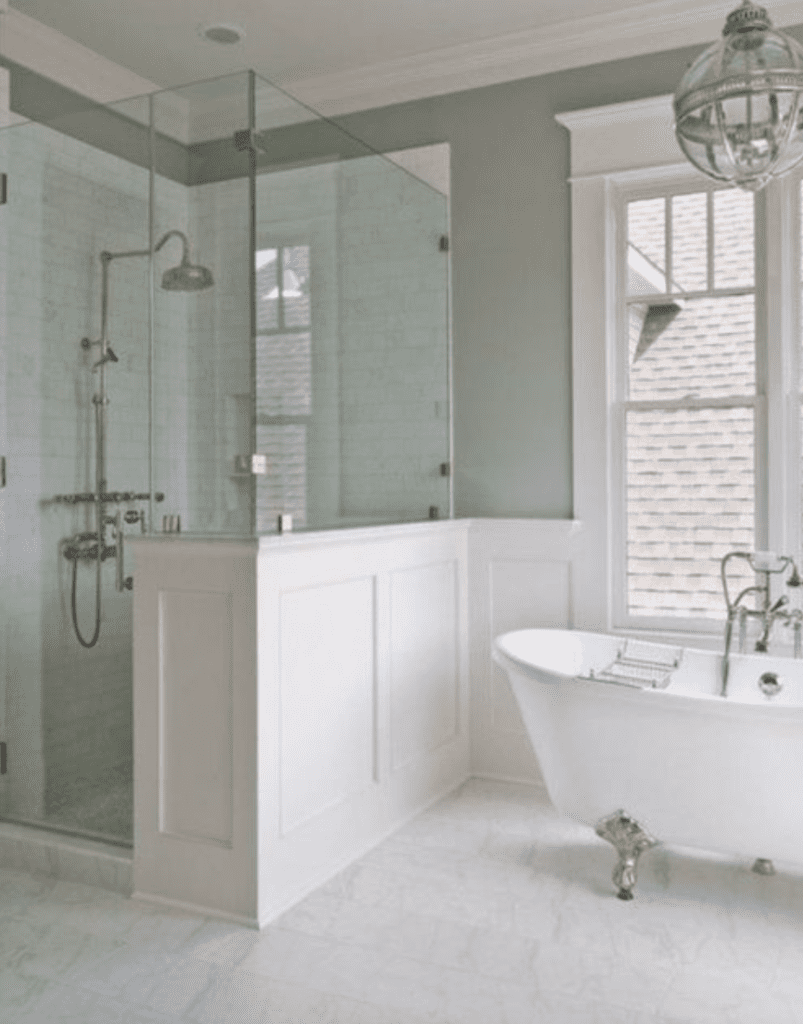
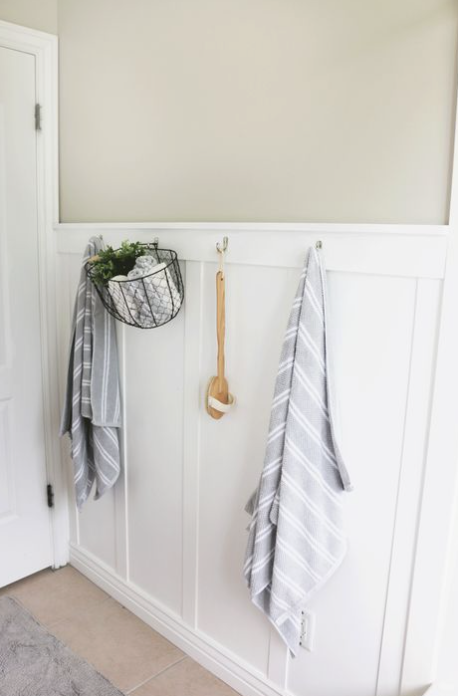
How’s that for some moulding inspo? As you can see from the in progress photos we decided to do a half-wall in our master to give a little separation from the toilet area and shower. We would love to do some type of wood moulding detail. Definitely, in the kids bathroom we are doing a simple board and batten with hooks for towels, painted in Decorator’s white and then a pop of bold color above that.
The reason I’m not doing a color on the board and batten is because I want the kids toilet to blend in with white wood work as it’s the first thing you see when you walk up our stairs. It’s an unfortunate placement for sure, but it’s not something we could afford to change.
Paint Colors:
Keep in mind that the paint colors will only be on a the above sections of the wall due to the use of some type moulding (board and batten, etc.) inspired by the above pictures.
I’m so excited about the potential color I chose for the kids bath! I love that it’s called “Comet” and we have a star floor. Promise it’s not an outer space theme! 😉 It’s just a coincidence as I was looking for a bold color with blue/gray almost slate, it also will have a little purple undertone in certain light but since it’s in a kids boy/girl bathroom I think it is perfect. Comet will only be on two small wall sections, it will bring a nice balance to all the white tile, toilet and vanity in the room.
For our bathroom I choose a gray/beige color called Collingwood. I wanted something a bit traditional and neutral but that wasn’t too warm, too cool, too light or too dark. This will make all the white tile and white vanity pop. All the trim and if we do some type of moulding will be in Decorator’s White. Now I just need to decide to add a moulding detail to our toilet nook area or just paint it all Collingwood and move on?
That’s all the updates I have for you now. Thank you for stopping by! I can’t wait to share the final reveal with you all.
Shop this Post

Jordan
read the full post >

Since returning from Haven Conference 2019 I’ve been soaking in all the knowledge and just goodness from my weekend with some of the nicest and most creative women I’ve ever met. If you’re not sure, Haven conference is a conference for Home Decor Bloggers and DIY’ers that takes place in Atlanta. I started blogging about two years ago however I’ve been a home decor blog reader for over a decade. When I was an Art Teacher in between classes or when I had time, I’d read blogs like Young House Love, Bower Power and Making it Lovely, amongst others of course too (these are some of the OG’s of home blogging). They gave me ideas and inspiration for home decor projects, as we were just getting ready to buy our first home.
I really can’t believe that now I’m on the other side, as a blogger! I have my home decorating business that I’ve mainly built on Instagram. However, I wanted to connect to a platform I have ownership of, because if Instagram ever tanked you guys know where to find me. This year when they released tickets to Haven I knew I had to go! I’ve been working so hard and wanted to take another step towards investing in myself and learning the ropes of blogging. Haven is where you do that. Today I wanted to share 5 highlights of my Haven Experience. If you are thinking about blogging and not sure where to start this is the place to go and learn. Here are my highlights of the trip!
The Accommodations

Staying at a luxury Air B & B was for sure a highlight, yes being at the hotel would have been convenient, but for a girl that loves gorgeous design- staying at this beautiful Air B & B was such a treat. Typically, attendees stay at the hotel where the conference is being held. However, myself and a few other girls; Andrea from 31 Girl at Home, Merichelle from We’re the Joneses Brendt from She Gave it a Go, Kelly from The Tattered Pew and Jennie from The Little Bird , had the opportunity to stay here! We were hosted by owner Pam Sesssions and were less than a 10 minute drive to the conference. THIS is the listing to the Air B & B we stayed in if you want to see more photos. Each room was jaw dropping-ly beautiful. Plus these ladies were some of the sweetest people I’ve ever met! If you have a moment go check out all of their beautiful blogs.

The Classes
The workshops/classes range from photography, to upholstery classes, SEO, Making a Blog, Instagram Growth, Working with Brands and SO much more. Experts in the field lead the classes and offer a wealth of information and personal experience. I did a little of everything and I have to say, one of my favorites was learning how to work with local news stations to increase your brand presence on TV. As well as creating a cool display board with simple easy to use materials such as plywood, muslin, a staple gun and ribbon.

The Brands

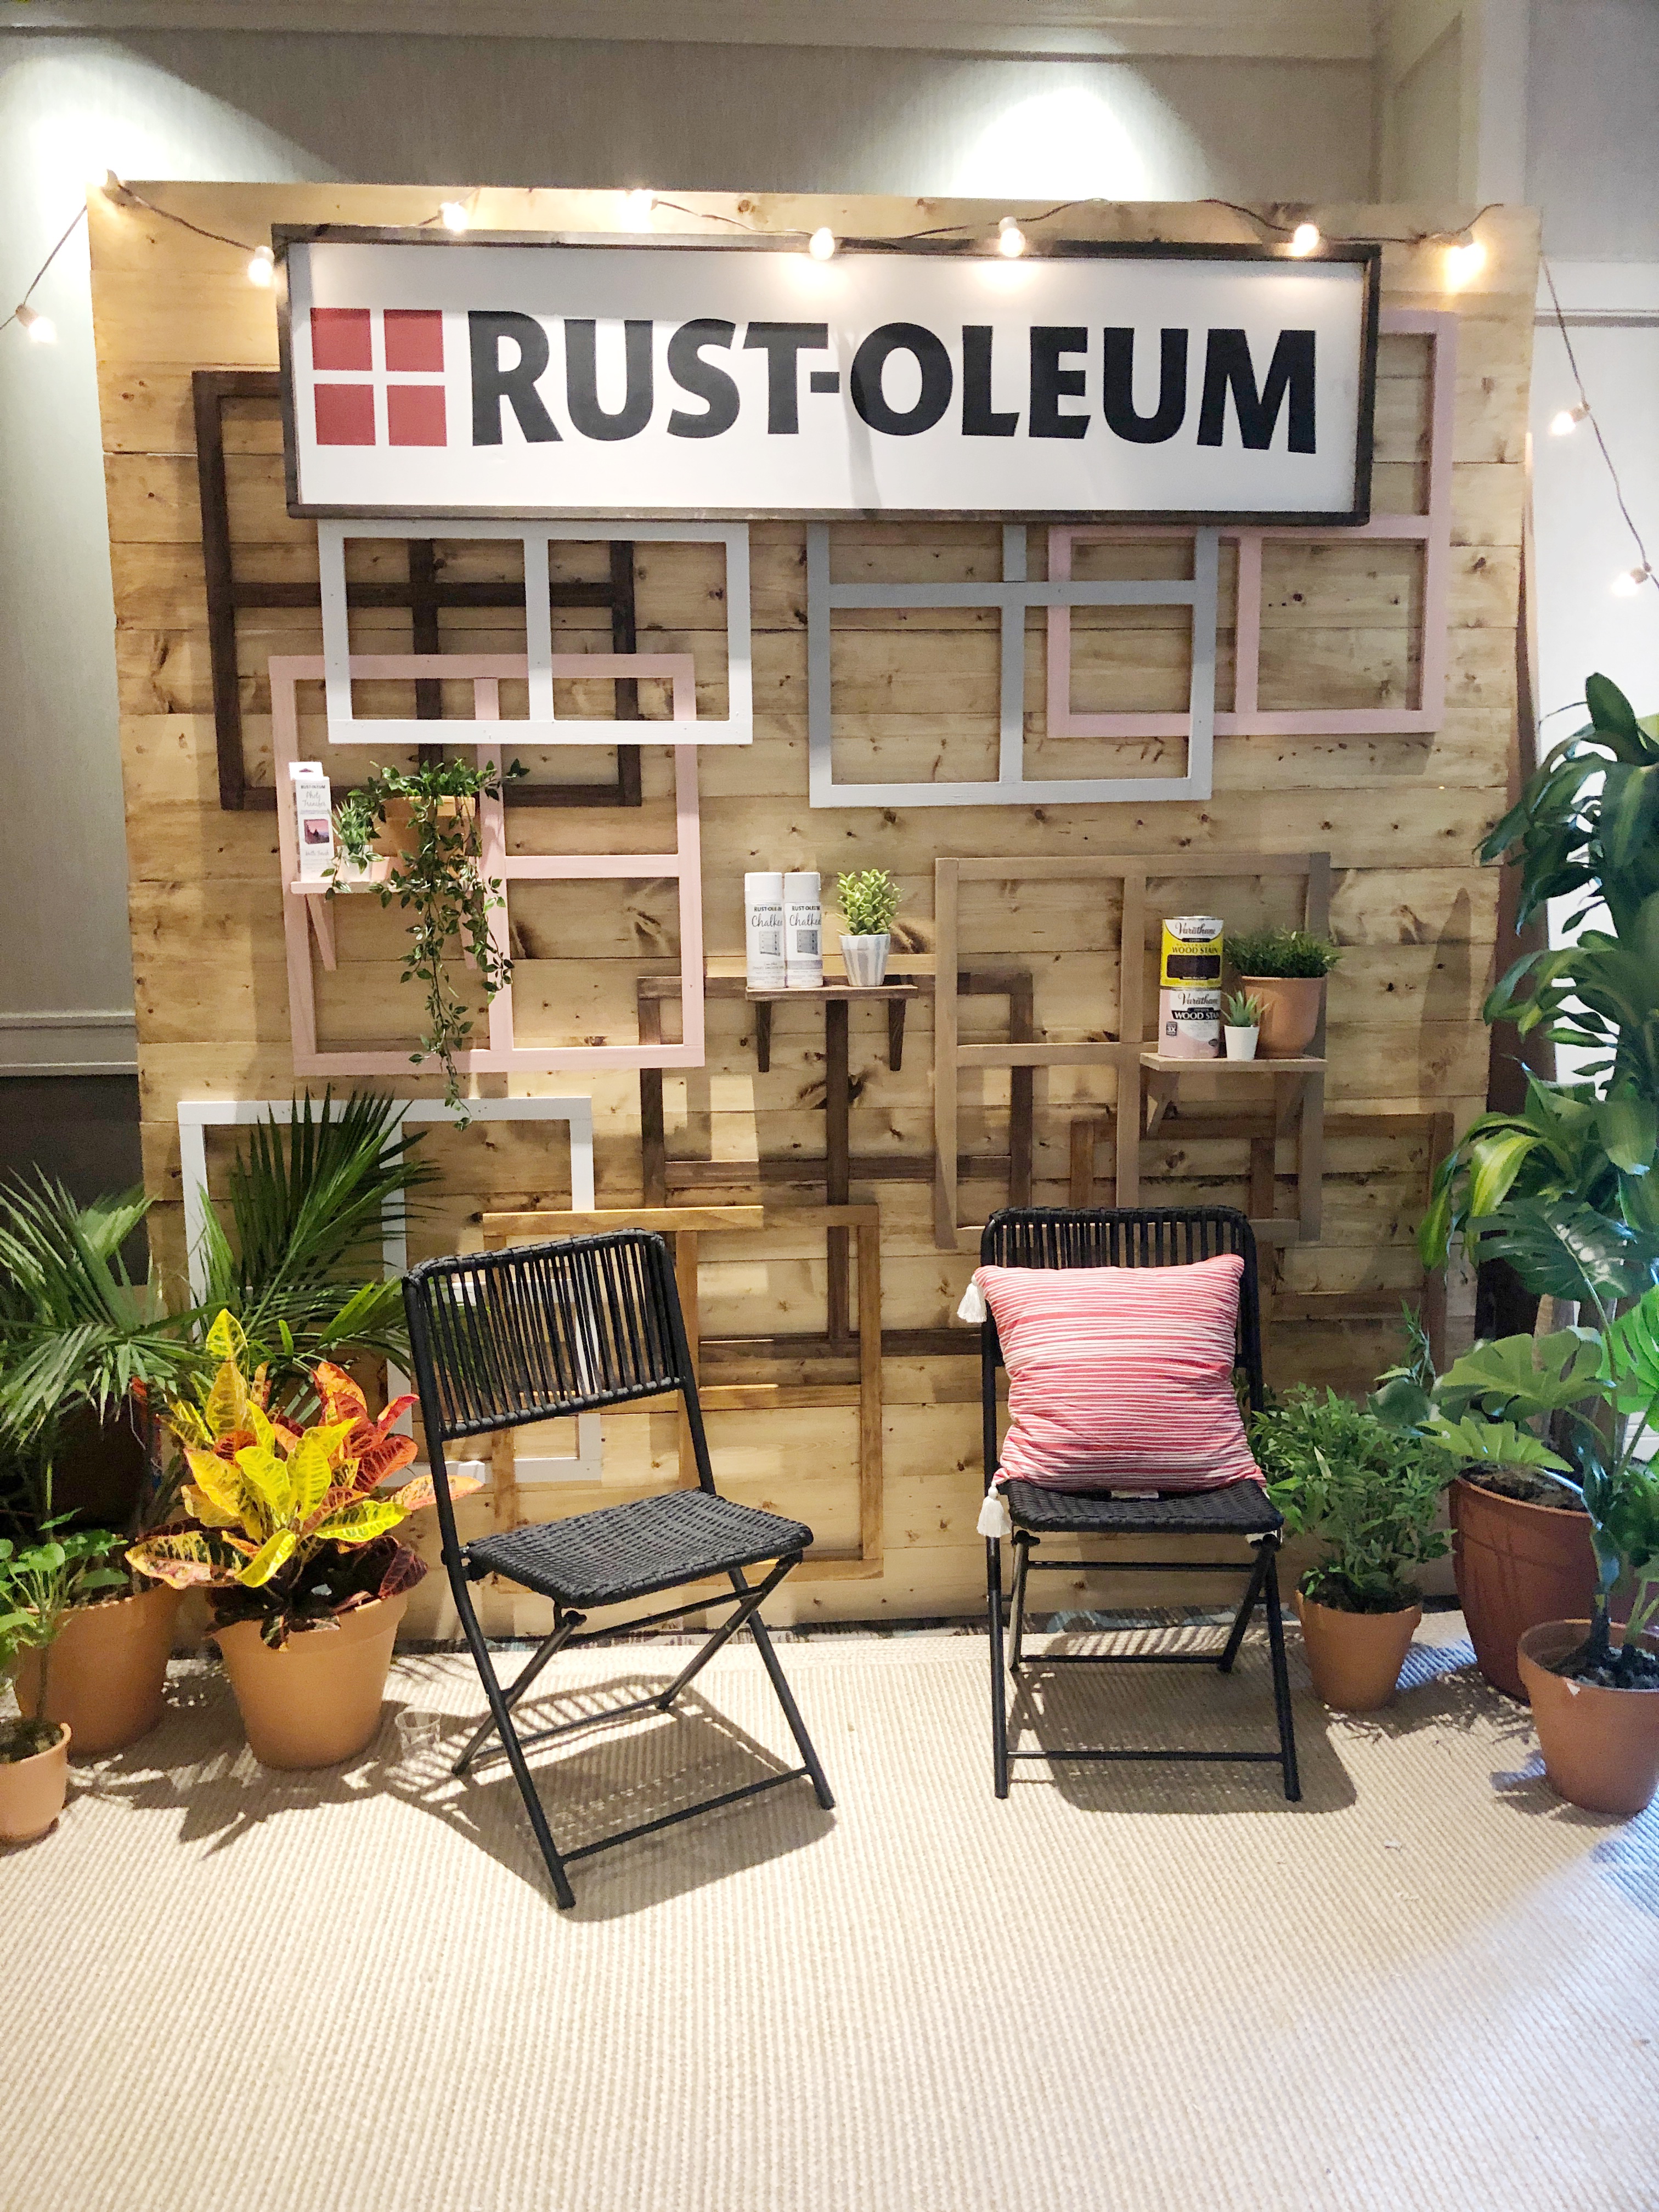
Some of the leading companies in the home category attend and sponsor Haven Conference. Everything from cleaning, to carpentry, to sinks, to paint and cement! Brands that attend go all out with their booth setups. I was so impressed with the level of creativity and eye catching-ness. I mean it is a conference for creatives after all. The Home Depot is the big sponsor of the whole event and shared their new line of home decor products from bedding to towels, which they were personalizing on the spot! Also, companies like Hoover, Rust-O-luem, Hunter Fan Co., Wagner and so many more were all in attendance to meet with us. It was so great to chat with reps from these companies and get inspired by their products for my own home projects and idea, essentially you pitch yourself to them for collaborations.

The Inspiration
Being at an event full of creative individuals is nothing short of inspiring and motivating. It reminded me back to my art school days where everyone has a talent, and everyone is trying to hone in on that talent to share it with the world. At Haven Conference it’s the gift of home decorating, building, photography, design and more… talent is overflowing and it would be easy to feel competitive but it’s not it is a community and everyone is there to help each other improve.

The Connection
I saved the best for last because connecting with others is something that can’t be topped. I’ve spent years building my Instagram account, not to intentionally become an “influencer” (I hate that word) but to share my love of decorating/crafting and to give people ideas on how to make their house a home and to make connections while I was home with two little babies. I have made so many friends these last couple of years on Instagram with people from all around the country, sharing this same passion. To meet these online friends in person and grow that connection… was the best feeling! To know I have a network of friends “colleagues” I can go to when I need advice or help is priceless.


Tips:
- Pack a tote bag for carrying around all day and an extra duffle bag to bring home lots of swag
- Prepare to be on the GO a lot wear Comfy shoes
- Some dressy outfits for night and business casual for the day
- Notebook and Folder for all the brand hand outs
- Battery Pack charger for your phone
- Business cards and business card holder
Shop Conference Essentials:
Pin for later:

read the full post >
Happy Monday! I’m back with my new summer series Board On a Budget! With your help on Instagram stories, I choose one room & one store to shop from to create an affordable design board for you to shop from. I’m hoping this series gives you ideas for stylish items for your home. Last week I had you vote on two stores, however I made an executive decision to scratch the other stores when I remembered that today is AMAZON PRIME DAY! Their farmhouse line Stone and Beam is on serious serious sale. I love the simplicity of a lot of Stone and Beam’s pieces.
I’ll tell you, over the years I’ve had great success purchasing items for my home from Amazon. Everything from sink faucets, light fixtures, rugs, furniture, faux plants and more! If you do your homework AKA read a ton of reviews, you can definitely find some affordable pieces that will add style to your home, not to mention the convenience of Amazon prime shipping!
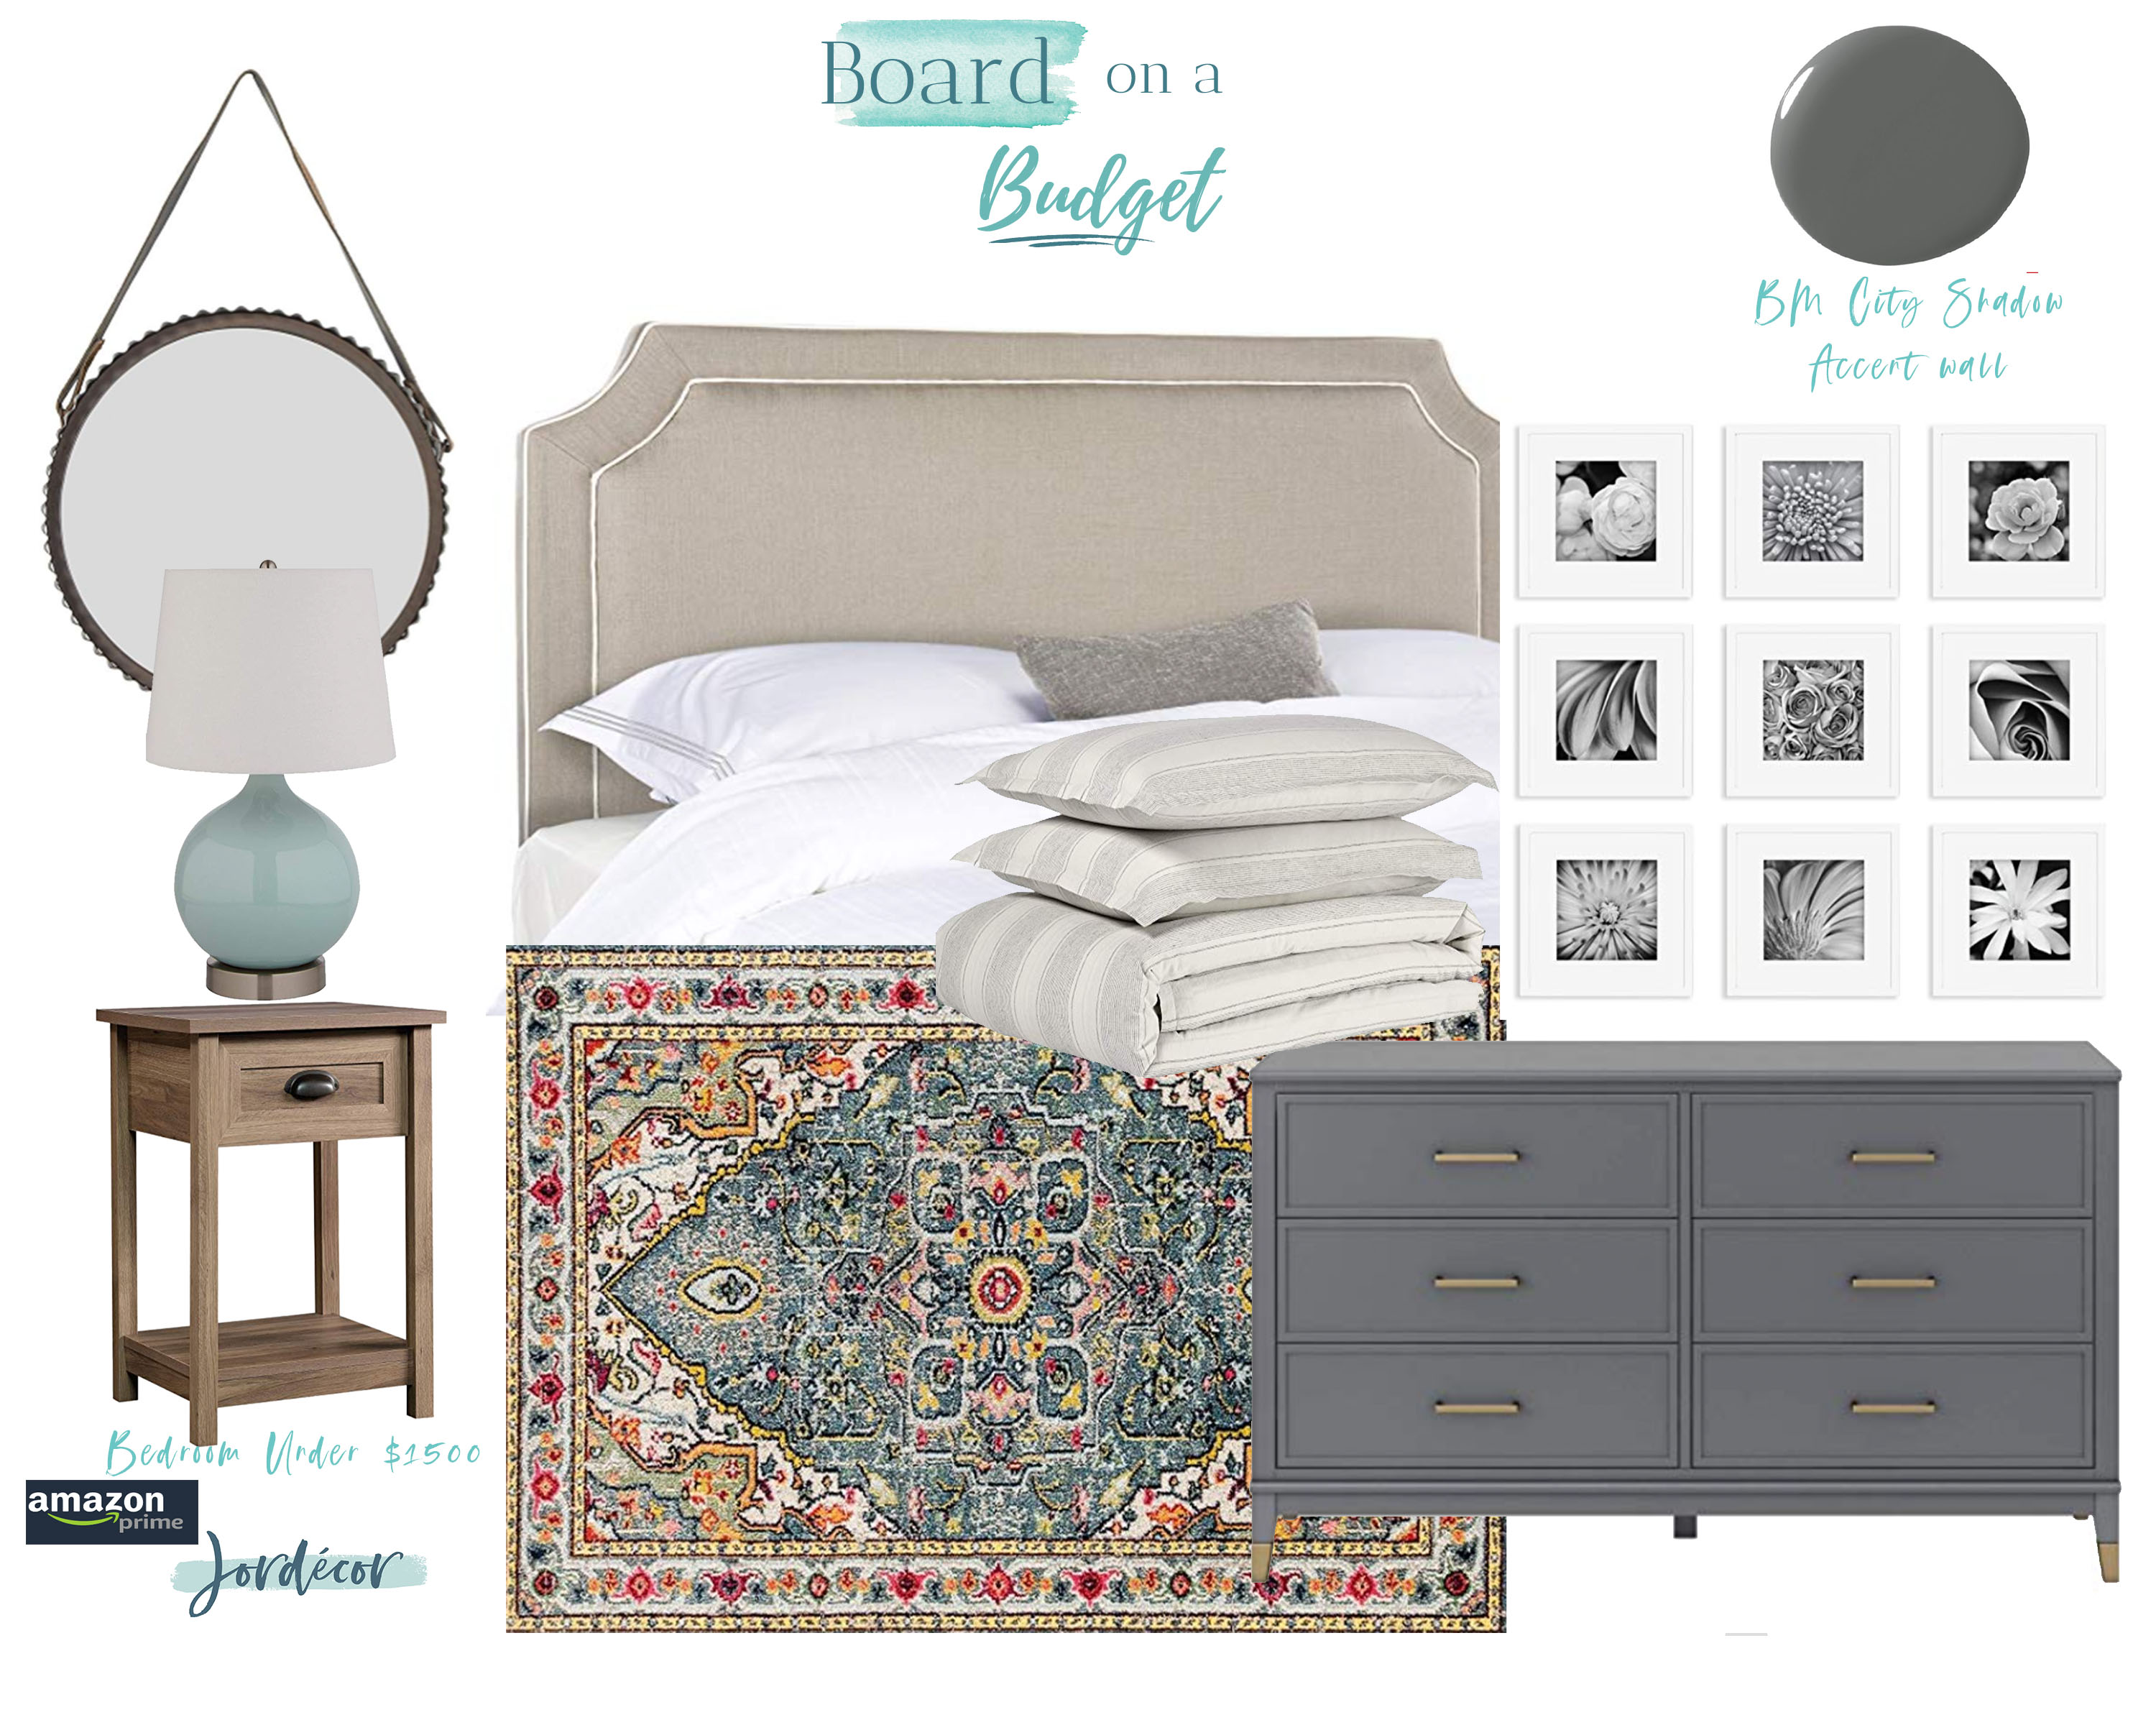
Today I pulled together a cozy modern farmhouse bedroom with a splash of color all for under $1500- yup you read that right! I’m so excited with how this board turned out and I think you will love the prices even more. Let me know in the comments below your favorite piece. I think adding an accent wall in Benjamin Moore City Shadow will really make the space feel warm and cozy, it will also make that headboard pop. I love that the rug and the lamp add that pop of color too. To make the wall feel bigger add a mirror behind the lamp. There are so many cool mirrors on sale today for Prime Day too which I’ll link below too.
The dresser is such an amazing deal even though it is the most expensive of the items, it isn’t under the Prime Day deals but I loved the style of it so much I had to include it. I would place this dresser on a different wall probably adjacent to the bed and paint the other wall colors a soft white like Alabaster by Sherwin Williams or Simply White by Ben Moore.
Keep the bedding classic with a neutral stripe and then add throw pillows seasonally or pull from the colors of the rug. I also thought this grouping of square frames was classic and simple and a great prices as well!
SHOP THE DESIGN BOARD

More Amazon Home Favorites:
I hope you guys enjoyed my Board on a Budget this week! It was so fun to shop a bedroom all from Amazon! I hope you don’t mind I switched the store at the last minute. There are so many great deals happening today! I’m a huge fan of Amazon Prime and the ease of shipping right to your door. Let me know if you grab any of these items!
JORDAN
*this post contains affiliate links which do not cost you anymore money to purchase, however if you purchase something from my website I receive a small commission that helps support my blog. Thank you!
read the full post >
Happy Monday! I’m back this week with another round of my new Summer Series called Board on a Budget!! I truly believe that great style can be achieved on all budgets. Whenever I start a new project I also create a design board to visualize how all the various items I’m loving will come together in a space. Each week this summer I’ll create a design board for one room, from one retailer for a set budget that you will help me vote for, on Instagram stories. I thought this series would be a fun challenge for me to source and select affordable home items from some of my favorite retailers. I hope it will inspire you and give you ideas of what affordable products are out there. Great style doesn’t have to come with a great BIG price tag. The biggest challenge for most people is putting it all together. I think these Design Boards will help you visualize different looks for different spaces.
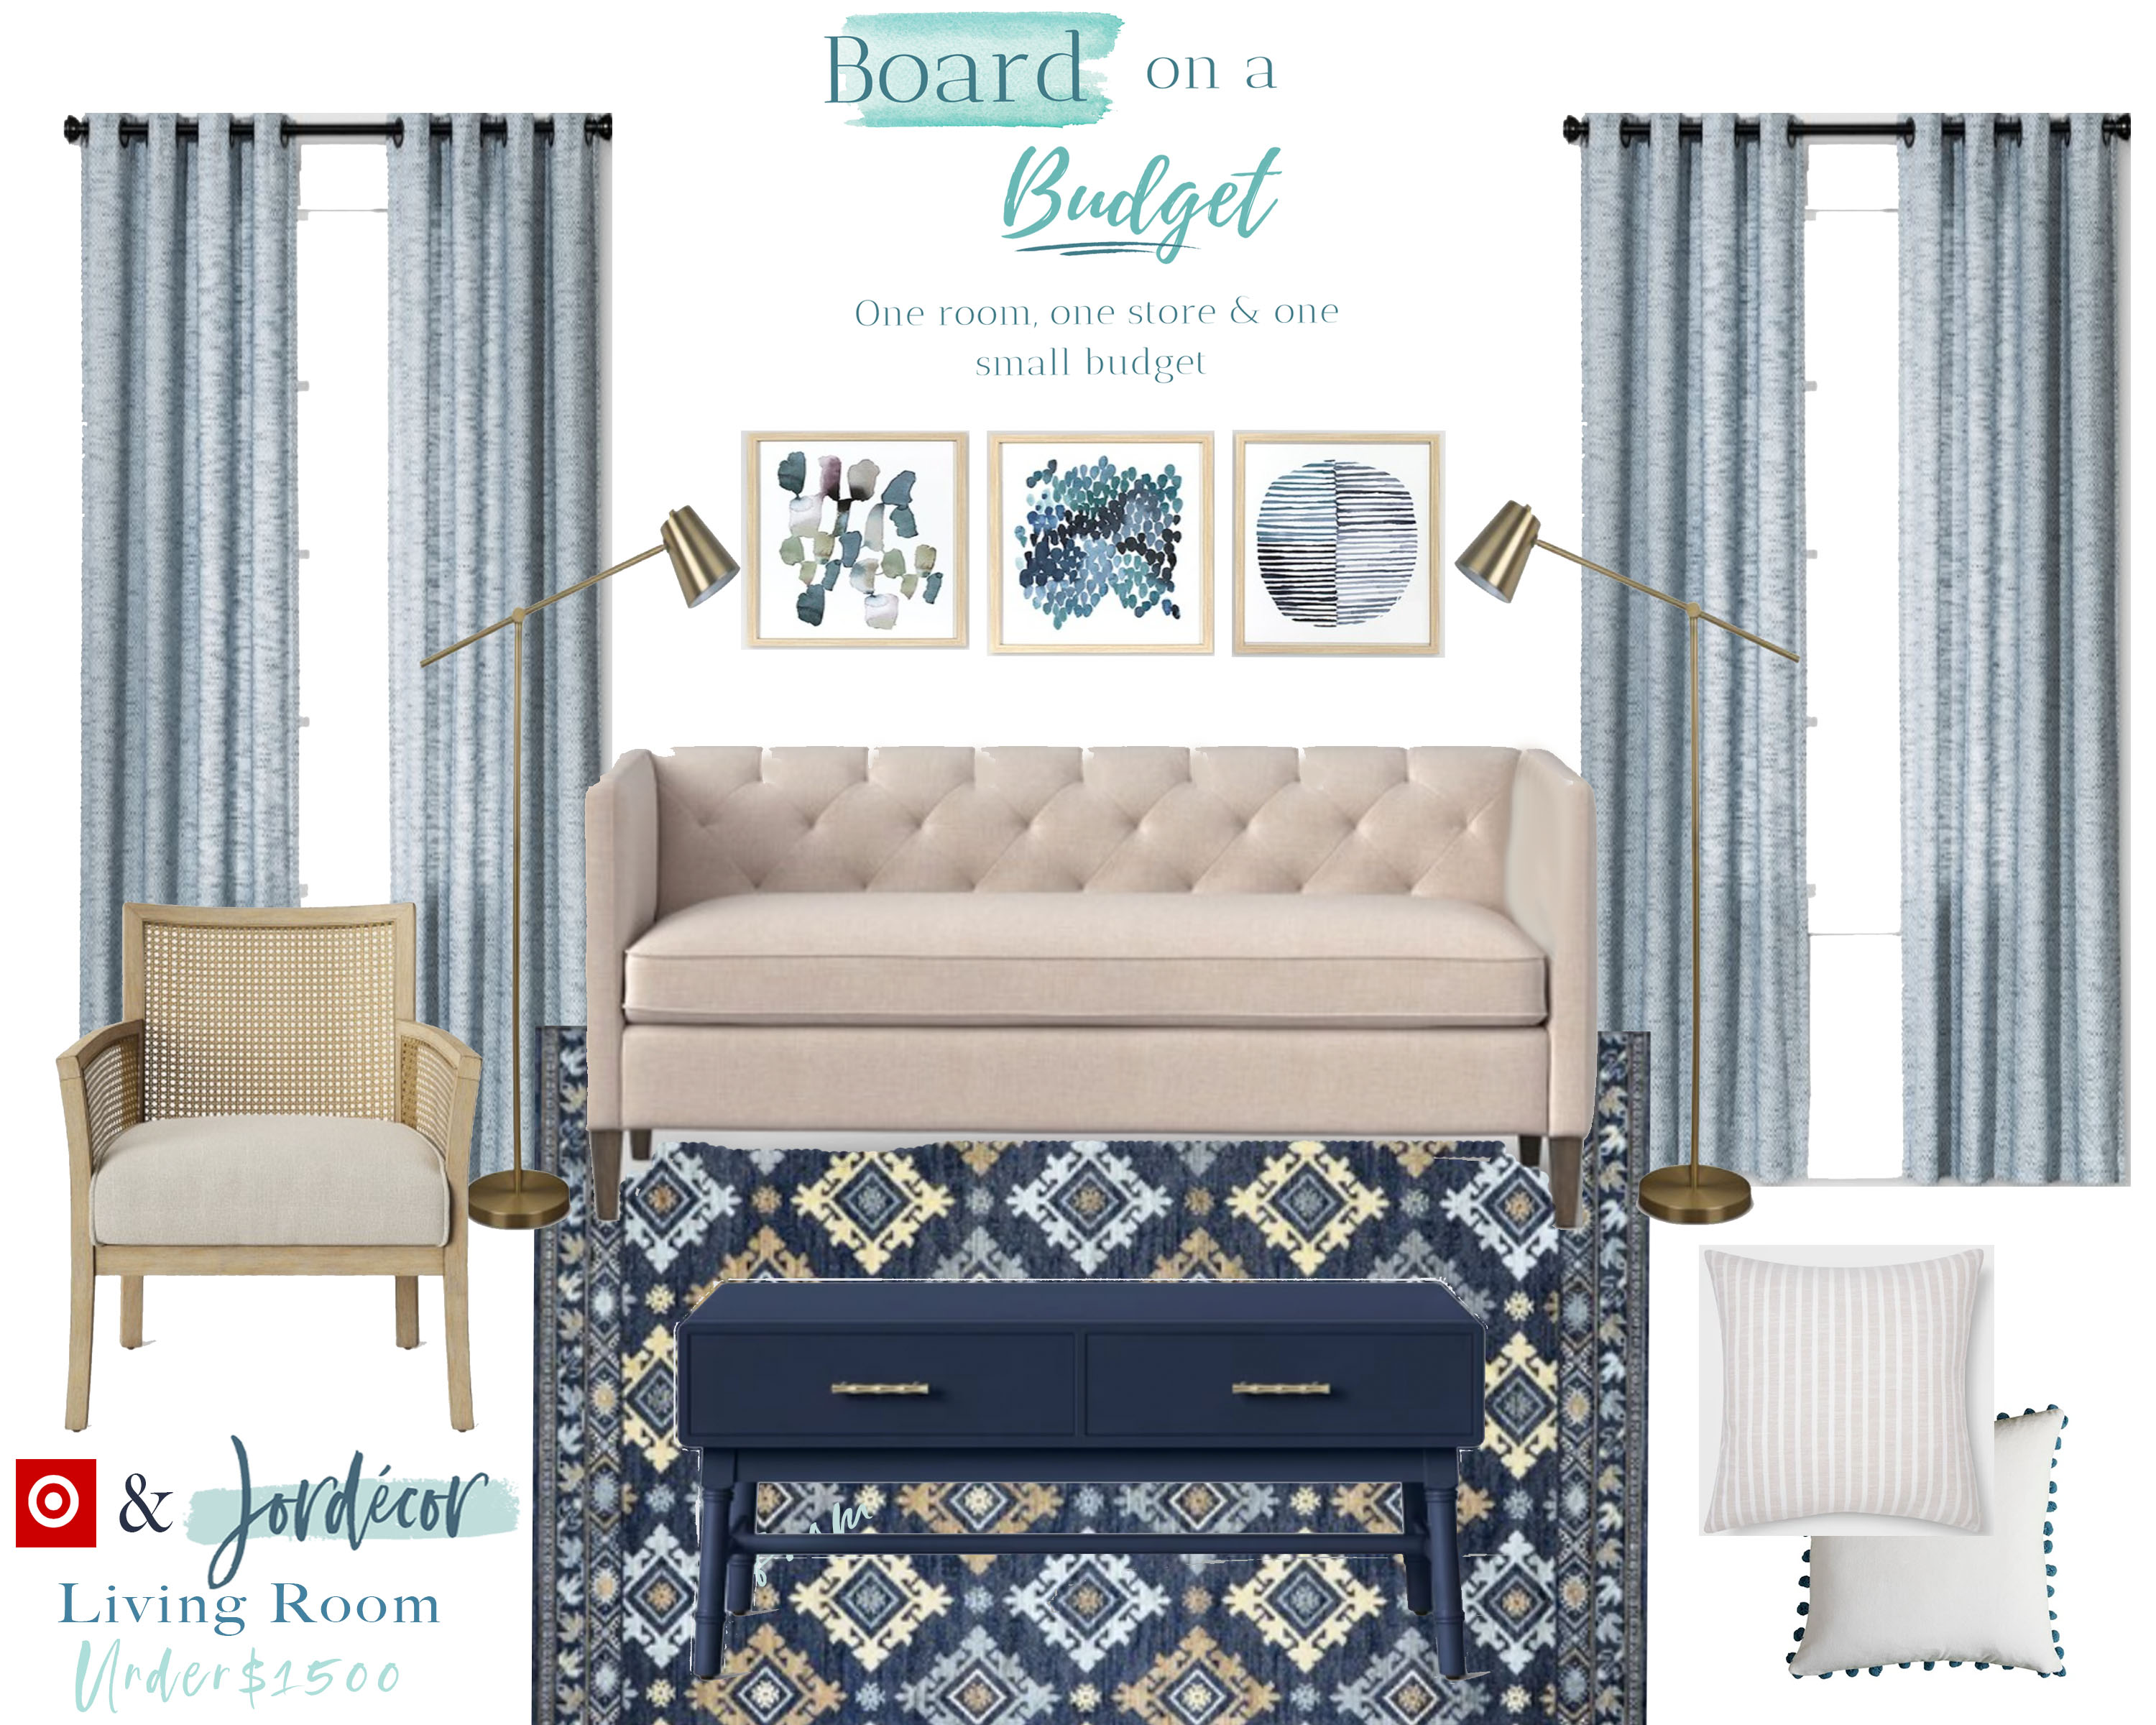
This week, based on your votes, I’ll be decorating a living room from TARGET. I set the budget for $1500 dollars. Target, Target, Target… my happy place. The one sad thing I can say about being on Cape Cod a lot in the summer is not having a Target close by. I’m usually at Target 2-3 times a week when I’m at home (I hate admitting that out loud lol) I haven’t been in soooo long. I’m sure Ben is happy about that! Luckily, you guys voted on a living room from Target for this weeks Board on a Budget. I was so happy to go online and browse all my favorite Target brands like Opal House, Threshold, Project 62, Hearth and Hand and more! It was so fun sourcing some awesome living room products that are all still available (that is the tricky thing sometimes). Target never disappoints in the stylish & affordable category. I found some great pieces that I think you will love! I’ll link everything at the very end of this post.
Let’s start with the RUG. You guys know I’m a huge fan of rugs, they not only set the foundation, they can also set the whole tone of the room. I found this rug and my heart went pitter patter. I’m also a sucker for navy! Here is the rug that set the tone of the room:

Next, I wanted a classic simple looking SOFA that would work the warm tones in the rug but wouldn’t break the bank. This sofa is on clearance and is under $400 right now, it would be great in a smaller living room or sitting room, make it more comfy by adding layers of throw pillows. For a bigger space get two and put them across from each other to create the perfectly balanced sitting area.

A living room needs more than a sofa to really make it feel complete. Either a second sofa mirroring it or a set of these ARM CHAIRS or other upholstered chairs would be lovely. I loved how sophisticated these cane backing chairs are, probably the most expensive thing in the room but they are so classic and versatile. You can add a throw pillow for a pop of color and comfort on the back.

CURTAINS are so important too, since the rug has a bold pattern I chose a soft simple curtain and I love how these have a soft blue and dark blue threads mixed together (TIP- makes them look more expensive) They tie in so nicely with the rug and come in a variety of lengths (colors). A lot of people go too short with their curtains and you always want to hang your curtains HIGH, WIDE, LONG (TIP- makes your windows look big and beautiful). These are also on sale for under $30 a panel. Such a good deal!

I fell in love with this navy coffee table with drawers, which you don’t see very often. I thought it was really different. I love that it has storage for games, magazines or other things. I’d add a cute tray, stack of books or basket with a candle and vase next to that. Plus it is UNDER $100!

For the lighting I added these cute floor lamps, I think they are sleek and affordable plus you can turn them to the arm chair seating area or keep them flanking the side of the sofa. Perfect for small space living as well. Or replace with side tables and table lamps if you have space/budget for it.

So here it is the full reveal of this weeks Board on a Budget all put together from Target, I’ve included a set of wall art to pull the look together, and some of my favorite affordable throw pillows that won’t compete with the rest of the room.
The Design Board:
SHOP THIS POST:
Please let me know what you think! Target is such an amazing place to grab great home decor items on a budget. The trick is putting it all together to make a cohesive look that doesn’t scream any one store. Look to add one or two focal point pieces in the room and then work the other pieces around that. Thank you for stopping by today!
Jordan
*This post contains affiliate links that doesn’t cost you anything additional. If you shop from my website you are supporting me and my blog- which I’m so appreciative of!
read the full post >
This summer I’m starting a fun series called Board on a Budget. I love creating design boards for myself and for clients. Whenever I start a new project I create a design board to visualize how all various items will come together in a space. Each week this summer I’ll create a design board for one room, from one retailer for a set budget that you will help me vote for on Instagram stories. I thought this series would be a fun challenge for me to source and select affordable home items from some of my favorite retailers. I hope it will inspire you and give you ideas of what affordable products are out there. I believe great style doesn’t have to come with a great BIG price tag. However, the big challenge for most people is putting it all together. I think these Boards on a Budget will help you visualize different looks for different spaces.
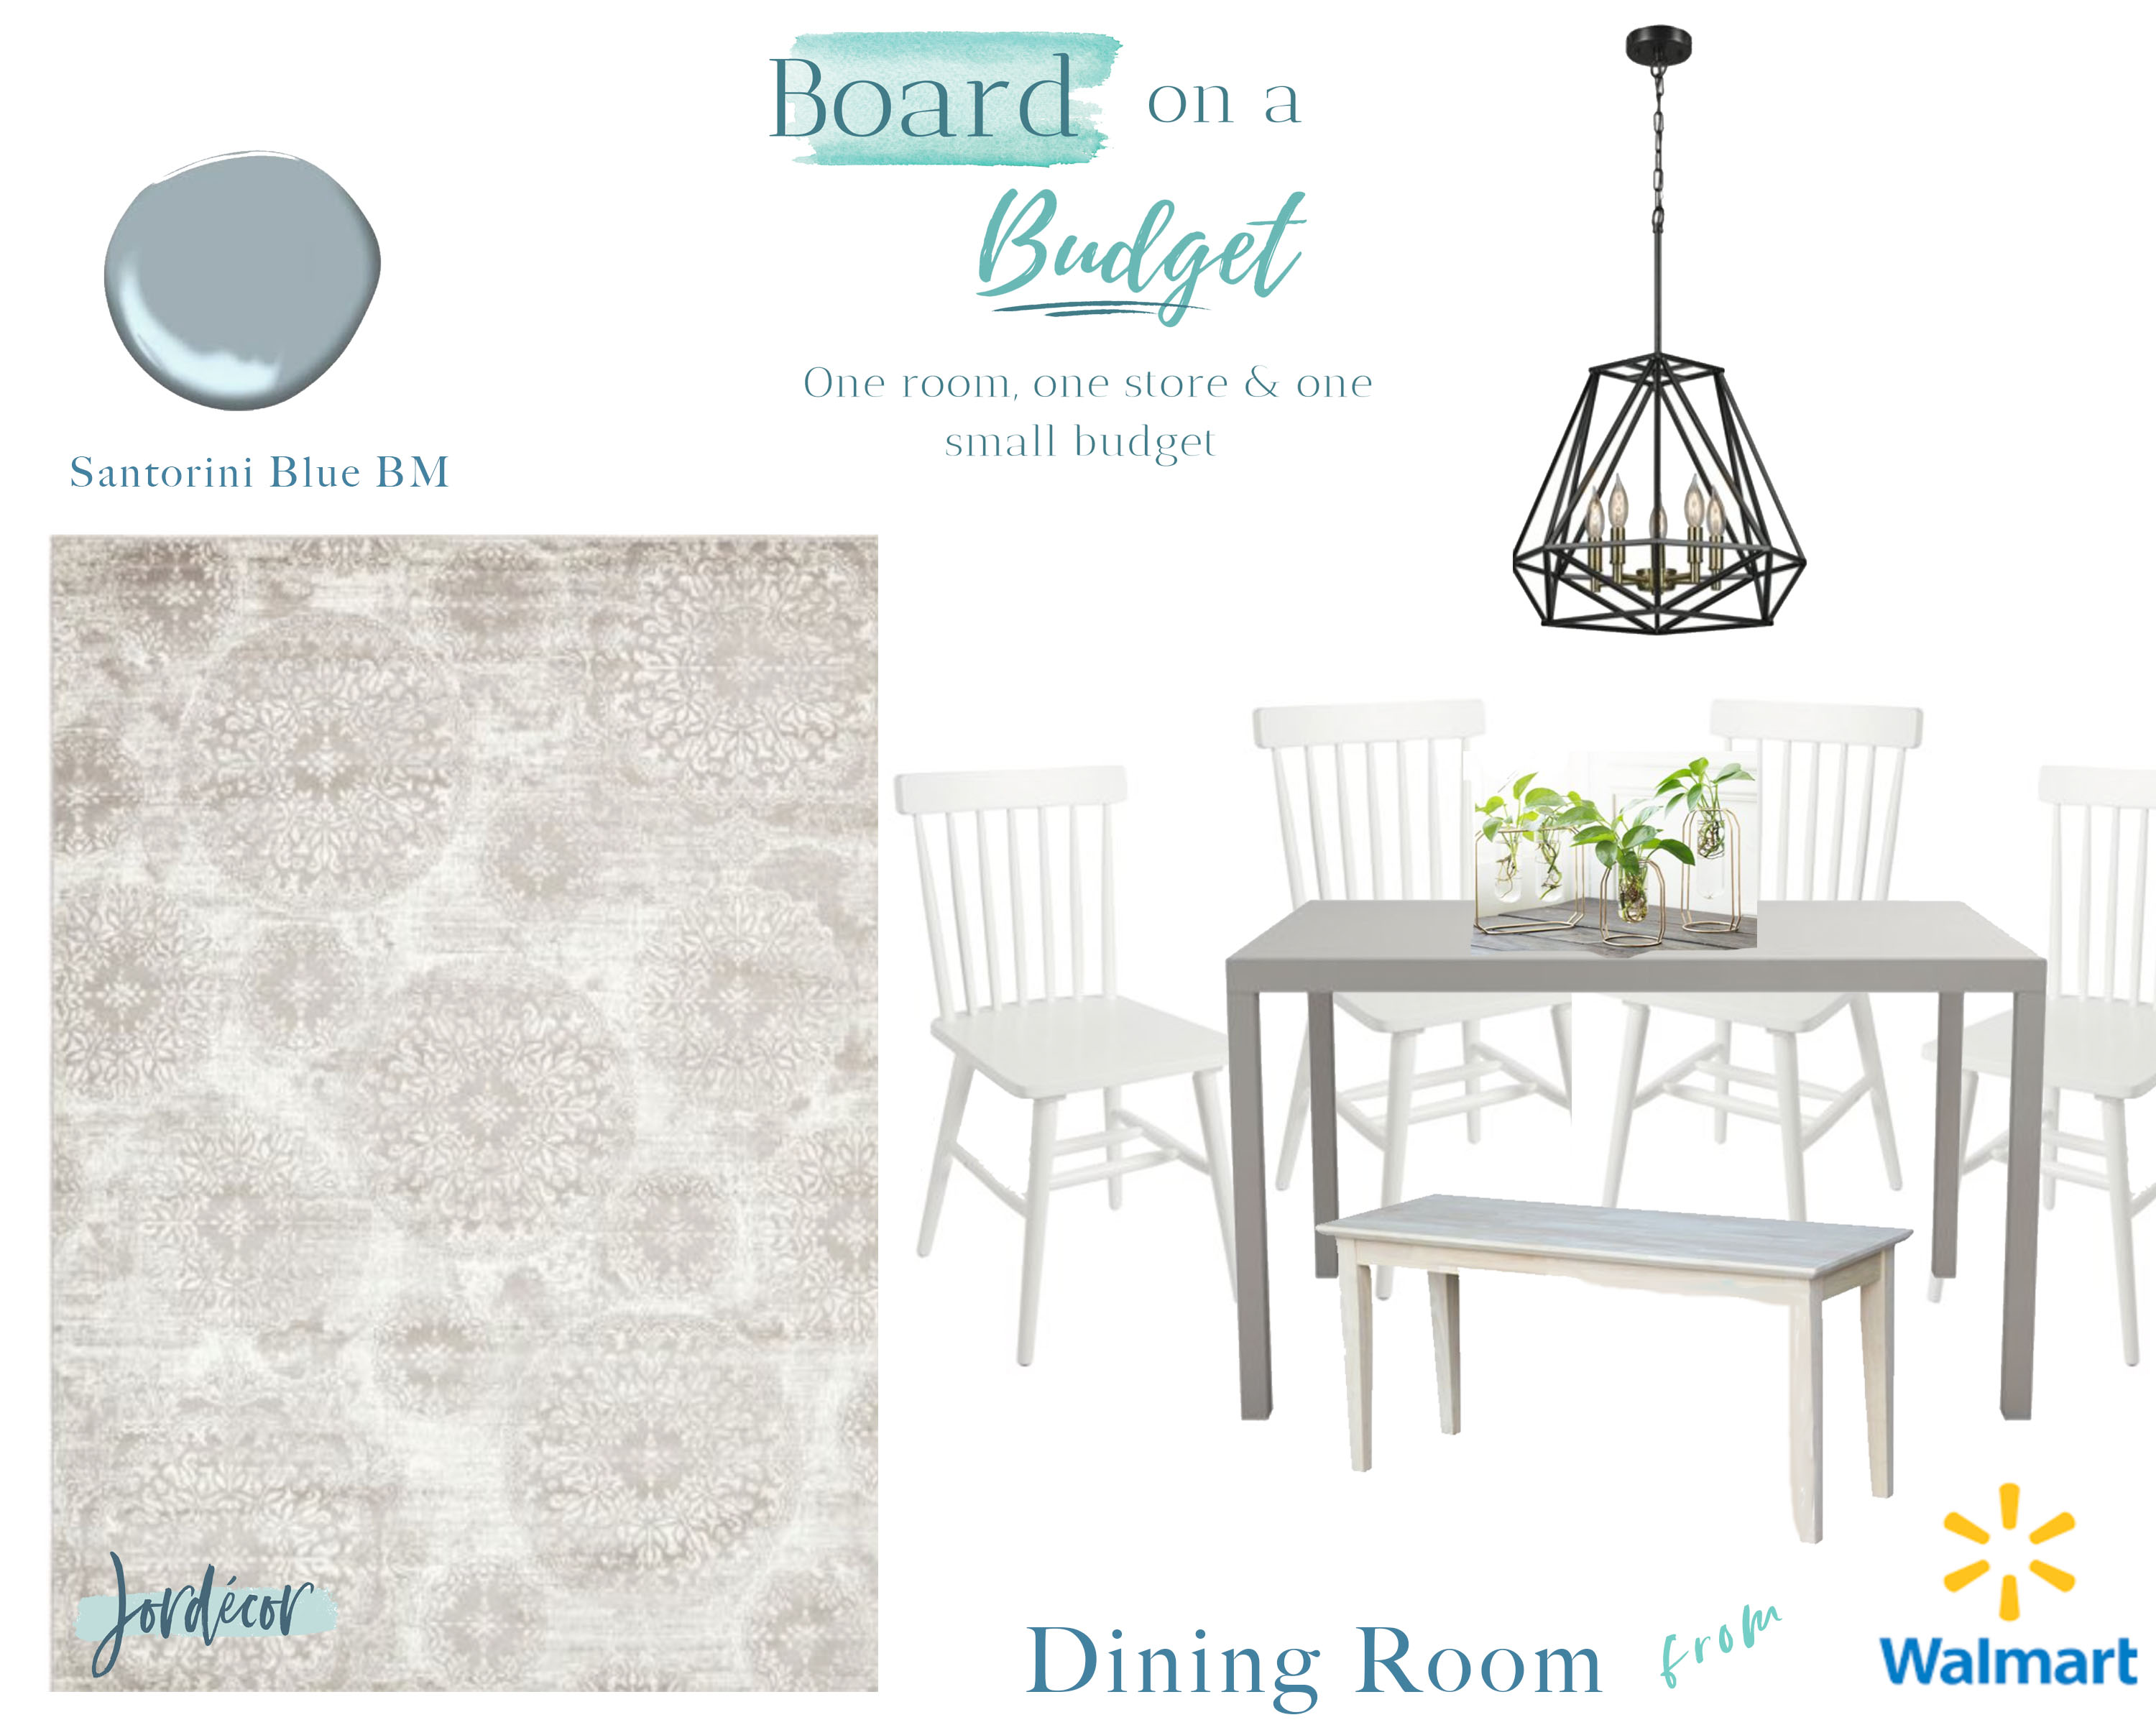
This week, based on your votes, I’ll be decorating a dining space from WALMART. I set the budget for $500 dollars which for a dining space is tough! Typically a dining table on its own costs more than that- nevermind the entire space! I’m so excited to share how this budget friendly board turned out. My preference is to not overly match your dining furniture. I went with a smaller version of this table and two chairs to stay under the $500 but originally I had the larger version of this table and a bench on one side. But in the end to keep it under $500 I had to keep things small. This would be perfect for a small living situation, apartment, condo or city living. Walmart has some really stylish dining chairs that you can buy in sets! This is a great way to save. I love the classic look of these white chairs. I could fit four (two sets) into the budget. Finding an affordable rug that I actually liked was a little harder until I saw this one! It’s neutral and very cozy in this round trellis pattern that could work with a few different styles from farmhouse to traditional or more transitional. For the walls I’d add a pop of color with a pretty blue – gray or even a subtle green. To add a focal point in the room I went with this cool hexagon light fixture. Add some greenery from your yard as a centerpiece in these super cool test tube vases for another pop of color.

LIGHT $106 RUG $89 CHAIRS set of 2 $85 (x 2) TABLE $89 VASES $9 (x 3)
Cost Total- Under $500
Shop my Board on a Budget:
Jordan
*this post contains affiliate links, it will cost you nothing additional however it does help support my blog.
read the full post >
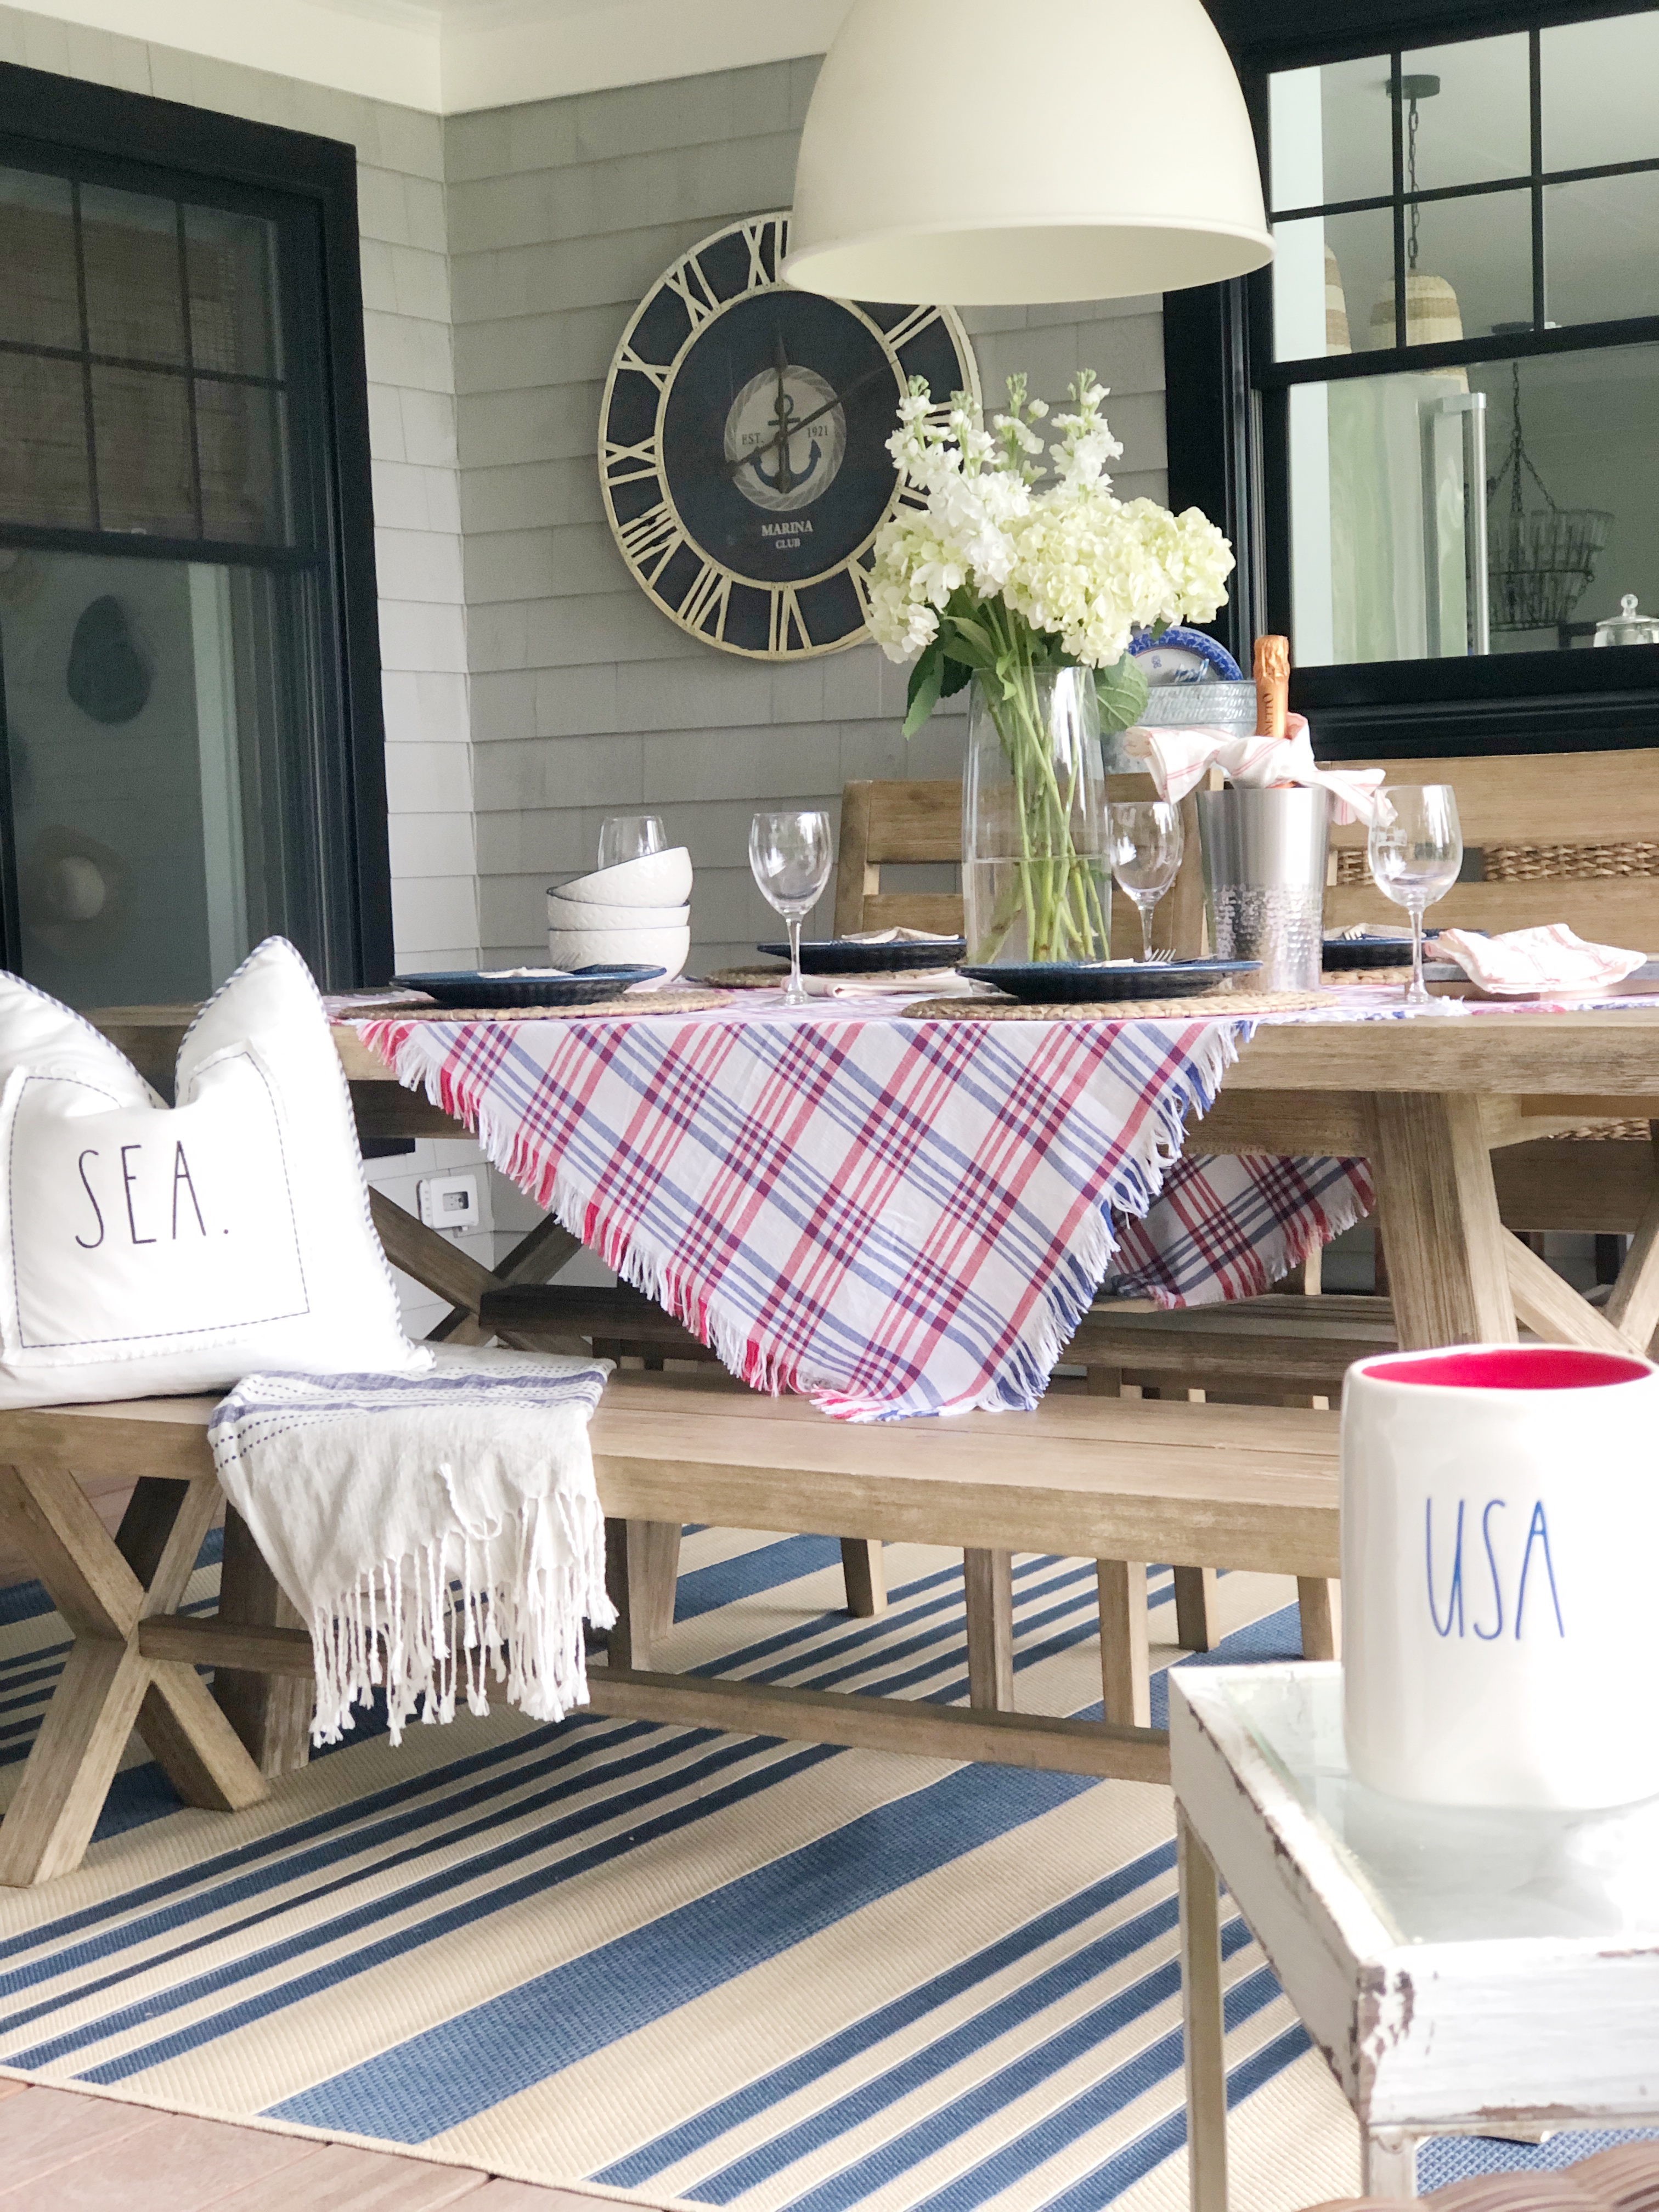
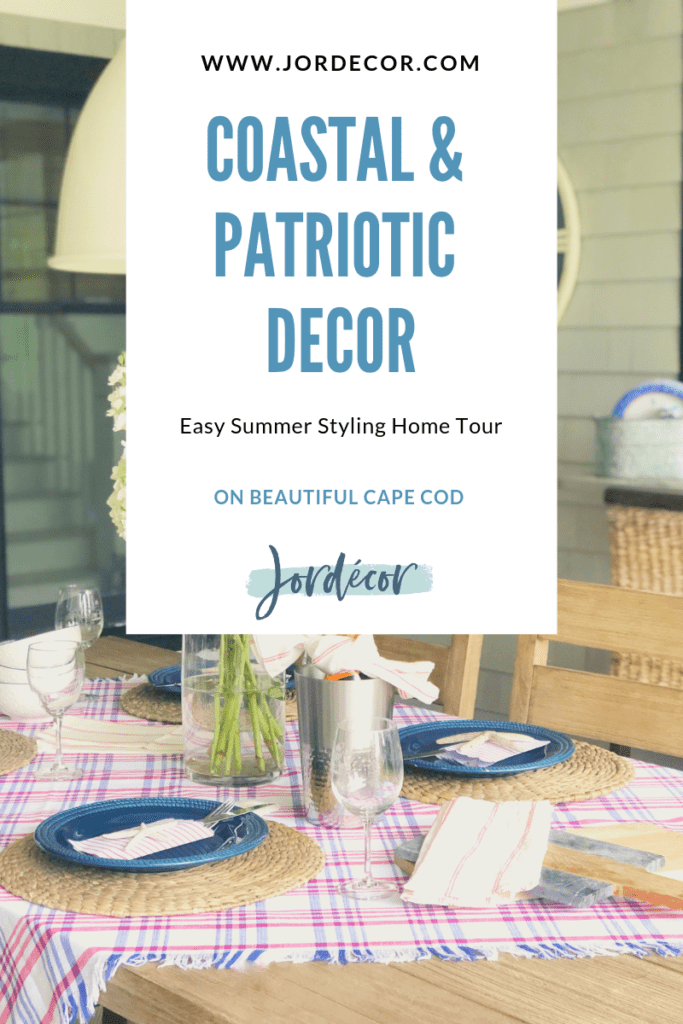
Welcome to the Easy Summer Home Styling Tour! I’m so happy to share our outdoor living space on Cape Cod with you all! I’m thrilled to be part of this awesome blog hop today because I want to share a little bit about our exterior back/deck space which over looks a beautiful harbor. On a summer day you can smell the salt air and see campers learning to sail on small sunfish (including my son!). This is our family beach house- it’s my parent’s home they built last year that I help design and decorate. We spend a lot of time here with my husband and kids, especially in the summer! This special little home represents a place we can escape to, disconnect and spend time together making memories as a family. We spend every July 4th on Cape Cod!
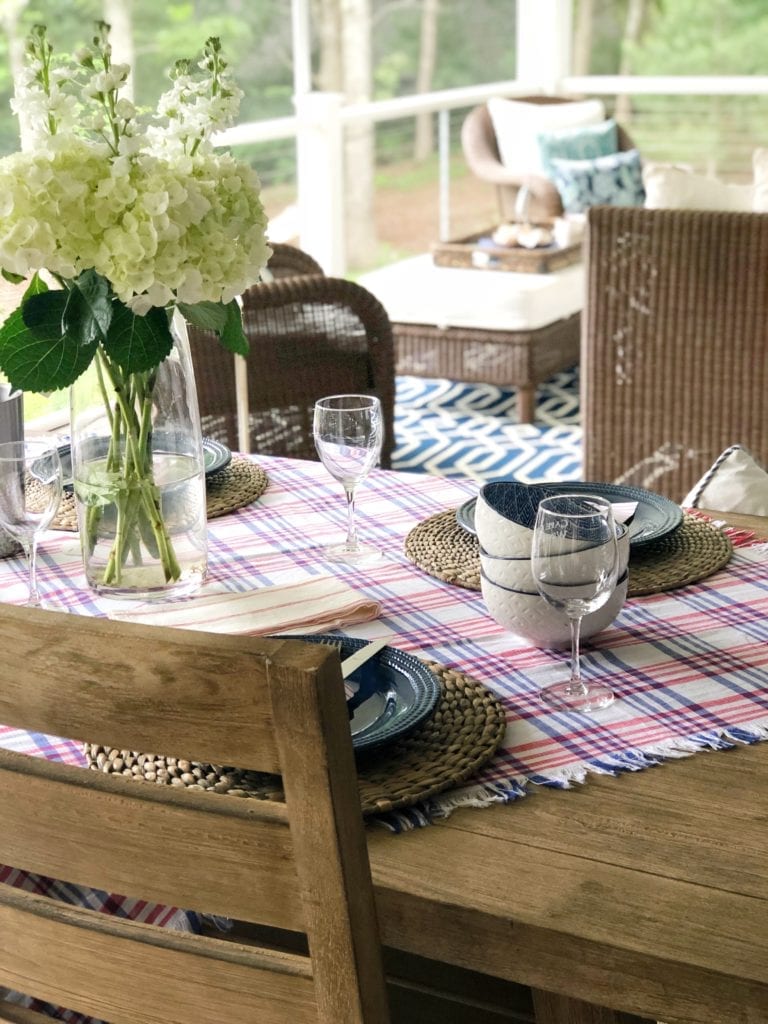
our home is on a sloping property so the back deck is about 20-30 feet off the ground which is why you’ll see those protective wires. It’s super safe and yet doesn’t take away from the view. Our back deck extends the whole back of the home. This specific area consists of a dining space and living space that connects to the home with two french doors and is screened in. Making it a perfect spot to dine al- fresco, play music and enjoy some delish summer time drinks. When we were designing the home I made it a point to include a connection to the kitchen through that window. We added a granite counter and bar stools to transform it into a super functional spot for kids to eat or even as an outdoor buffet/ bar set up. We can simply pass food out from the kitchen instead of walking around through the doors. My kids love sitting and eating here they feel like they’re at a diner. Guess who’s the waitress 😉
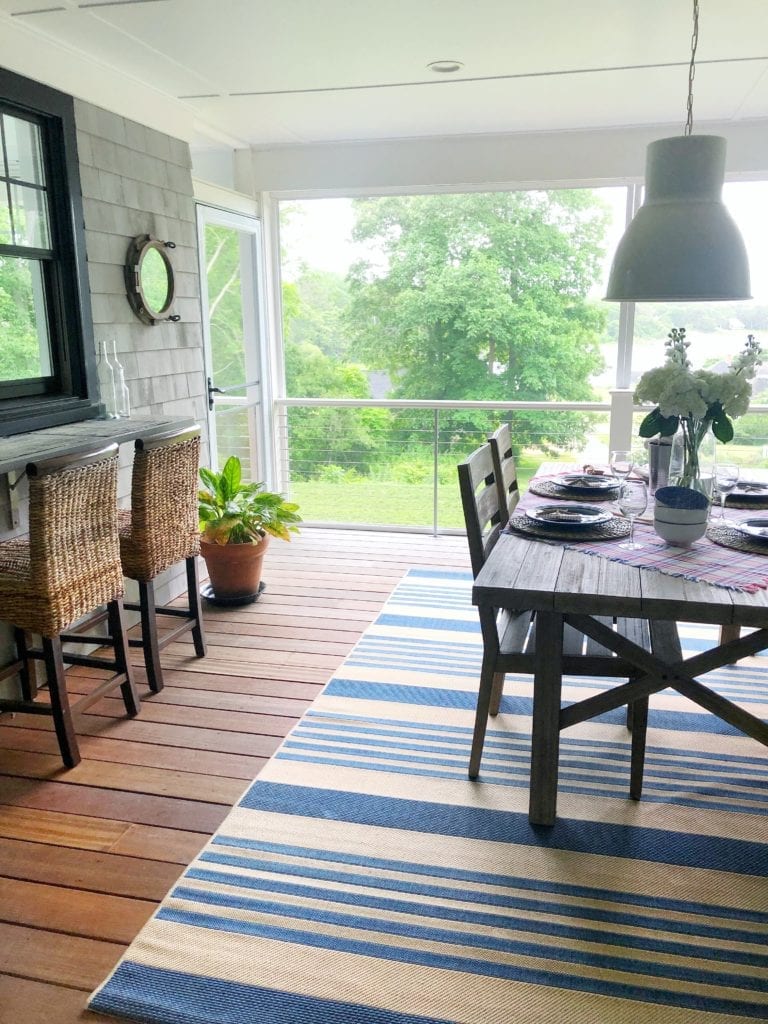
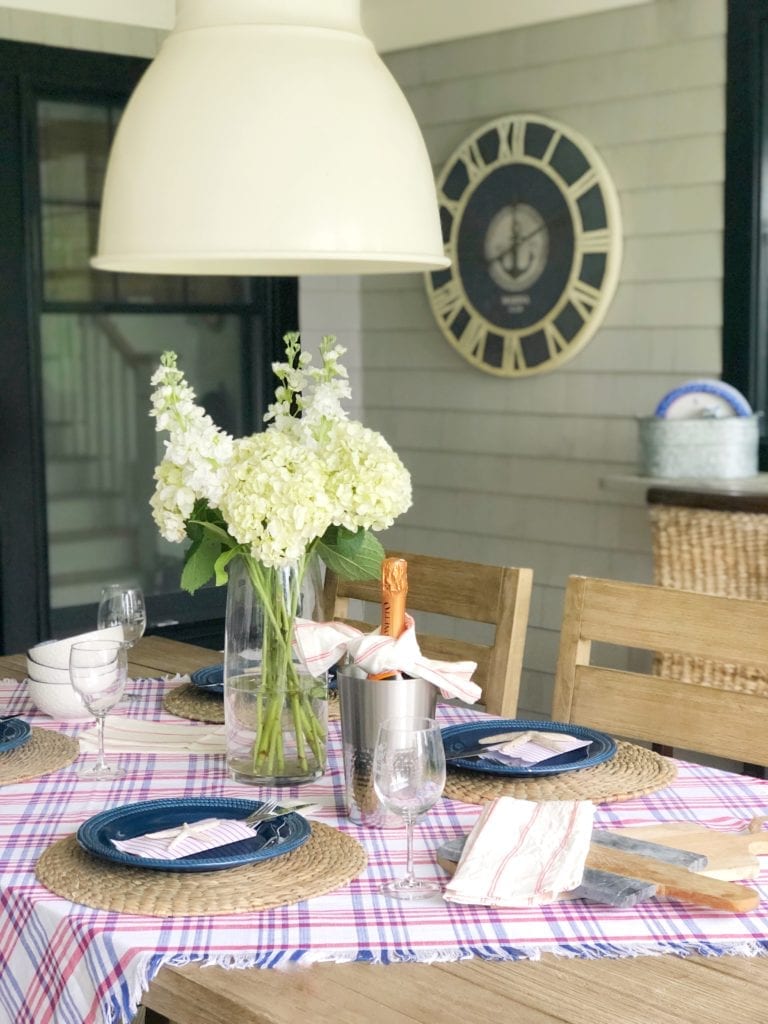
The beautiful white light fixture is from Ikea. We wanted something bright and simple so the focus would be more on the water view in the back yard. We decided to go with black exterior windows just to do something a little different than you traditionally see on Cape Cod. It’s a bit modern but the gray shingles tie it back to it’s coastal Cape Cod roots.
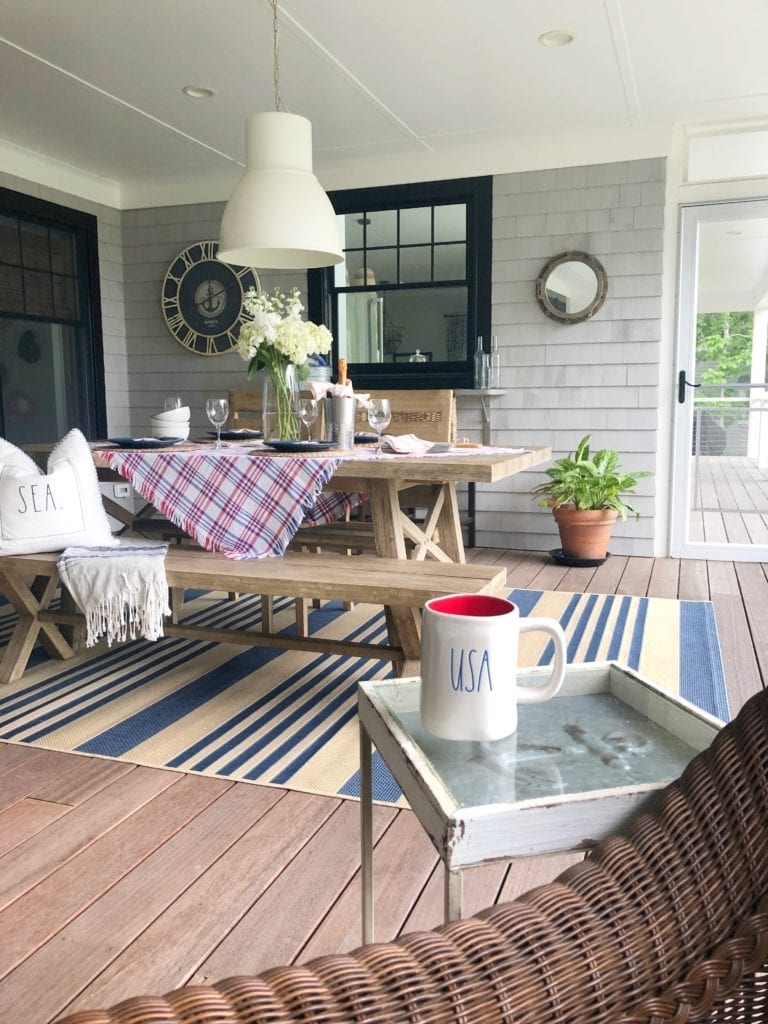
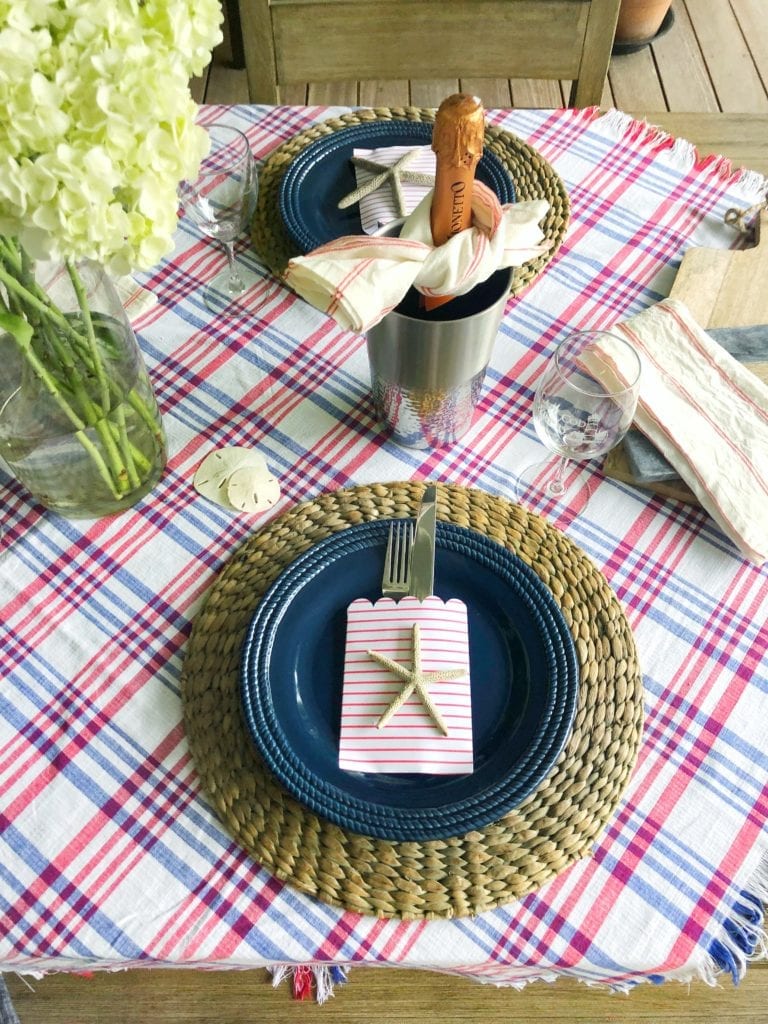
I recently picked up some outdoor rugs four these two spaces. I’m a firm believer that if you want a space (even an outdoor one) to feel more defined and inviting you need to start with a rug as the foundation. I love that once you add that layer it instantly just pops! In Cape Cod navy is a signature color so we have a bit of it through out the house as well as some other denim shades of blue which I love.
This large wall clock with the anchor I purchased at Christmas Tree Shops and That! last summer, as well as the navy rope plates. I also found these Rae Dunn pillows at T.J. Maxx that say “SAND” and “SEA” I couldn’t resist them. I added this beautiful plaid table “throw” as the base layer on the table and it quickly sets a patriotic tone. I like that its a bitt different from a runner but lighter than a table cloth. It looks so pretty thrown off the side of the table too. We had these jute chargers for awhile so I layered them next, then the plates and these cute little silverware sleeves.

I hope you enjoyed stopping by and seeing our Cape Cod beach house all set up for summer! We can’t wait to entertain, relax and simply take in the beautiful warmth of this season, that we waited so long for! Do you host any 4th Of July festivities? Do you keep your decor somewhat relaxed or do you go all out?! I hope you will stop by and see the other amazing Summer Home Tours today (all linked below!)
Jordan
SHOP THIS POST
PIN FOR LATER

Come enjoy 13 talented bloggers sharing some easy summer styling this week! Sharing with me today are…
Thursday
31 Girl At Home // Sand Dollar Lane // The Turquoise Home
JorDecor //She Gave it a Go // A Blue Nest
And sharing yesterday…
Wednesday

Citygirl Meets Farmboy // Grace In My Space //We’re The Joneses // Aratari at Home
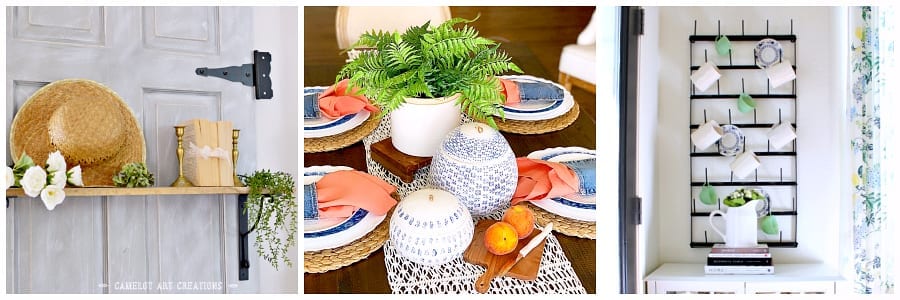
Camelot Art Creations // Crisp Collective //The Tattered Pew
read the full post >

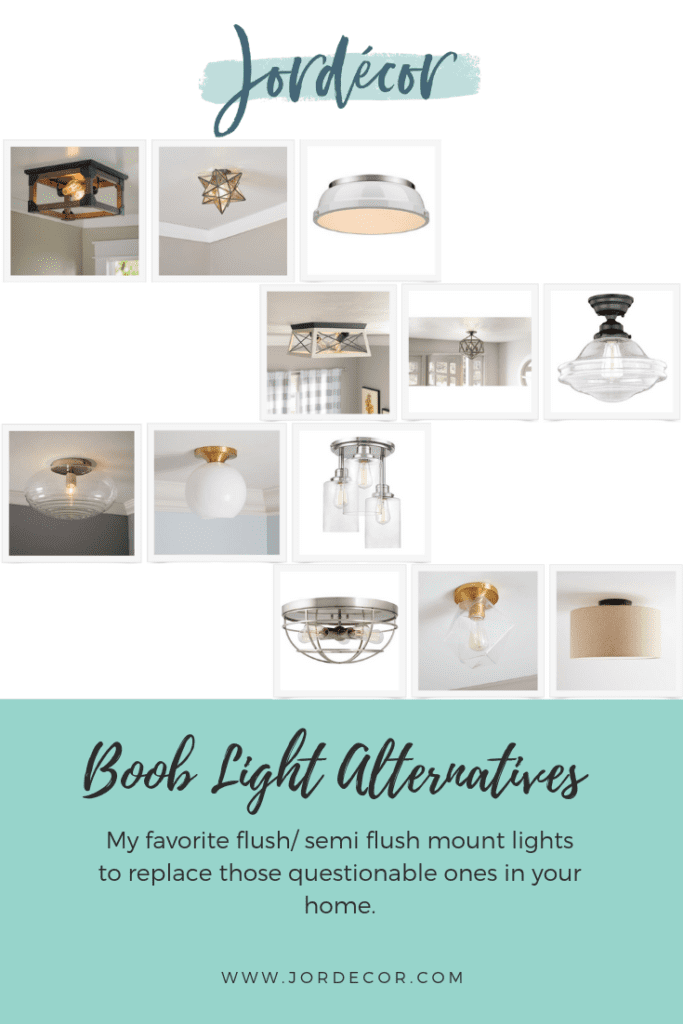
Are you scratching your head thinking, what the heck is a boob light?!? Many people have them in their home and don’t even realize it. If you look directly up at one, you will understand exactly why they have that nickname 😉 . I have a very strong dislike for them. However, a lot of people don’t realize what they resemble and gravitate towards them because they are so inexpensive.
I’ve been on a mission these last few years on my Instagram- trying to rid your homes of the awful BOOB LIGHT phenomenon. I will admit we had quite a few when we first moved into our current home and my plan overtime is to get rid of each and every one of them. I’m happy to report we are now down to two! Still it’s two too may if you ask me 😉 Today I want to share a variety of other more stylish options.

There are so many great flush mount choices out there. Below I rounded up some of my favorites all of which are under $100. If you’re more farmhouse or more traditional or modern… Whatever your particular style is there is something for everyone. I found a little of everything and I hope it’s a helpful resource for you if you are also slowly trying to update your outdated lighting. Ok now tell me… how many do you have in your home? You must have at least one.
MY FAVORITE FLUSH MOUNTS UNDER $100
I hope these ideas help you if you are in need of updating some questionable light fixtures in your home. Thanks for stopping by!
Jordan
*post contains affiliate links which help support my blog but cost you nothing extra
PIN FOR LATER:
read the full post >
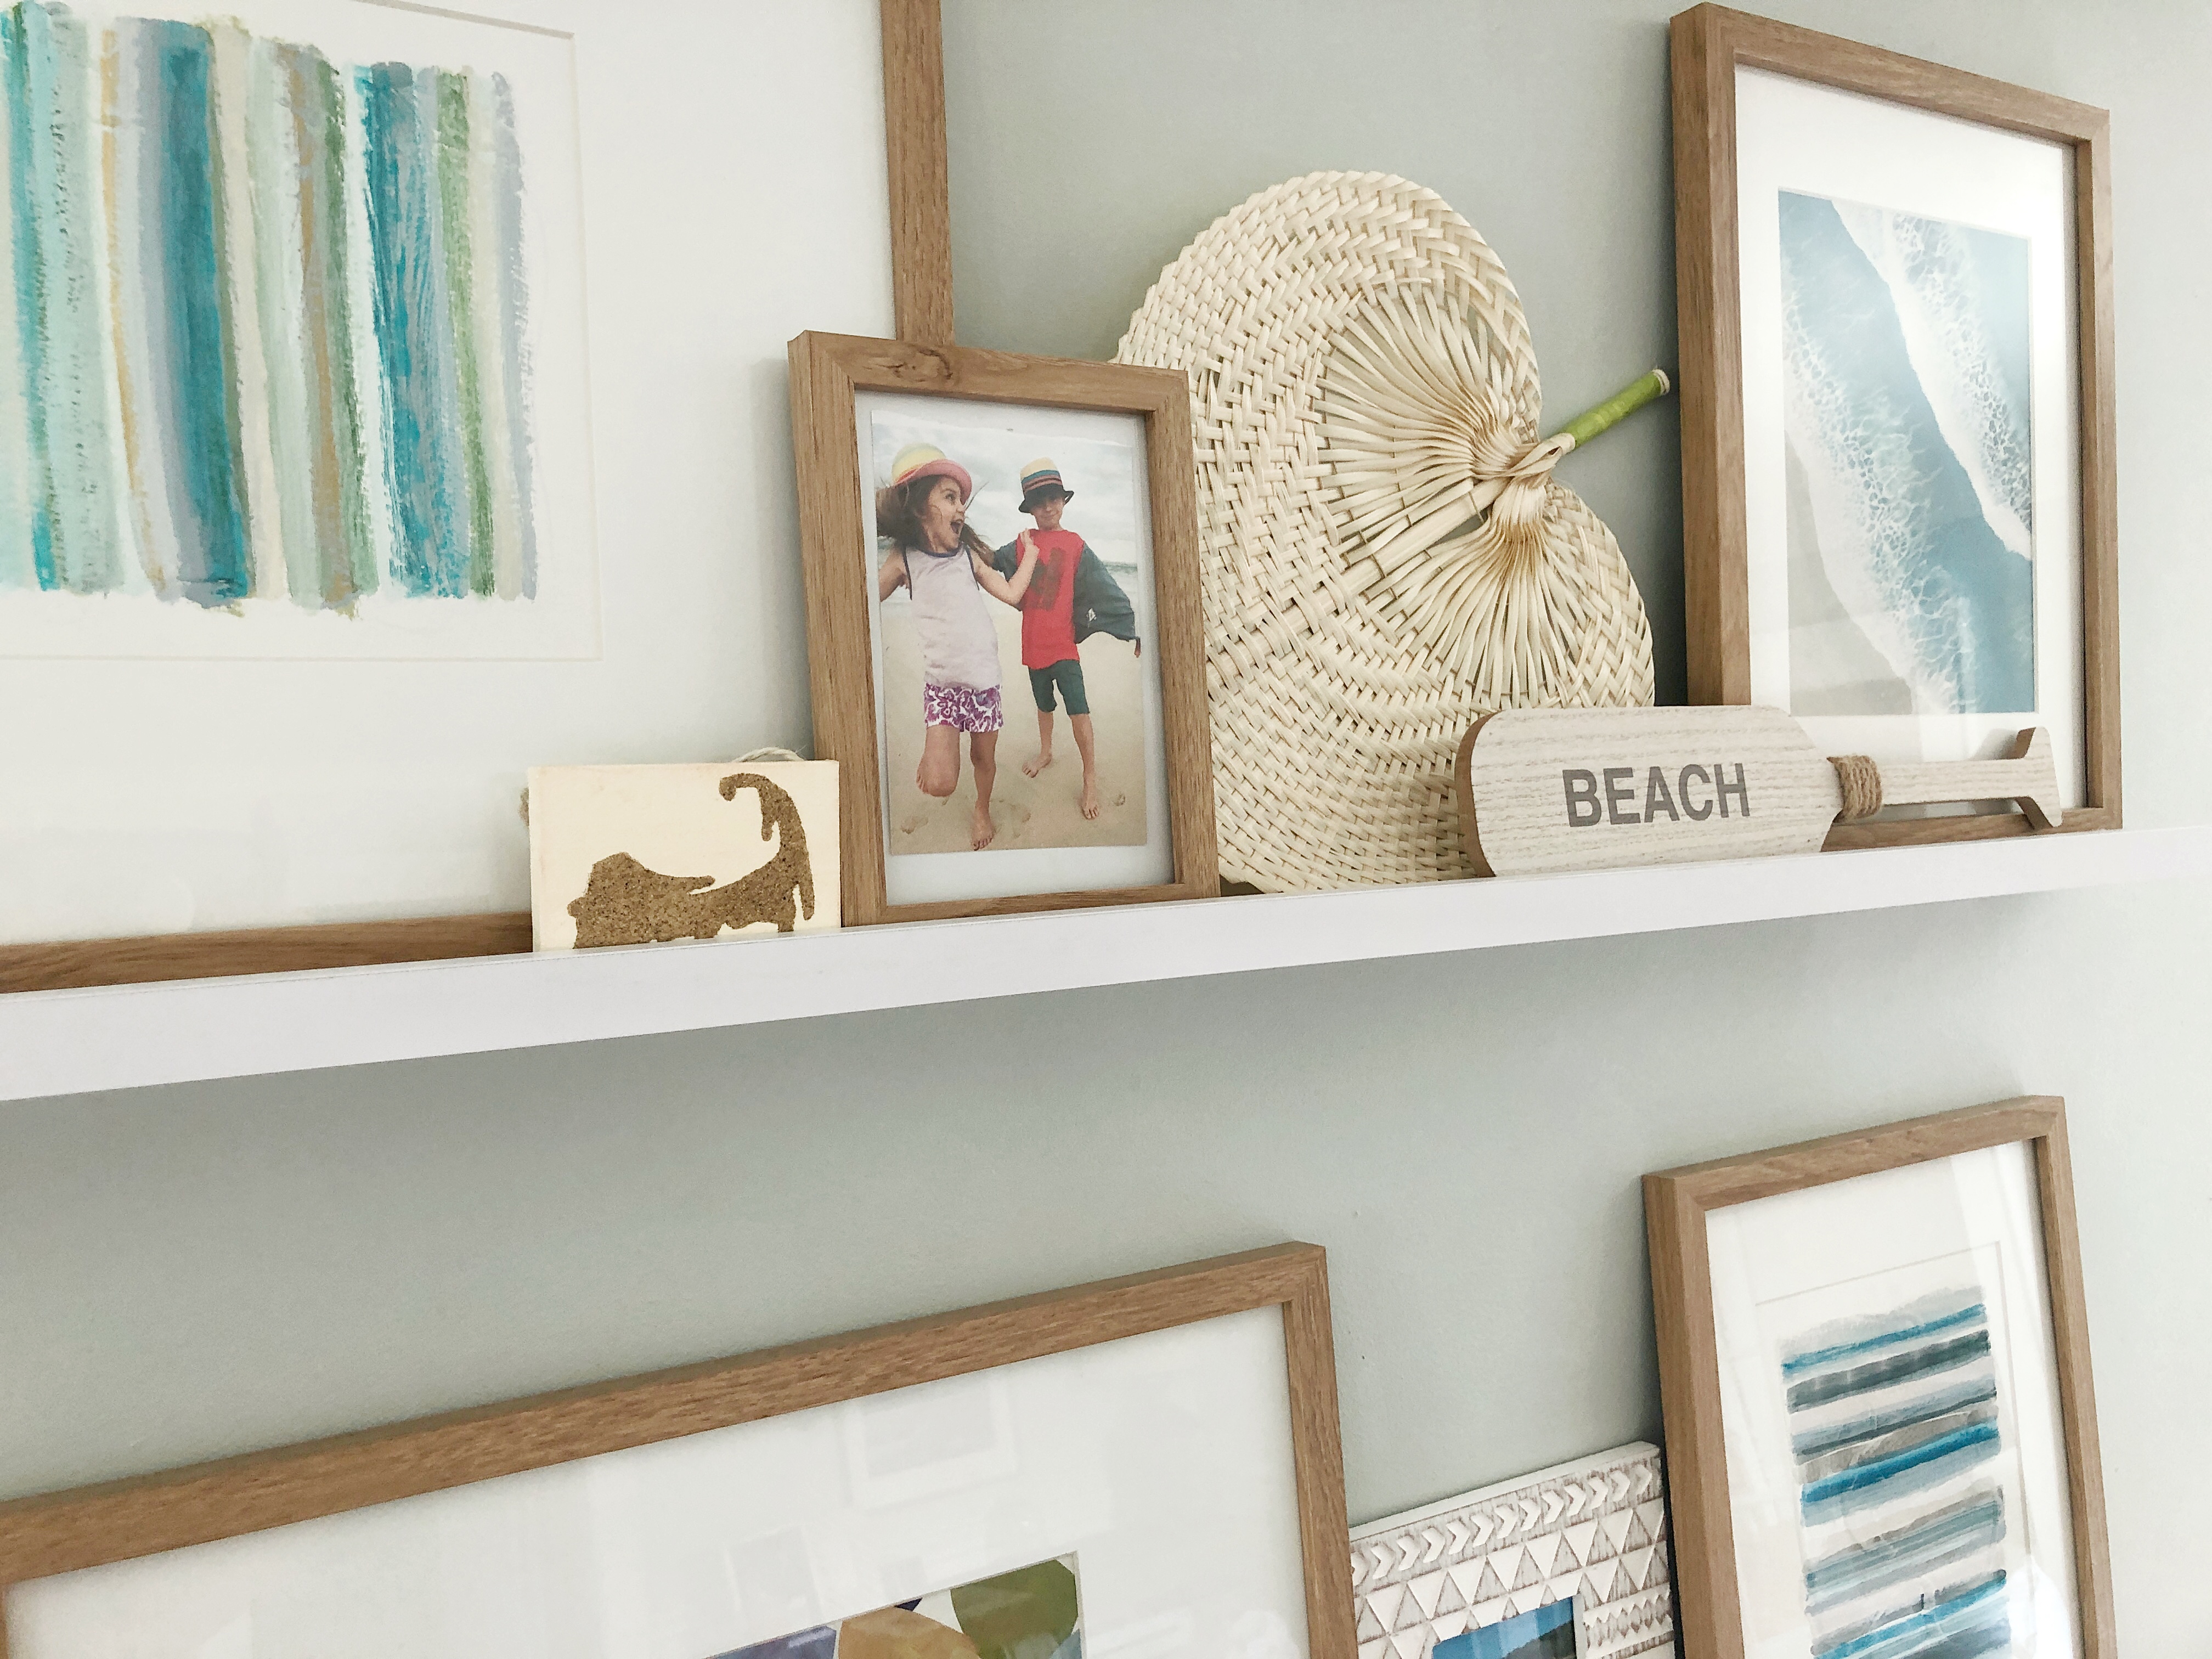
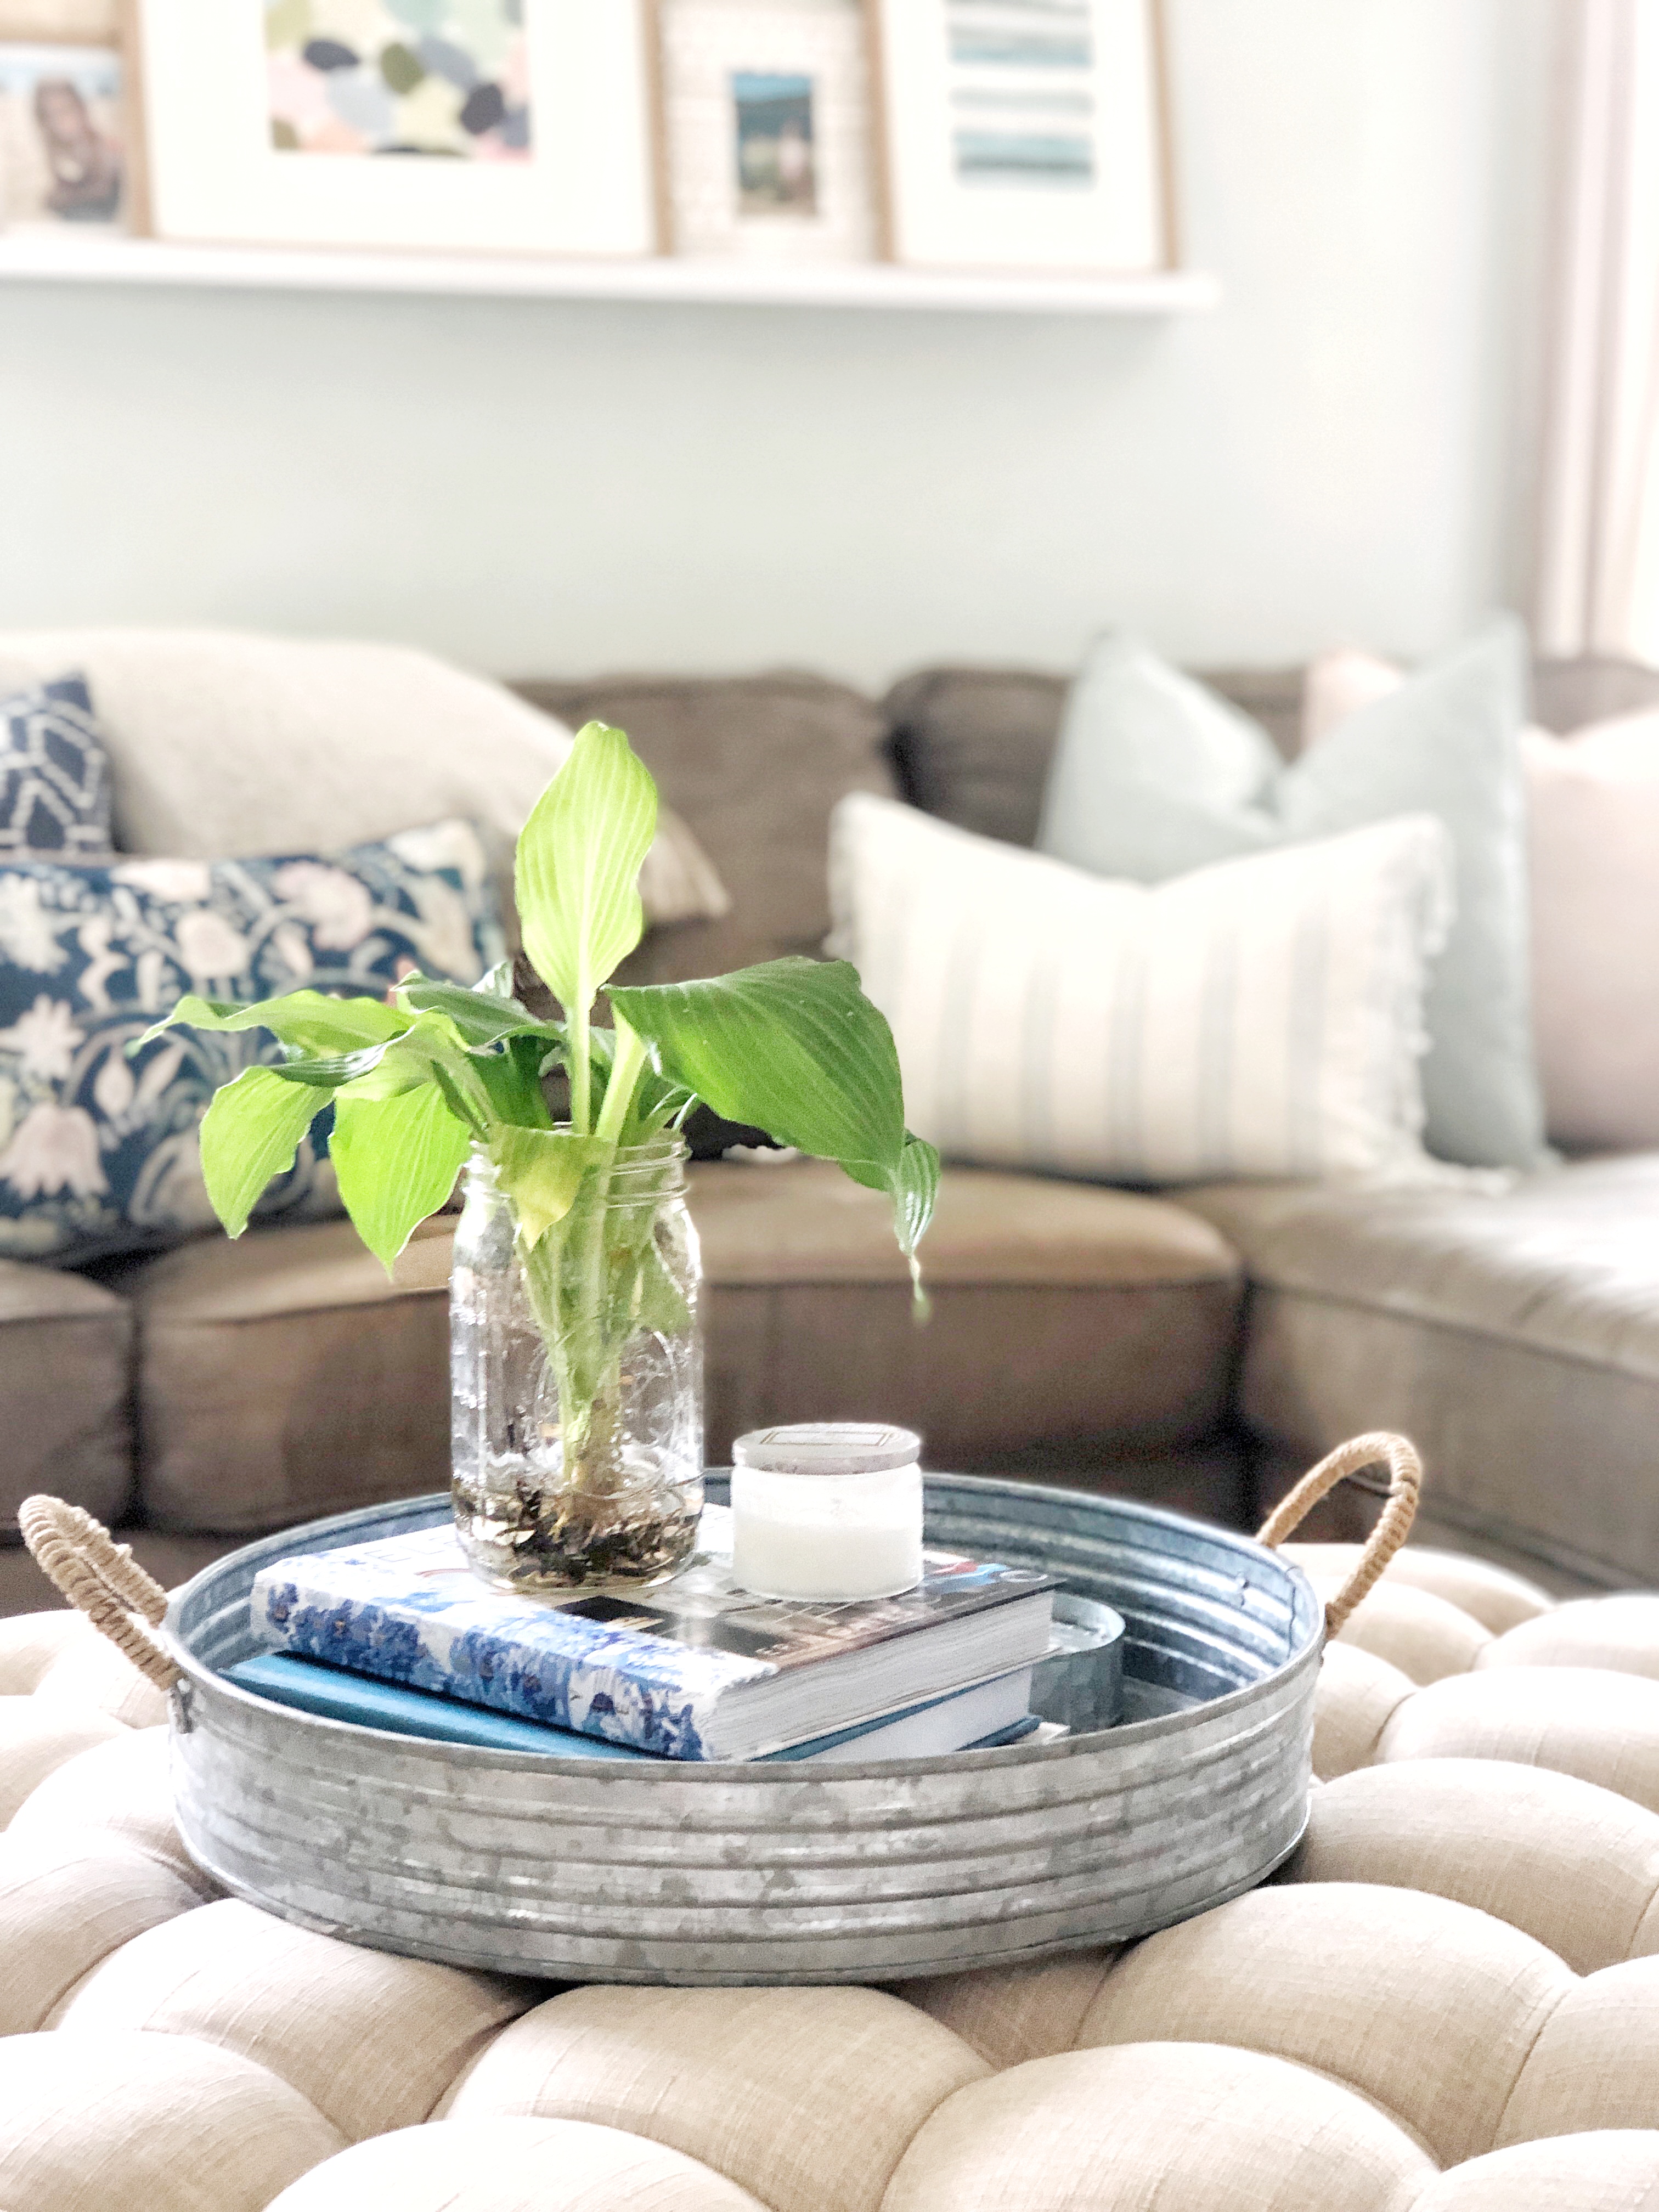
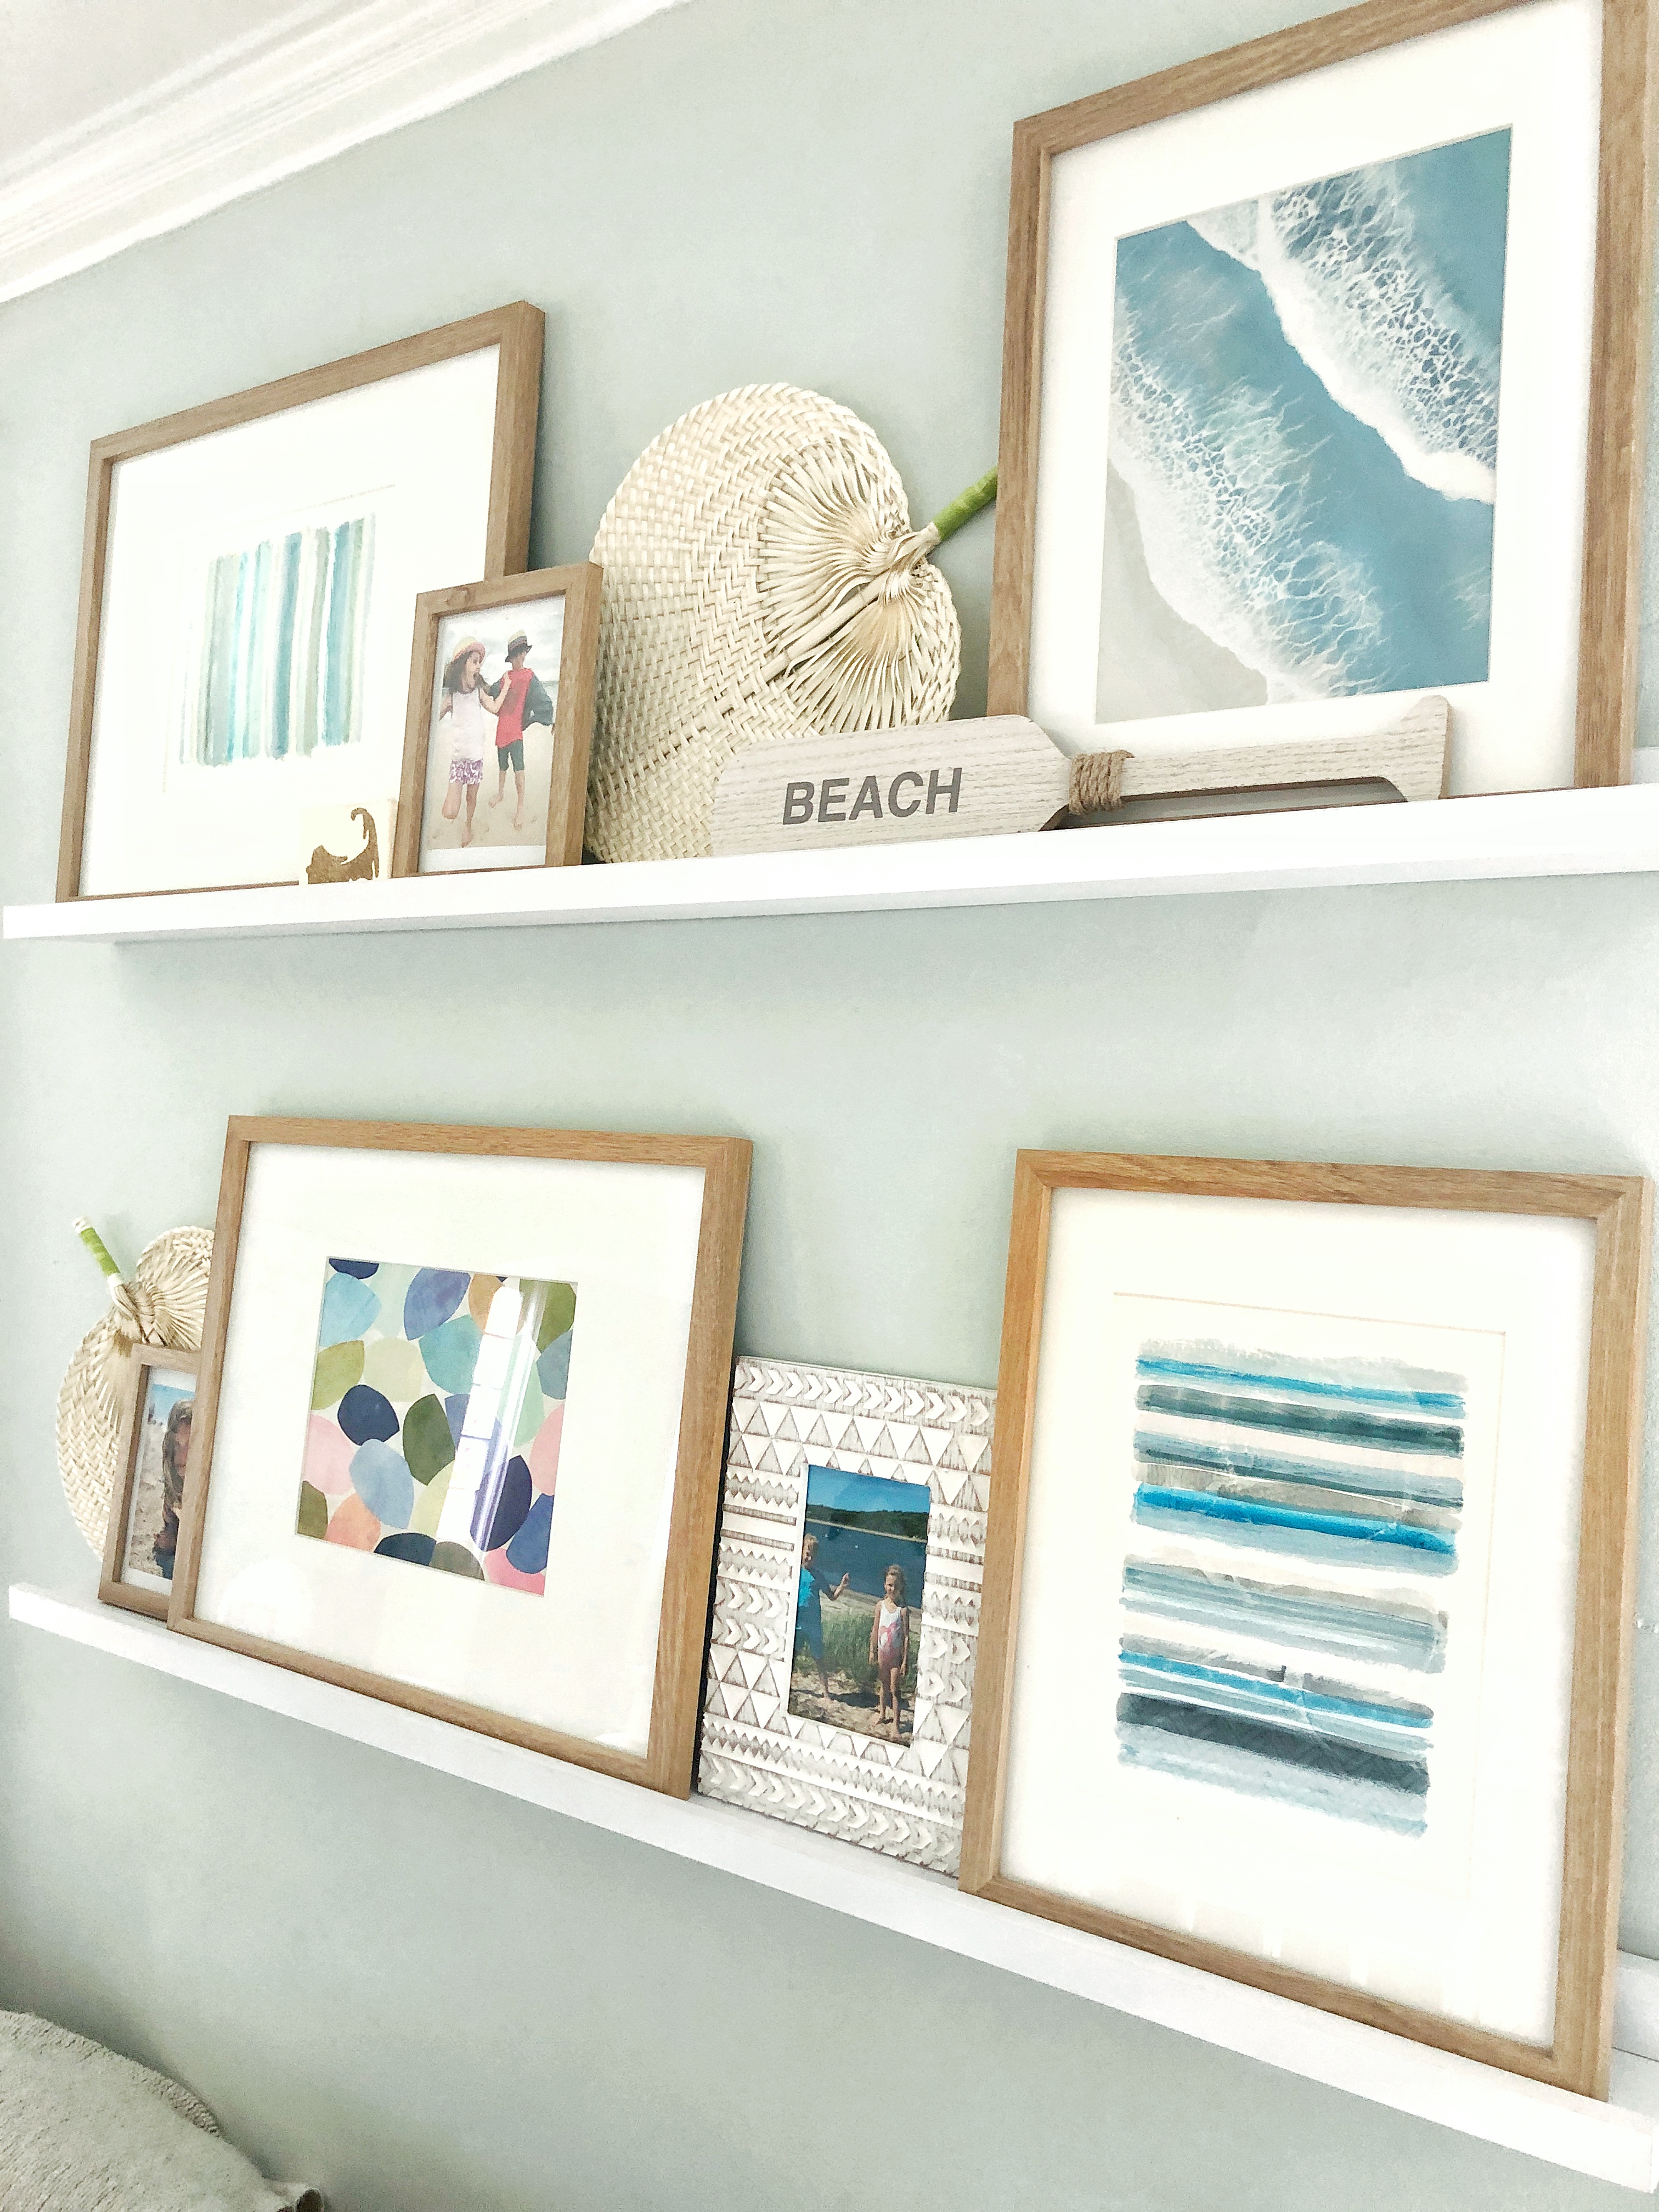
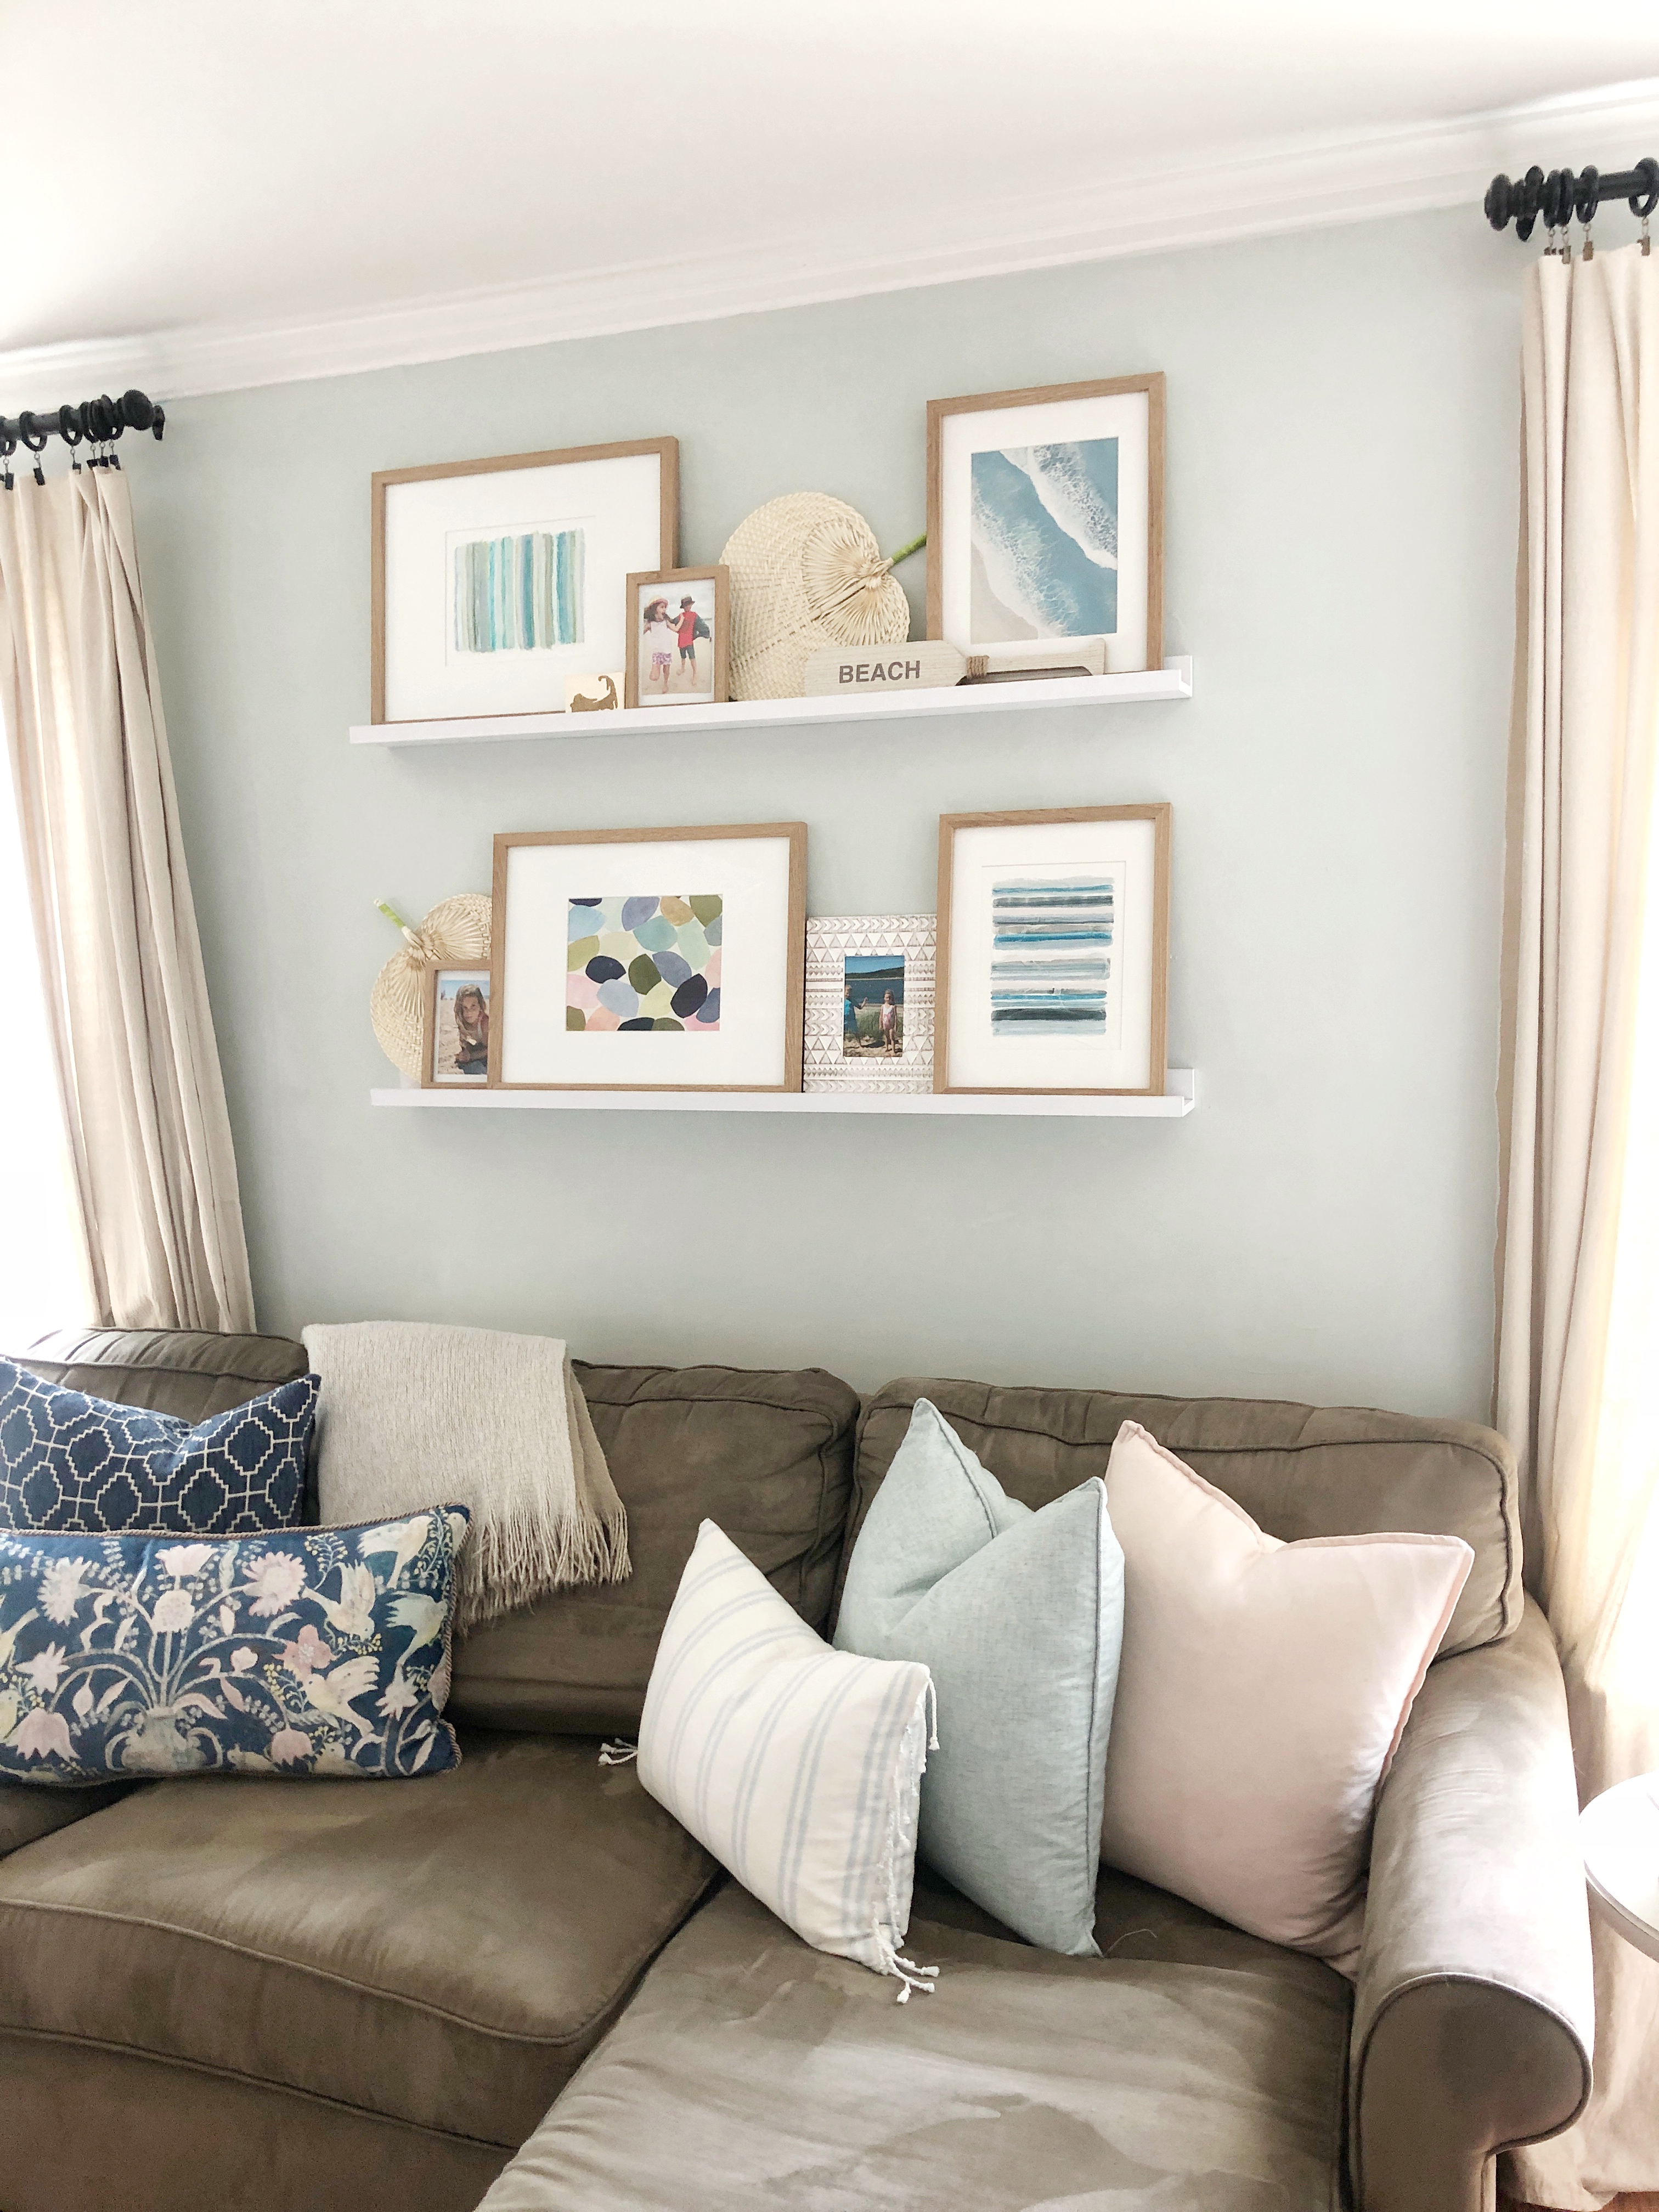
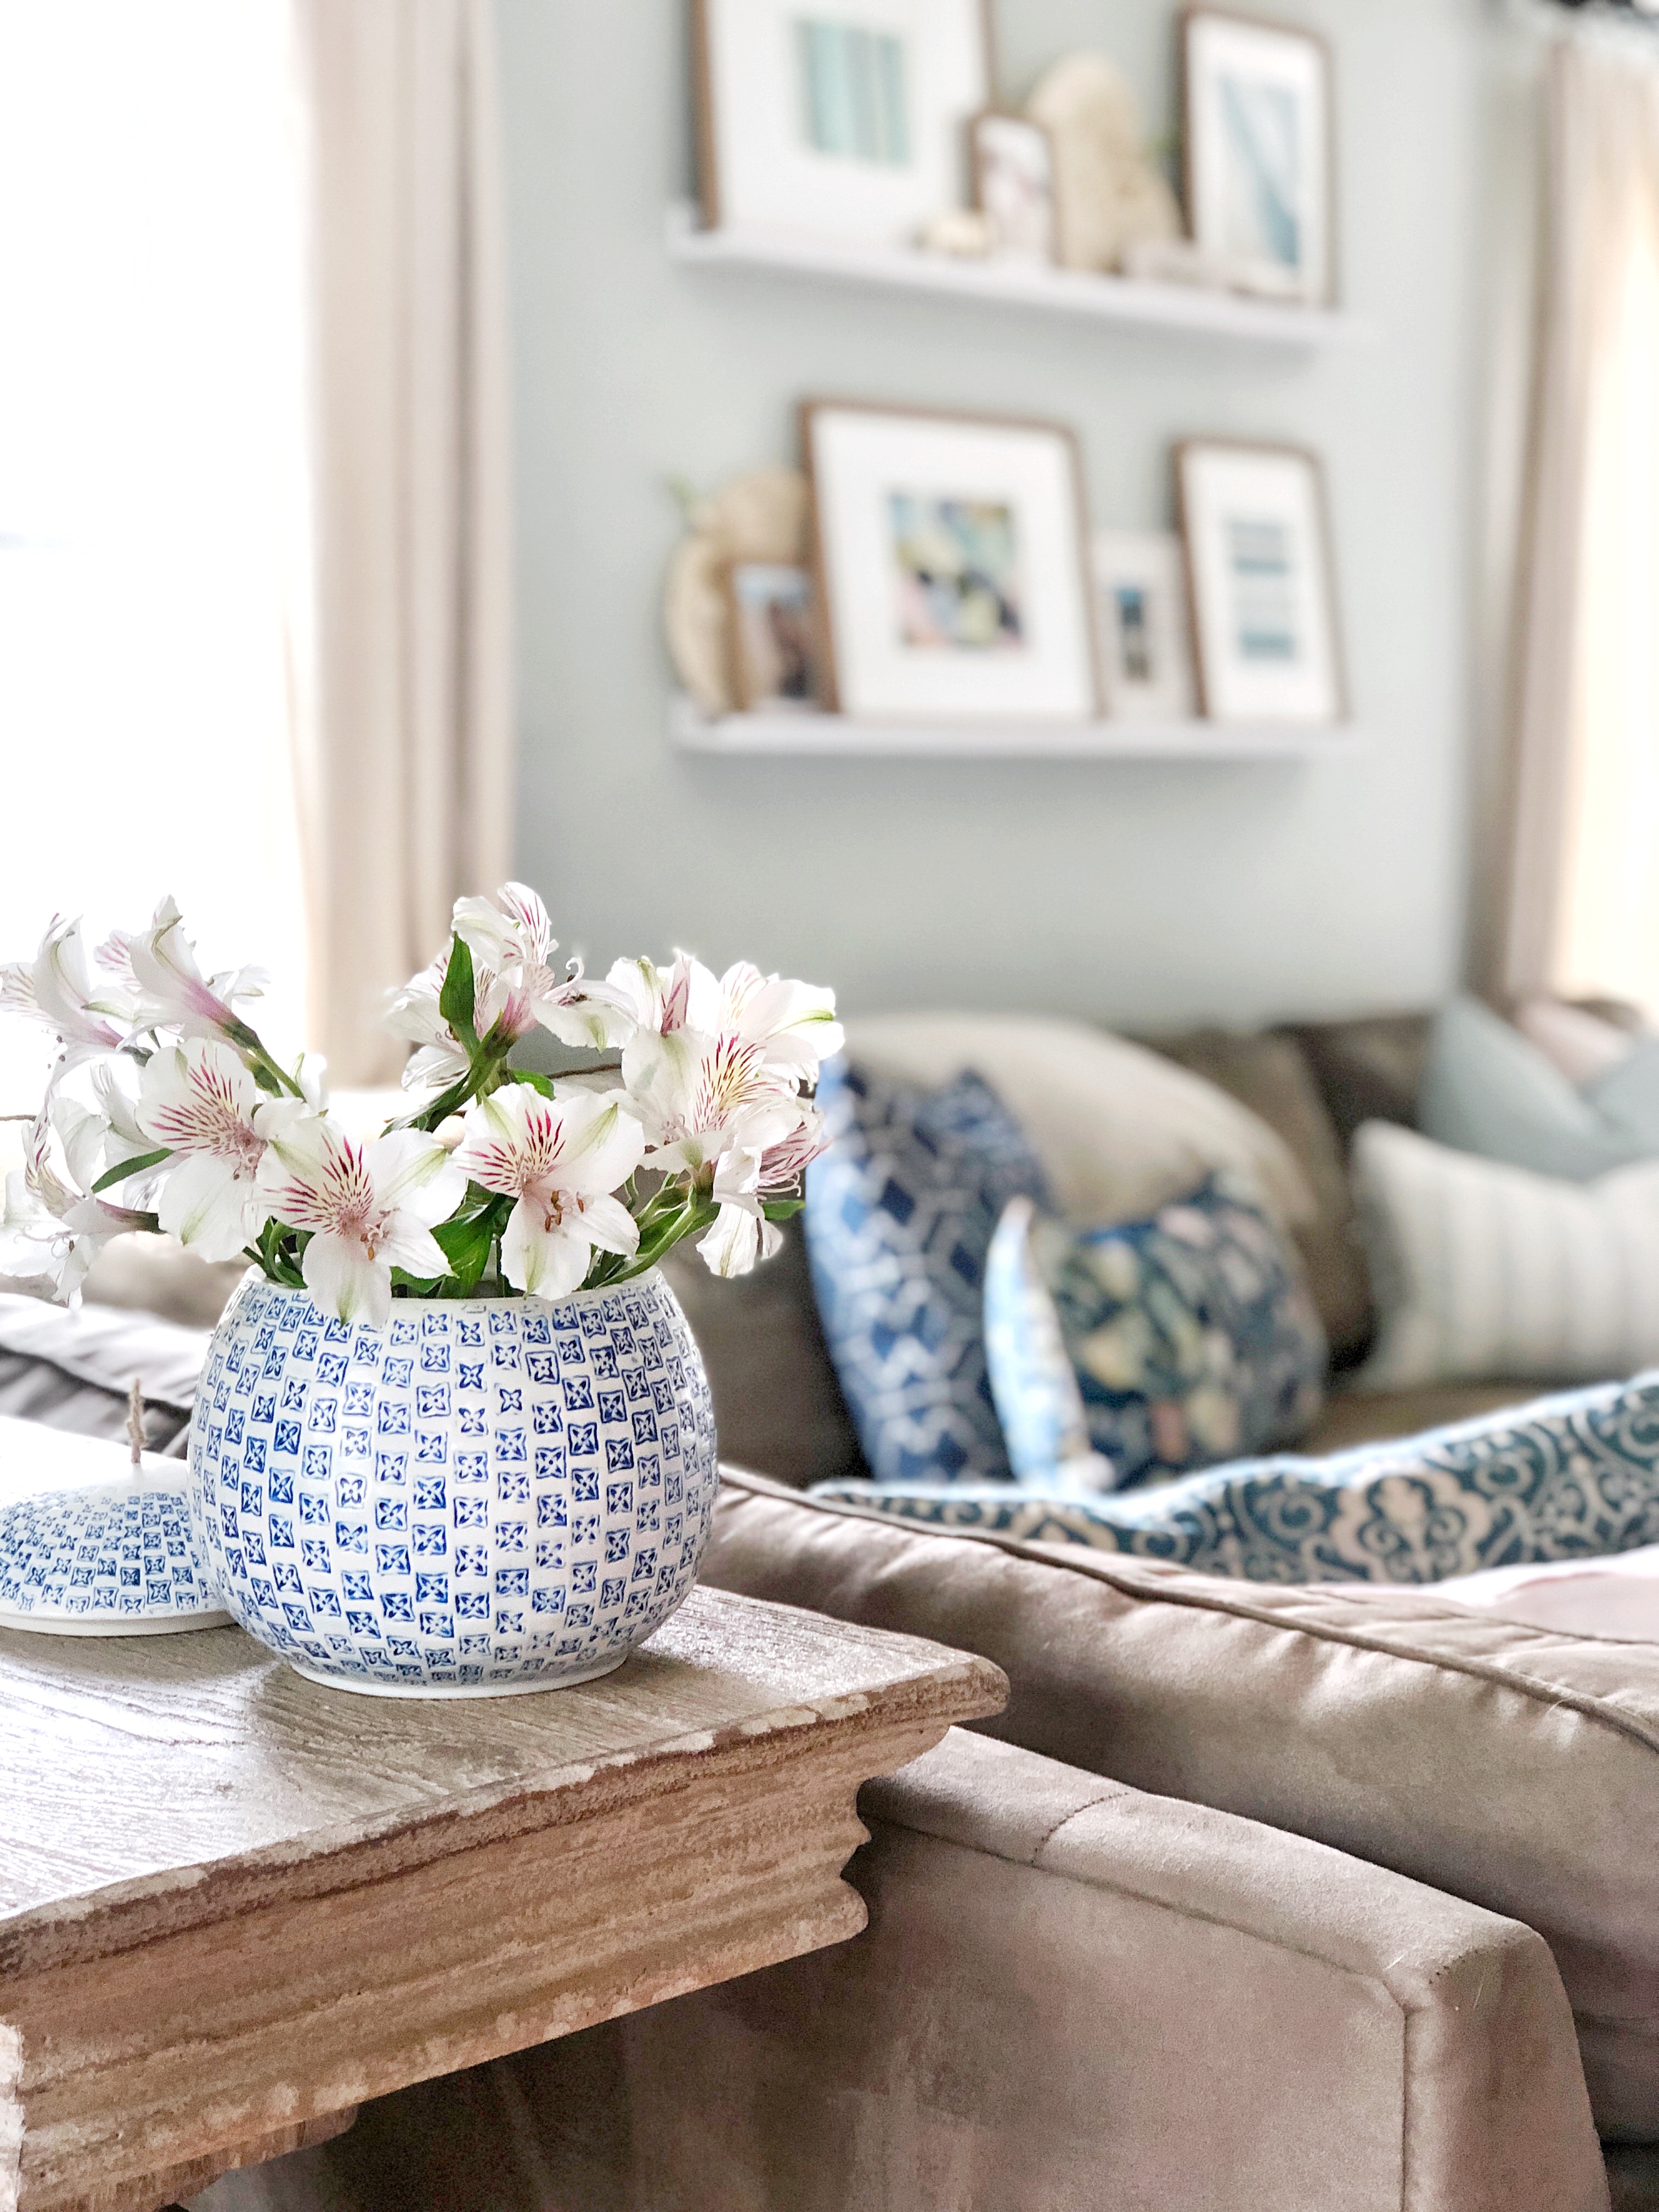
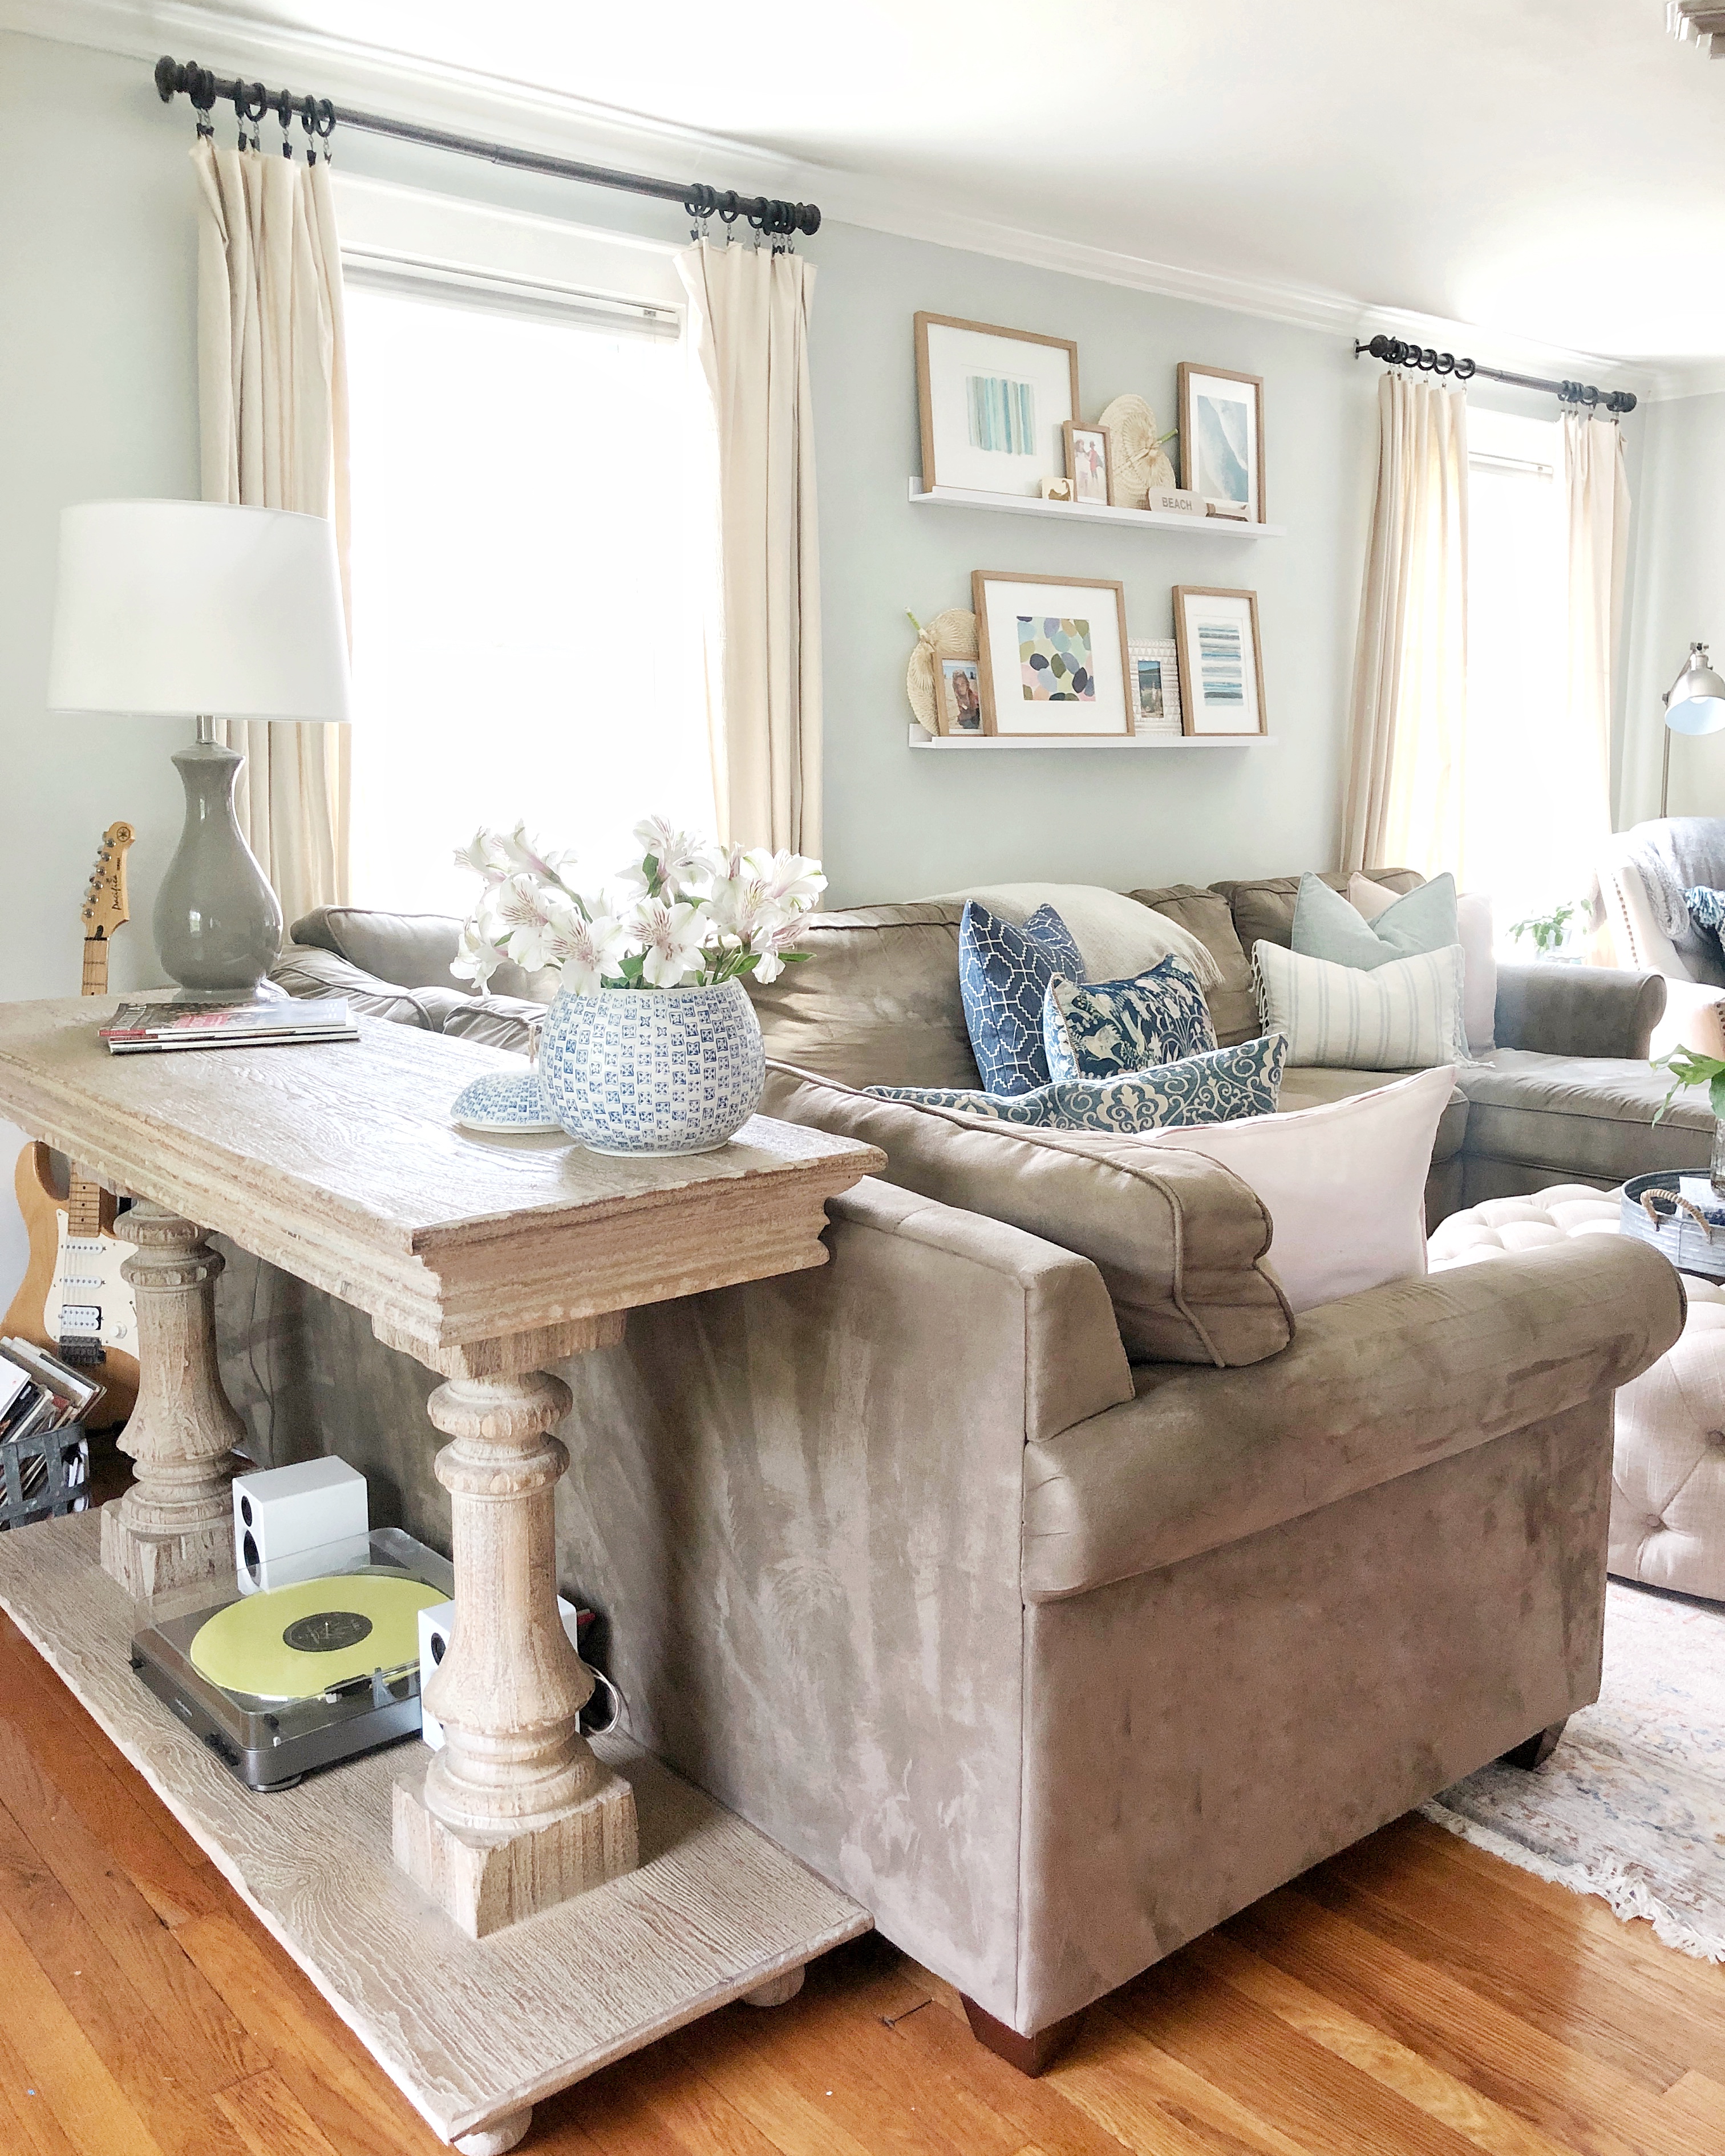
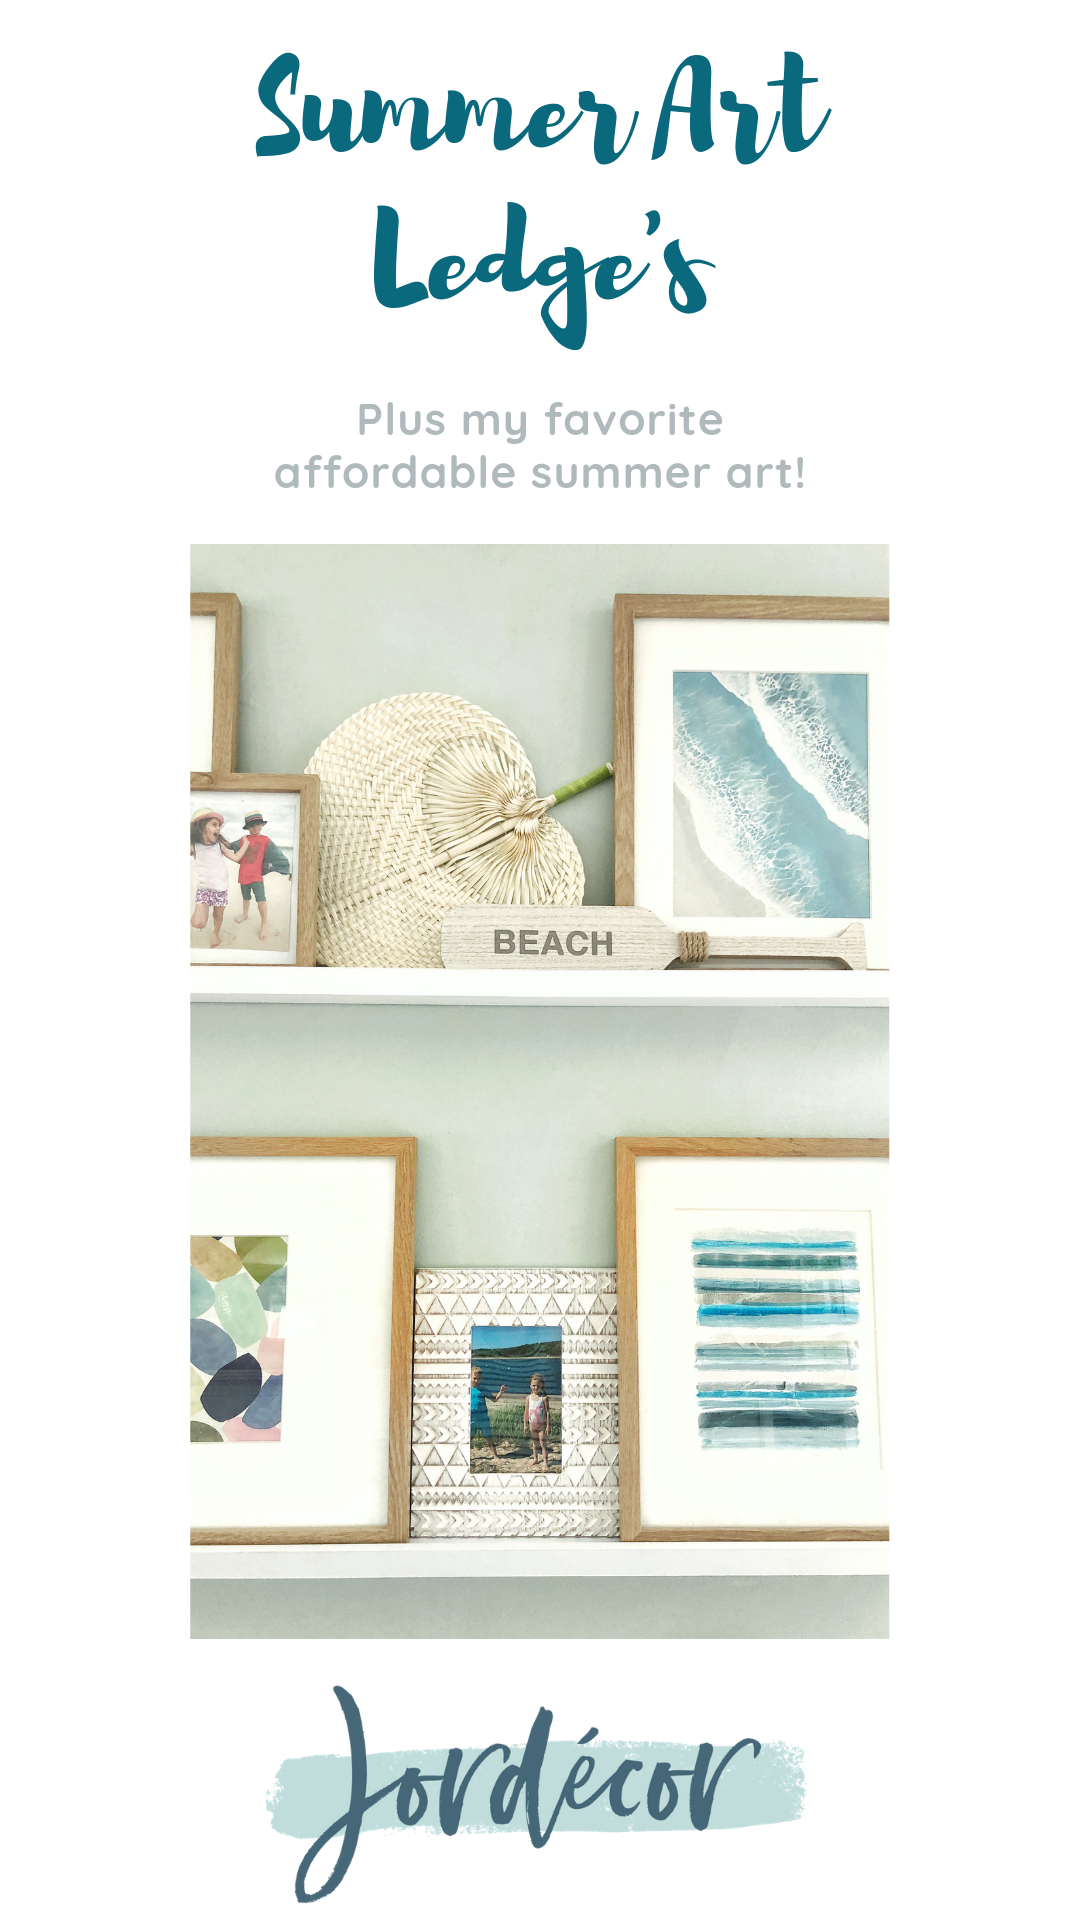
The weather is beautiful today, with a warm breeze blowing through the window as I write this. Summer is finally here and is one of my favorite seasons. I love making my home feel light and airy this time of year. I like to go minimal with my decorating in the warmer moths to help create that light vibe. I wanted to show you how I added some summer art to our gallery ledges, which you can find HERE. I really enjoy switching things out for each season as you can see on this post and this post. Choosing art doesn’t have to be exhausting mentally or financially it can be really easy and fun. My two favorite places to shop for affordable art is HERE and HERE.
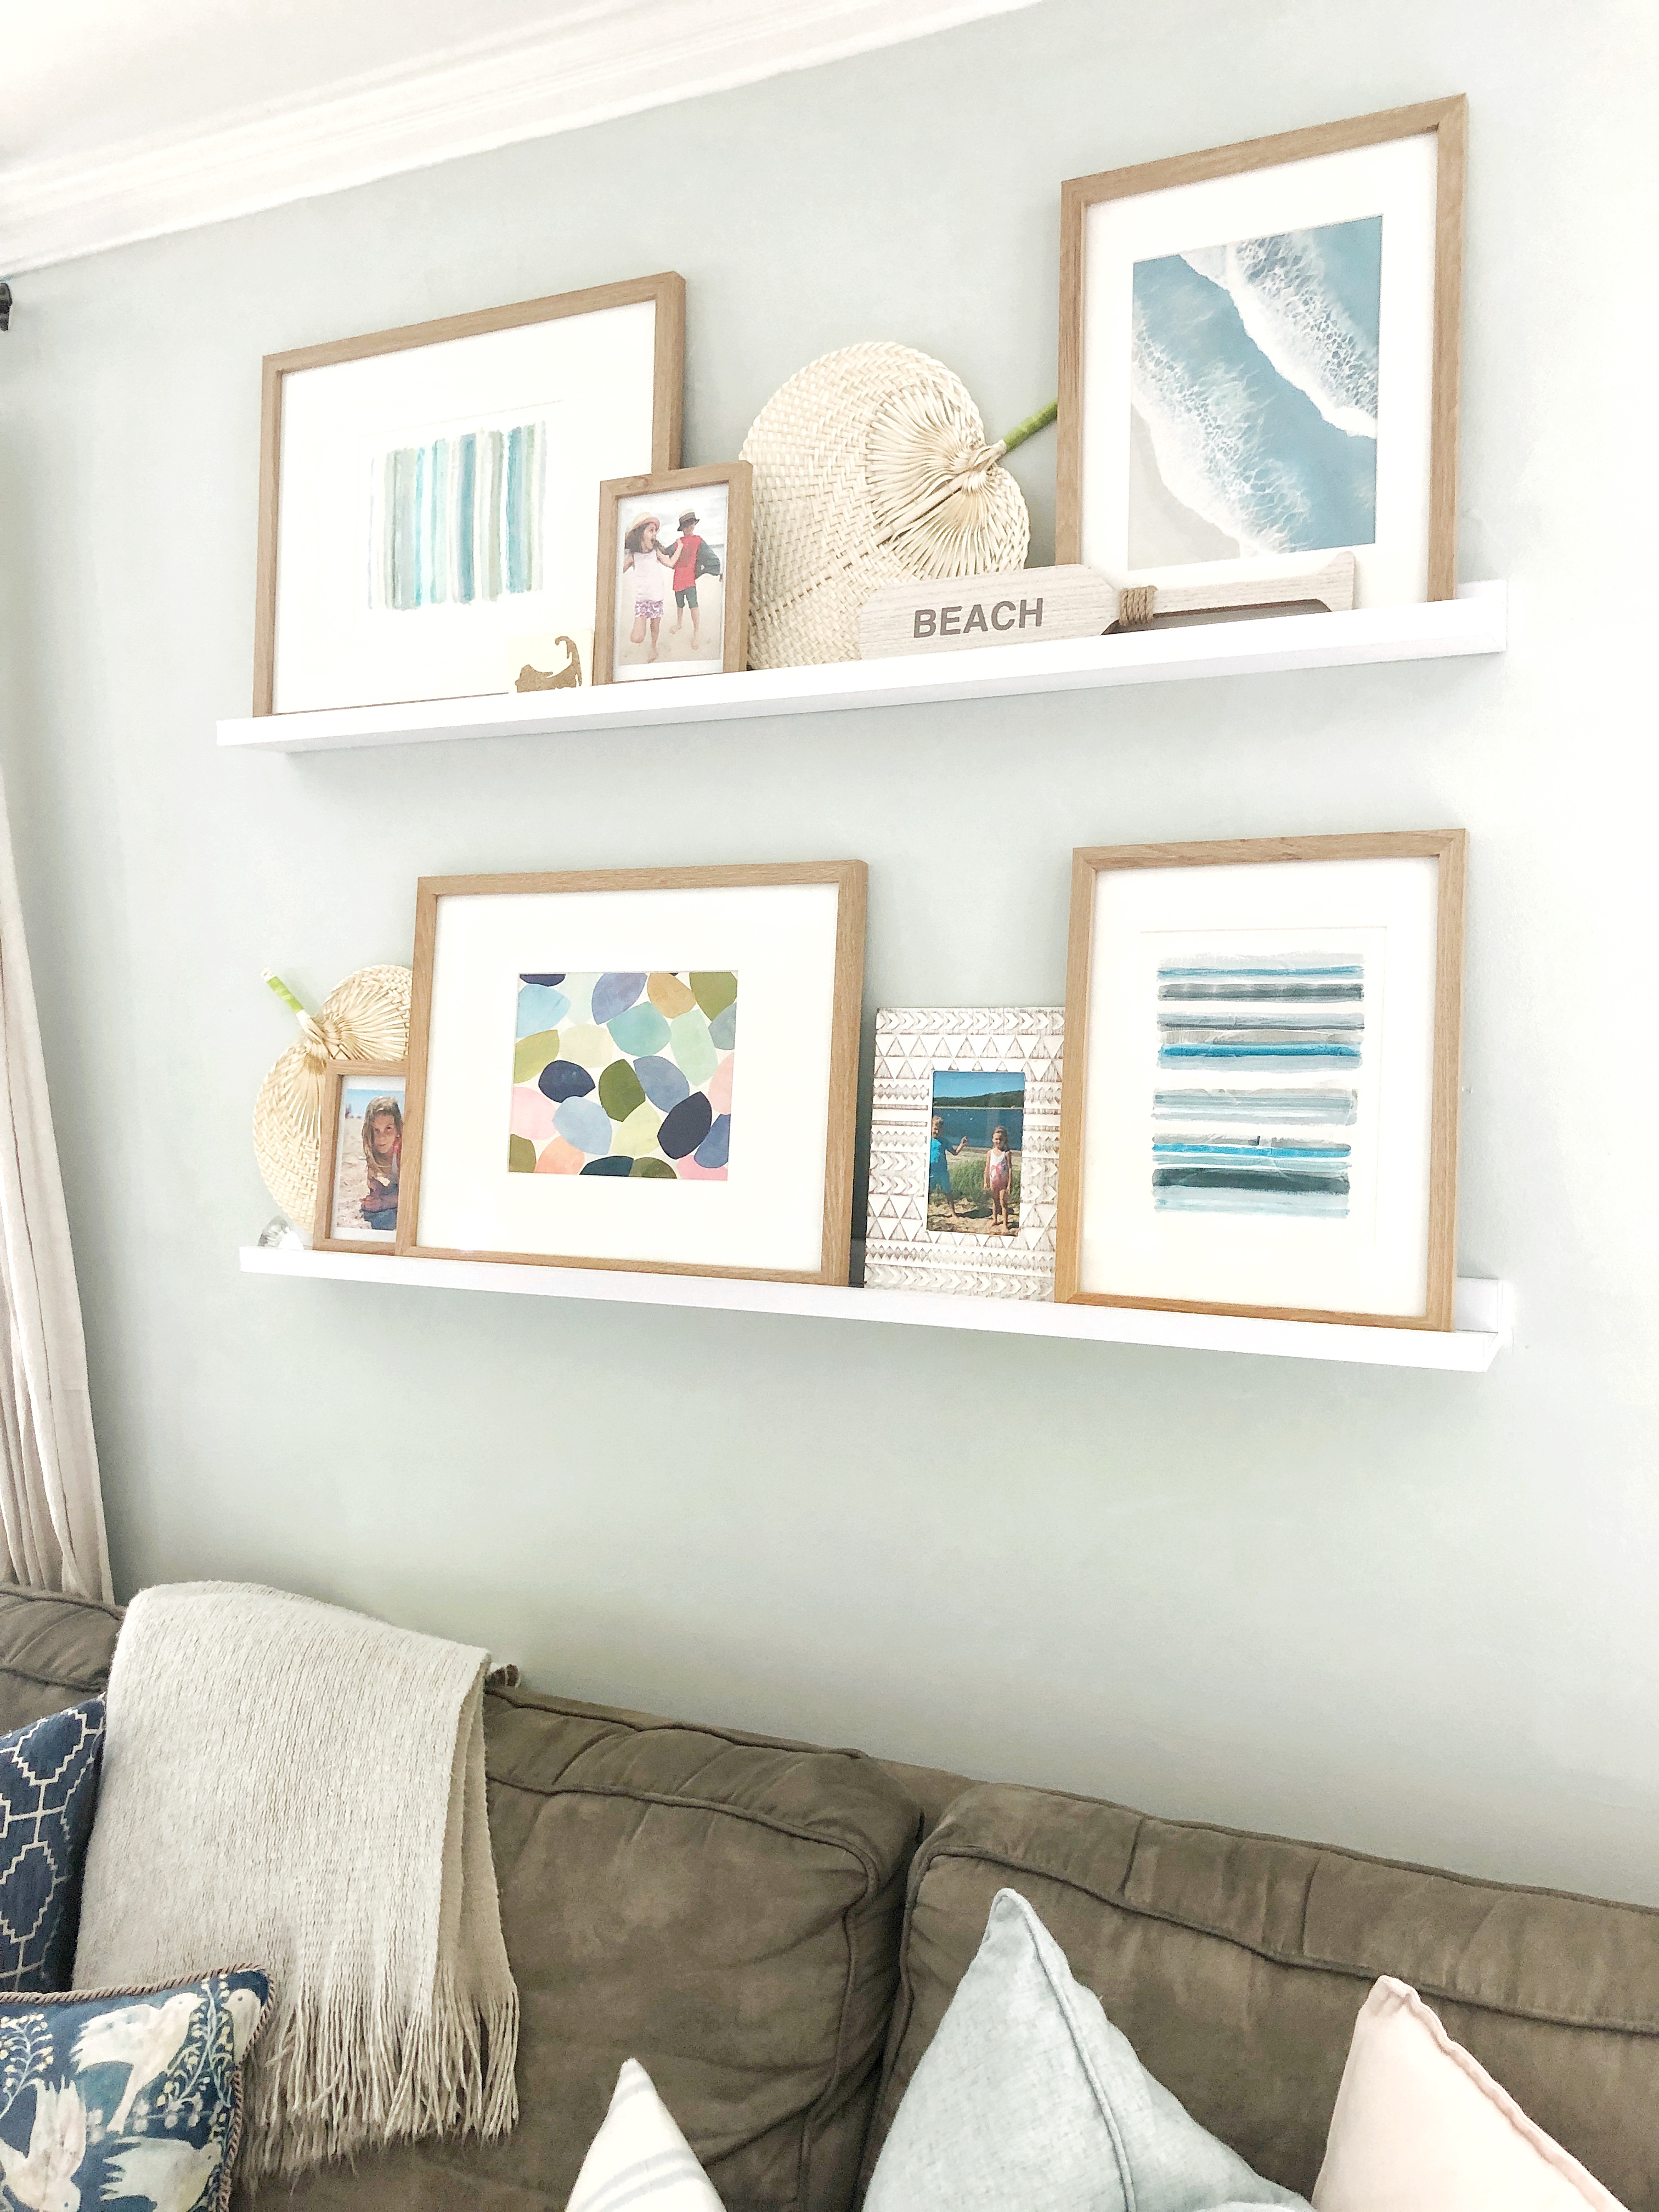
SUMMER ART LEDGES
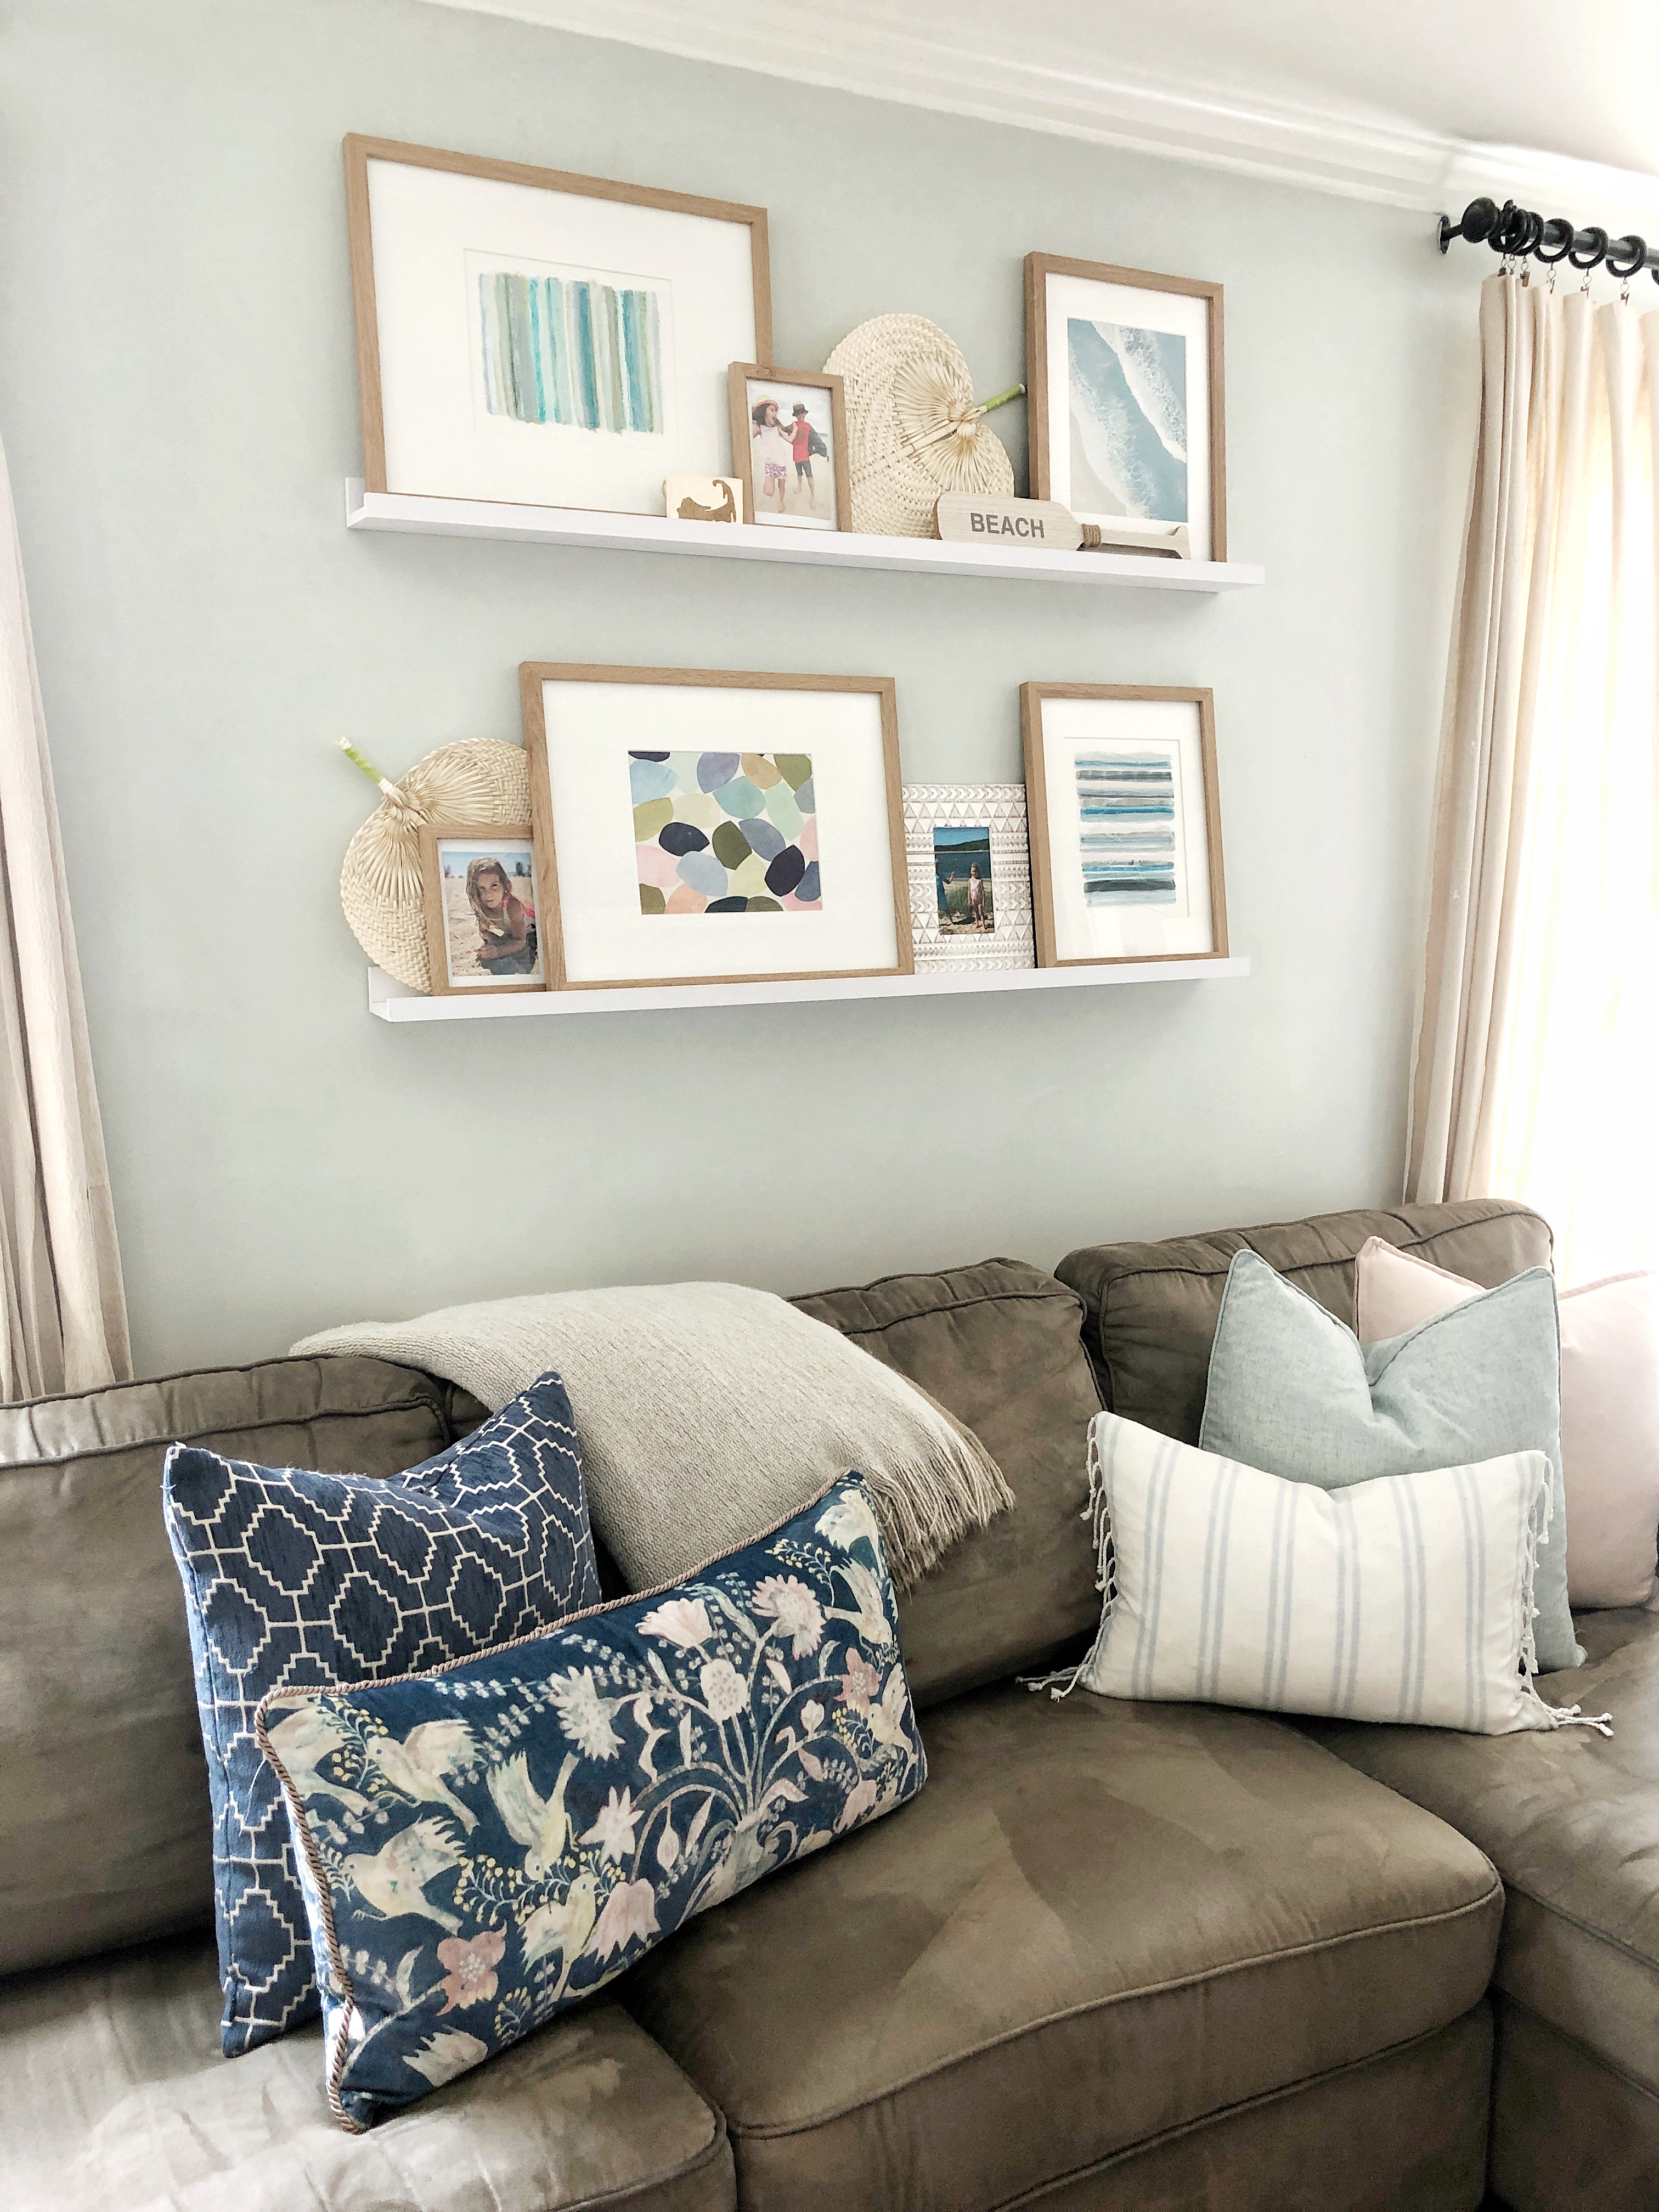
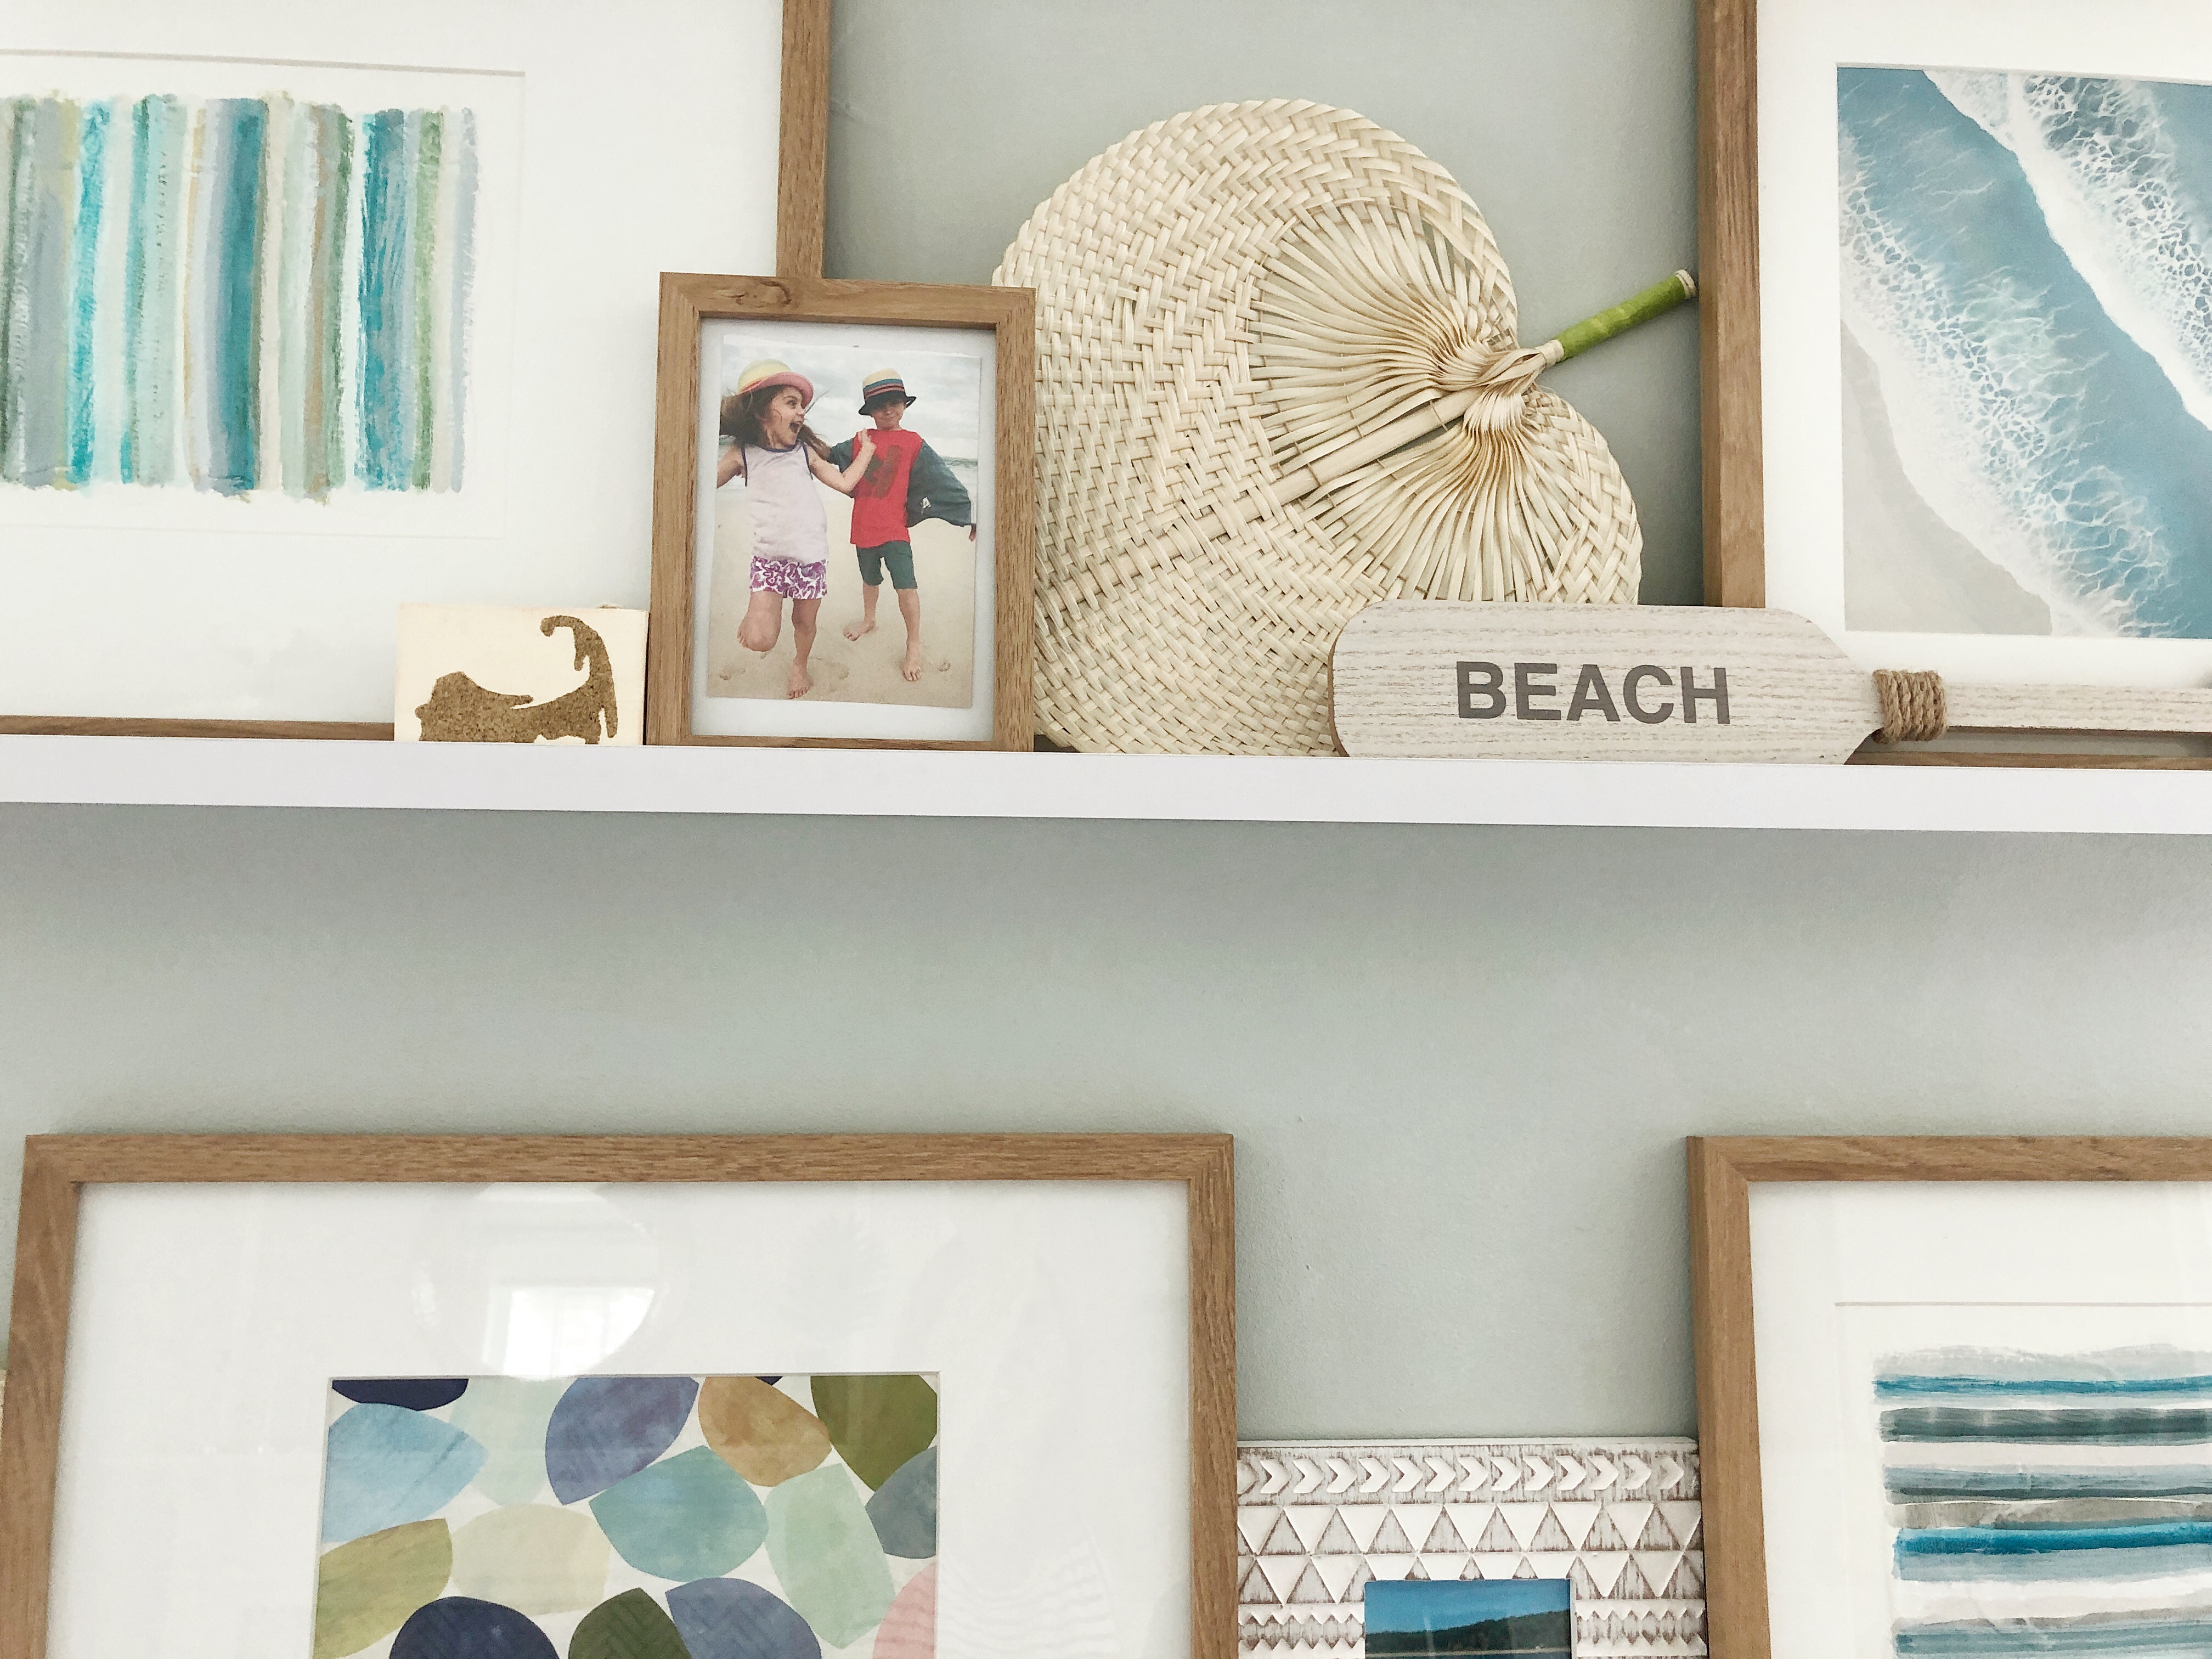
Here they are all ready for summer. I mixed in some of my photographs of the kids at the beach and then let the art and color just shine. I still love the wood tone frames against the white matt’s. I think it adds a little warmth and coziness. I played around with the layout and composition but ultimately I think having three of each size frame works and then just playing with the arrangement. I still might try to swap the frames and sizes so the same exact ones aren’t above and below but for now this is good!
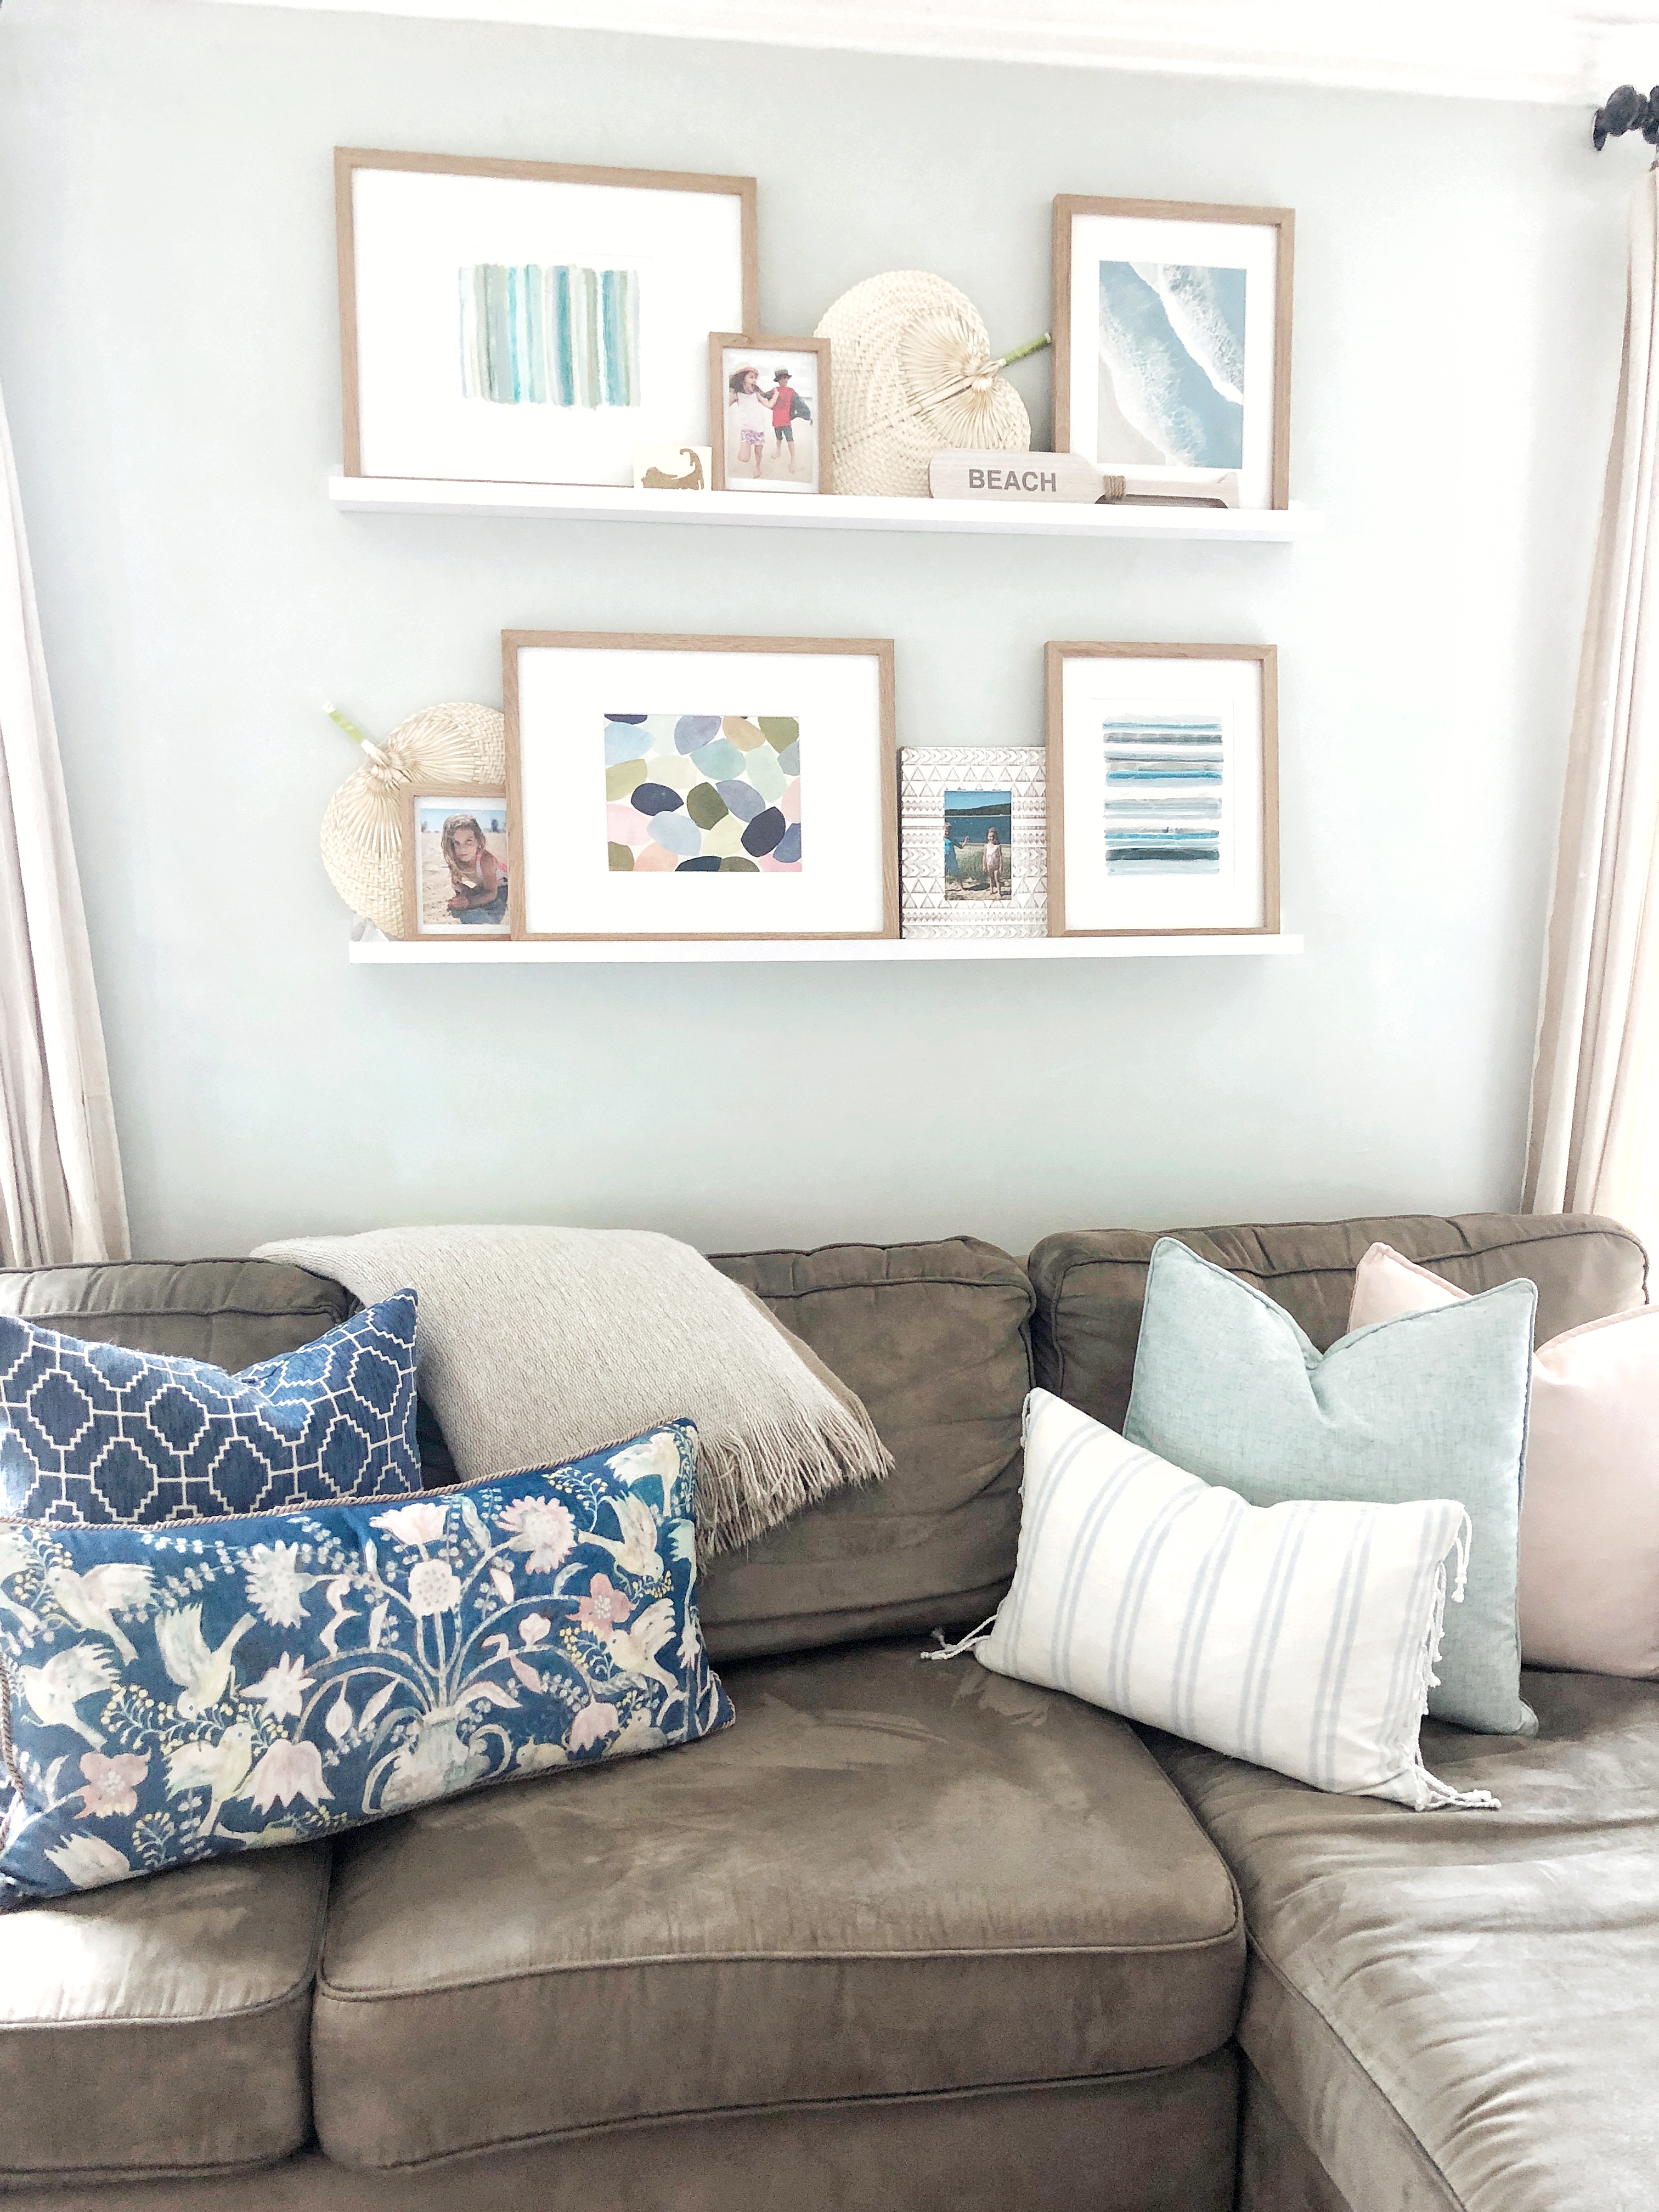
The two stripe paintings are original paintings by local artist Carolyn Mackin. They are part of her series called “Cape Cod Stripes” of which I’m a huge fan of and I was so excited to get two 8×10’s in these blue color schemes. The other two paintings I will link at the bottom of this post. I LOVE how they add movement in the waves as well as the small pebbles or shell shapes that are just so organic and simple plus I love some of the green and pink shades it brings in.
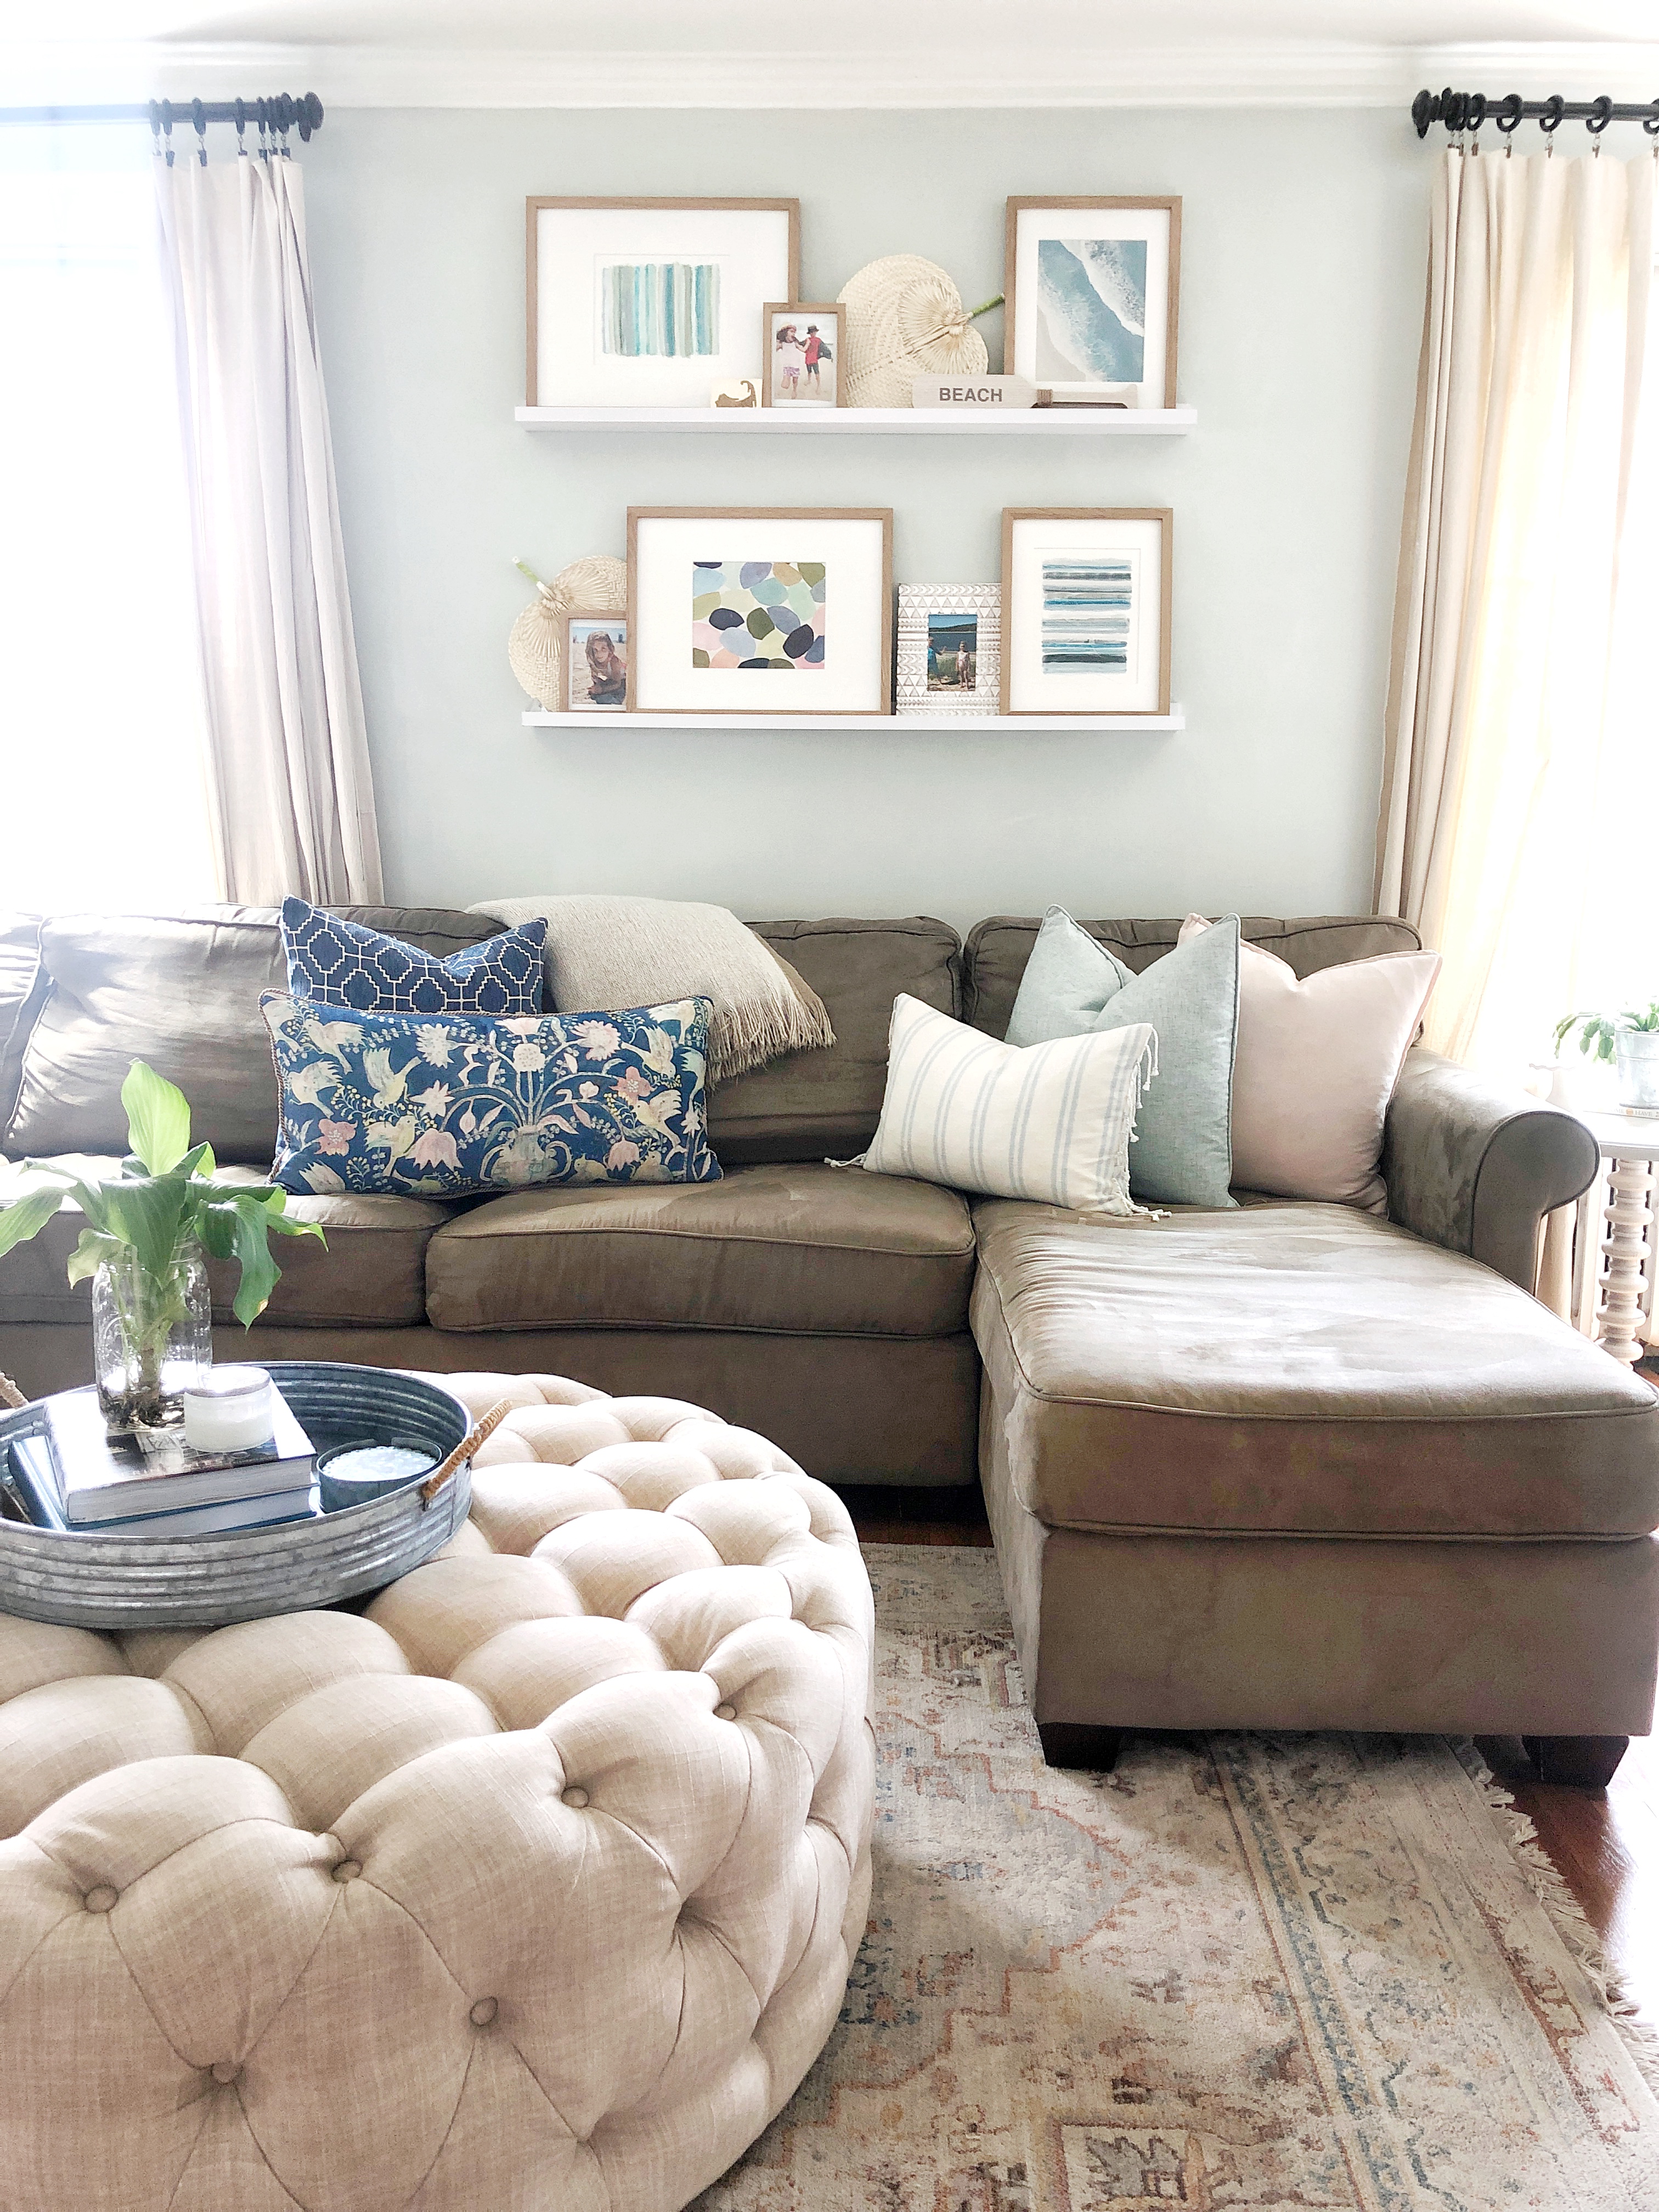
Mixing media is a good idea in your art ledges, or gallery wall whatever you might have! I think bringing in a couple different types of art adds a collected feel and makes it more visually interesting. Here I have two original paintings of which you can see the texture of the brush strokes and then a photograph and a print of a painting.
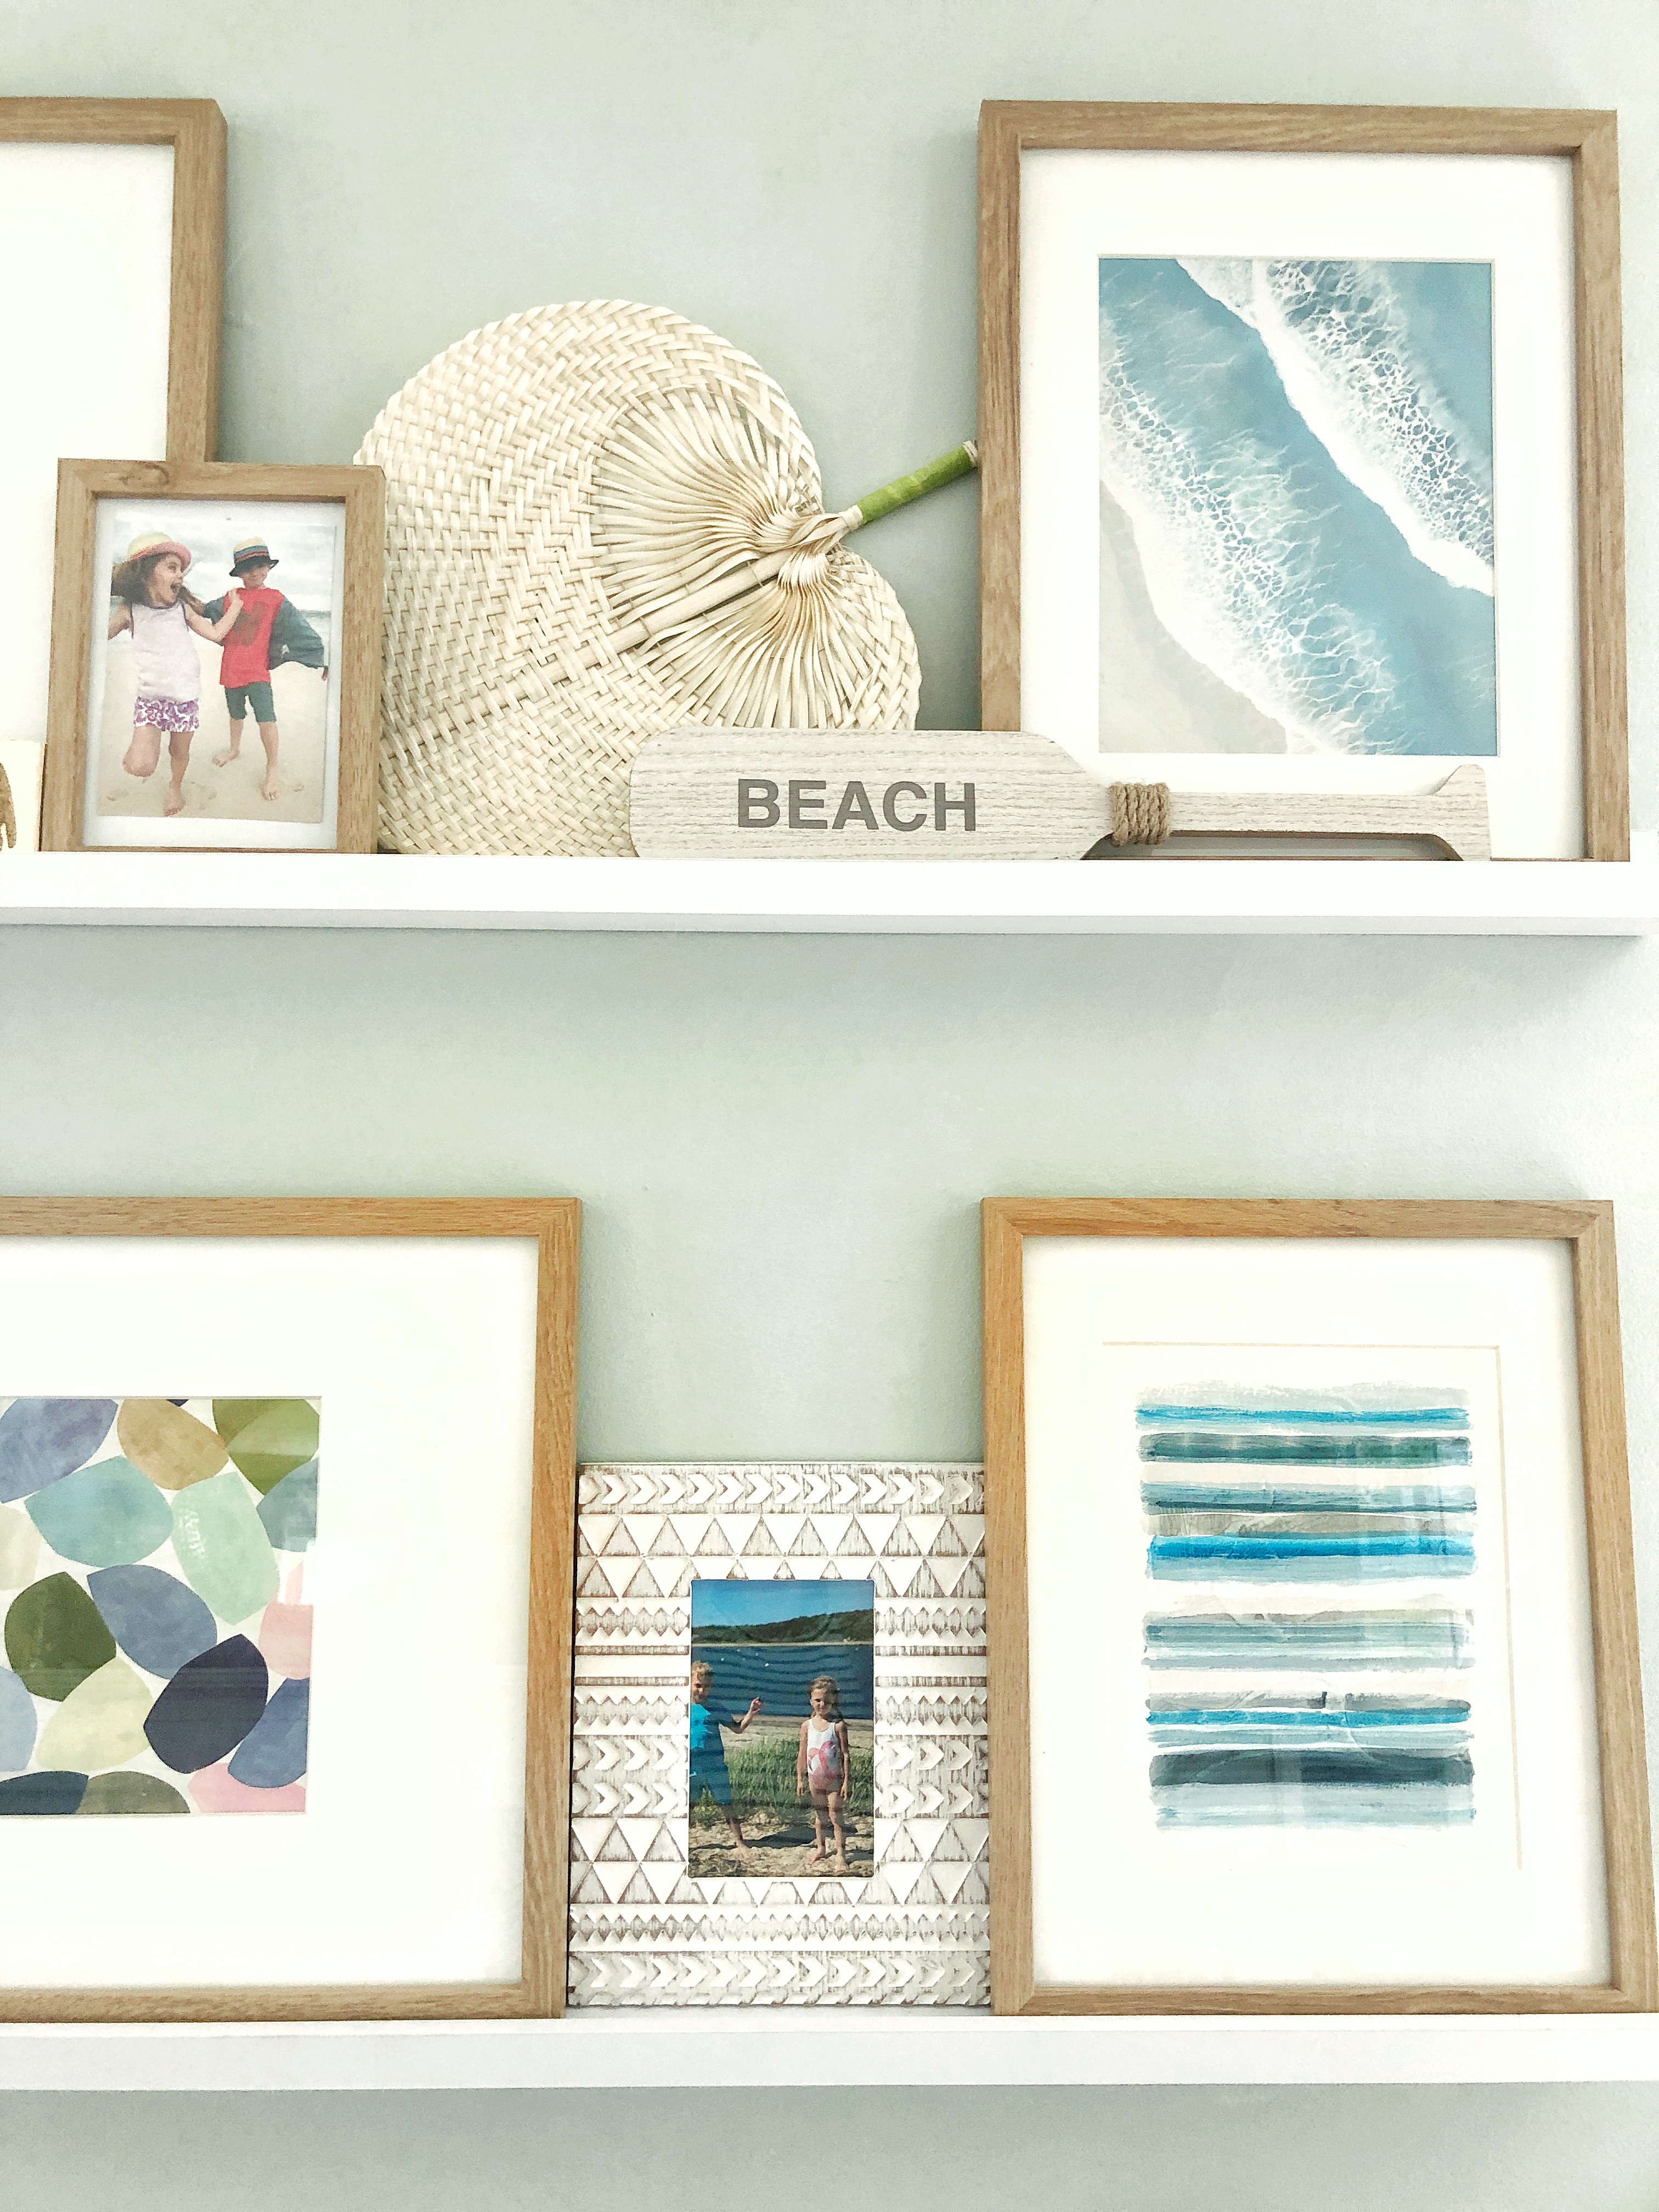
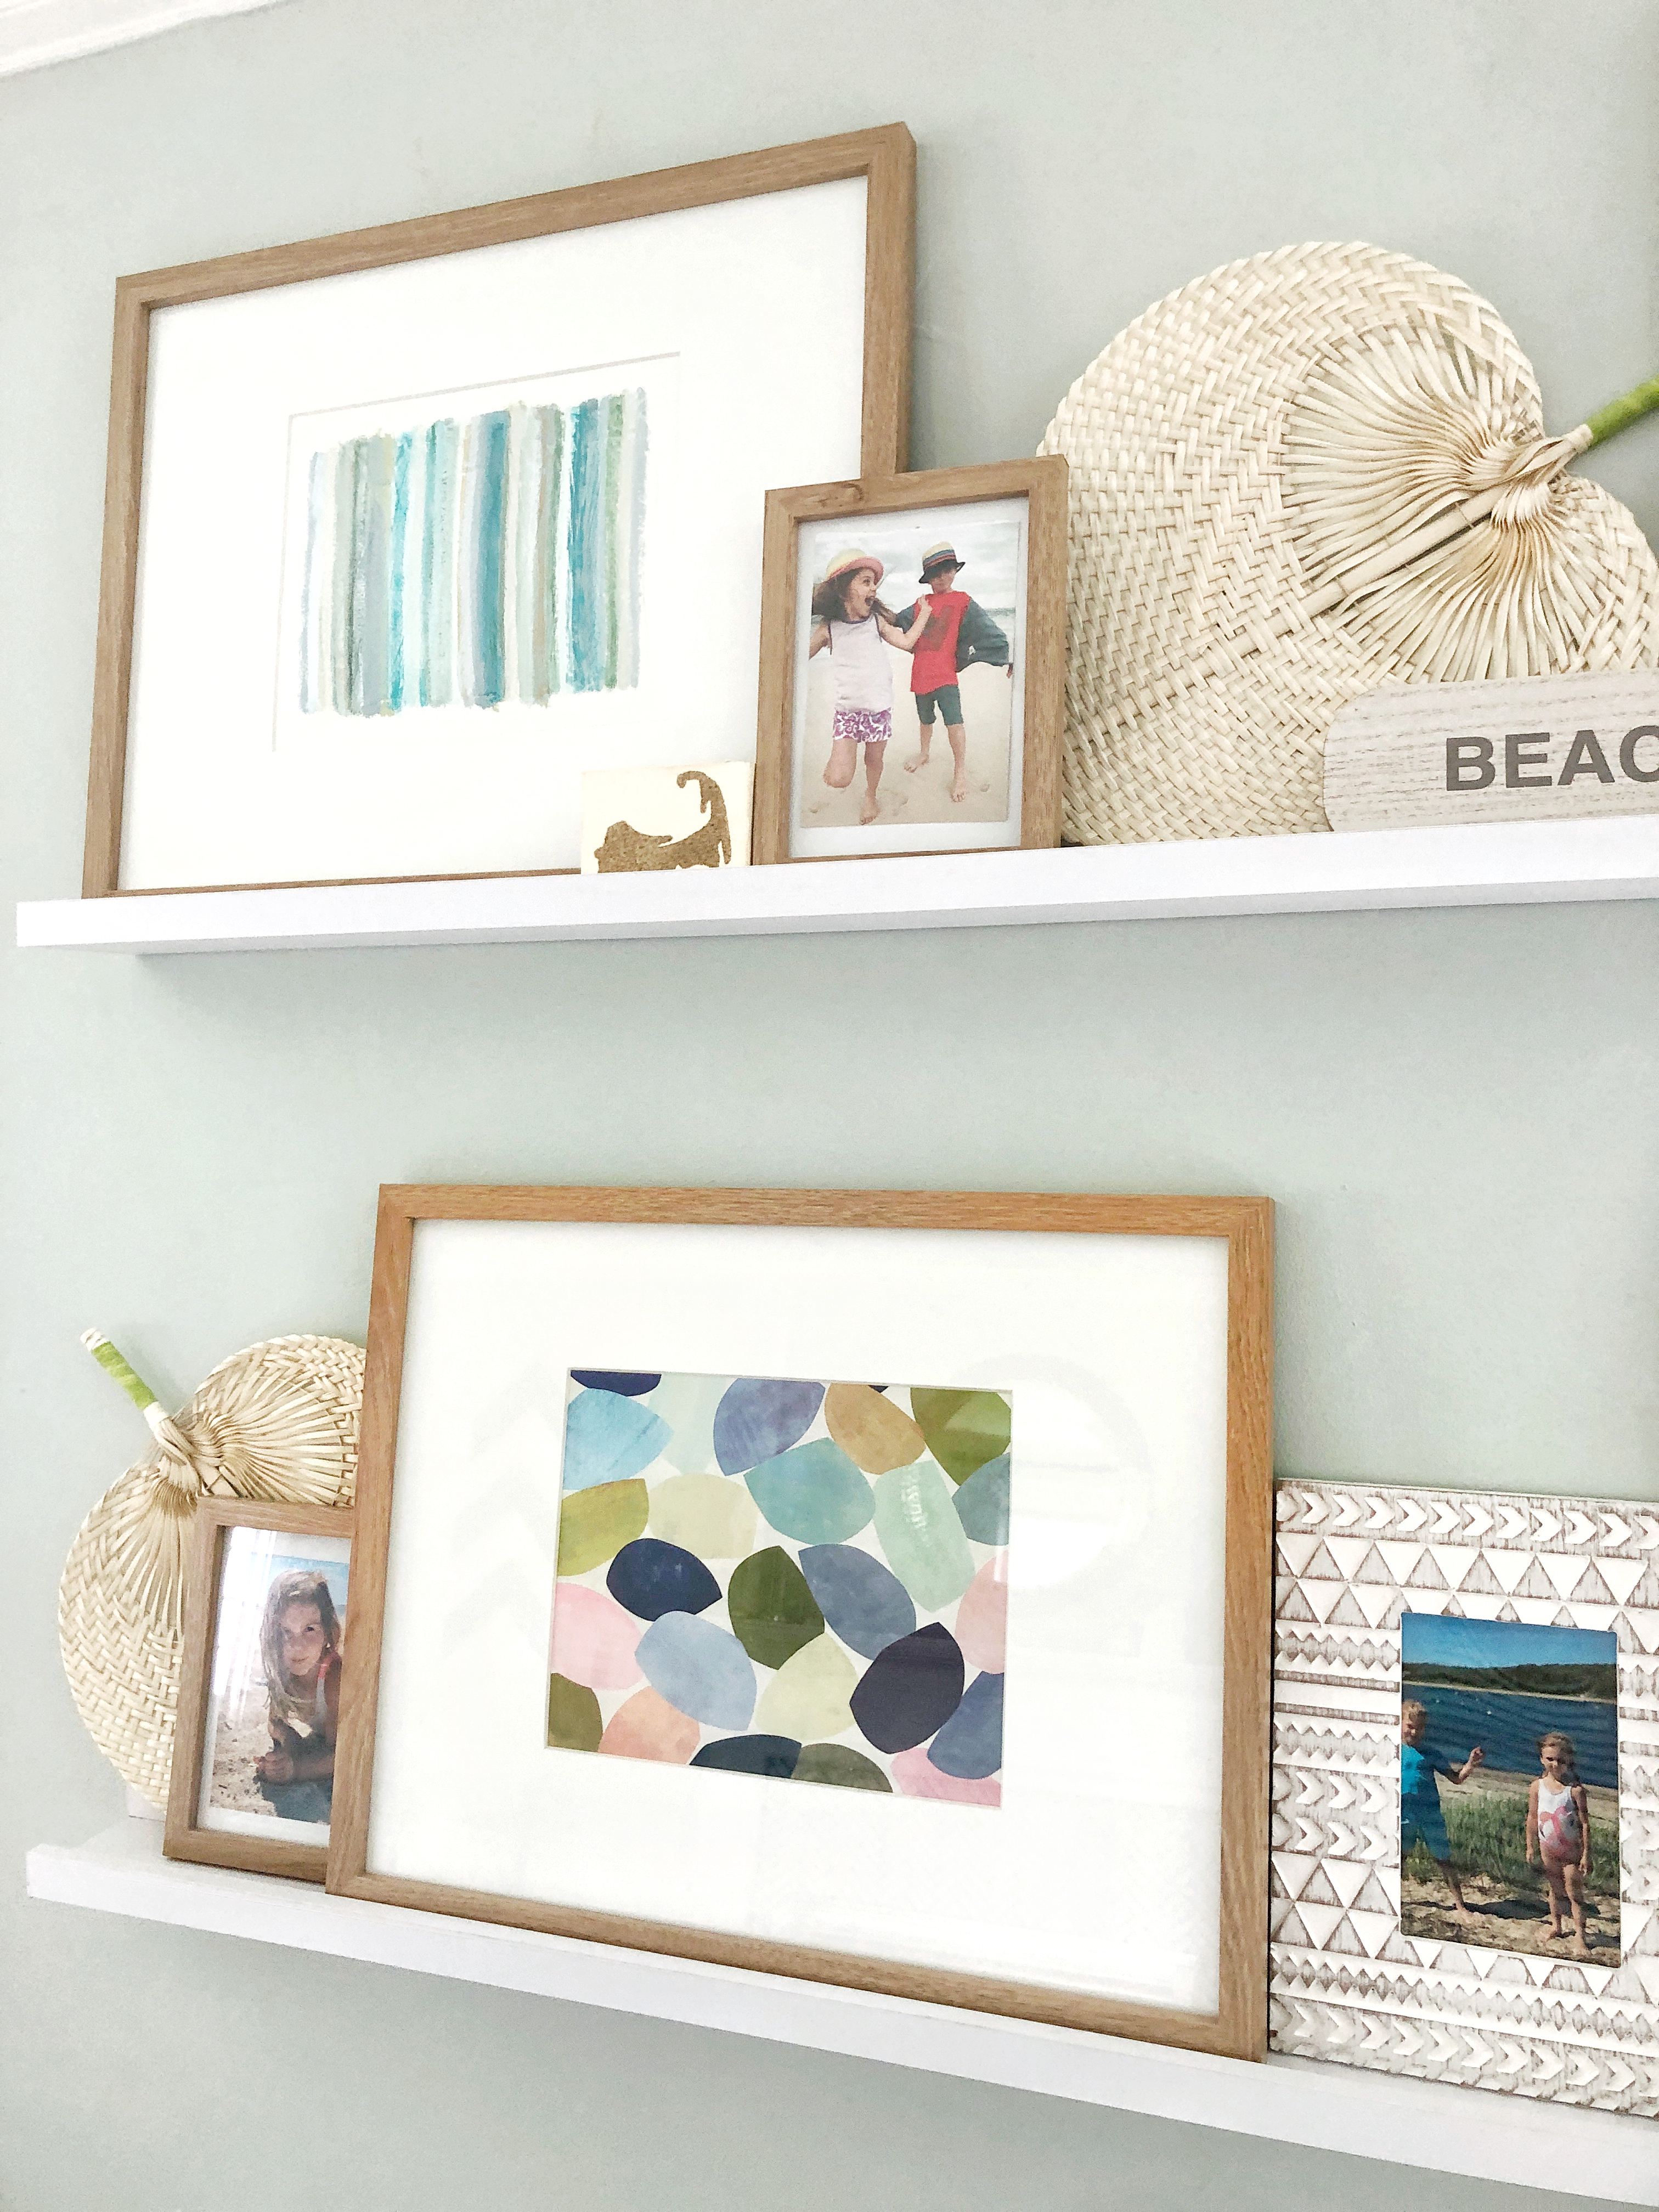
As you can see I also mixed in some objects that I found at the Target Dollar spot, these woven fans break up the rectangular shapes and bring in another beach-y texture. This adorable “beach’ paddle also adds another layer of interest on the shelves. The small Cape Cod canvas is made with real sand by my friend over at www.tahlulastreasures.com

I hope you enjoyed seeing my ledges all styled for summer.
Thanks for stopping by!
Jordan
Shop My Favorite Affordable Summer Art:
Pin For Later:
read the full post >
It feels like an eternity ago that I was a Teacher. I always wanted to become either an Interior Designer or an Art Teacher. I taught art for almost 10 years before staying home with my own two littles. It’s crazy to me that now, in my own JorDecor way, I’m pursuing my other passion and sharing that pursuit with all of you. Art and creativity will always be at my core, creating and helping others create whether it be something you hang on your walls or the cozy look of a space itself. Creation comes in many forms, it is about releasing an expression, emotion, idea or vision. Teaching elementary art was one of the most fun jobs. I loved the amazement on kids faces when I taught them a new technique or introduced them to an artist or material they never heard of before.
As my own kids school year is now coming to an end I’m feeling nostalgic to all those end of year feels on the other end of it, as a a teacher. I can related to how much those teachers are SOOOO ready for a break. I also recall how exhausting it was, how the children become like your own. You care for them, help them not only in subject matter but teach them about social skills, manners, kindness, acceptance and so many other valuable things on a daily. I recall by the end of the year being drained; mentally, physically and emotionally. Summer is the time when teachers restore themselves, renew their spark for education and regain the energy to do it all again the next year.
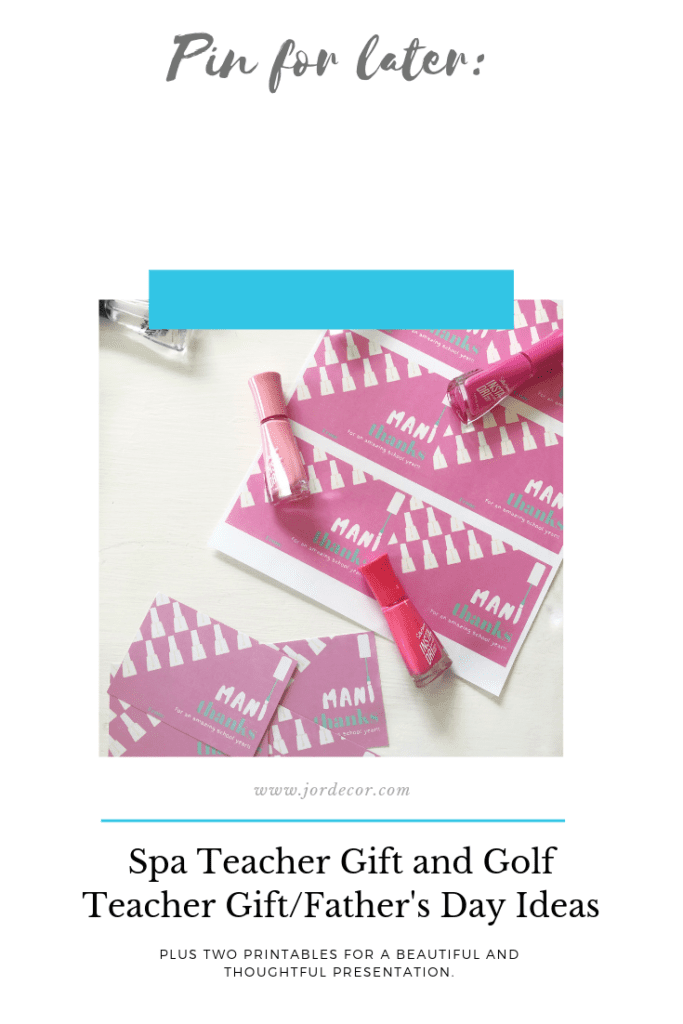
So this is why I have such an appreciation for my kids teachers and all teachers. At the end of the year I try to make a little something special as a “Thank You” and as a “go enjoy your time off” because let’s face it, they’ve earned it. This year I wanted to create a little pampering kind of gift. One of my favorite gifts from a student was a simple manicure gift card (and the inspiration for this years) I remember using it right after school on that last day of classes and treating myself. It was the perfect start to summer. Back in my Art Teachers days I never got my nails done because they were always covered in paint, sharpie or clay. It was such a thoughtful and kind gift to receive.
The second gift idea is for the male teachers but it also doubles as a Father’s Day Gift too! I’m also going to include the cards that I made so you can print your own if you’d like. *read the end to get my tips on printing
SPA TEACHER GIFT IDEA
Click to download and print my cards to attach to your gift.
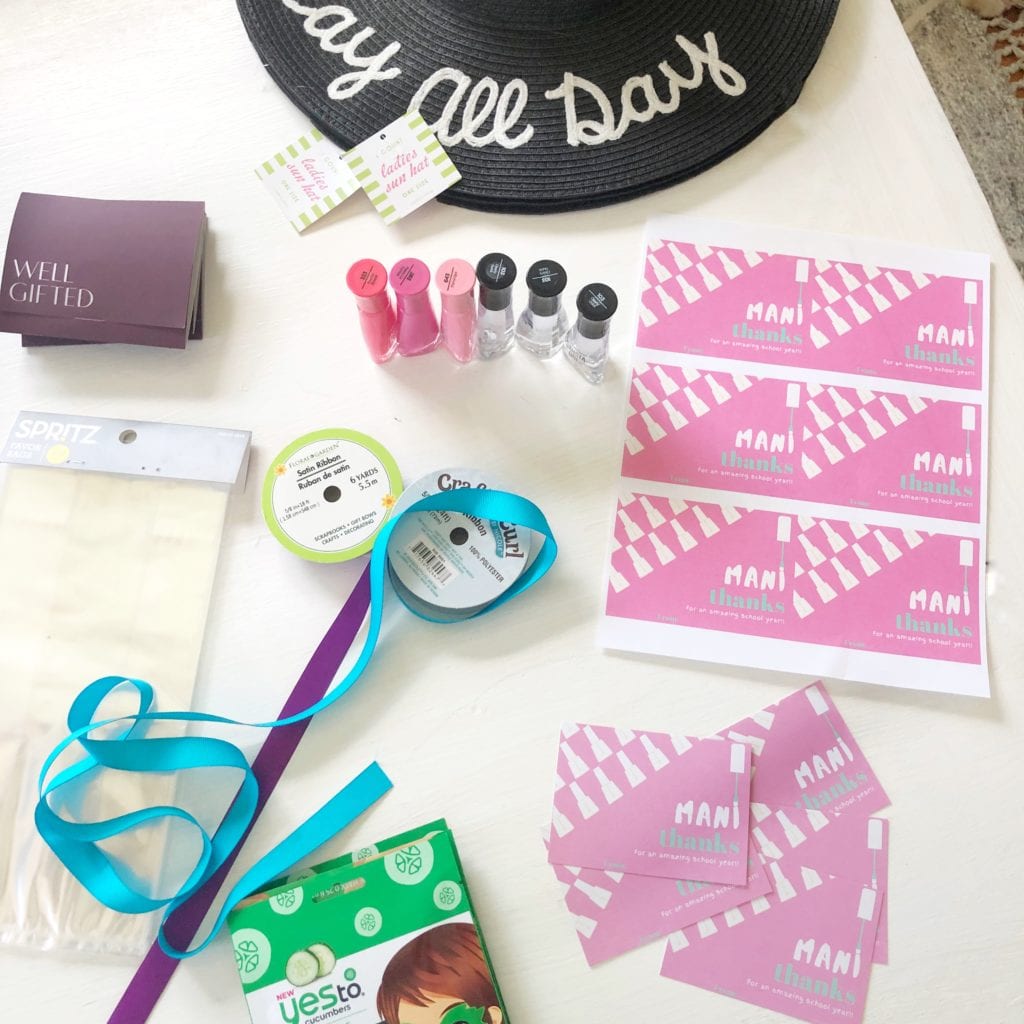

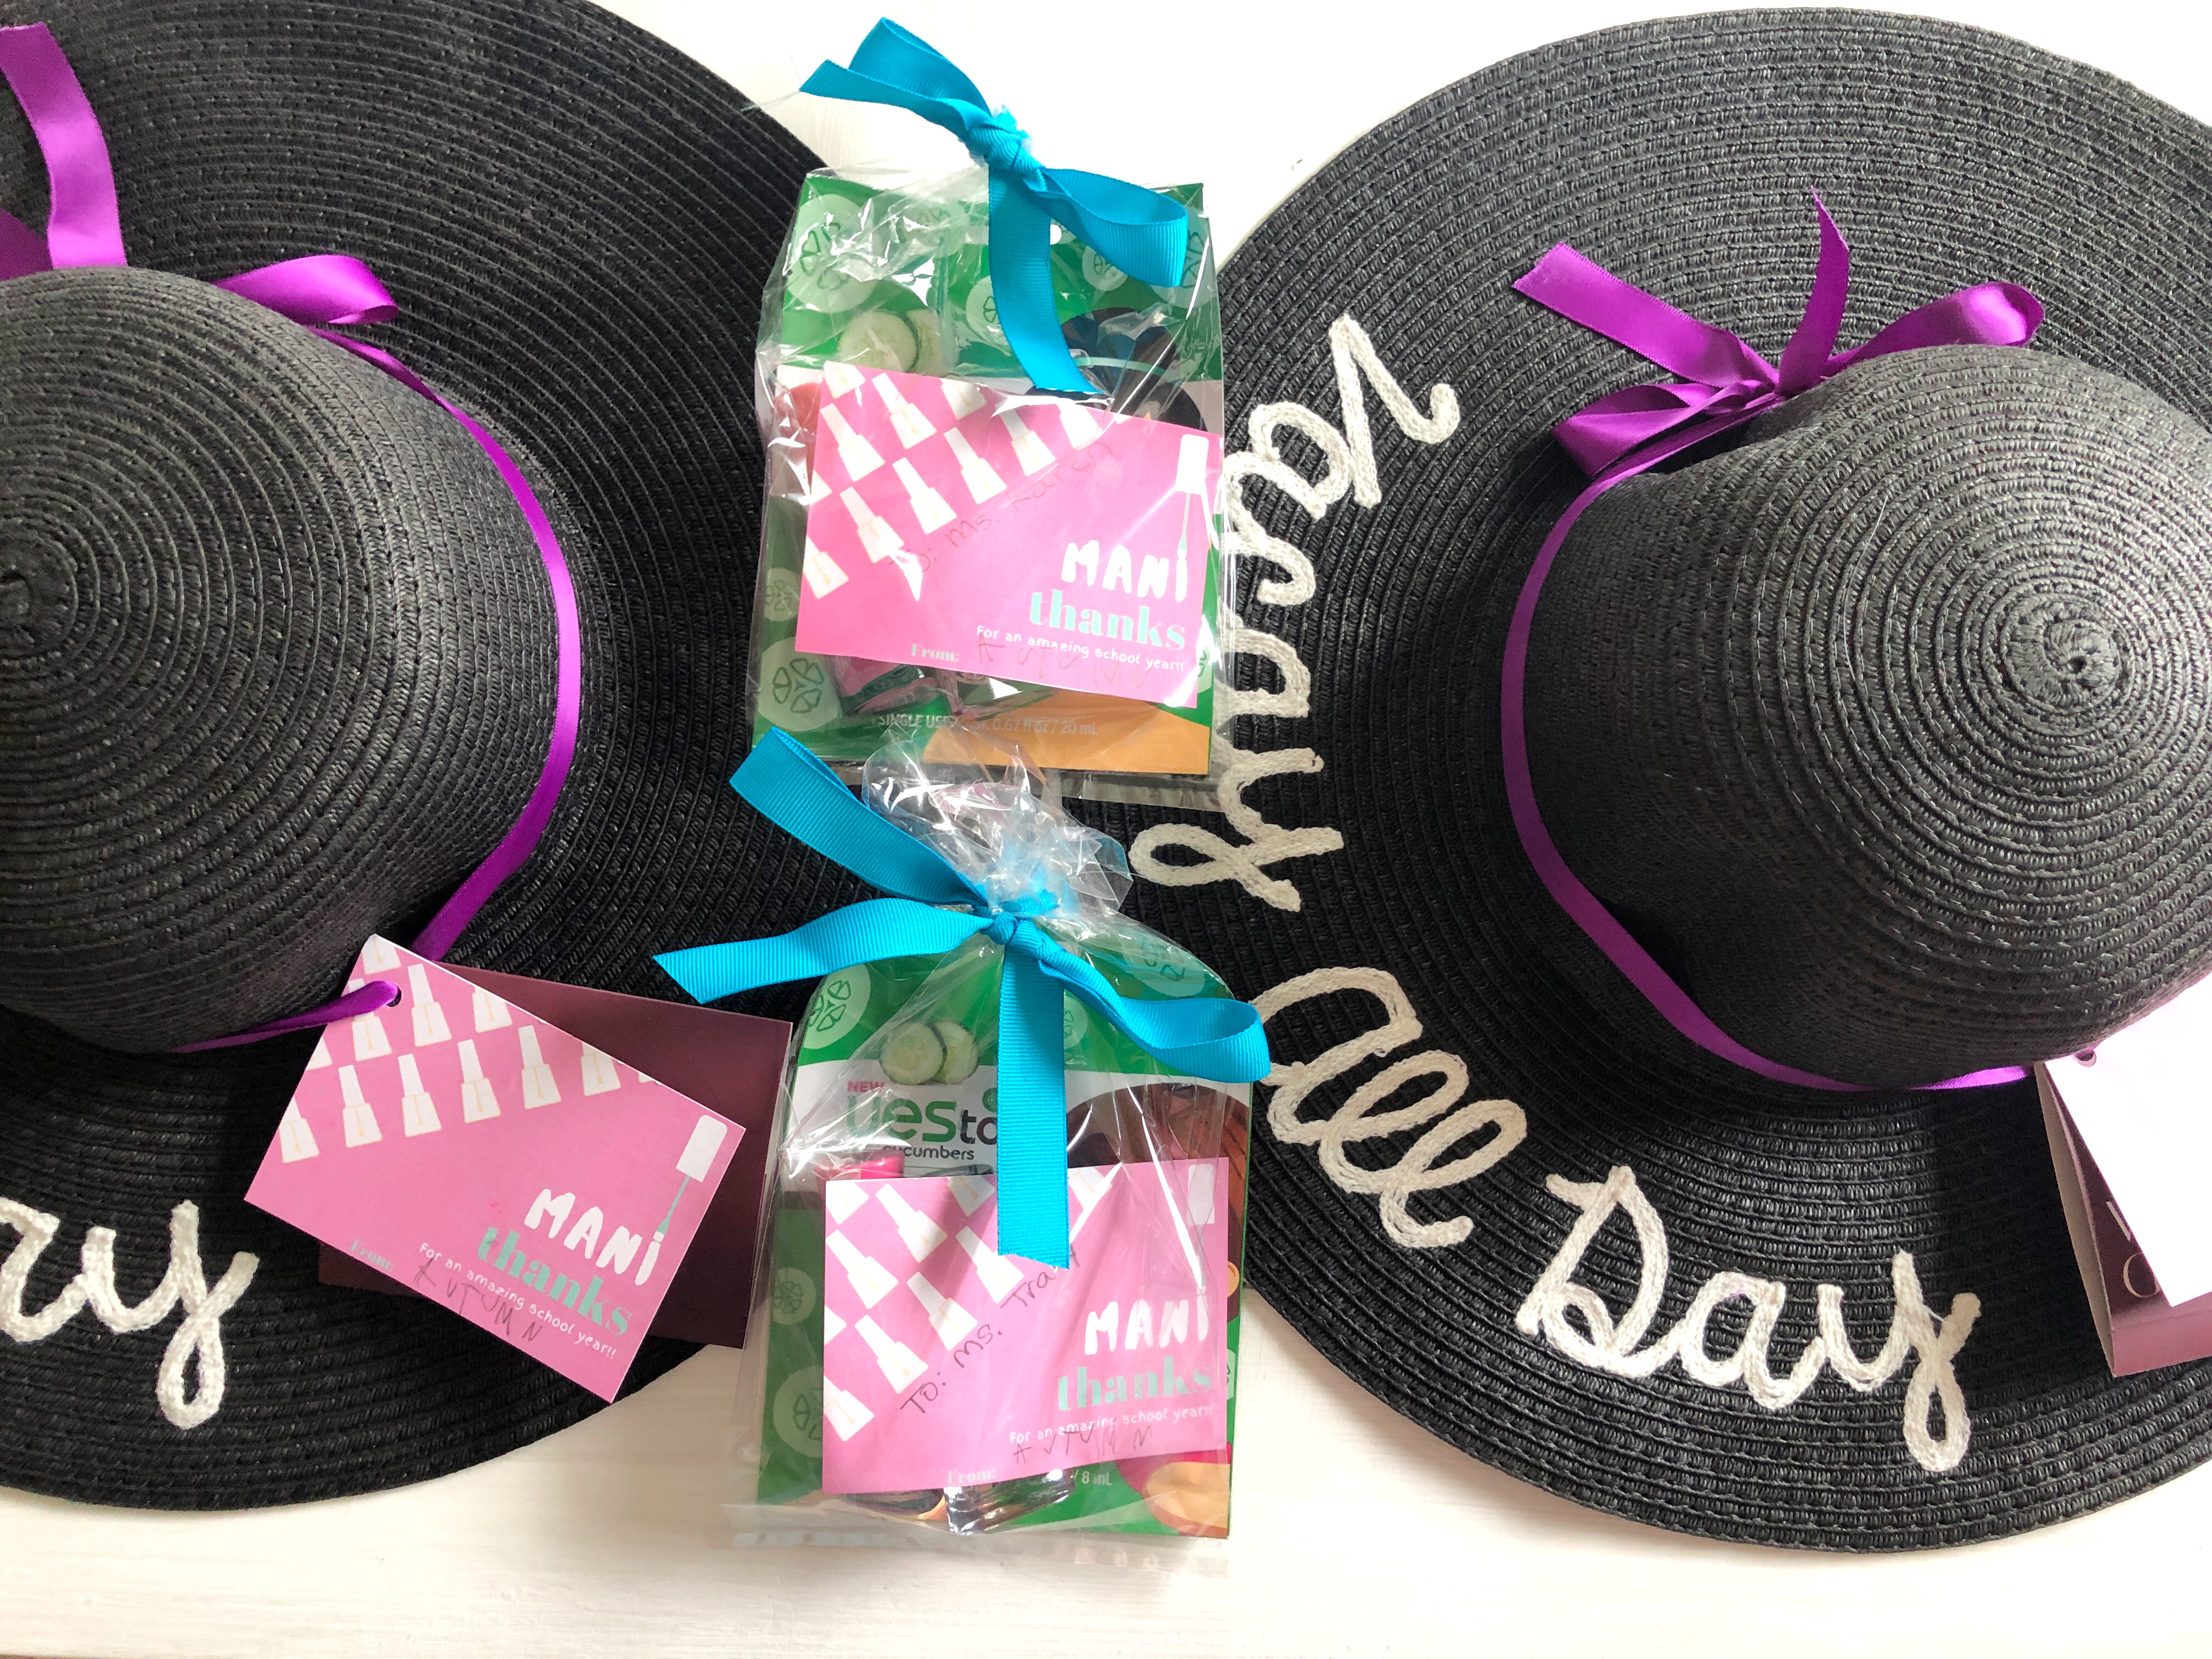
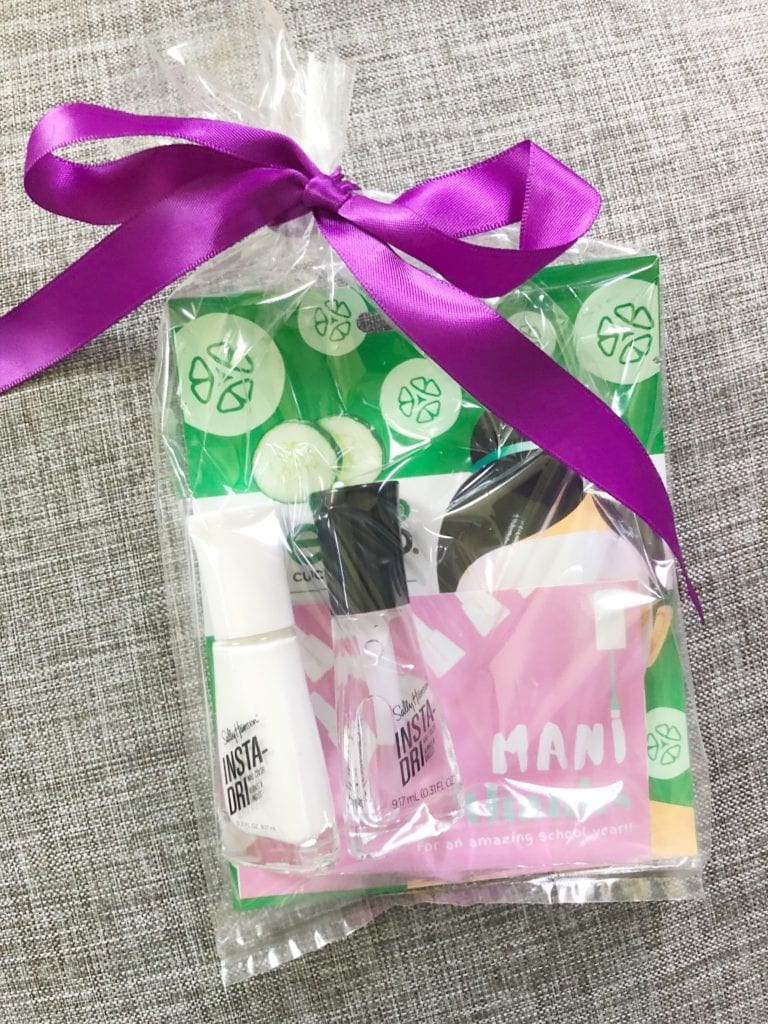
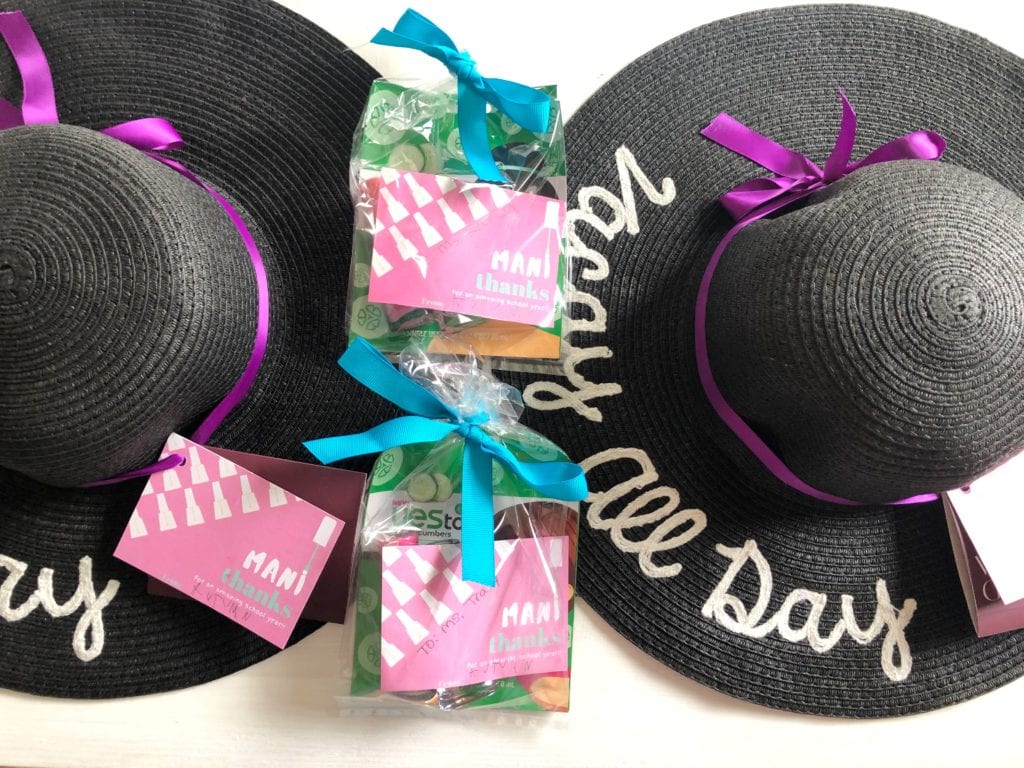
I created these adorable “Mani Thanks” gift cards. For a Teacher Assistant or specialist if you wanted to do a little something and add the tags to a clear mini gift bag with a color polish and a clear top coat and then a little facial treatment- it’s the perfect little thank you. For the Teacher if you wanted to also add a gift card to a local spa that would be amazing any teacher would love a little end of year pampering session. I also found these adorable beach hats that say “Vacay all Day” and then tied the gift card around with the cute “Mani Thanks” around it with ribbon.

GOLF TEACHER GIFT IDEA (OR FATHER’S DAY GIFT)
Click to download and print my cards to attach to your gift.
For the guys how fun is this Golf themed gift card idea. Find a local golf place and grab a gift card to hit balls and add it to this cute little bucket of balls. I grabbed a bag of recycle balls that were a bit more affordable and some t’s.

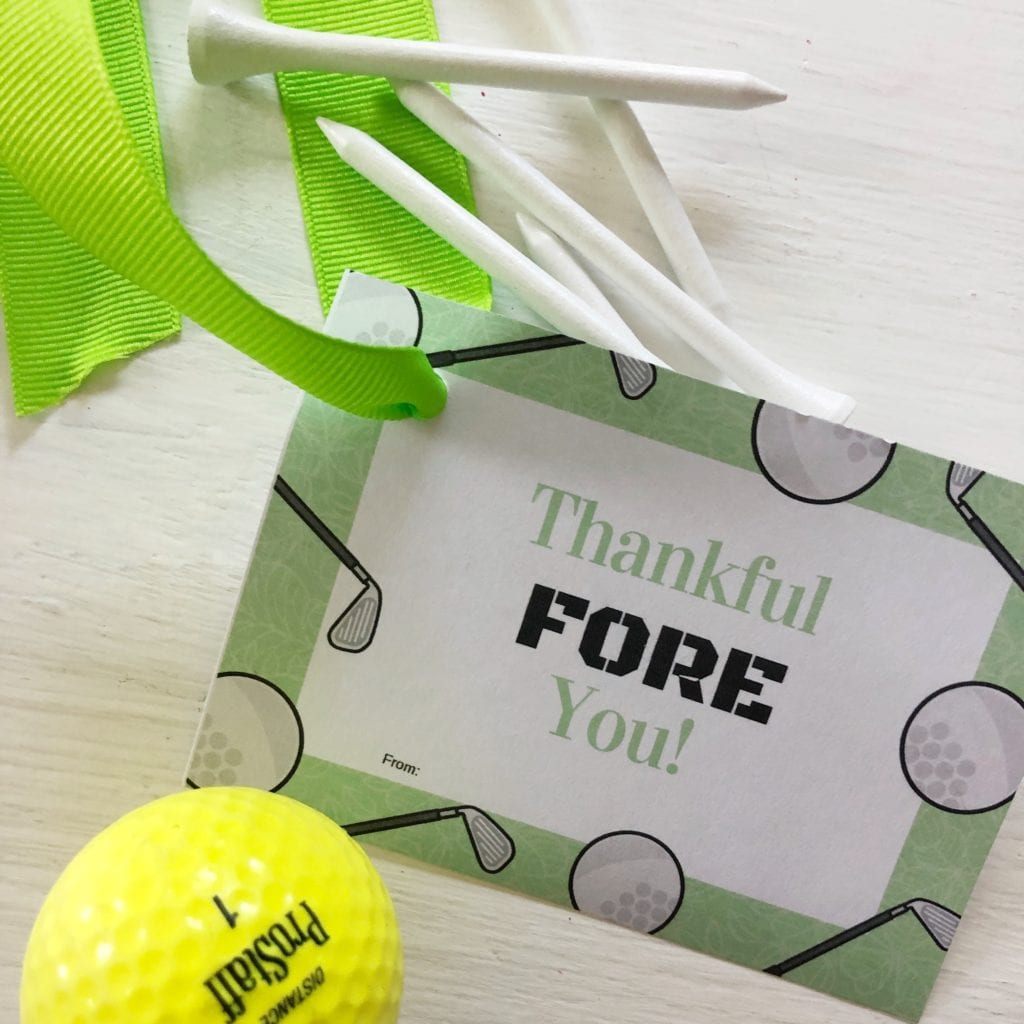

I used the shredded paper to lift the balls up so I didn’t need to use as many. Then put the T’s in the center to hold the gift card in place. But play around with the presentation to create something that works for you.
Recommendation for printing- cardstock paper works best. When you go to print, select 6 copies to a page and it will shrink the photos down to the size you need. If you use these I’d love for you to tag me so I can see how they turned out.
Thank you guys for stopping by and happy almost SUMMER!
Jordan
Shop the Supplies:
read the full post >
I can’t believe Memorial Day Weekend is here and we are just about to kick off summer. We are actually splitting up the weekend between Cape Cod and then back home for some little league baseball and a family BBQ. I’m so happy that BBQ season is officially here. We’ve worked so hard on our outdoor spaces that I’m so ready to finally enjoy them! The last thing on my to do list this week was to get some Red, White and Blue, decor on our front door. I want to enjoy it for awhile before we head back to C.C. for majority of the summer and a lot of my Patriotic decor is at our beach house so I was really just looking for things I already had around the house to bring a little Americana vibes to our front door with out going out and buying a bunch of new stuff.
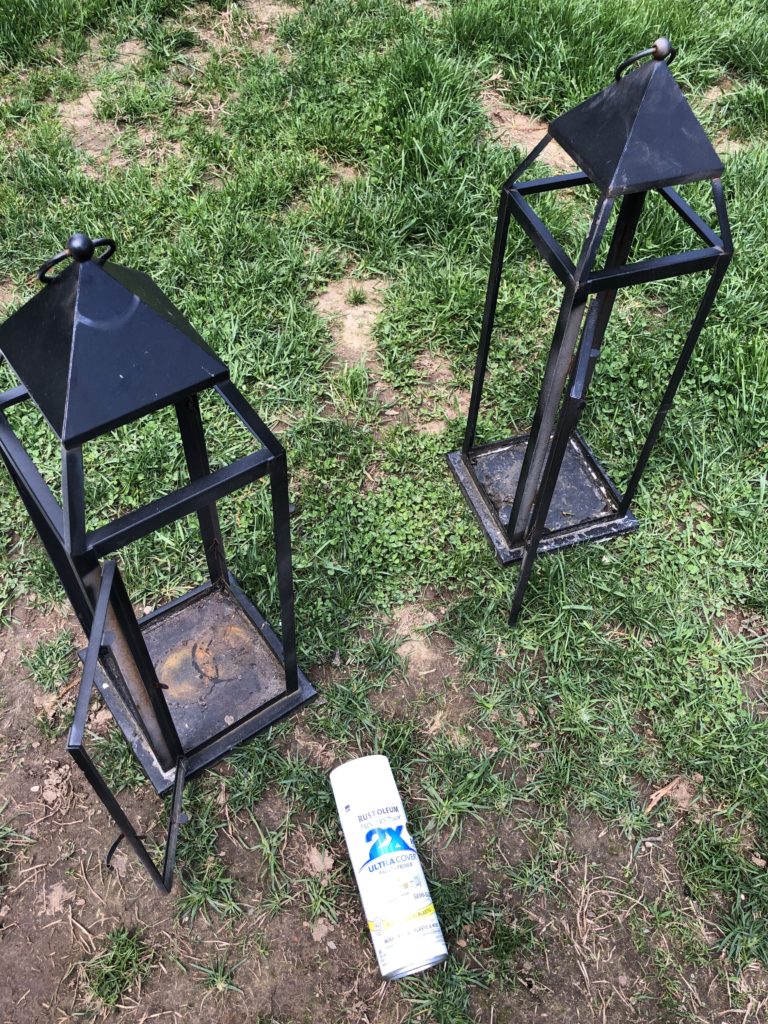
Let’s start with the lanterns. I’ve had THESE lanterns for several years now. They’ve seen it all from rain and lots of snow. They really were starting to look dirty and dingy. I’ve tried to clean them before but there was fading and chipping. So I decided to do my favorite most cost effective tricks- spray paint. Whenever I want to breath new life into something, if I can spray paint it I will. So for the lanterns I just grabbed some white spray paint and gave it a nice clean coat. They look so much better. I also have to admit to you that I don’t ever truly light up my lanterns. They are there for look. Since these are exposed to moisture the batteries always rust and get messy. So I simply leave the lanterns with out batteries. That may seem strange to you but just works for me.
I already had these red planters and I tend to bust them out every summer when I start adding some festive Patriotic decor. I’ve had these for years, however it’s as simple as taking a large cheap plastic planter and spray painting it red and like that you have super inexpensive and easy patriotic decor. I wish I could tell you the name of the plant I put in them. I was in such a rush, I was looking for something full and with white petals and this was the best I could find at Lowes. I also grabbed this large red flowered plant which I was so excited to bring in that natural red color.
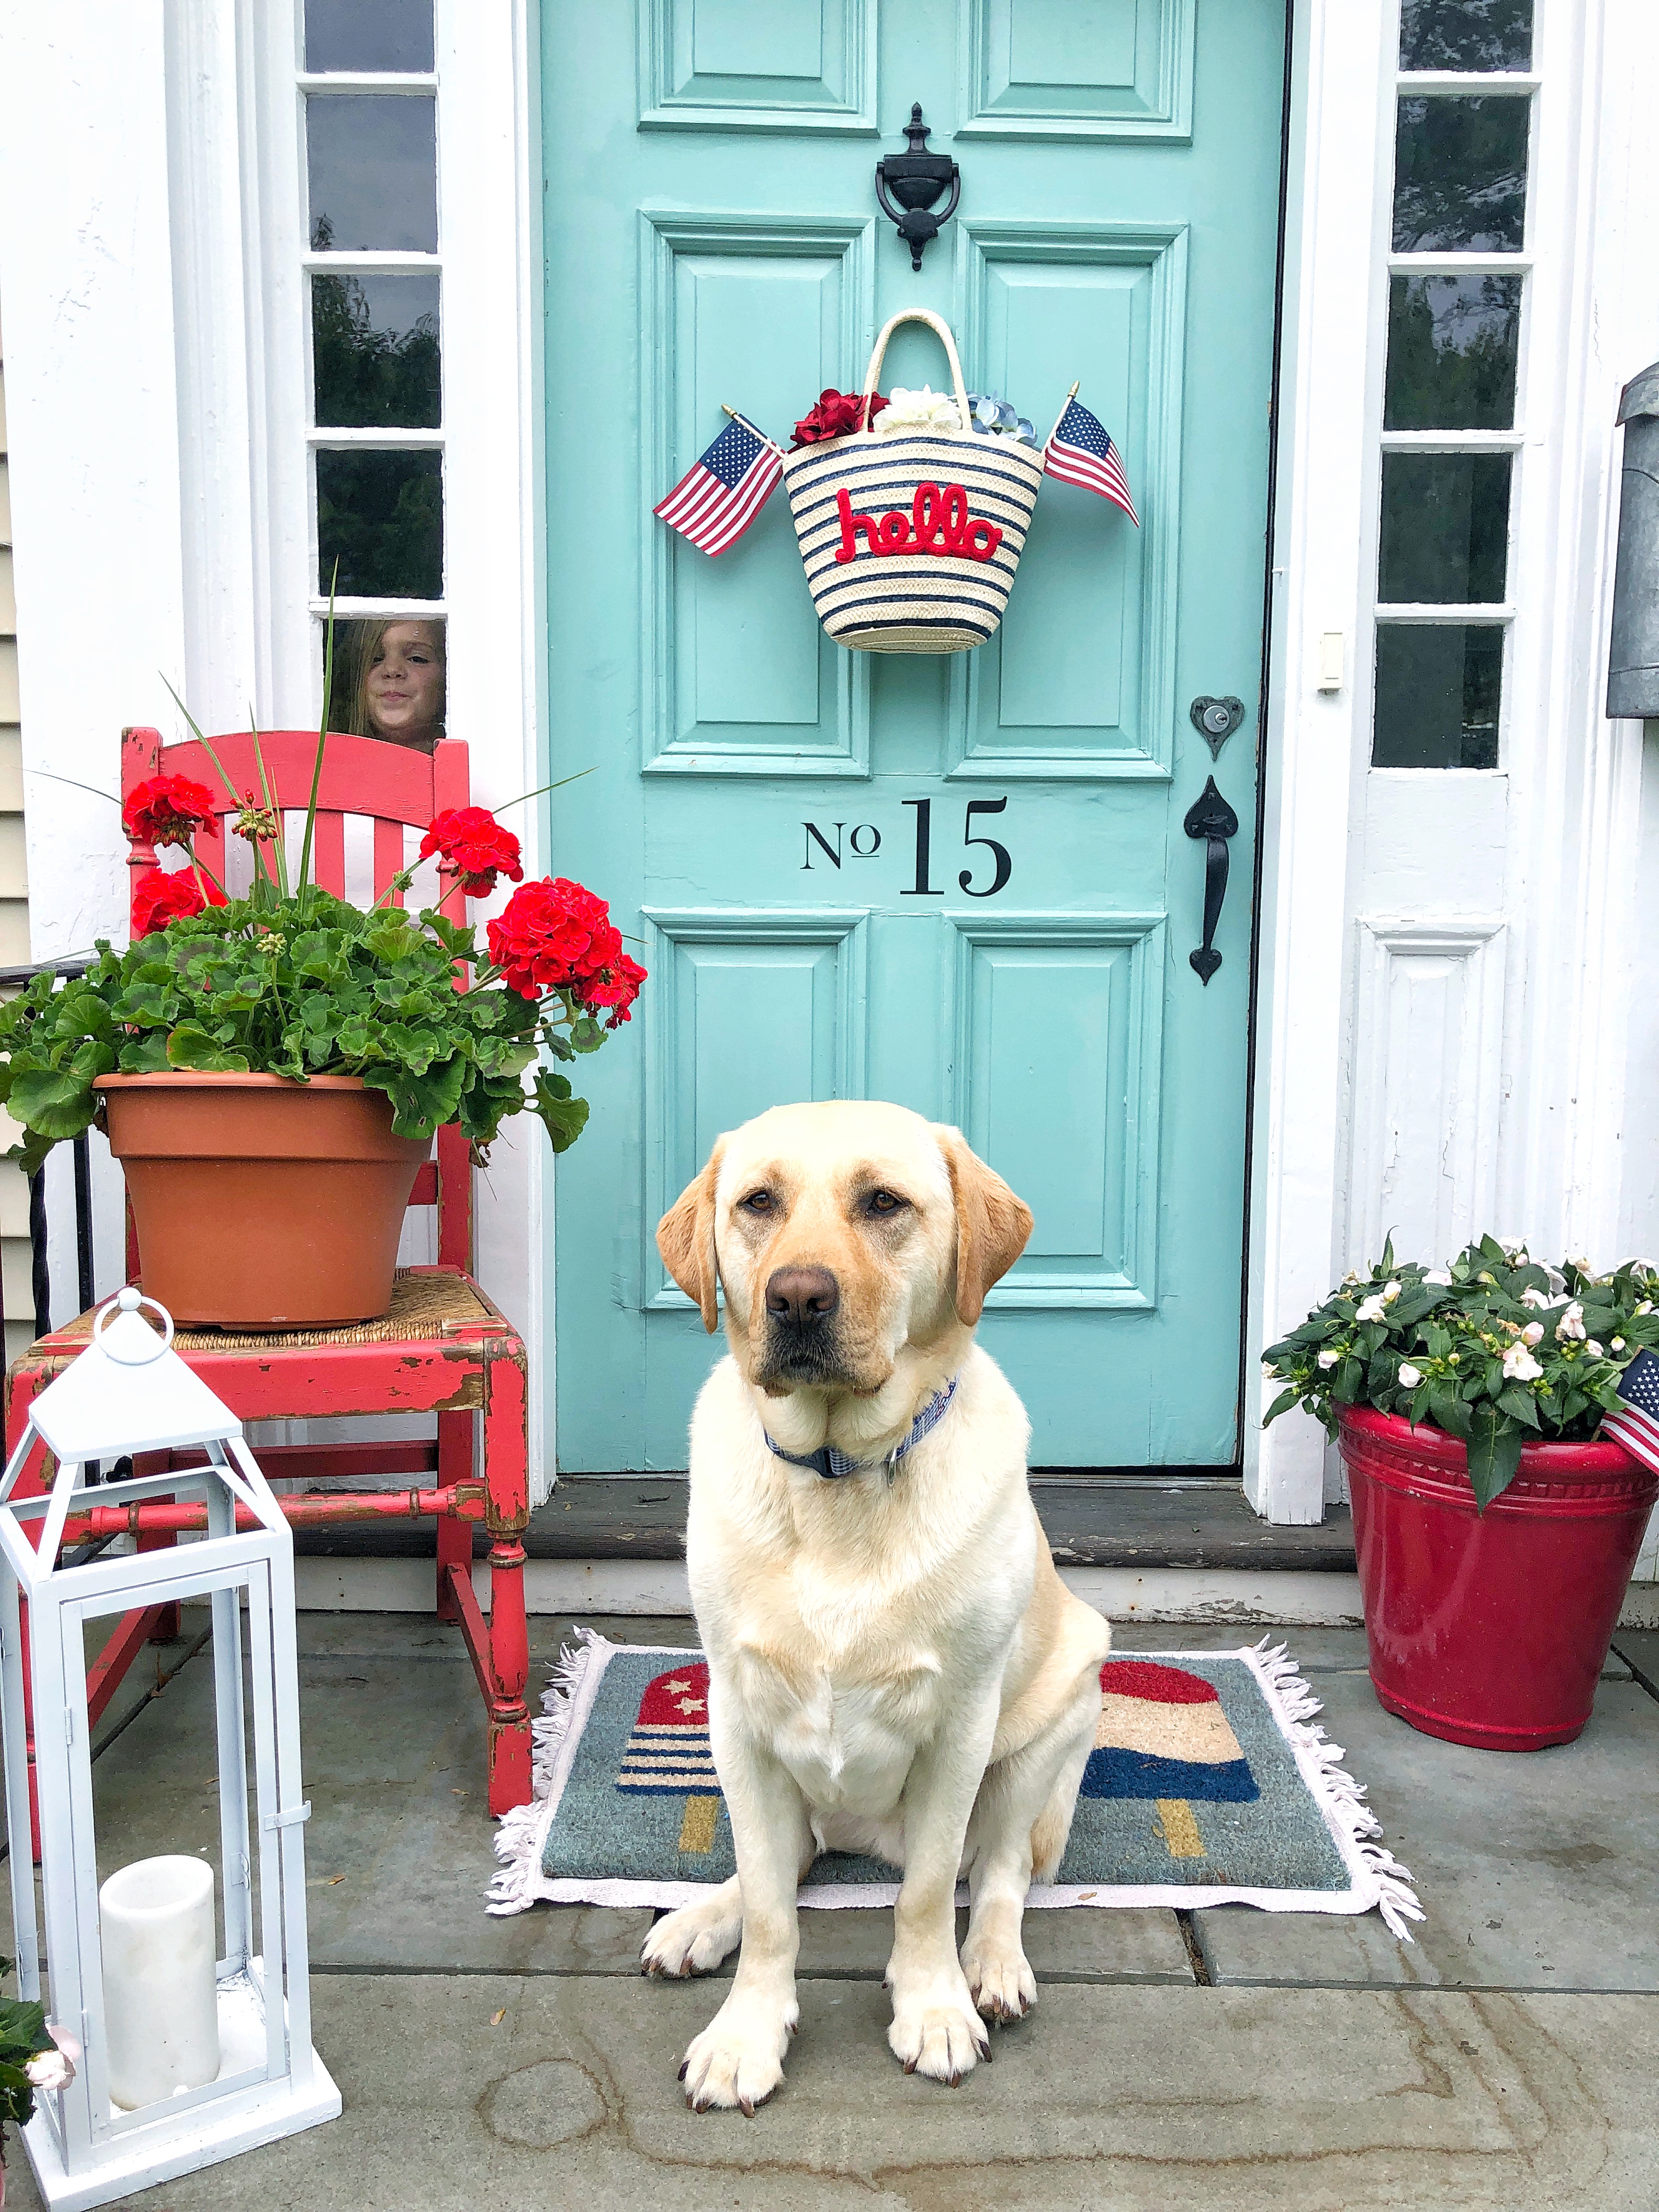
If you ever see an old chair on the side of the road, or at a local thrift store, grab it! I chalked paint this one red, after a few seasons outside its weathered to this rustic chippy garden stool. My front steps need such a good cleaning. I think we need to get the pressure washer out. Always something else to do right guys?!
TIP 1: I love to add height on either side of the door it makes the entrance feel more grand. Chairs/ stools add height to plants. Or grab a potted tree of some kind to flank either side of your door.
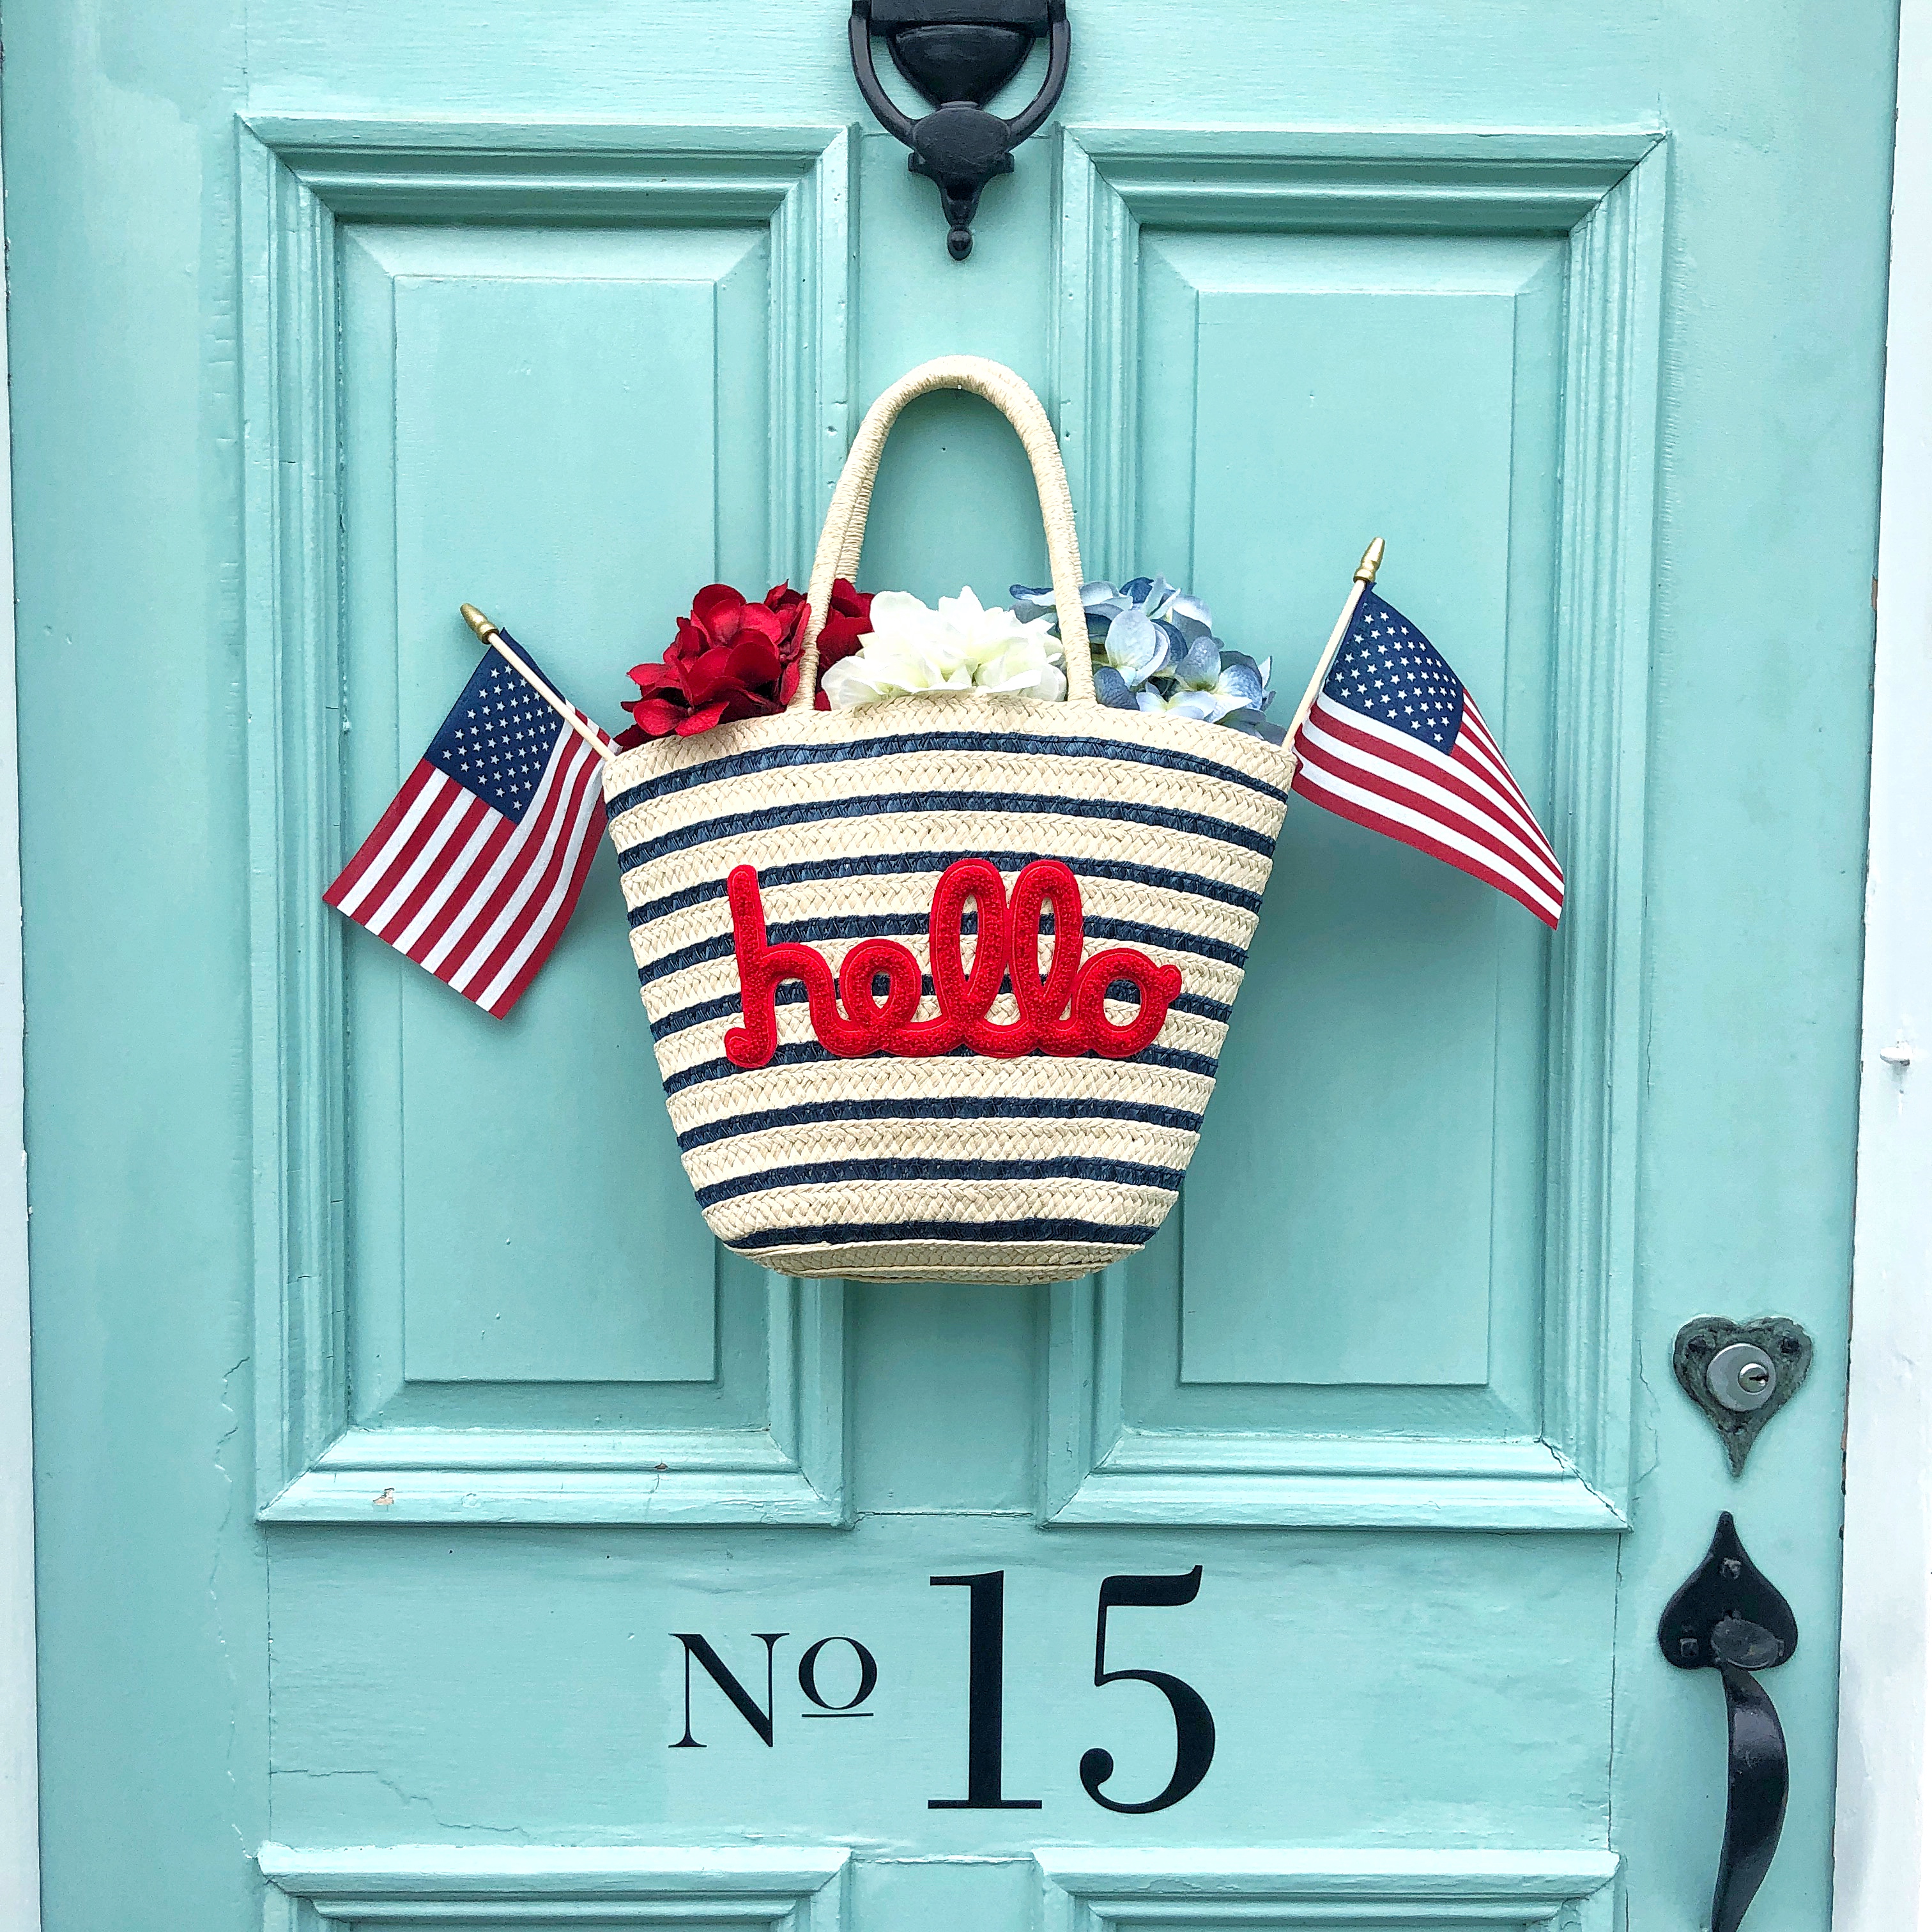
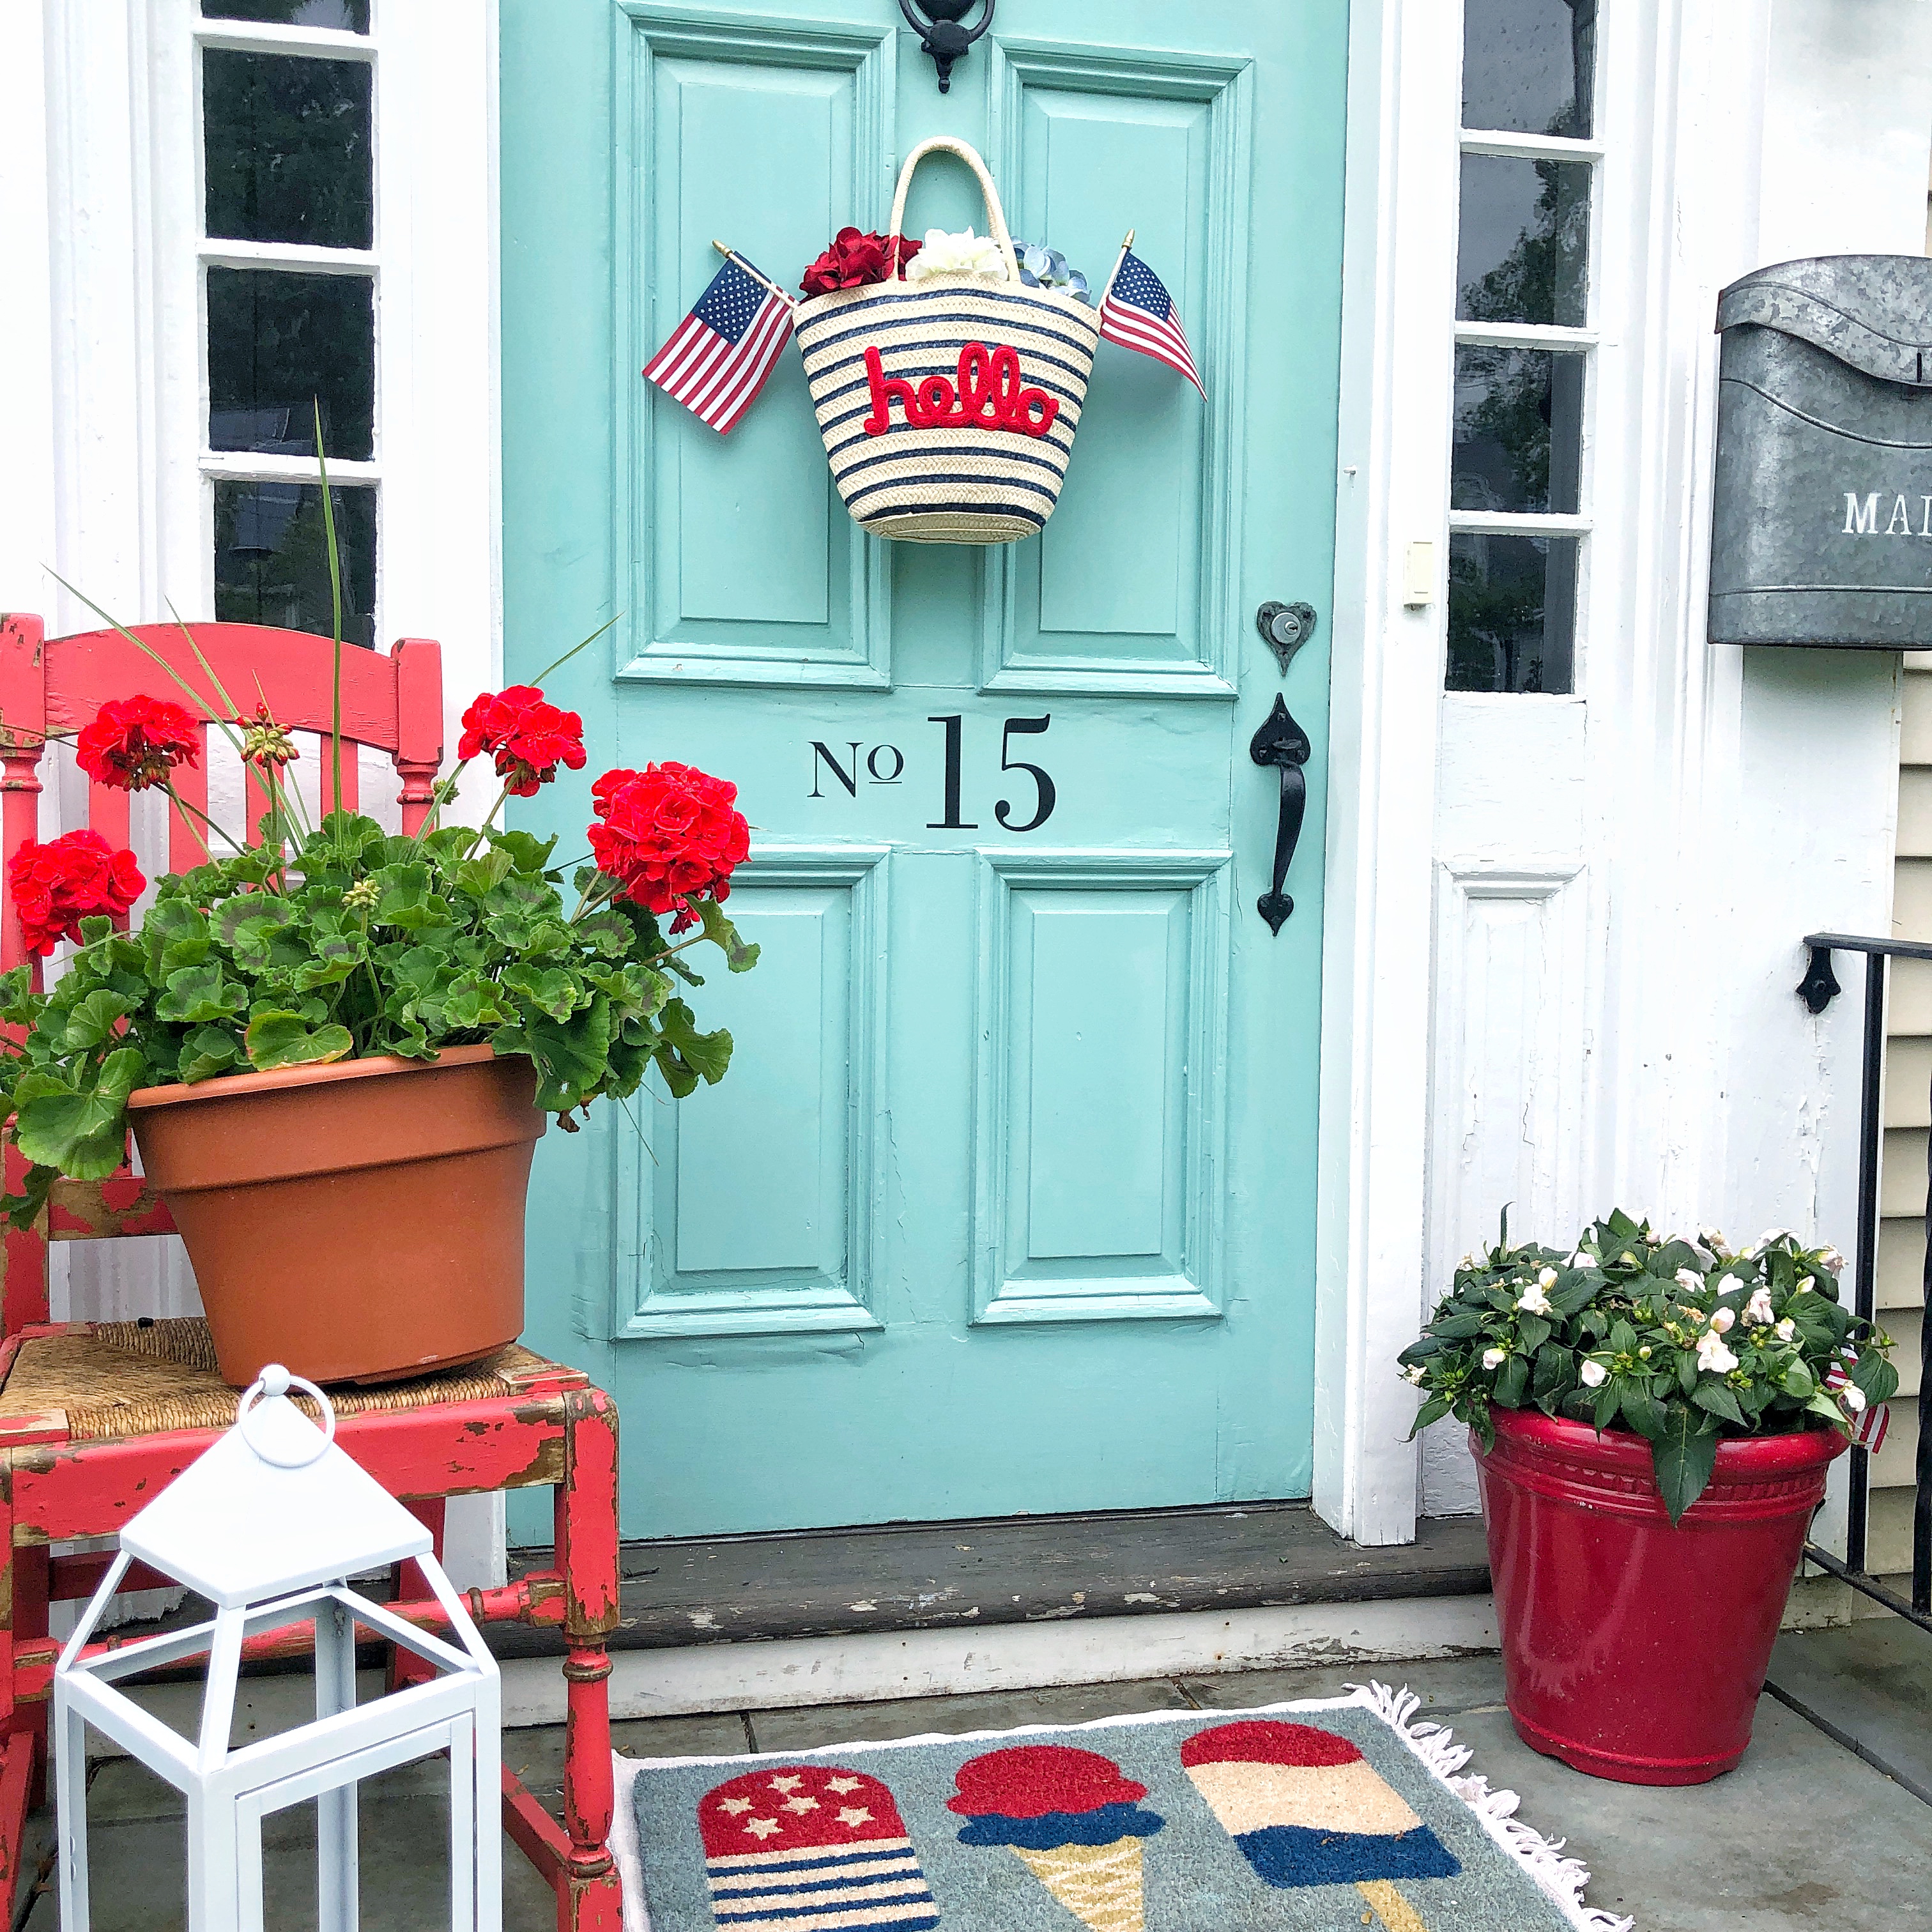
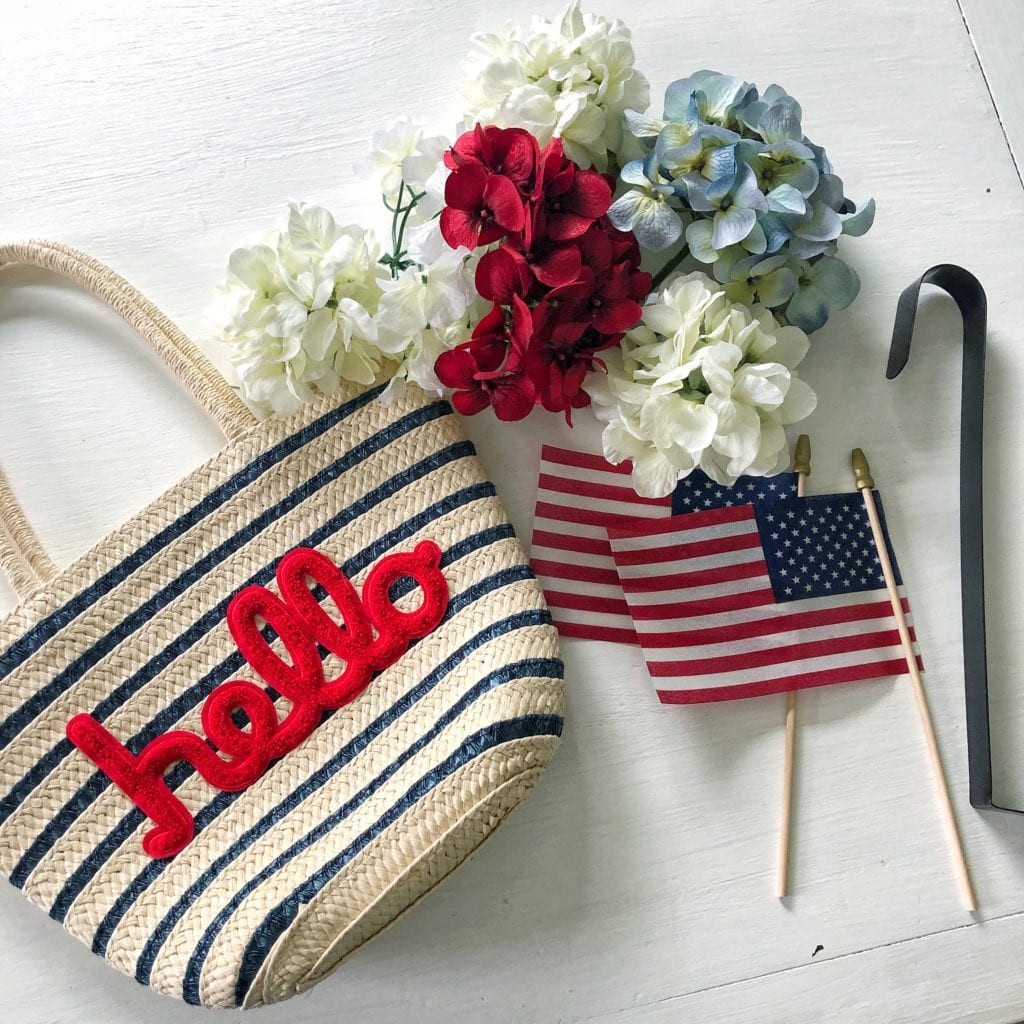
I purchased this adorable straw tote months ago with intent to use it or give it to Autumn to use, because I loved the classic colors and “hello”. However I couldn’t find a wreath I was really into and I love trying out different things for my decor, reusing something for a different purpose is always my favorite thing to do. I love how it looks with some simple faux hydrangea and two small flags on either side. I used some bags to fill out the bottom and make it look really full. I just added mine to a small nail we already had on the door so its centered. I tried adding to a wreath hook but it looked to bulky. Our door has seen a lot of abuse over the years with out a storm door that, it’s probably time to replace soon. So a tiny nail hole doesn’t really bother me too much.

TIP 2: Bring in colors of the season through plants, a wreath and maybe one touch of simple decor. Don’t need to go over board.
I found this simple metal star with the flag on it at the grocery store of all places and it was under $5 and I simply rested it to the side of the lantern to bring the colors down in that corner. Hanging it on the door wouldn’t have made enough of an impact but just leaning it against a pot or lantern is a nice extra touch.
TIP 3- Change up your door mat to fit the season, layer a throw rug underneath to add interest.
Tip 4- Create depth in your front door design, by adding decor elements to the first steps and build them back towards the front of the door.
Tip 5- Use a mixture of plants to add a variety textures and visual interest to your front entry.
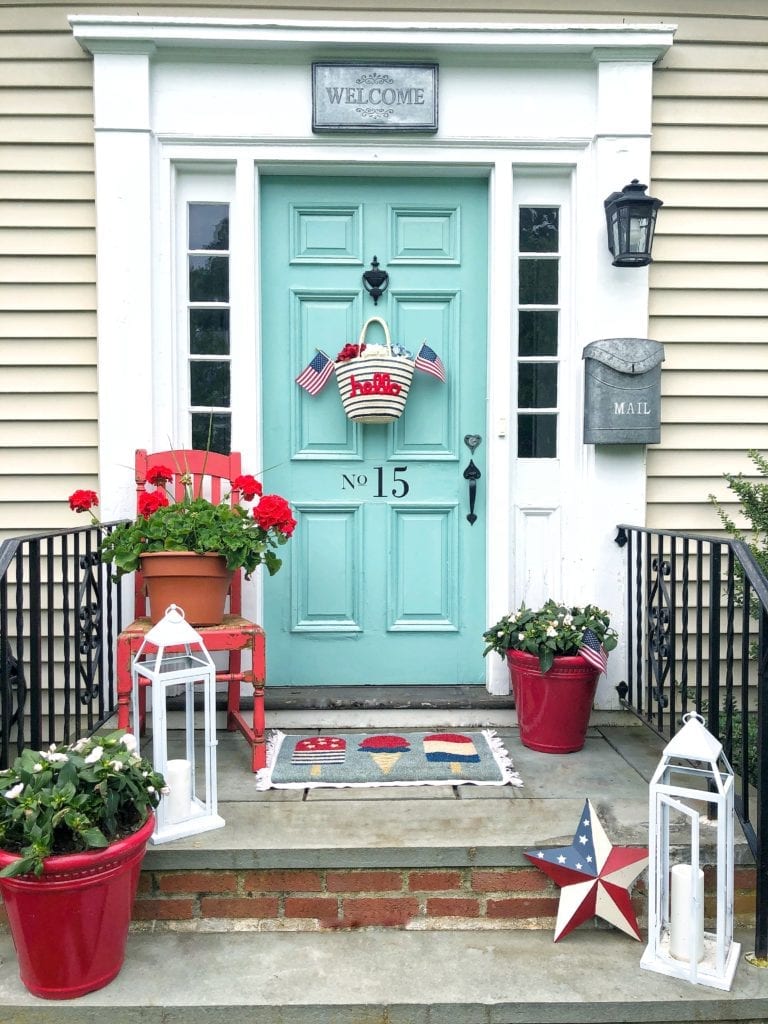
There you have it my Red, White and Blue Decor for the upcoming summer Holidays! I didn’t have to buy too much and used a lot of things I already had on hand, I just grabbed some plants and spray paint!
I hope you have an amazing Memorial Day weekend.
Jordan
SHOP THIS POST
*Post contains affiliate links


")

