
Seasonal

Today I’m sharing my fall mantel with you! I’ve been trying to keep my fall decor more simplified this year, maybe it’s from catching up after finishing our double bathroom renovation which kept me behind on life a little bit. No matter the reason, the beauty is however you decorate your home is that it’s yours and you can do as much or as little as you’d like. Some years I find that I go all out in certain areas, like the dining table or my front door and the living room is really simple. So far my dining room only has a few touches of fall and I’m ok with that at the moment. I don’t think every area of your home has to be an all out reflection of the season, I just really enjoying bringing in touches of the outside inside, gradually and in certain areas of our home.
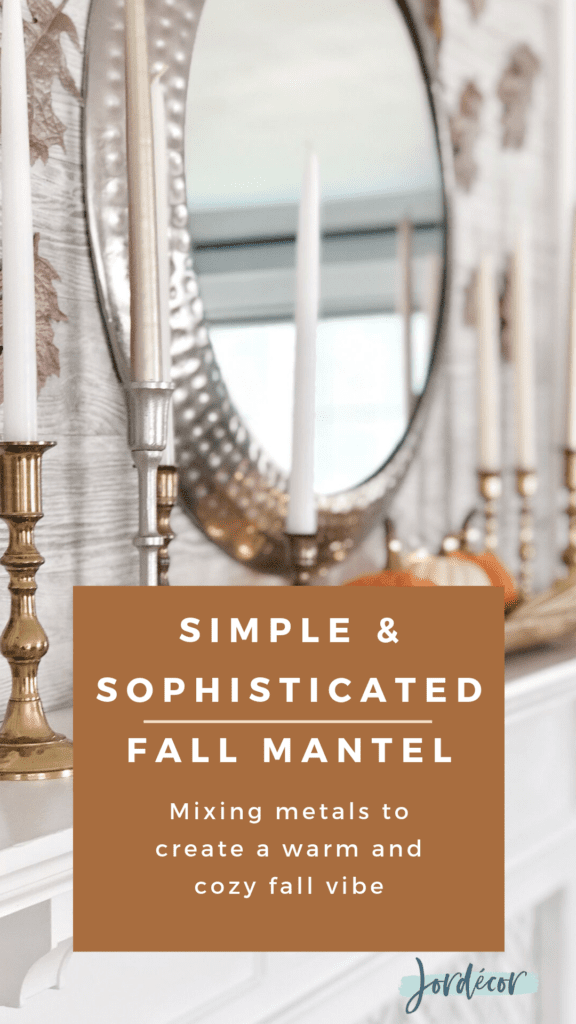
Mixing Metals to Create a Cozy yet Sophisticated Fall Mantel:
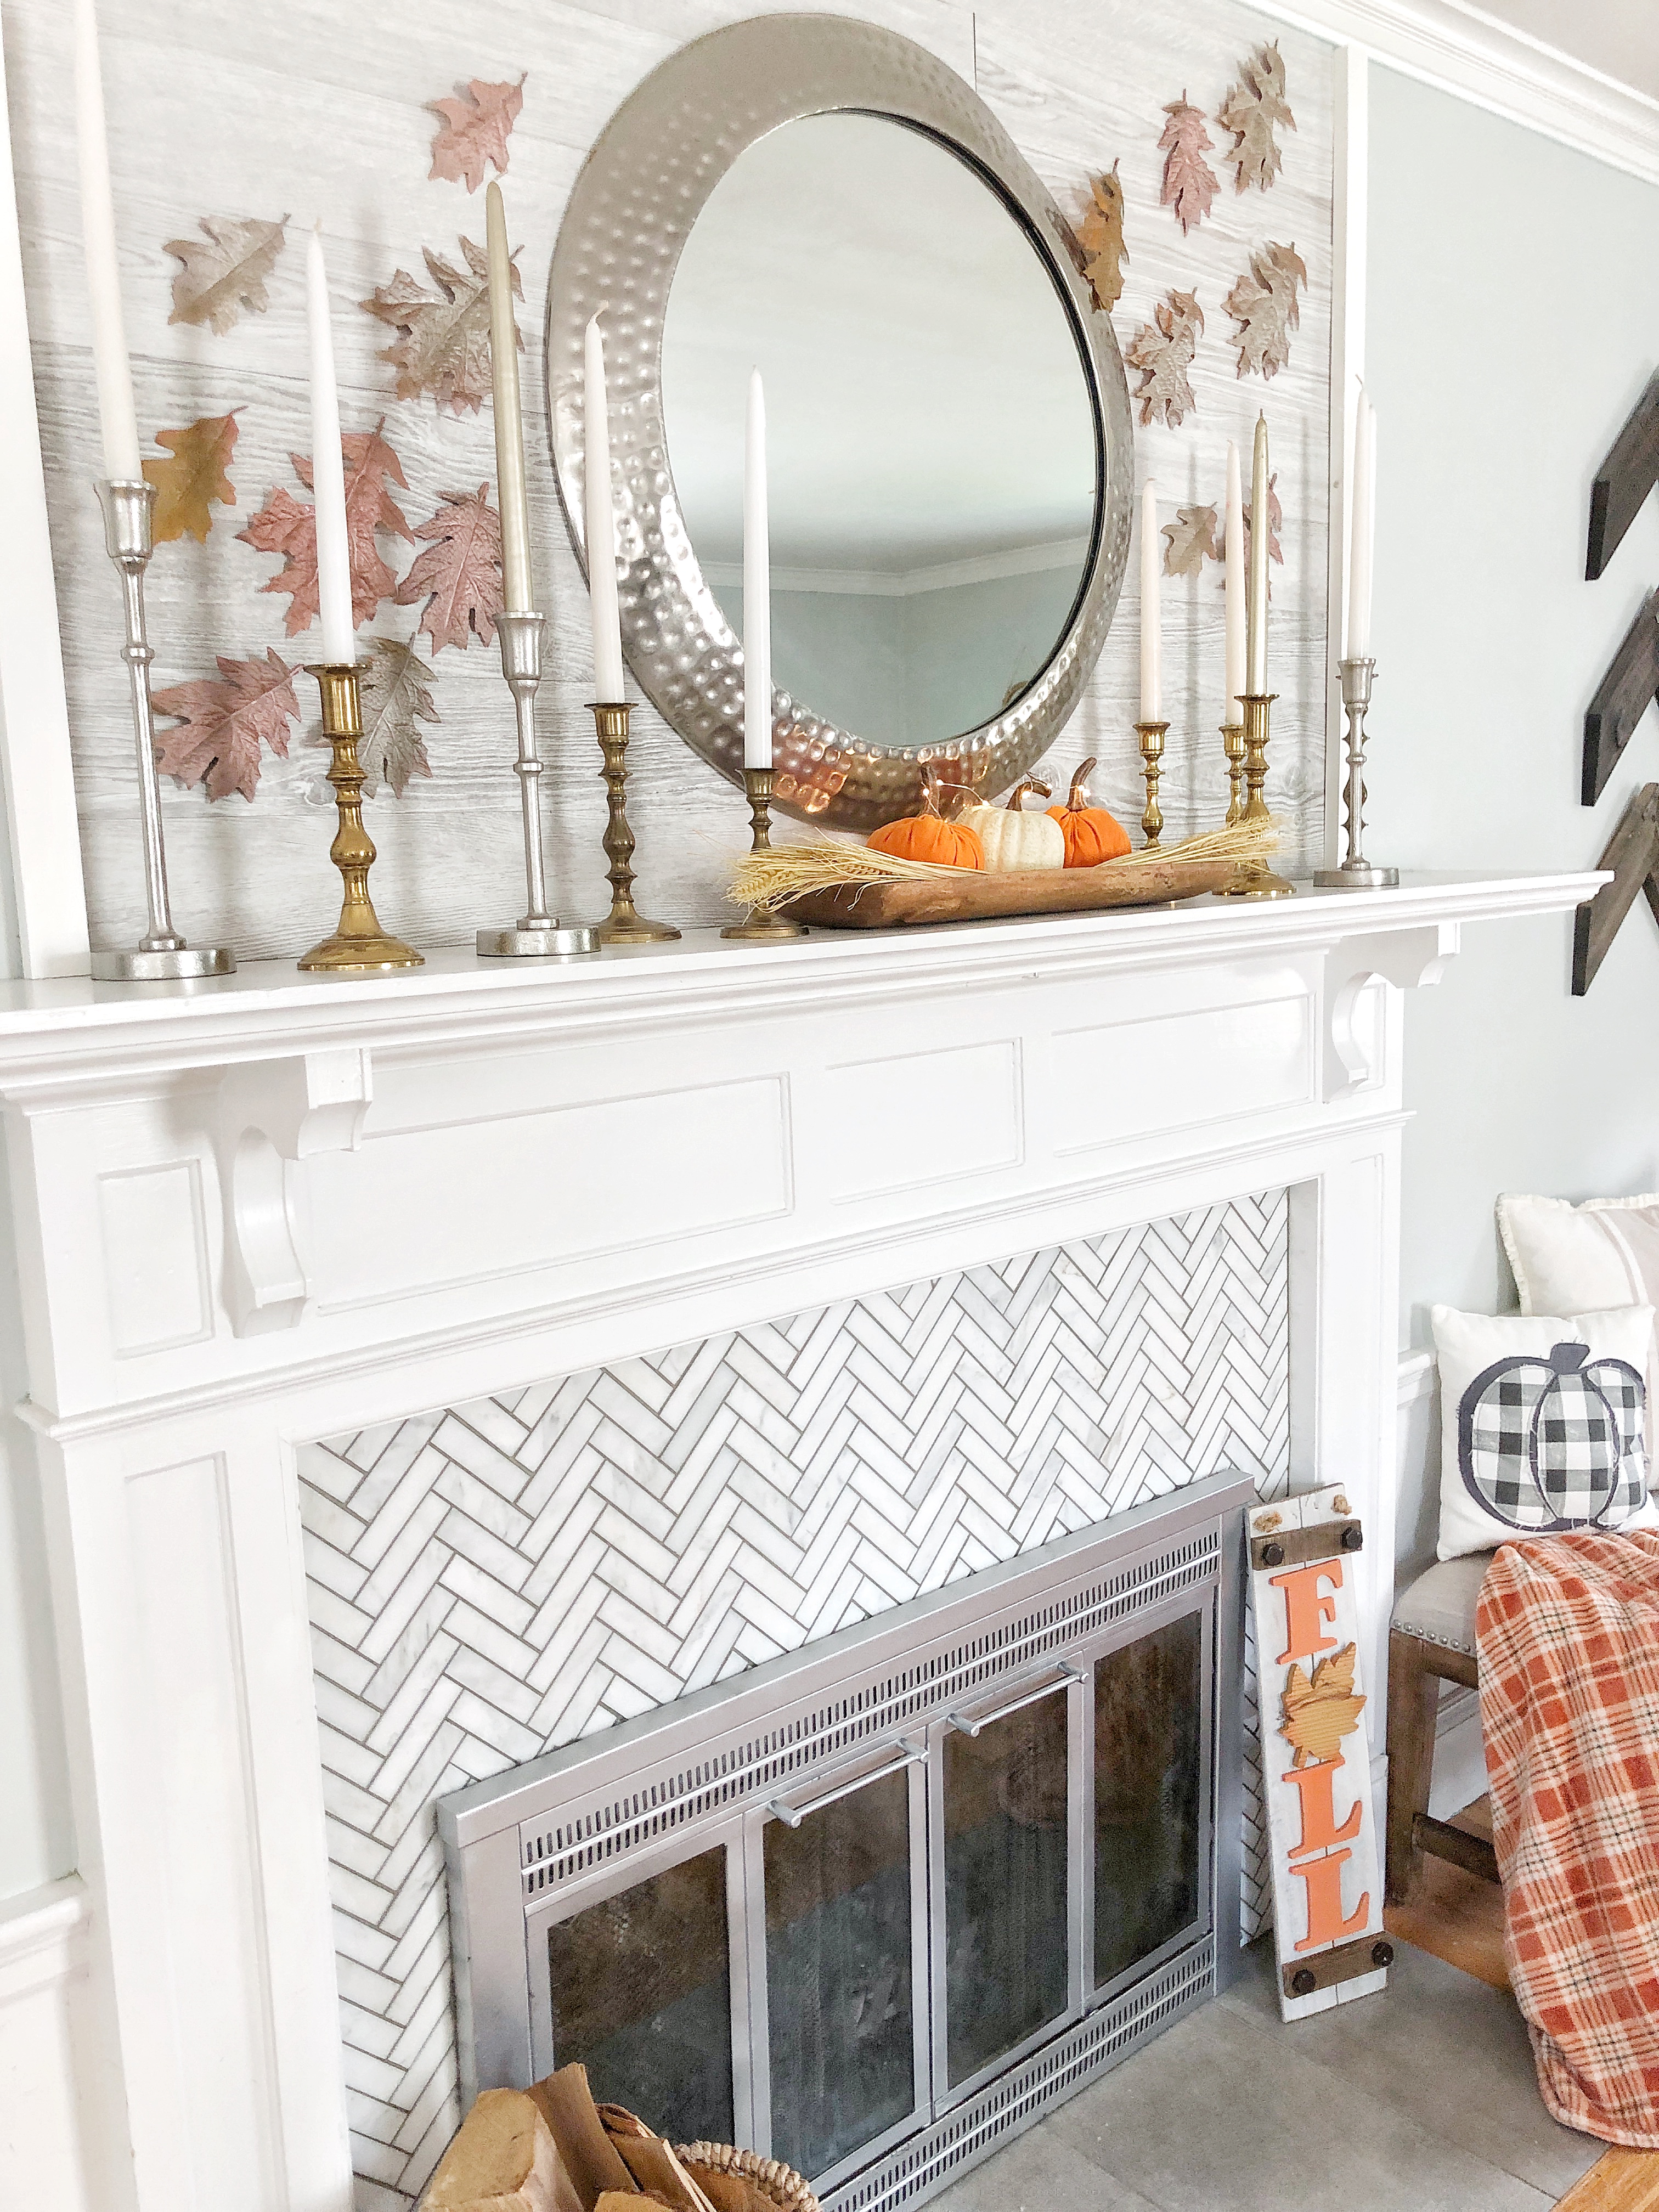
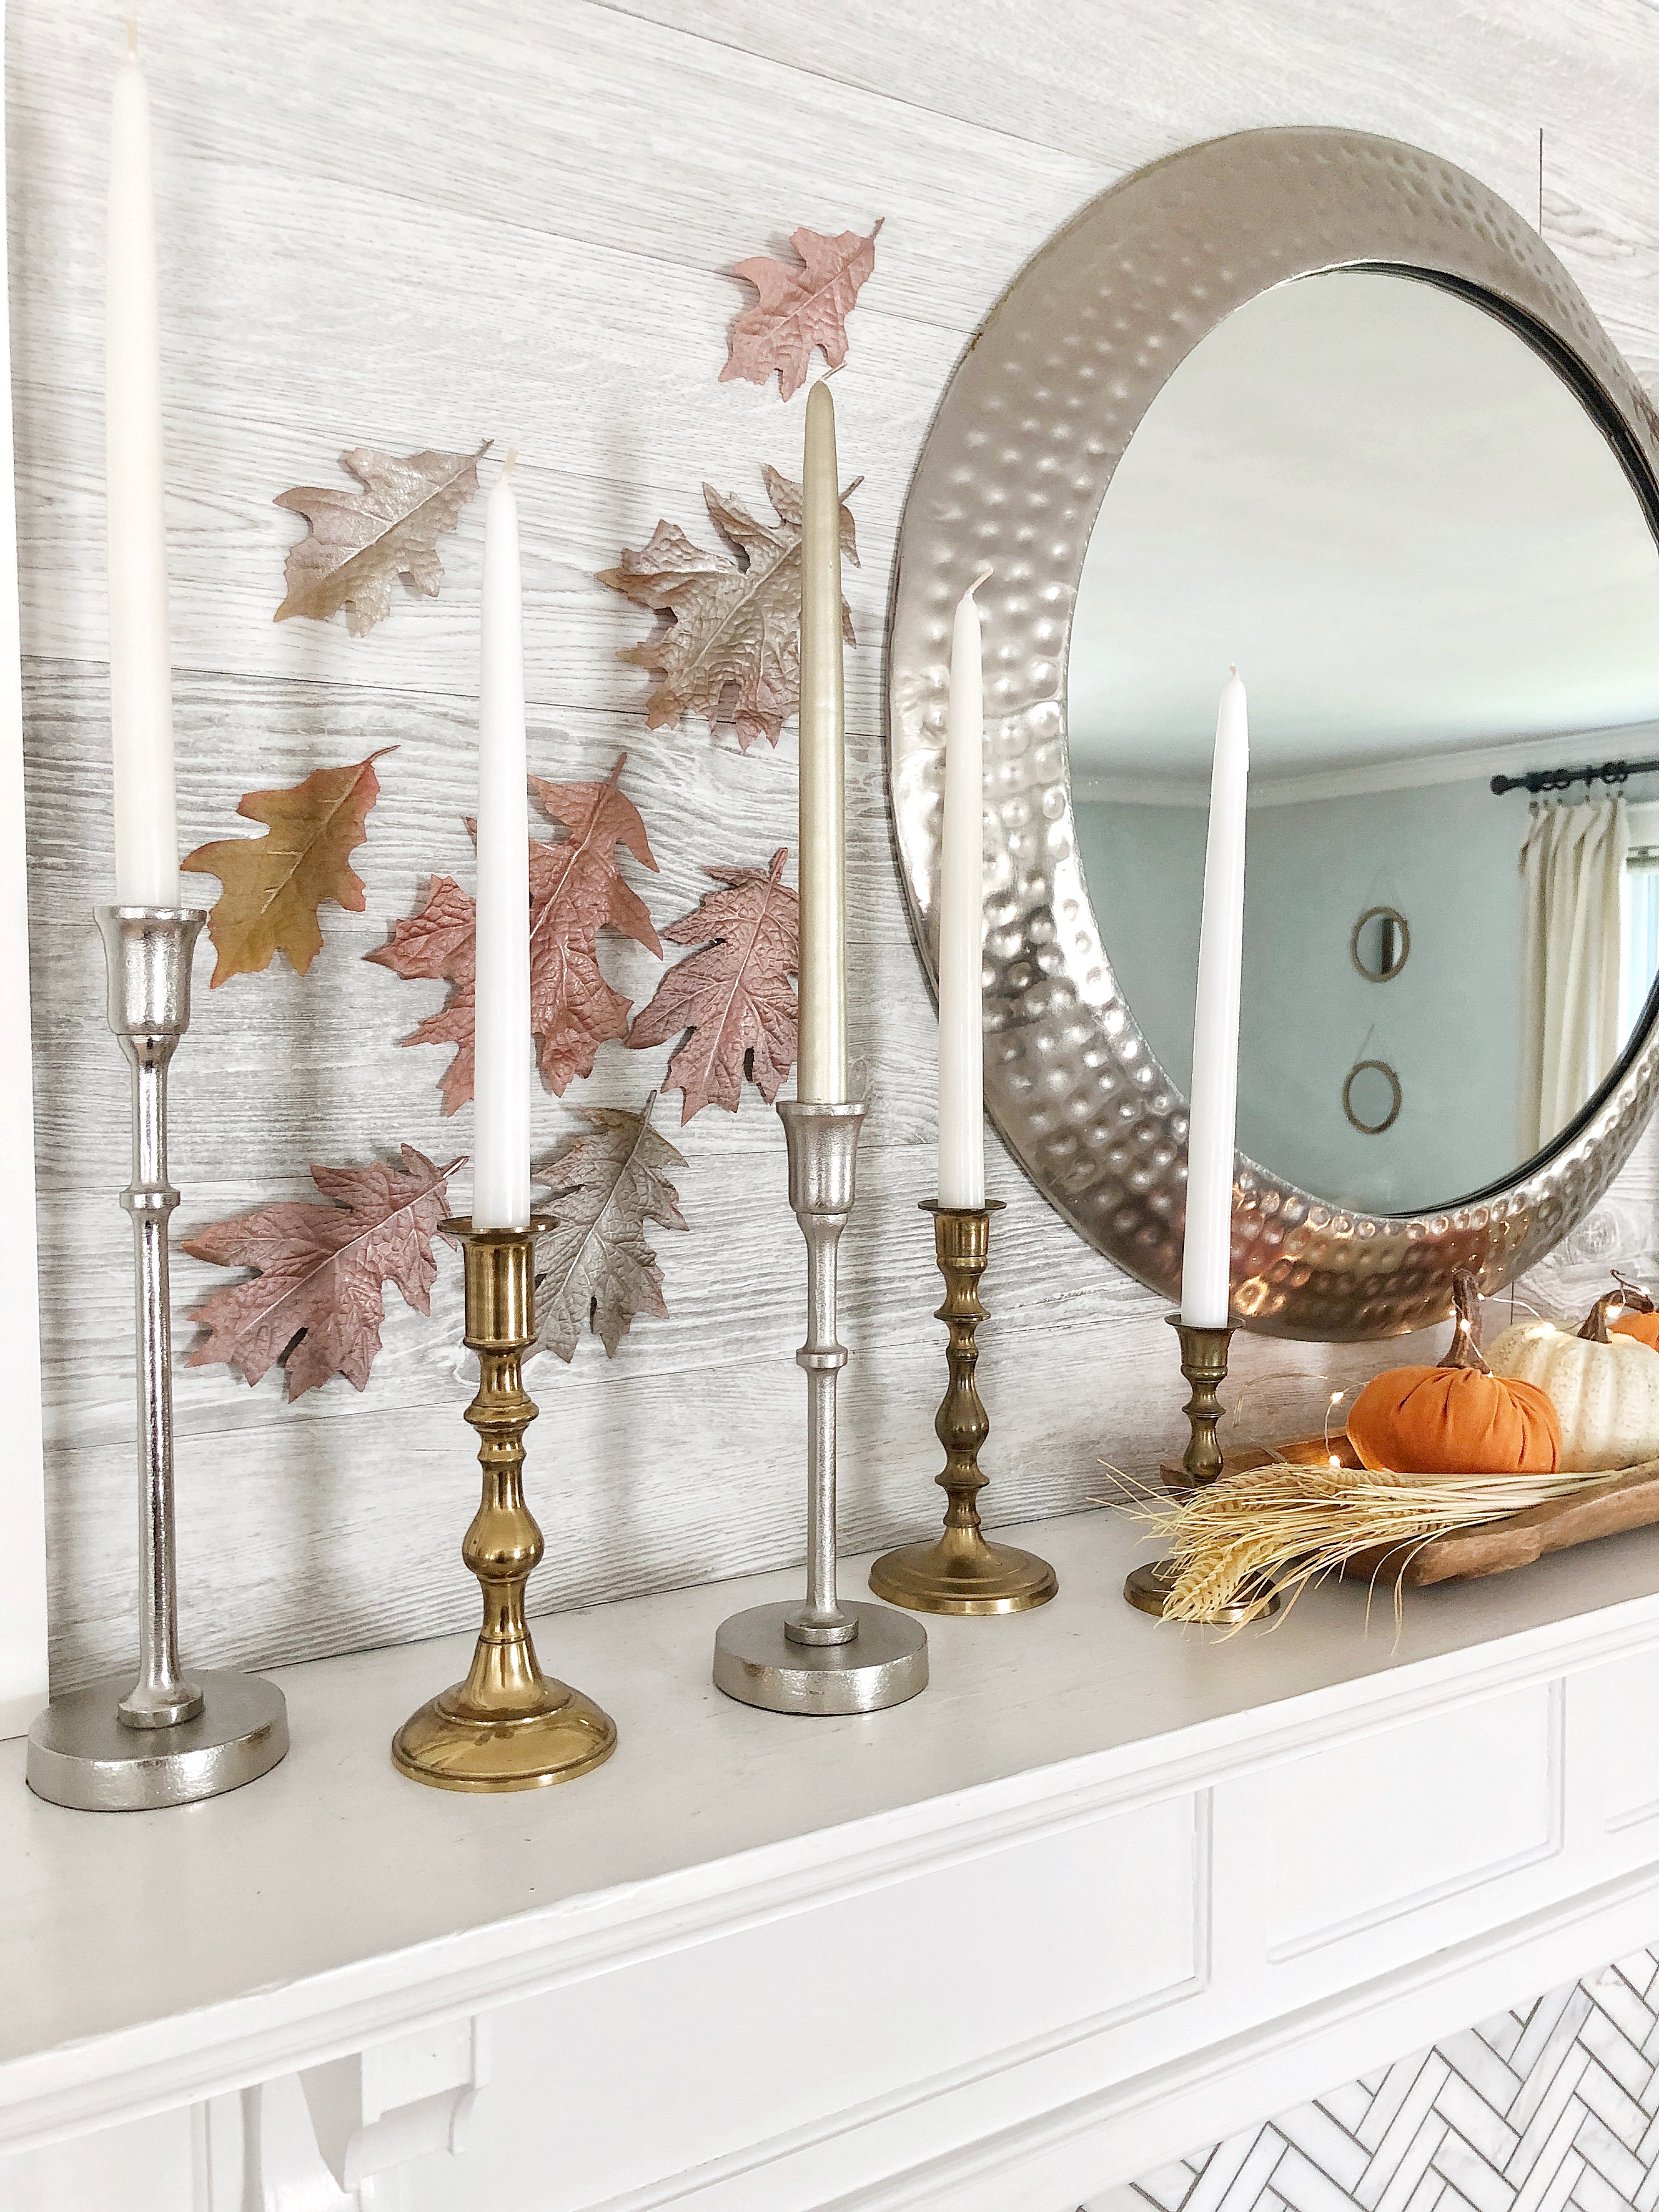
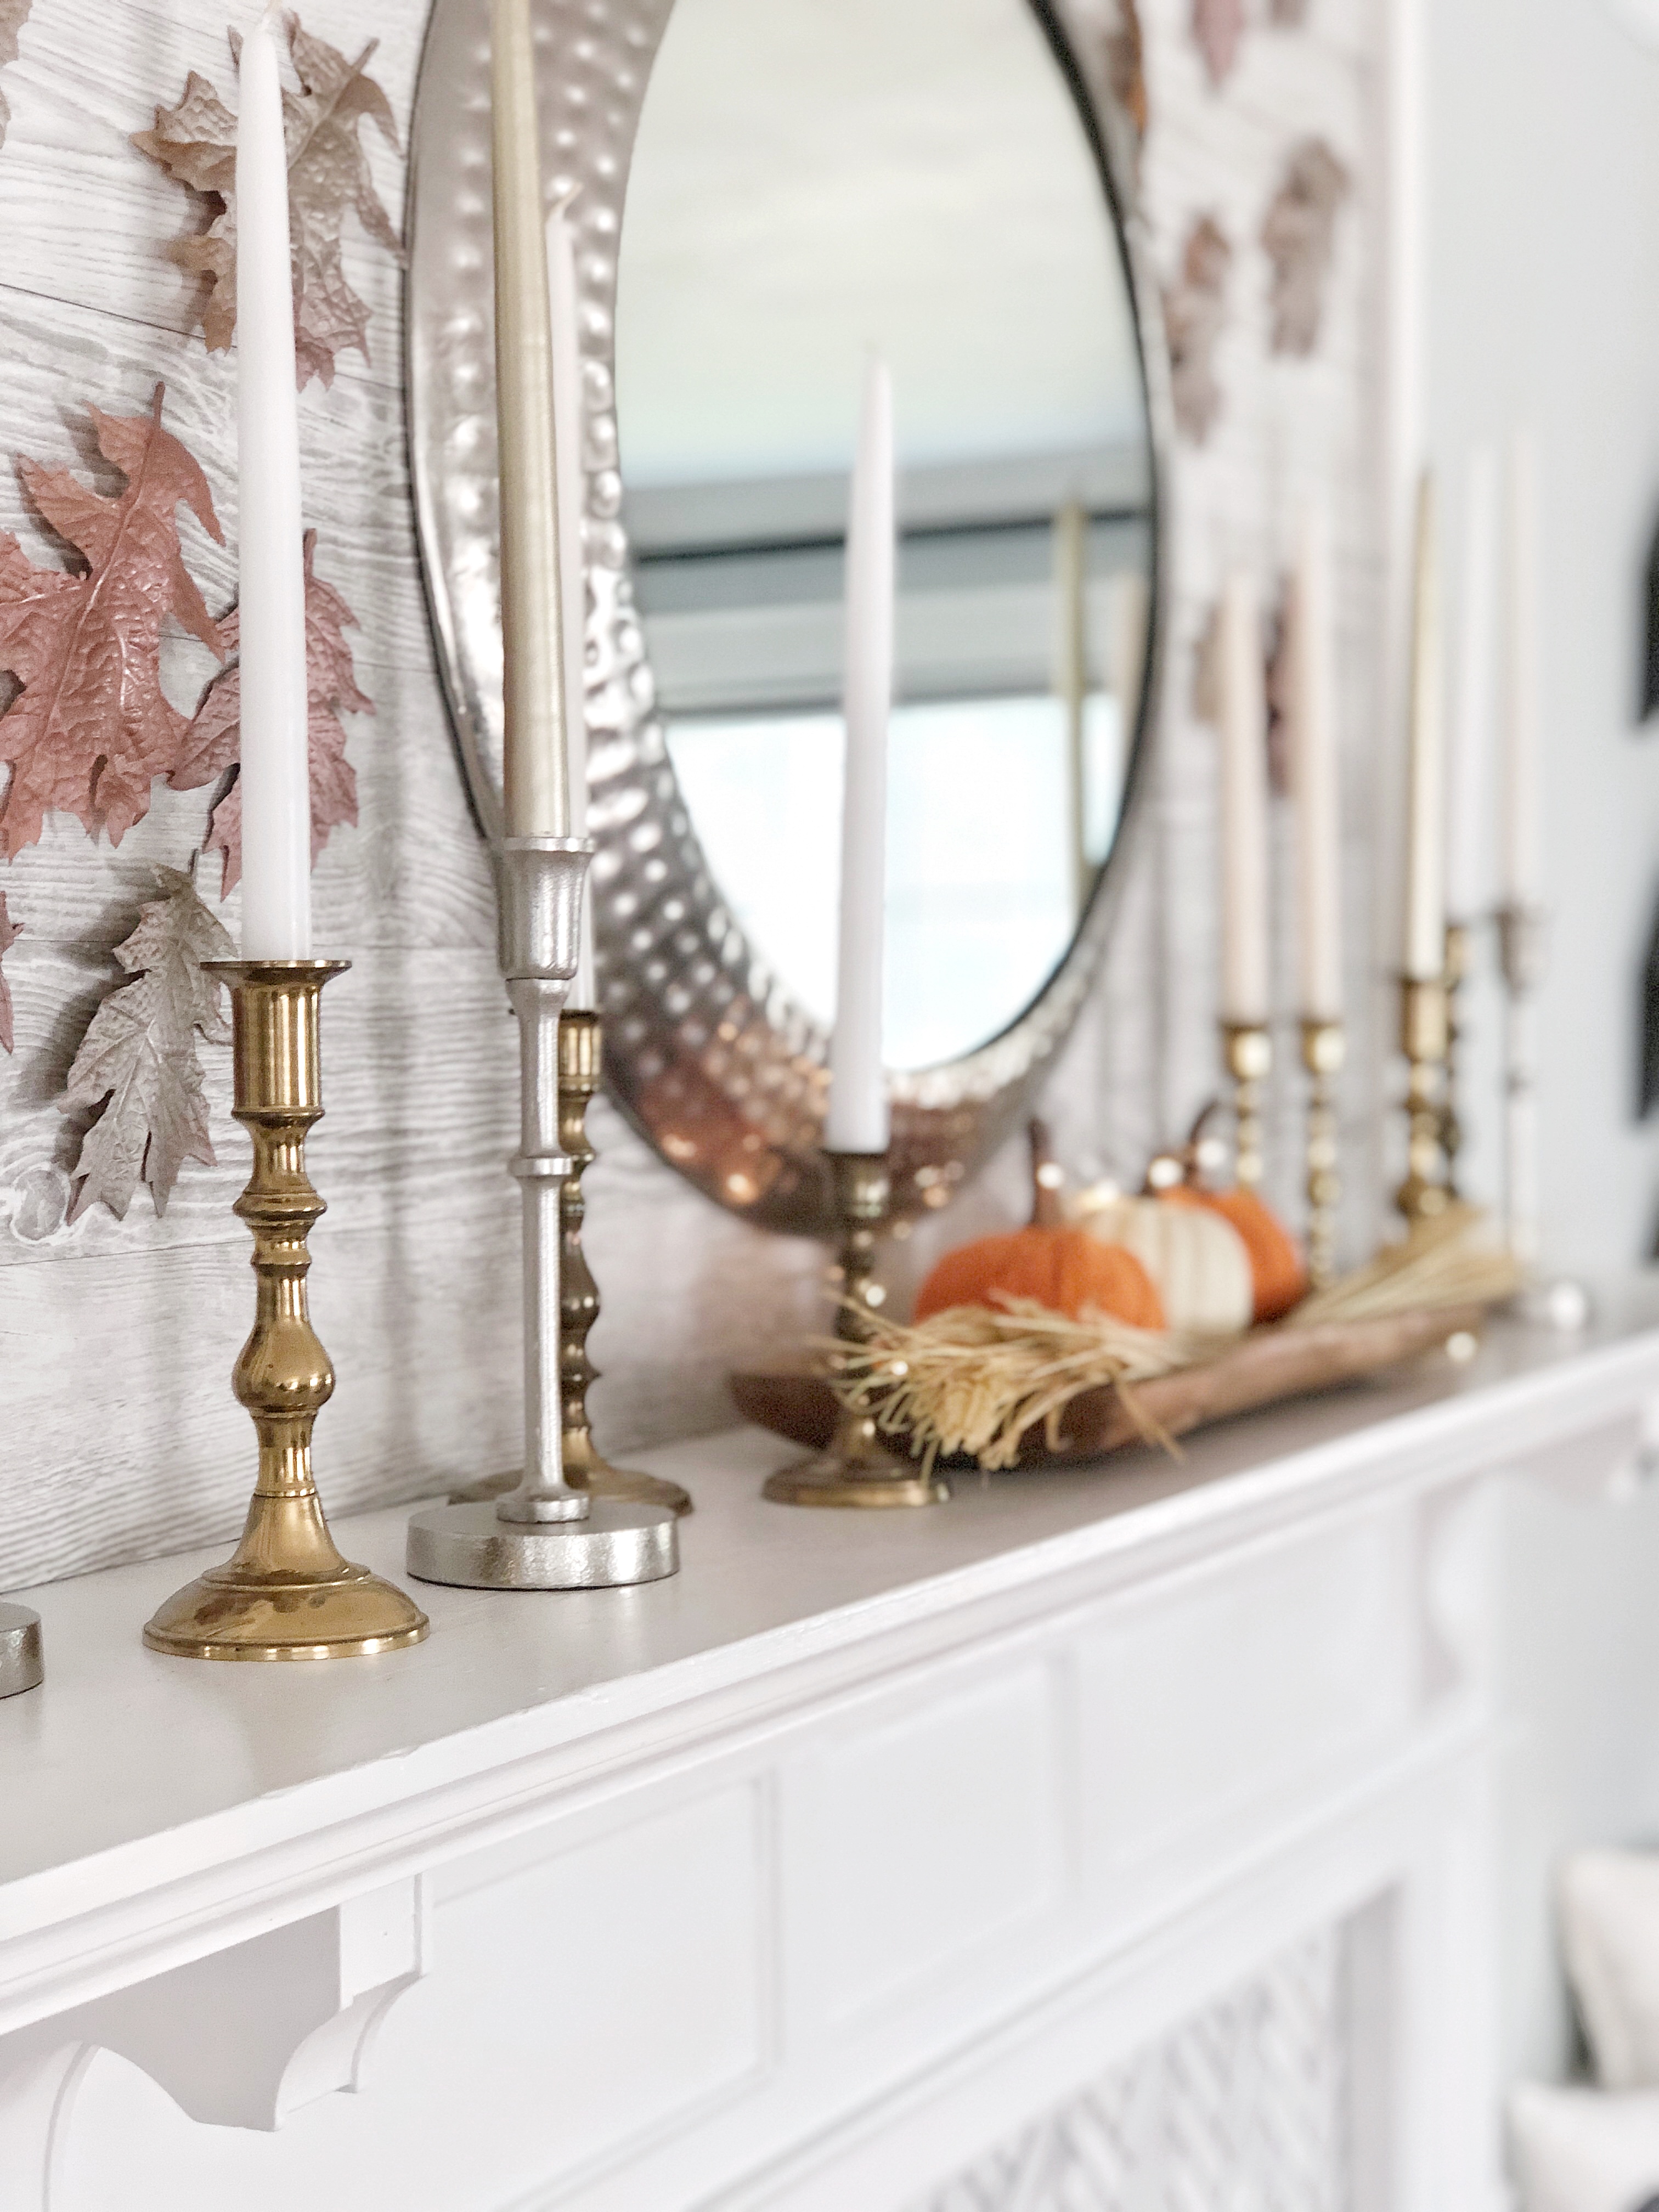
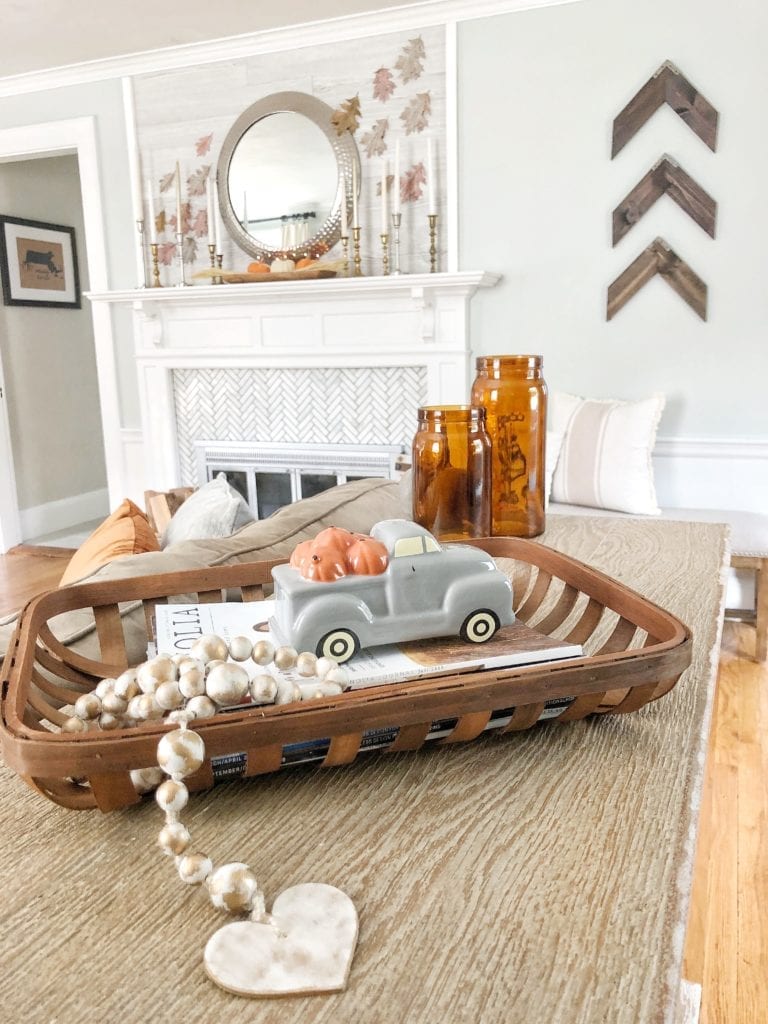
This year I’m really feeling metallic colors for fall. So I’ve incorporated brass, silver and copper tones into our fall living room. I used a mix of metal candle holders I’ve been collecting. I found a bunch of these at local thrift shops (like Savers) and Target (I’ll link a bunch below) and spaced them through out the length of mantel to create a sophisticated modern/vintage look. I also decided to mix different candle sticks in gold, ivory and an off white to make it even a little more interesting.
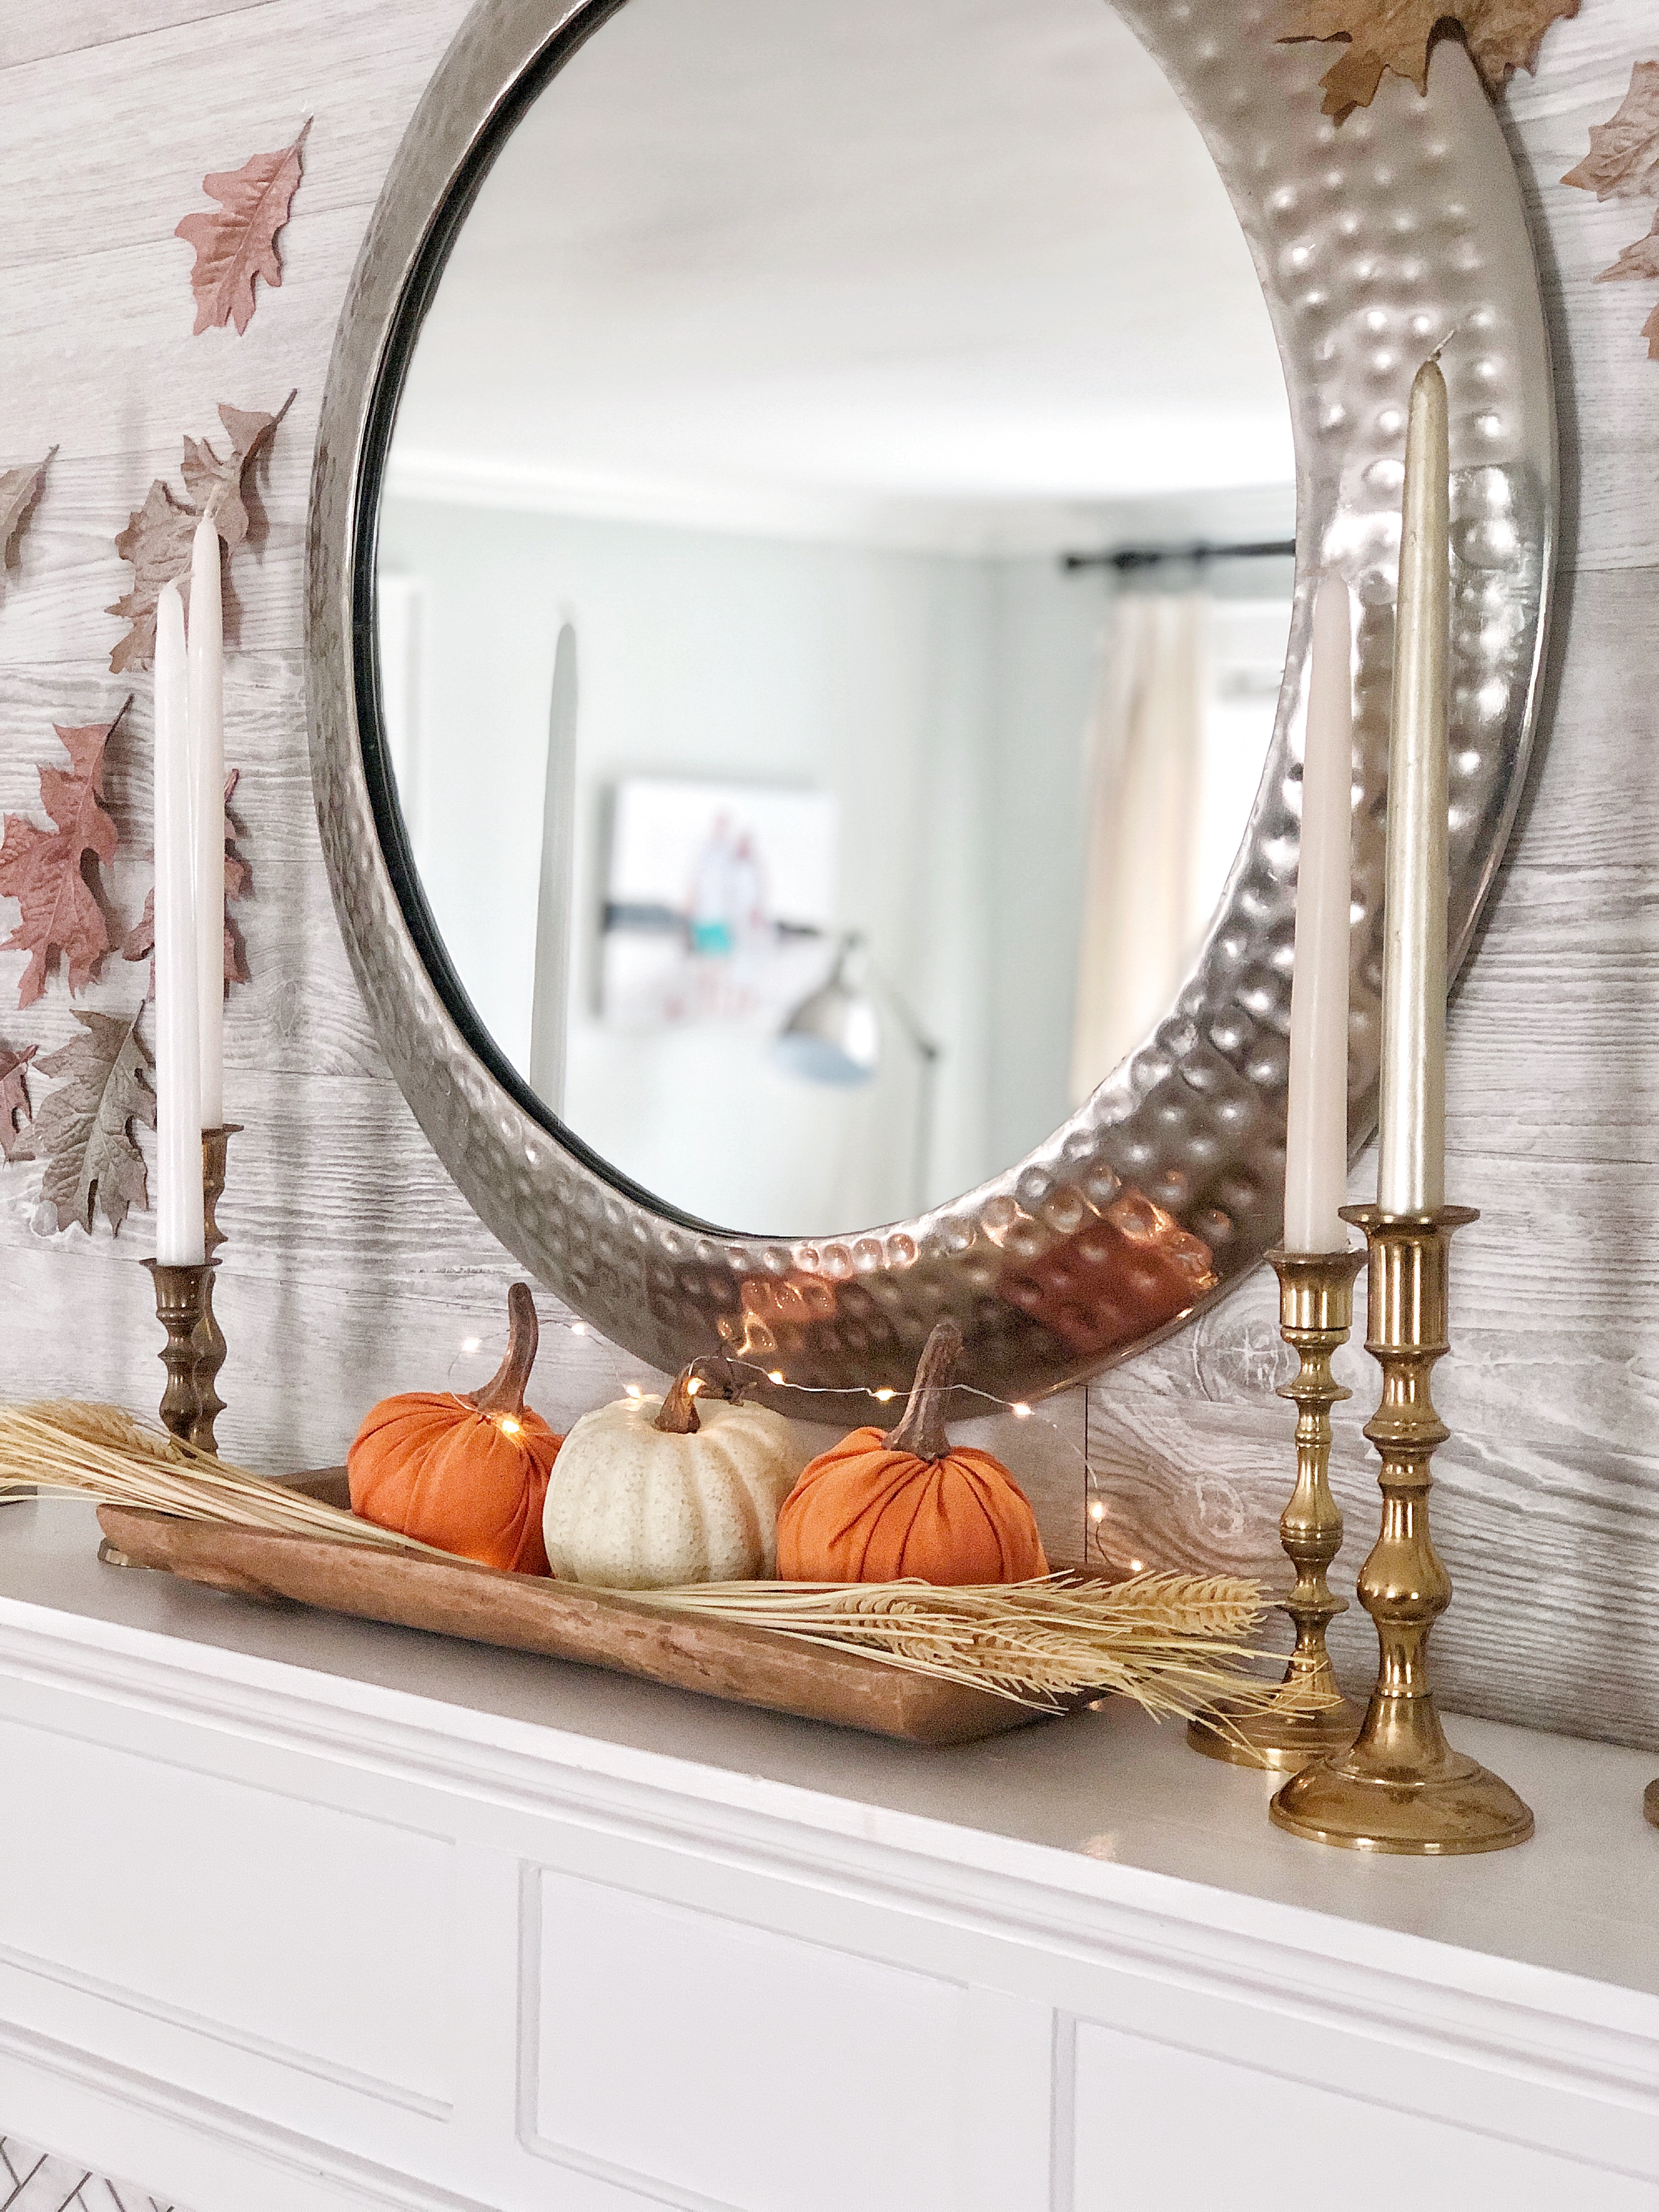
I added the leaves to the all with 3m double sided tape to add another layer of interest for fall decor. I also spray painted them outside with metallic spray paint, instead of the bright orange and yellow they were before which was way too bright. Now they look really soft and aged. I purchased this mirror at Homegoods years ago and I just love it. It reflects light and has a cool hammered texture. I use it as a simple focal point and just layer and build my decor around it. I’ll link some similar mirrors below.
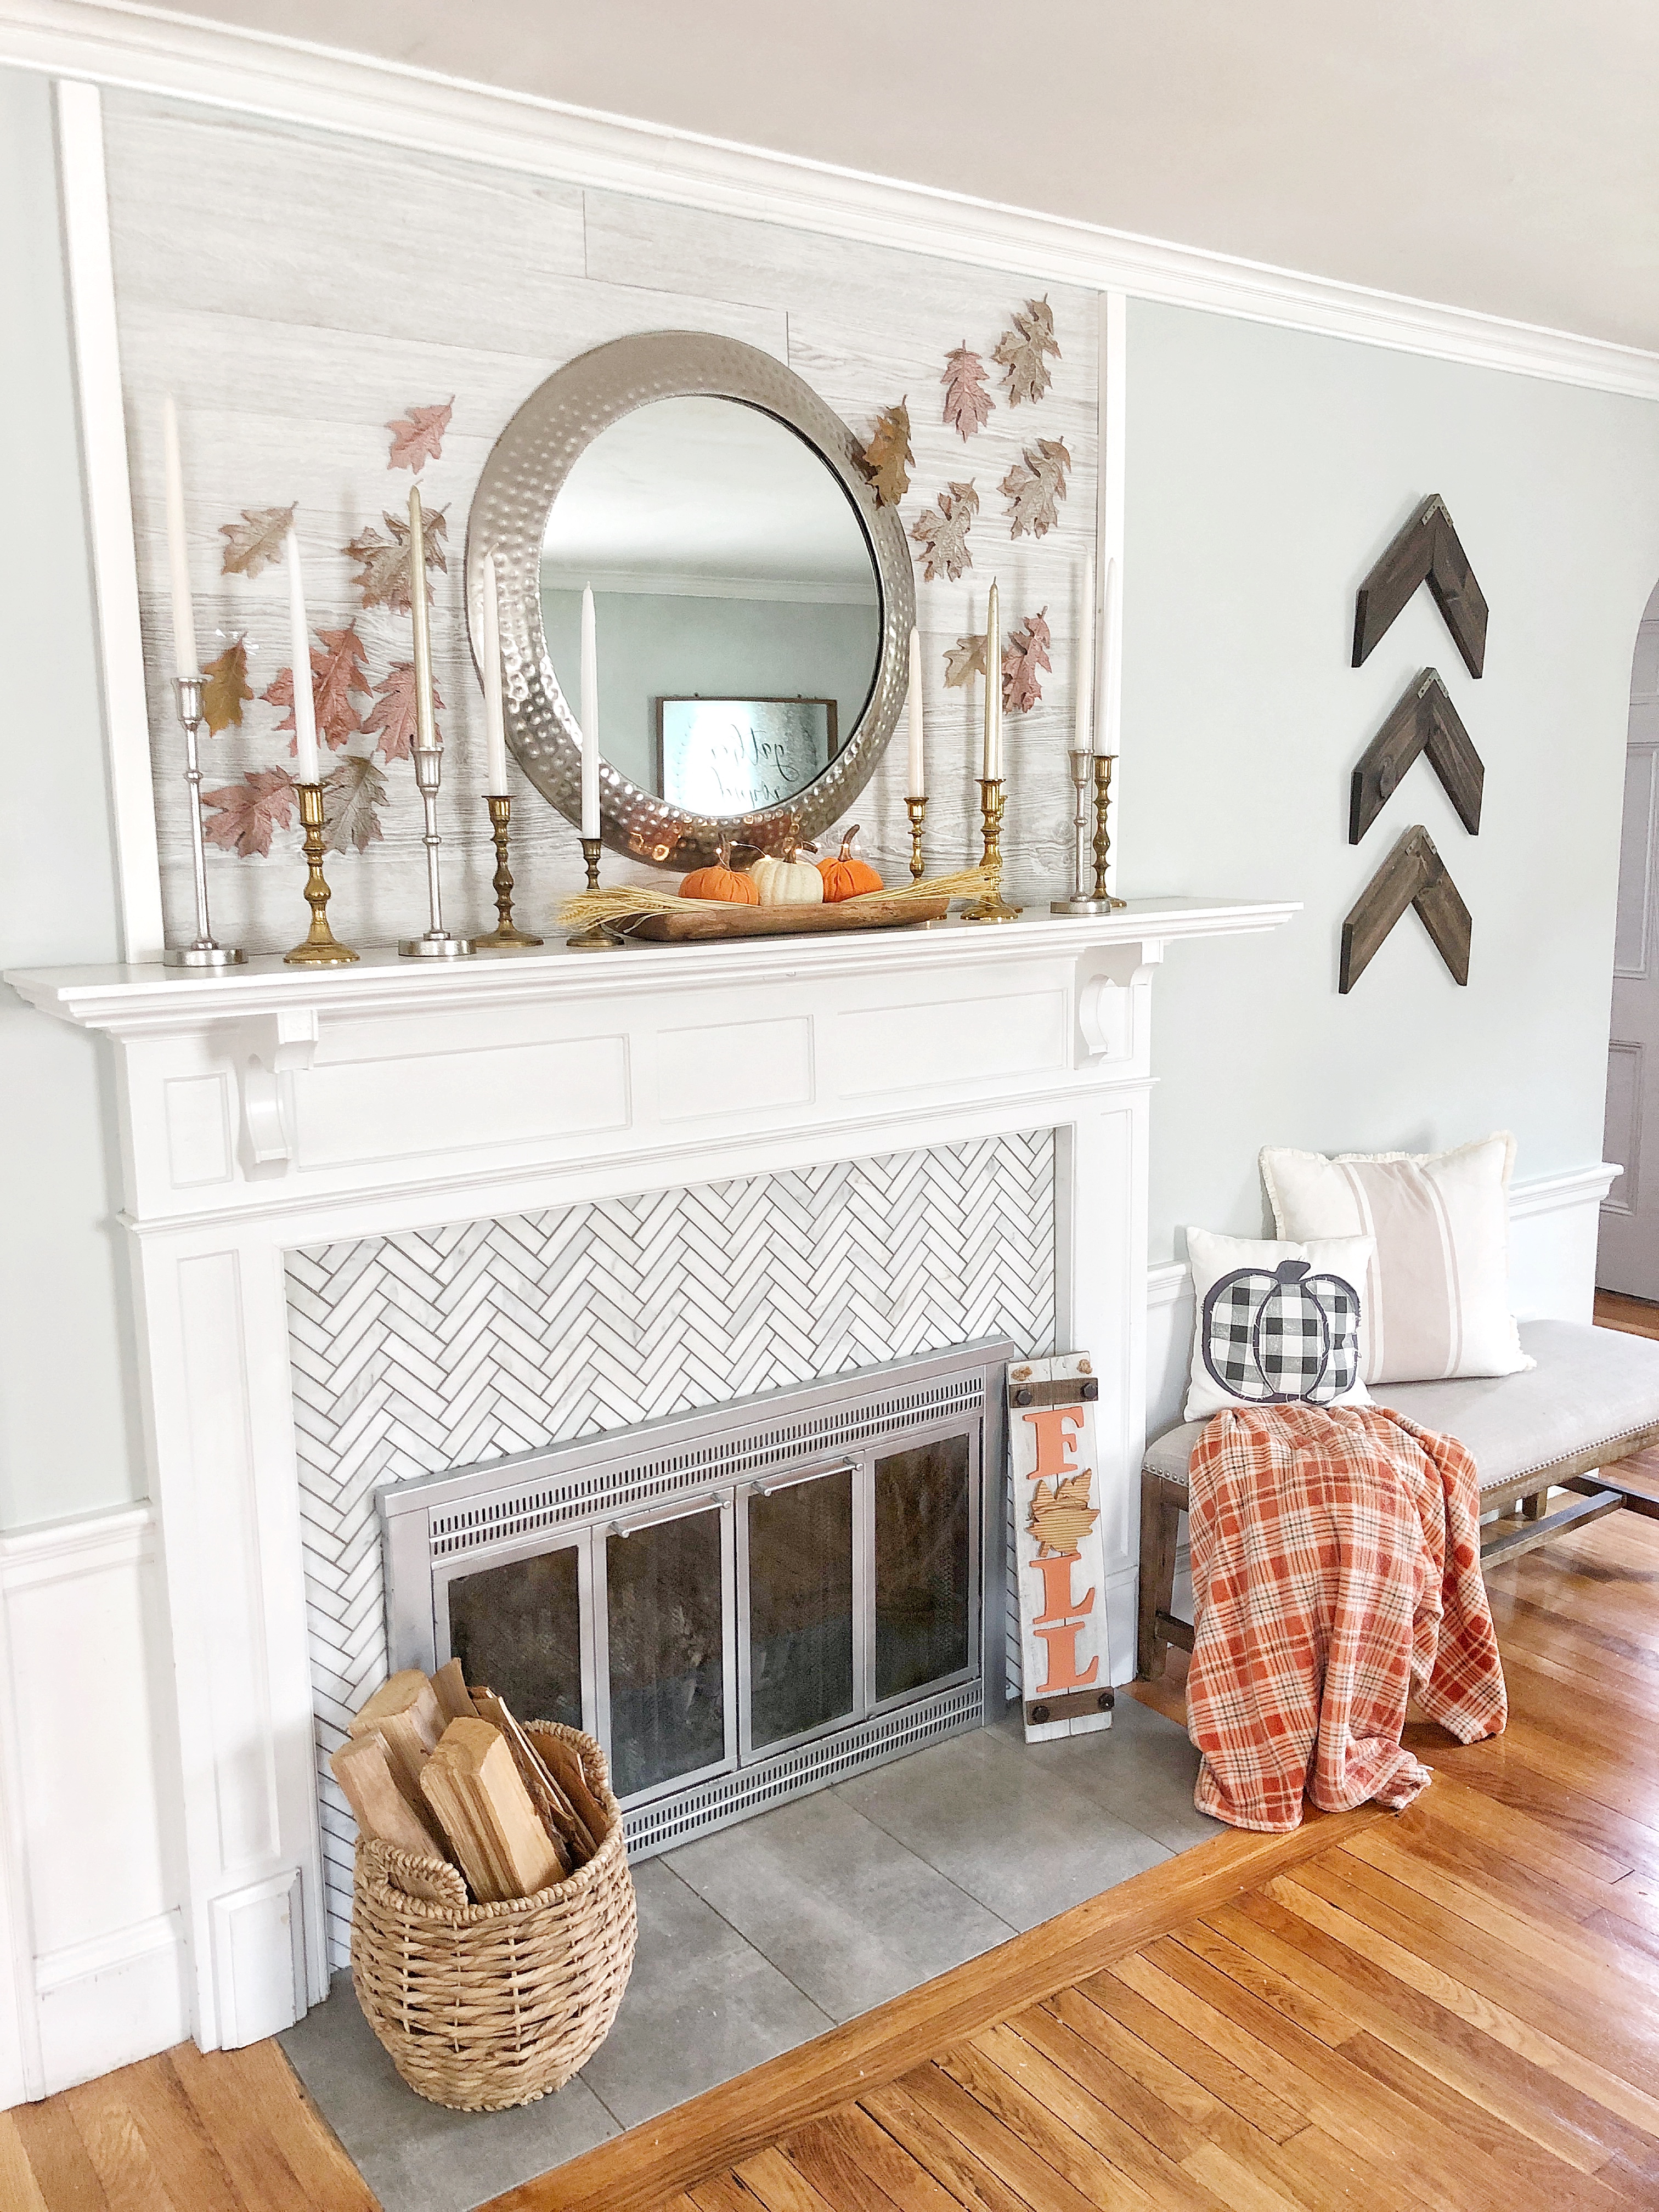
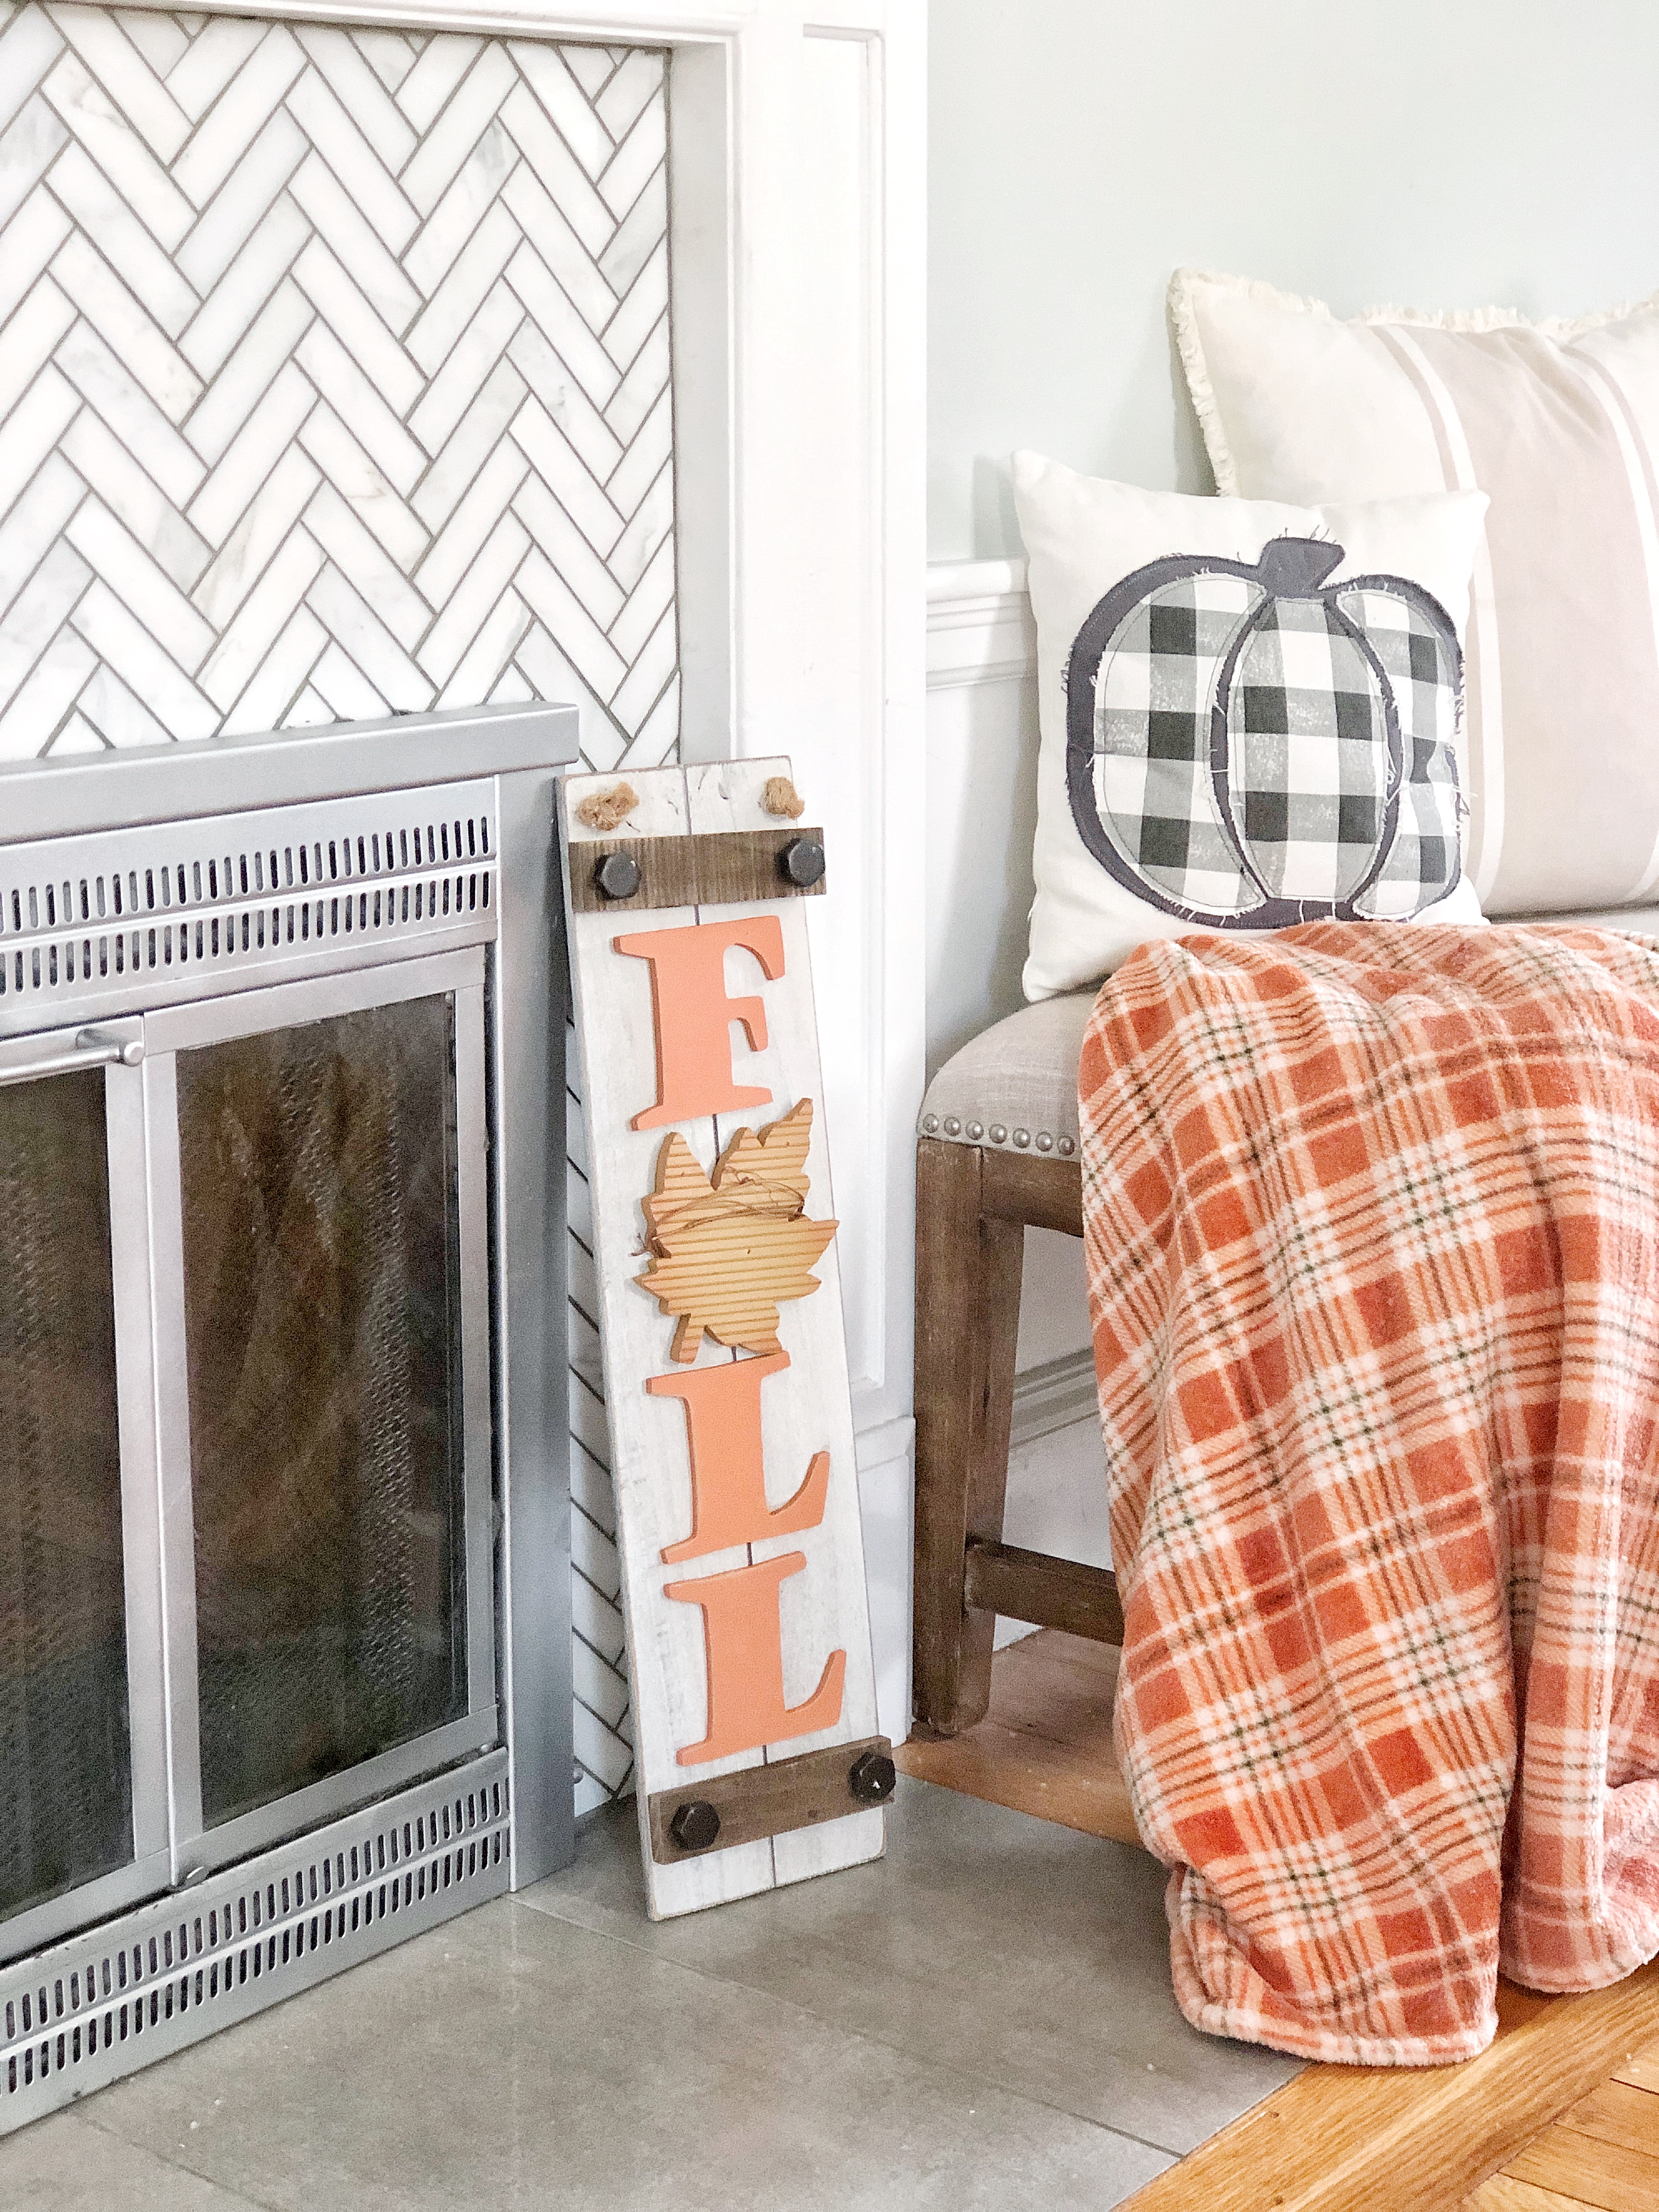
The “Fall” sign is from Christmas Tree Shops and pillows I had from past years that I repurposed I love how the oranges pop against the gray tile and it feels like classic fall to have some touches of orange mixed in as well. I’ve had this rectangular dough bowl for awhile and always use it around the house, I love it on my mantel because it can hold different decorative elements. Here I filled it with a couple fabric pumpkins I found at the Target Dollar Spot.
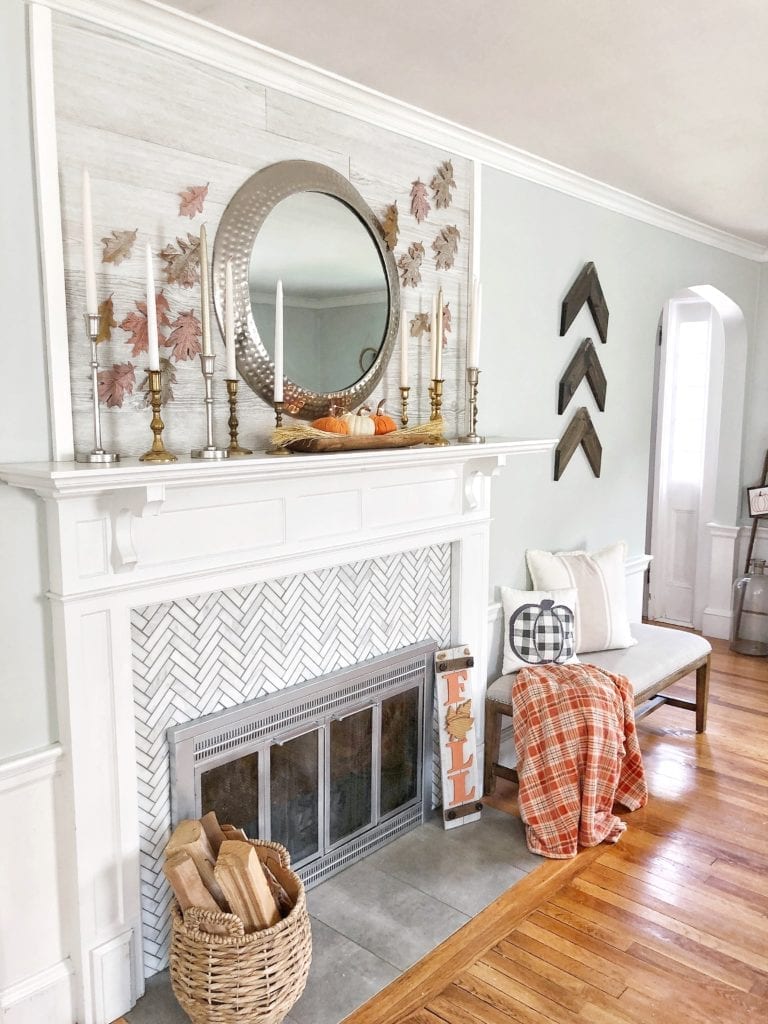
These pretty wheat picks were also a Target Dollar Spot find. I think they look so pretty and harvest-y (is that even a word) tucked in with the pumpkins and twinkle lights.
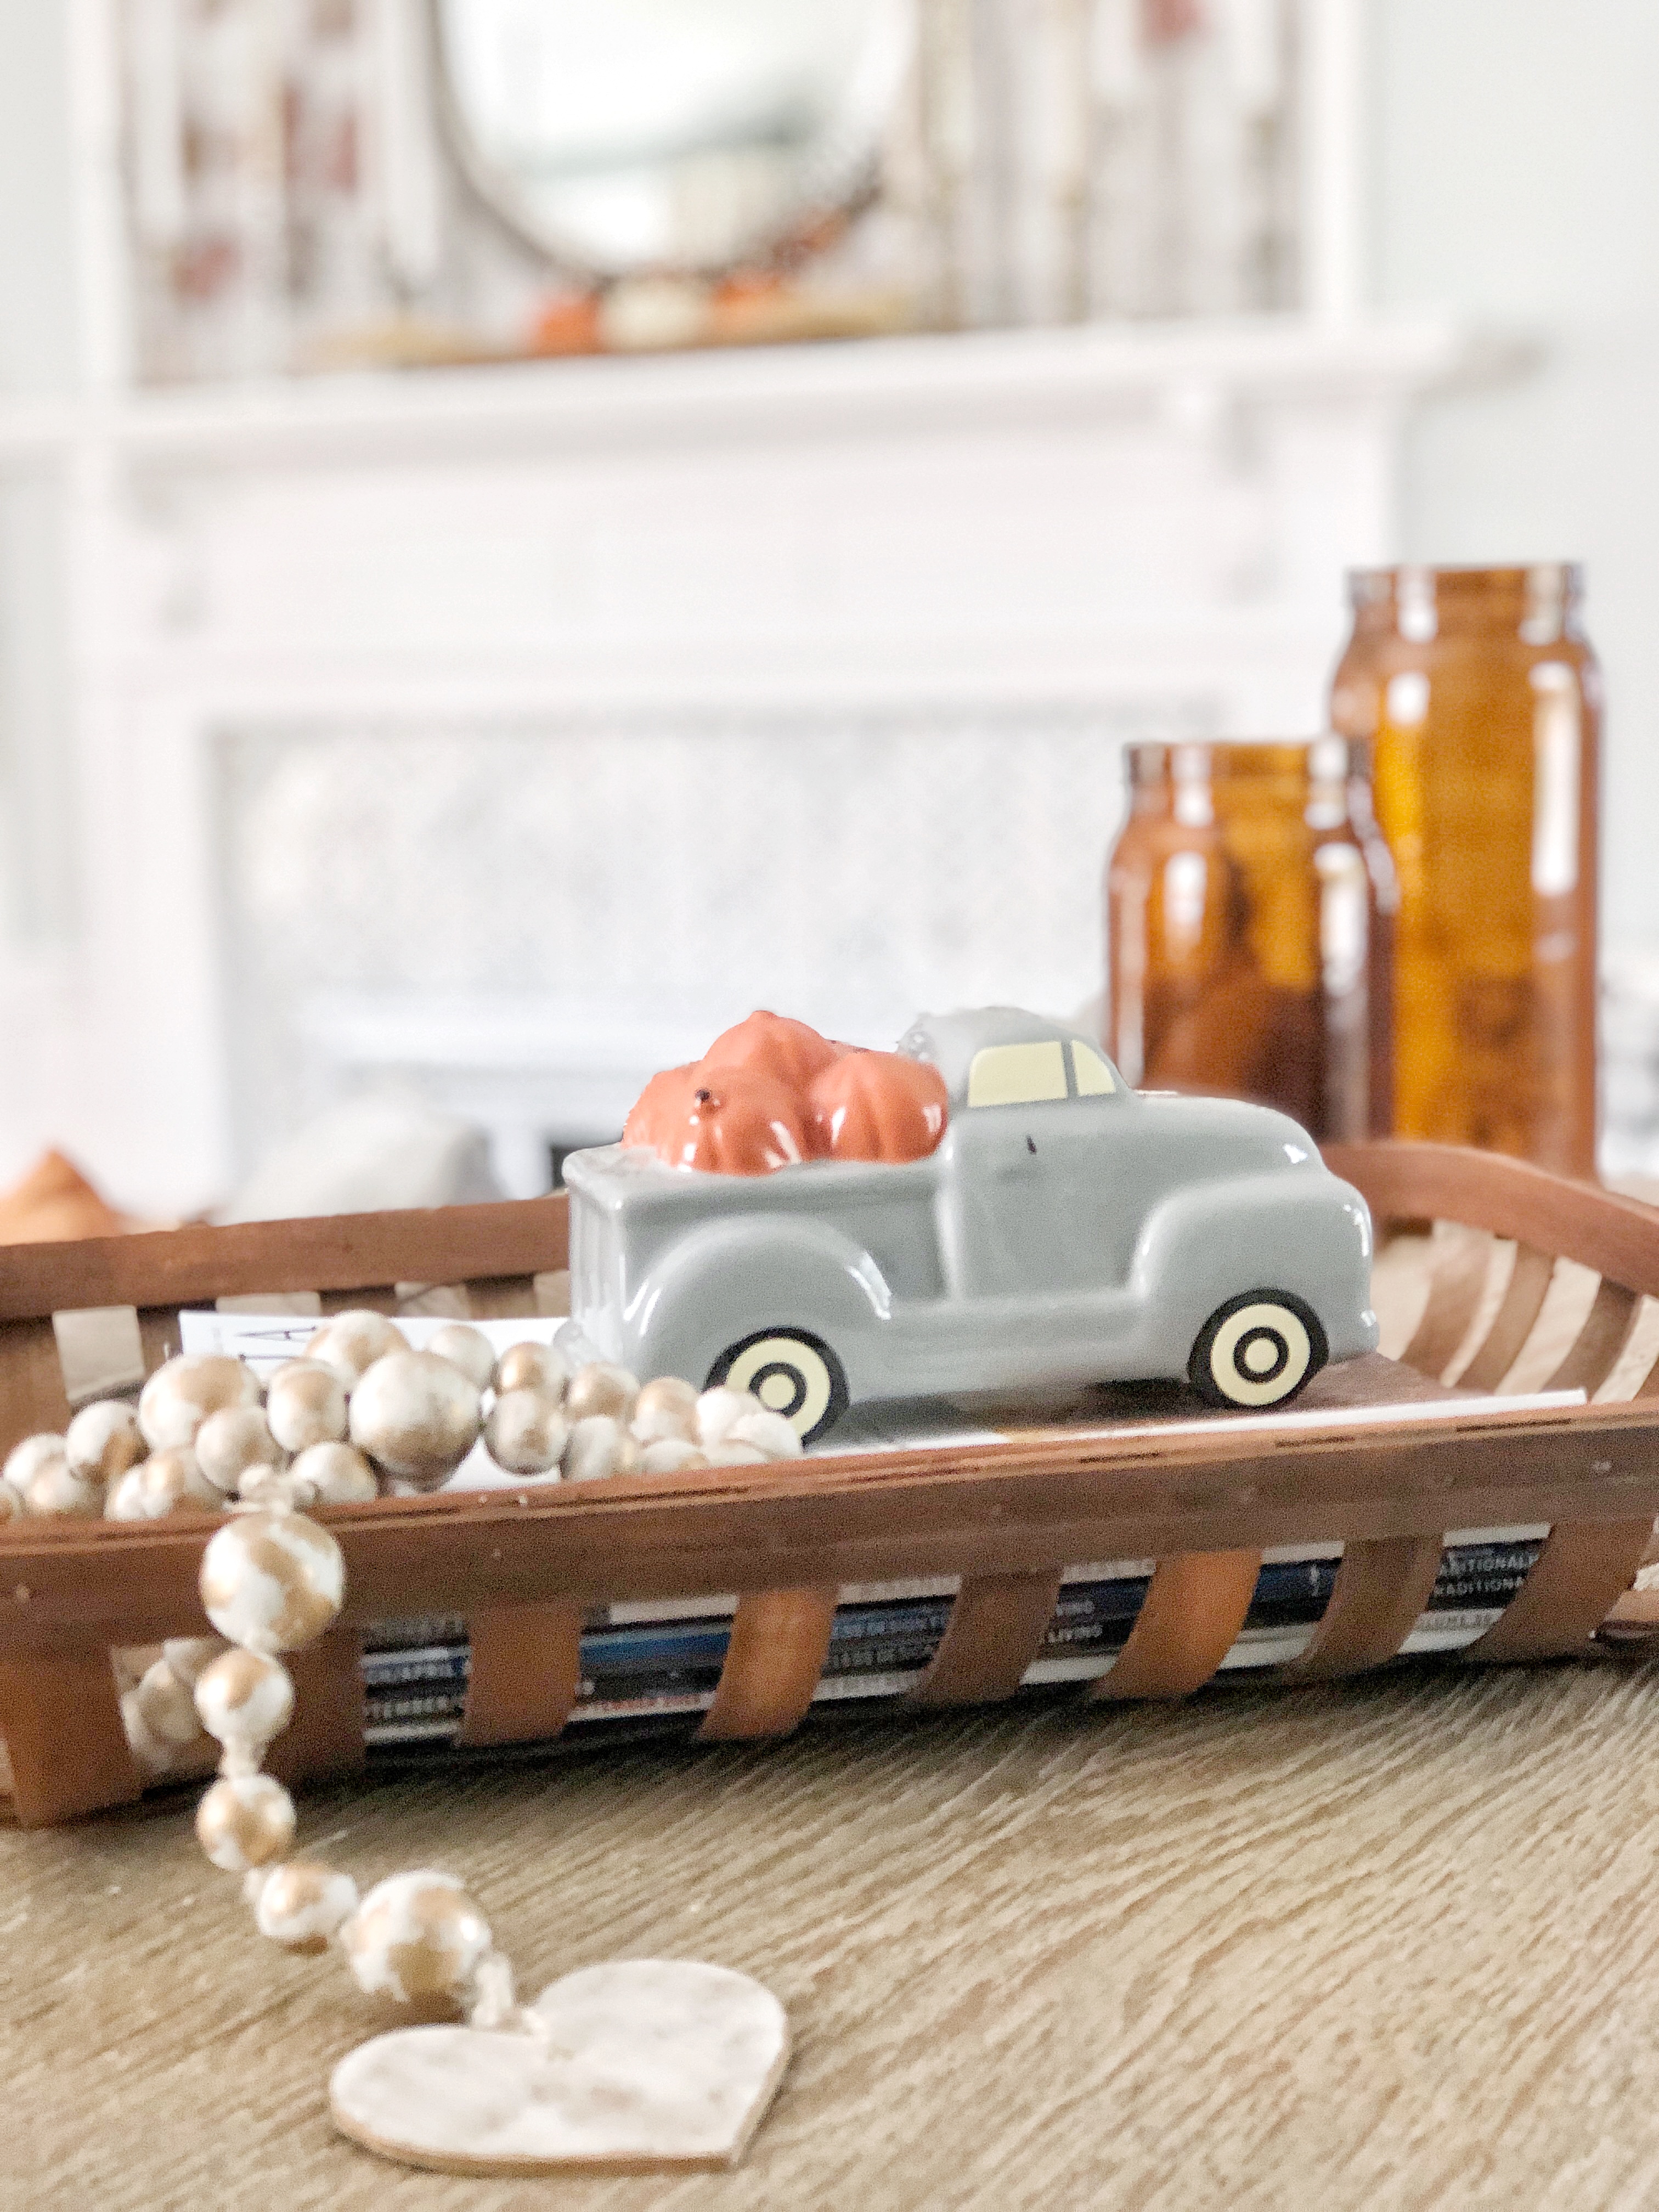
I always try to incorporate and repurpose decorative items from past years and then pick up maybe a couple things to give it old decor a new feel. I love the Target Dollar Spot for simple and affordable small seasonal touches. Like this precious little truck with pumpkins. I thought it was the cutest thing ever!
Something about this whole look just makes me want to get a pumpkin spice latte, light a fire and get cozy with my family. I love this time of year!! Fall is the best! Have you started decorating for fall? Do you go all out in every room or just a little here and there?
I hope you like this simple and sophisticated Fall mantel! Also hope it inspires you, too.
Thanks for stopping by!
JORDAN
Shop this post:

Pin For Later:
read the full post >
Are you looking for a fun fall weekend getaway with your family? Looking to get outdoors, peep some fall foliage and just enjoy nature? Did you know that Christmas Tree Shops and That! has everything to make your next camping or glamping experience a success? Keep reading to see my camping/glamping essentials that I purchased From CTS and my overall thoughts on the whole experience.
Thank you to Christmas Tree Shops and That! for sponsoring this post, as always all thoughts, opinions and ideas are my own.
I’m so excited to be joining a group of amazing bloggers all sharing our fall style ideas. Please be sure to follow through to see all the other creative ways to use the great products from Christmas Tree Shops and that!
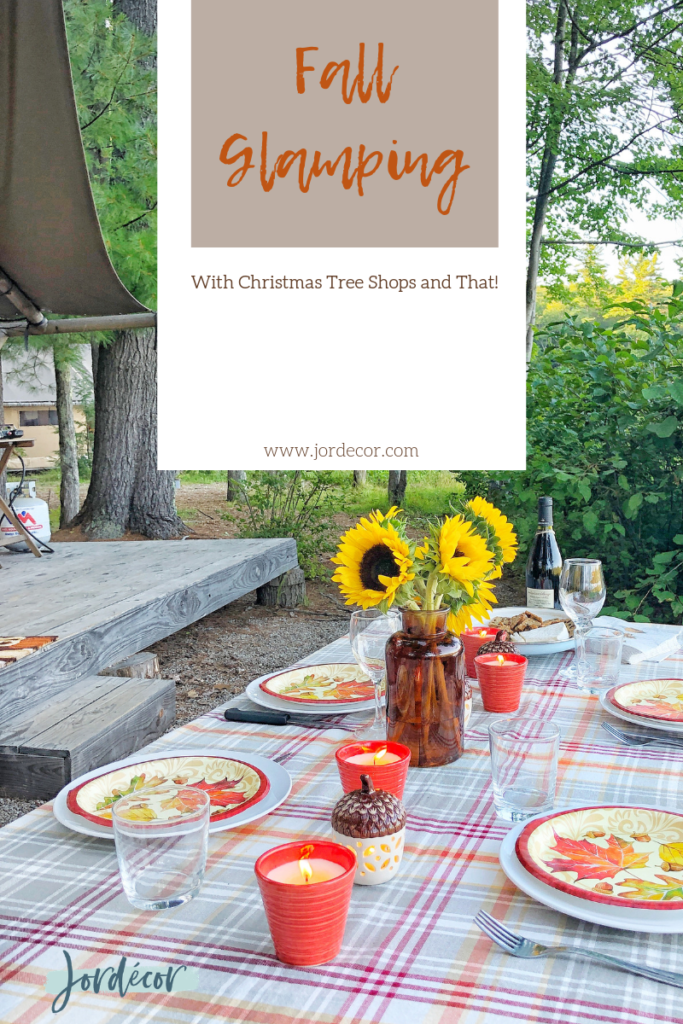
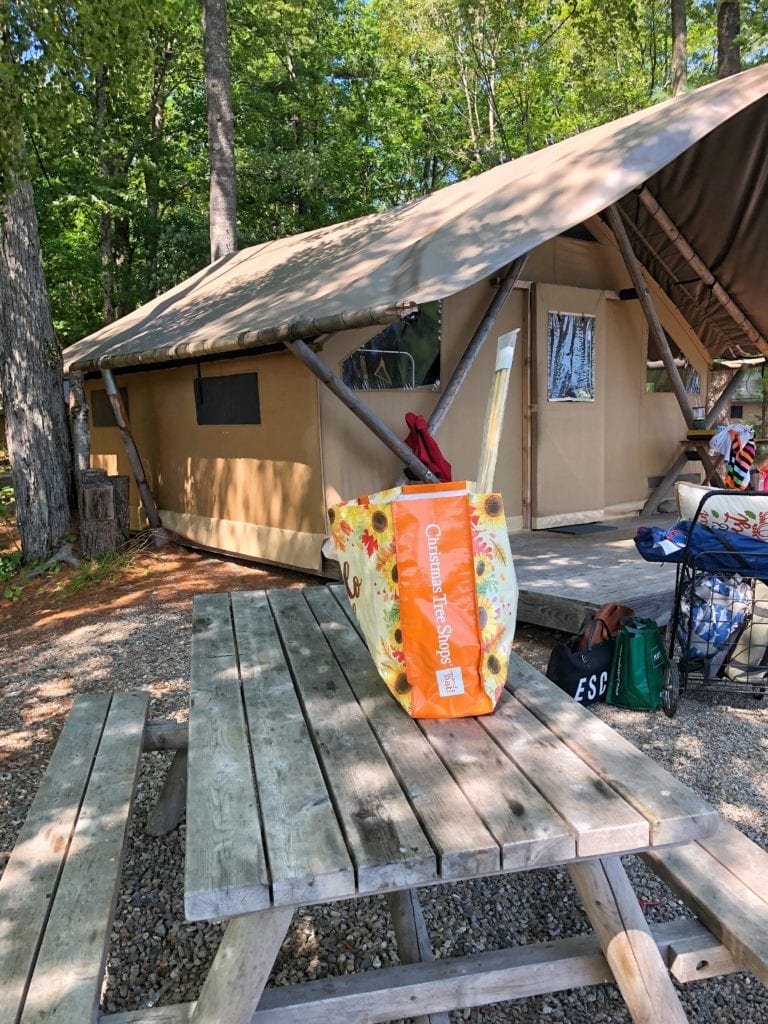
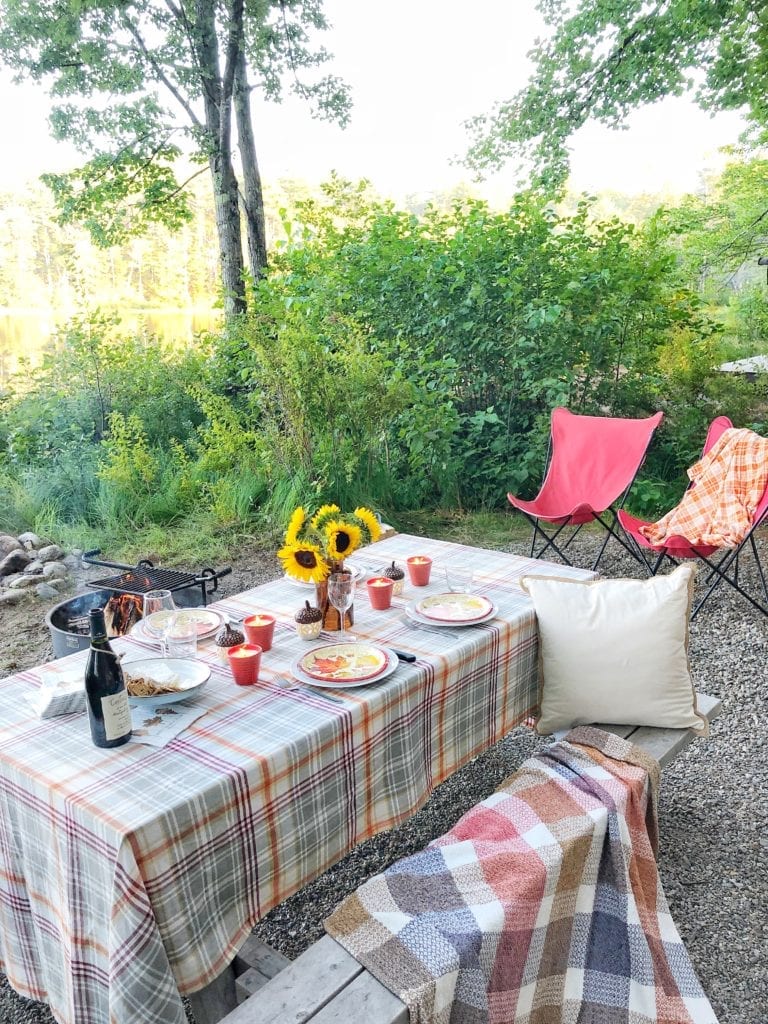
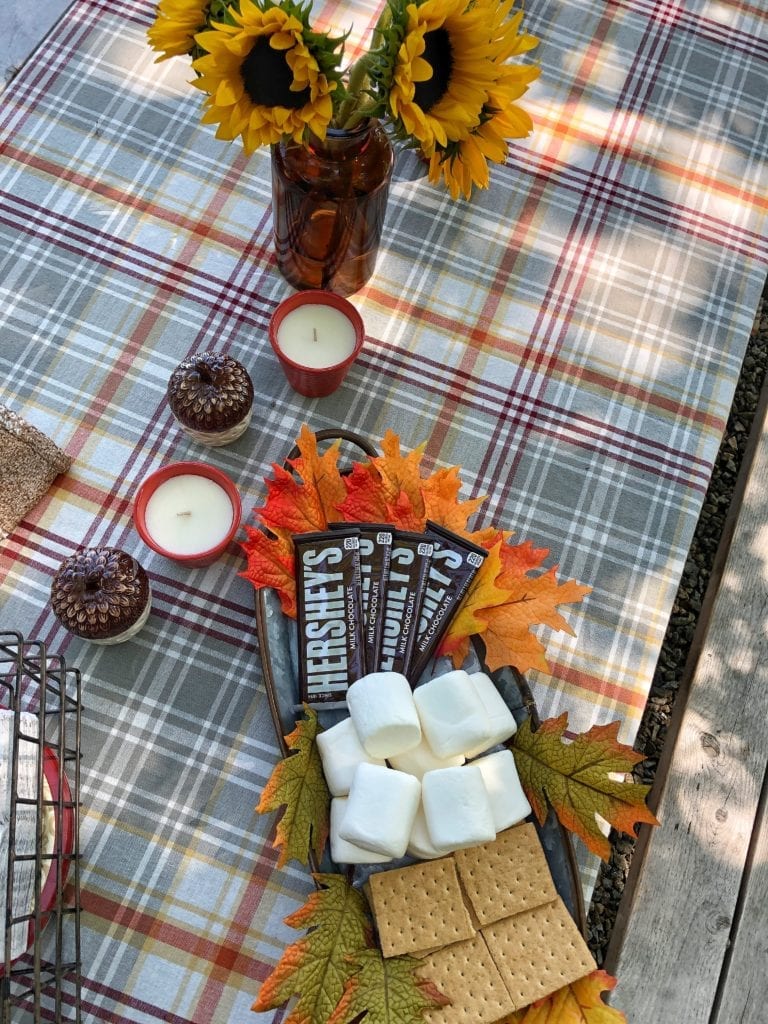
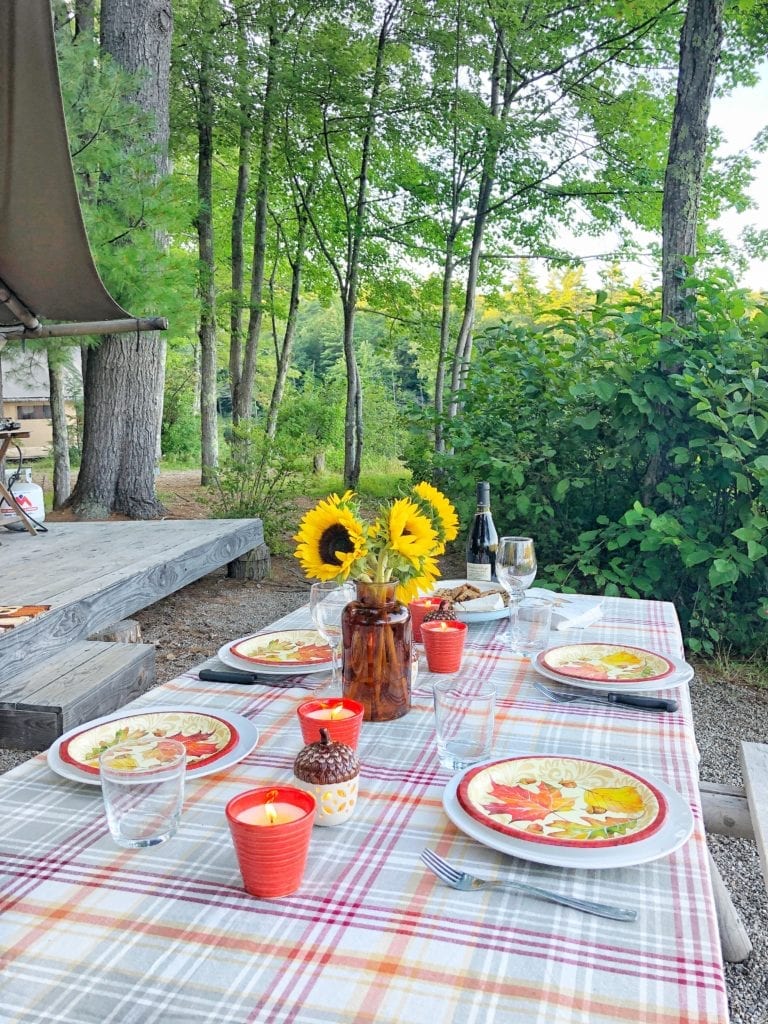
We recently went on a family “glamping” trip to Huttopia in the White Mountains and it was SO fun! Of course I had to decorate our grounds to make it feel homey and welcoming. I mean it was glamping after all, so why not! At this point nothing surprises Ben anymore and he got a good laugh at my decor for the camping trip. I love shopping at Christmas Tree Shops and That! they always have the best prices on seasonal decor which keeps me going back season after season. For Fall this year I wanted to do something different, outside our home. Since we were already going on this weekend getaway I decided it would be fun to decorate our camping grounds for us to enjoy for the weekend and make it feel like a home away from home. So while I was grabbing some essentials I also picked up some decorative items to make our spot a little cozier.
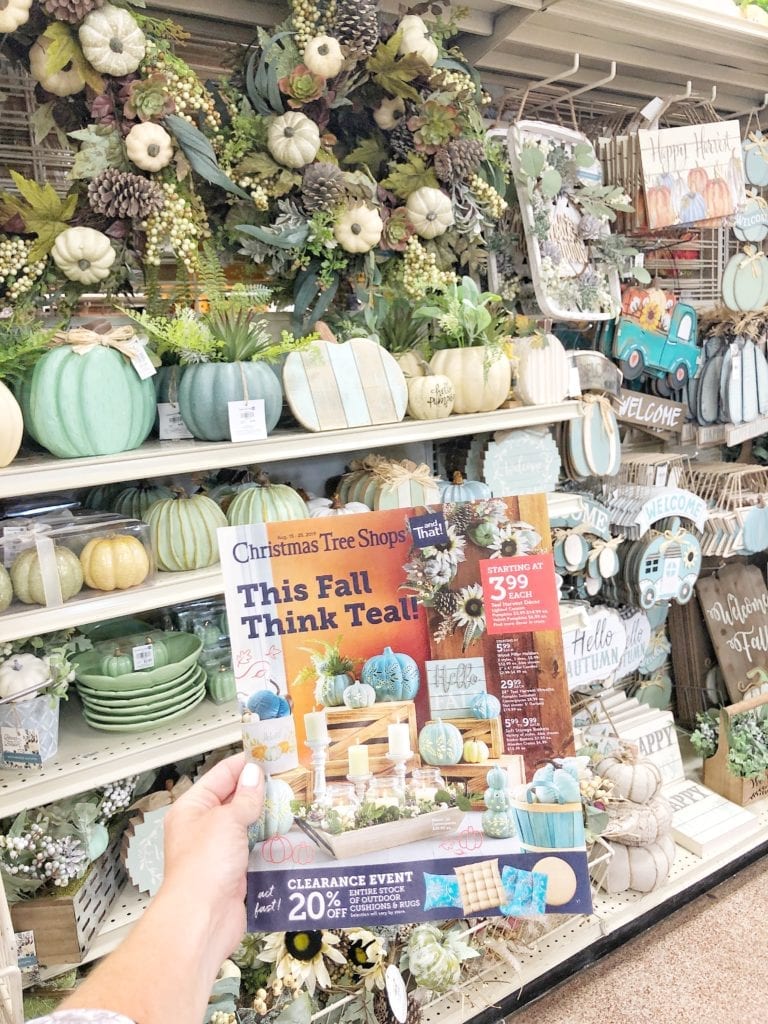
You can see in the photo below from when we arrived that the pre-constructed tent (yurt) is really cool. But the picnic table outside isn’t very attractive nor anything you’d really want to dine on or even play games on with out a table cloth. Keep reading to see how I transformed our area with some cute and affordable items from Christmas Tree Shops and That! fall selection out in stores now.
Here is a list of the items I found during my most recent trip to create a cozy fall welcome to our camp site:
- Bug Spray
- Citronella Candles
- Paper Goods
- Table Cloth
- Cute Fall Pillow
- Cozy Blankets 2 for kids 1 for grown up
- Camper Style Mugs
- S’more Sticks
- Door mat
- Travel Food Containers
- Kids travel chairs
- Door mat
Camping in Style
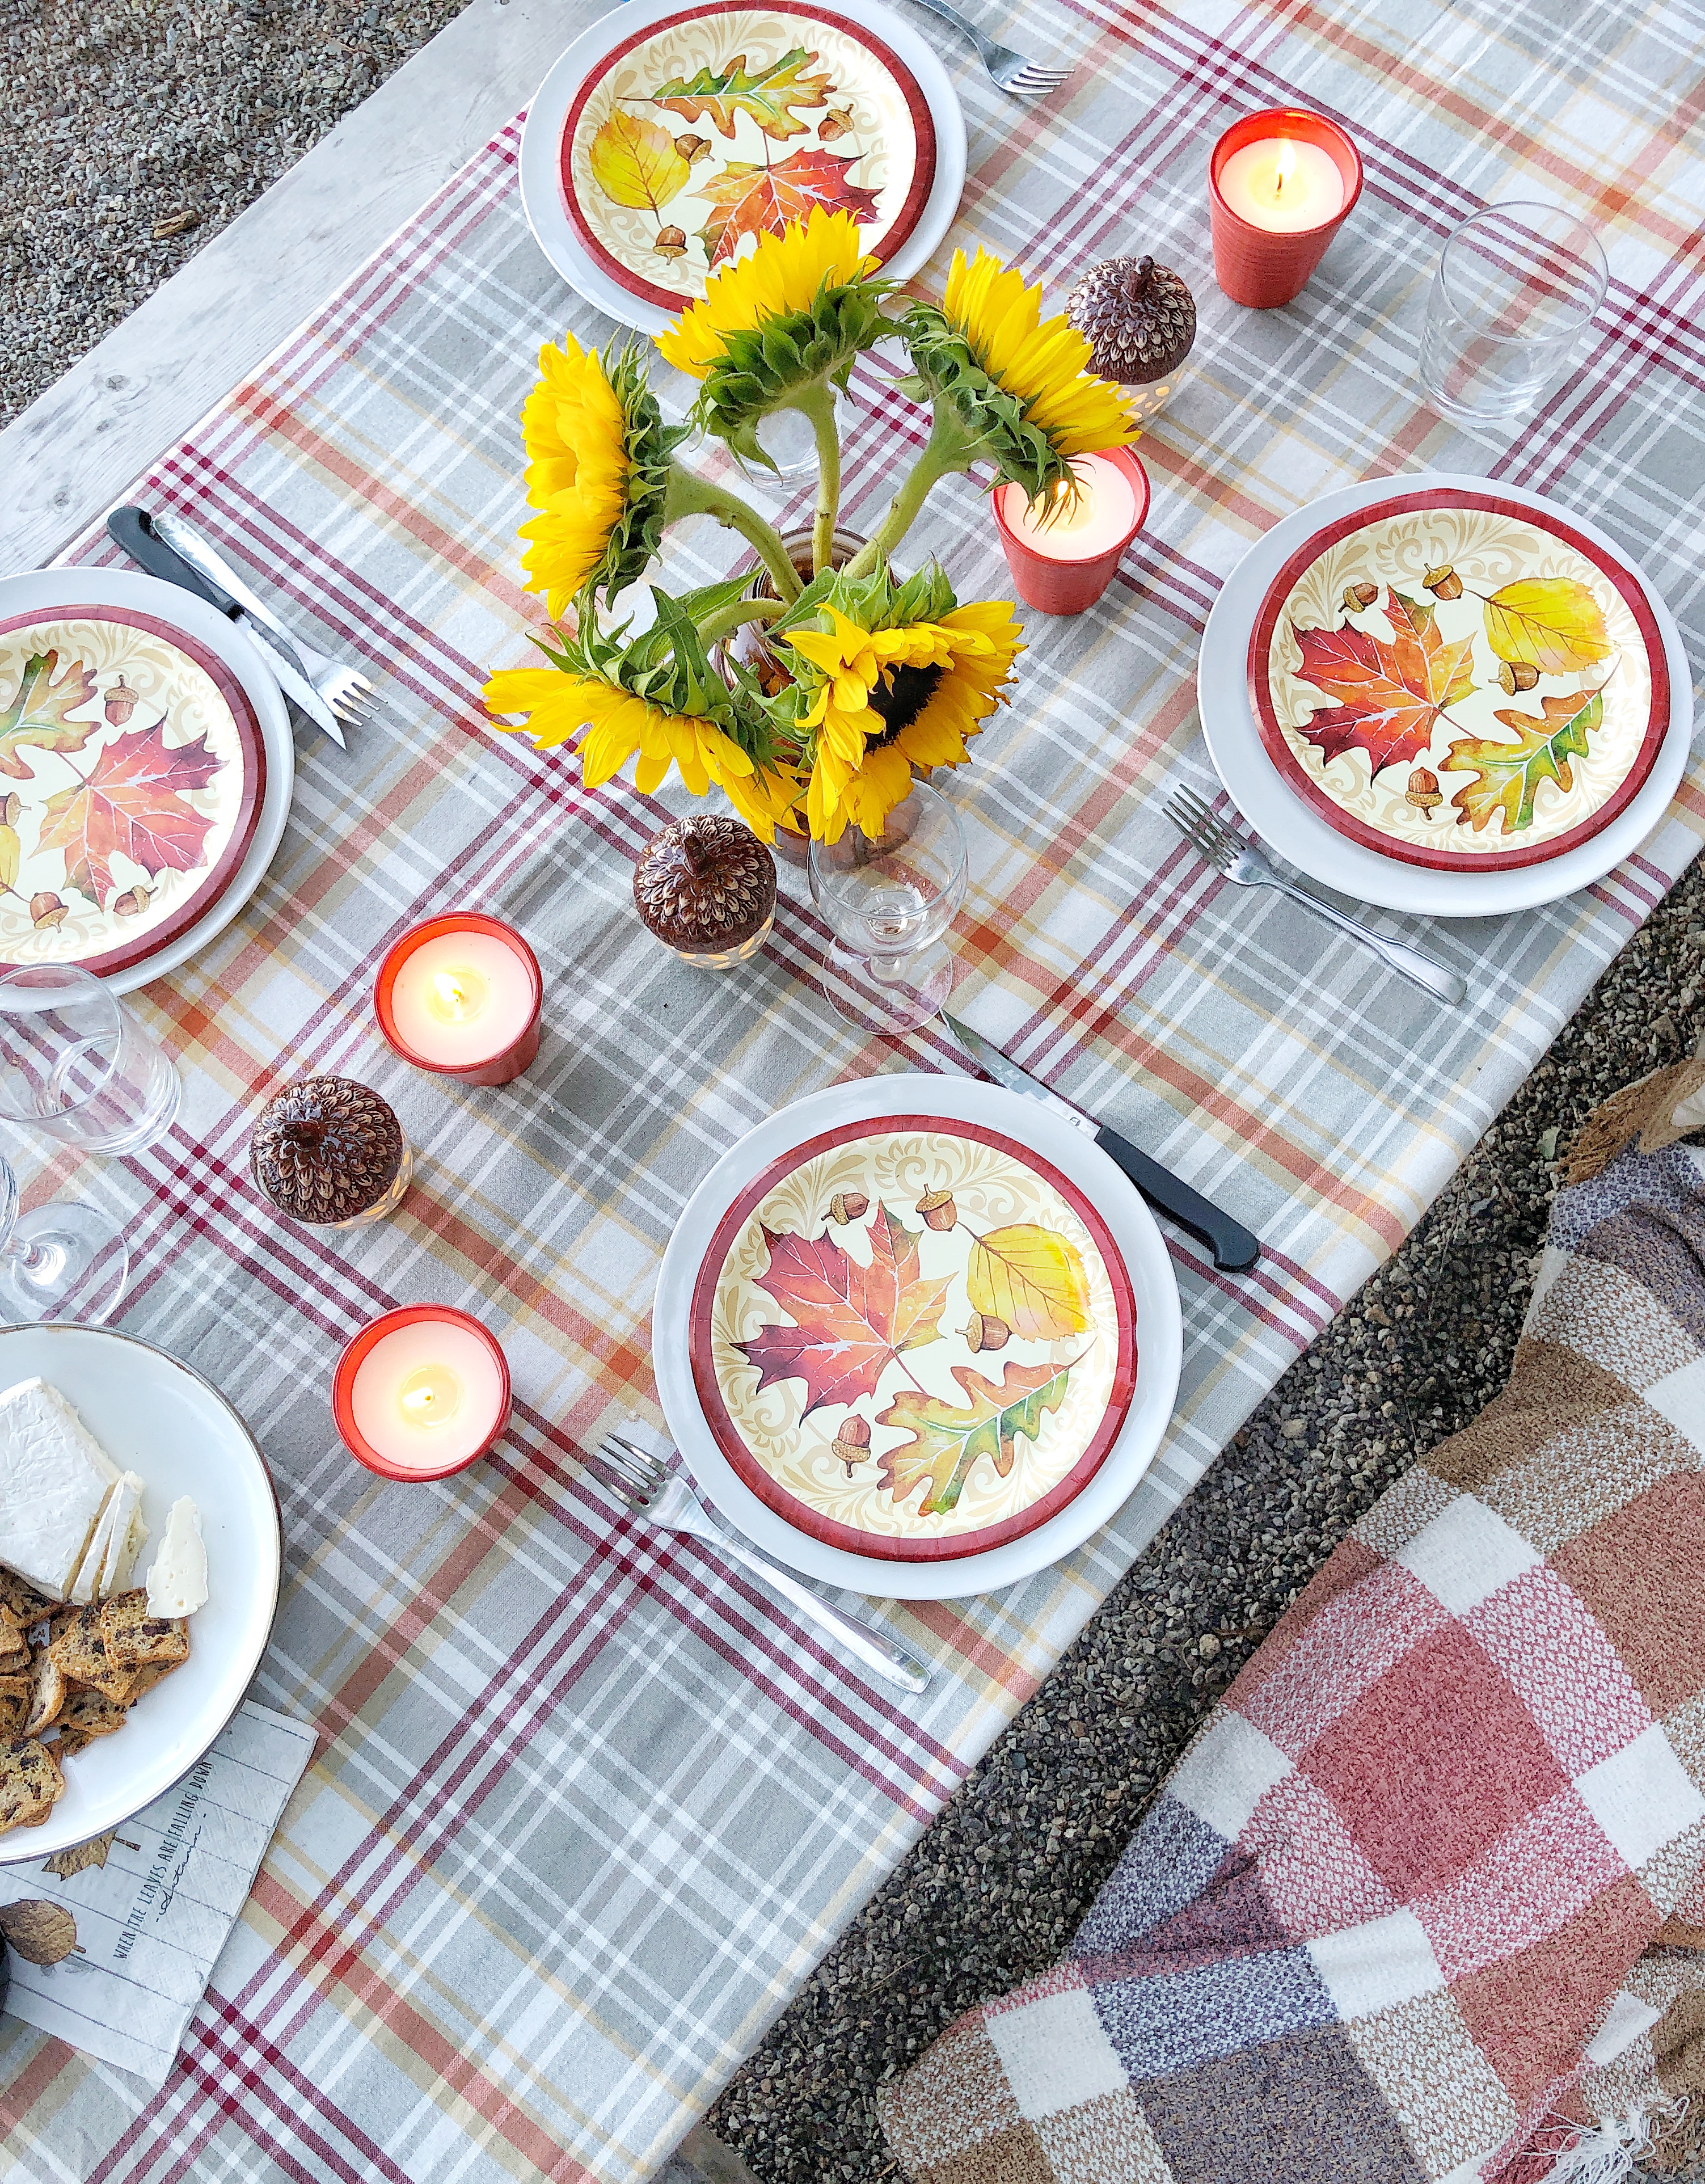
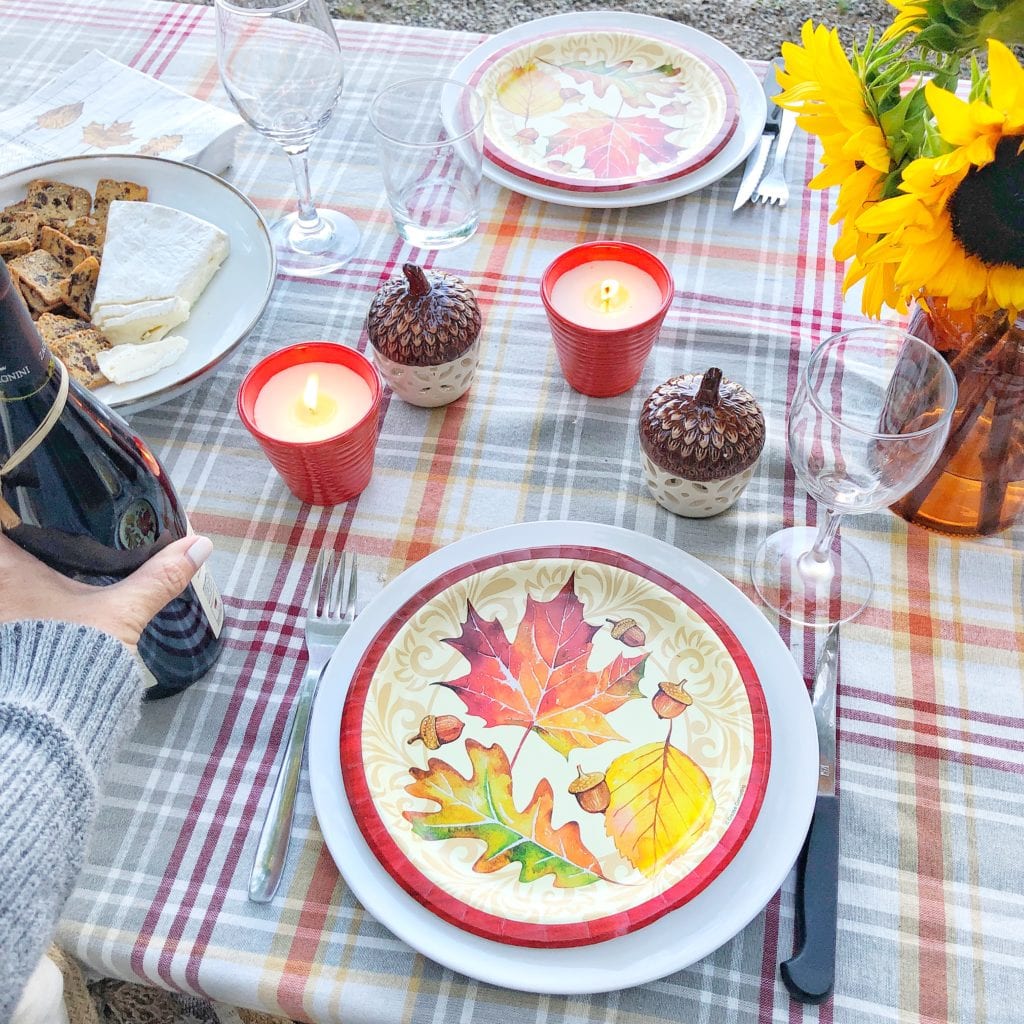
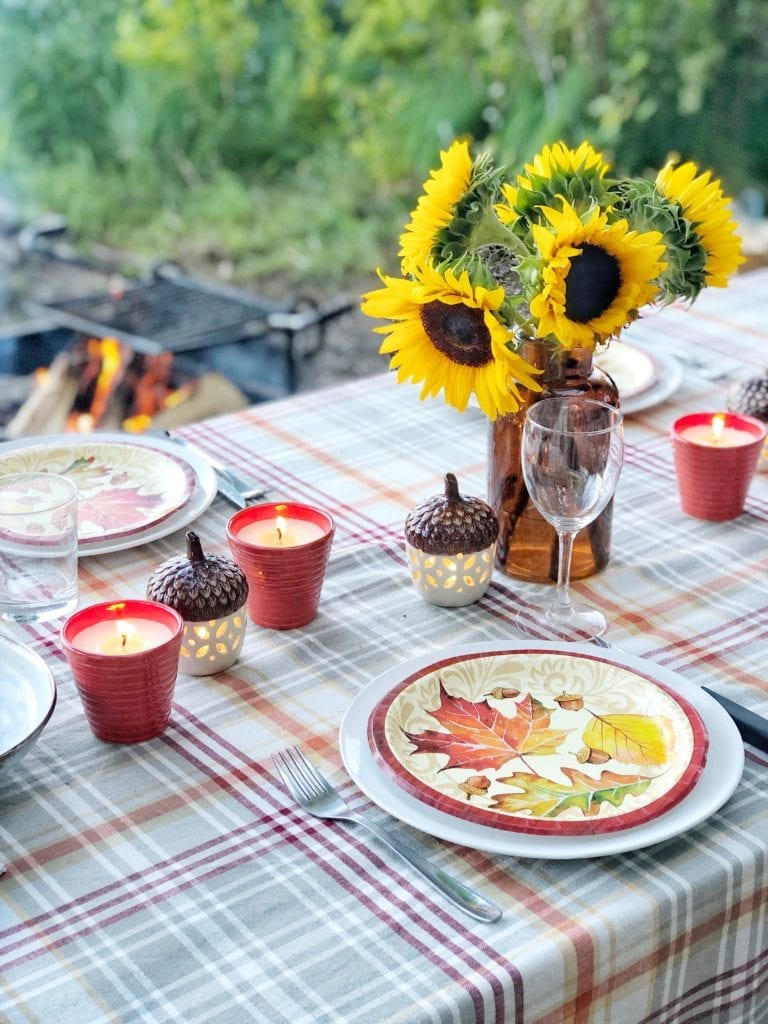
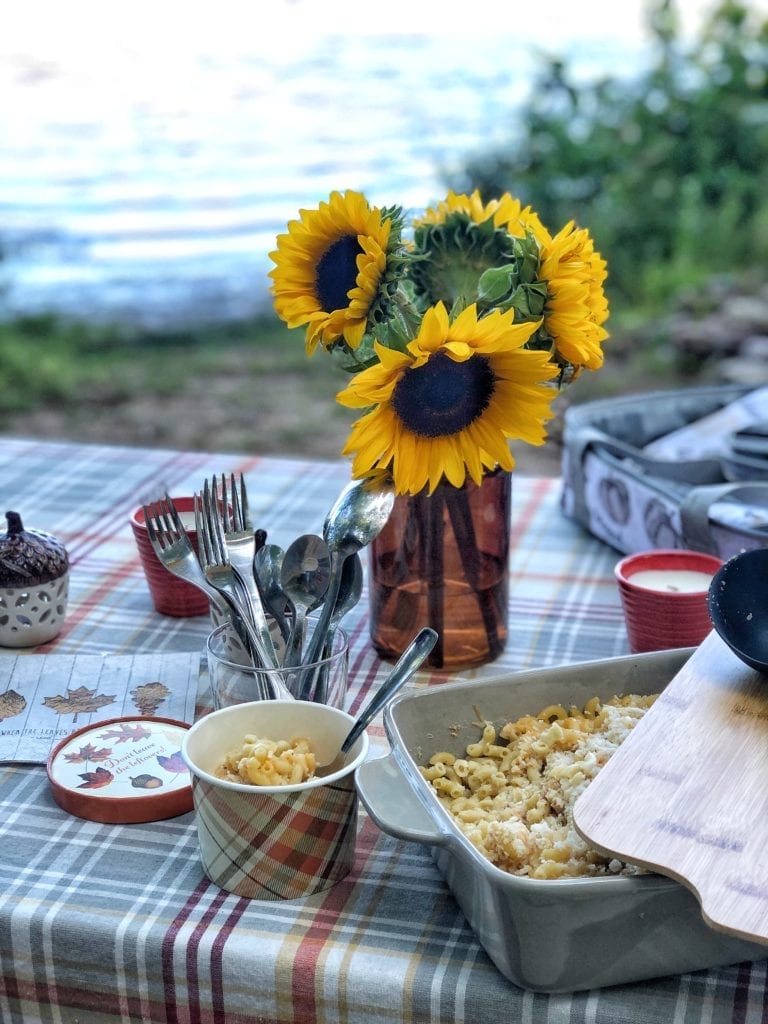
If your camping or glamping you want your area to look festive and home-y it will make the whole experience so much more enjoyable and of course much prettier! I purchased some fresh sunflowers at the grocery store and put them in a vase that I already owned and drove with them on my lap the whole ride. That’s how determined I was to make a beautiful setting for us to enjoy! I started by using the table cloth from Christmas tree Shops and That! (they have many beautiful prints and designs for fall) as the base. I then added a row of citronella candles in a coordinating color and these adorable ceramic acorn lanterns. It get’s really dark in the woods at night and it helps to have multiple light sources, of course flash lights are great too, but these little lights created such amazing ambience at night.
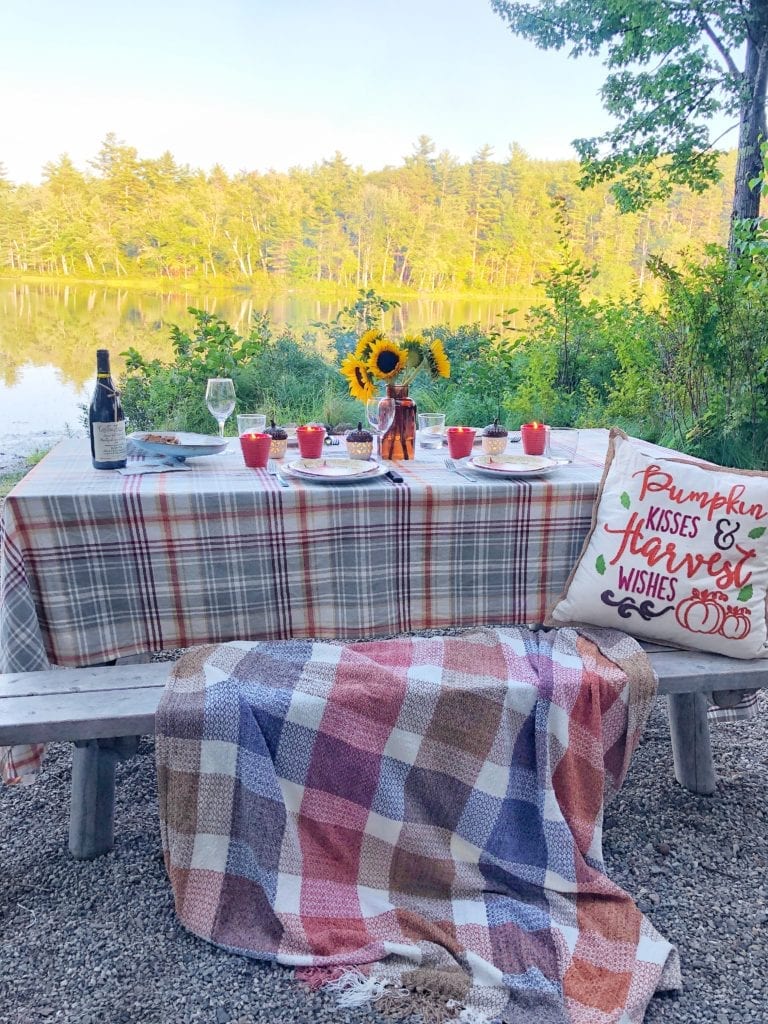
Luckily our Yurt/tent had a small kitchenette inside with basic plates, bowls, mugs and cutlery. But, I wanted to be prepared so I bought two adorable fall camper mugs from Christmas Tree Shops and That! and then a bunch of adorable paper plates and to go tins with lids for eating on our laps or storing left over food that we grilled on the fire. I really mixed in things I purchased and items from the Yurt like the glasses and cutlery, and my pot lid turned cheese/cracker plate.
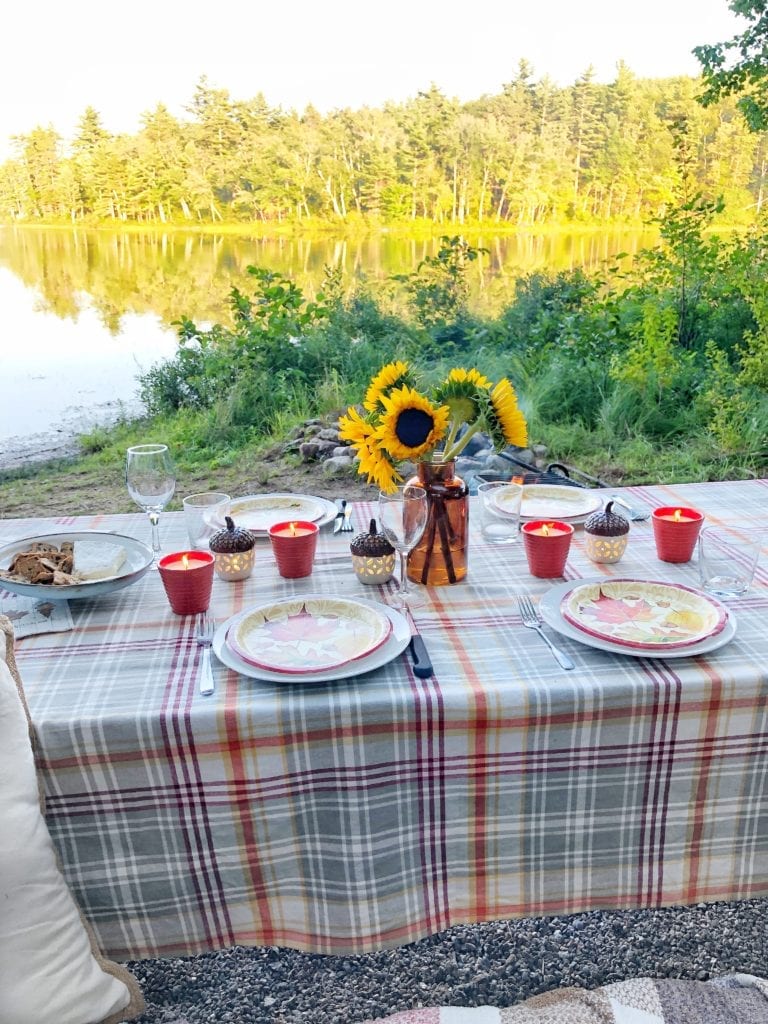
I stuck with a traditional Harvest color scheme for our glamping adventure. I love that Christmas Tree Shops and That! has a variety of seasonal decor so there really is something to fit every home, style or yurt! Can you believe how gorgeous this view was outside our front door? To dress up the paper plates I just layered them over the white ceramic plates from the Yurt and this made our last dinner very special. Ben grilled steak tips and we grabbed a salad from the Air Streamer cafe on site. It’s really an awesome experience to glamp, you mix a little rustic with a little lux.

Cozy Camping
Camping in late summer or early fall means being prepared for cooler temps. The temps would drop quickly as the sun went down so lots of cozy blankets and warm fires were key. Luckily, Christmas Tree Shops and That had the coziest blankets! I got one for each kid to wrap themselves in when out by the fire and one for Ben and I to share that I knew would look great in the living room once we got home.
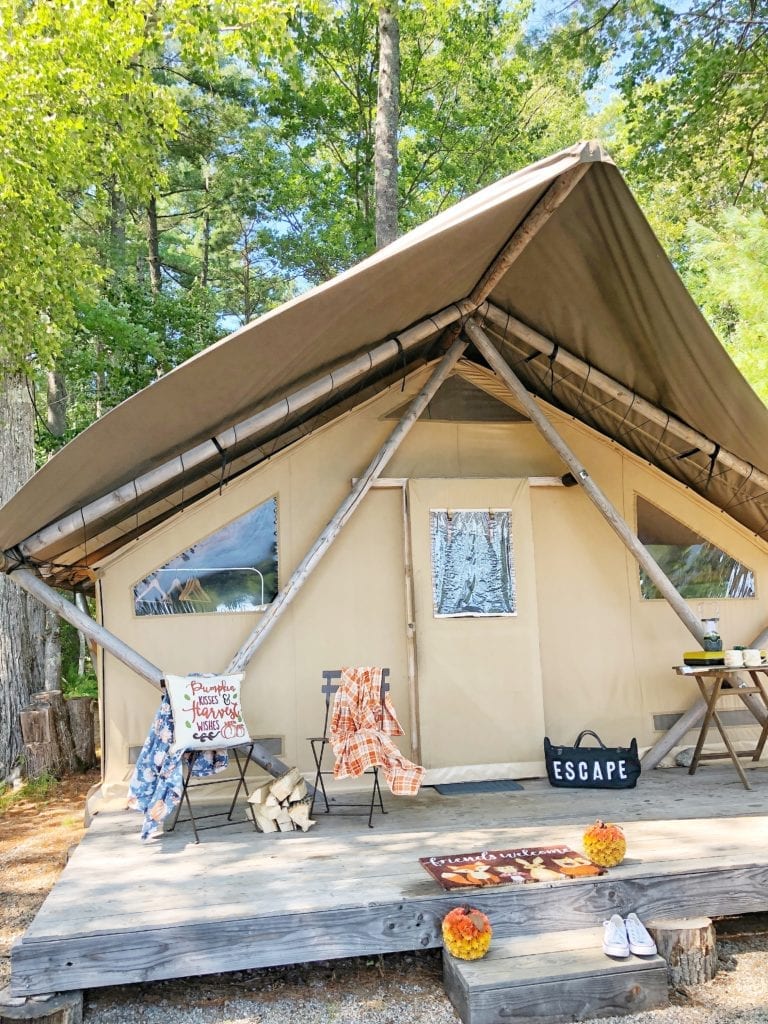
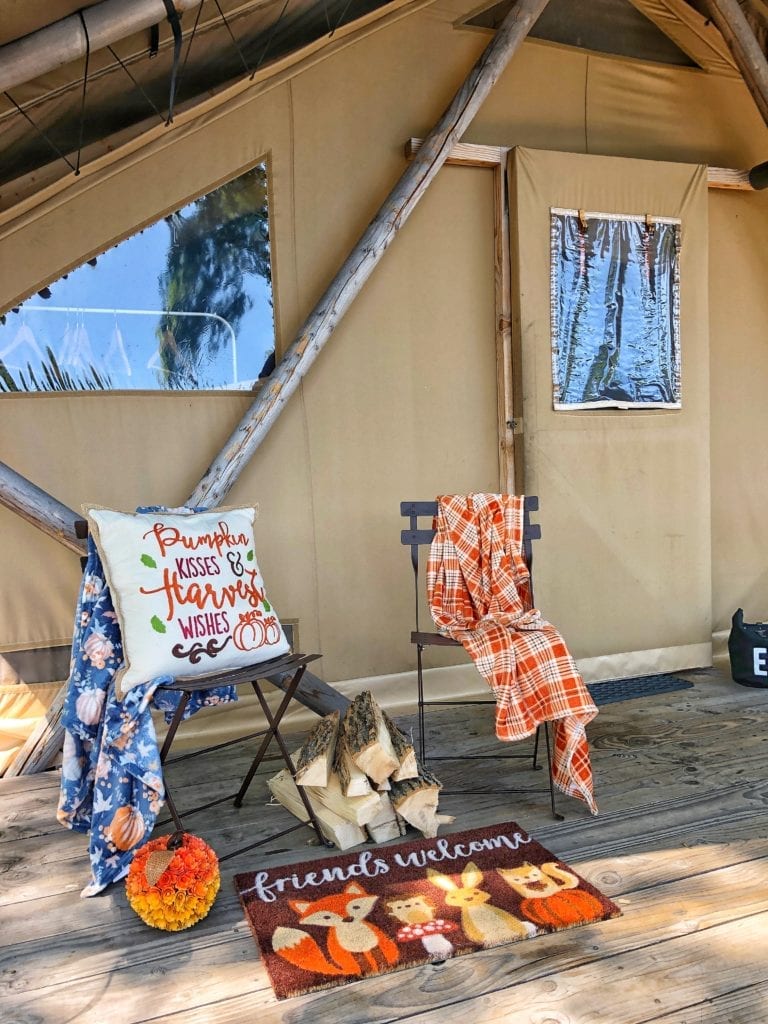
The cute little door mat and wood rosette pumpkins are the perfect pop of color and welcome to our Yurt. The kids loved the woodland animal theme. Christmas Tree Shops and That! also has an adorable section of woodland creature decor and I just couldn’t resist this mat. A lot of dirt gets brought into the tent, being in the woods all day will do that 😉 and this really helped keep the tracking in dirt down to a minimum. The plush blankets are insanely soft and warm, the kids loved them! For under $10 it’s a fall camping necessity. I loved moving this adorable pumpkin pillow all around our camp grounds to add another layer of cozy to our outdoor area.

Food & Drink
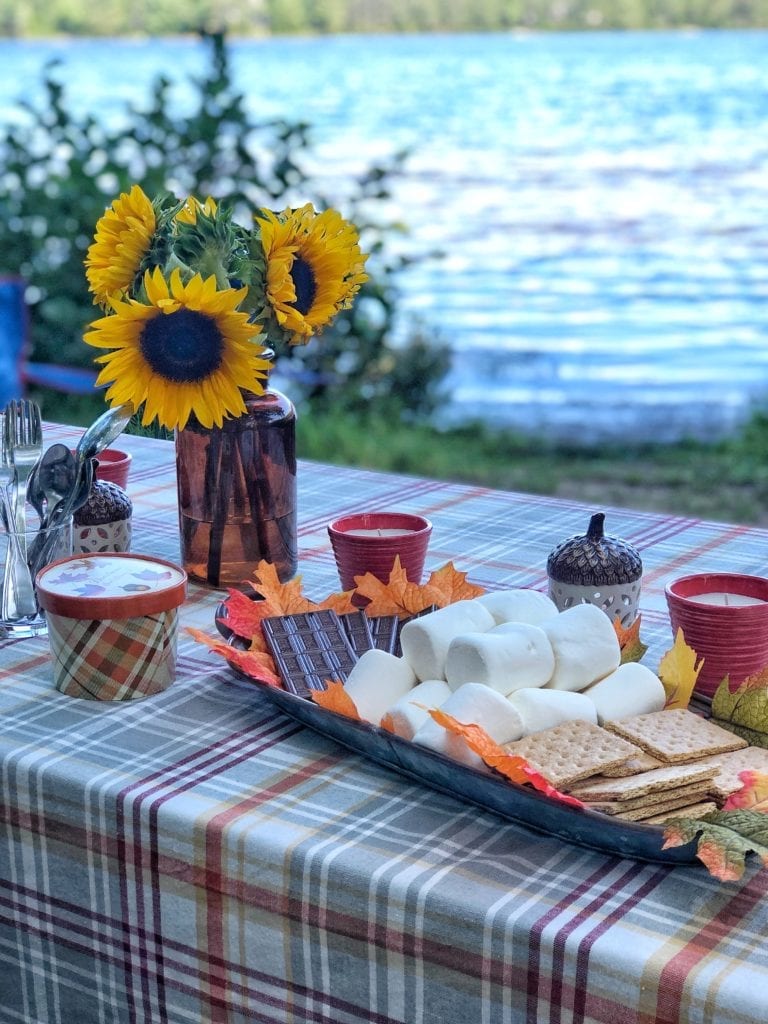
We kept it simple with food and brought a cooler with juice boxes and some beer. I pre-made a mac and cheese that we warmed over the gas stove. It would be great if you pre-made a chili too. Of course we had to have some pumpkin beer and s’mores! I put all the s’mores ingredients on a metal tray but used a package of fall leaves from Christmas Tree Shops and That! as the base to give it that fall feel, it really dressed the tray up an made it looks so pretty. The resort we stayed at also had an air stream cafe on site which had a pizza oven, so we tried that one night too! We really never wanted to leave our beautiful lake view! However I promise we did more than eat the whole time. In between meals there was canoeing, fishing and an amazing salt water heated pool to enjoy too! We played lots of board and card games at the picnic table as well, which was so fun!
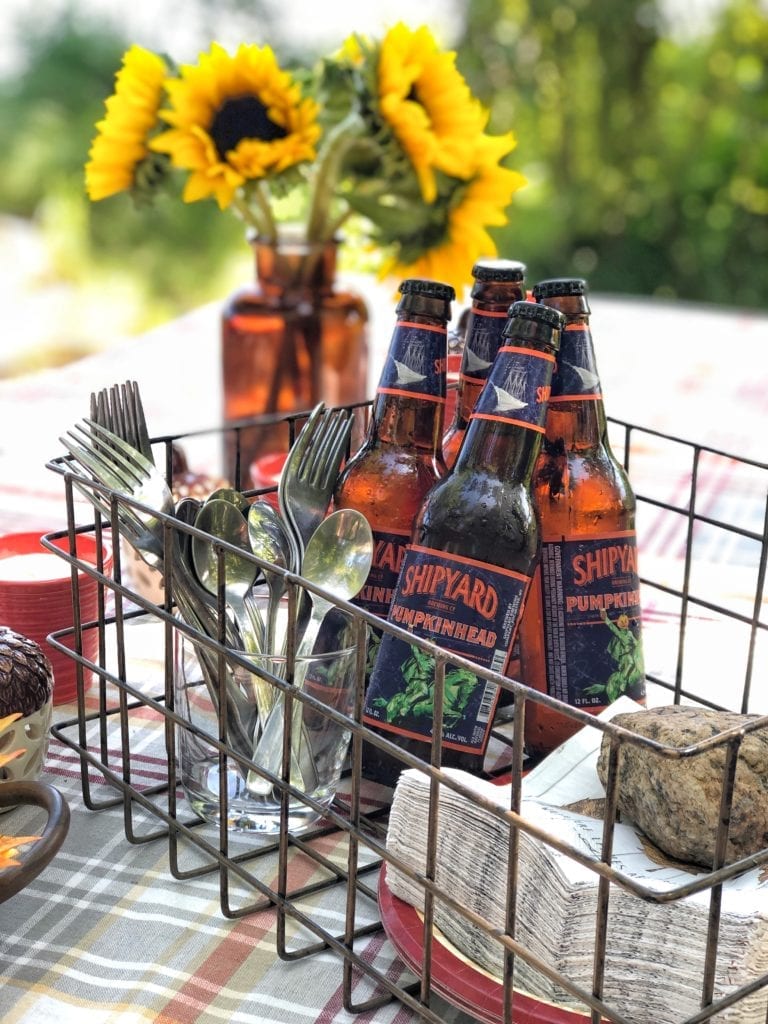
Thankfully it wasn’t very buggy because it was cooler. However, we didn’t want to chance it and came prepared with our bug spray and citronella candles all purchased at Christmas Tree Shops and That! I love that I grabbed everything I needed affordably at one of my favorite stores. There you have it! Our family glamping experience!
All in all we had an amazing experience in the White Mountains. We made so many memories. The kids enjoyed time in nature, Ben got his fill of the great outdoors; lighting fires and cooking on an open flame. I had a working bathroom + electricity and an actual bed in the Yurt. So basically we were all happy glampers! What made it a little extra festive was all the great products I found at Christmas Tree Shops and That! and I look forward to also finding ways to use these items through out our home this fall.
Are you a camper? Could you see yourself glamping? I would do it again next year for sure and I think it would be a blast with a group of friends or for a family reunion!
Thank you for stopping by and I hope you check out all the other beautiful homes on our fall tour!
Jordan
Pin For Later:

Southern State of Mind | At Charlotte’s House | A Tufted Life |
Jor Decor | Aratari at Home
read the full post >
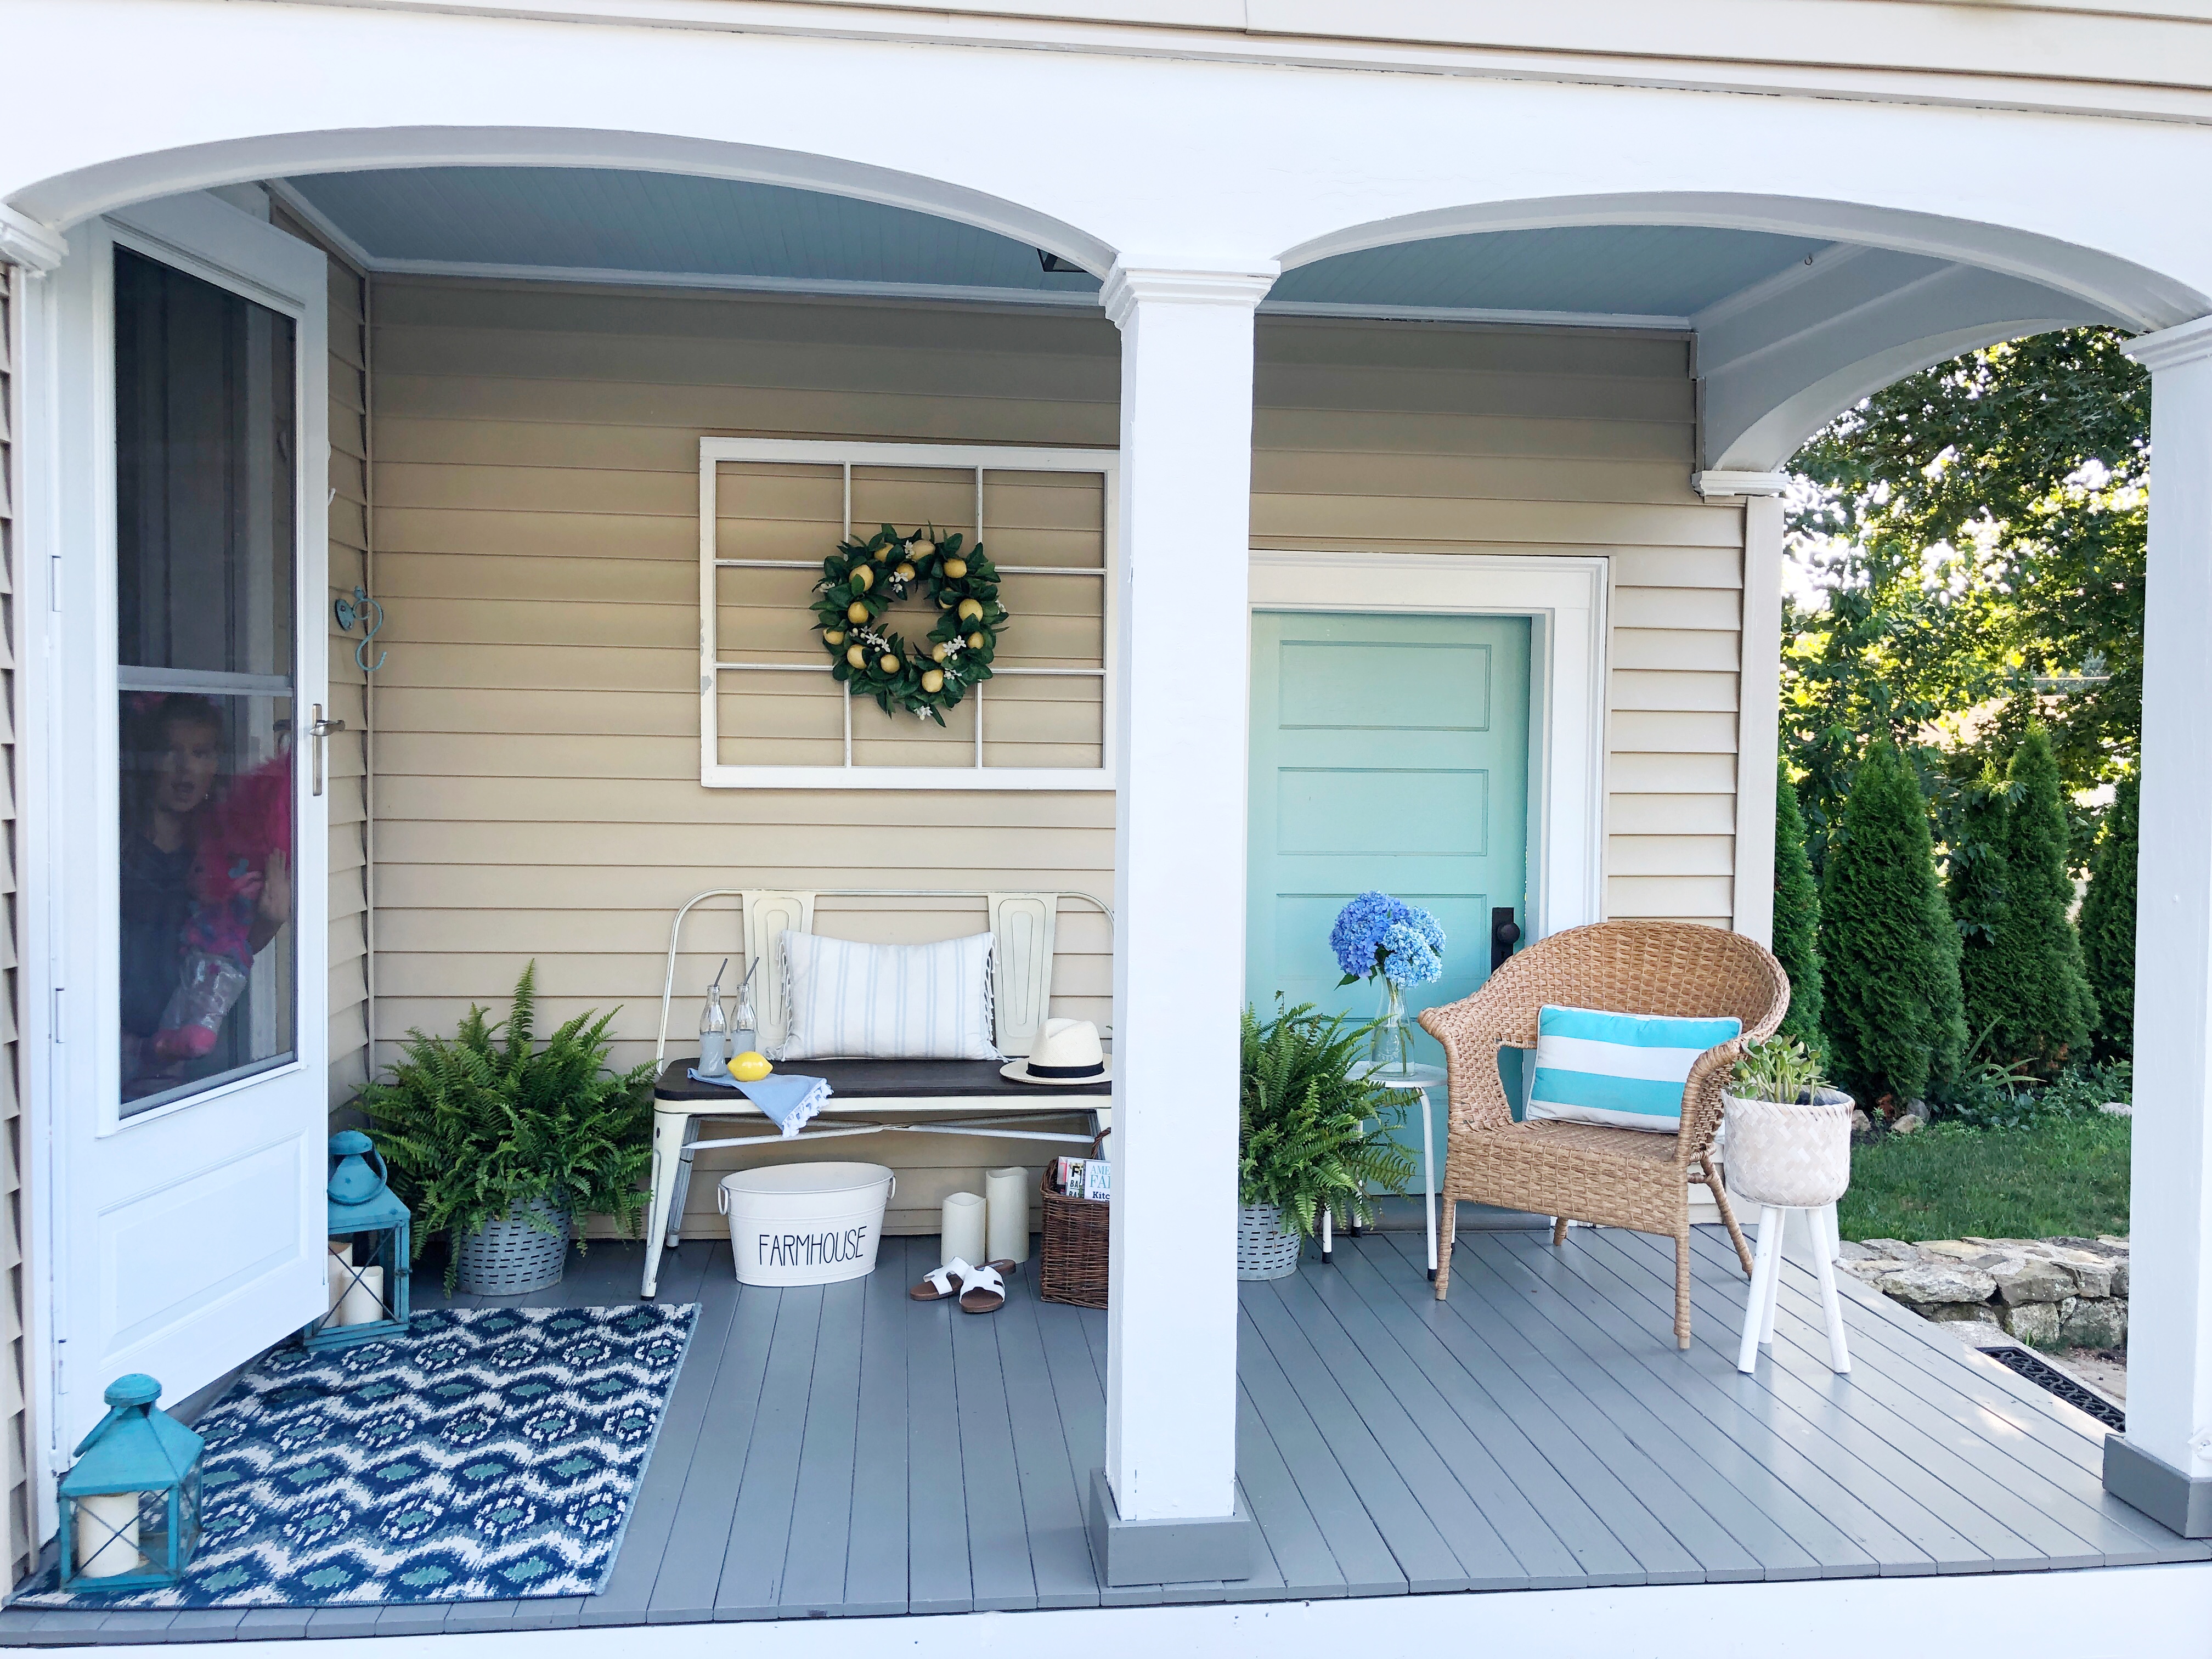
The dog days of summer are officially here in Boston with temperatures in the 100’s this past weekend. Like many we are trying to beat the heat and stay cool. Hey, I’d take heat any day over snow and cold- so bring it! I like to keep my decor really simple this time of year and now that the 4th of July decor has been packed up I wanted to switch up some of our farmer’s porch decor to make it feel really summer-y and fresh with out going crazy or spending a lot. Today I’m sharing my Summer Porch Refresh!
Before I jump into summery photos of our farmer’s porch I want to share something pretty awesome that finally happened a couple weeks ago which inspired this summer refresh. We were long over due to have all the exterior trim of our home repainted, it was chipping for years and we knew it was time, well it finally happened!!! Ok maybe this isn’t that exciting, but it get’s better! I’m not ready to show it off just yet because now our window shutters look pretty dang… BAD. Figure’s right? One thing always leads to the next. Hopefully in the fall we will update them. They’re a redish-brown color and super faded, some even broken.
Anyways, back to the more awesome part. I knew the painter’s would be here working on all the trim around the house, even our farmer’s porch. I have been wanting to freshen up our farmer’s porch FLOOR paint and CEILING paint for awhile but haven’t been able to find the time or energy in this heat. SOOO the company that was doing our trim ended up painting it for us! *TIP if you’ve hired a subcontractor for a home project (painter, plumber, electrician etc… ) it’s worth it to ask for other smaller add on’s, chances are since they are there they’ll do it for you and give you a better deal than having to come back later for that other smaller task. So it wasn’t much more for them to do those two areas since they were literally already working on all the trim around it. YAY!
THE BEFORE:
Here is our front porch at Halloween last Fall, notice the floor and ceiling?
You can see that it was a worn out brown paint with out much of a sheen to it. The ceiling wasn’t awful but it was just white and would attract a ton of bugs nesting in the corners (I guess it would have fit in at Halloween time! ;))
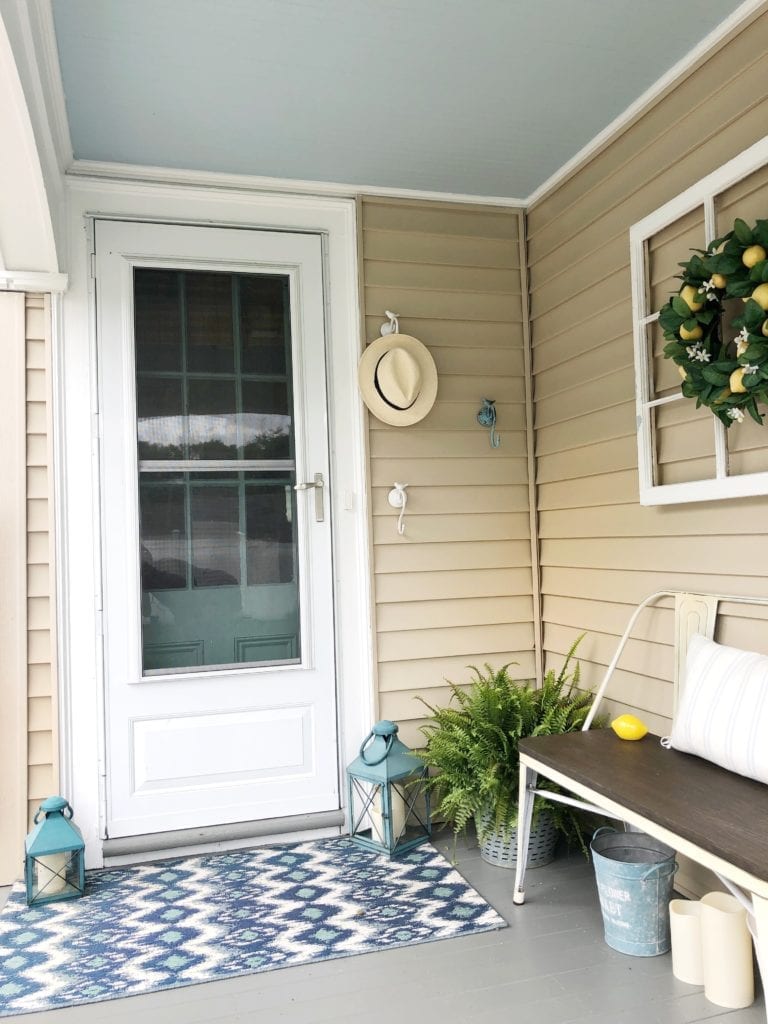
PORCH FLOOR PAINT COLOR:

I like it because it’s a darker gray (in person) but not overly dark and there are some warmer undertones with out it looking too brown. It’s a very dynamic color. We used Benjamin Moore’s exterior paint in a semi gloss and I love that it has a little sheen to it.
PORCH CEILING PAINT COLOR:

Palace Pearl By Benjamin Moore
I like it because it’s a subtle soft powdery blue that won’t fight too much with the St. Lucia Teal on the exterior doors. We did this in an eggshell since we didn’t want it overly glossy on the ceiling.
So why blue on the ceiling? Blue on porch ceilings originally started in the South to ward off evil spirits and then over time was also used to confuse bugs from nesting on your porch ceiling as they think it’s the sky. I’m not sure if this is actually true, but it looks really pretty! I’m going to see if it works at all because we always have yucky bugs in all the corners out here in the summer. So far it’s been a couple weeks and zero bugs! This article from Apartment Therapy also does a great job going more in depth about the historical context of the blue porch ceiling origins.
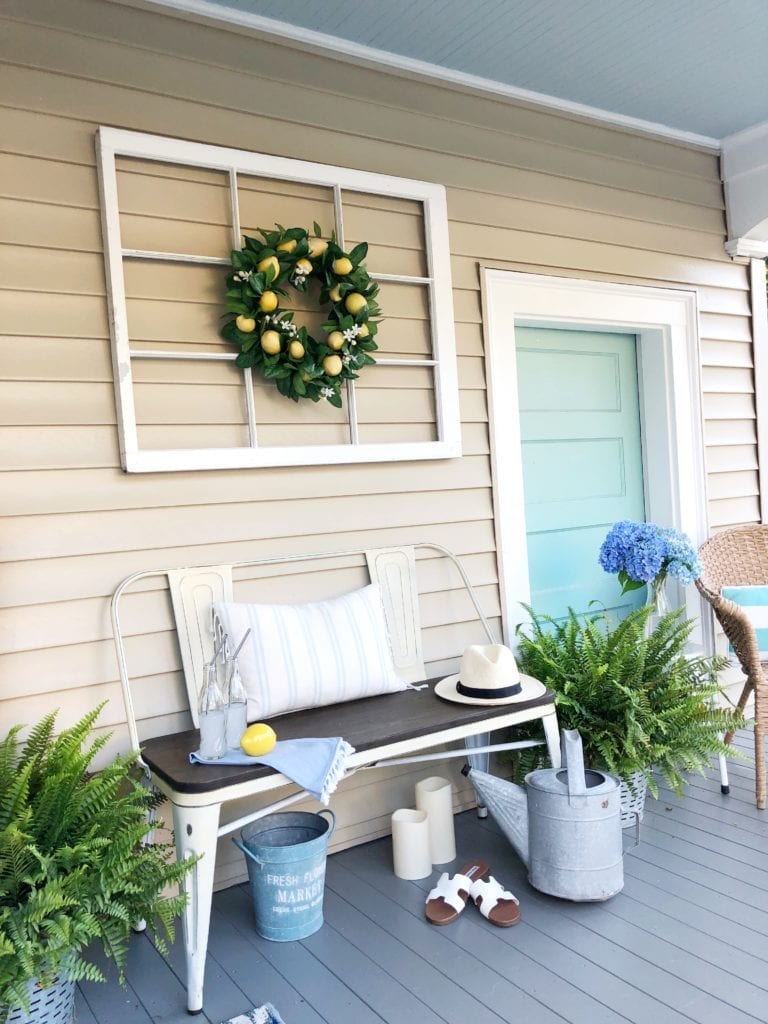
FRONT PORCH DECORATING TIPS:
1. Pick a color scheme.
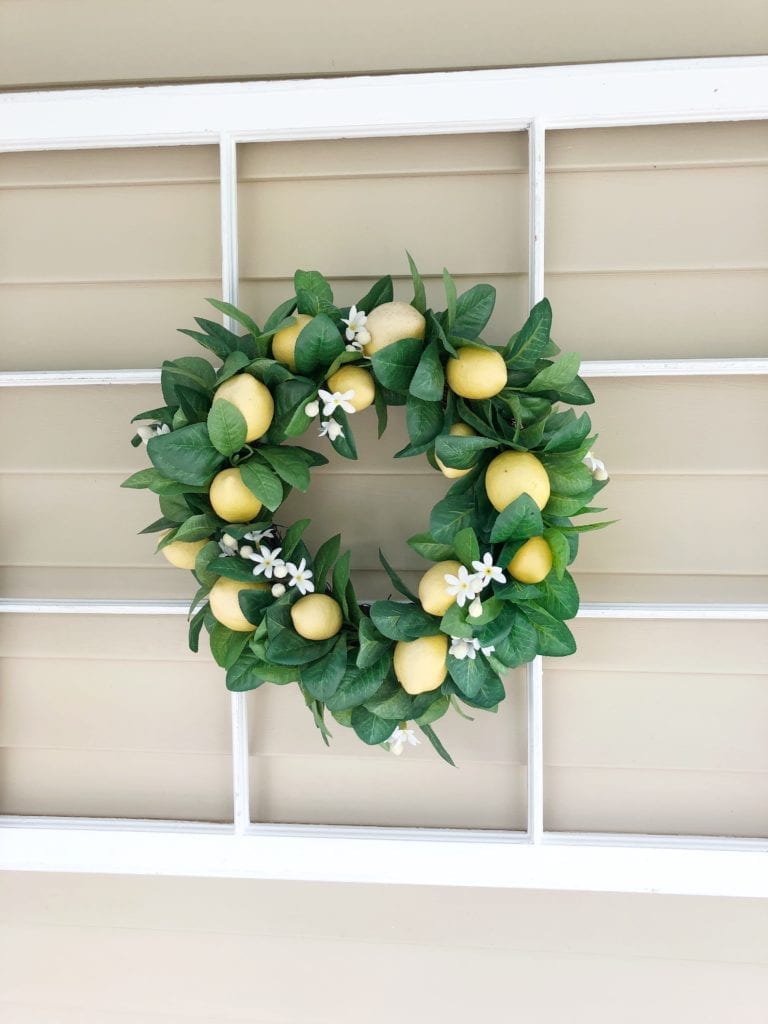
I have my signature blues going on but the accent color this time of year that I gravitate towards is yellow- it’s cheery and think of how refreshing lemons and anything citrusy is this time of year.
2 GREENERY/FLOWERS
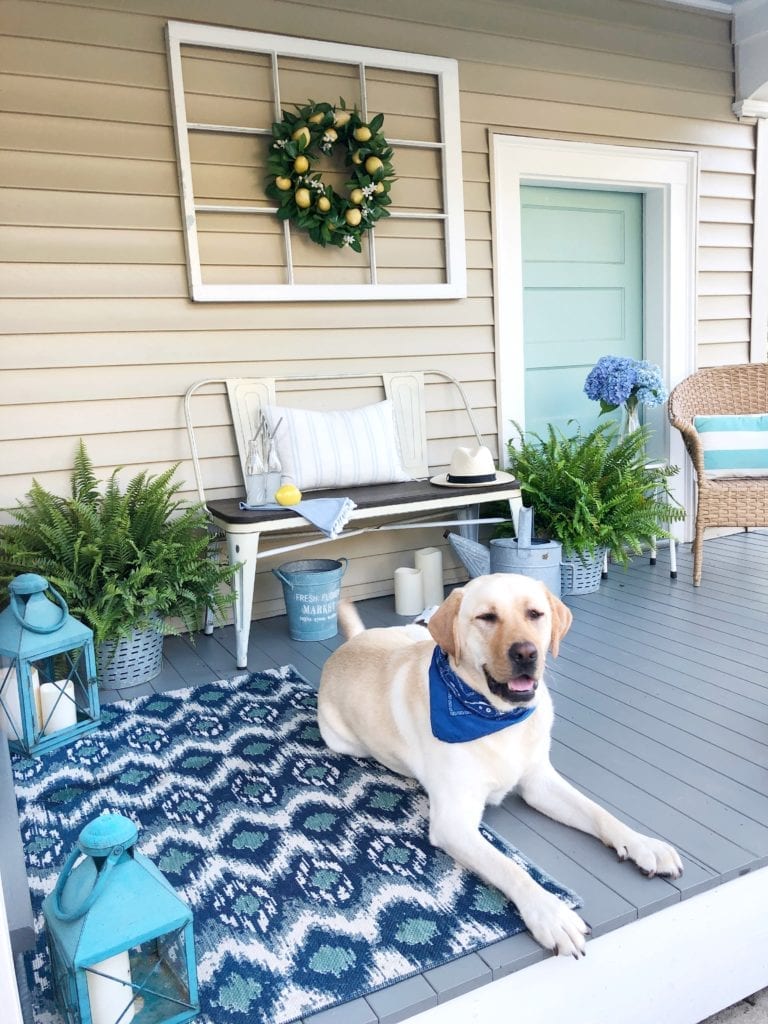
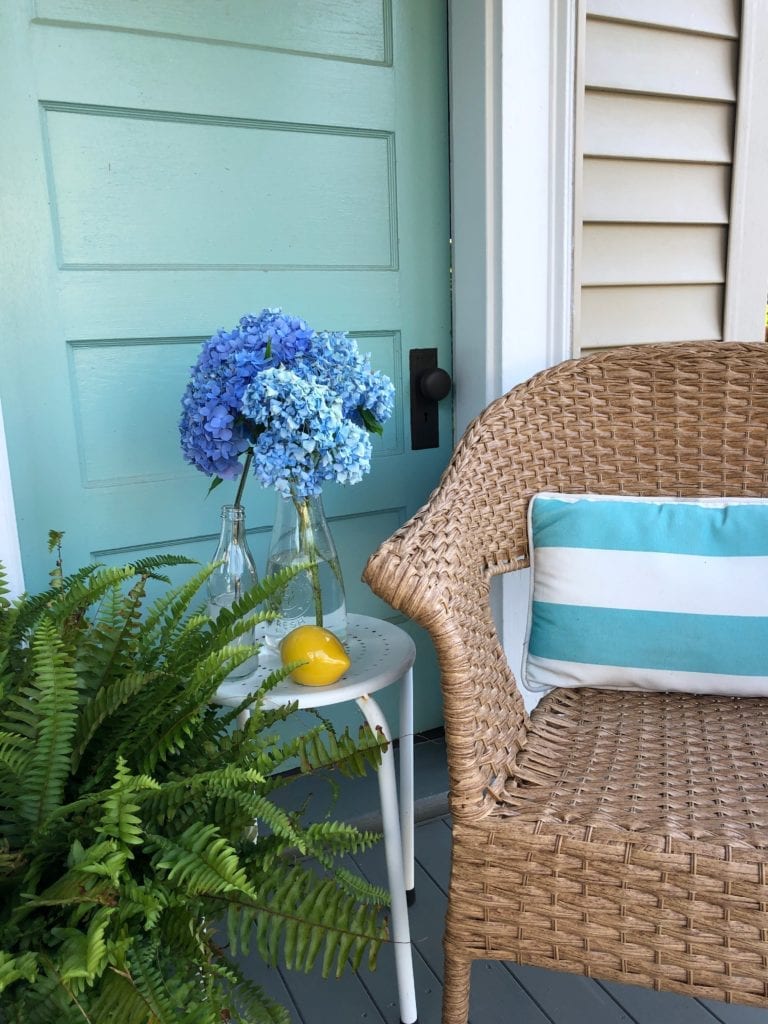
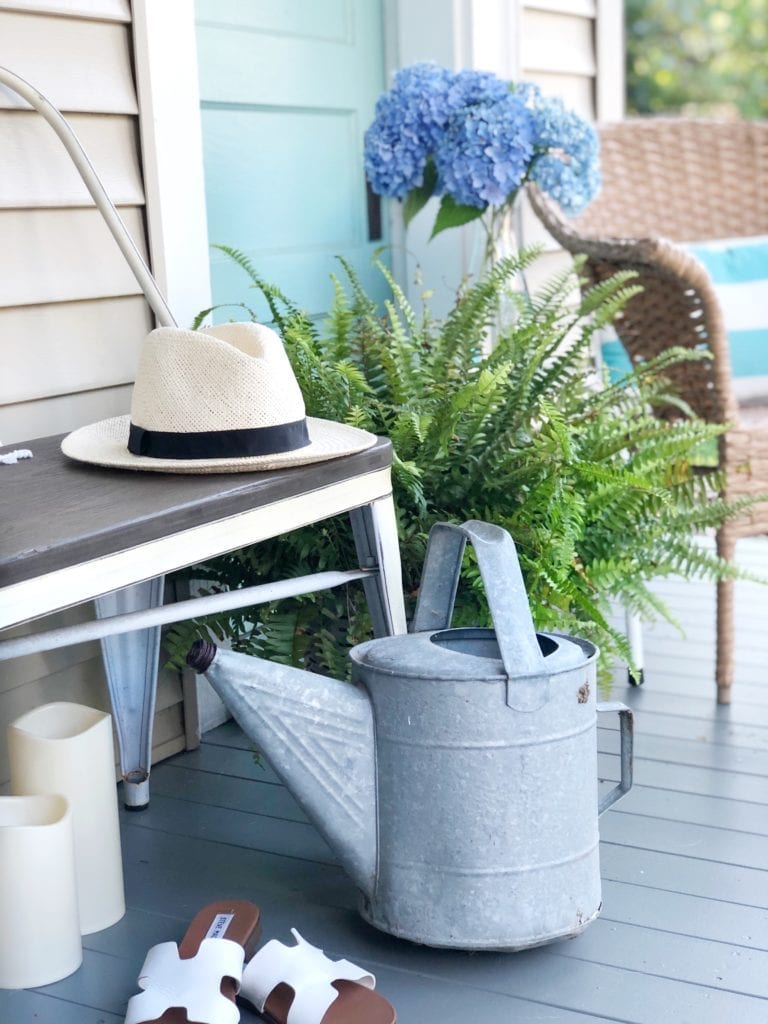
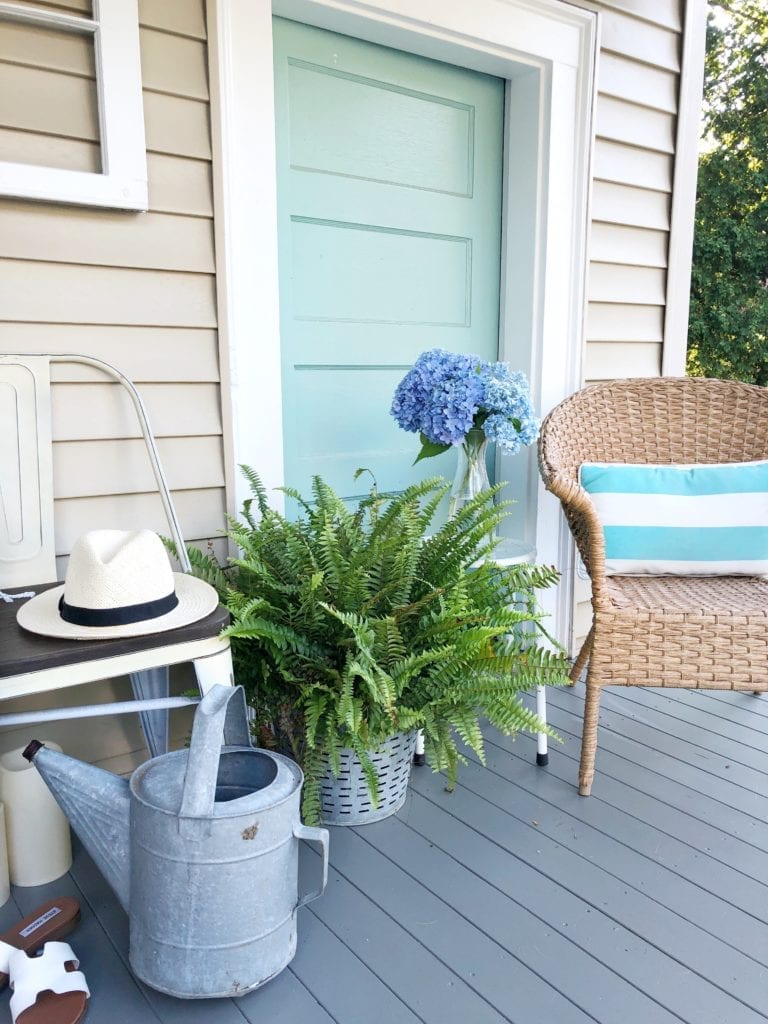
Find some plants that like to be potted in slightly shady areas that can also withstand heat. So far my ferns have been thriving. Honestly, I’m not the best with keeping potted plants alive! So far ferns for the win! Our hydrangea plants in the front yard are having the best year ever! So I trimmed some and put them in a vase with cold water and ice cubes to perk them up in the heat.
3. LANTERNS
I’m always a fan of adding lanterns outside. Plus I love that they can bring in your color scheme and add ambiance in the evening.
4. PATTERN RUG & PILLOWS
Always add a fun pattern or two to you outdoor area either in a rug or pillows. I love this ikat pattern rug I got from Target last year and this pin stripe pillow from T.J. Maxx. You can either mix different colors or keep the same theme going on. For me blues are my favorite especially in the summer.
5. MIX UP YOUR SEATING
For your seating try mixing materials. Buy something second hand and chalk paint then distress, or use a metal bench like mine mixed with a woven side chair. It adds interest to your seating area. Outdoor seating doesn’t have to match perfectly as long as you have a cohesive color scheme. I linked some similar options below!
6. CITRUS ACCENTS
Nothing gives summer vibes like fresh fruits and citrus! I love this lemon wreath which I’ve had for a couple years now (linked similar at the bottom of the post) I also think oranges or even pineapples would be a beautiful accent! I love layering my seasonal signs or wreaths over our vintage window frame it just brings so much more depth than if this was just a wreath on its own.

SHOP THIS POST:

Thank you guys so much for stopping by on this summer day! I hope you are enjoying every moment of summer. What do you think of the colors I chose? I’m always so amazed with what a great coat of paint can do!
Jordan
*This post contains affiliate links which means I may make a small commission off an item you purchase from my blog. I only share products I love and it doesn’t cost you any more. It truly helps support my blog!
PIN FOR LATER:
read the full post >
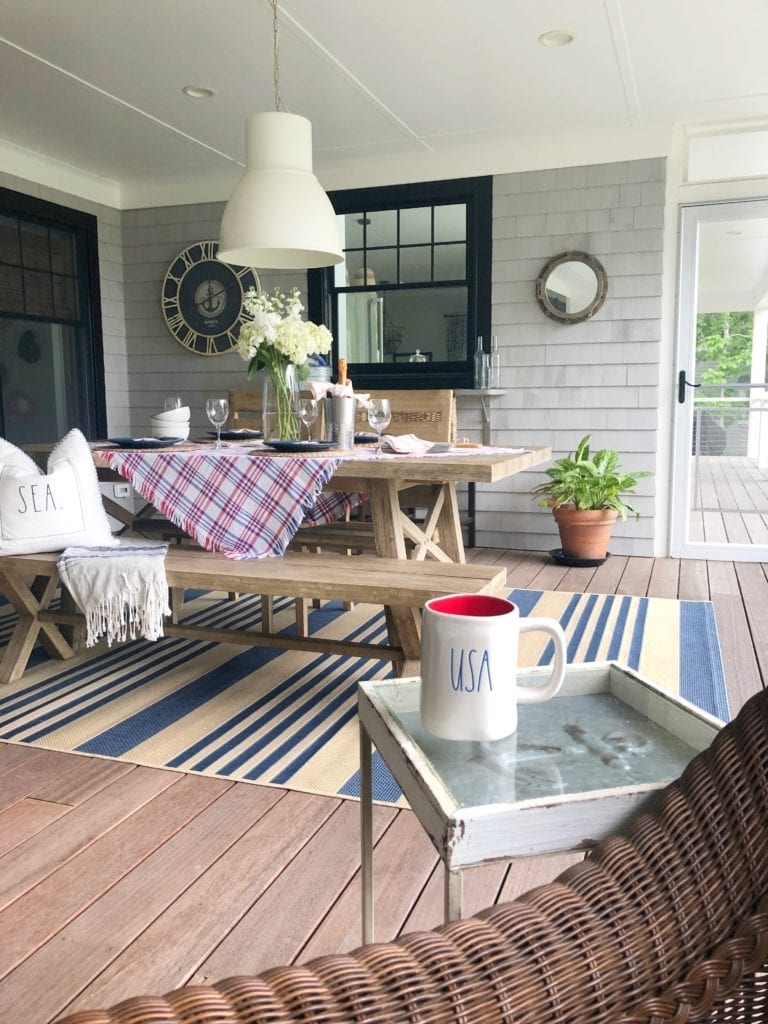
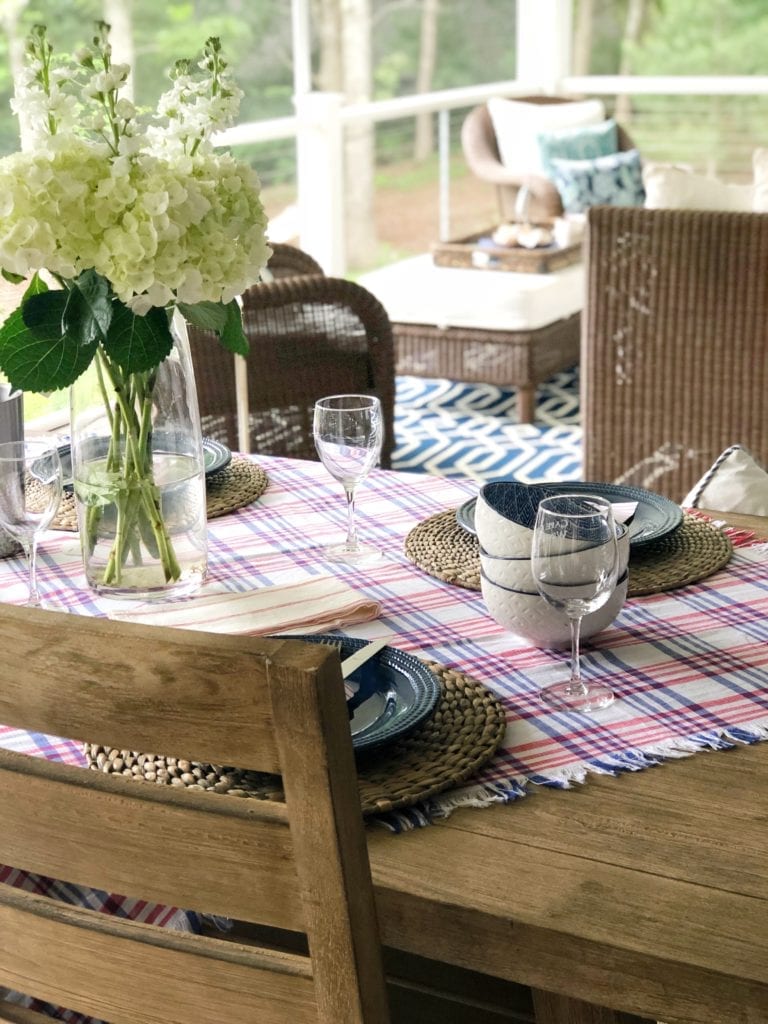
Welcome to the Easy Summer Home Styling Tour! I’m so happy to share our outdoor living space on Cape Cod with you all! I’m thrilled to be part of this awesome blog hop today because I want to share a little bit about our exterior back/deck space which over looks a beautiful harbor. On a summer day you can smell the salt air and see campers learning to sail on small sunfish (including my son!). This is our family beach house- it’s my parent’s home they built last year that I help design and decorate. We spend a lot of time here with my husband and kids, especially in the summer! This special little home represents a place we can escape to, disconnect and spend time together making memories as a family. We spend every July 4th on Cape Cod!
our home is on a sloping property so the back deck is about 20-30 feet off the ground which is why you’ll see those protective wires. It’s super safe and yet doesn’t take away from the view. Our back deck extends the whole back of the home. This specific area consists of a dining space and living space that connects to the home with two french doors and is screened in. Making it a perfect spot to dine al- fresco, play music and enjoy some delish summer time drinks. When we were designing the home I made it a point to include a connection to the kitchen through that window. We added a granite counter and bar stools to transform it into a super functional spot for kids to eat or even as an outdoor buffet/ bar set up. We can simply pass food out from the kitchen instead of walking around through the doors. My kids love sitting and eating here they feel like they’re at a diner. Guess who’s the waitress 😉
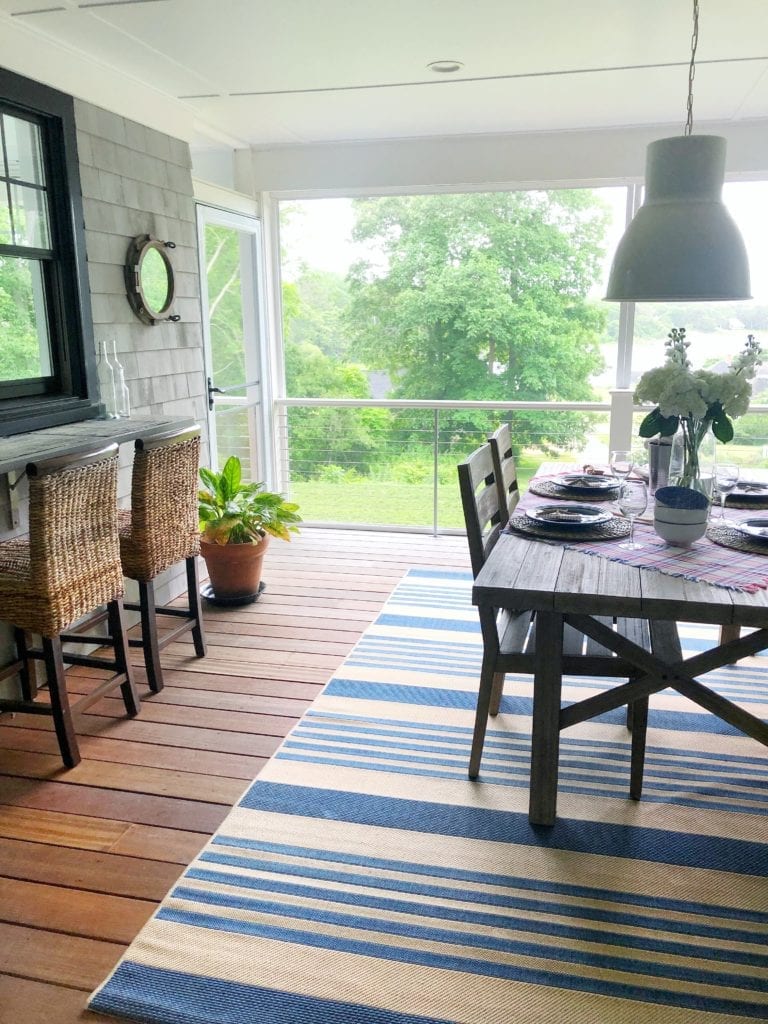
The beautiful white light fixture is from Ikea. We wanted something bright and simple so the focus would be more on the water view in the back yard. We decided to go with black exterior windows just to do something a little different than you traditionally see on Cape Cod. It’s a bit modern but the gray shingles tie it back to it’s coastal Cape Cod roots.
I recently picked up some outdoor rugs four these two spaces. I’m a firm believer that if you want a space (even an outdoor one) to feel more defined and inviting you need to start with a rug as the foundation. I love that once you add that layer it instantly just pops! In Cape Cod navy is a signature color so we have a bit of it through out the house as well as some other denim shades of blue which I love.
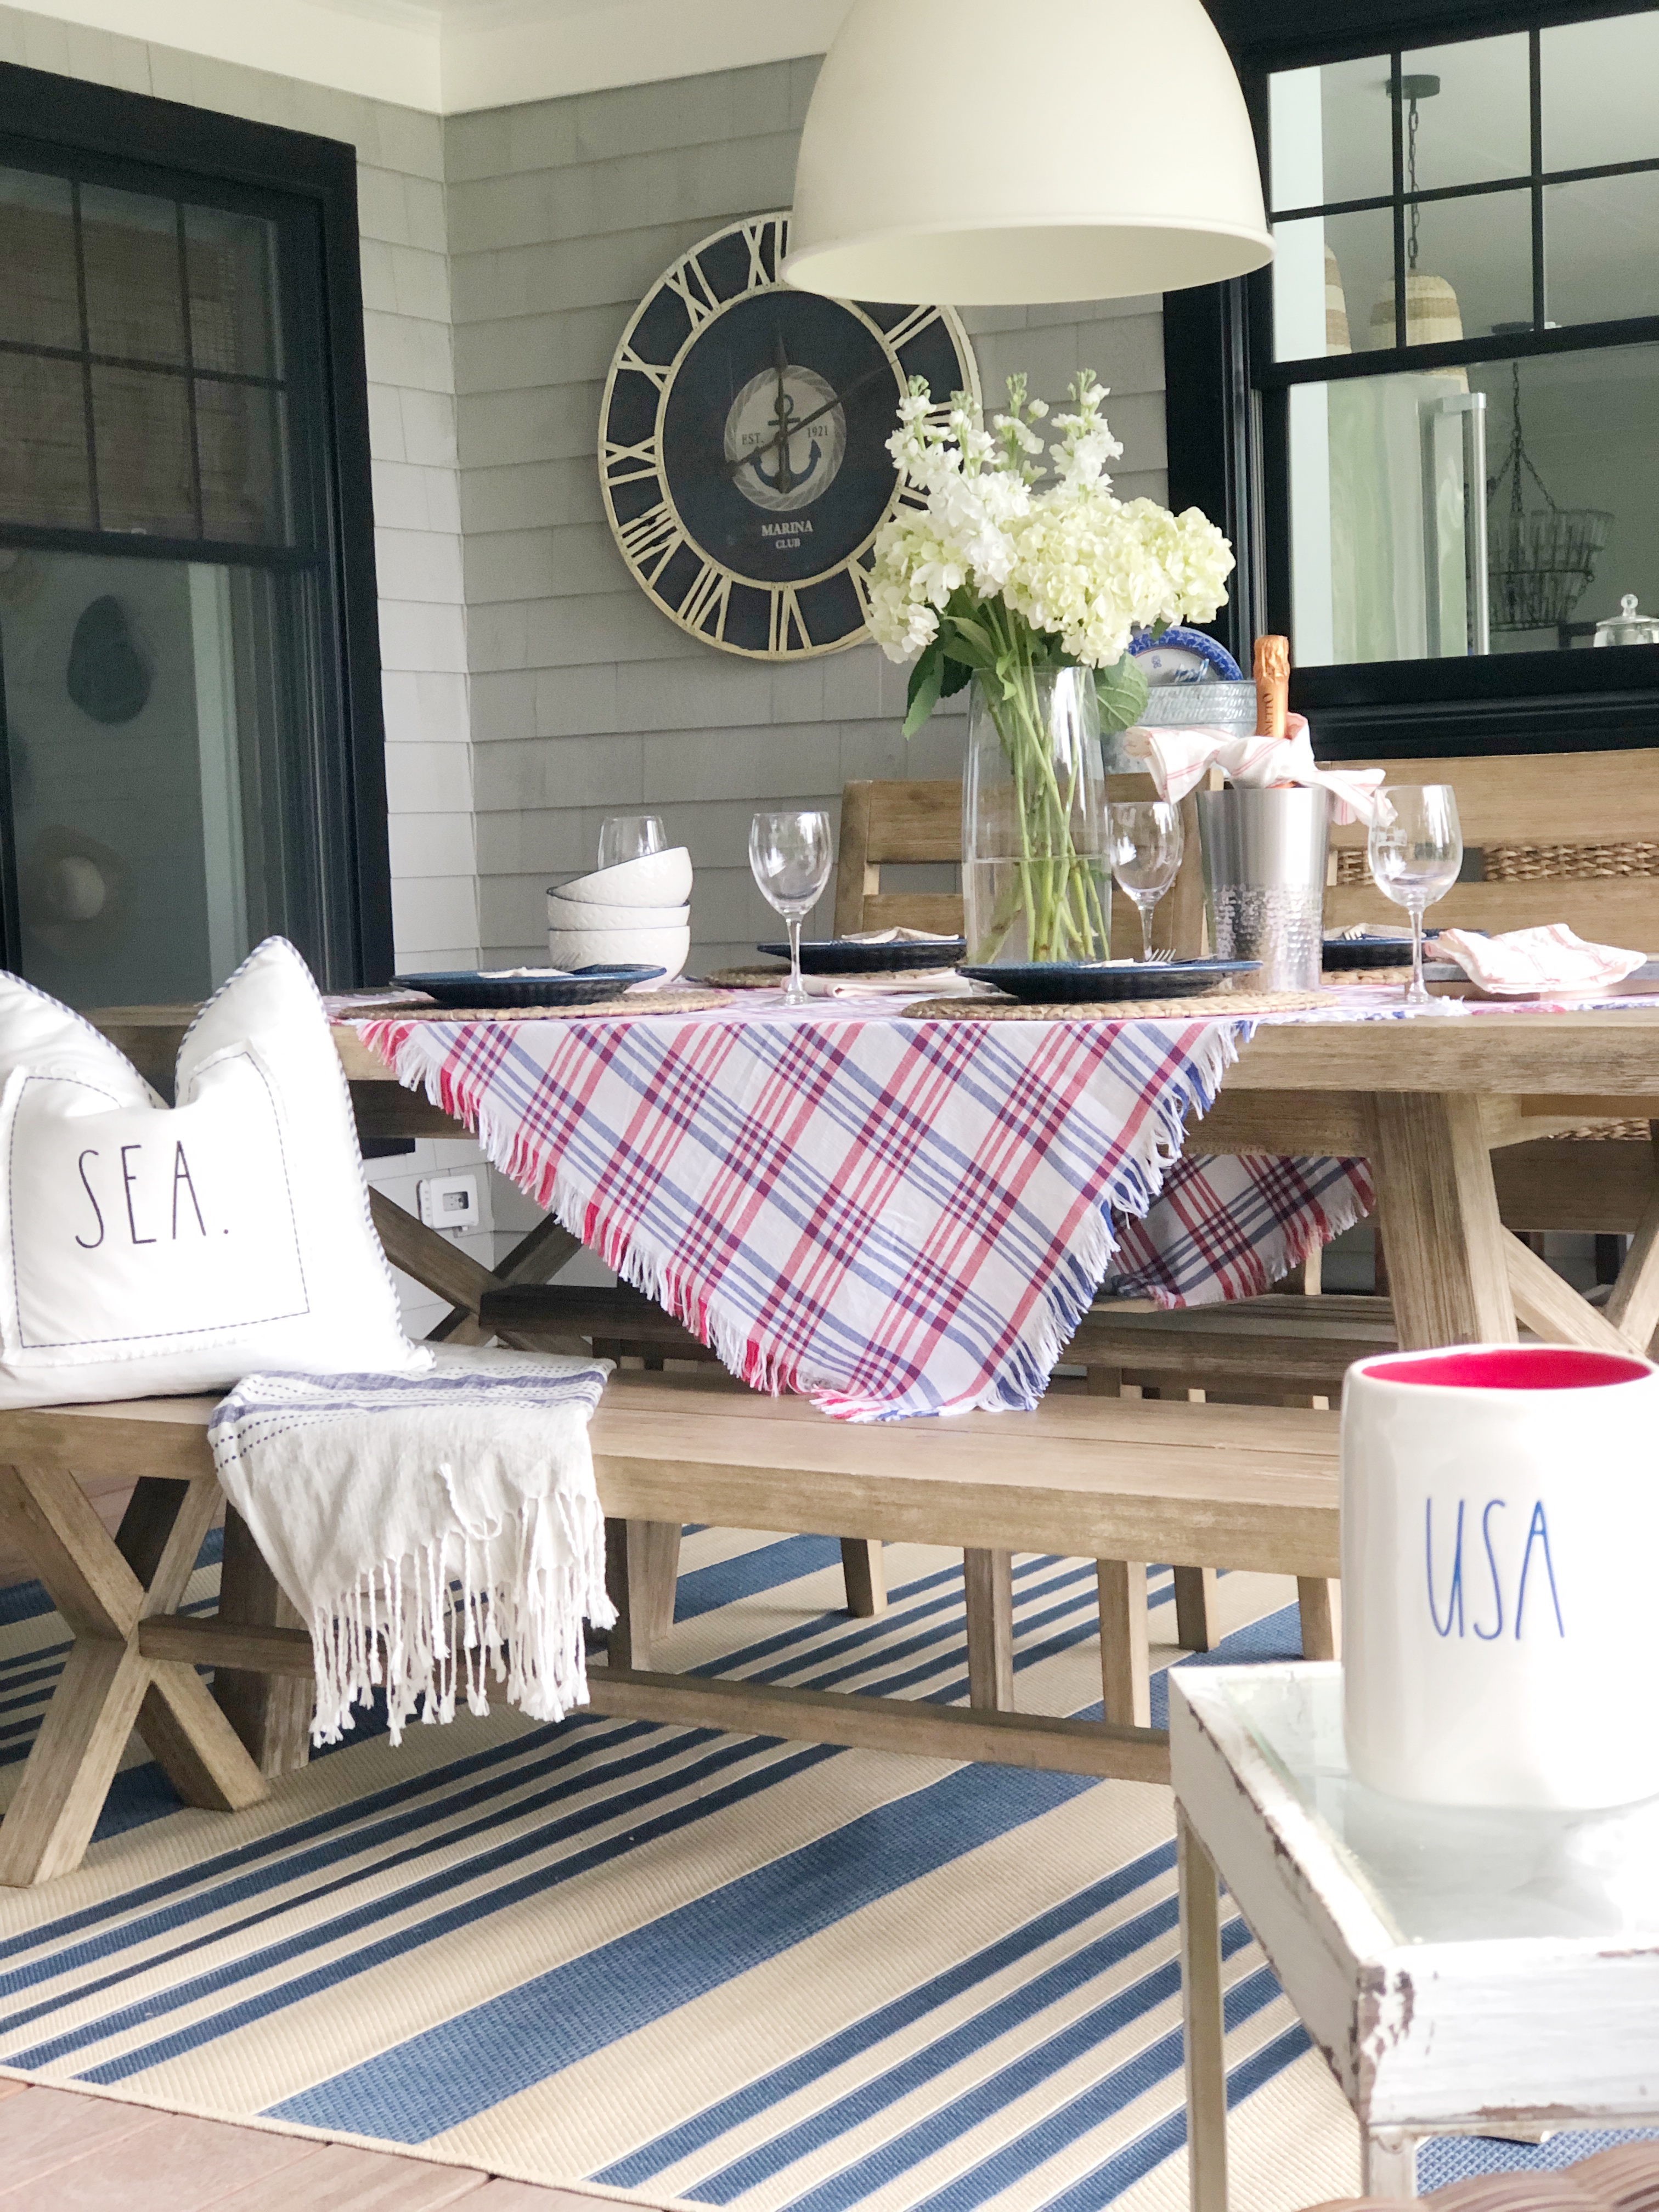
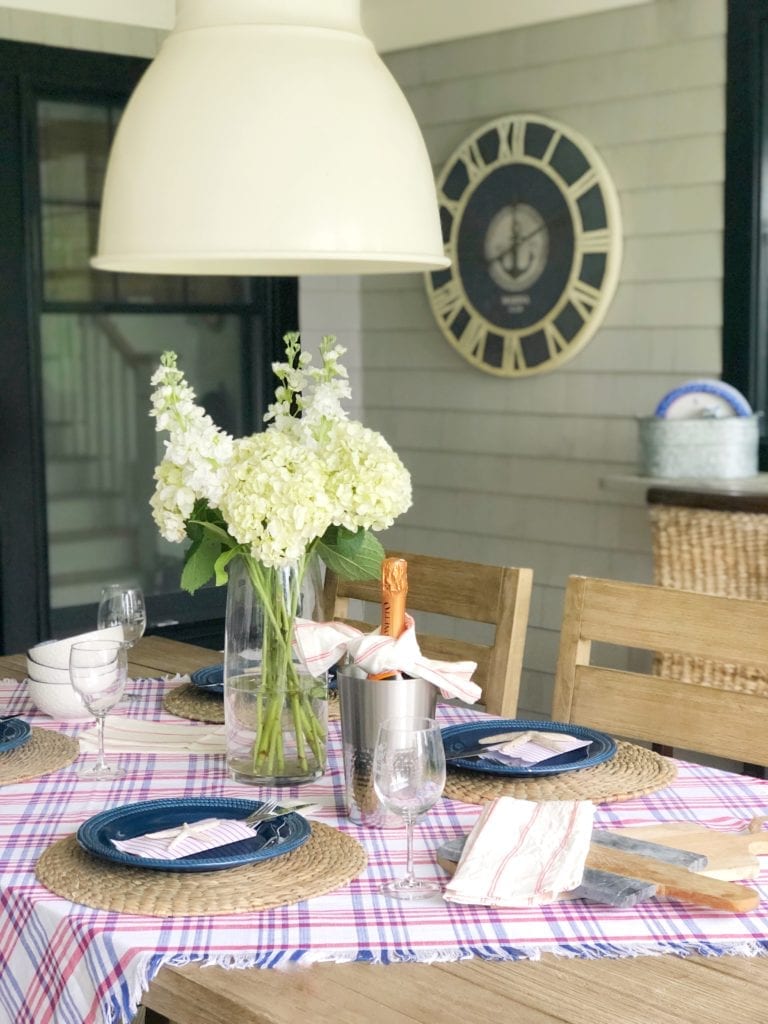
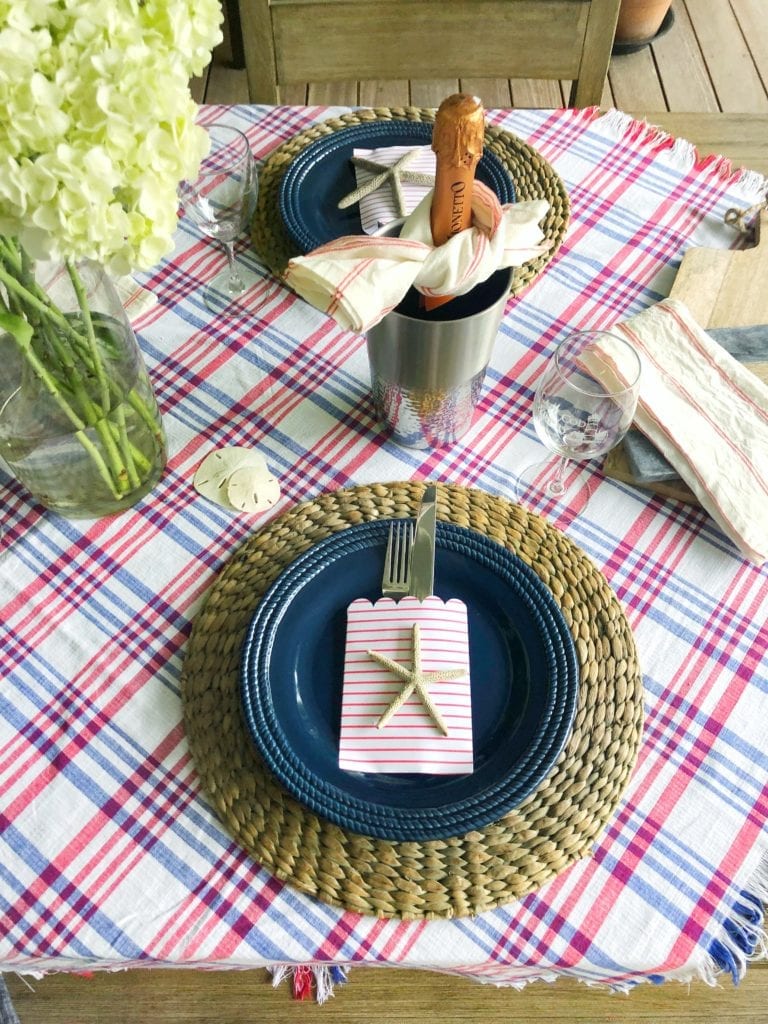
This large wall clock with the anchor I purchased at Christmas Tree Shops and That! last summer, as well as the navy rope plates. I also found these Rae Dunn pillows at T.J. Maxx that say “SAND” and “SEA” I couldn’t resist them. I added this beautiful plaid table “throw” as the base layer on the table and it quickly sets a patriotic tone. I like that its a bitt different from a runner but lighter than a table cloth. It looks so pretty thrown off the side of the table too. We had these jute chargers for awhile so I layered them next, then the plates and these cute little silverware sleeves.

I hope you enjoyed stopping by and seeing our Cape Cod beach house all set up for summer! We can’t wait to entertain, relax and simply take in the beautiful warmth of this season, that we waited so long for! Do you host any 4th Of July festivities? Do you keep your decor somewhat relaxed or do you go all out?! I hope you will stop by and see the other amazing Summer Home Tours today (all linked below!)
Jordan
SHOP THIS POST

PIN FOR LATER

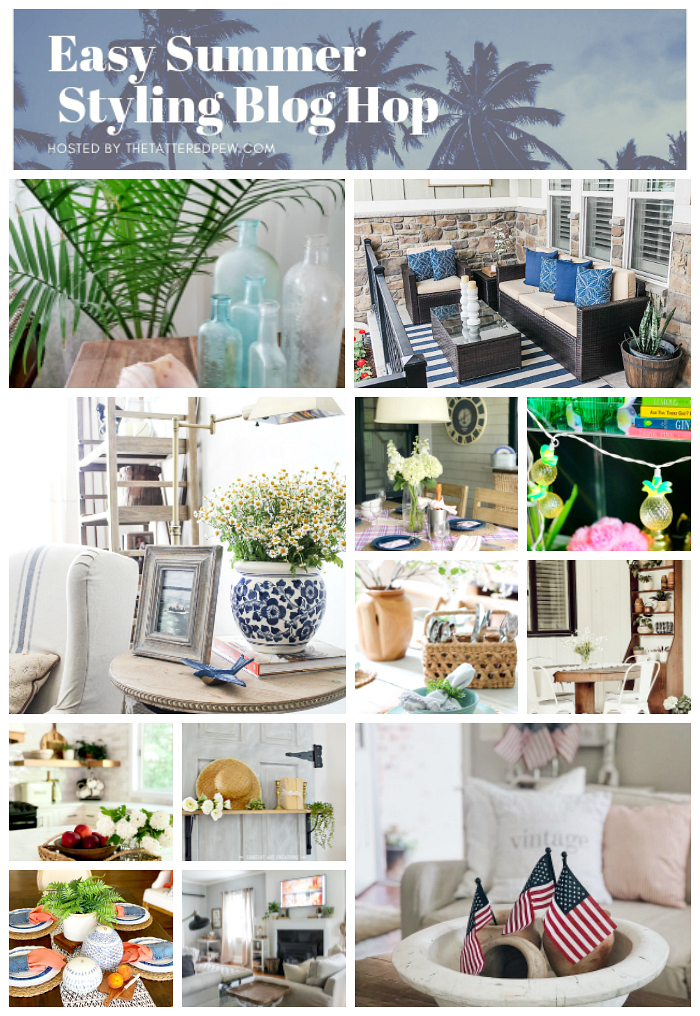
Come enjoy 13 talented bloggers sharing some easy summer styling this week! Sharing with me today are…
Thursday
31 Girl At Home // Sand Dollar Lane // The Turquoise Home
JorDecor //She Gave it a Go // A Blue Nest
And sharing yesterday…
Wednesday

Citygirl Meets Farmboy // Grace In My Space //We’re The Joneses // Aratari at Home
Camelot Art Creations // Crisp Collective //The Tattered Pew
read the full post >
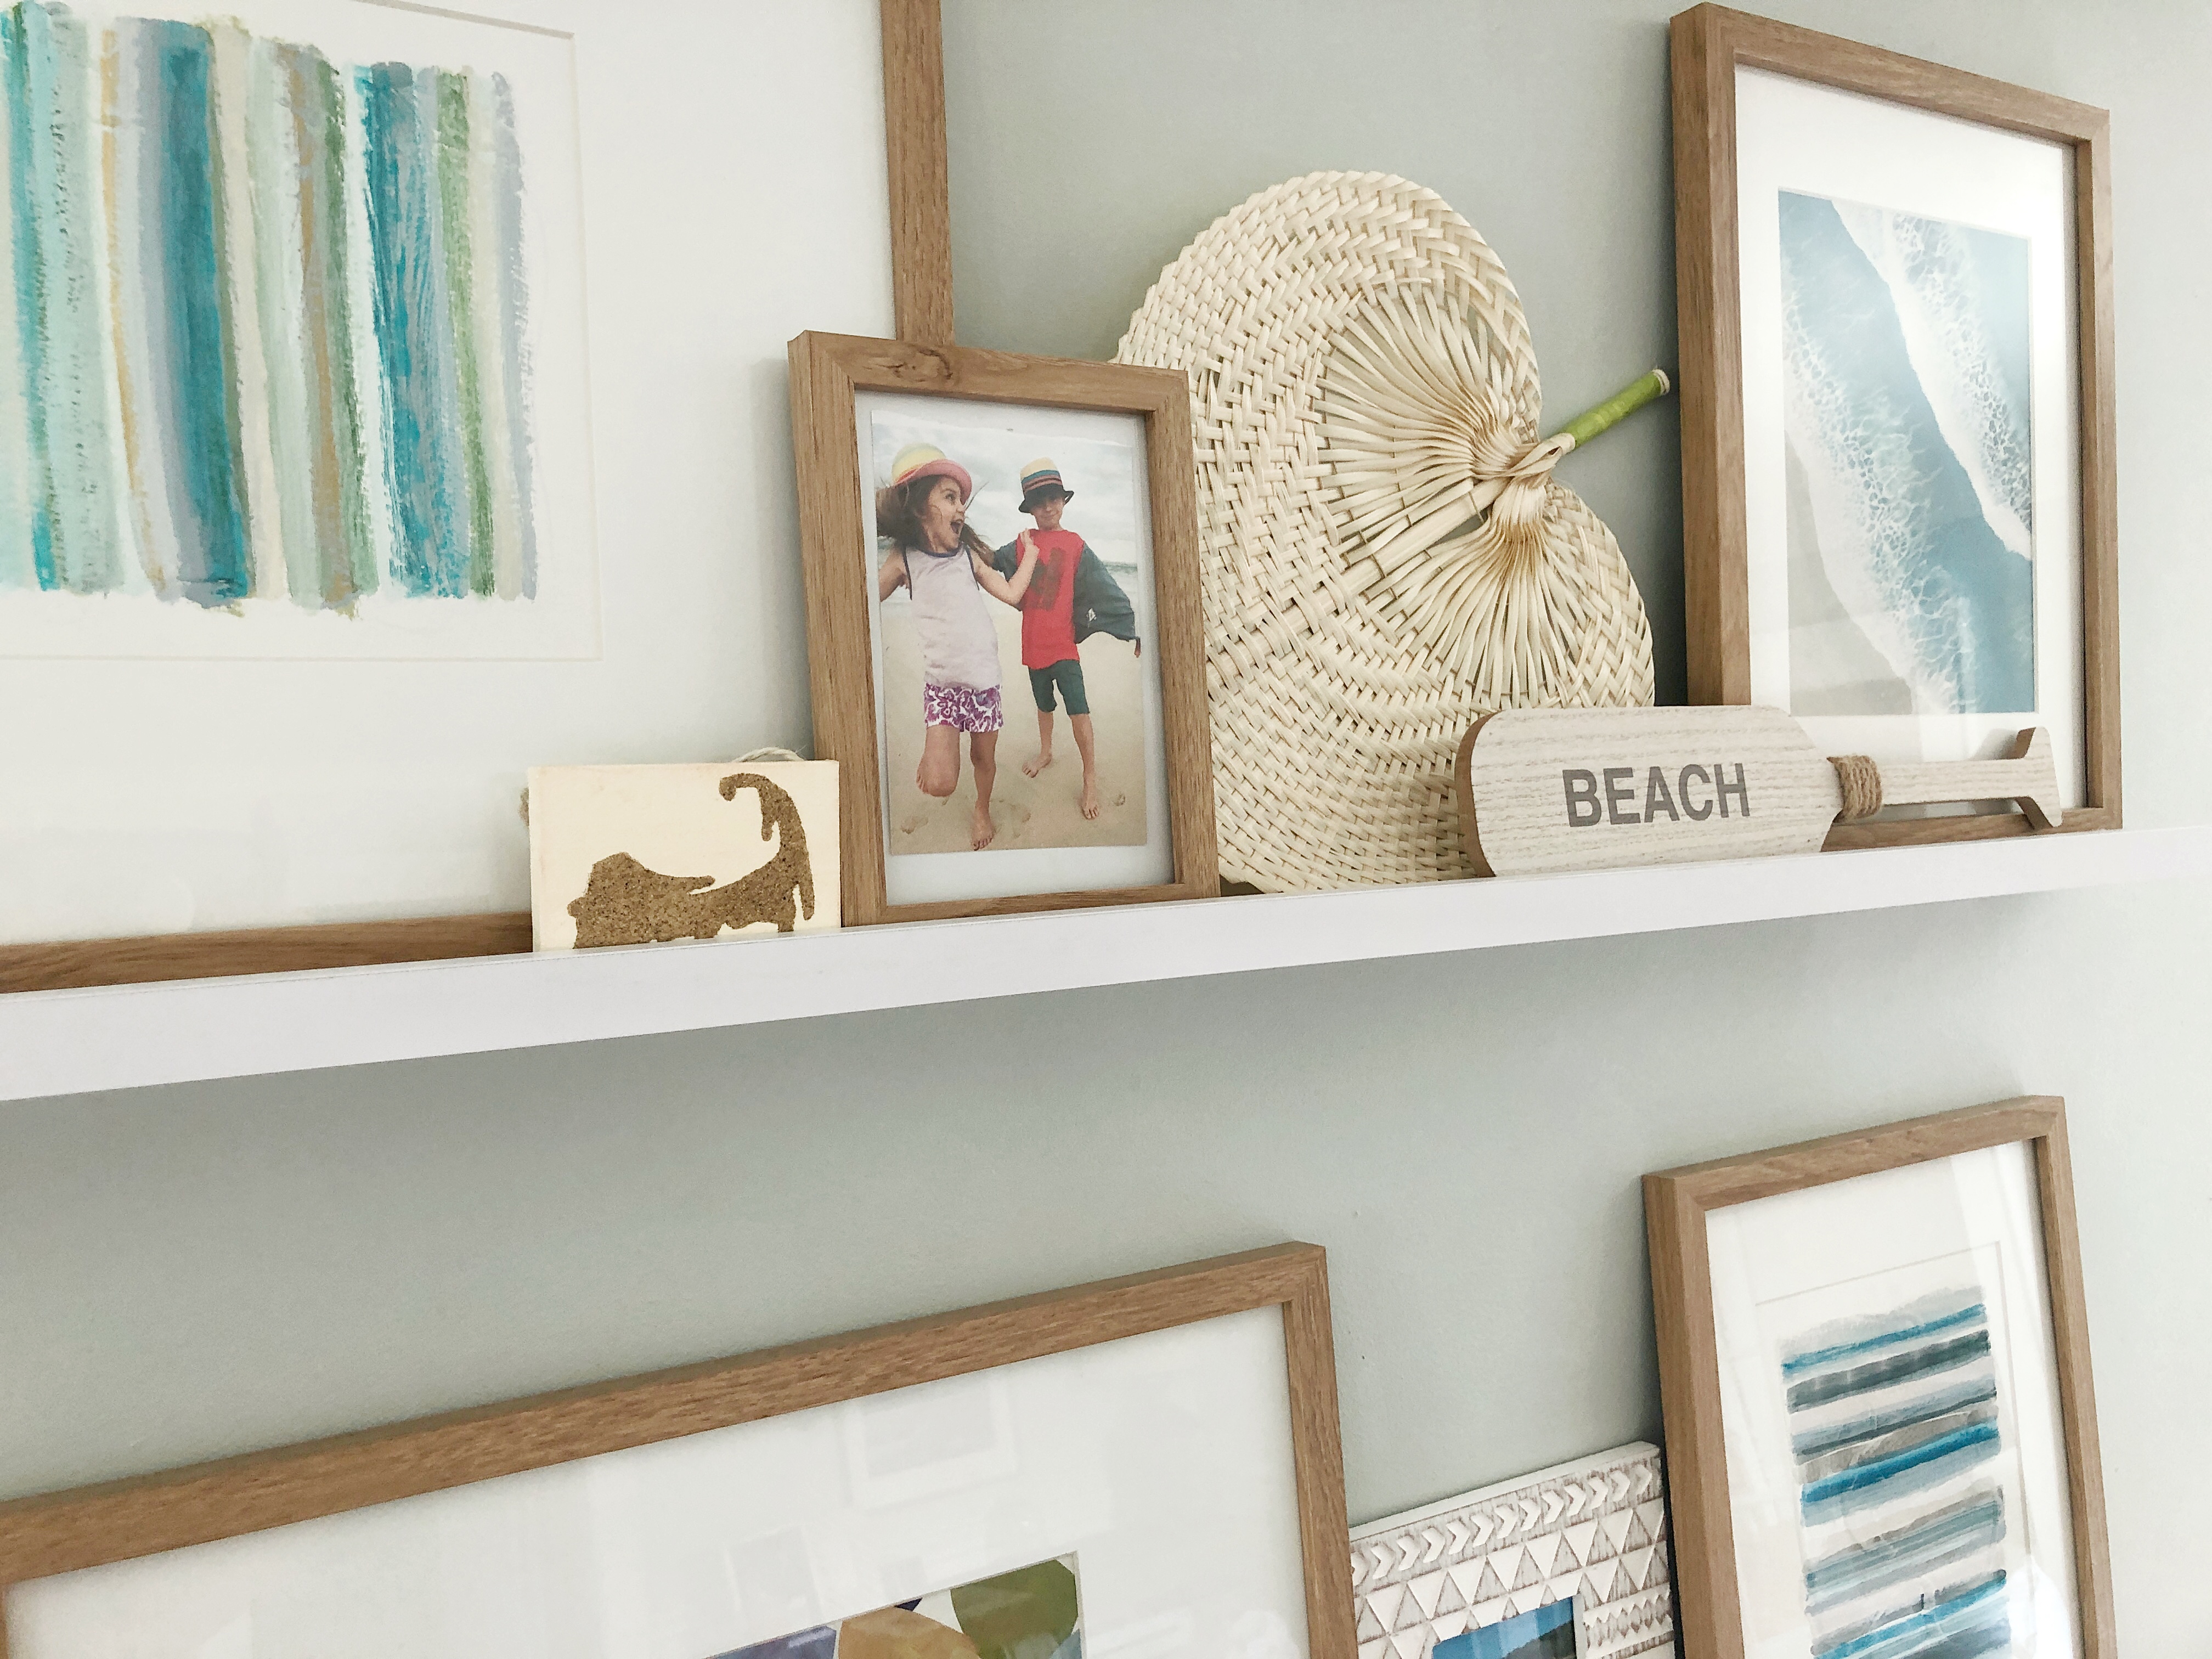
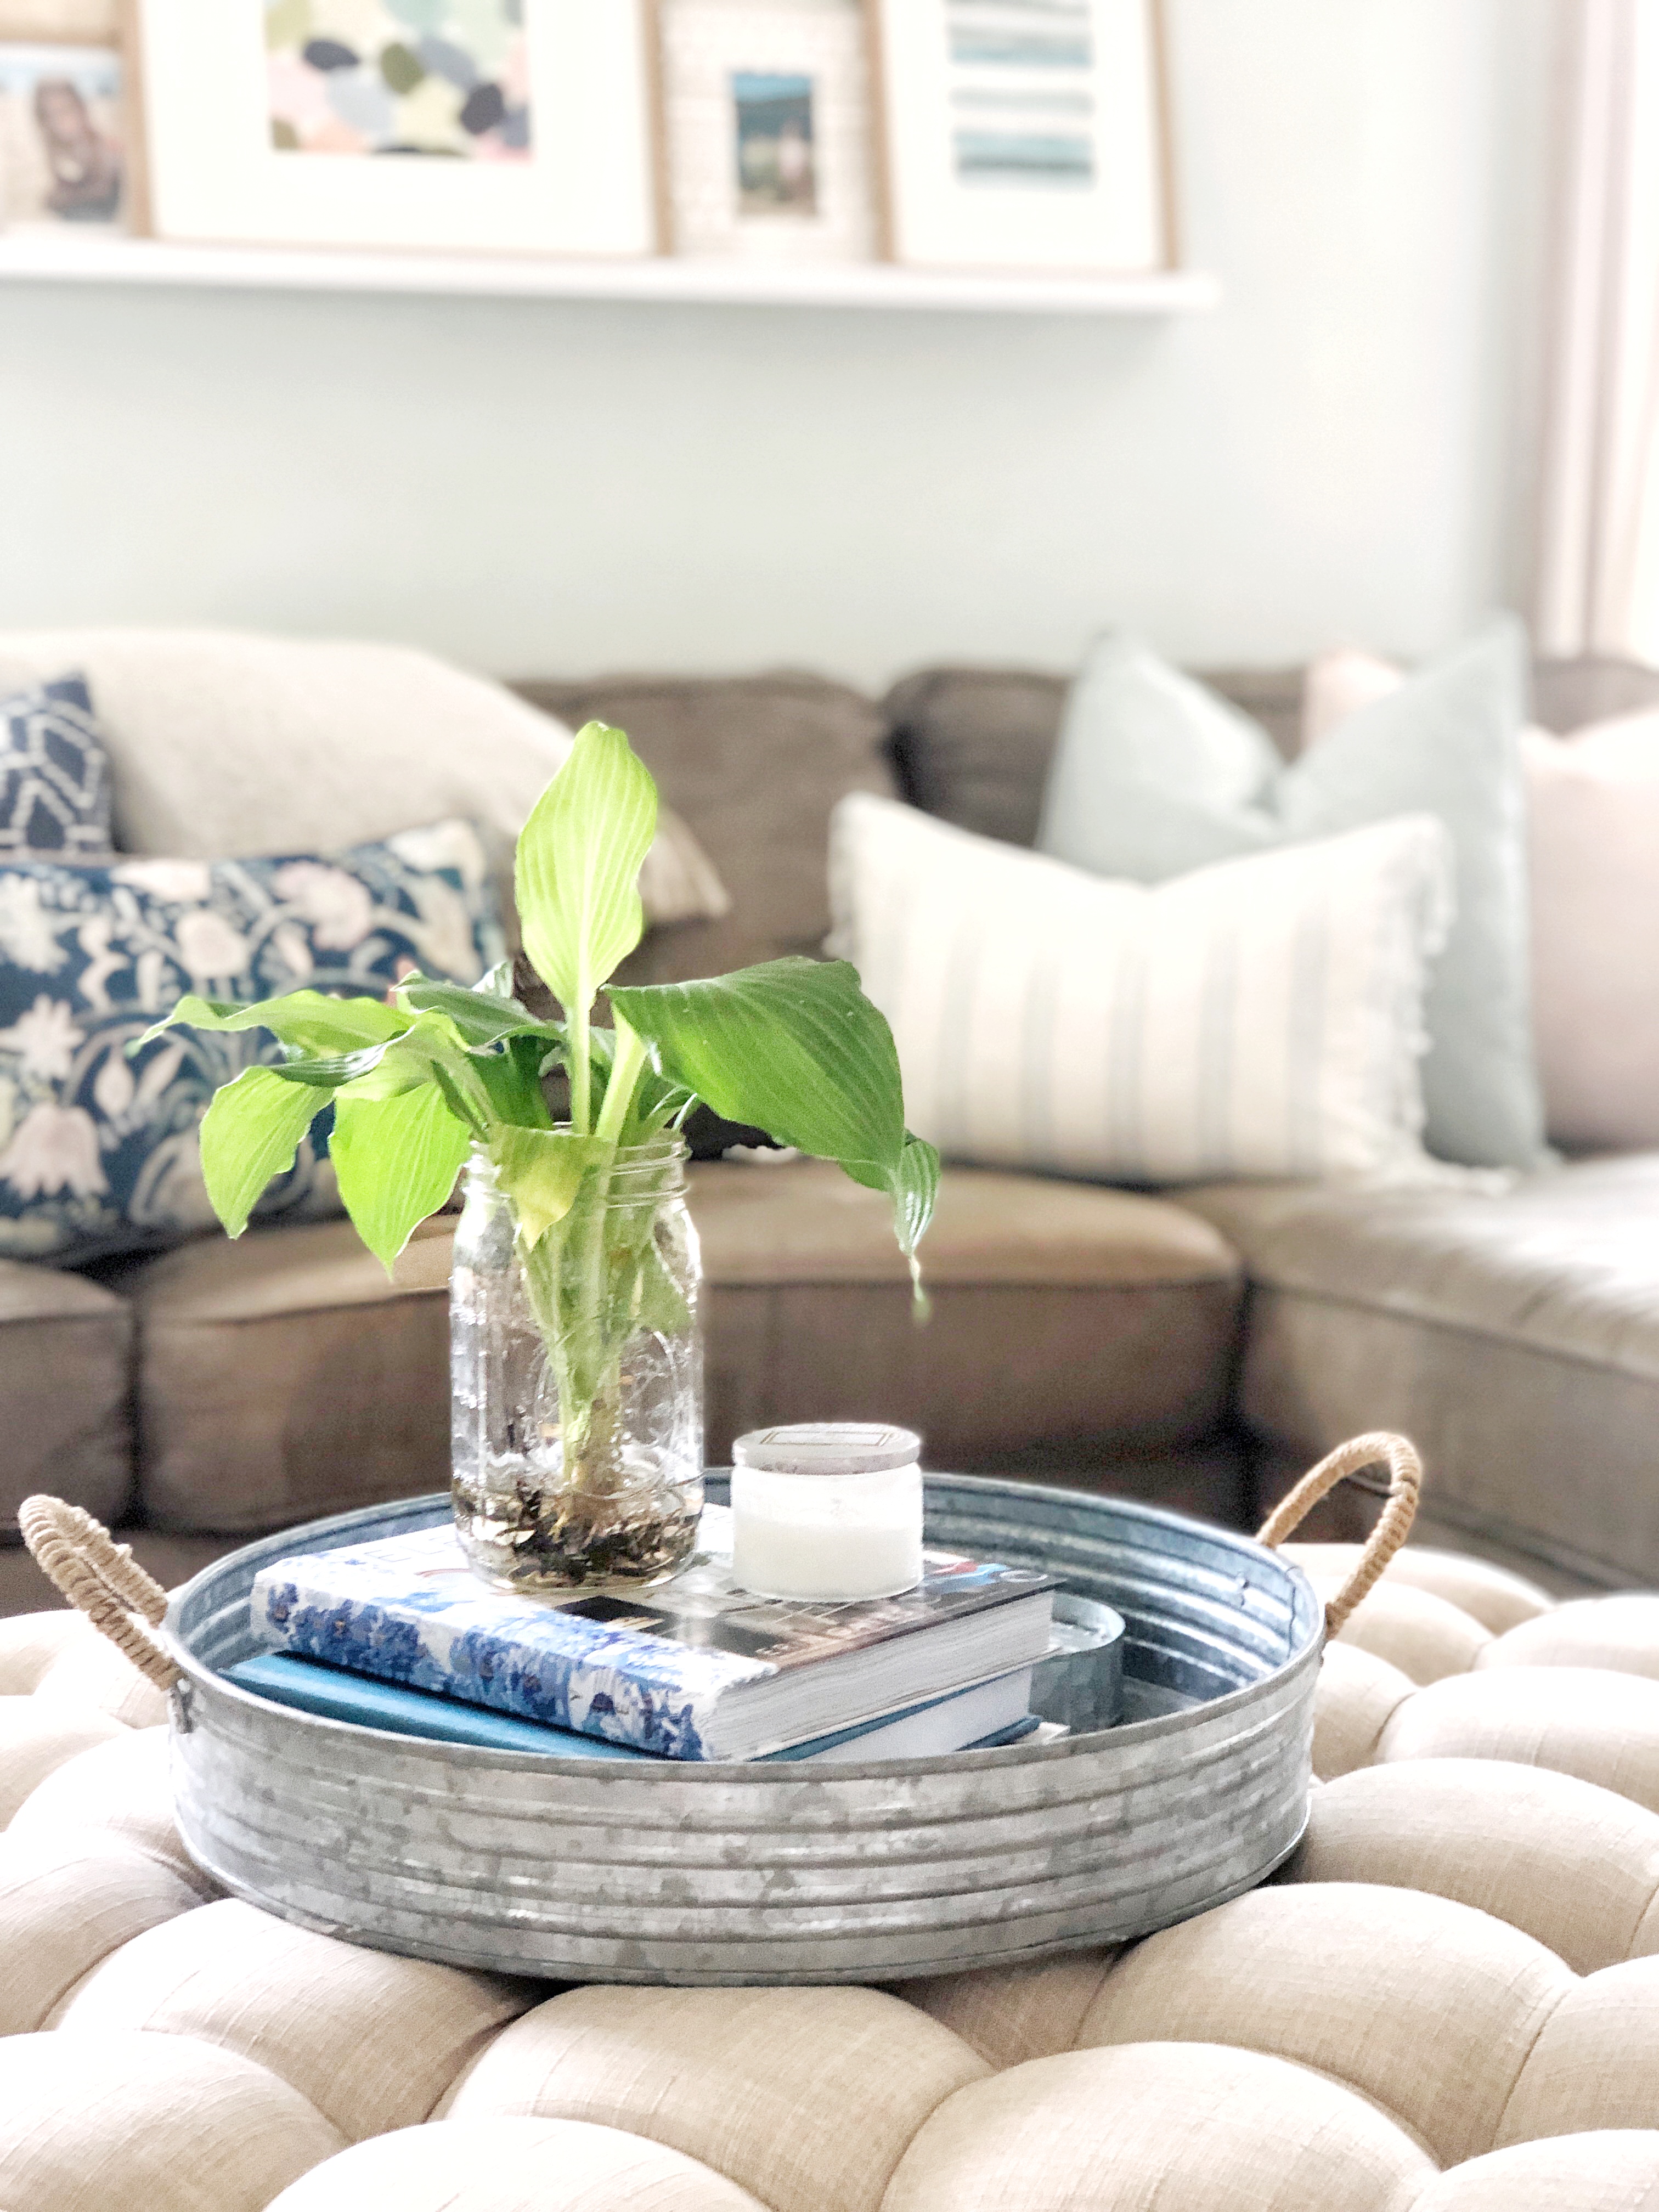
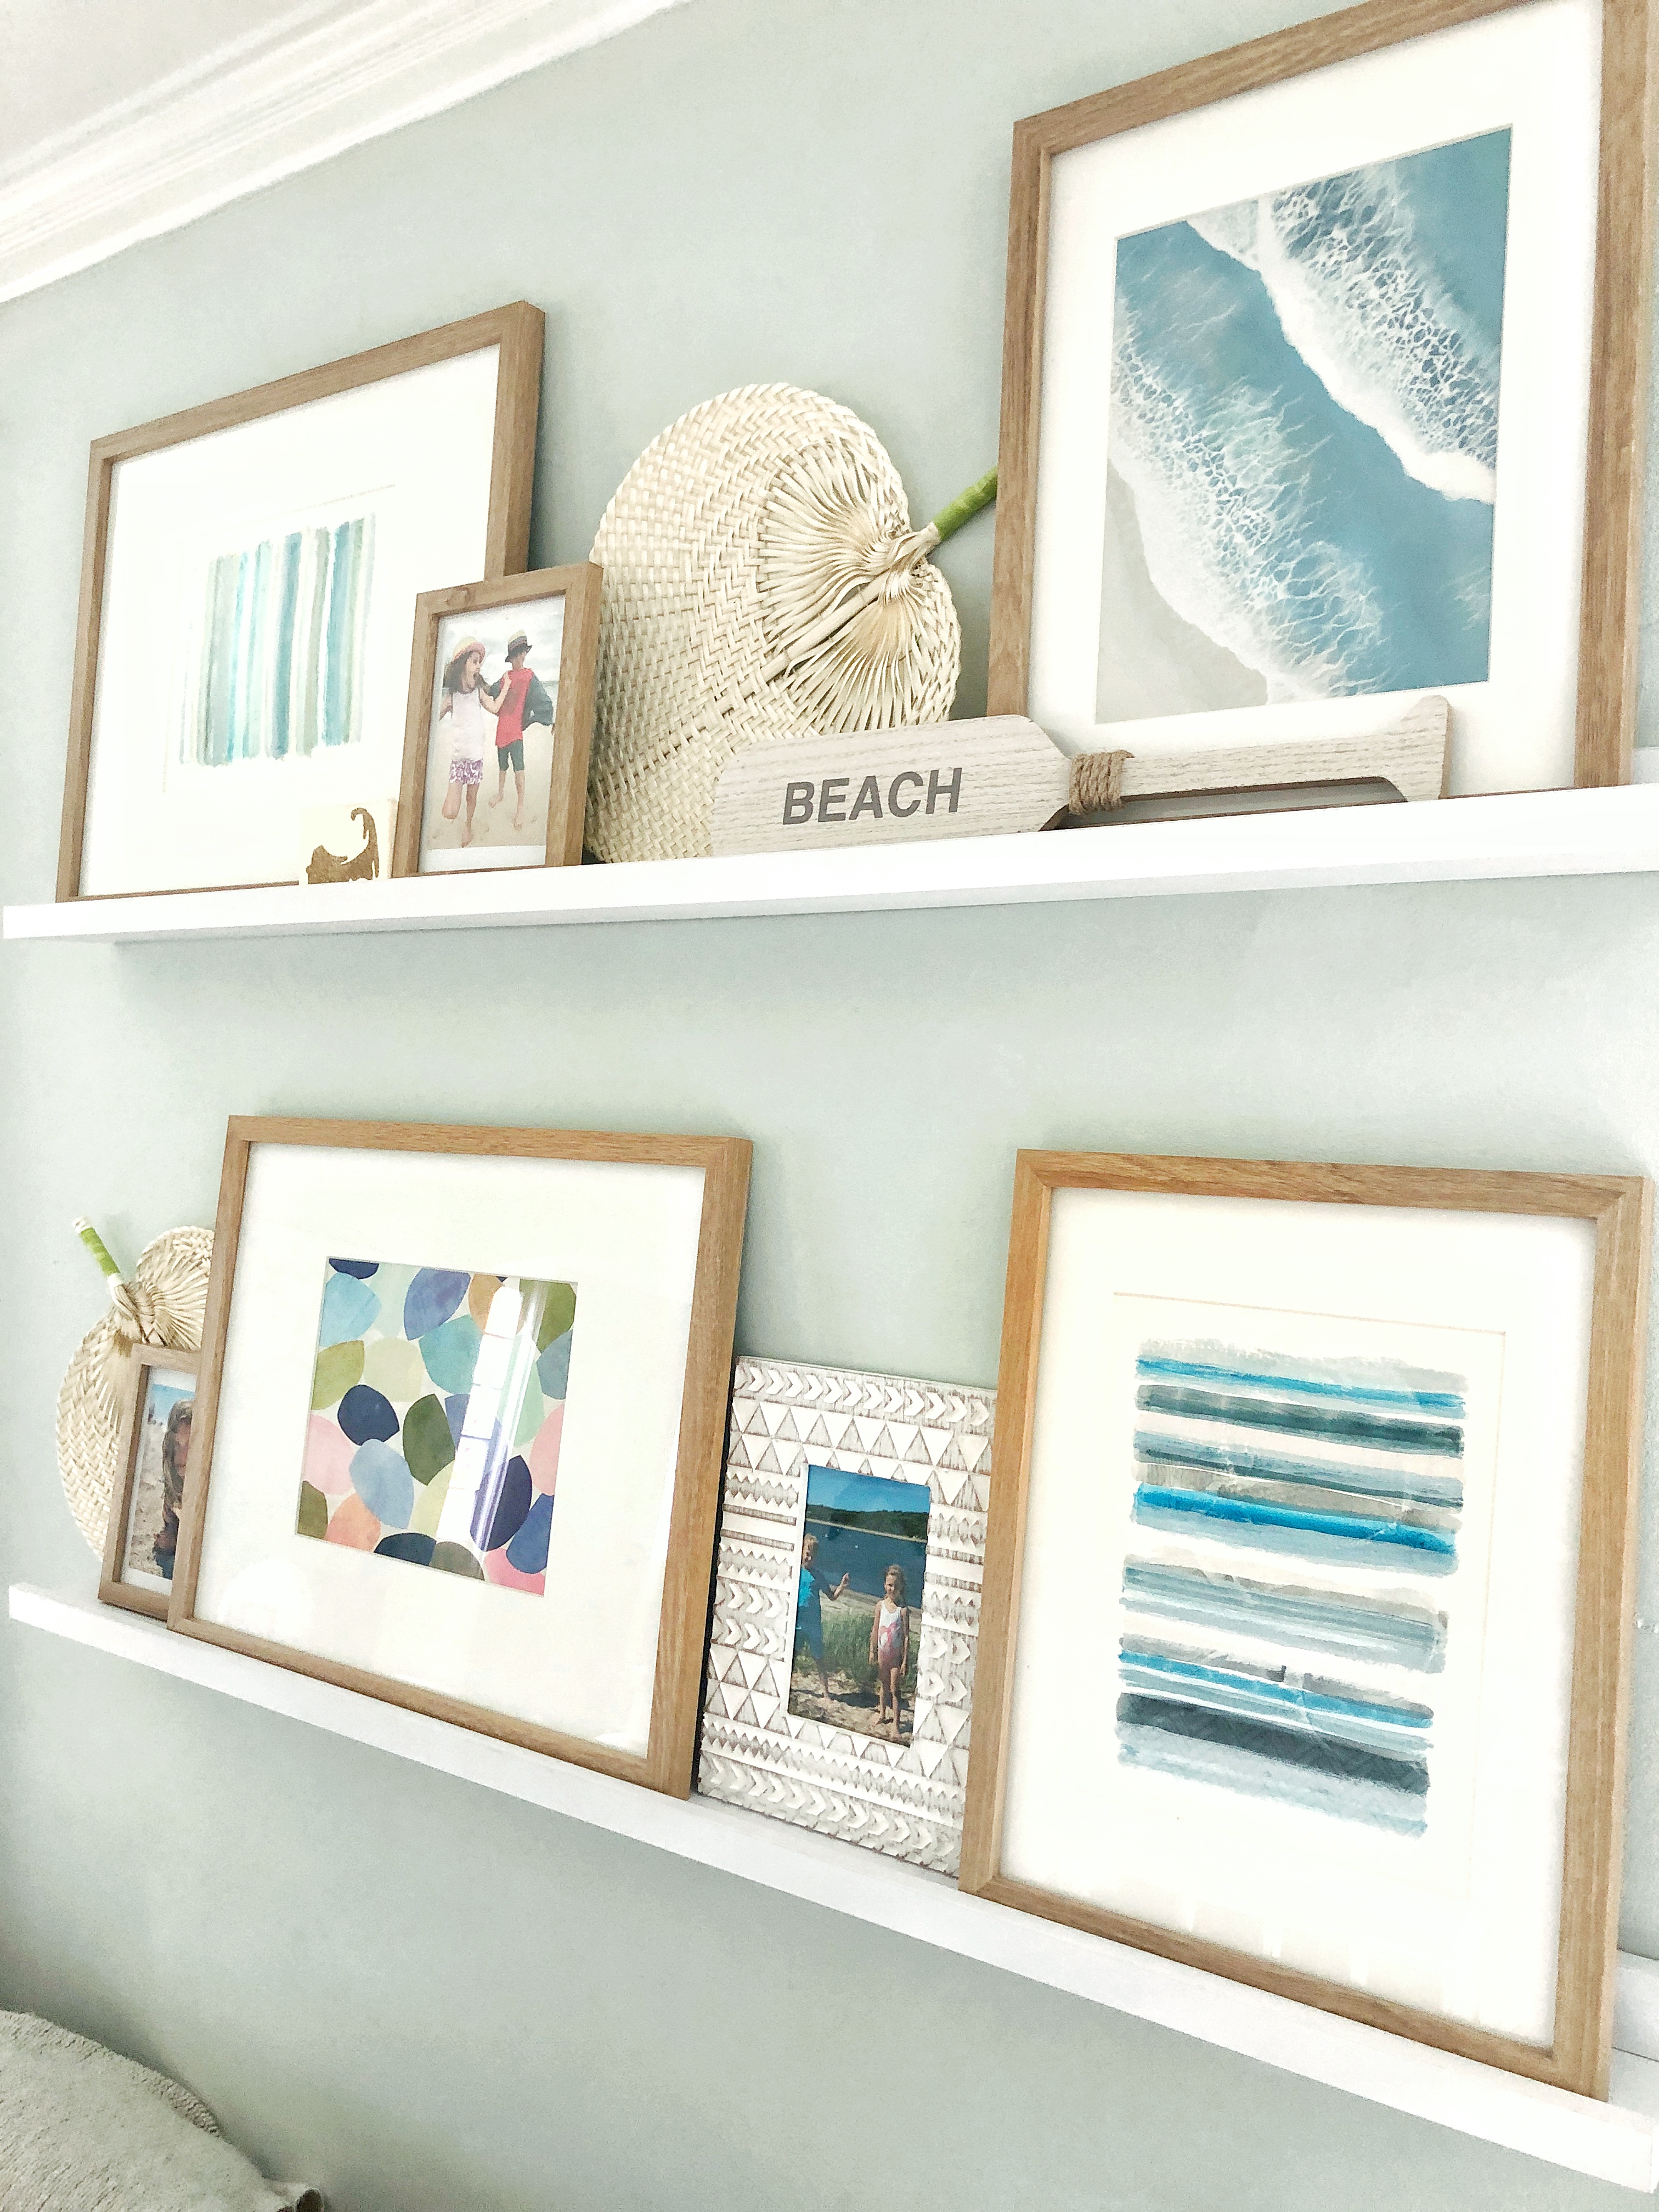
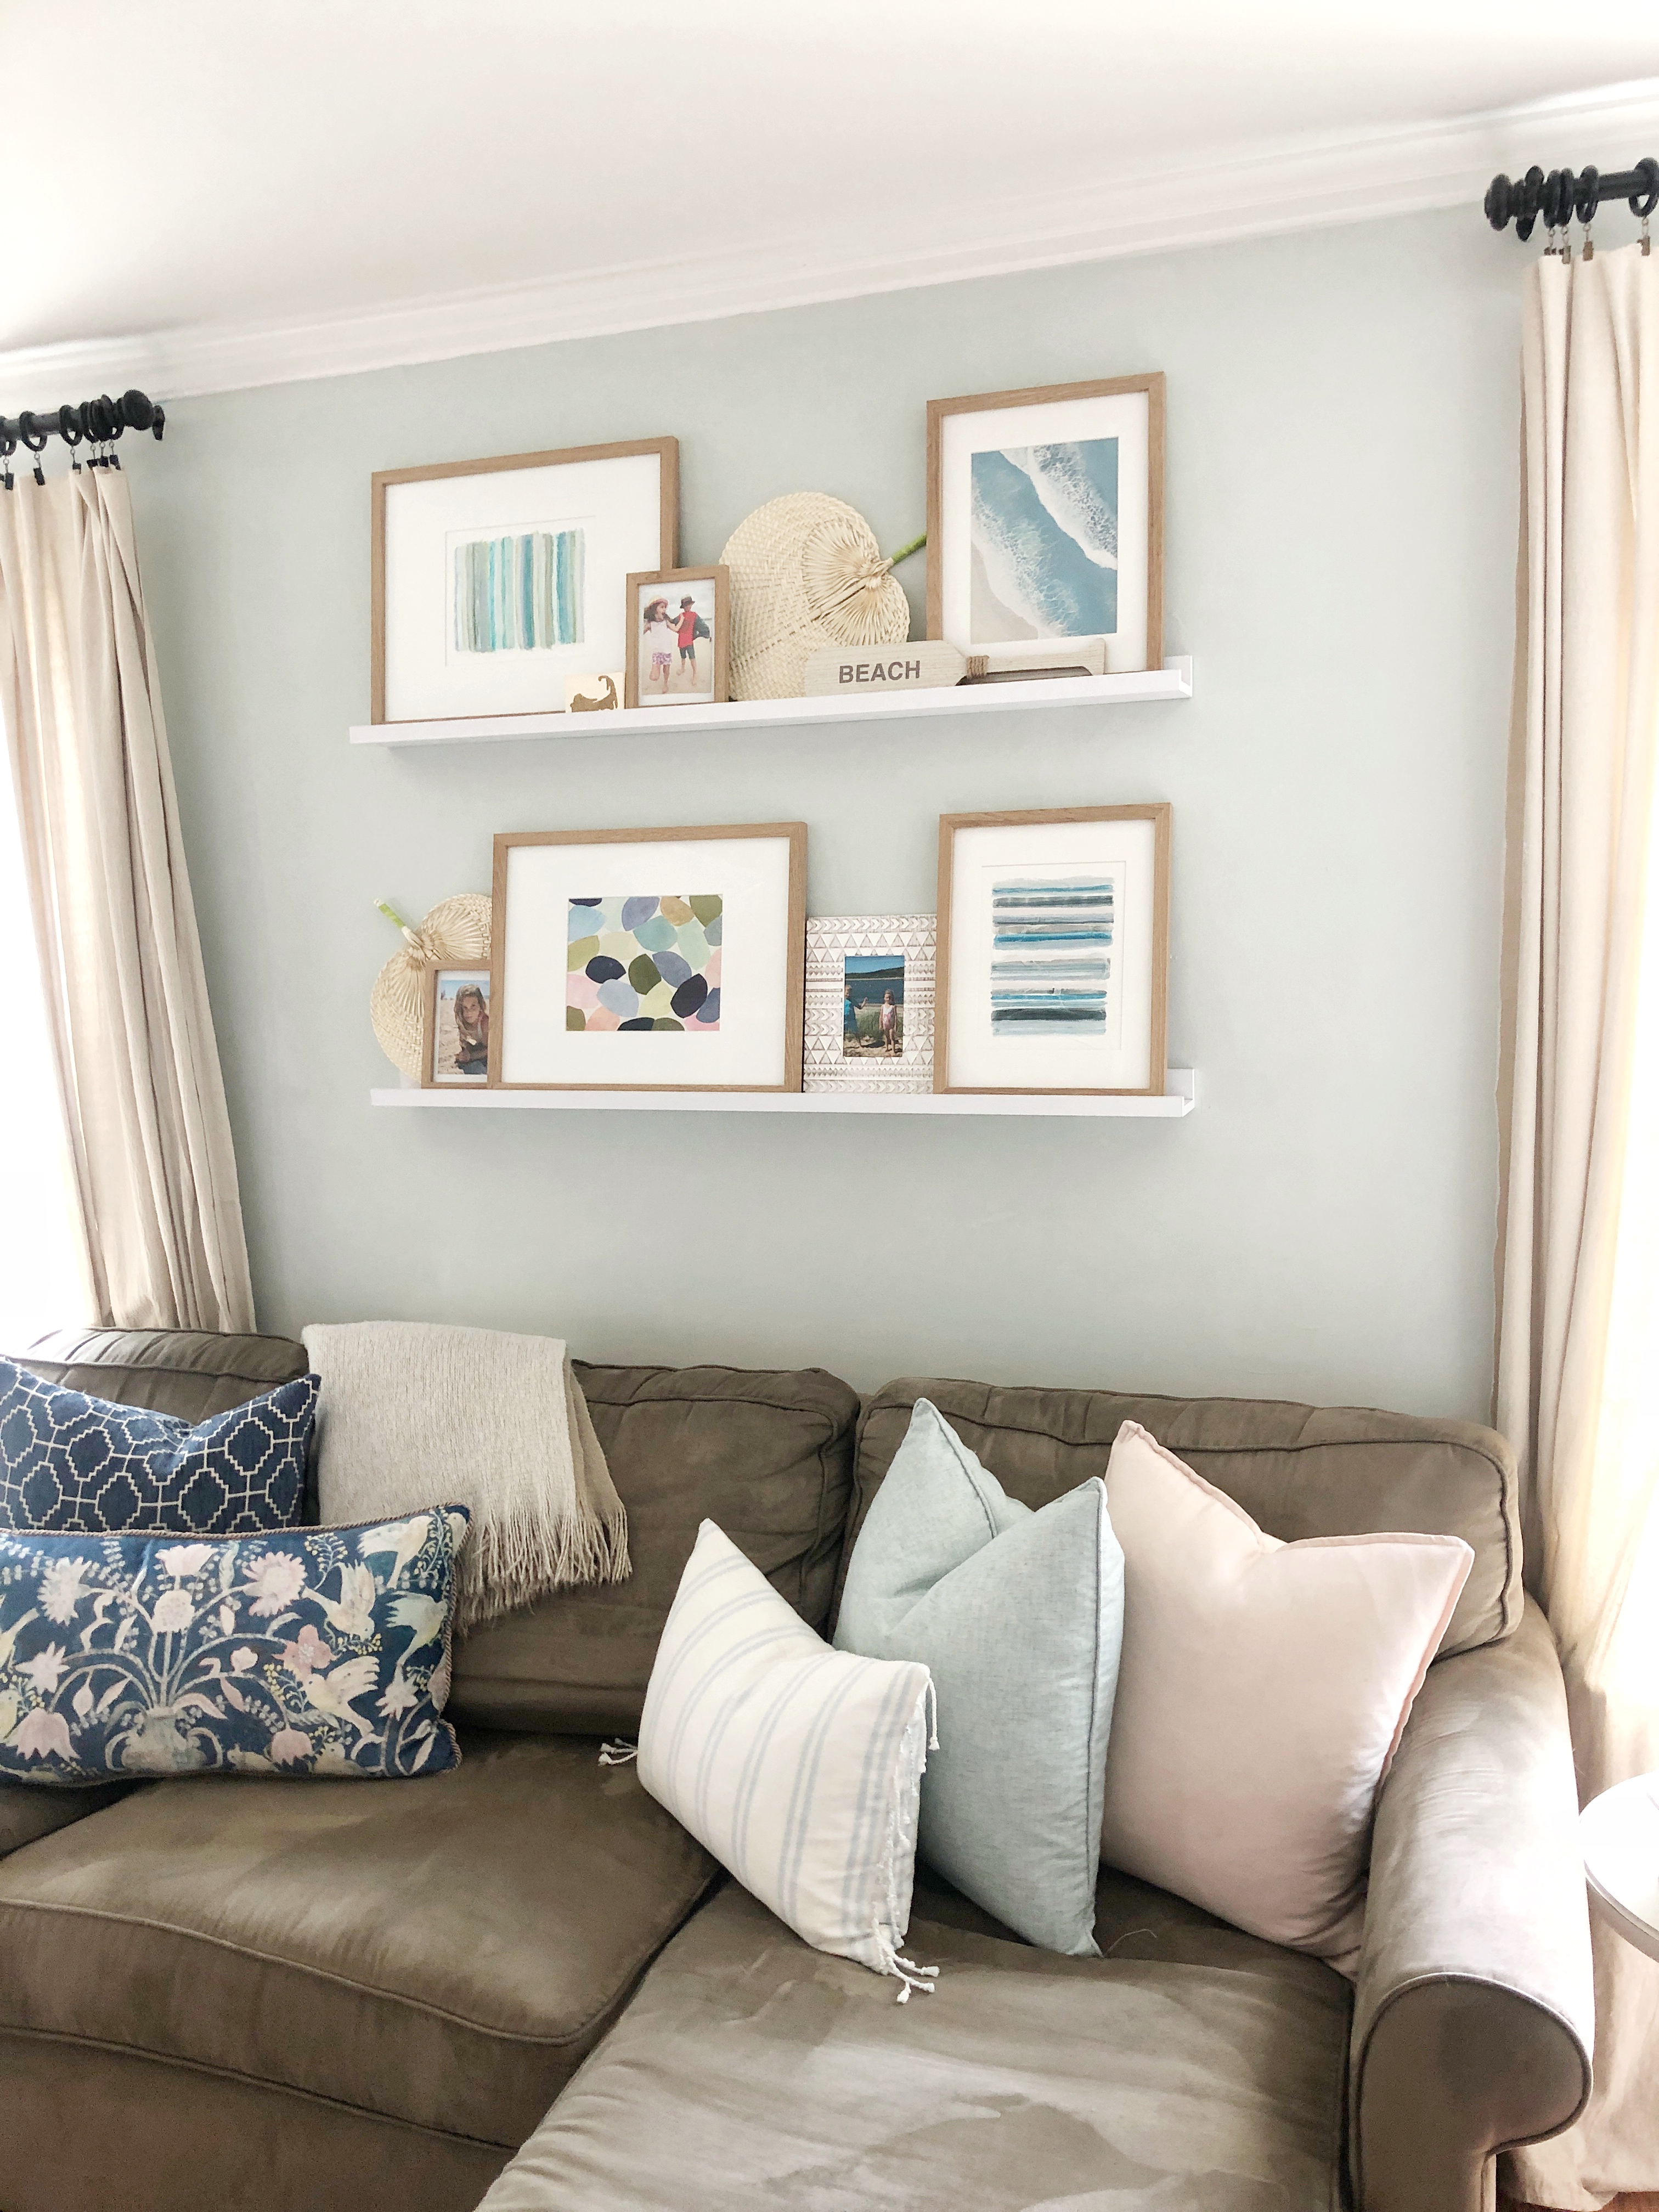
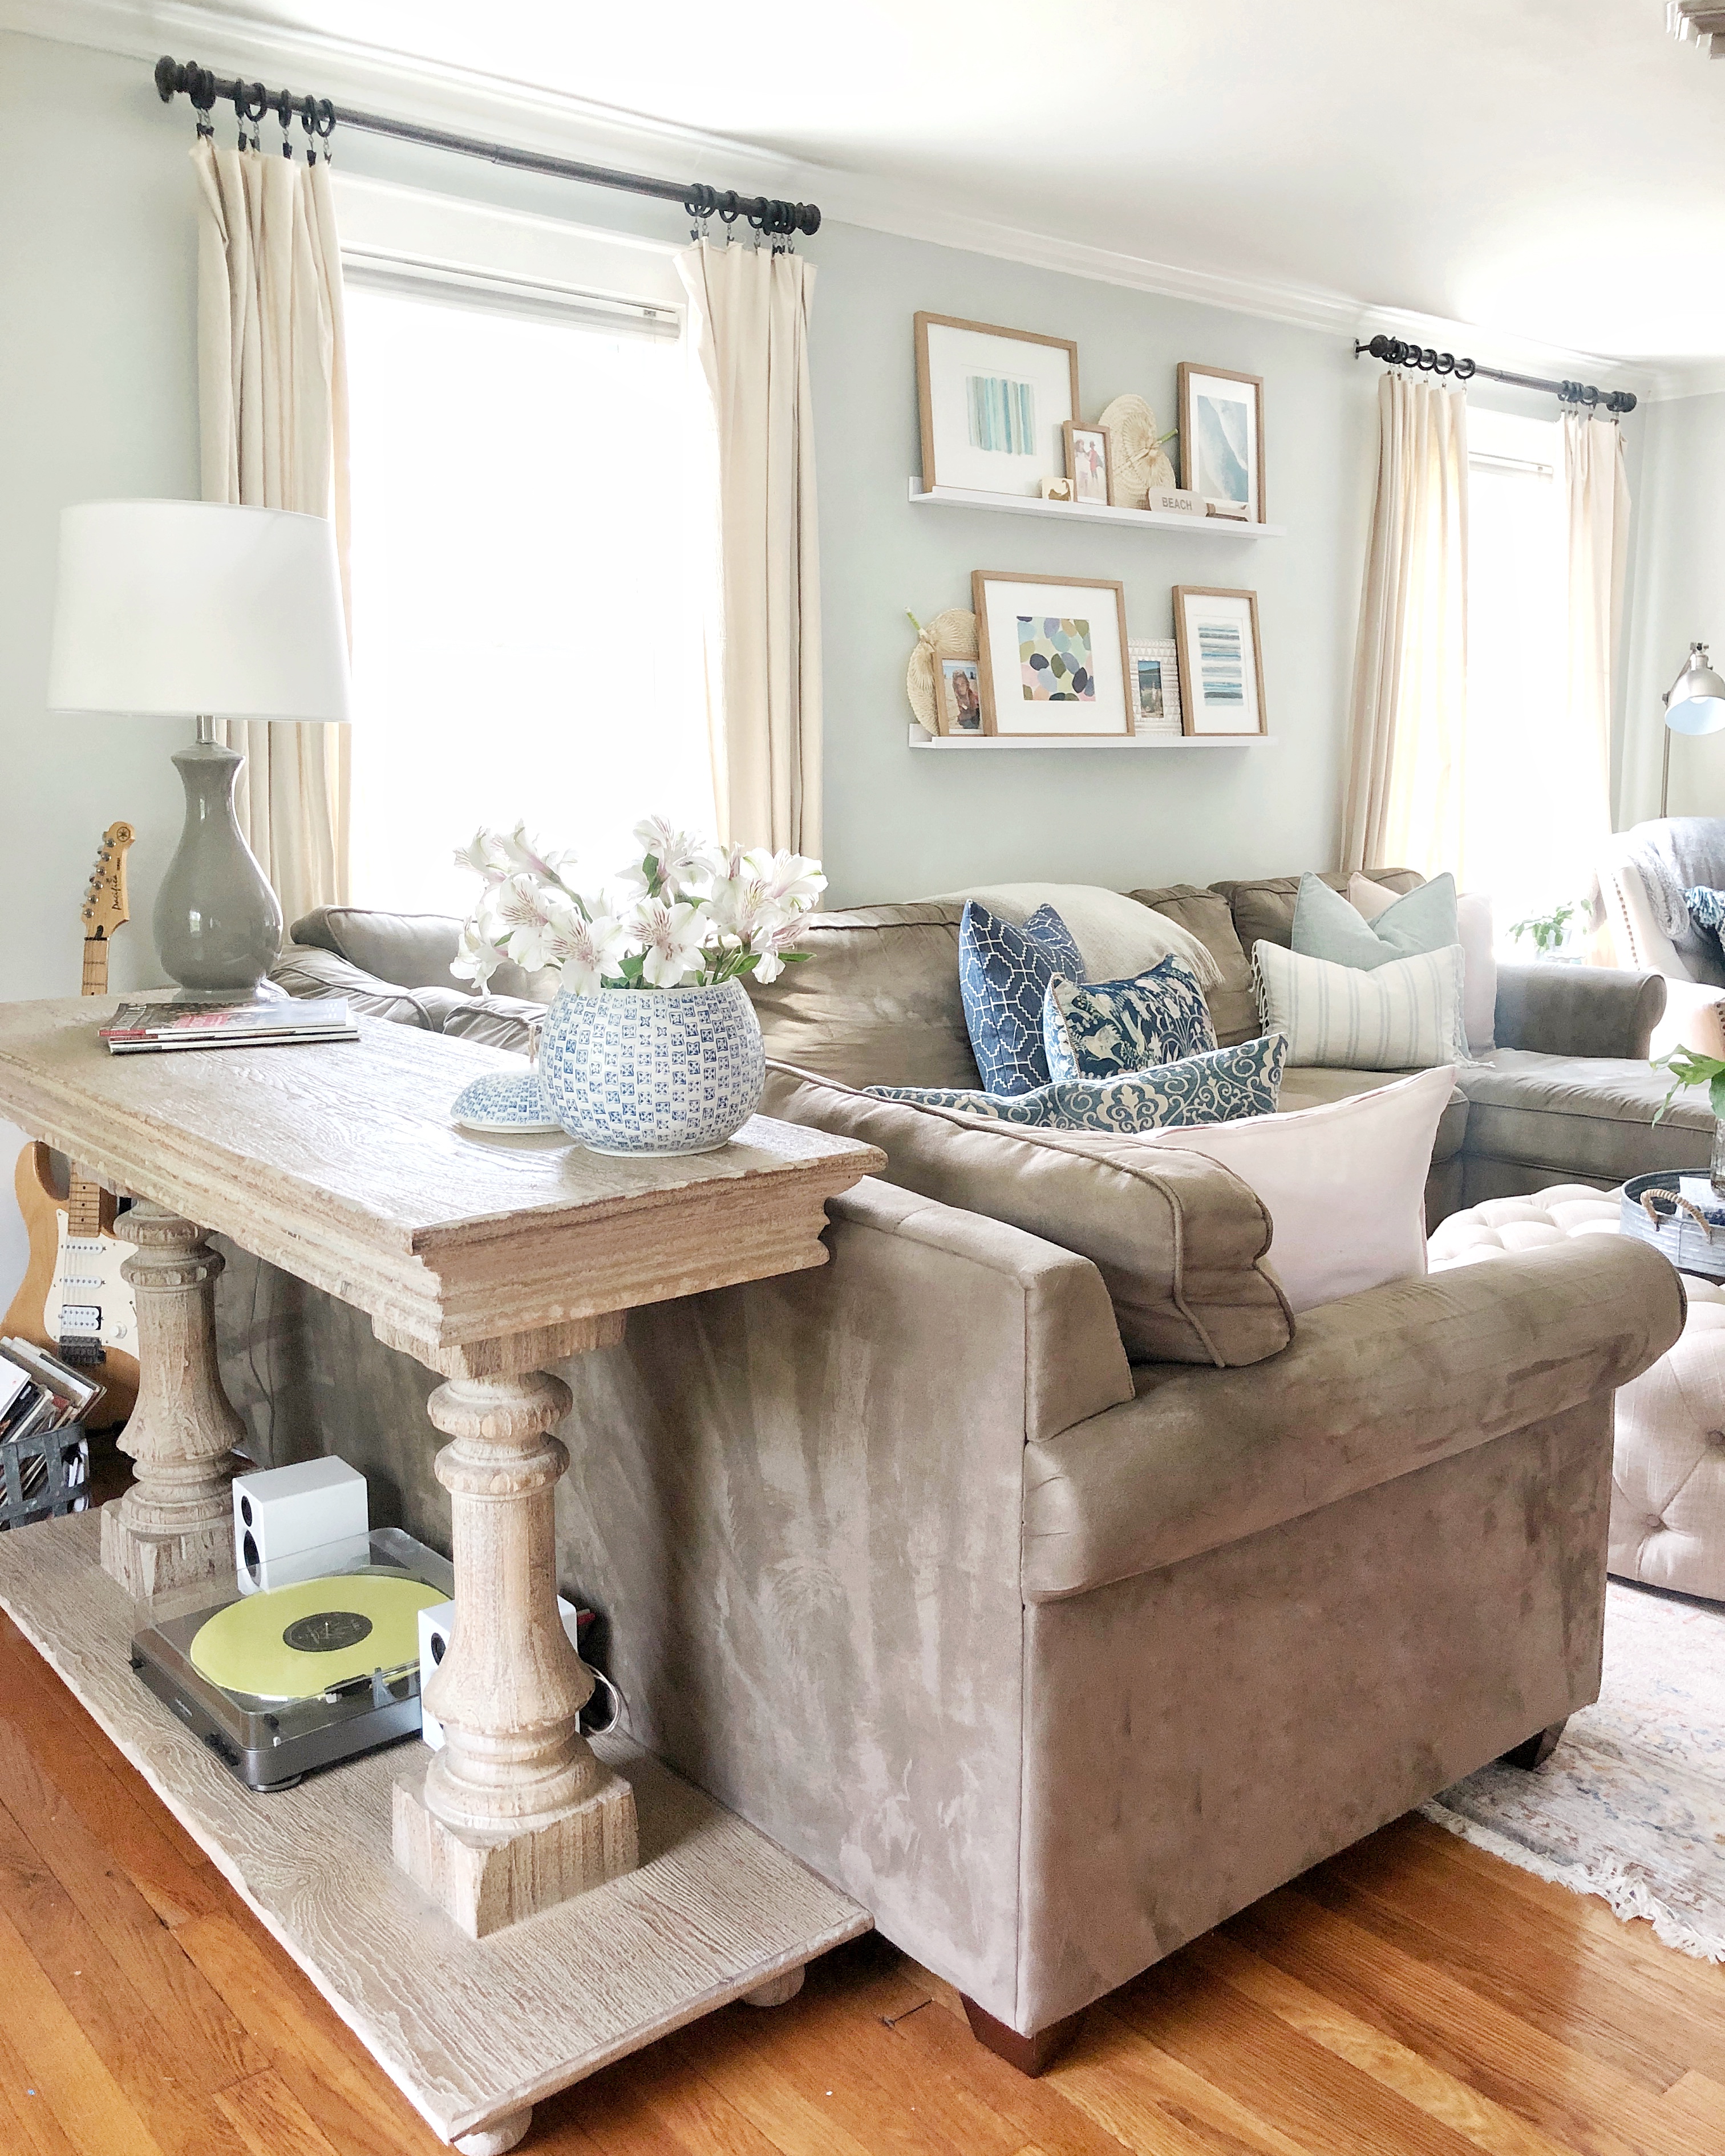
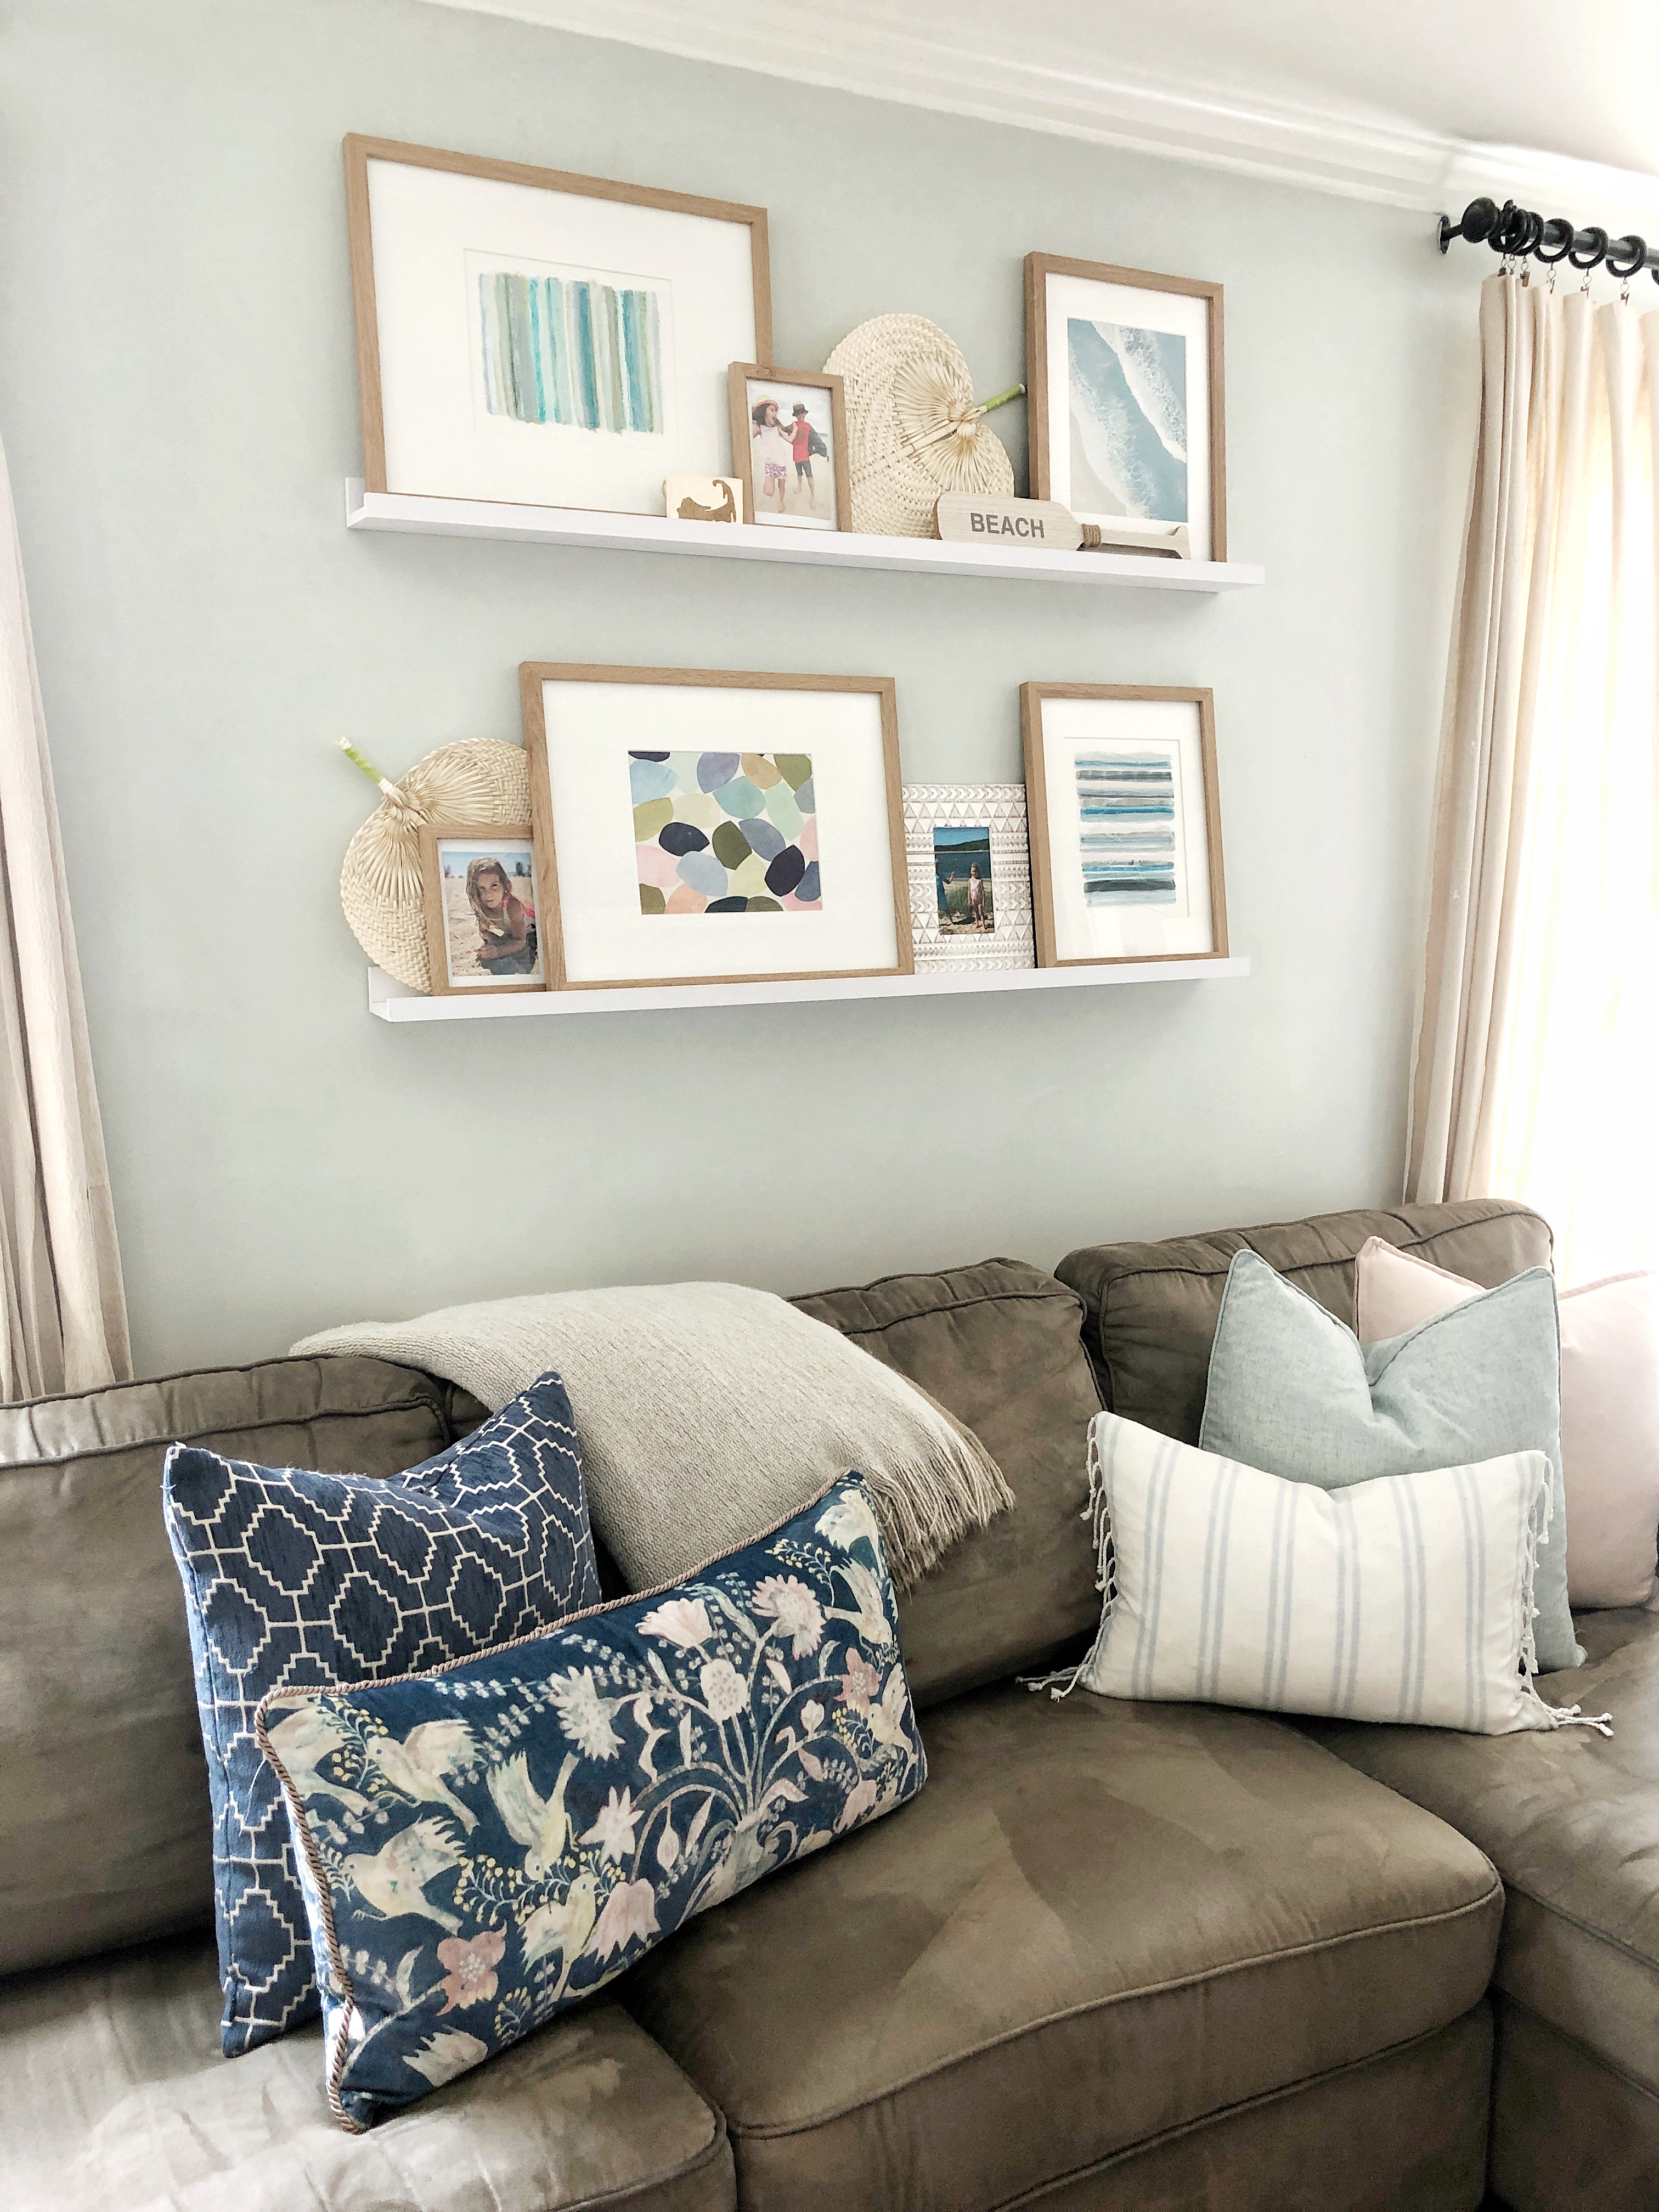
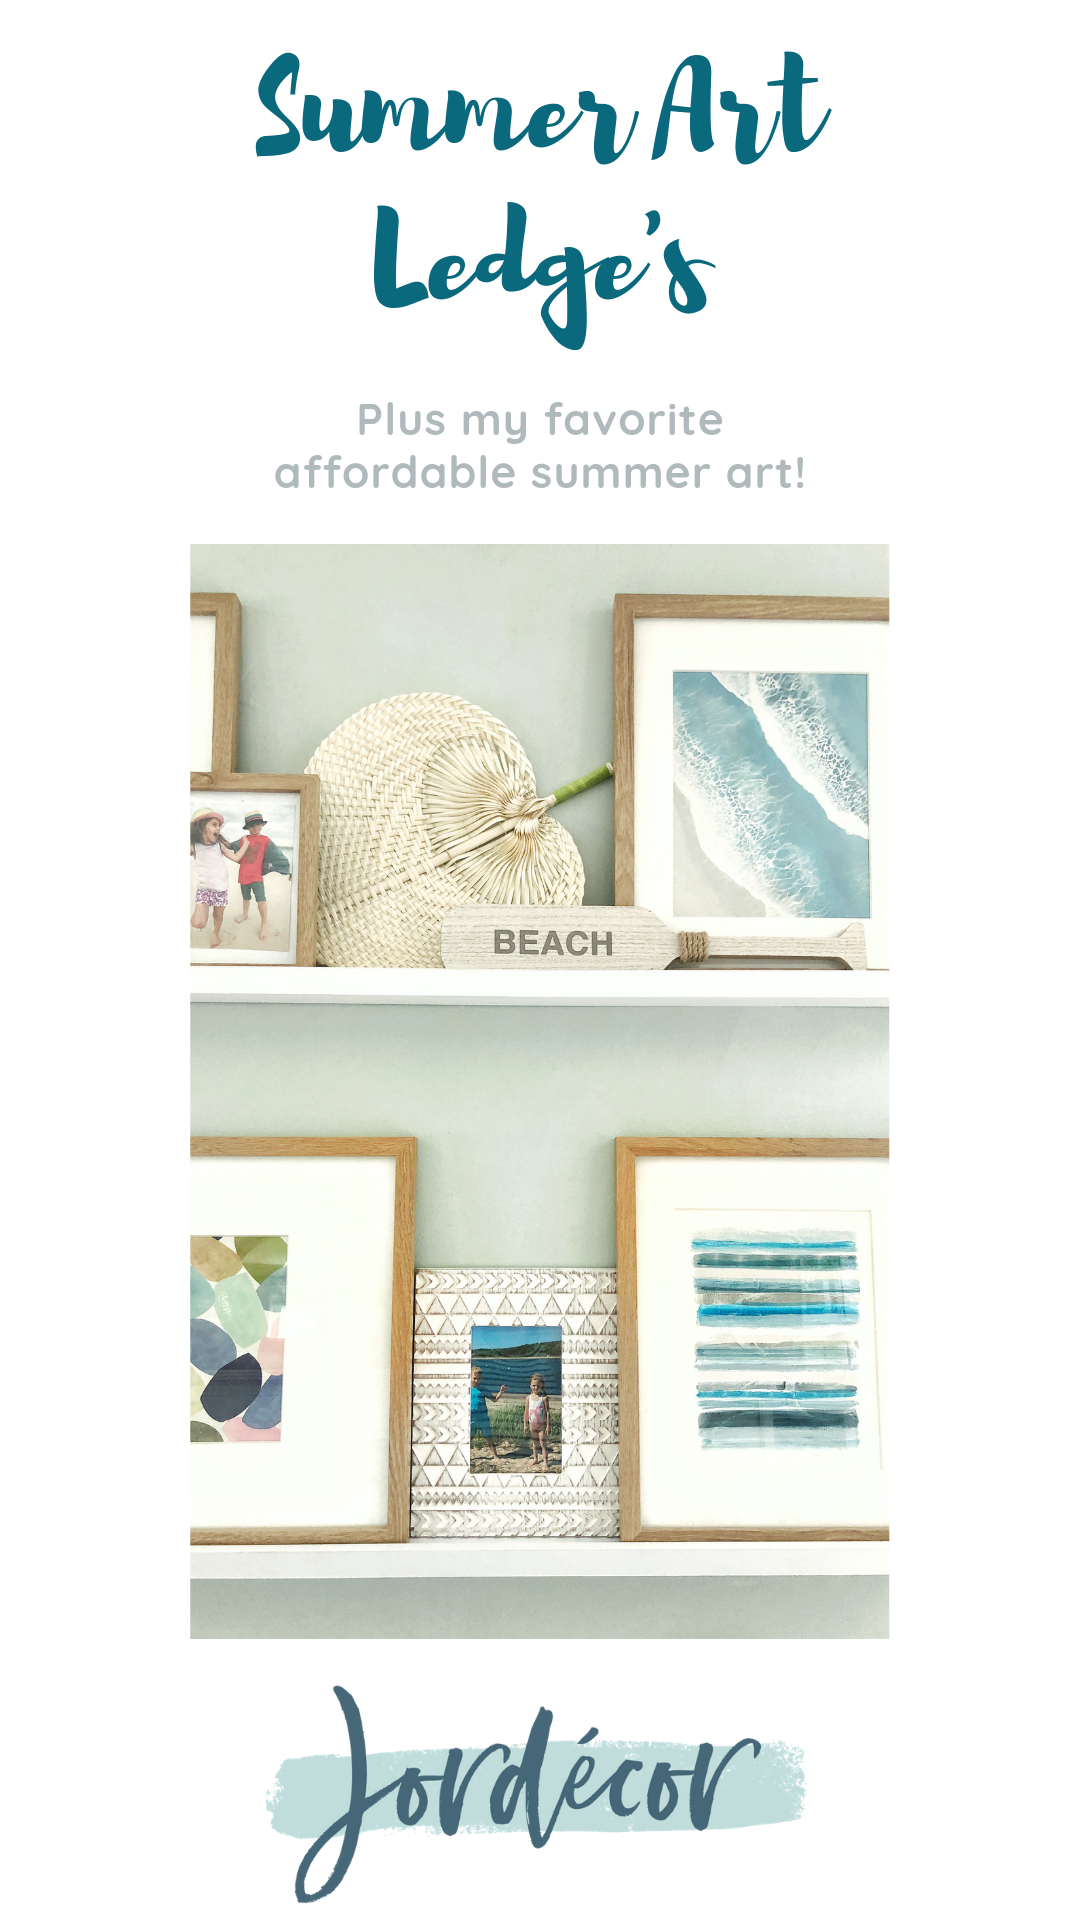
The weather is beautiful today, with a warm breeze blowing through the window as I write this. Summer is finally here and is one of my favorite seasons. I love making my home feel light and airy this time of year. I like to go minimal with my decorating in the warmer moths to help create that light vibe. I wanted to show you how I added some summer art to our gallery ledges, which you can find HERE. I really enjoy switching things out for each season as you can see on this post and this post. Choosing art doesn’t have to be exhausting mentally or financially it can be really easy and fun. My two favorite places to shop for affordable art is HERE and HERE.
SUMMER ART LEDGES
Here they are all ready for summer. I mixed in some of my photographs of the kids at the beach and then let the art and color just shine. I still love the wood tone frames against the white matt’s. I think it adds a little warmth and coziness. I played around with the layout and composition but ultimately I think having three of each size frame works and then just playing with the arrangement. I still might try to swap the frames and sizes so the same exact ones aren’t above and below but for now this is good!
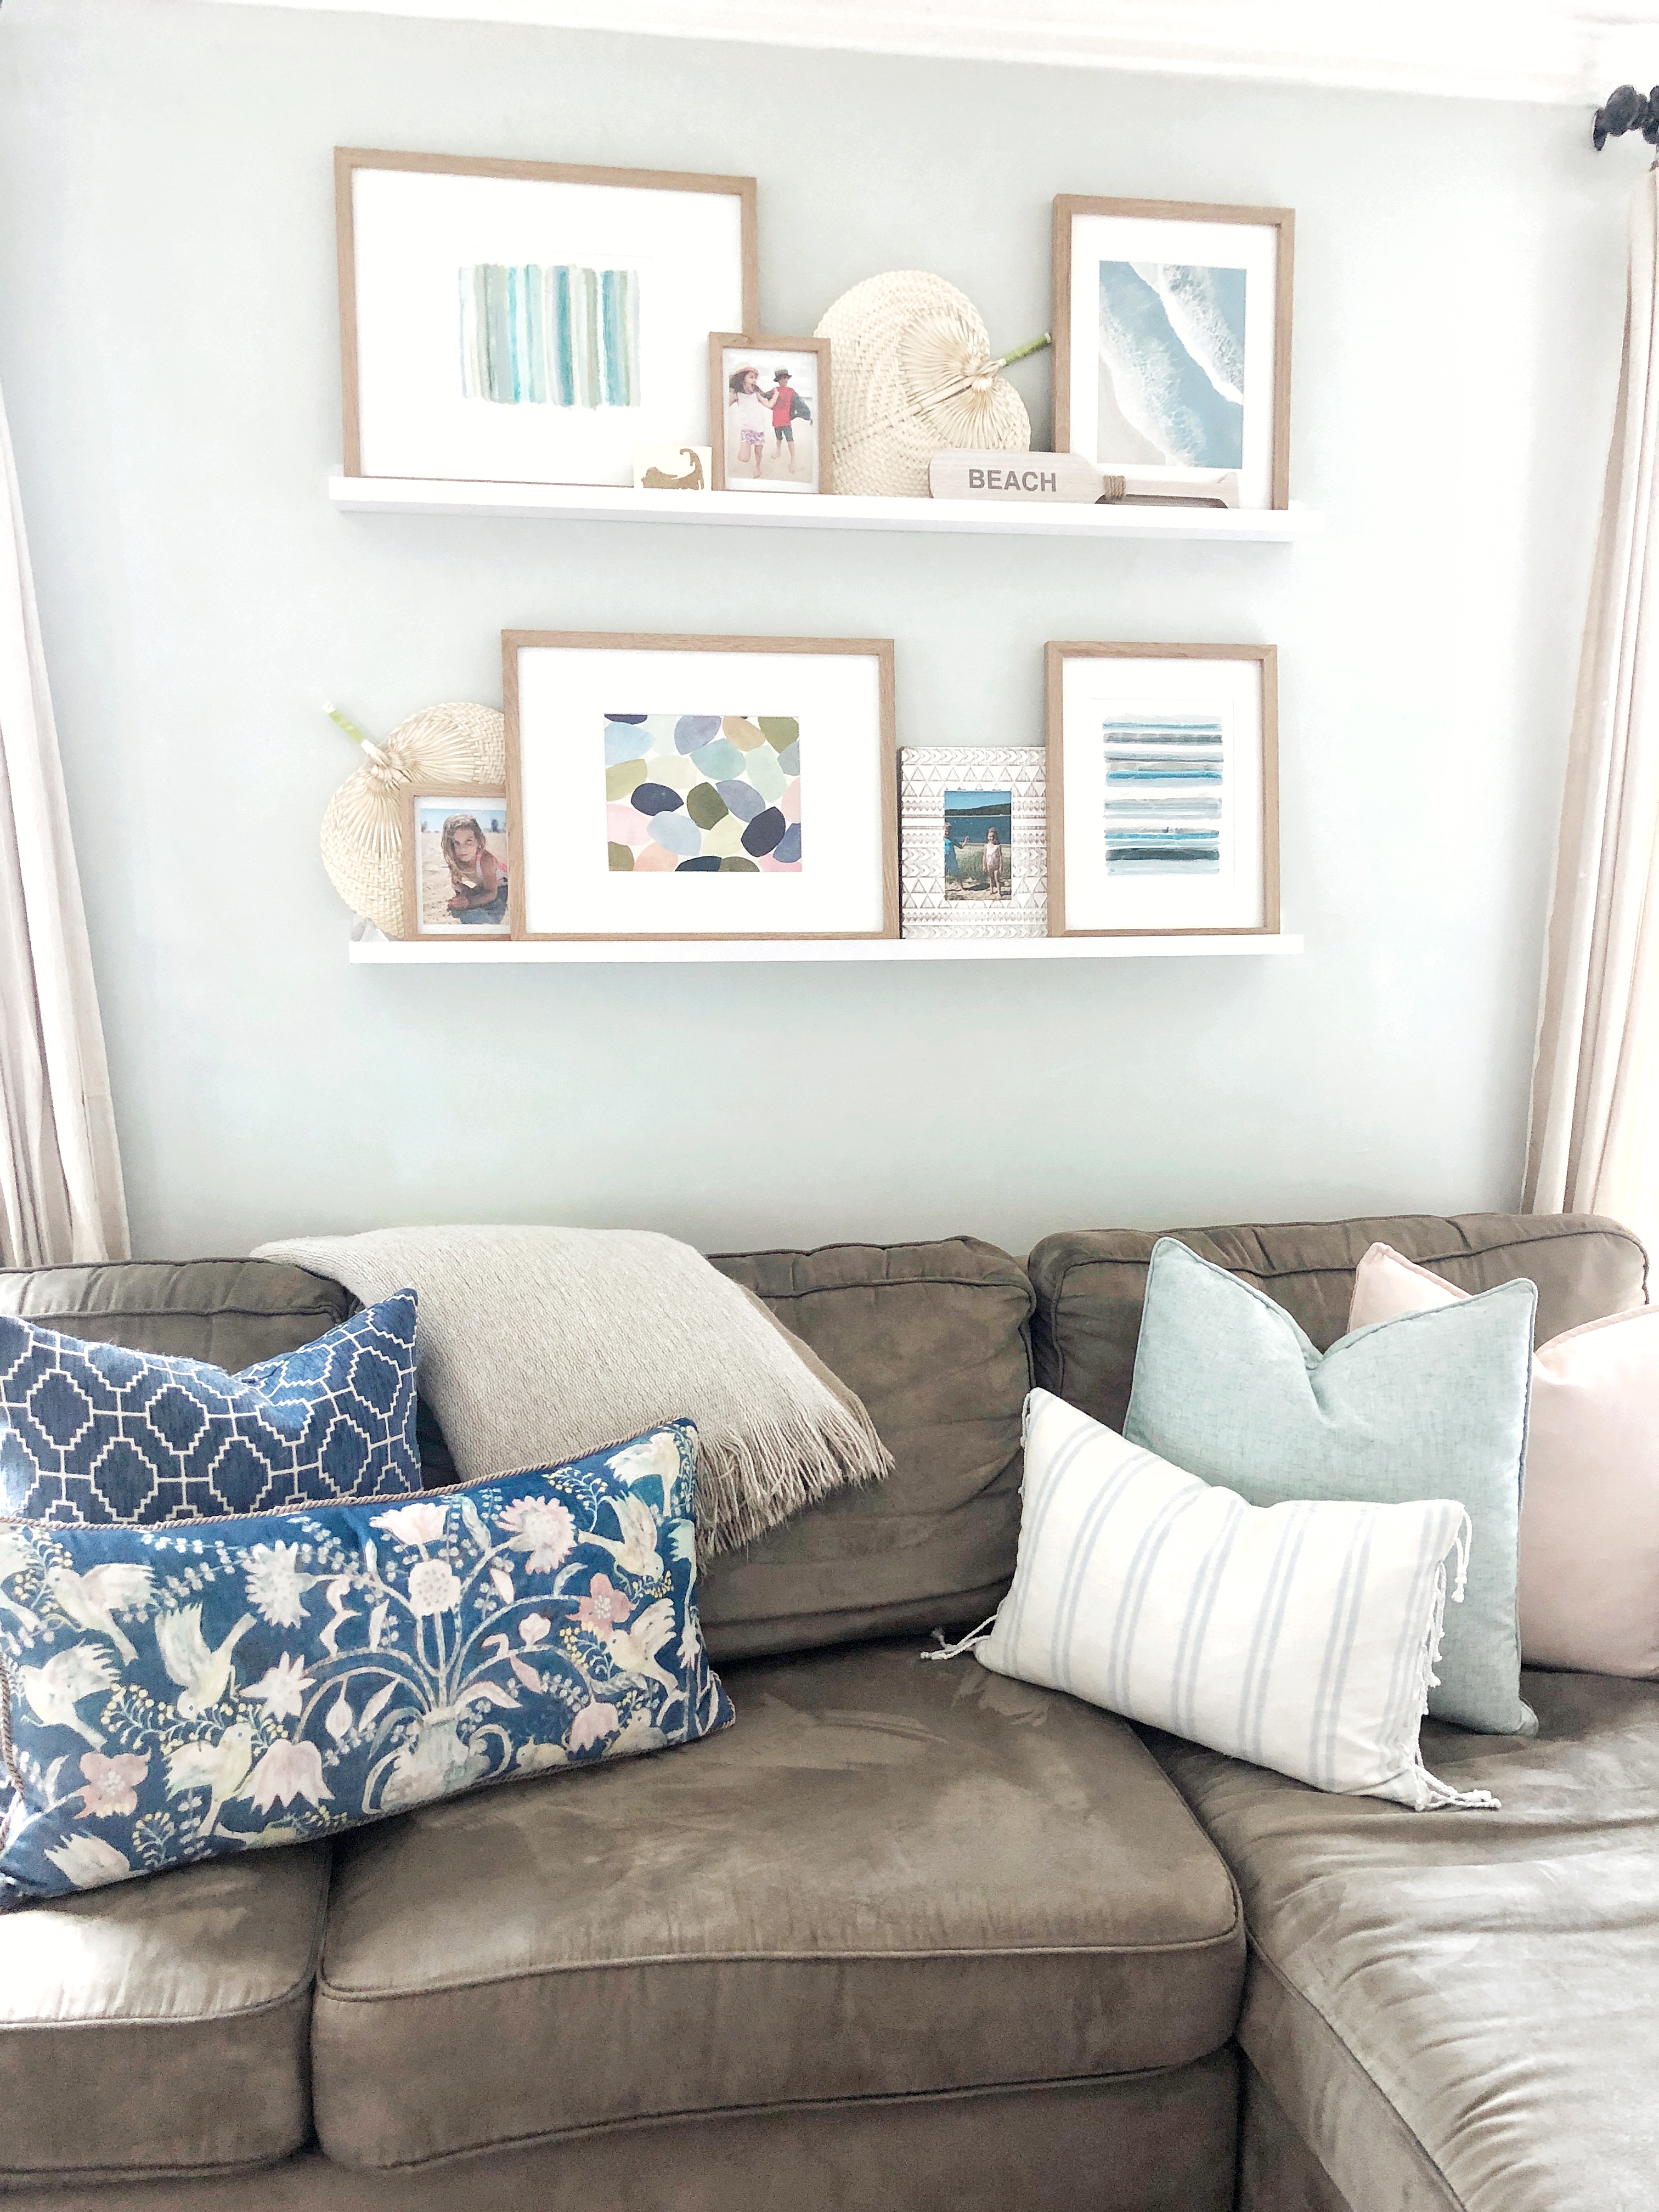
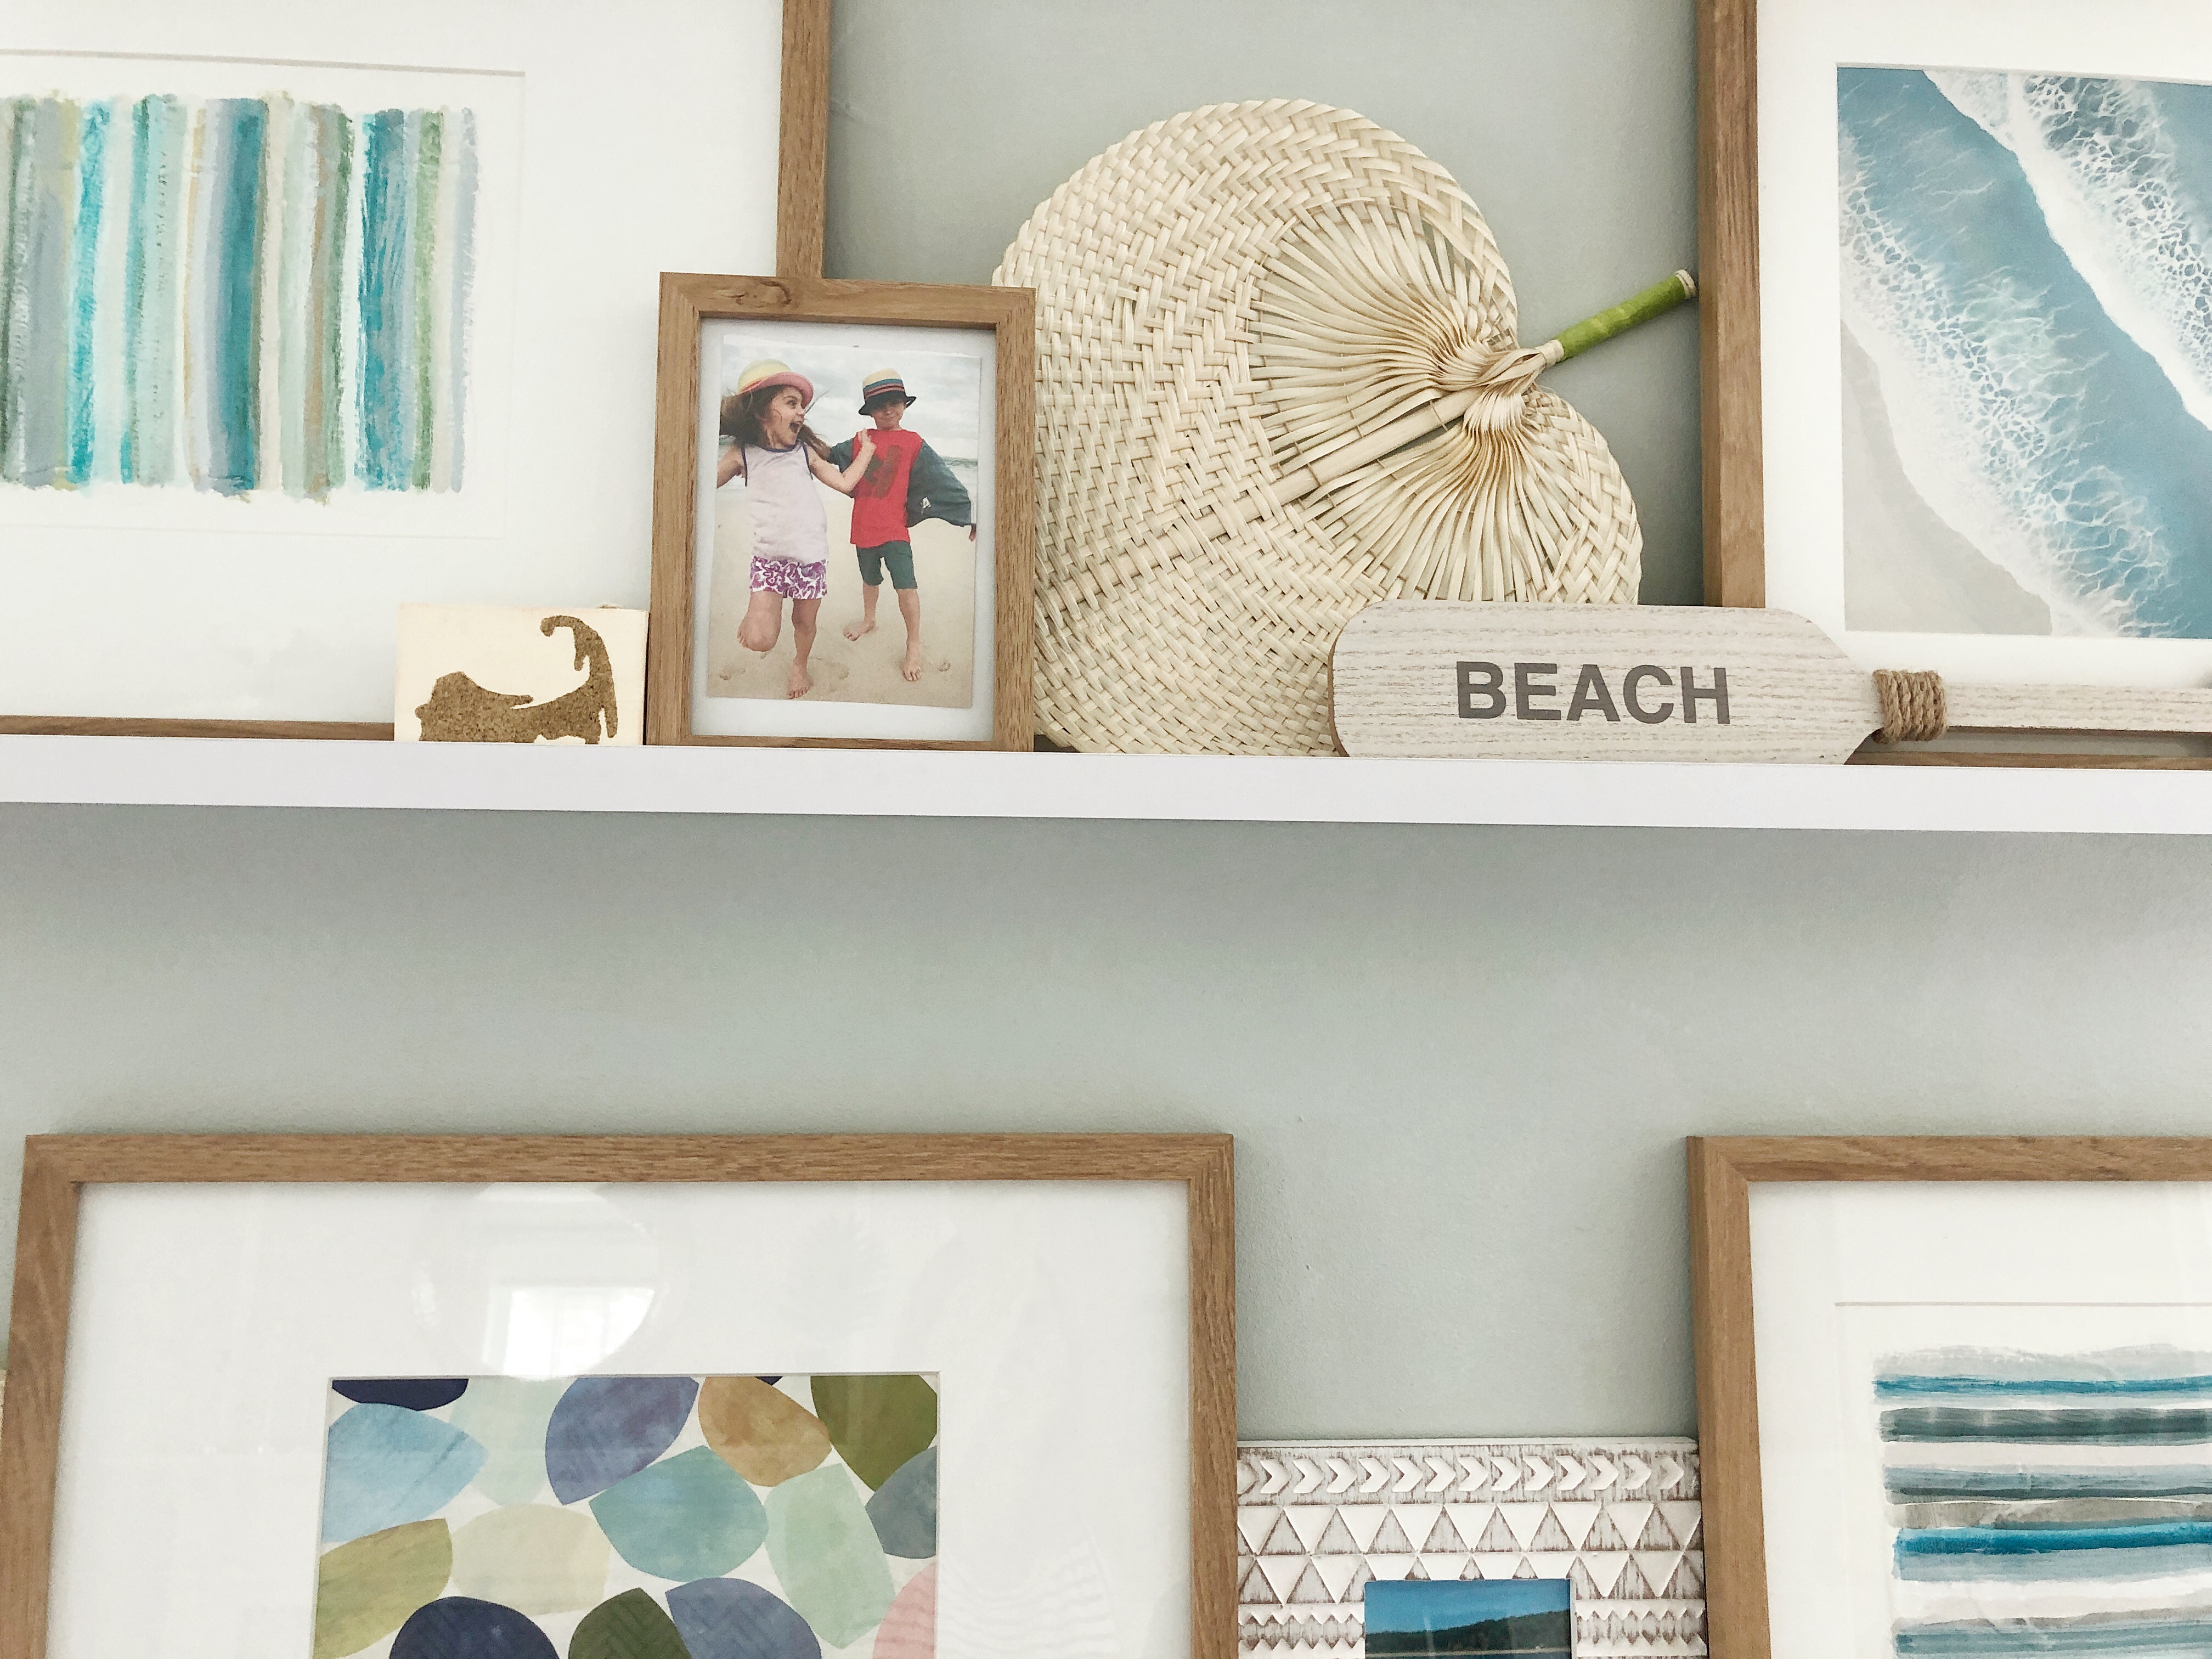
The two stripe paintings are original paintings by local artist Carolyn Mackin. They are part of her series called “Cape Cod Stripes” of which I’m a huge fan of and I was so excited to get two 8×10’s in these blue color schemes. The other two paintings I will link at the bottom of this post. I LOVE how they add movement in the waves as well as the small pebbles or shell shapes that are just so organic and simple plus I love some of the green and pink shades it brings in.
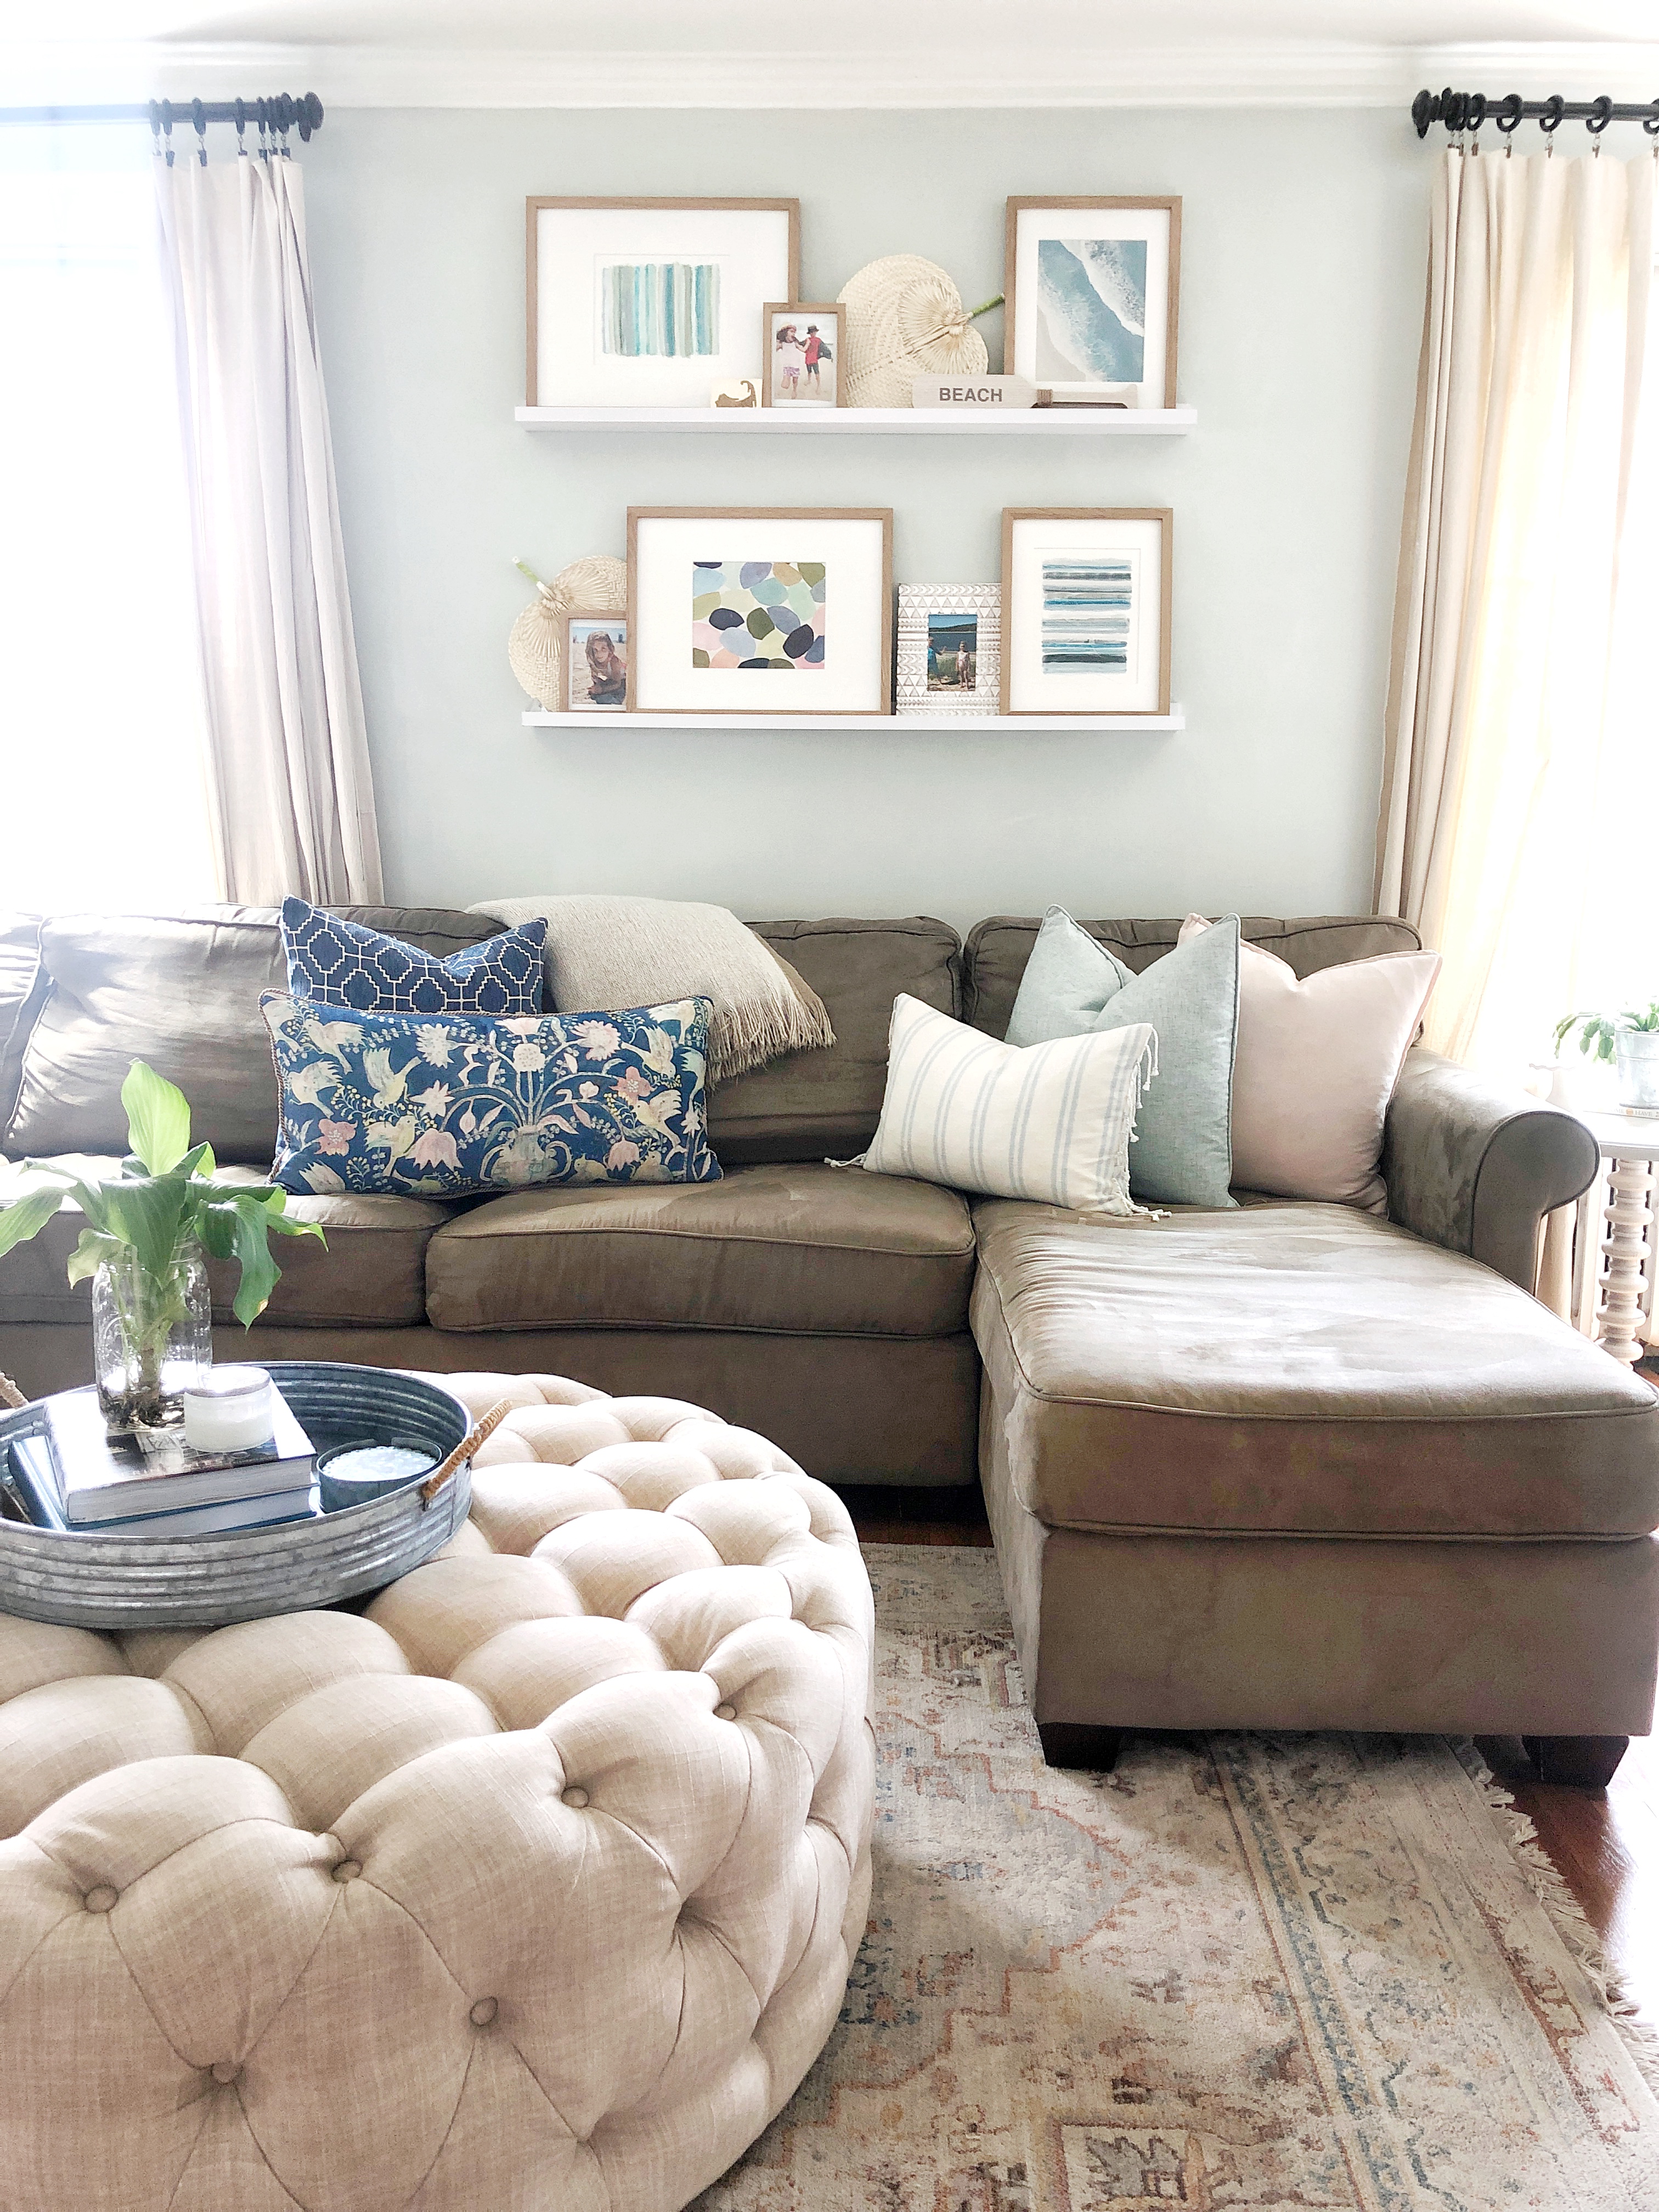
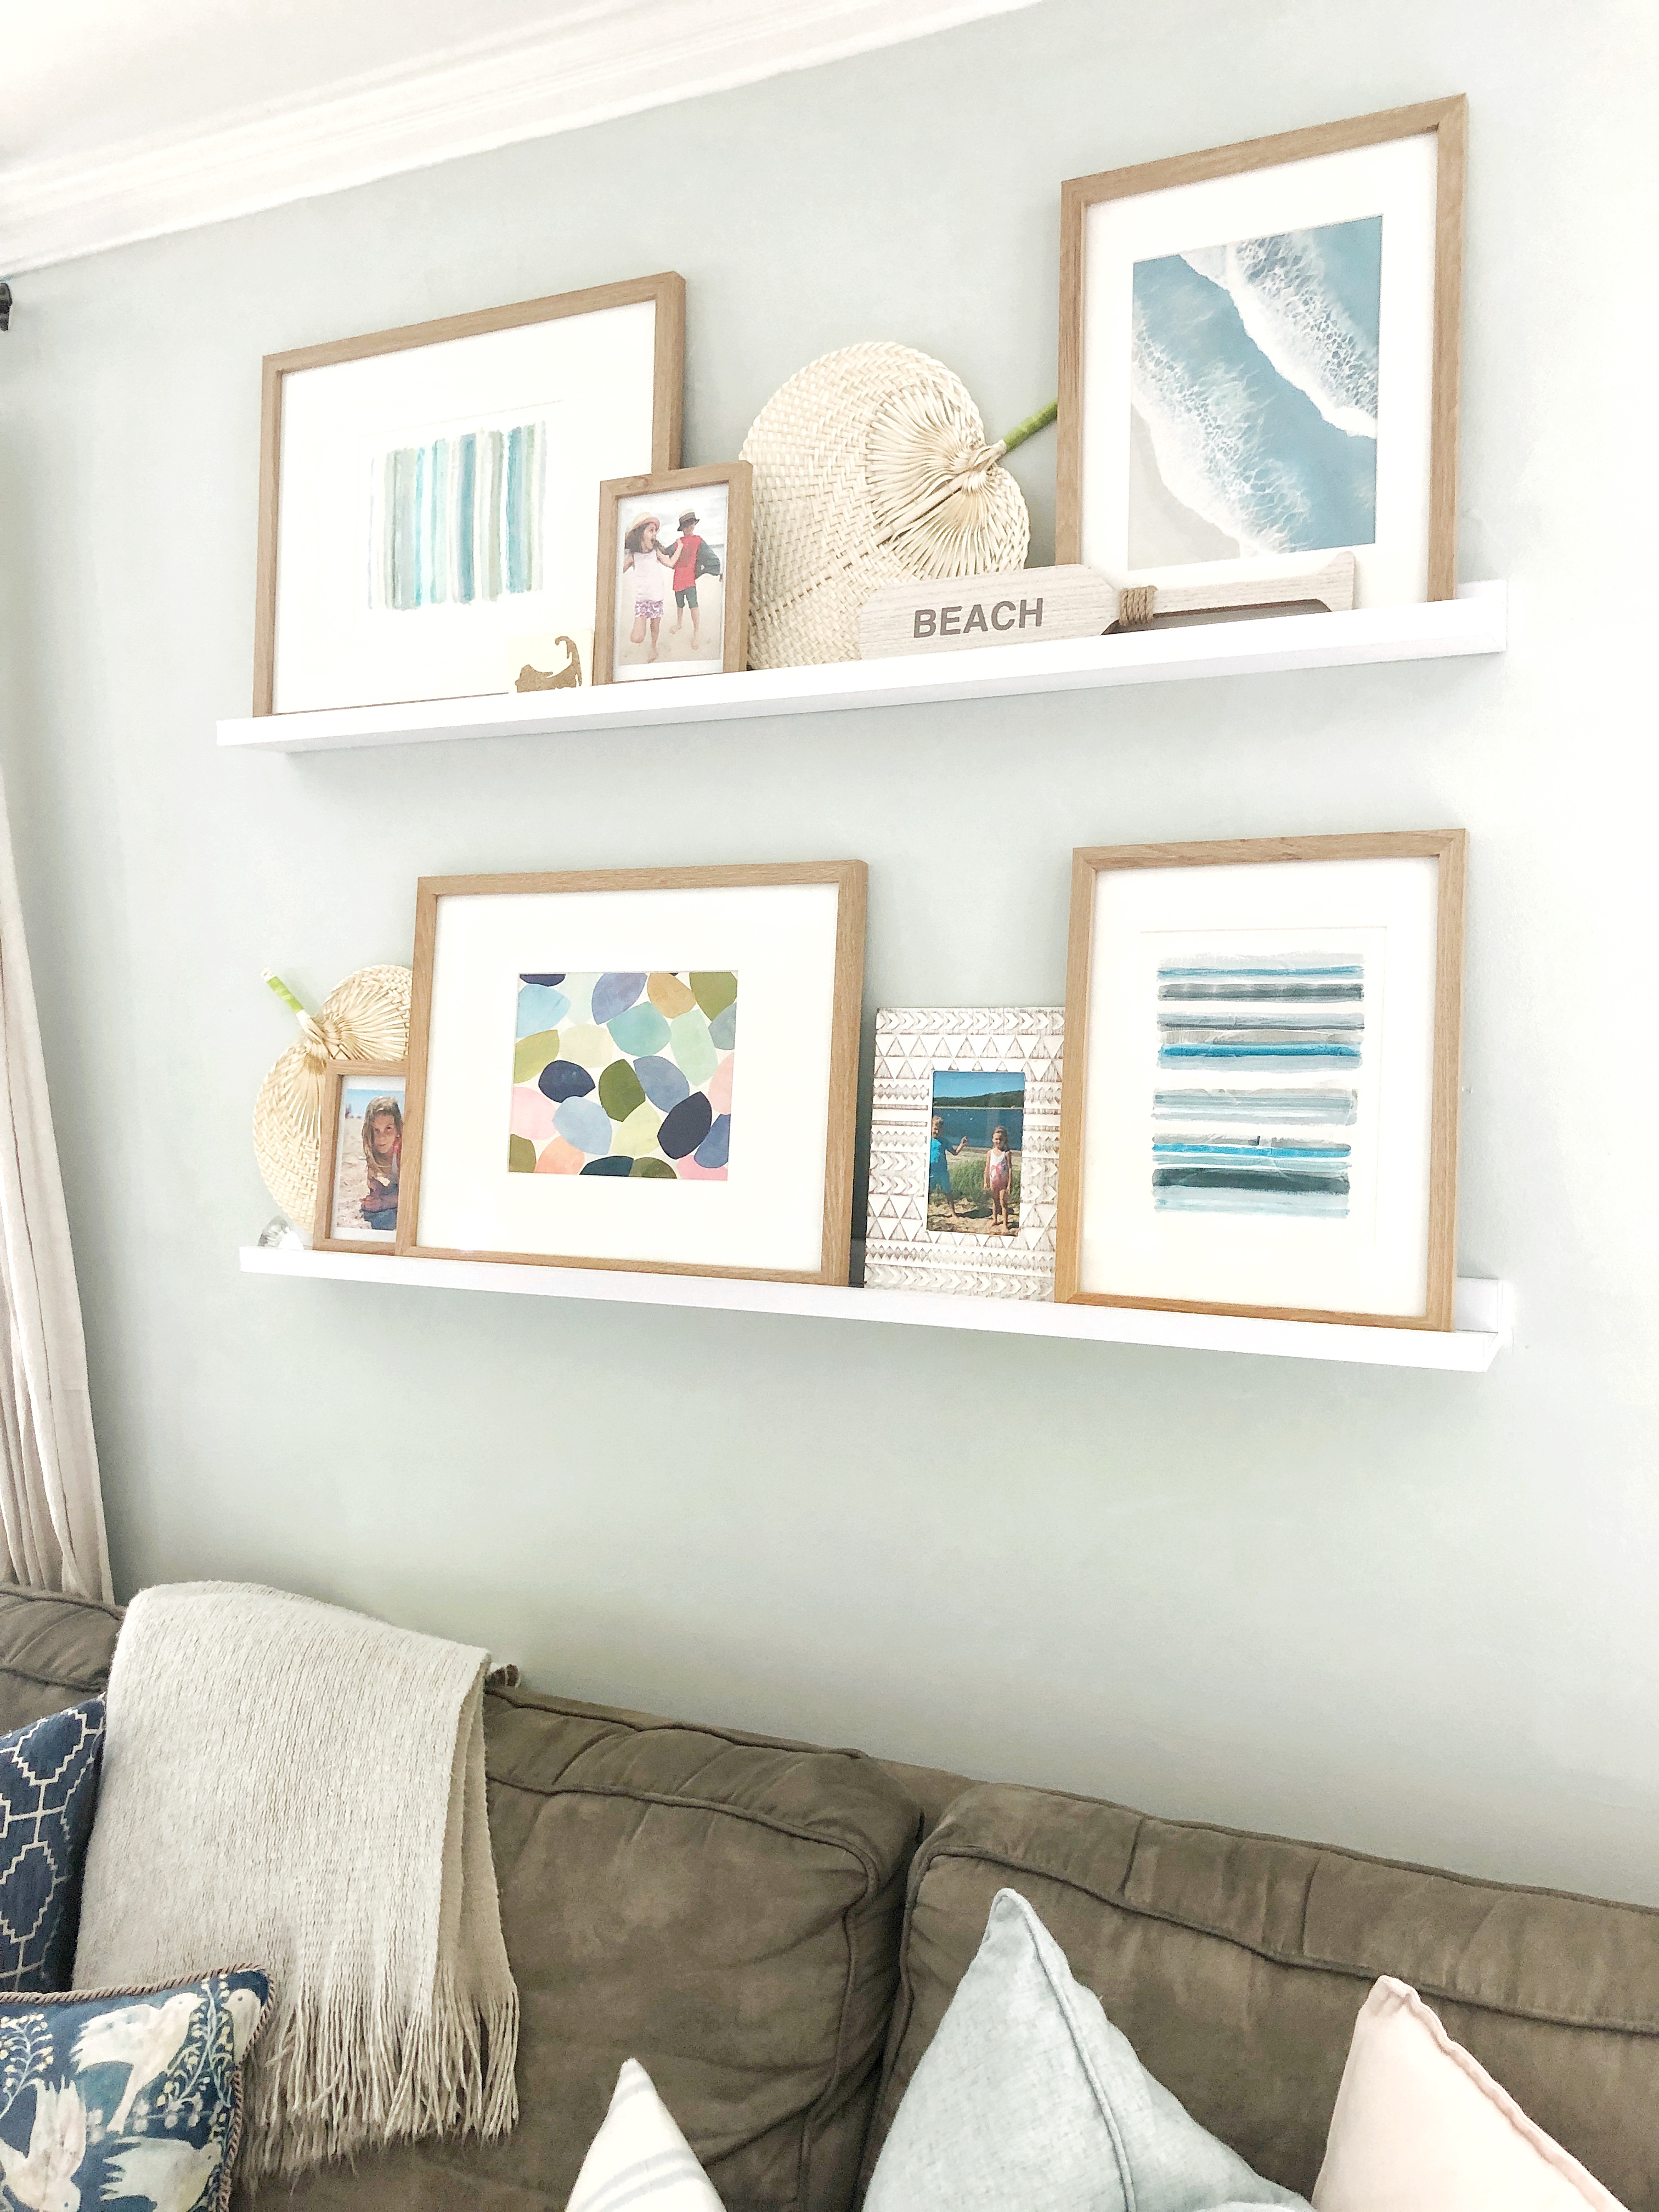
Mixing media is a good idea in your art ledges, or gallery wall whatever you might have! I think bringing in a couple different types of art adds a collected feel and makes it more visually interesting. Here I have two original paintings of which you can see the texture of the brush strokes and then a photograph and a print of a painting.
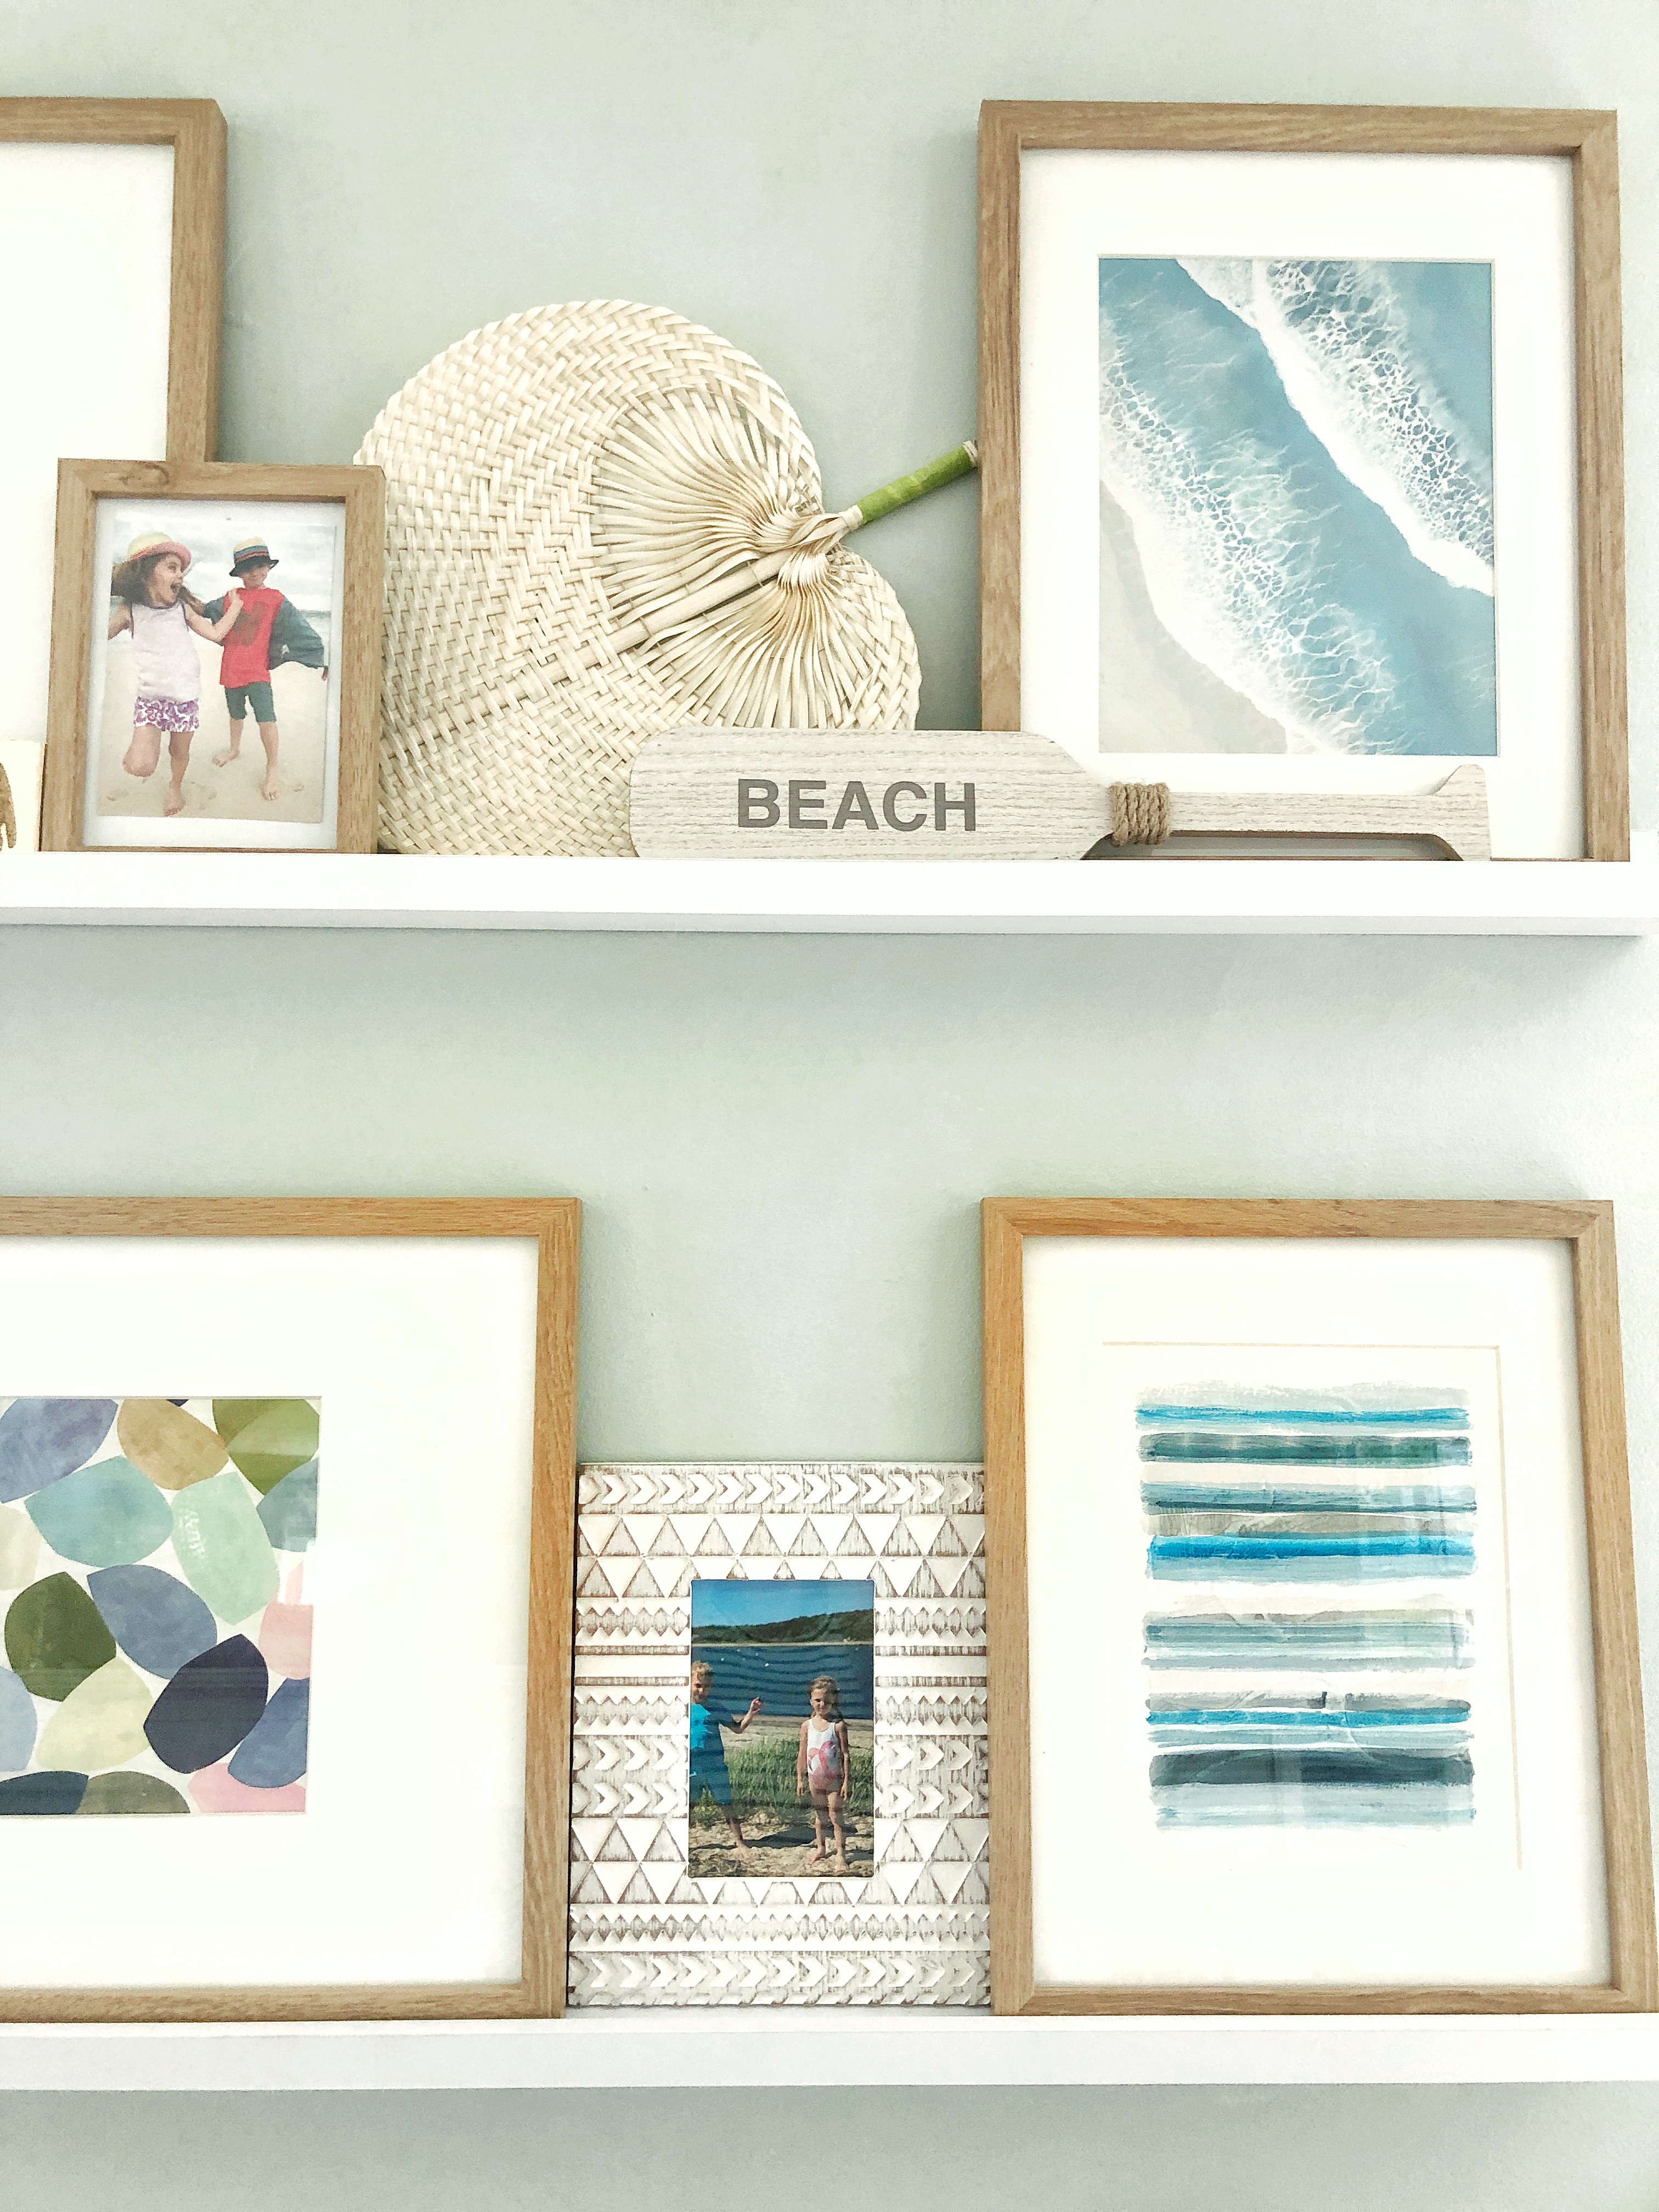
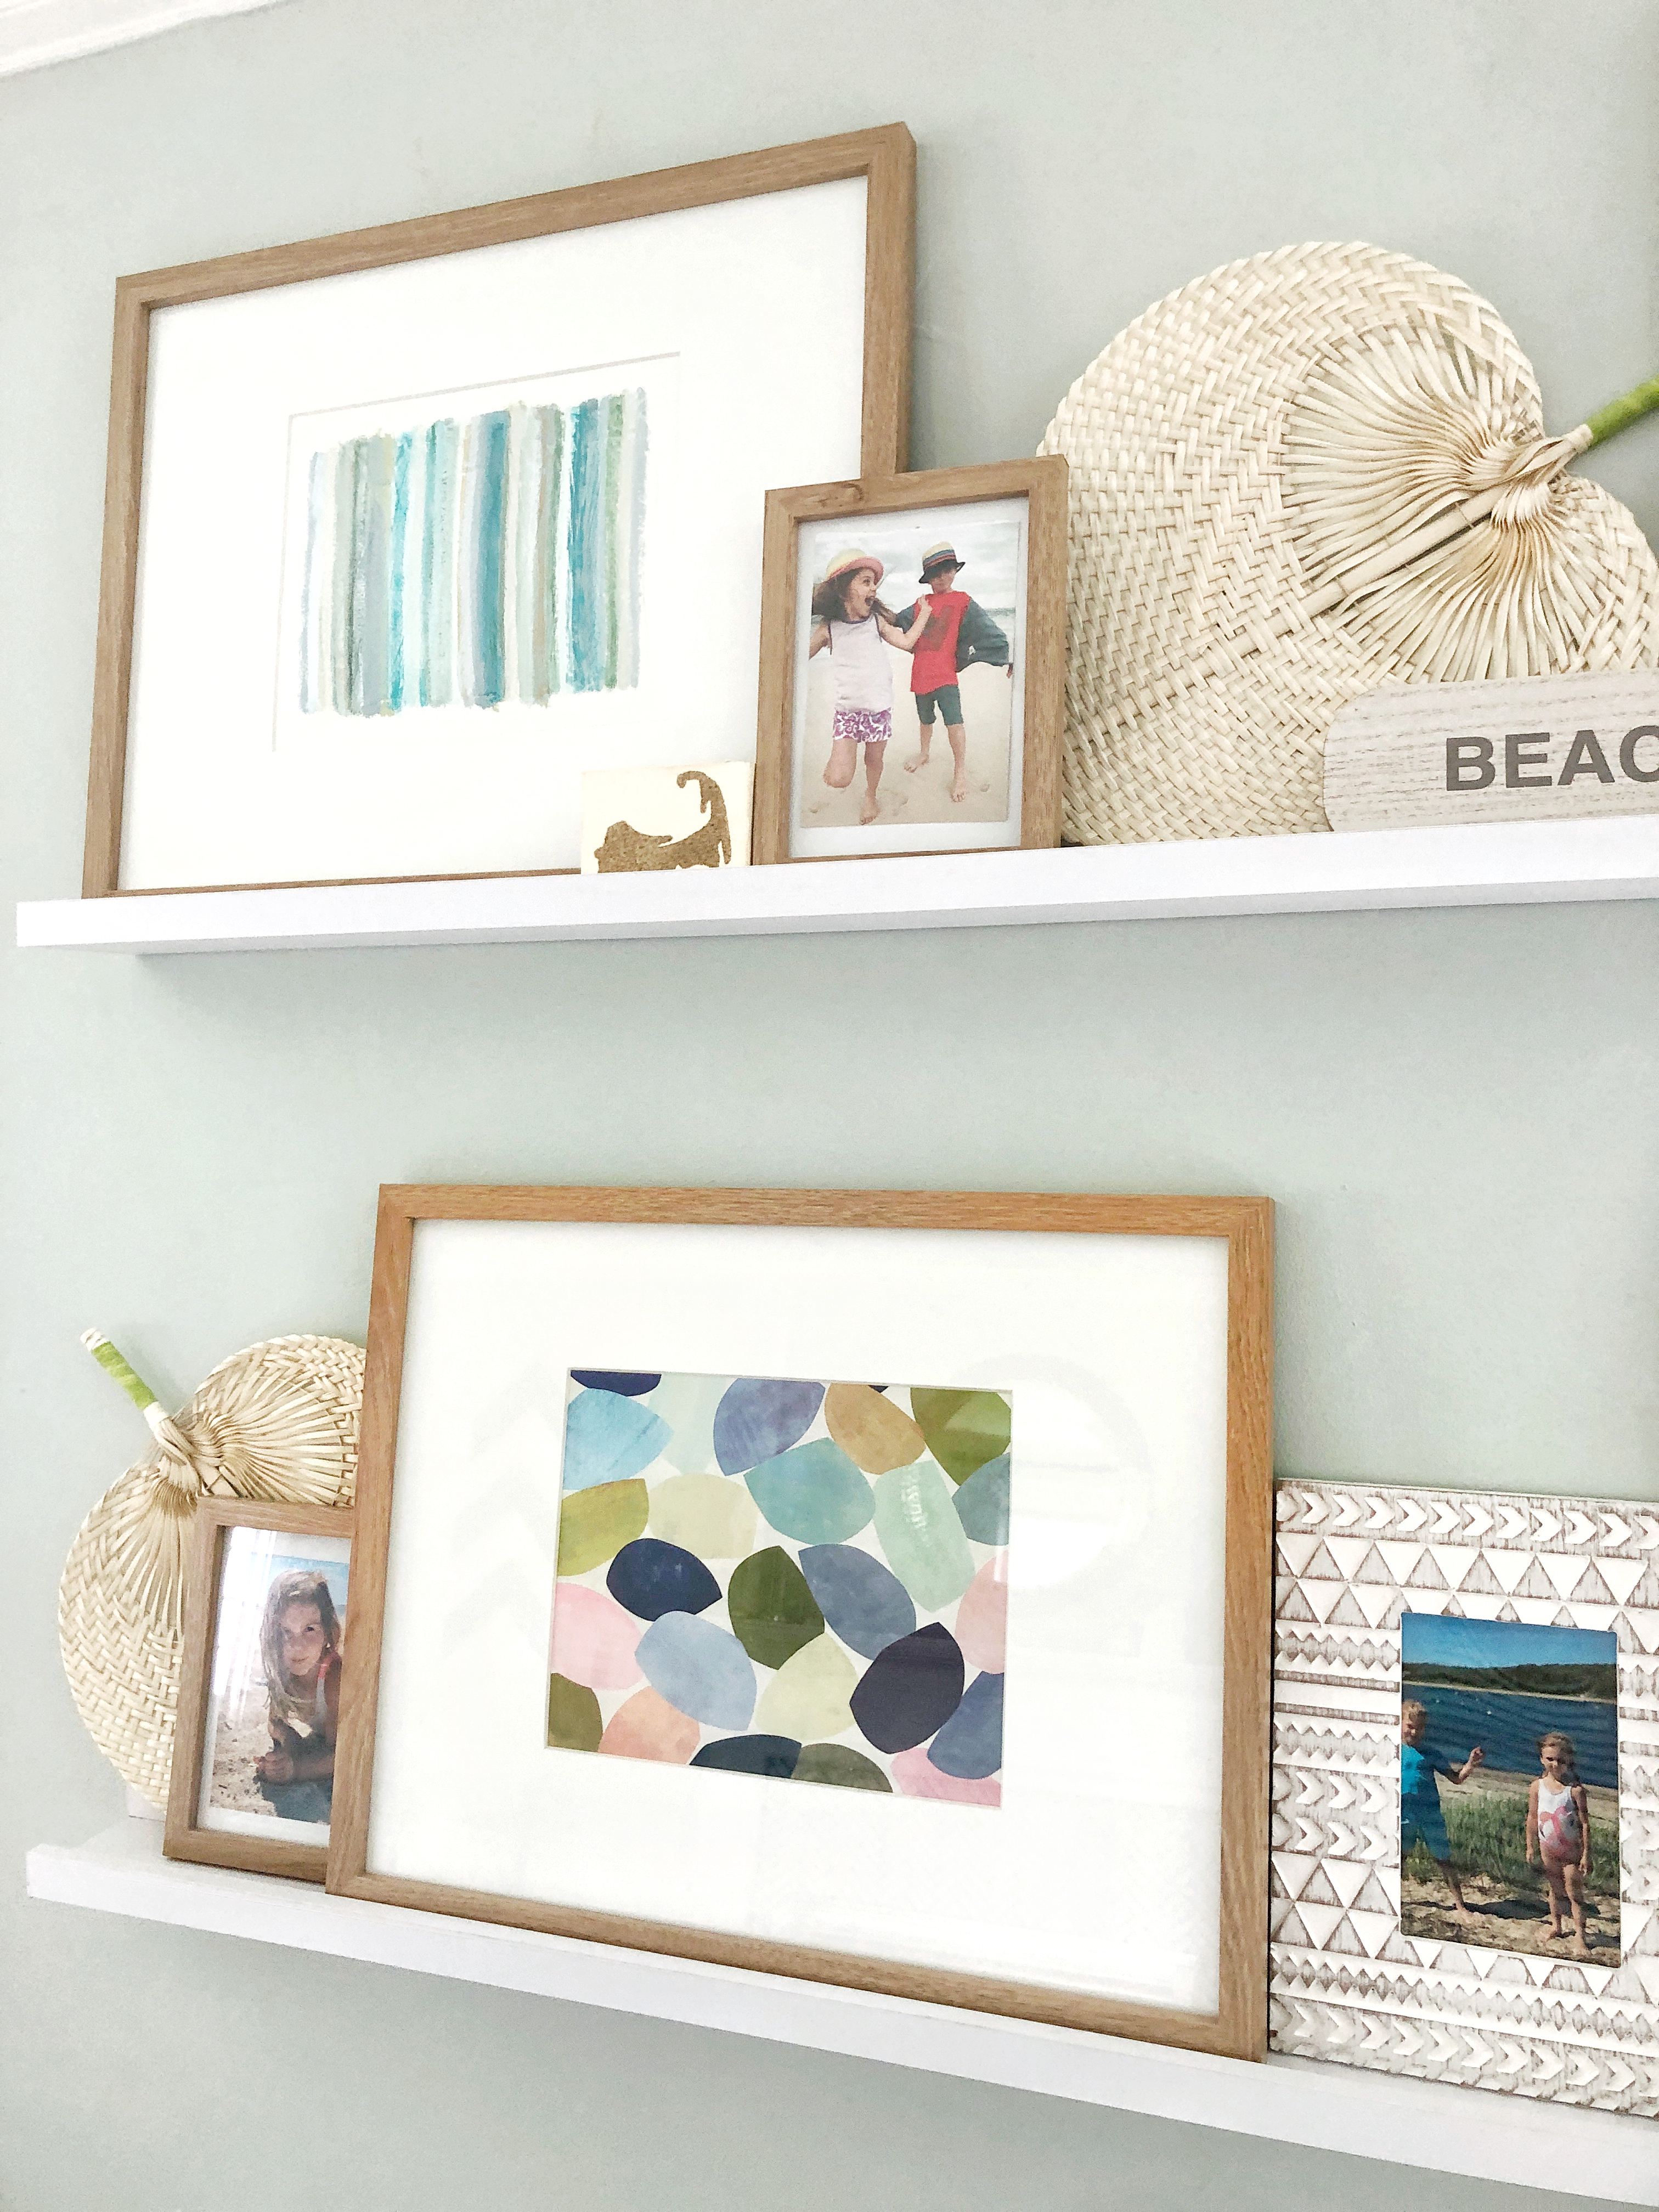
As you can see I also mixed in some objects that I found at the Target Dollar spot, these woven fans break up the rectangular shapes and bring in another beach-y texture. This adorable “beach’ paddle also adds another layer of interest on the shelves. The small Cape Cod canvas is made with real sand by my friend over at www.tahlulastreasures.com

I hope you enjoyed seeing my ledges all styled for summer.
Thanks for stopping by!
Jordan
Shop My Favorite Affordable Summer Art:
Pin For Later:
read the full post >
It feels like an eternity ago that I was a Teacher. I always wanted to become either an Interior Designer or an Art Teacher. I taught art for almost 10 years before staying home with my own two littles. It’s crazy to me that now, in my own JorDecor way, I’m pursuing my other passion and sharing that pursuit with all of you. Art and creativity will always be at my core, creating and helping others create whether it be something you hang on your walls or the cozy look of a space itself. Creation comes in many forms, it is about releasing an expression, emotion, idea or vision. Teaching elementary art was one of the most fun jobs. I loved the amazement on kids faces when I taught them a new technique or introduced them to an artist or material they never heard of before.
As my own kids school year is now coming to an end I’m feeling nostalgic to all those end of year feels on the other end of it, as a a teacher. I can related to how much those teachers are SOOOO ready for a break. I also recall how exhausting it was, how the children become like your own. You care for them, help them not only in subject matter but teach them about social skills, manners, kindness, acceptance and so many other valuable things on a daily. I recall by the end of the year being drained; mentally, physically and emotionally. Summer is the time when teachers restore themselves, renew their spark for education and regain the energy to do it all again the next year.
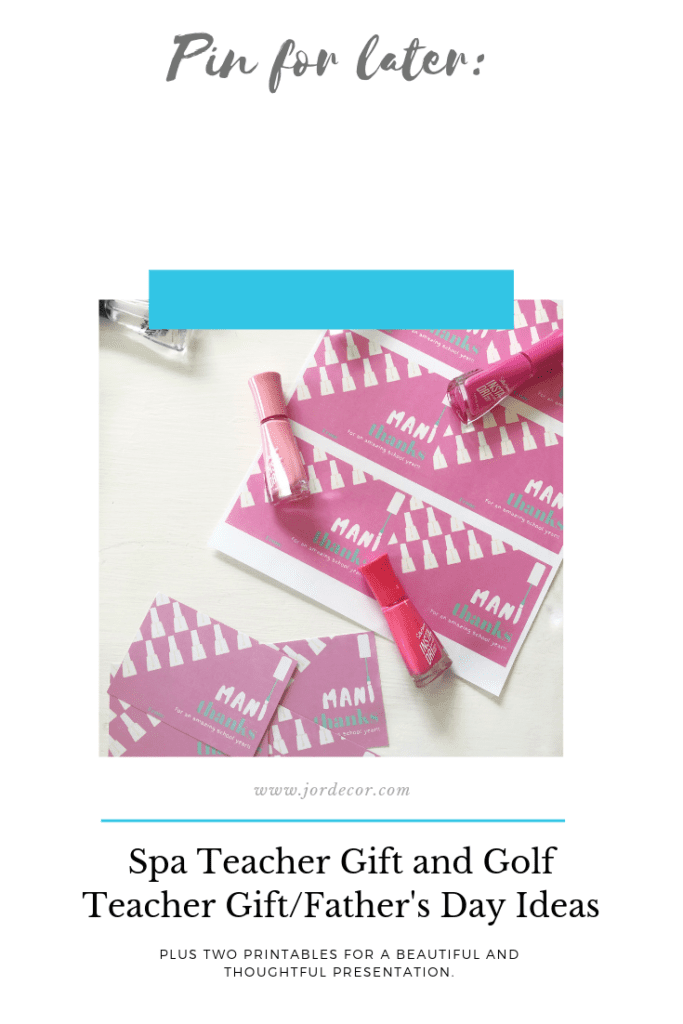
So this is why I have such an appreciation for my kids teachers and all teachers. At the end of the year I try to make a little something special as a “Thank You” and as a “go enjoy your time off” because let’s face it, they’ve earned it. This year I wanted to create a little pampering kind of gift. One of my favorite gifts from a student was a simple manicure gift card (and the inspiration for this years) I remember using it right after school on that last day of classes and treating myself. It was the perfect start to summer. Back in my Art Teachers days I never got my nails done because they were always covered in paint, sharpie or clay. It was such a thoughtful and kind gift to receive.
The second gift idea is for the male teachers but it also doubles as a Father’s Day Gift too! I’m also going to include the cards that I made so you can print your own if you’d like. *read the end to get my tips on printing
SPA TEACHER GIFT IDEA
Click to download and print my cards to attach to your gift.
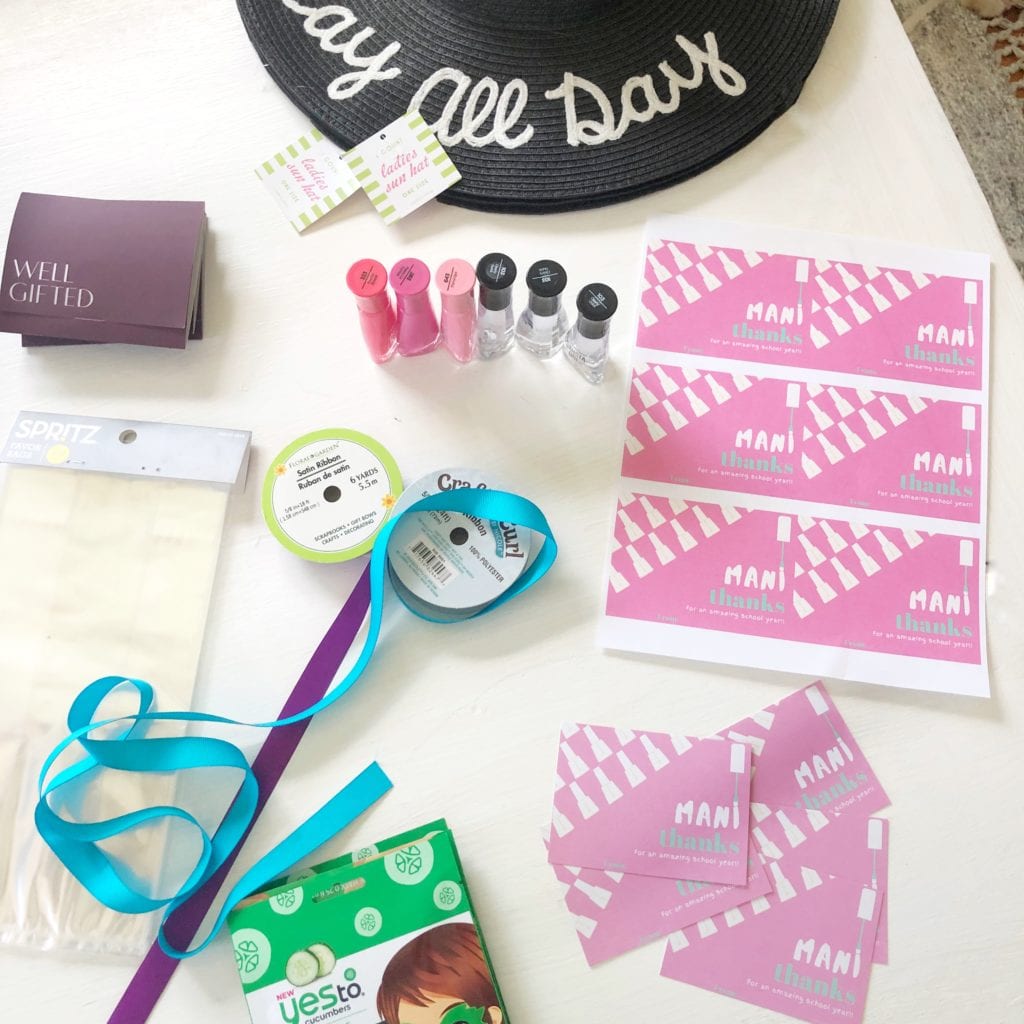

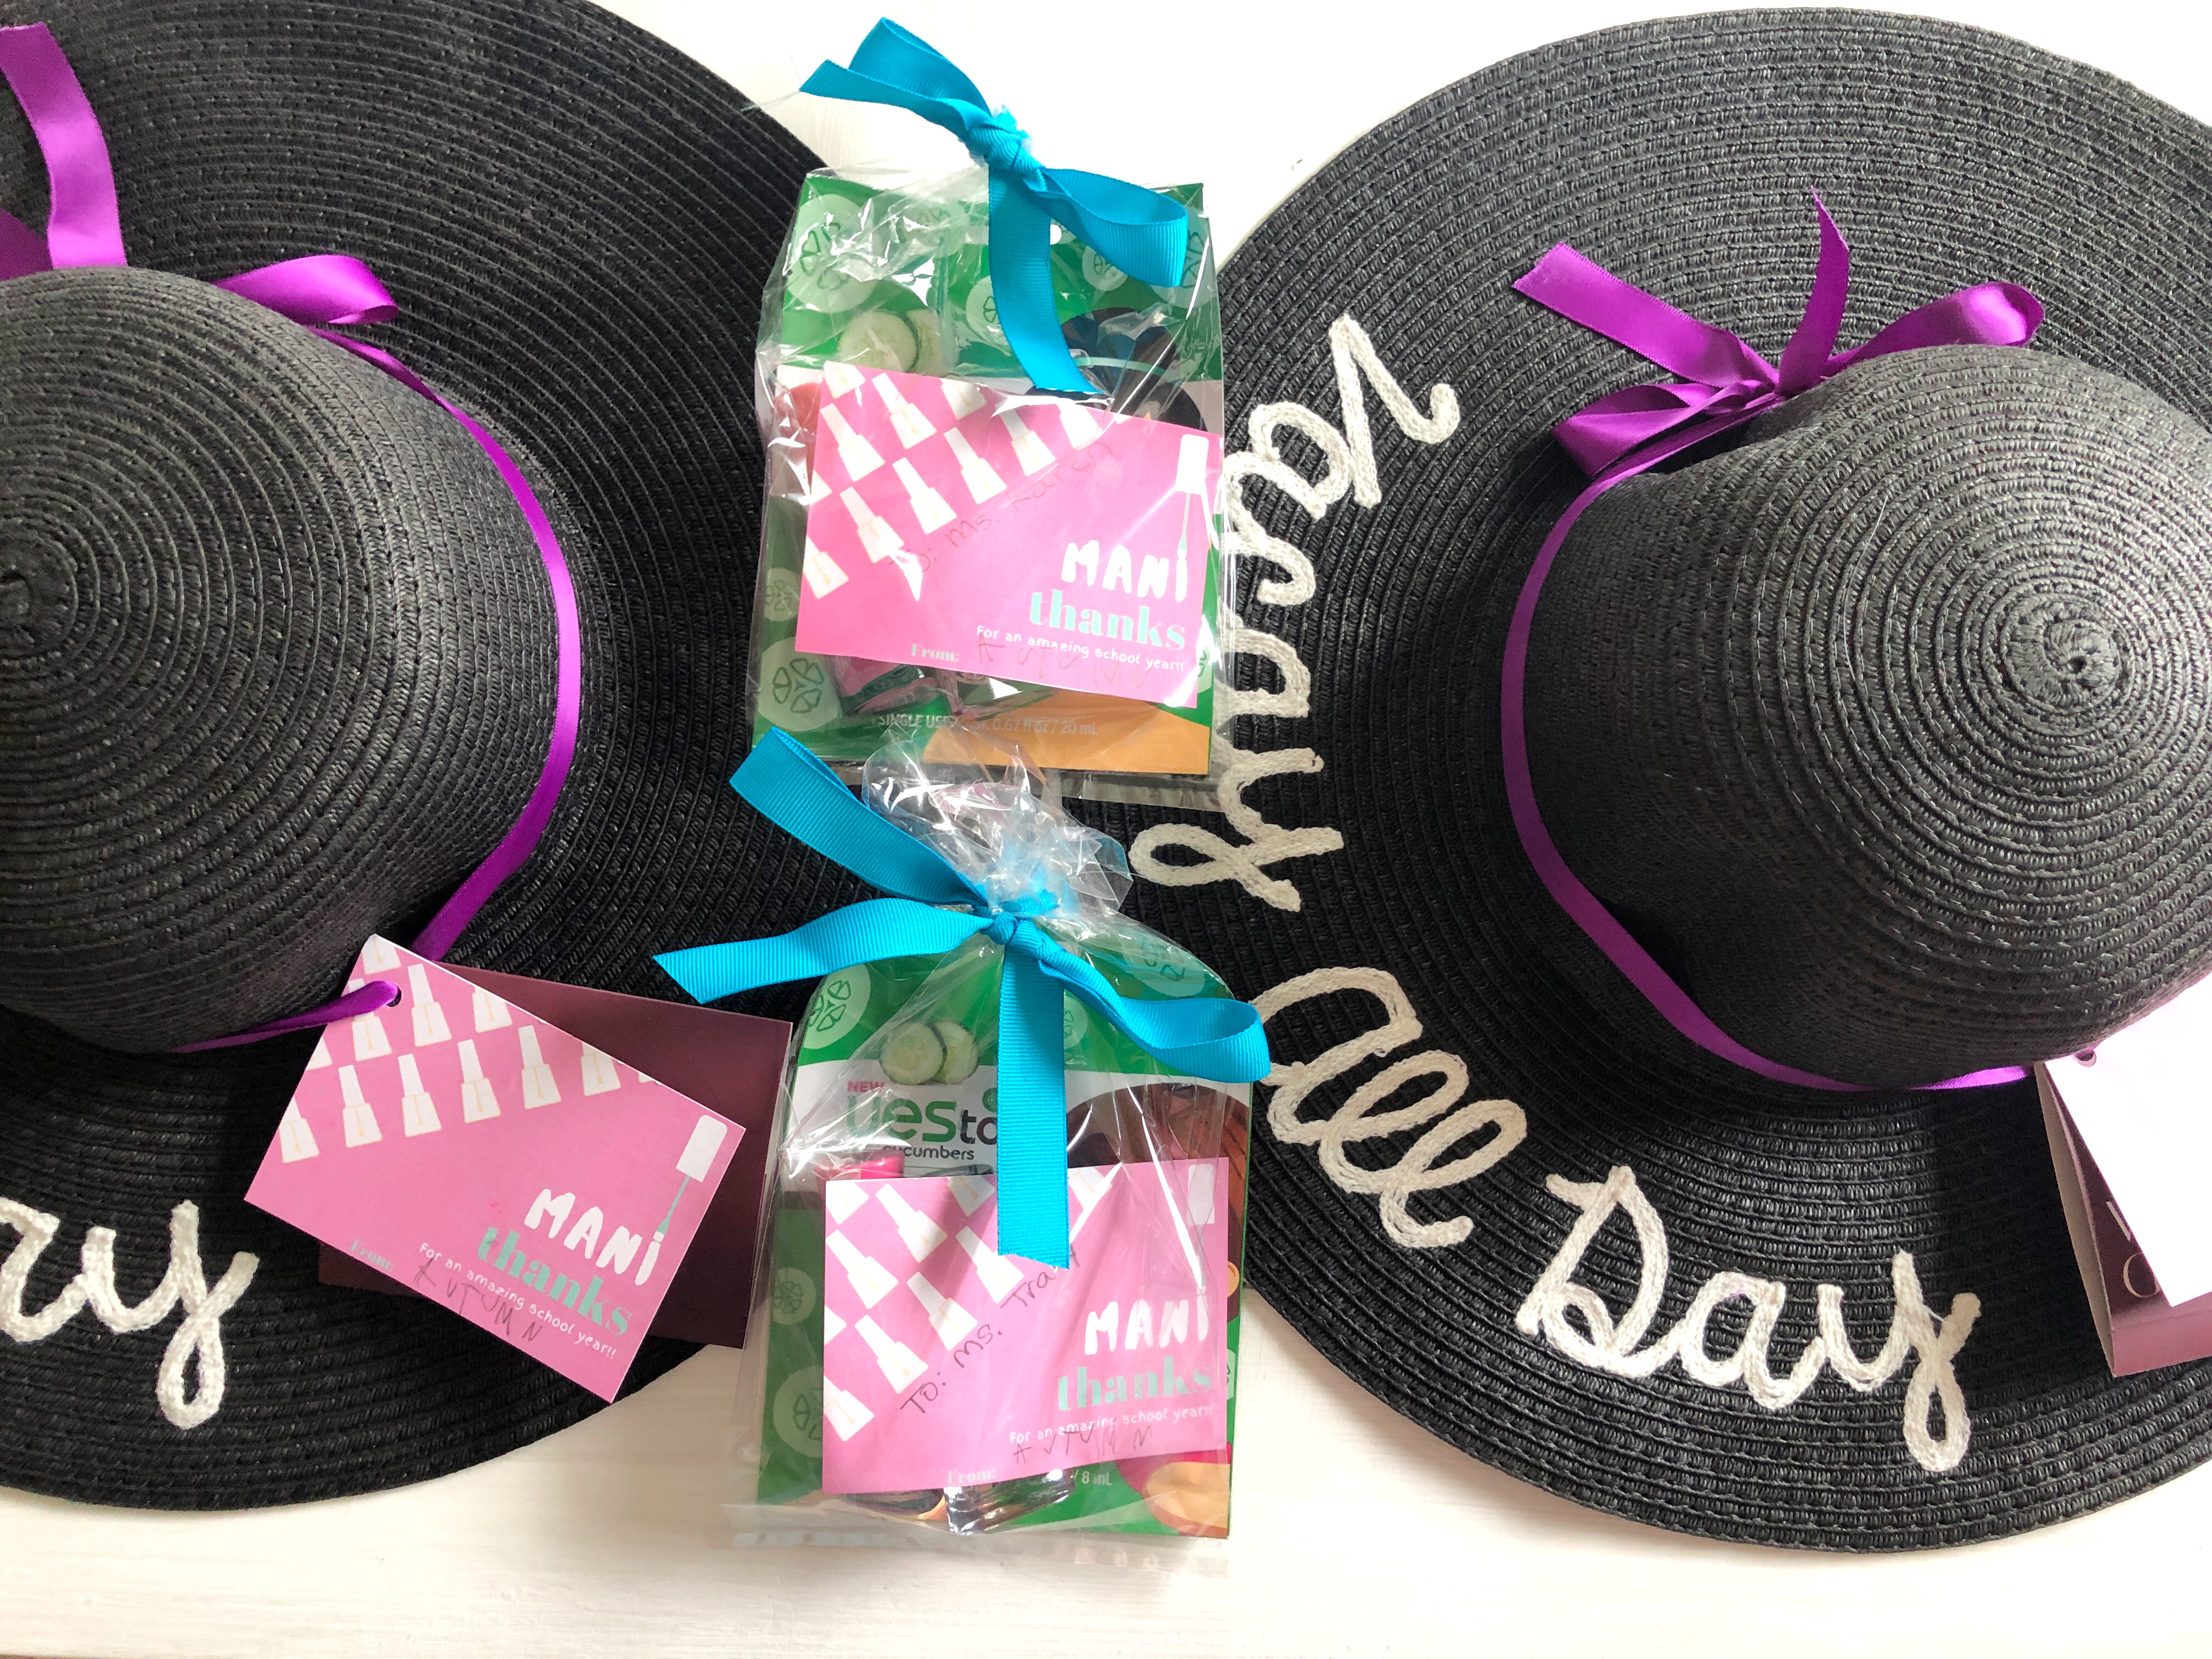
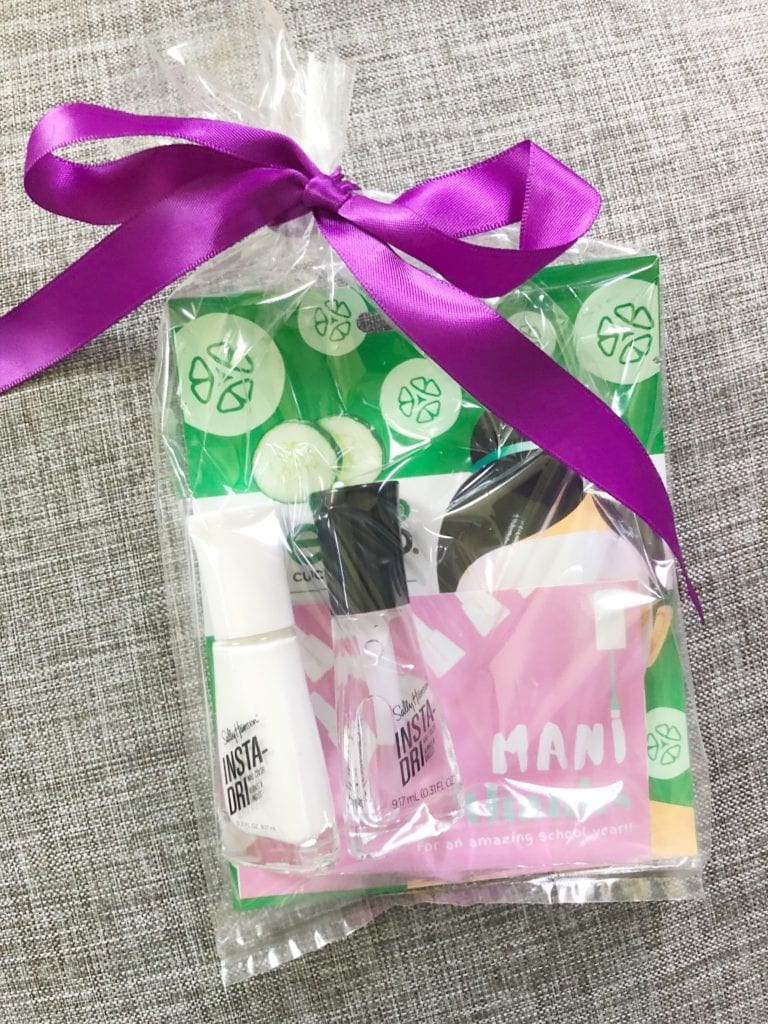
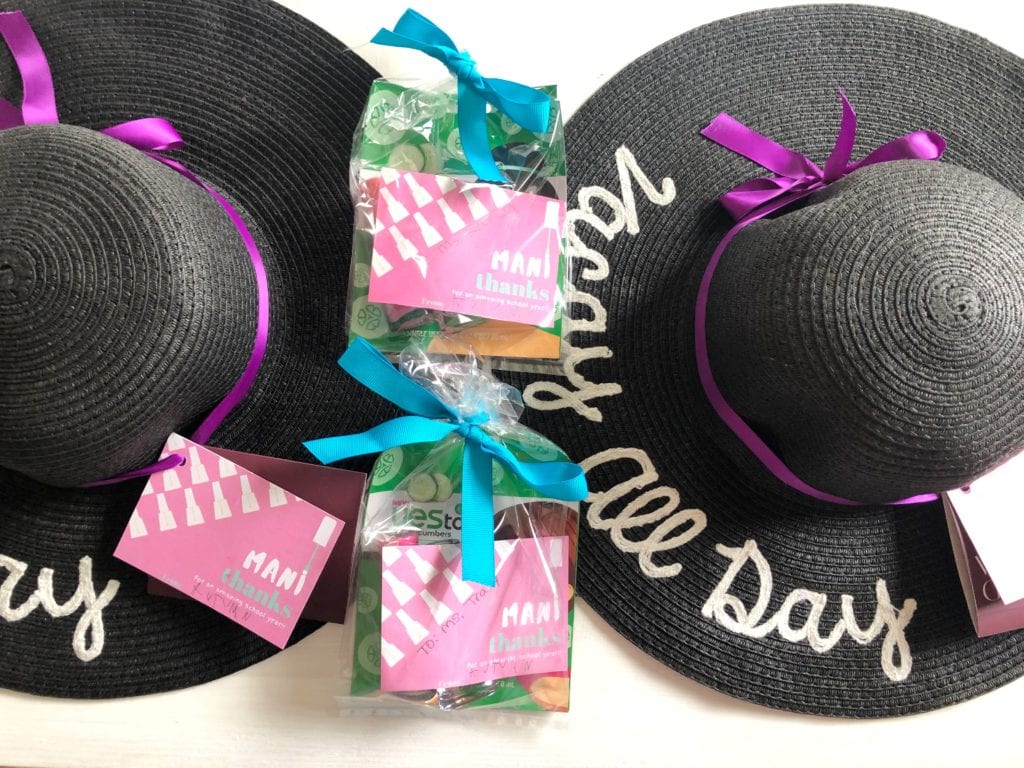
I created these adorable “Mani Thanks” gift cards. For a Teacher Assistant or specialist if you wanted to do a little something and add the tags to a clear mini gift bag with a color polish and a clear top coat and then a little facial treatment- it’s the perfect little thank you. For the Teacher if you wanted to also add a gift card to a local spa that would be amazing any teacher would love a little end of year pampering session. I also found these adorable beach hats that say “Vacay all Day” and then tied the gift card around with the cute “Mani Thanks” around it with ribbon.

GOLF TEACHER GIFT IDEA (OR FATHER’S DAY GIFT)
Click to download and print my cards to attach to your gift.
For the guys how fun is this Golf themed gift card idea. Find a local golf place and grab a gift card to hit balls and add it to this cute little bucket of balls. I grabbed a bag of recycle balls that were a bit more affordable and some t’s.

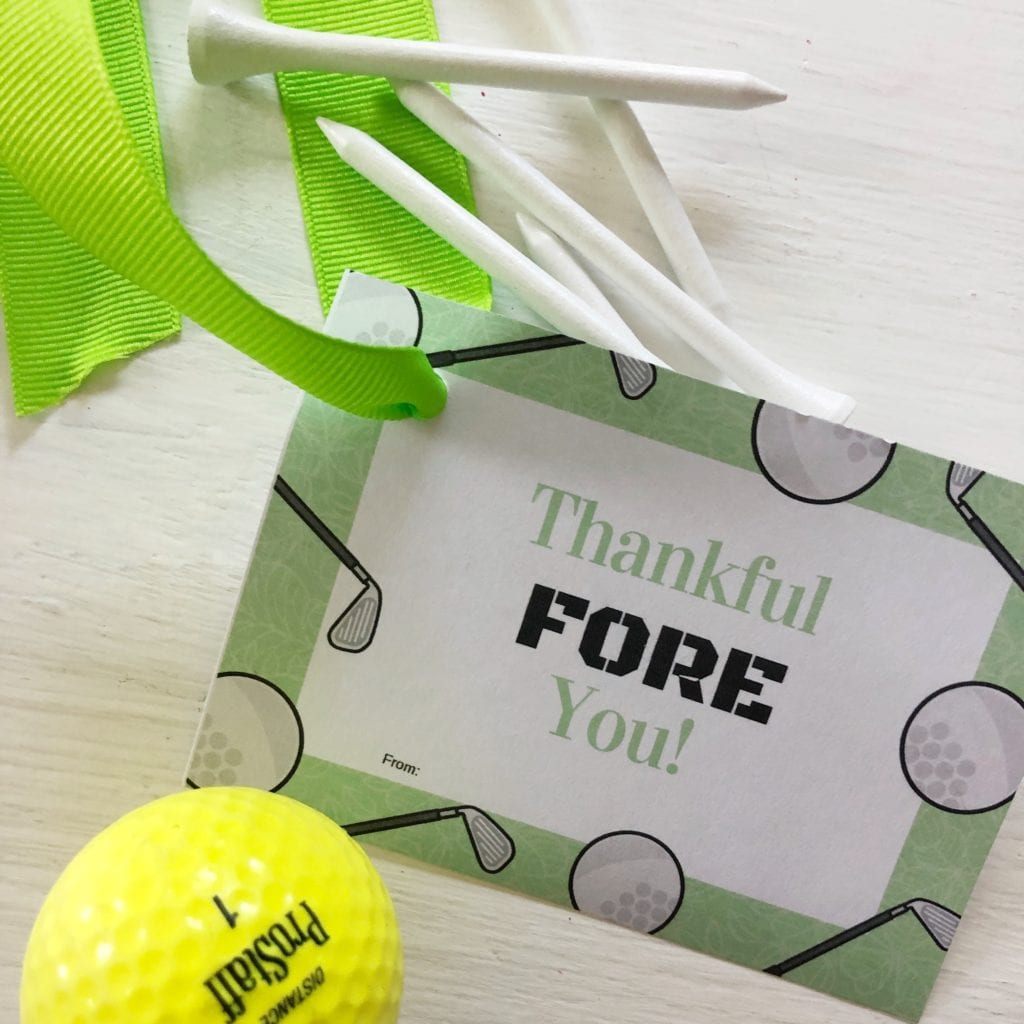

I used the shredded paper to lift the balls up so I didn’t need to use as many. Then put the T’s in the center to hold the gift card in place. But play around with the presentation to create something that works for you.
Recommendation for printing- cardstock paper works best. When you go to print, select 6 copies to a page and it will shrink the photos down to the size you need. If you use these I’d love for you to tag me so I can see how they turned out.
Thank you guys for stopping by and happy almost SUMMER!
Jordan
Shop the Supplies:
read the full post >
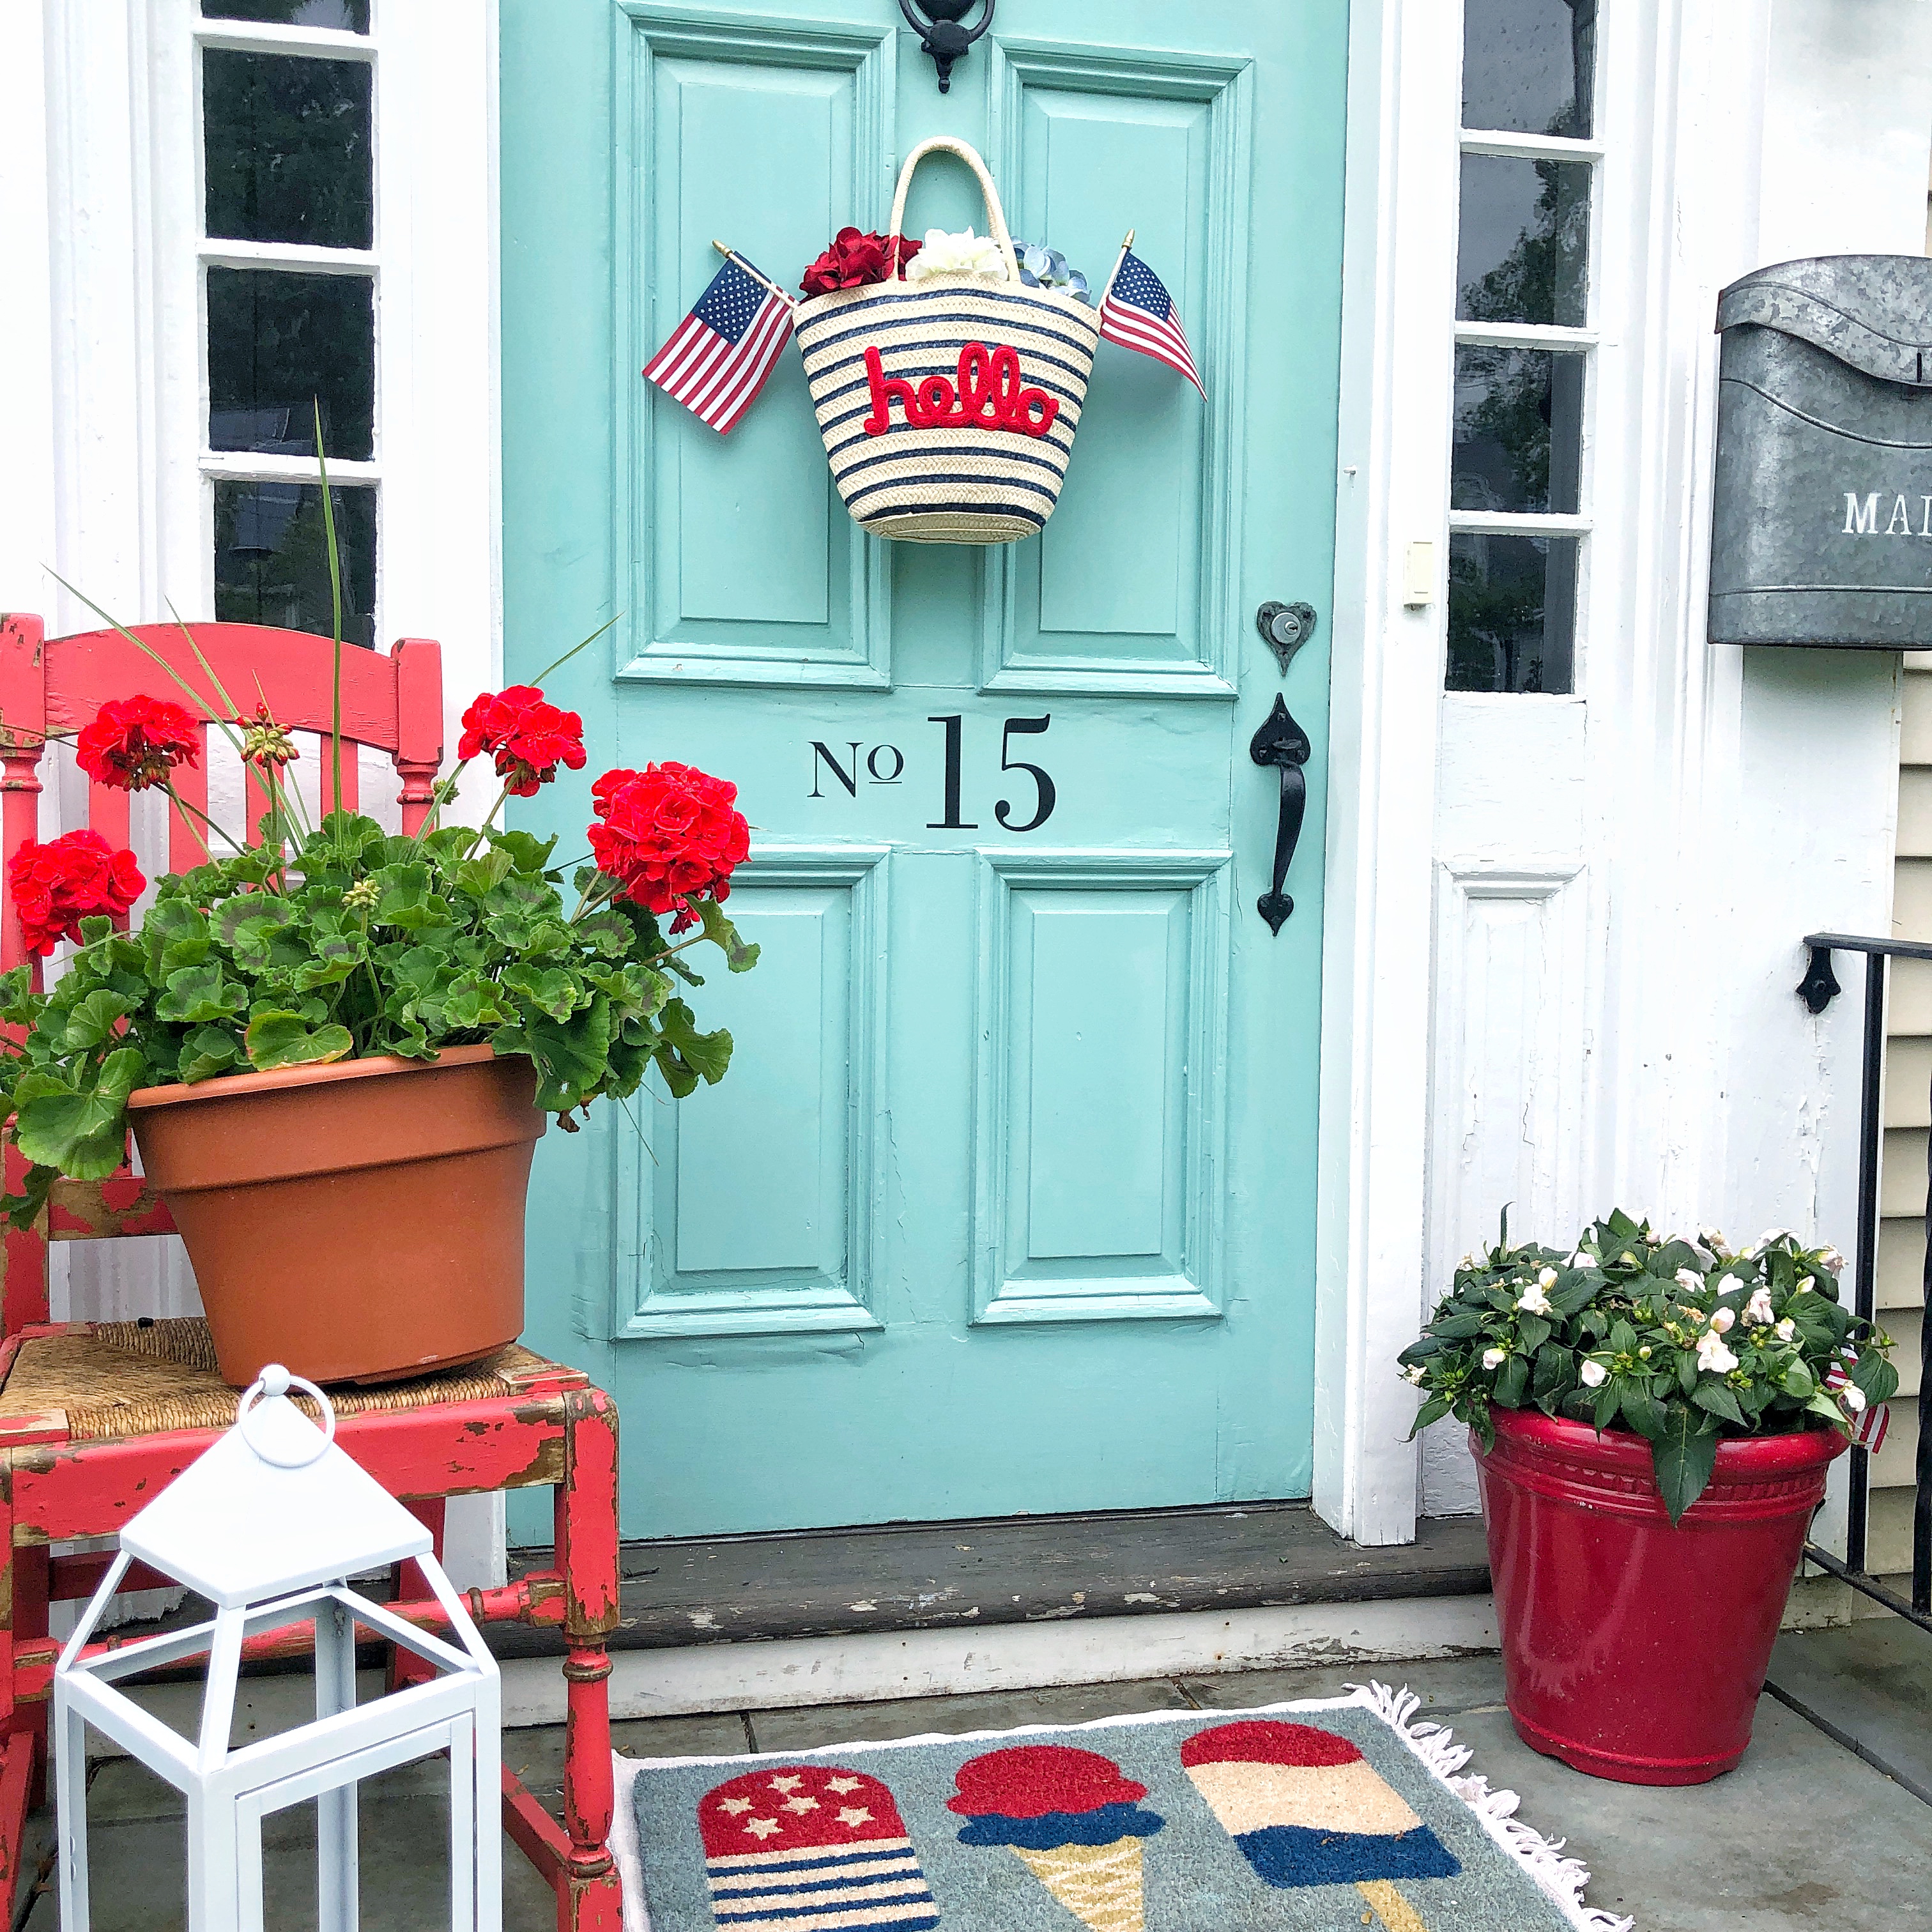
I can’t believe Memorial Day Weekend is here and we are just about to kick off summer. We are actually splitting up the weekend between Cape Cod and then back home for some little league baseball and a family BBQ. I’m so happy that BBQ season is officially here. We’ve worked so hard on our outdoor spaces that I’m so ready to finally enjoy them! The last thing on my to do list this week was to get some Red, White and Blue, decor on our front door. I want to enjoy it for awhile before we head back to C.C. for majority of the summer and a lot of my Patriotic decor is at our beach house so I was really just looking for things I already had around the house to bring a little Americana vibes to our front door with out going out and buying a bunch of new stuff.
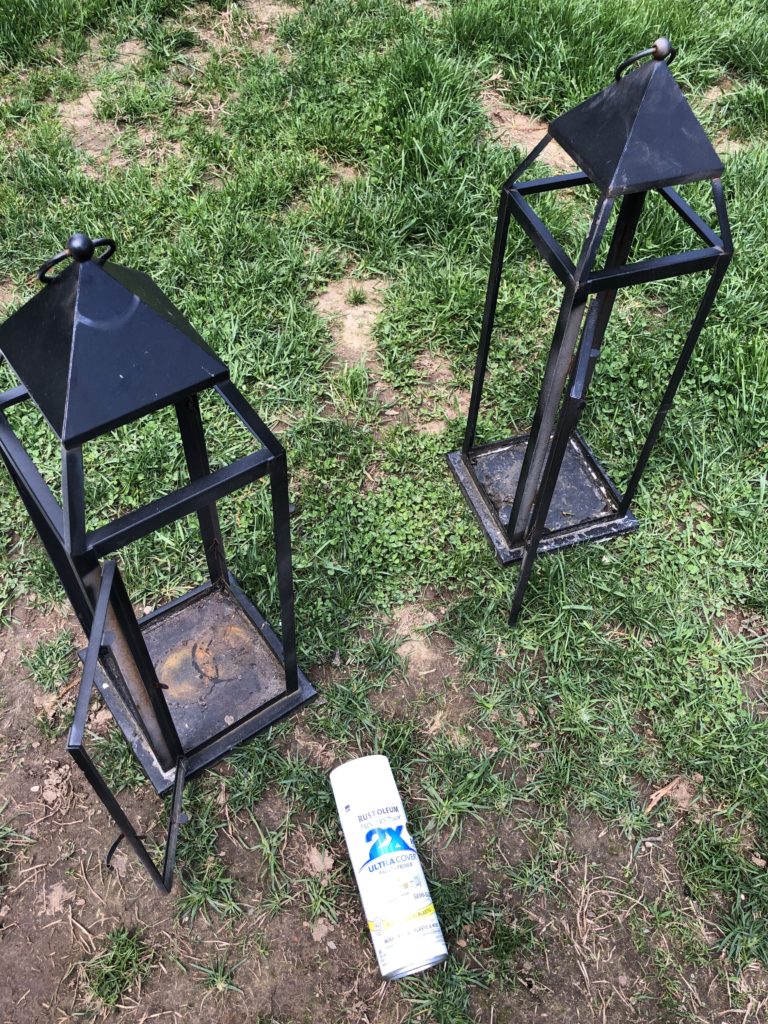
Let’s start with the lanterns. I’ve had THESE lanterns for several years now. They’ve seen it all from rain and lots of snow. They really were starting to look dirty and dingy. I’ve tried to clean them before but there was fading and chipping. So I decided to do my favorite most cost effective tricks- spray paint. Whenever I want to breath new life into something, if I can spray paint it I will. So for the lanterns I just grabbed some white spray paint and gave it a nice clean coat. They look so much better. I also have to admit to you that I don’t ever truly light up my lanterns. They are there for look. Since these are exposed to moisture the batteries always rust and get messy. So I simply leave the lanterns with out batteries. That may seem strange to you but just works for me.
I already had these red planters and I tend to bust them out every summer when I start adding some festive Patriotic decor. I’ve had these for years, however it’s as simple as taking a large cheap plastic planter and spray painting it red and like that you have super inexpensive and easy patriotic decor. I wish I could tell you the name of the plant I put in them. I was in such a rush, I was looking for something full and with white petals and this was the best I could find at Lowes. I also grabbed this large red flowered plant which I was so excited to bring in that natural red color.
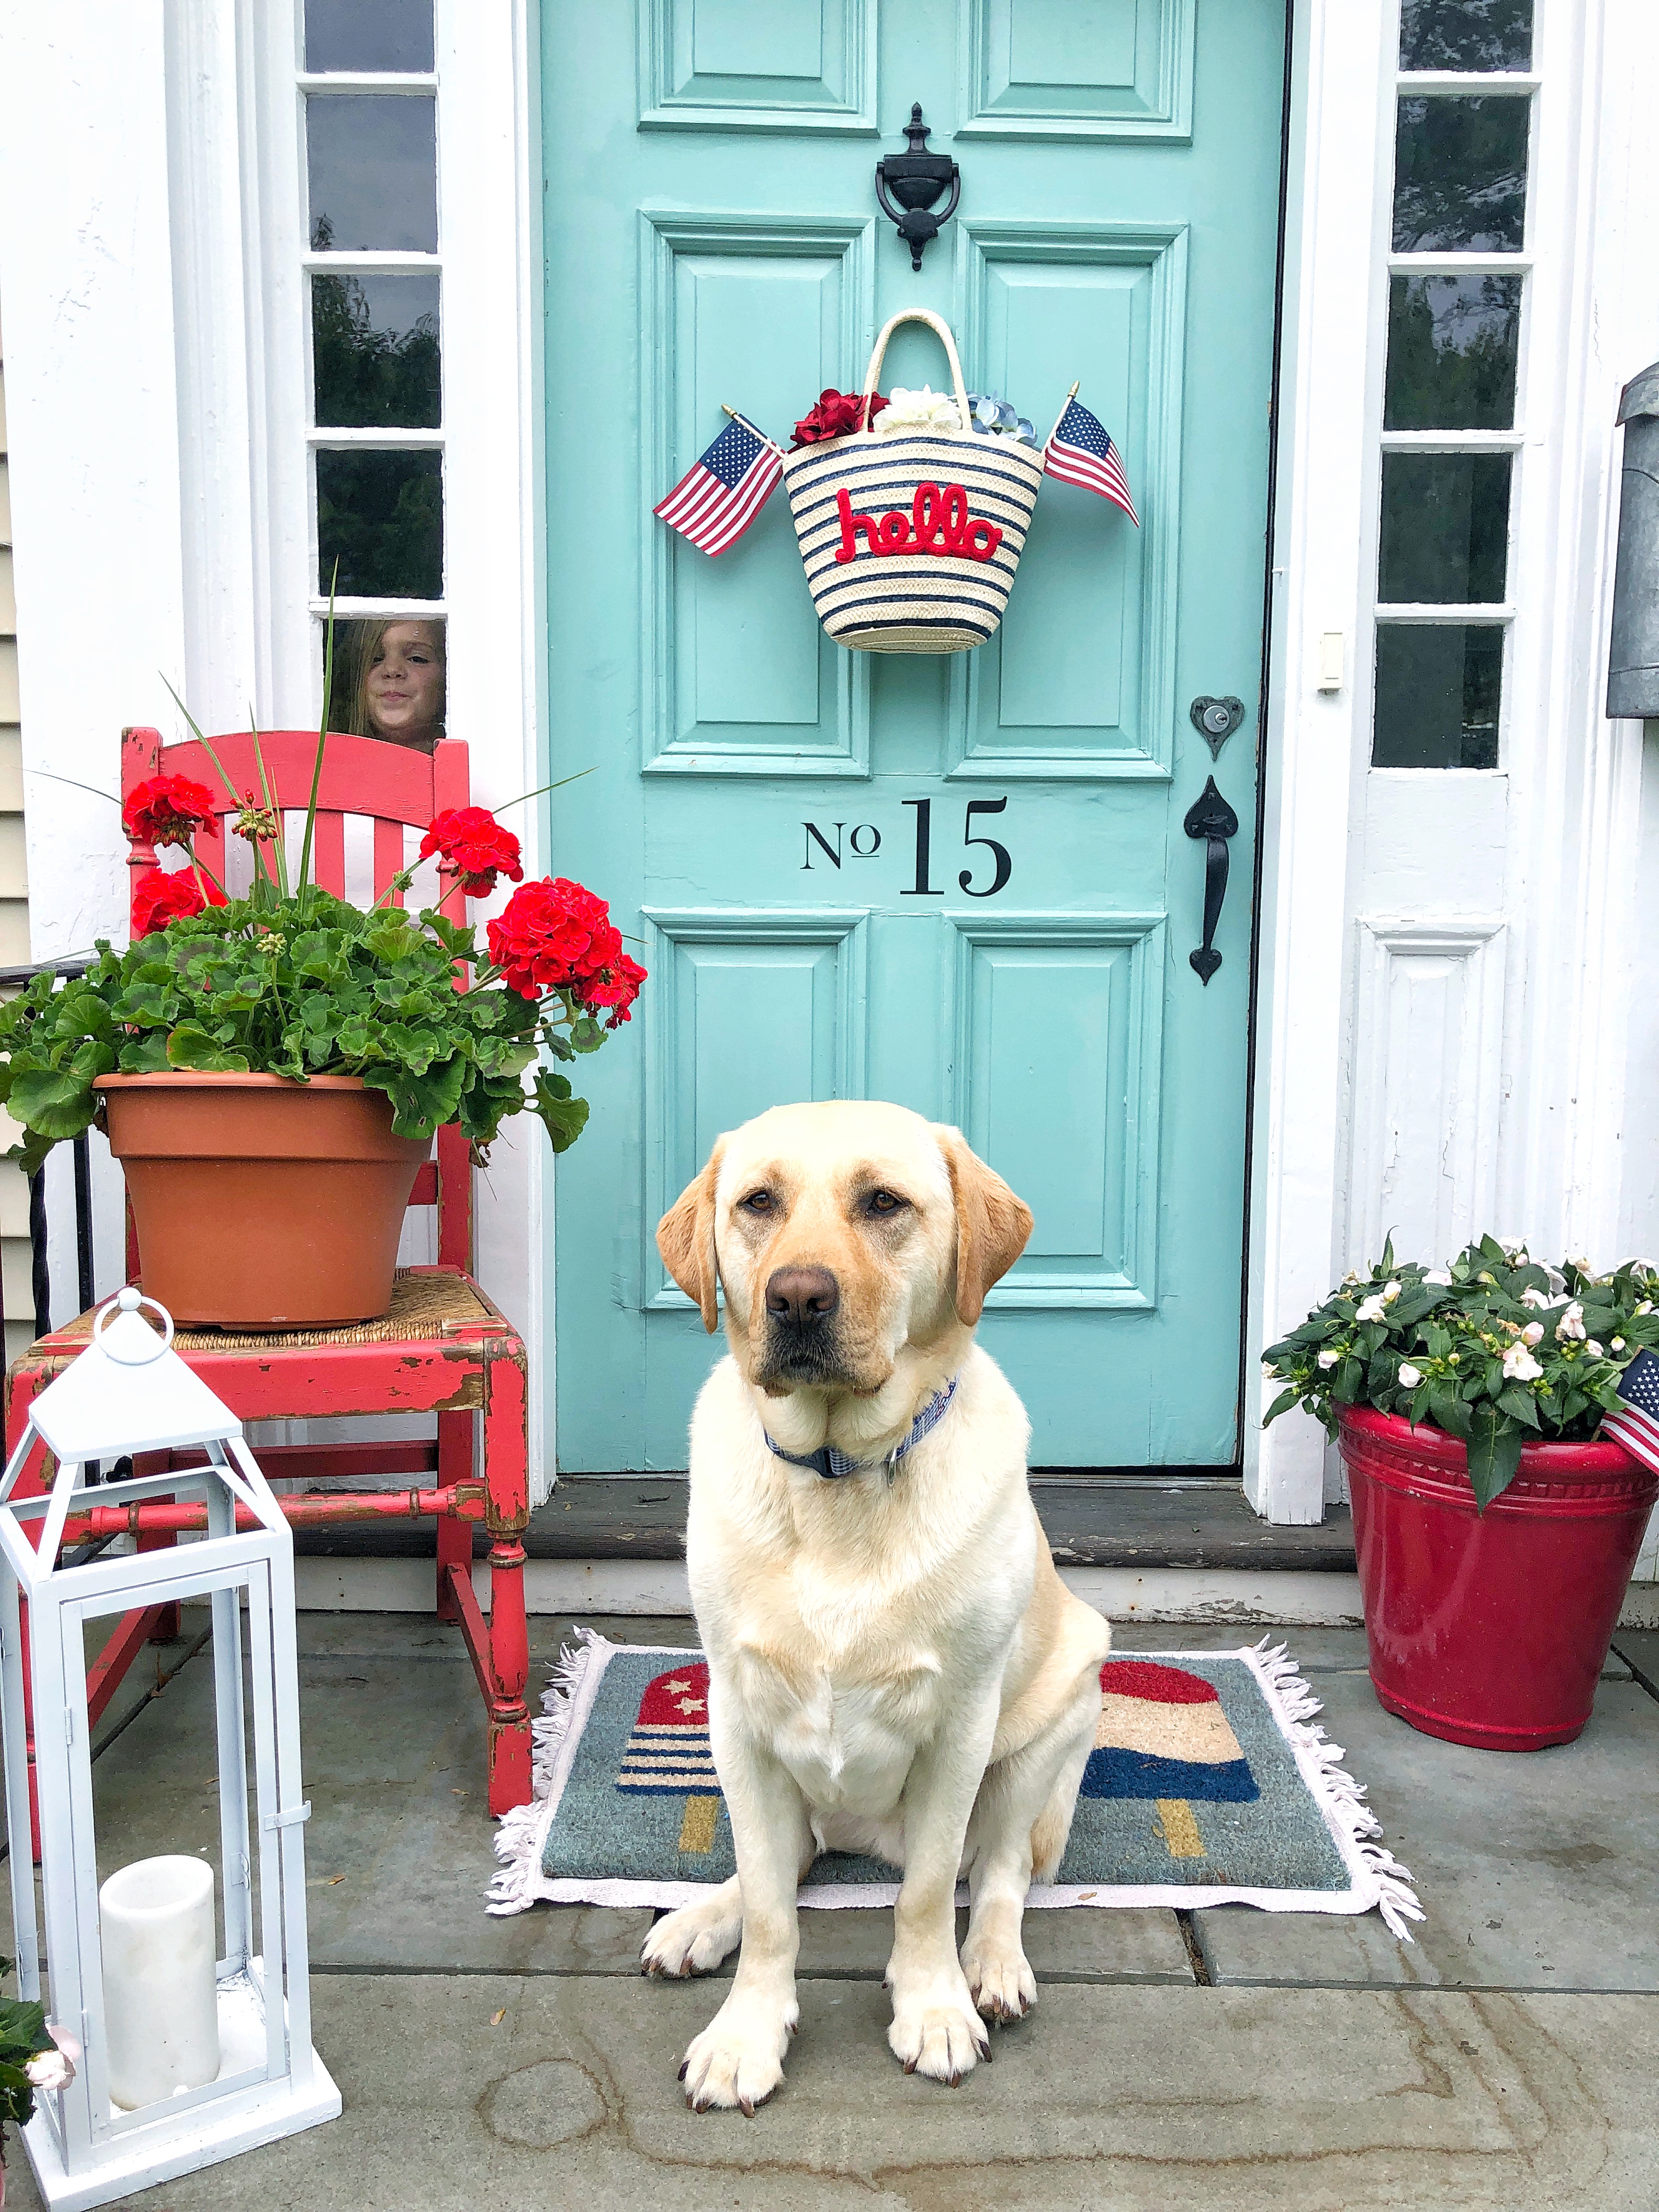
If you ever see an old chair on the side of the road, or at a local thrift store, grab it! I chalked paint this one red, after a few seasons outside its weathered to this rustic chippy garden stool. My front steps need such a good cleaning. I think we need to get the pressure washer out. Always something else to do right guys?!
TIP 1: I love to add height on either side of the door it makes the entrance feel more grand. Chairs/ stools add height to plants. Or grab a potted tree of some kind to flank either side of your door.
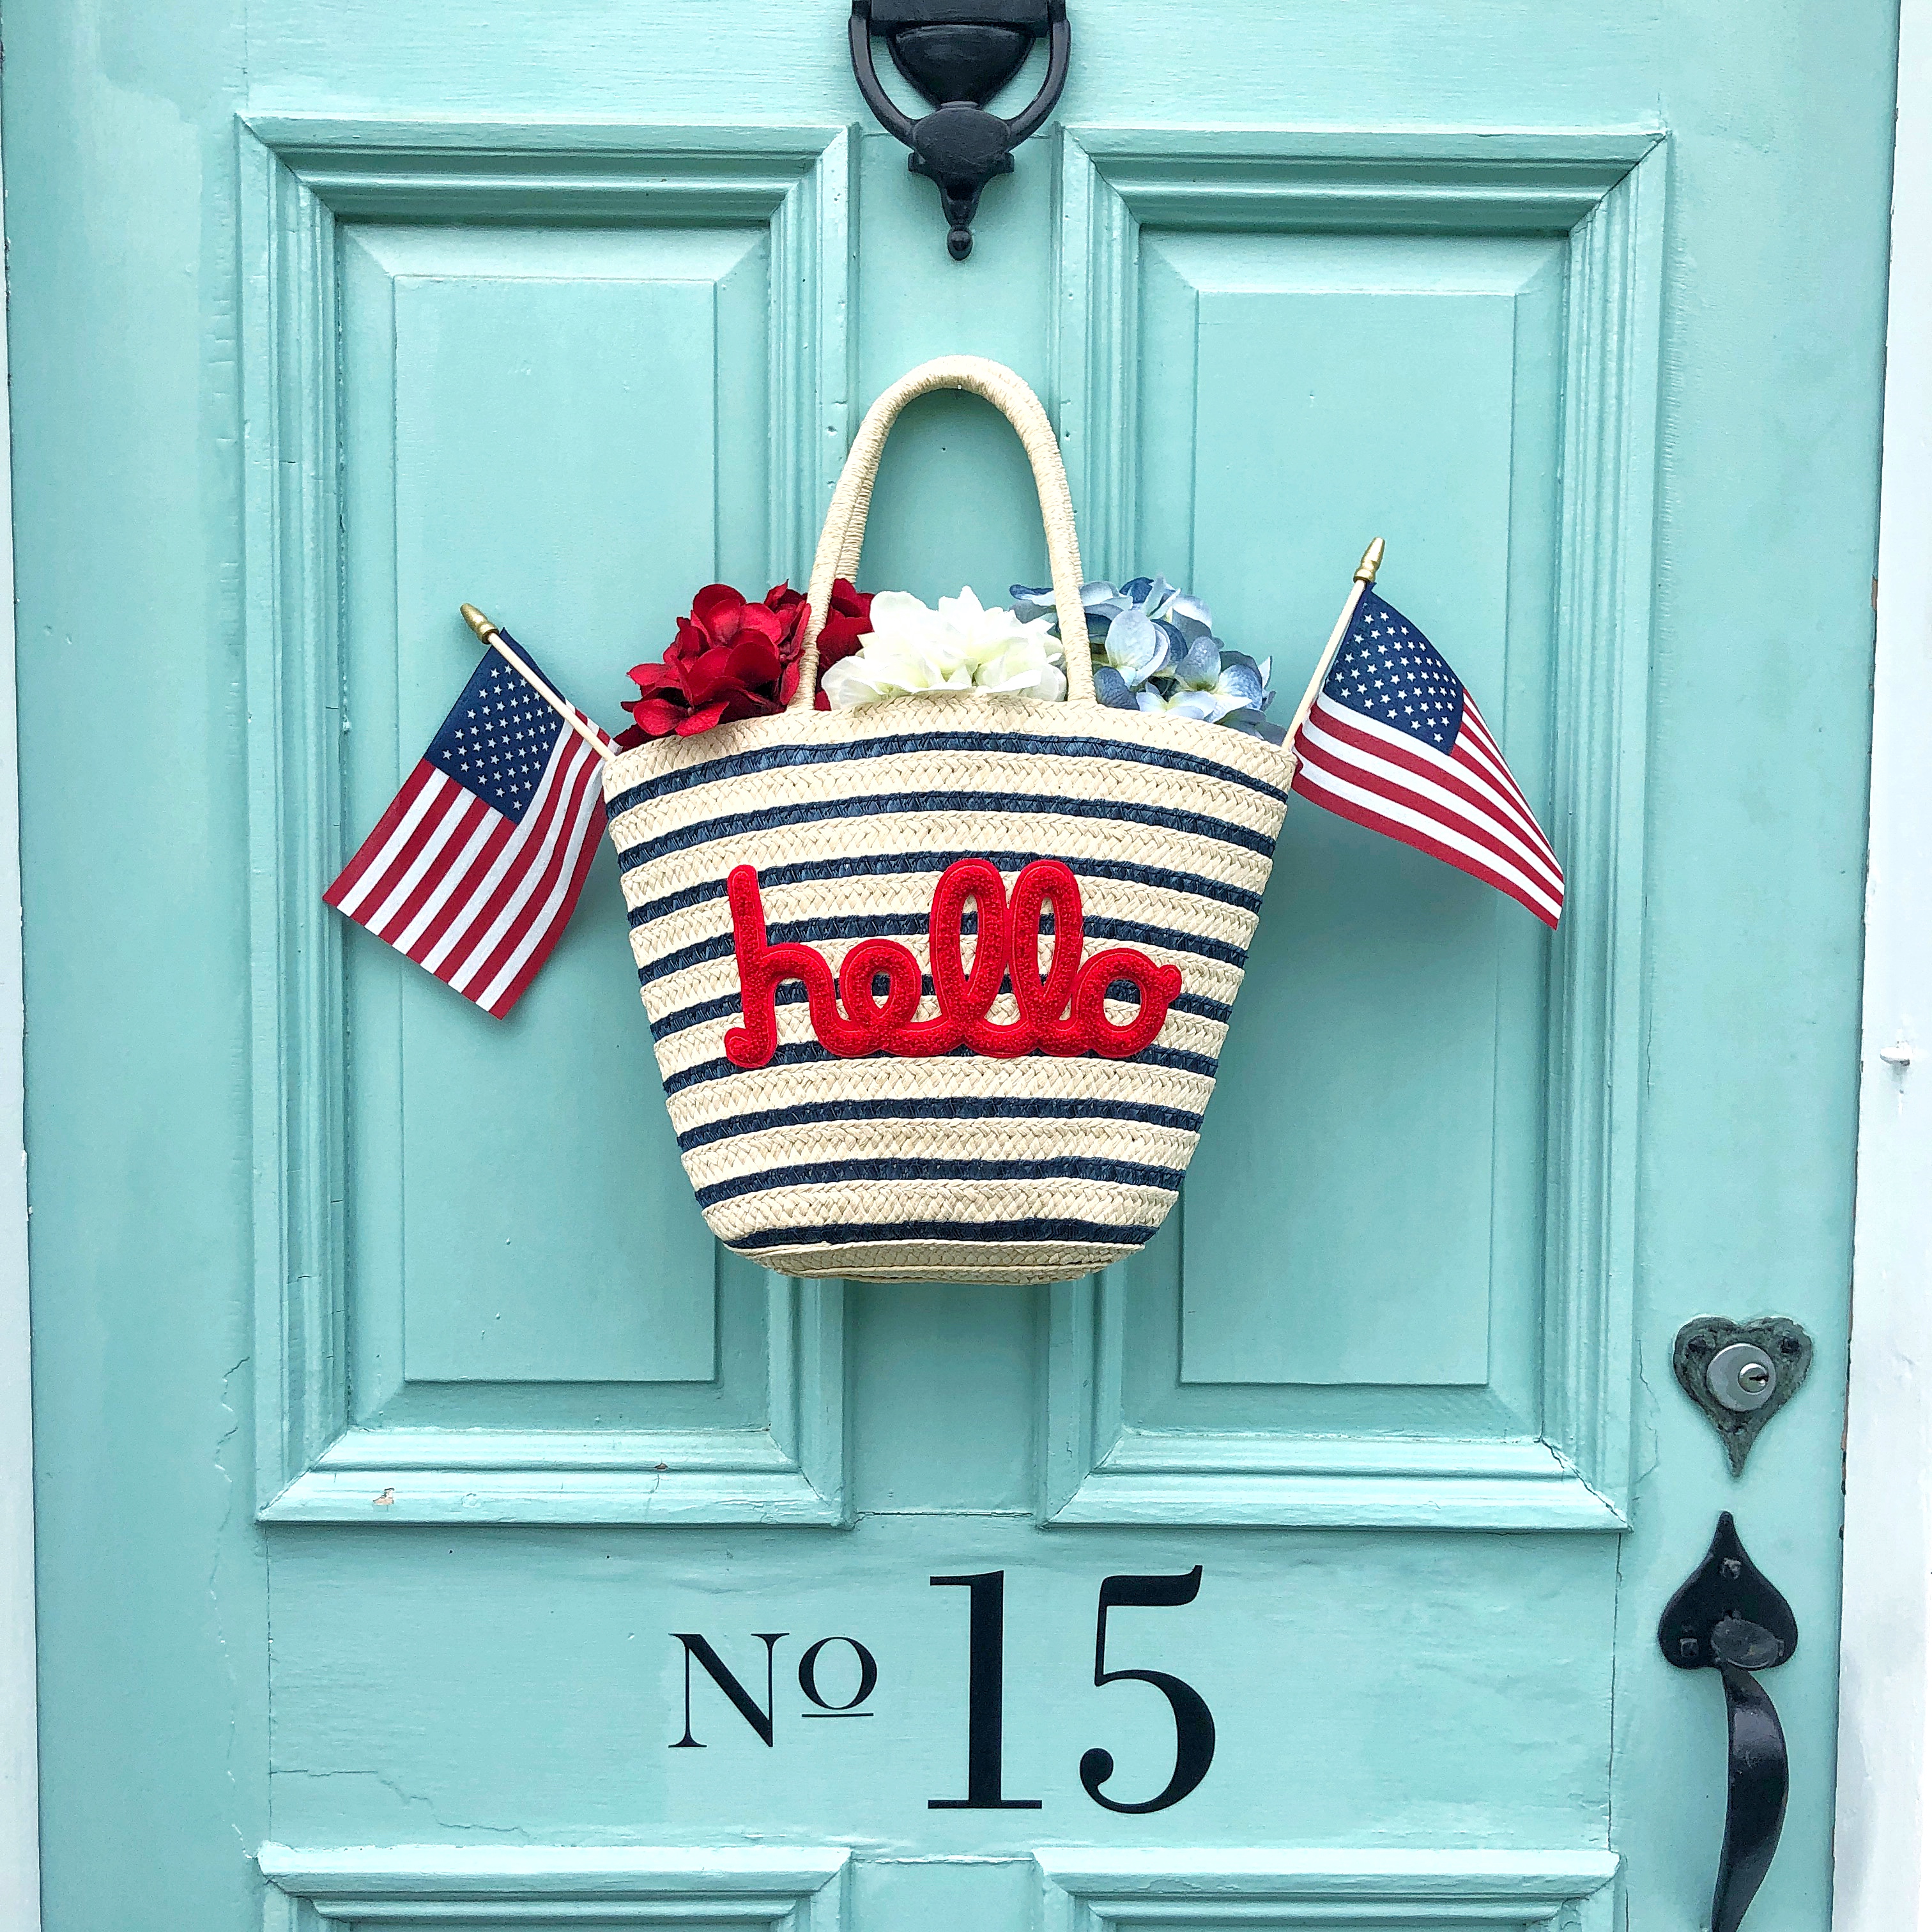
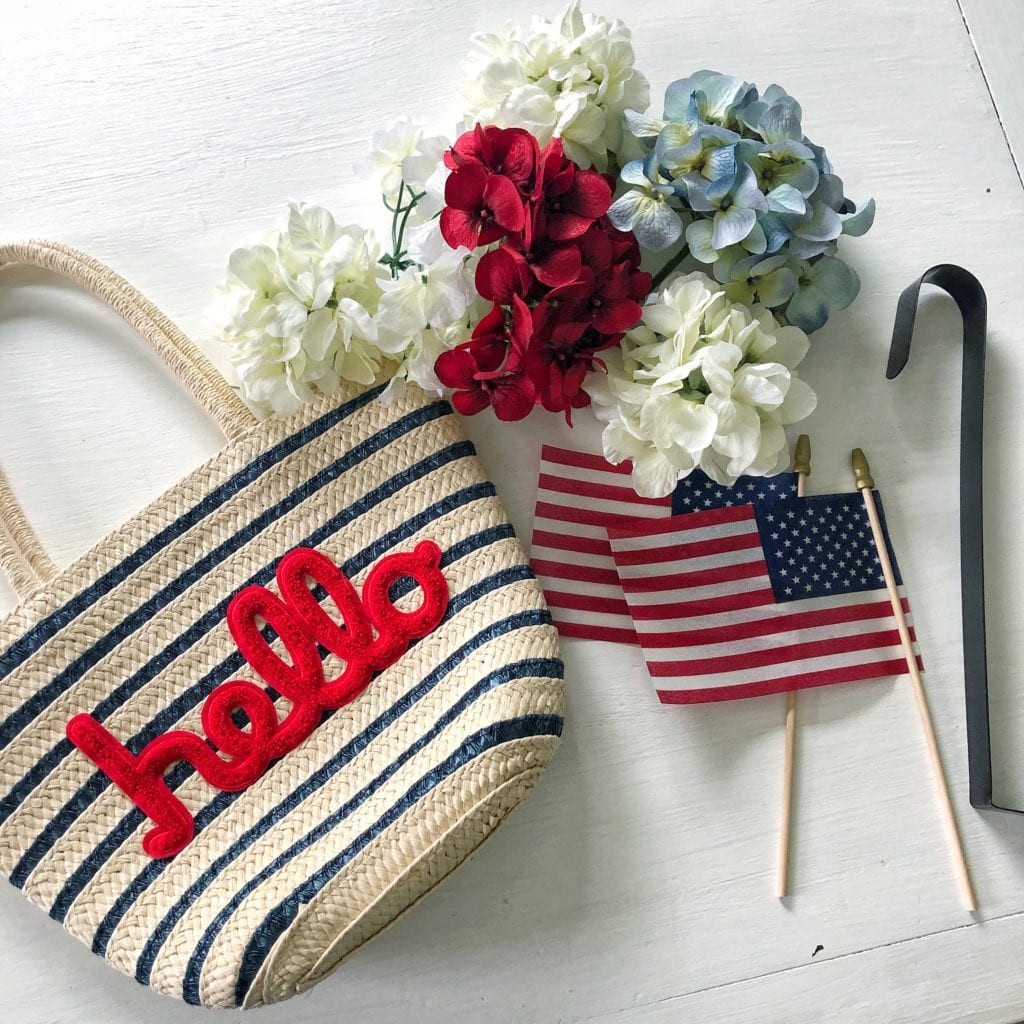
I purchased this adorable straw tote months ago with intent to use it or give it to Autumn to use, because I loved the classic colors and “hello”. However I couldn’t find a wreath I was really into and I love trying out different things for my decor, reusing something for a different purpose is always my favorite thing to do. I love how it looks with some simple faux hydrangea and two small flags on either side. I used some bags to fill out the bottom and make it look really full. I just added mine to a small nail we already had on the door so its centered. I tried adding to a wreath hook but it looked to bulky. Our door has seen a lot of abuse over the years with out a storm door that, it’s probably time to replace soon. So a tiny nail hole doesn’t really bother me too much.

TIP 2: Bring in colors of the season through plants, a wreath and maybe one touch of simple decor. Don’t need to go over board.
I found this simple metal star with the flag on it at the grocery store of all places and it was under $5 and I simply rested it to the side of the lantern to bring the colors down in that corner. Hanging it on the door wouldn’t have made enough of an impact but just leaning it against a pot or lantern is a nice extra touch.
TIP 3- Change up your door mat to fit the season, layer a throw rug underneath to add interest.
Tip 4- Create depth in your front door design, by adding decor elements to the first steps and build them back towards the front of the door.
Tip 5- Use a mixture of plants to add a variety textures and visual interest to your front entry.
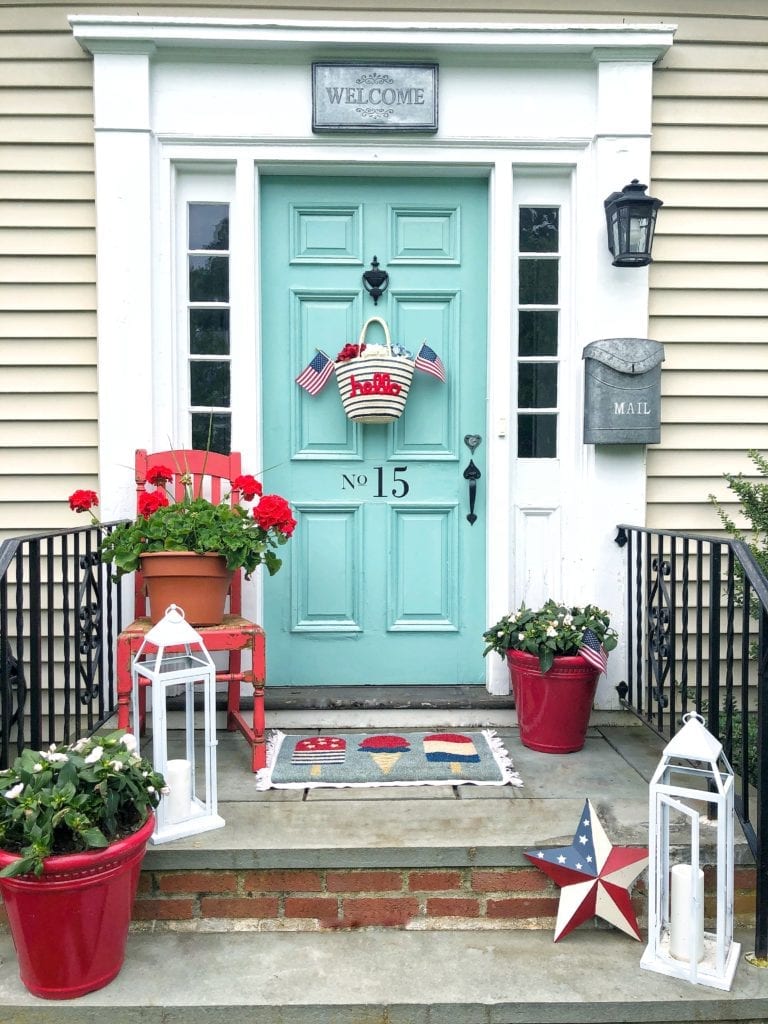
There you have it my Red, White and Blue Decor for the upcoming summer Holidays! I didn’t have to buy too much and used a lot of things I already had on hand, I just grabbed some plants and spray paint!
I hope you have an amazing Memorial Day weekend.
Jordan
SHOP THIS POST
*Post contains affiliate links
read the full post >
*This post is in partnership with Christmas Tree Shops andThat! a brand I love. As always all opinions are my own.
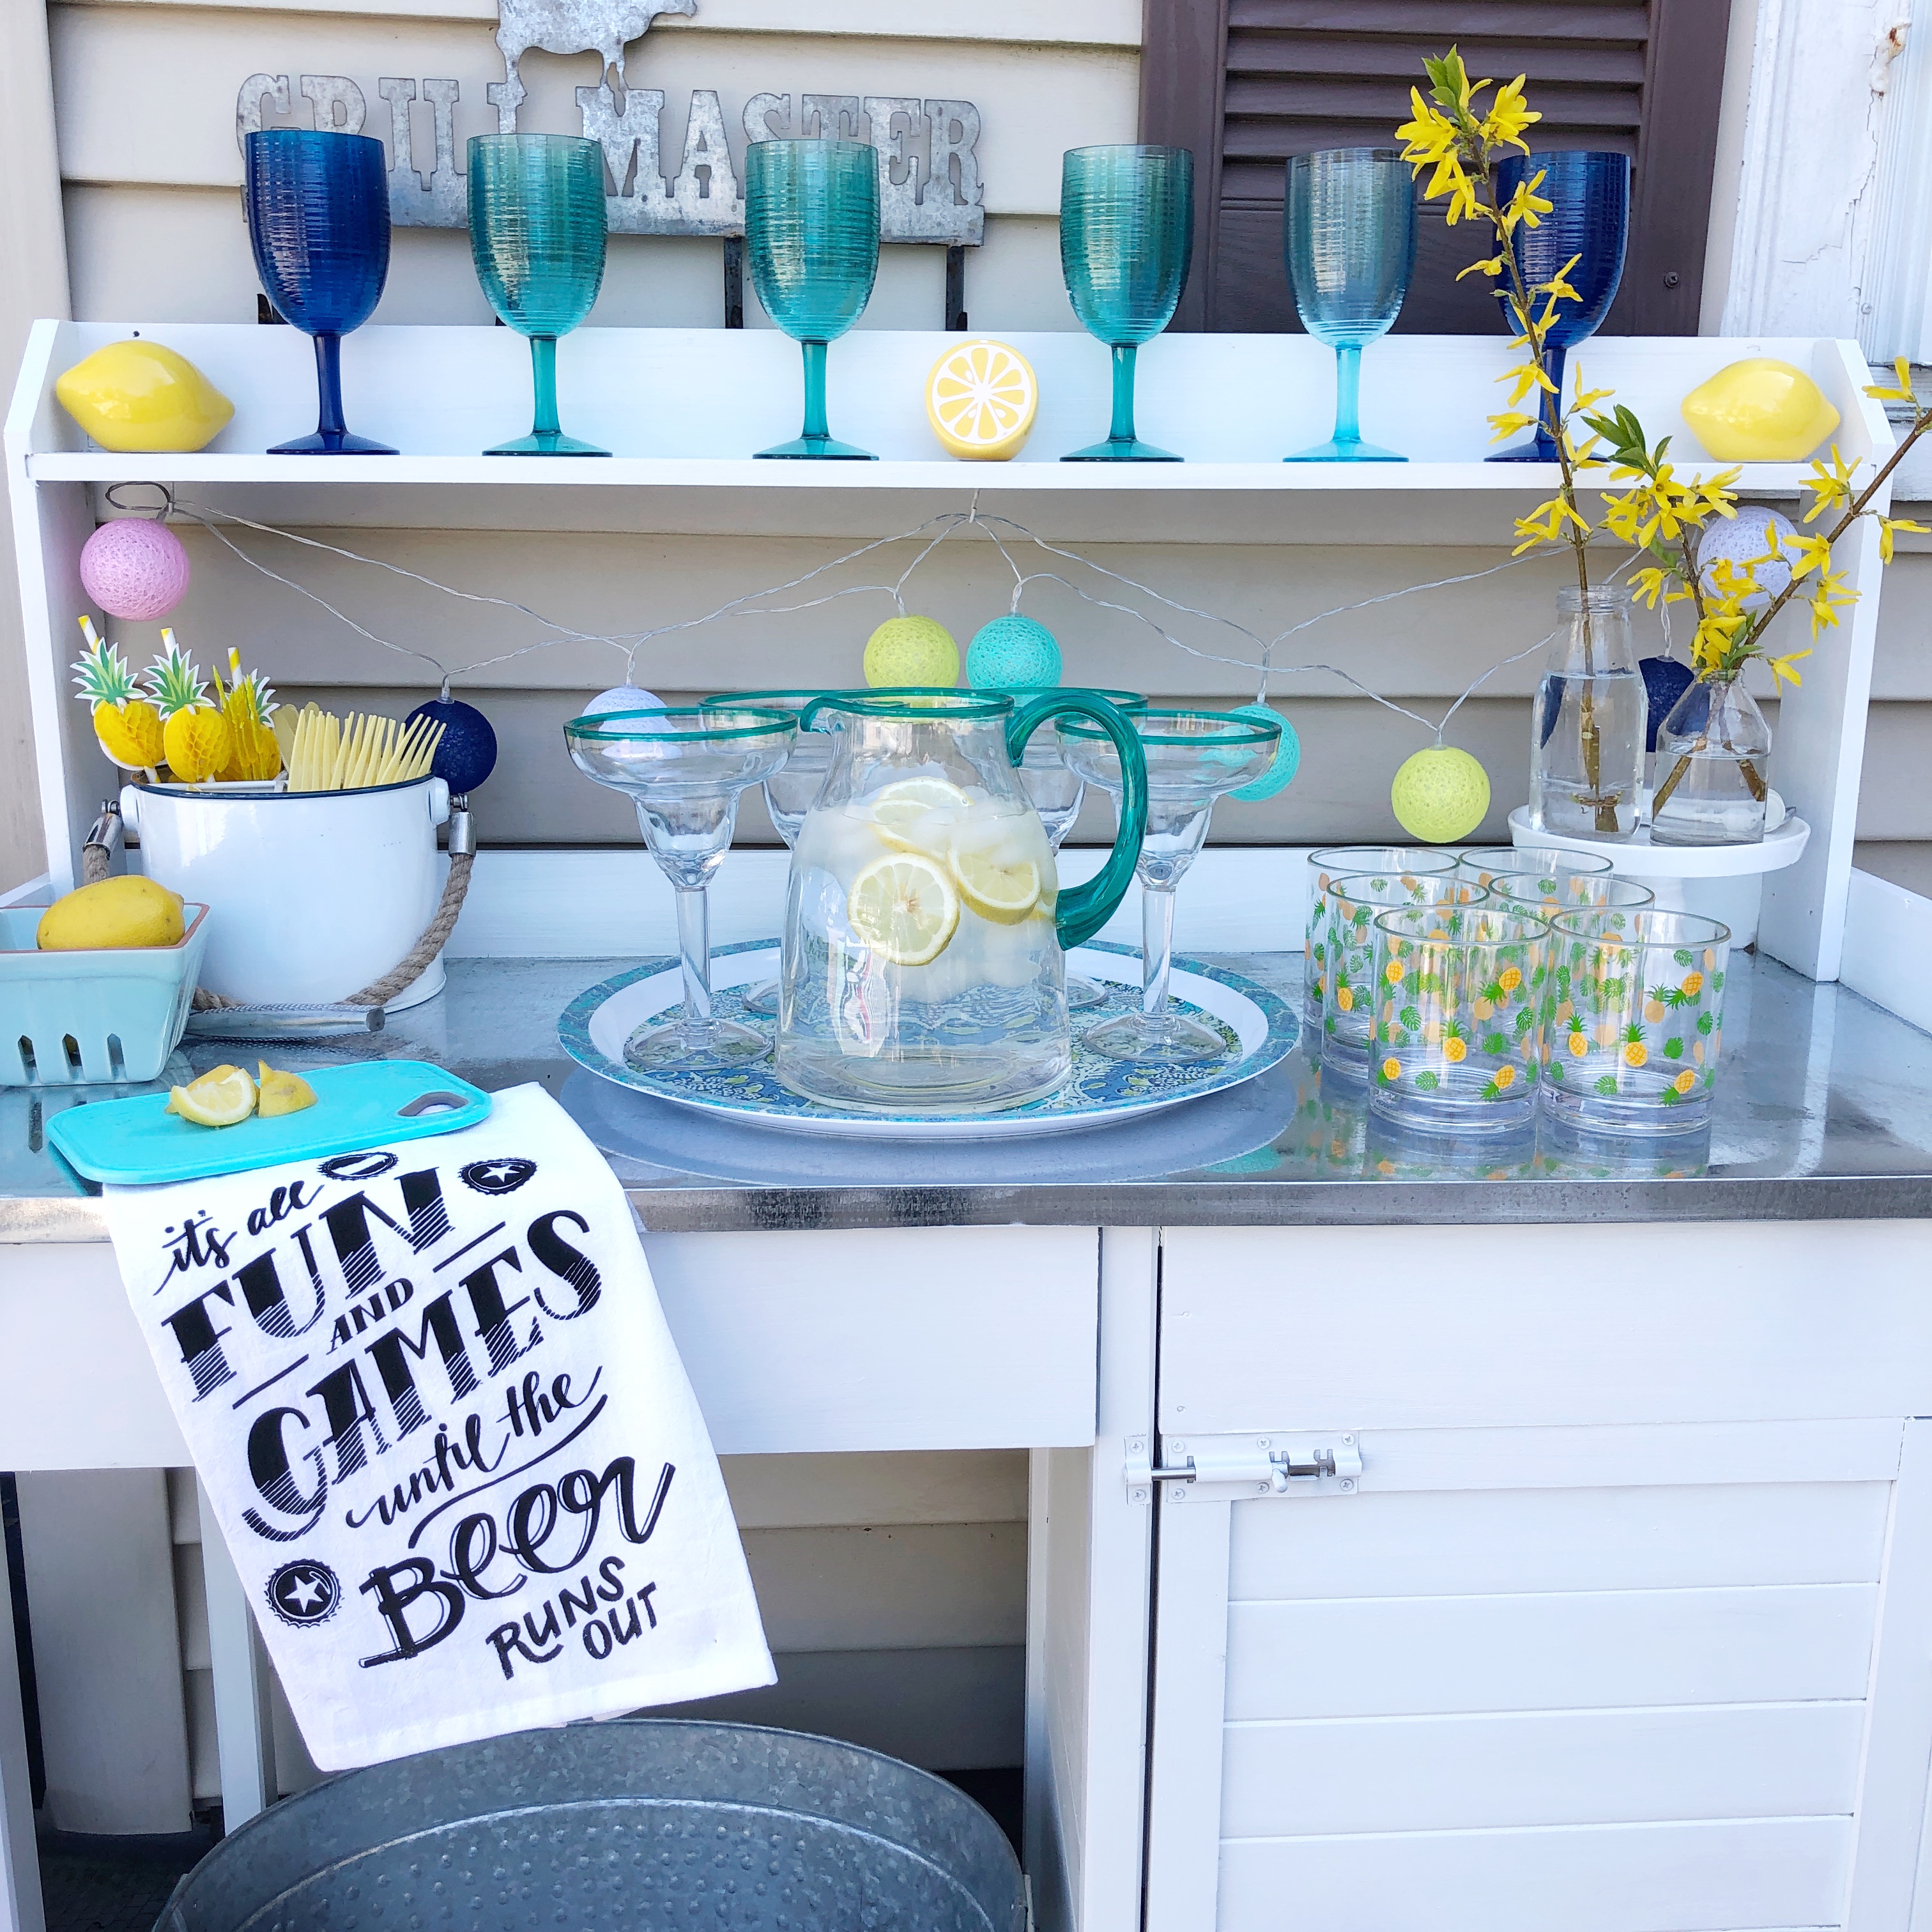
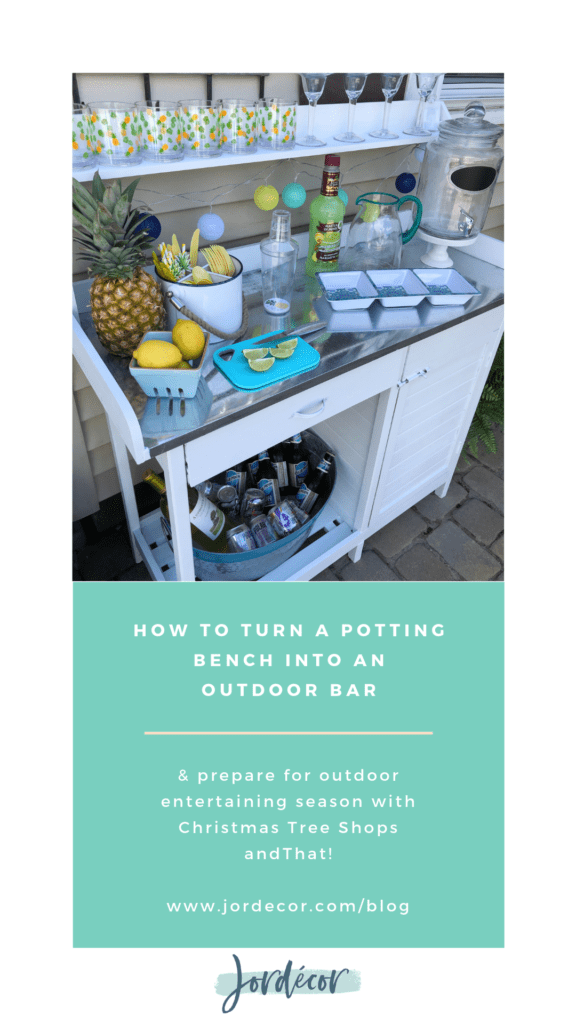
Hey Friends!! Today I’m so excited to partner with one of my favorite stores for finding great deals on seasonal decorating products Christmas Tree Shops andThat!. I’m also joining a fabulous group of home decor blogger to share our summer outdoor entertaining ideas with you. Now that outdoor Memorial Day is coming up and BBQ season is here I want to show you how I turned a potting bench into an outdoor bar, with the help of all the amazing and affordable summer items out now at Christmas Tree Shops andThat! Guy’s what is better than an ice cold beer or iced beverage on a warm summer day? A fun bar to set up all those refreshing drinks on! This cute little outdoor bar I’m about to show you, will completely improve your outdoor entertaining game.
The decor selection at Christmas Tree Shops andThat! never disappoints and this shopping trip was no different. I knew I wanted to stock my outdoor bar with accessories that are safe for outdoor use (non breakable) additionally that will make hosting outdoor parties easy & effortless. What I love about using a potting bench as a bar, is that it’s the perfect size and it has such a fun outdoor vibe, plus lots of storage. The potting bench I have came in a natural wood finish that I painted with an exterior white paint. However you could stain or event paint yours in a pop of color. This potting bench also comes with a cabinet and drawer, so it’s great for storing all of our new outdoor dishes, table linens and the cutlery caddy from Christmas Tree Shops andThat!. The best part is all of their summer melamine dishware is affordable and stylish! I was so excited to see a variety of prints, colors and styles, many of which match the colors of my outdoor color scheme; win, win! Plus, the prices can’t be beat.
My must have items for the perfect outdoor bar:
- Tub for ice and can/bottled drinks
- String lights
- Drink dispenser
- Cocktail shaker
- Outdoor safe cups (tumbler, wine and margarita)
- Cutlery caddy
- Pitcher
- Napkins, straws, paper cups
- Small cutting board
- Fun Dish Towels
Here is how I took my simple potting bench and with some fun colorful entertaining accessories, turned it into a bar.
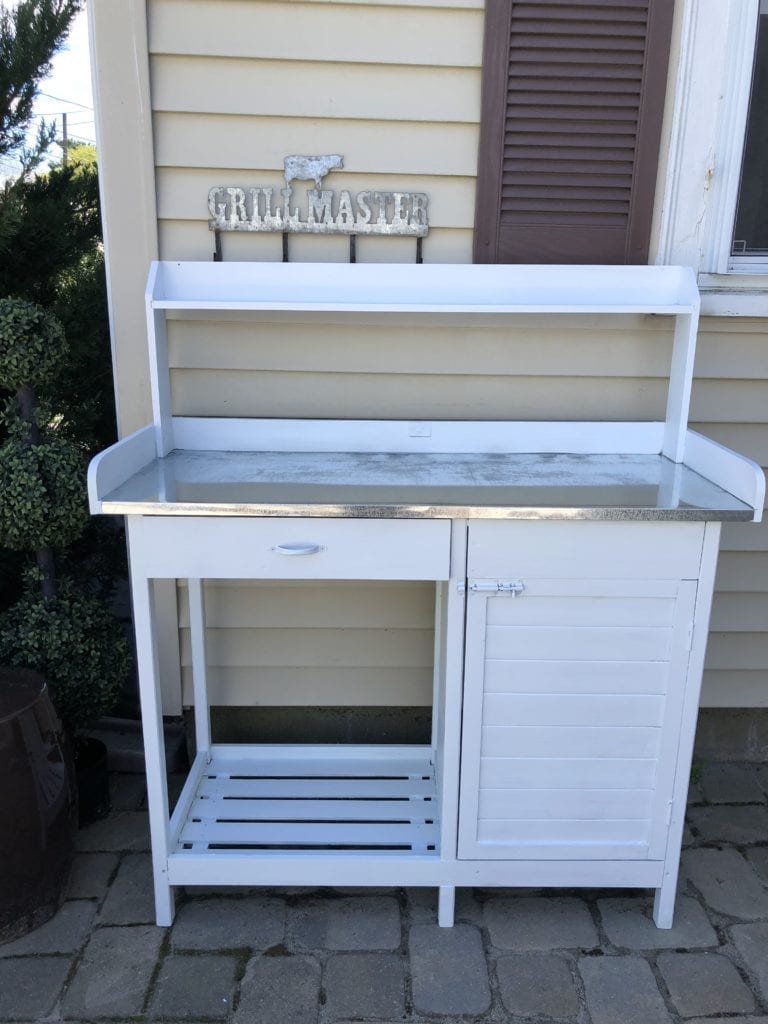
Start with your Potting Bench 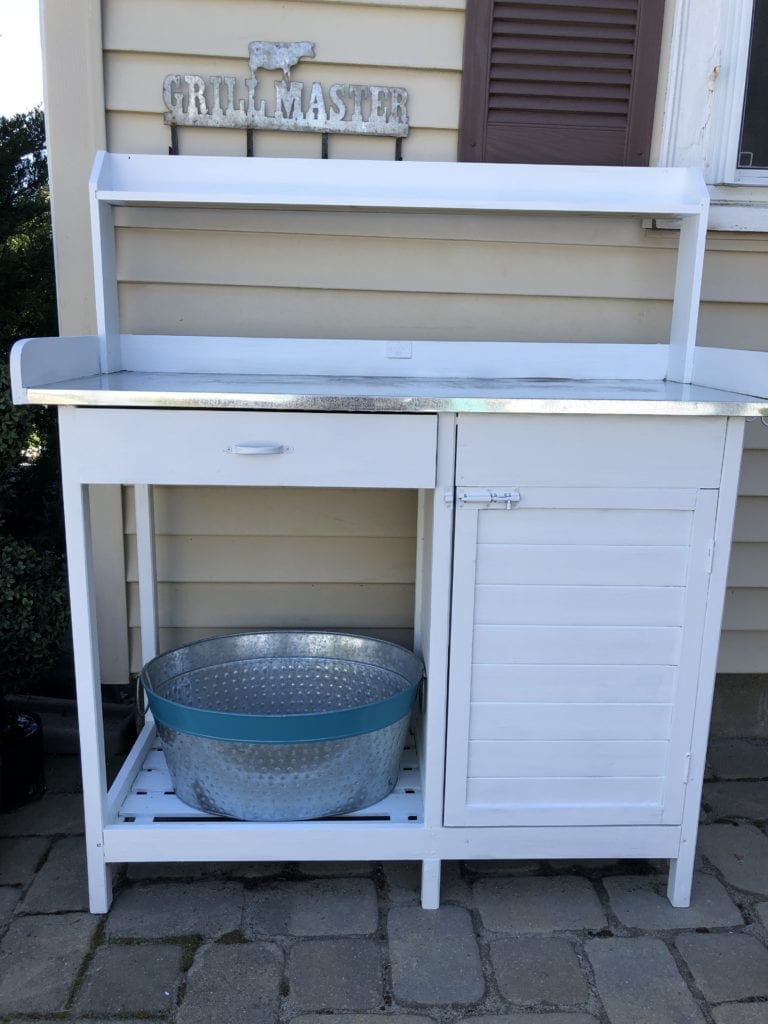
Add a tub for drinks 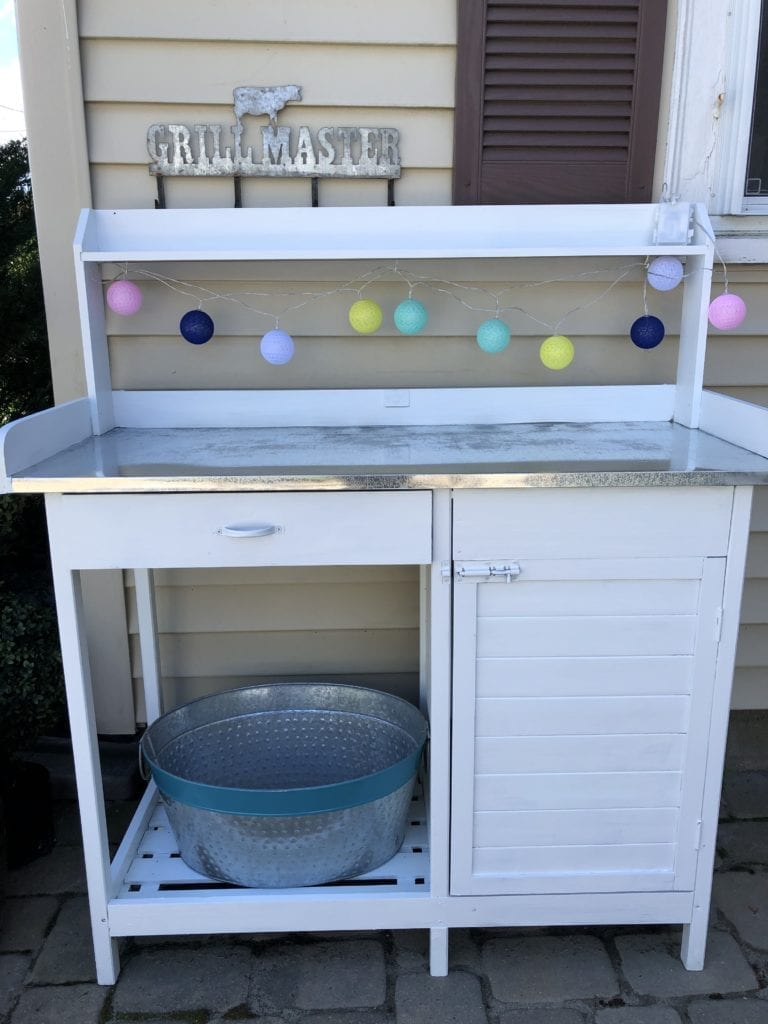
some fun string lights 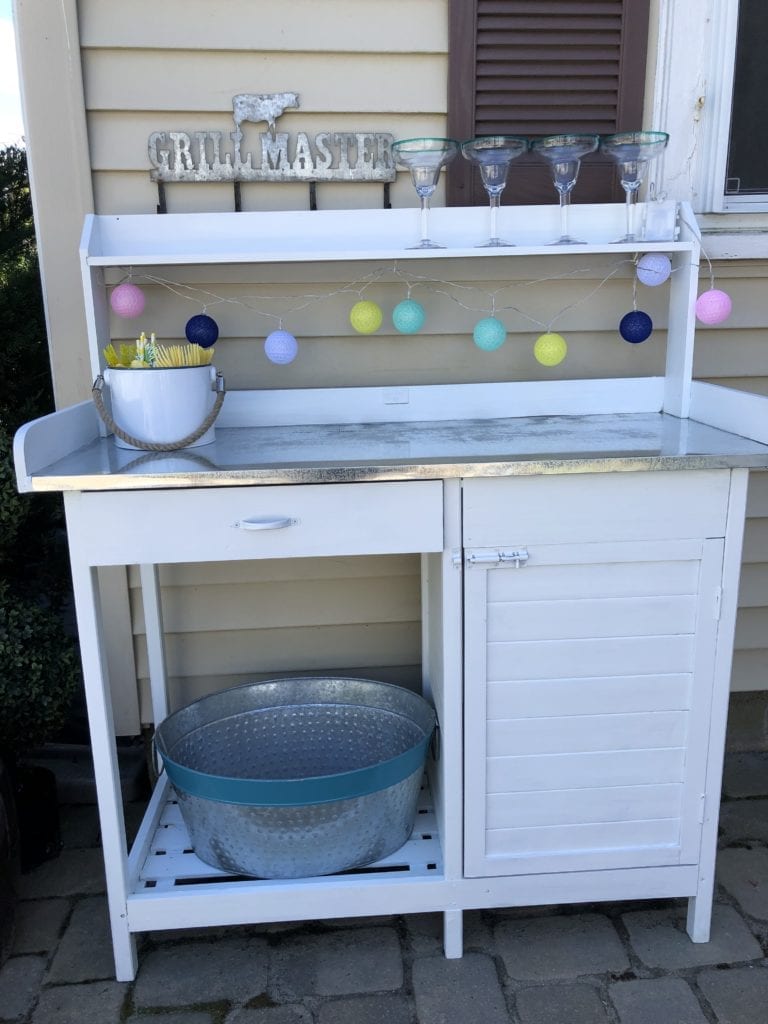
Don’t forget your cutlery and straws! 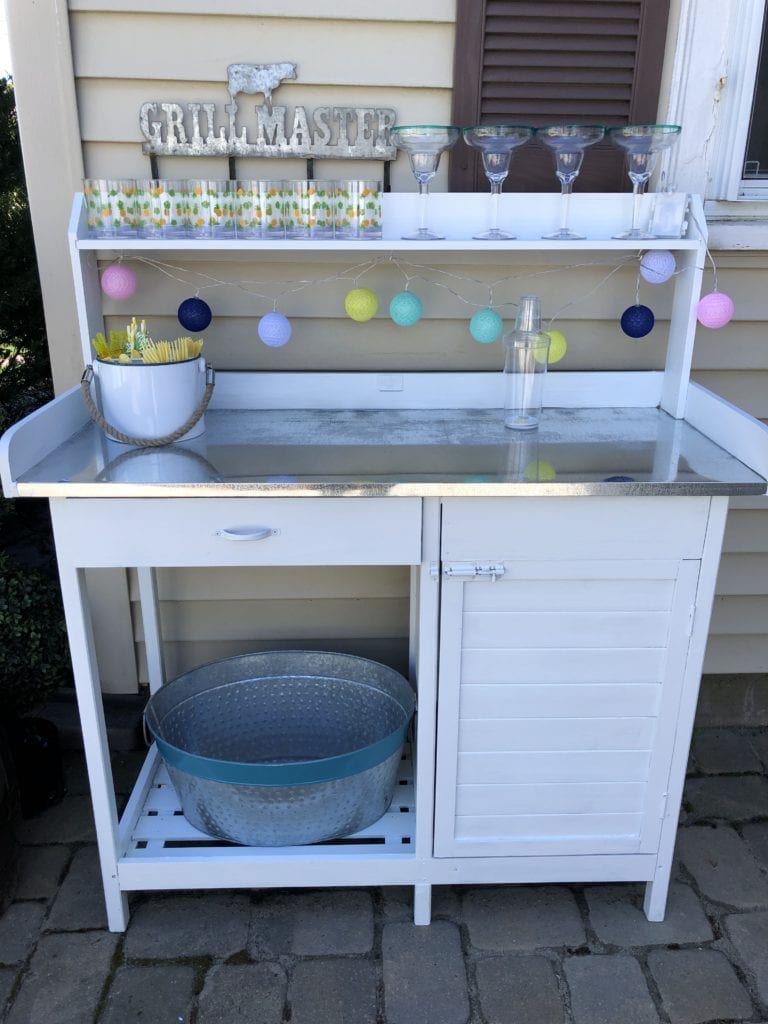
your outdoor safe cups… 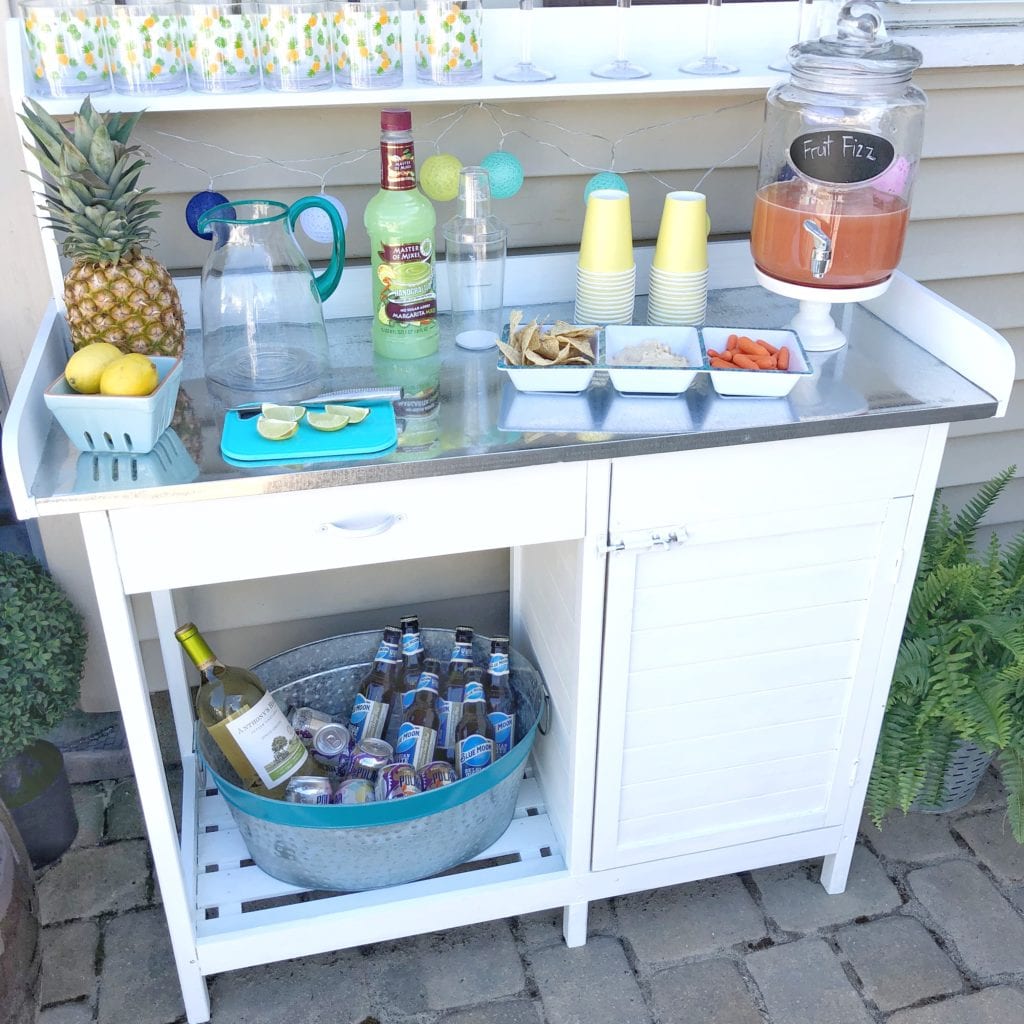
then add the rest!
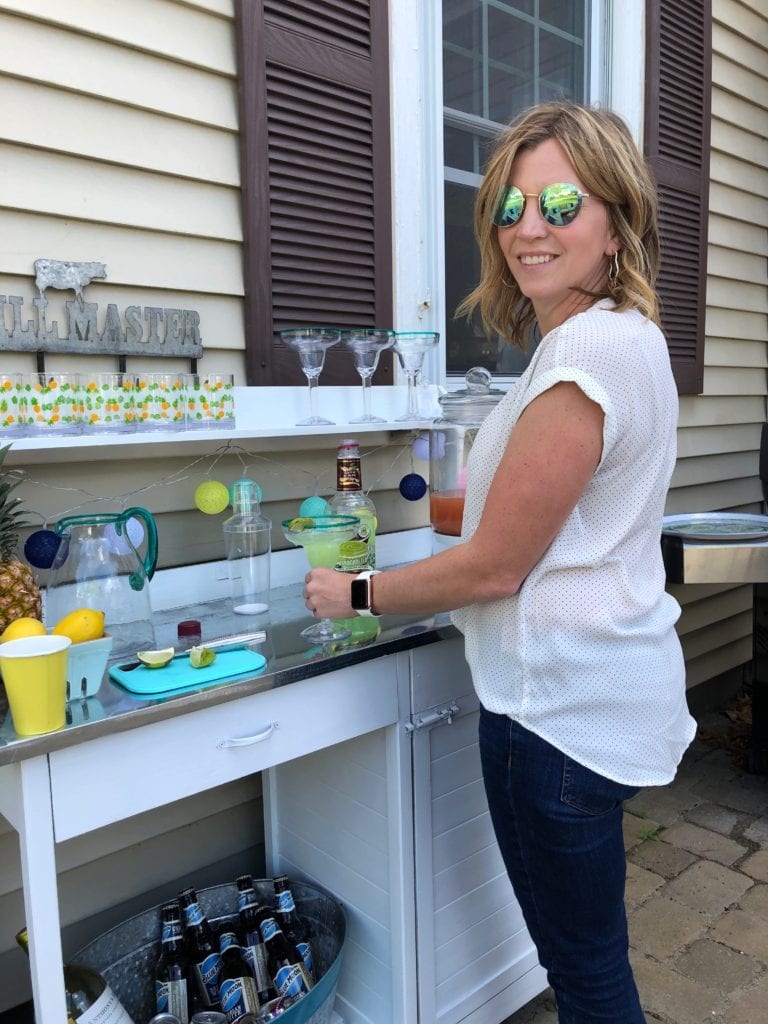
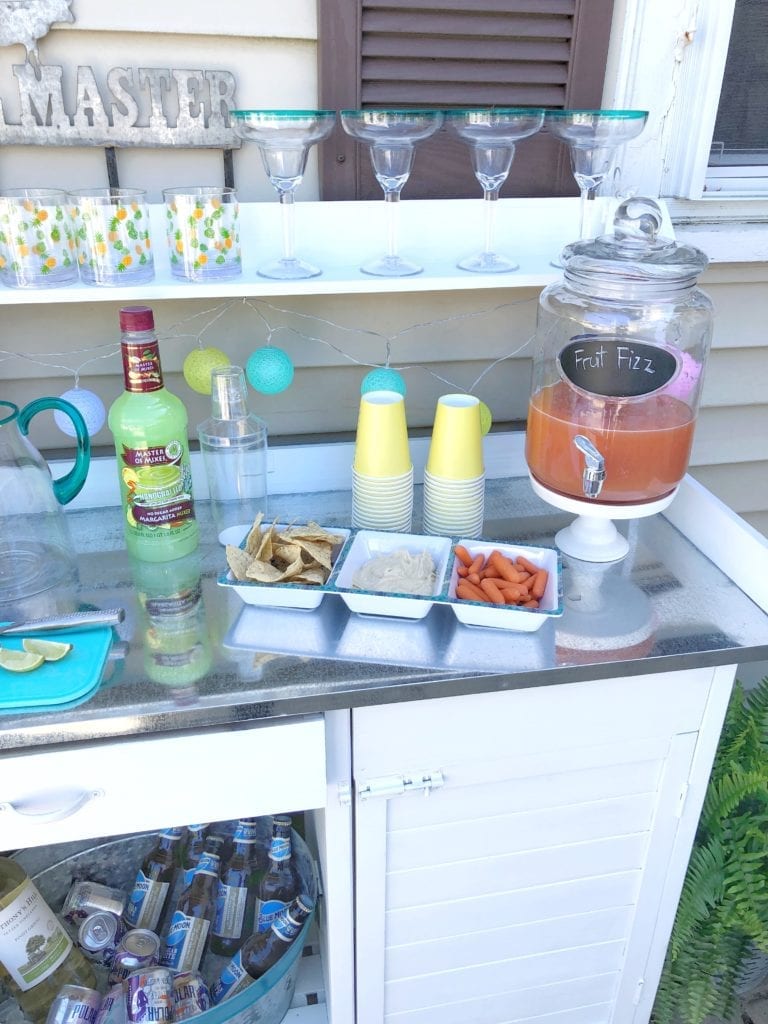
How fun do all these colorful accessories look displayed on our new bar? Thanks to Christmas Tree Shops andThat! for having such great selections of outdoor dishware and bar accessories. I added in some pops of yellow to break up all of the blue tones I was using and I love the yellow in these fun pineapple tumblers. They are super tropical and cute!
I’ll be honest- I completely forgot to grab lemonade or fruit punch mix for the kids to put in the drink dispenser (somehow managed to remember the margarita mix though haha) So I improvised with this completely crazy and also slightly genius idea. I took all the different assortment of juices we had in our fridge, mixed them together and then added some seltzer. I basically created my own fruit punch with fizz, so that’s what it’s called Fruit Fizz. I was really looking for any excuse to get all these half empty bottles out of my fridge. Just promise not to tell the kids my secrets, ok? Shockingly, it wasn’t actually as bad as I thought it would be!
I’m using the pretty blue rimmed pitcher for keeping out ice water, to cut down on bottle water use. If some of the kids see right through my use -up -all- the- juice- in- the- fridge- concoction there is always ice cold water available 😉 Just be sure to keep a sharpie in the drawer, out of their reach, so you can write their names on them, then they can easily identify their own.
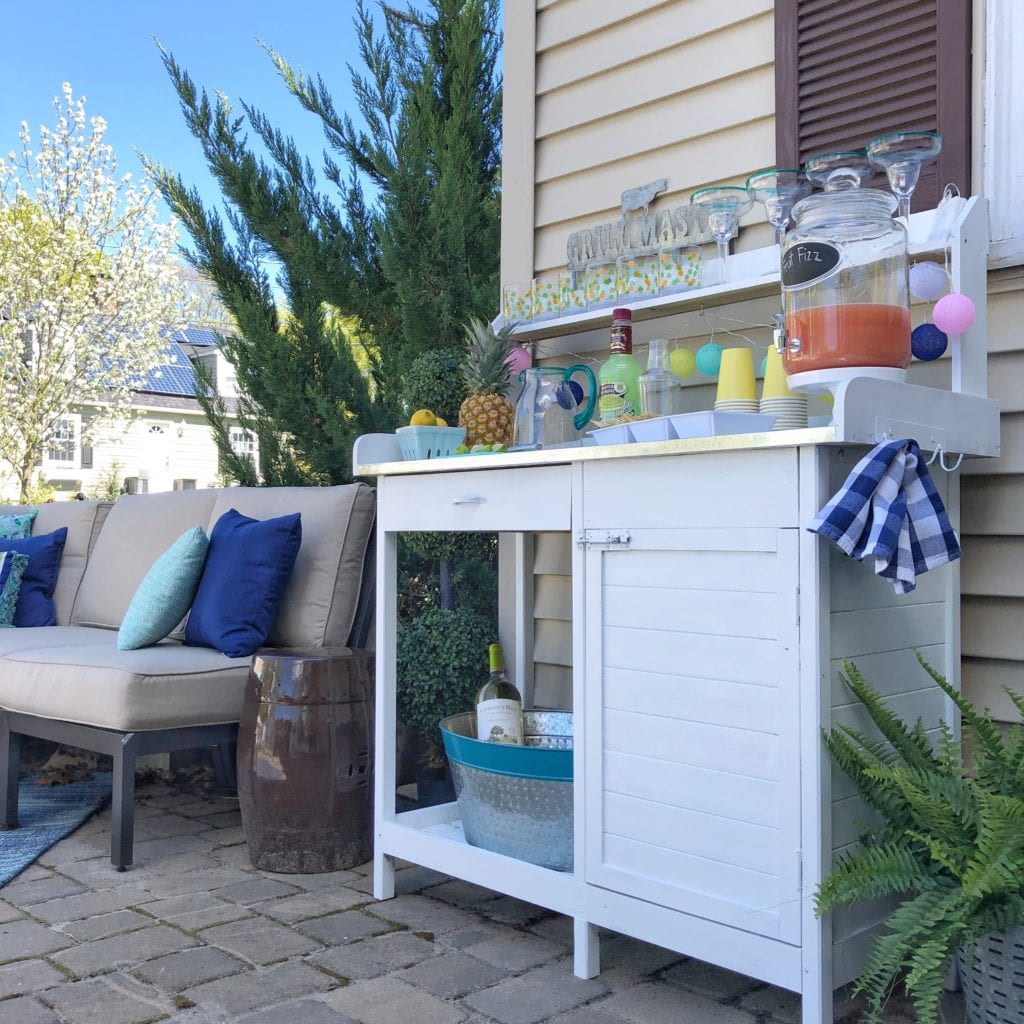
This little bar is such a fun addition to our patio. Before we used a random old cooler for all our beverages and all our mixed drinks inside the house on the counter. I love this hammered metal tub with blue which was a steal at Christmas Tree Shops andThat!, it brings such a fun pop to the bottom of the bar, and I like that it ties in the metal from the top of the bar. It’s so fun to have an area to make drinks outside and keep all the entertaining stuff organized. Now if we have an impromptu cookout with family or invite neighbors over for an evening cocktail, we have the perfect spot to entertain outside! Plus it’s all within arms reach- ready to go at a moments notice.
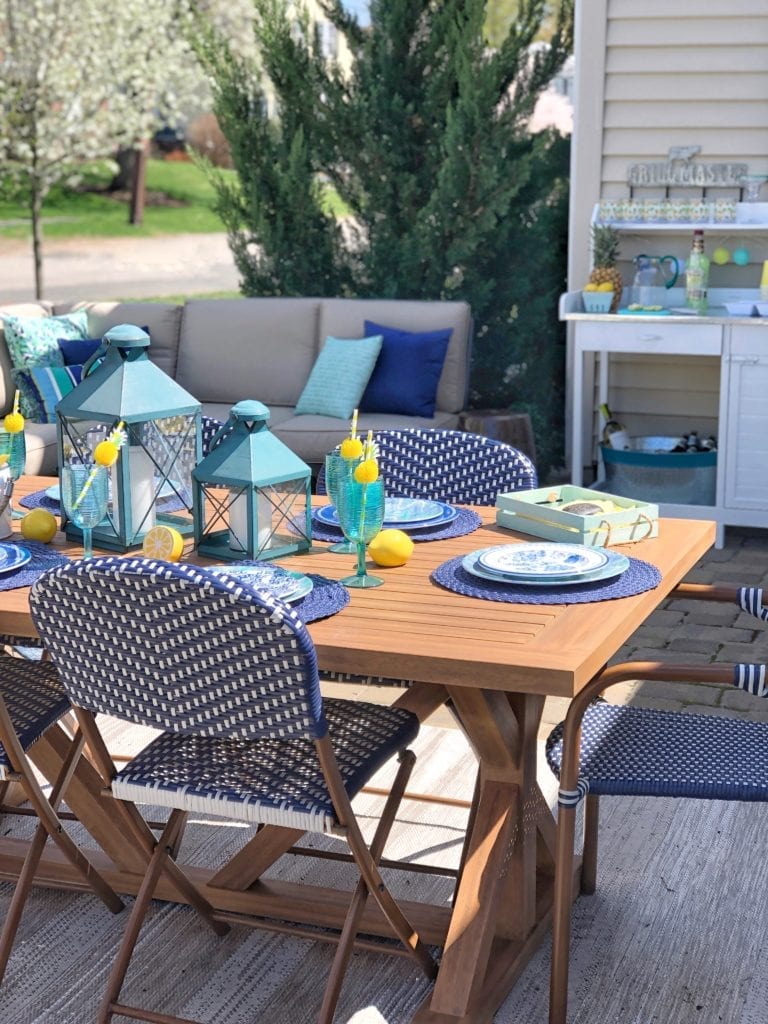
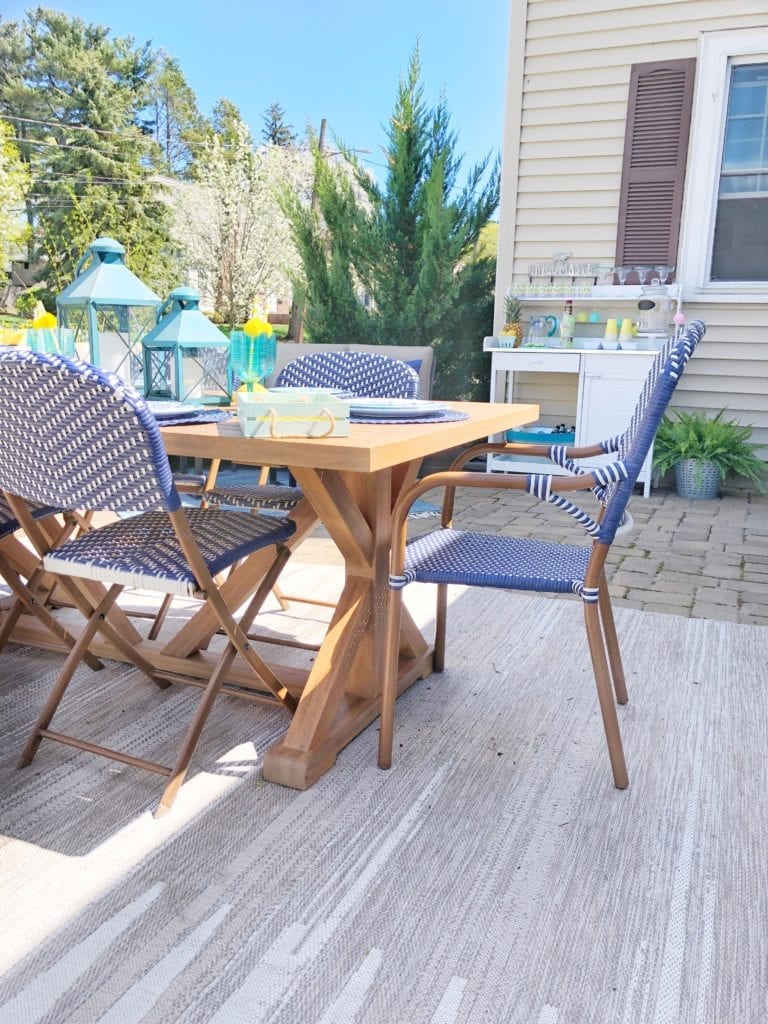
Now let me show you guys how the bar looks on our patio from further away. There it is tucked against the side of the house, it fits perfectly there and is central between our sitting area and dining area. I was so excited to also set up our outdoor dining table. I knew I wanted some pretty outdoor wine glasses. I grabbed these blue colored ones from Christmas Tree Shops andThat! and they look so festive with these fun pineapple straws in them. The teal lanterns I already owned but Christmas Tree Shops andThat! has a wide range of lanterns as well, which I think are so pretty as a table centerpiece, especially if entertaining in the evening.

Our table and chairs we already owned, however I needed some outdoor safe plates. I grabbed this set from Christmas Tree Shops andThat! I purposely mix-matched the designs so they had different combinations of patterns, which I think add’s so much interest to the table! I also layered underneath the plates these outdoor woven placemats in Navy also from Christmas Tree Shops andThat!.

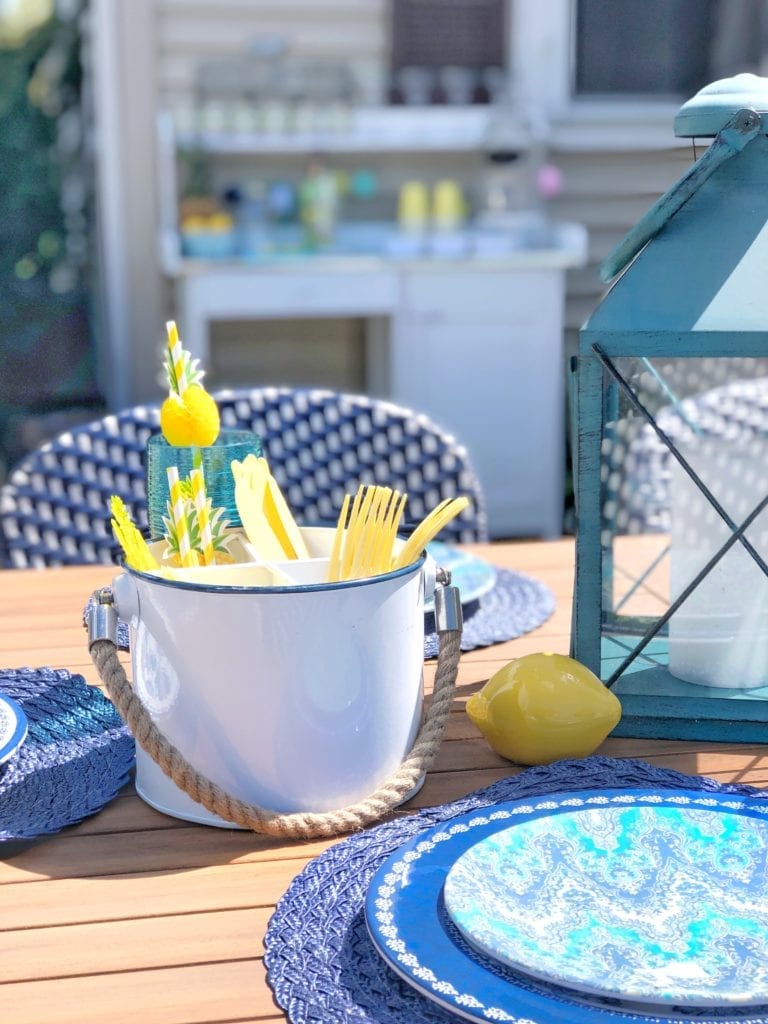
Here is a close up of the adorable white metal cutlery caddy with rope handle also from Christmas Tree Shops and That!. I LOVE how the yellow pops off the blue and white! I plan to leave the Caddy in the bar cabinet so it’s so easy to grab forks/knifes/etc when guests come over. The best part of the potting bench turned bar is that cabinet and drawer. I can easily tuck the place mats, plates, and put all the straws, etc… in while we are not using them. It make’s entertaining so easy!
I just love how this all came together. I’m so excited to host our next outdoor party! What do you think of the potting bench turned into a bar? Are these items you could see yourself using at your next BBQ?
Thanks for stopping by and thanks to Christmas Tree Shops andThat! for another great seasonal shopping experience. I’m always so impressed with the stylish pieces I find at great prices. Be sure to head over to the other blogs linked at the bottom of this post! They all share so many amazing summer decor ideas!
Jordan
SHOP THIS POST:

*this post contains affiliate links

Southern State of Mind | At Charlotte’s House | A Tufted Life | Jor Decor | Aratari at Home
PIN FOR LATER
read the full post >

 (Photo via Serena and Lily)
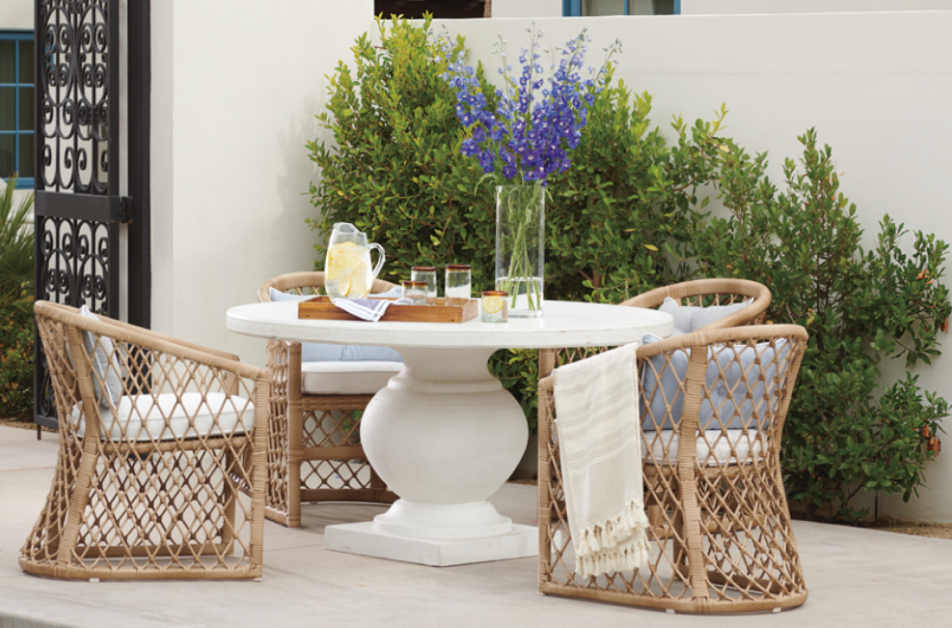
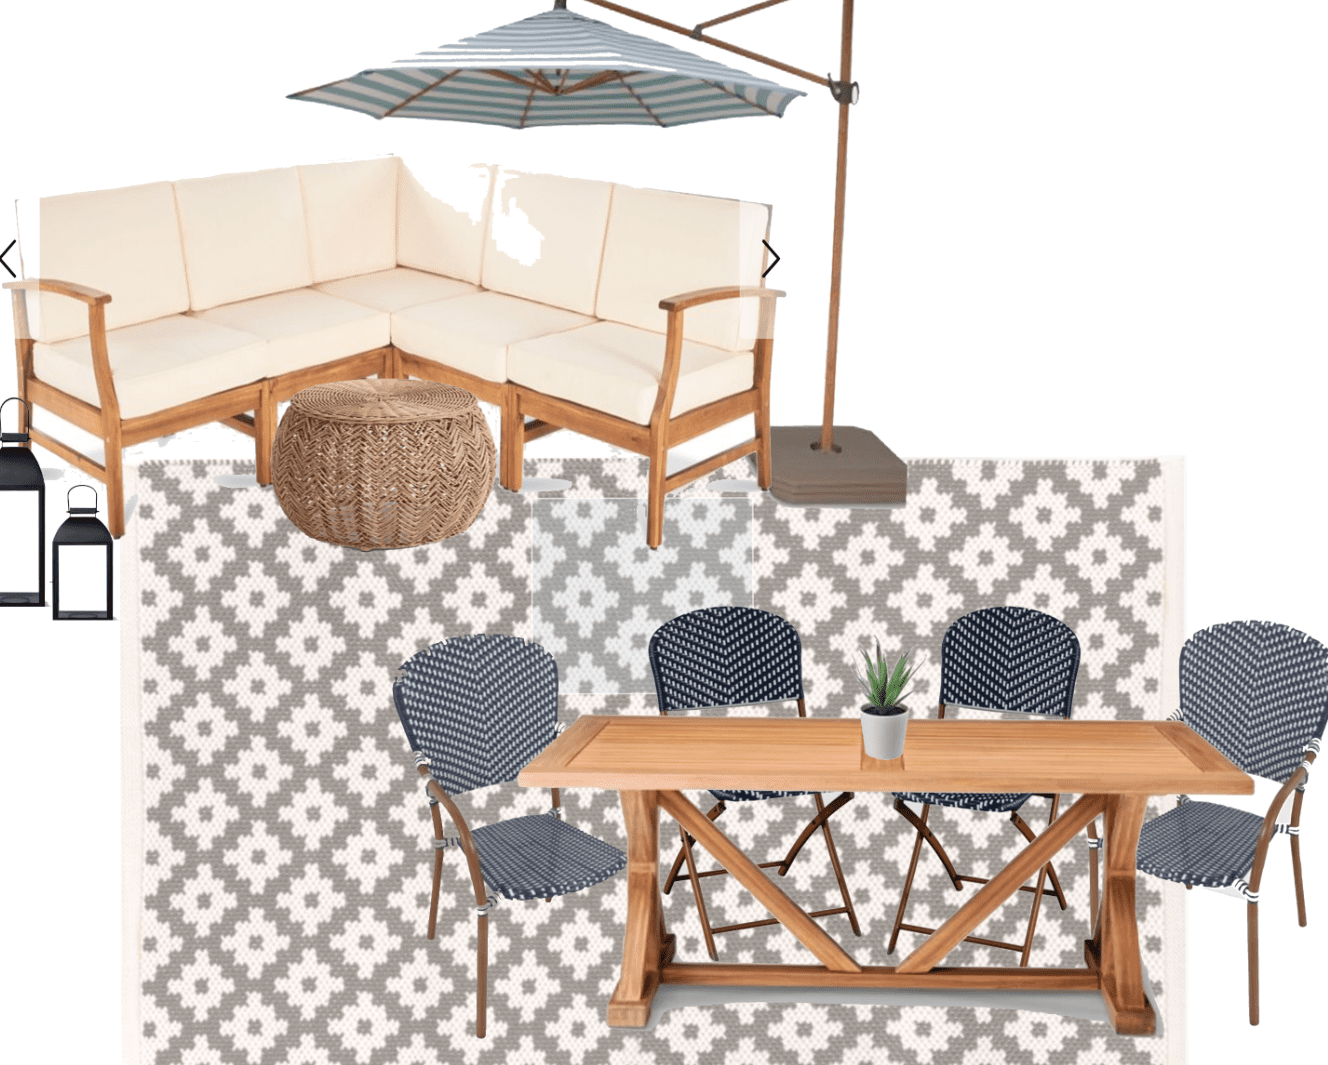
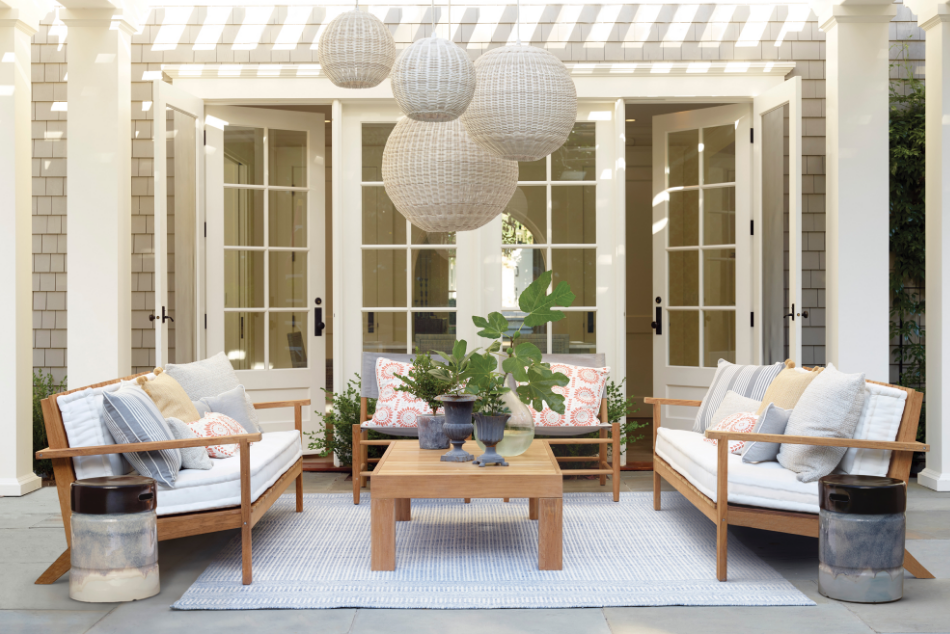
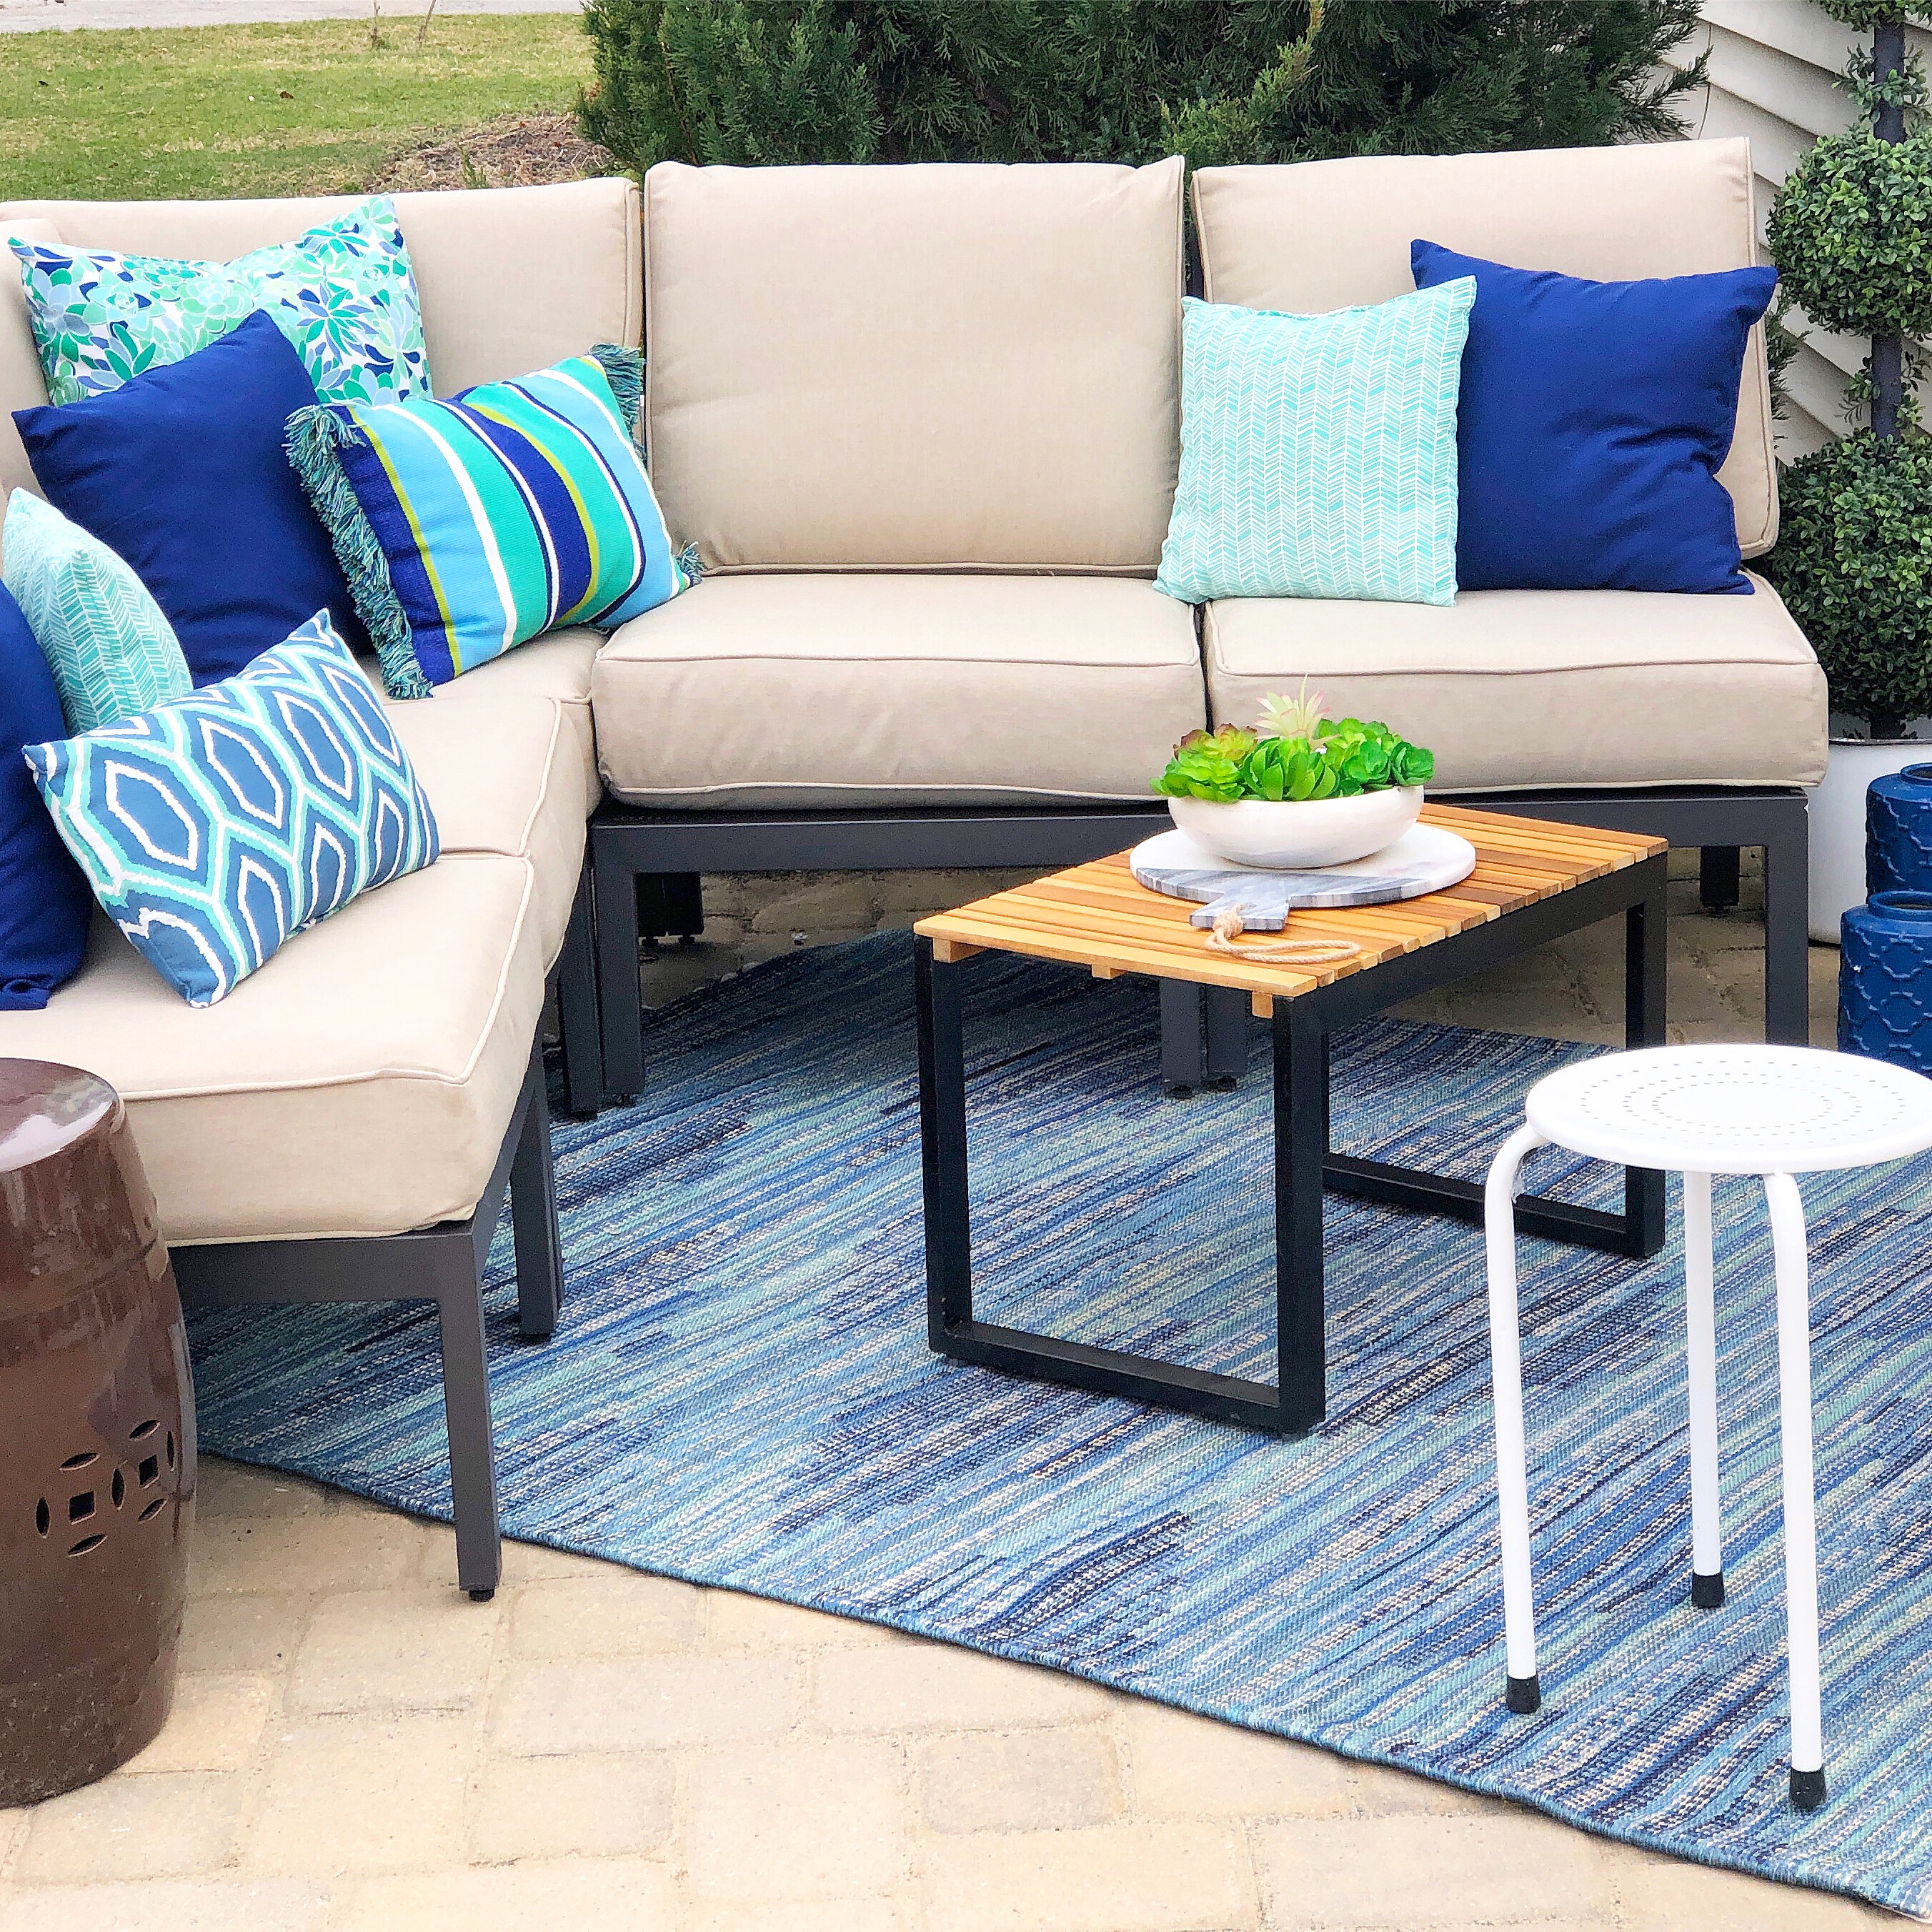
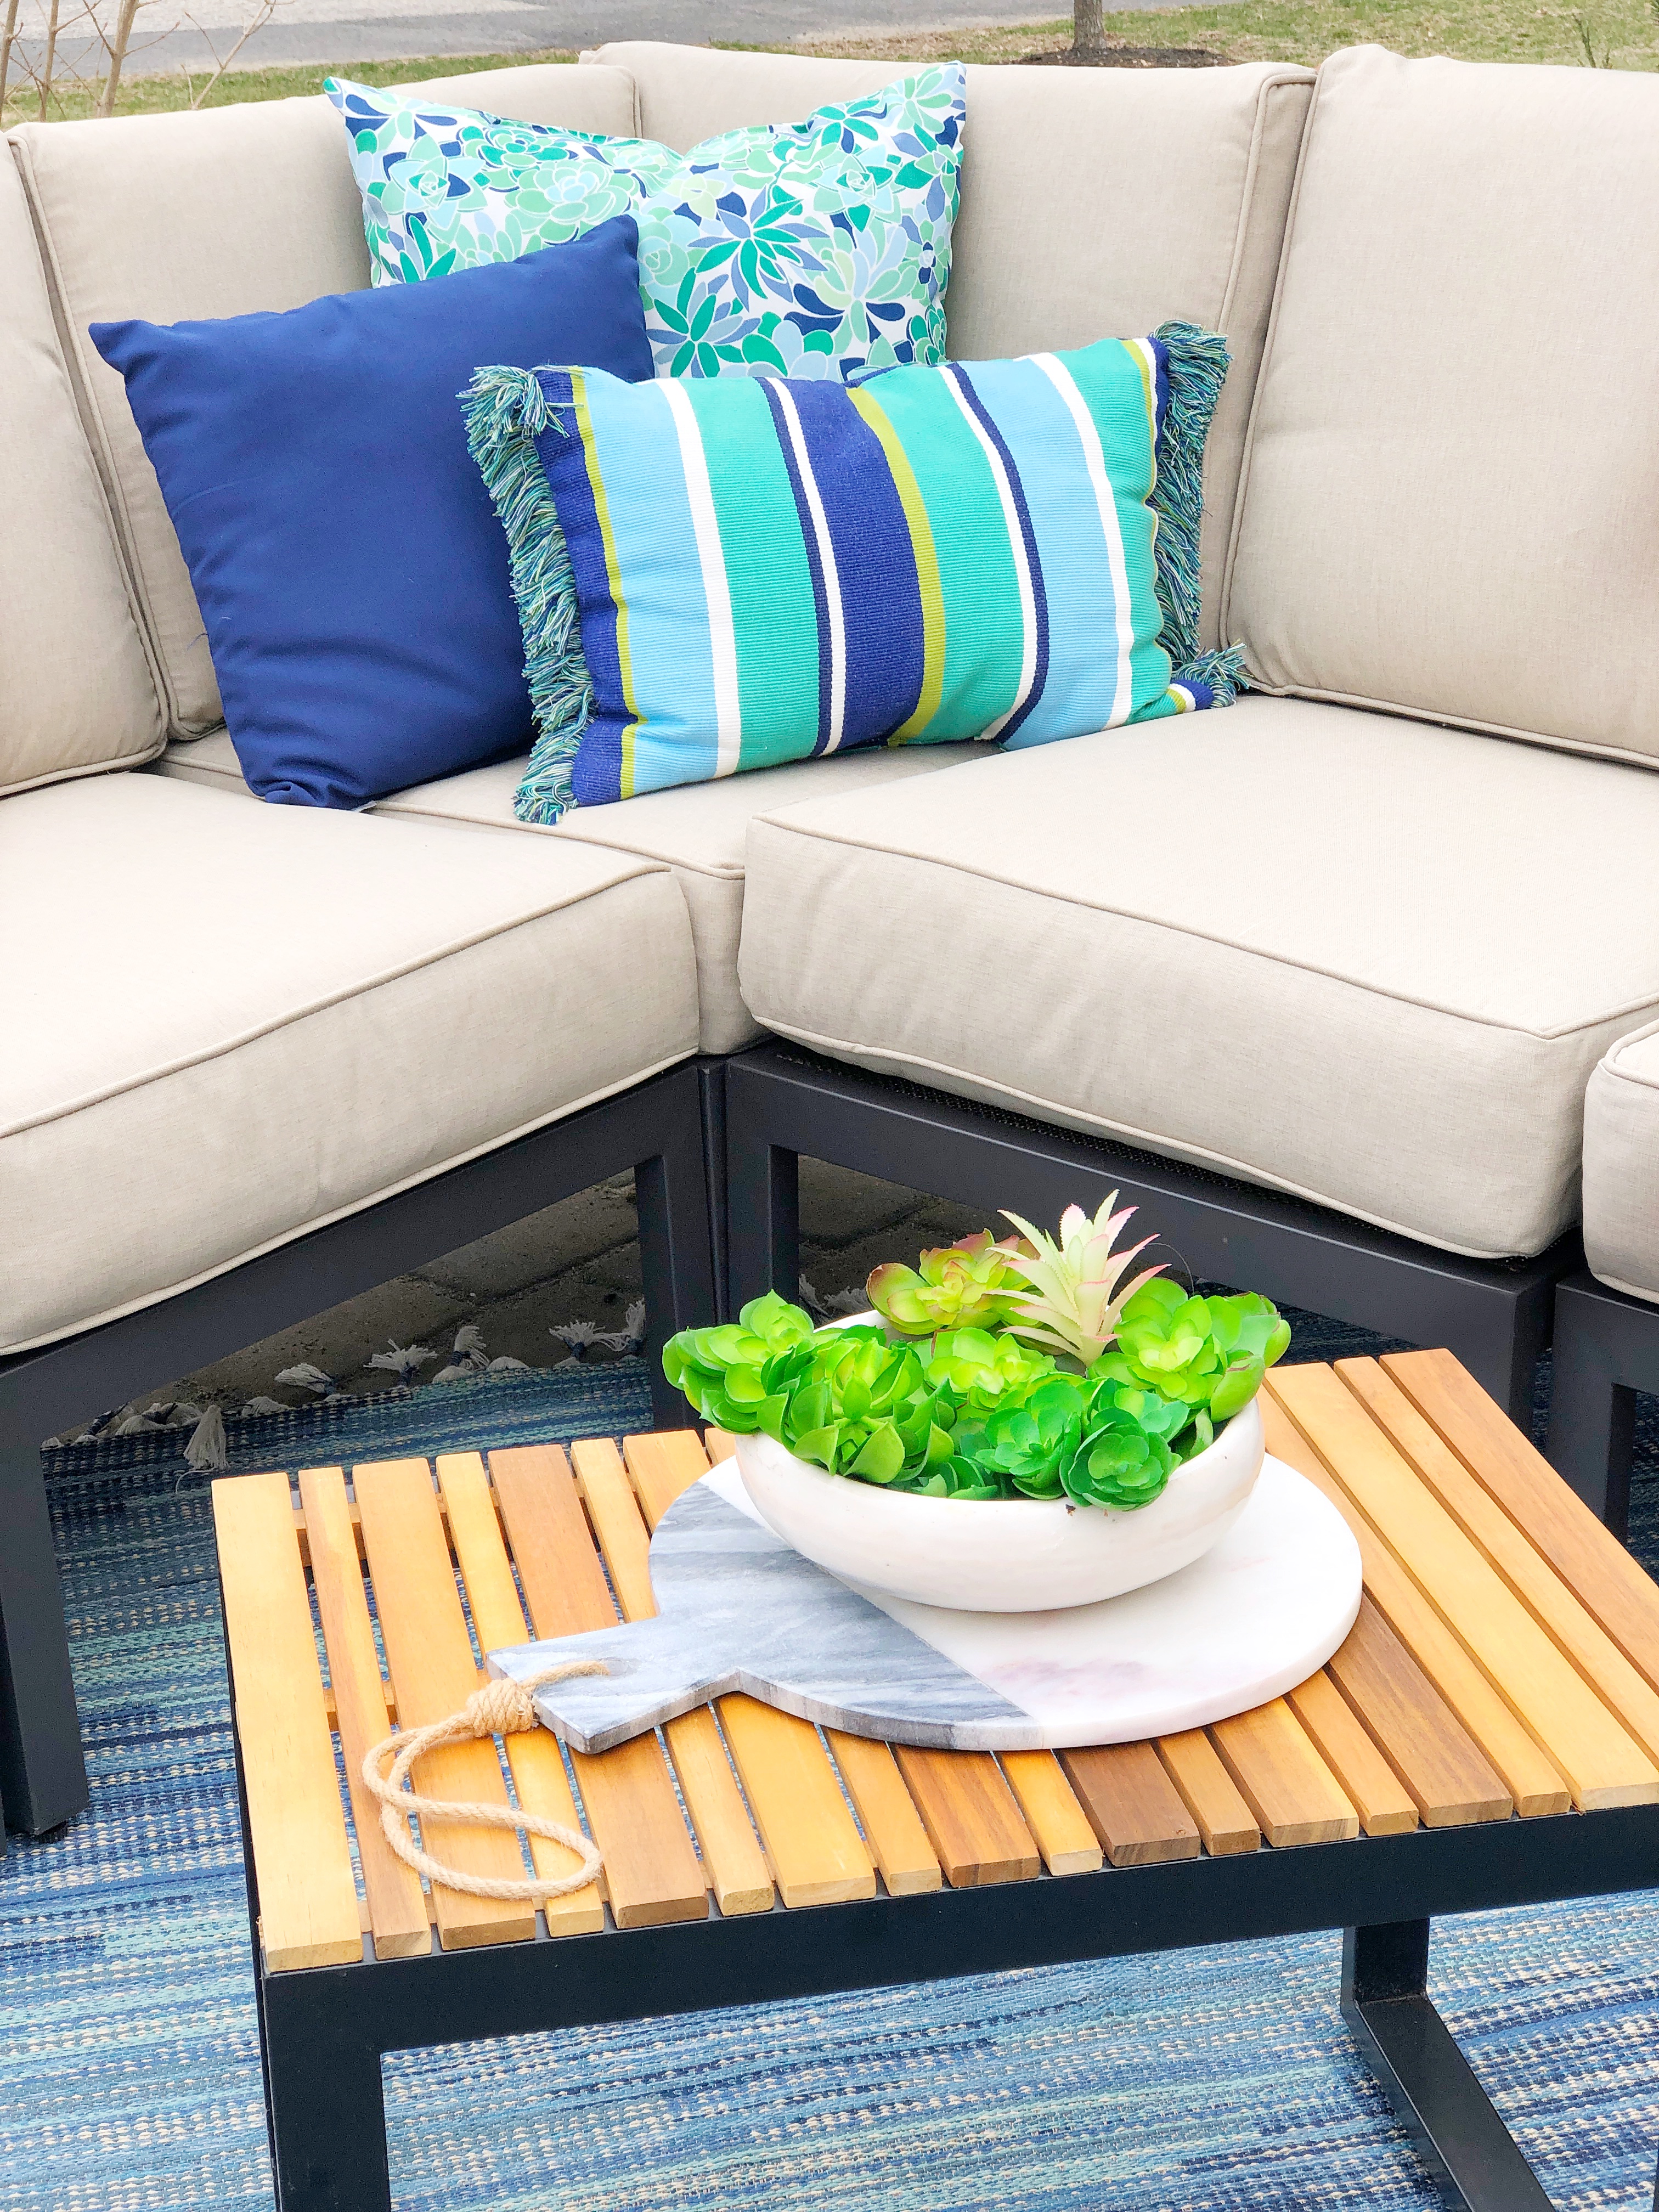
Happy April Everyone! I’m SOOOO excited that April is finally here and the weather is starting to turn in our favor. The best part of warm weather is simply that we get to spend time outside and when we aren’t working on the yard or playing with our kids we love to lounge and entertain on our patio a.k.a our outdoor living-room. I think of our patio as an extension of our interior space. On today’s post I want to share how I create that atmosphere. So if you’re looking to achieve an extension of your interior space, outside, keep on reading! If you have a deck, porch or patio I’m also going to suggest some of my favorite outdoor products to help you create your own outdoor oasis. Today I’m going to focus on zones and outdoor rugs.
 (Jordecor E-Design)
What is a zone? A zone is a designated area that will serve a purpose in your space. For example, where is the dining area going to be vs. seating area and/or grill set up? If you have a smaller size outdoor space you may need to think about what will be most functional for you. Perhaps the size of your outdoor space can’t accommodate two zones. So do you prefer to dine outside or do you prefer to lounge with a book and a cup of coffee? Once you decide what you will utilize most for your outdoor space to function as, you can start deciding on zones, measuring and picking out your pieces. We are lucky to have a large patio, sometimes it almost feels too big. It needs several zones to make it feel finished. With out the multiple zones of furniture it would look very bare and empty.
Once you have a zone or multiple zones, you want to define that zone by adding an outdoor rug. Make sure the rug you choose says outdoor. I LOVE using rugs outside. A rug makes a foundation for your space, even if you have beautiful decking or pavers or brick… adding that first layer on the ground is creating the zone and also adding visual interest plus coziness. I would definitely suggest at least one outdoor rug to soften the hard surface and bring that interior feel outside.
Caring for Your Outdoor Rug
Outdoor rugs are made to get wet, and deal with the elements so they are durable. However will they last for years and years? Maybe a few if you take care of them. Yes, I leave our outdoor rugs out in the rain. However, I make sure to keep them in a sunny area on our patio. This helps them dry out which prevents mold/mildew. I find the sun even helps with cleaning them. Occasionally, I take the rugs to the driveway and spray them with our power-washer and add some safe gentle cleaner (linked below), if we entertain and have a lot of stains we will spot clean and/or take the pressure washer to it with some soap. Where we live the winters are very harsh so rolling it up and putting it in your garage or basement through the winter is key to the longevity of your outdoor rugs.
 (photo via Serena and Lily)
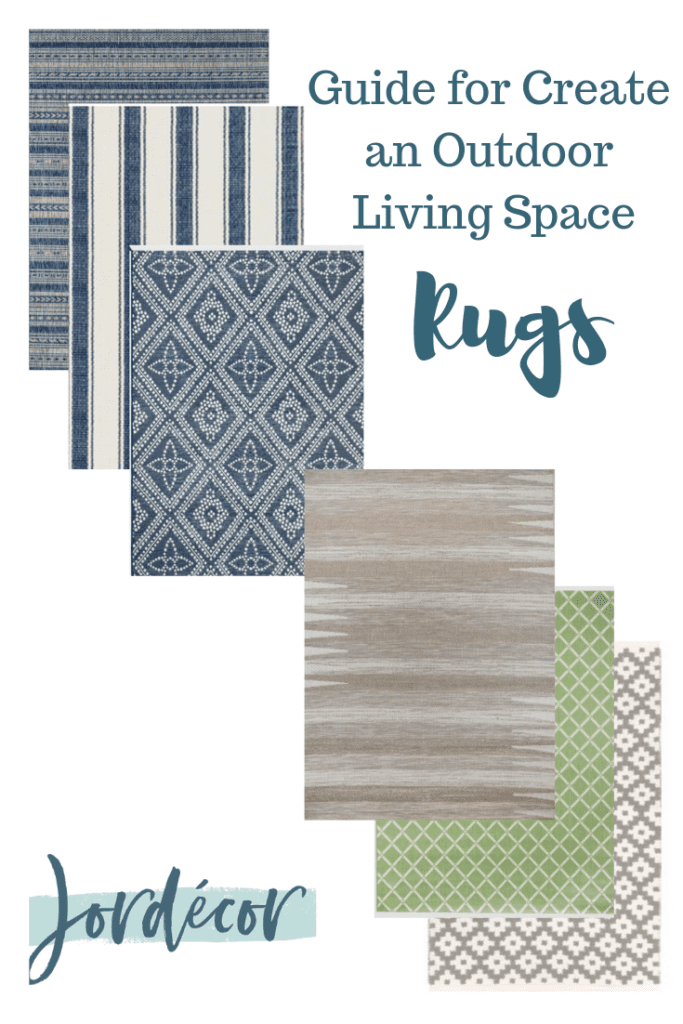
What Style to Pick?
 (from our beach house three summers ago)
You may want to stick with a color scheme or go neutral. It depends on your style. If you prefer more coastal beach vibes, colorful, classic or southwestern, there is something for everyone. Below find my favorites and in a low-mid price range.
My Outdoor Rug Picks

OUR CURRENT PATIO
There you have it, the first step in getting your outdoor space ready and refreshed for spring! Zones and rugs. Next I will share my favorite furniture, pillows and decor!
Thanks for stopping by,
Jordan
PIN FOR LATER
read the full post >

*This post is in partnership with ChristmasTreeShopsandThat! a brand I love, as always all opinions are my own.
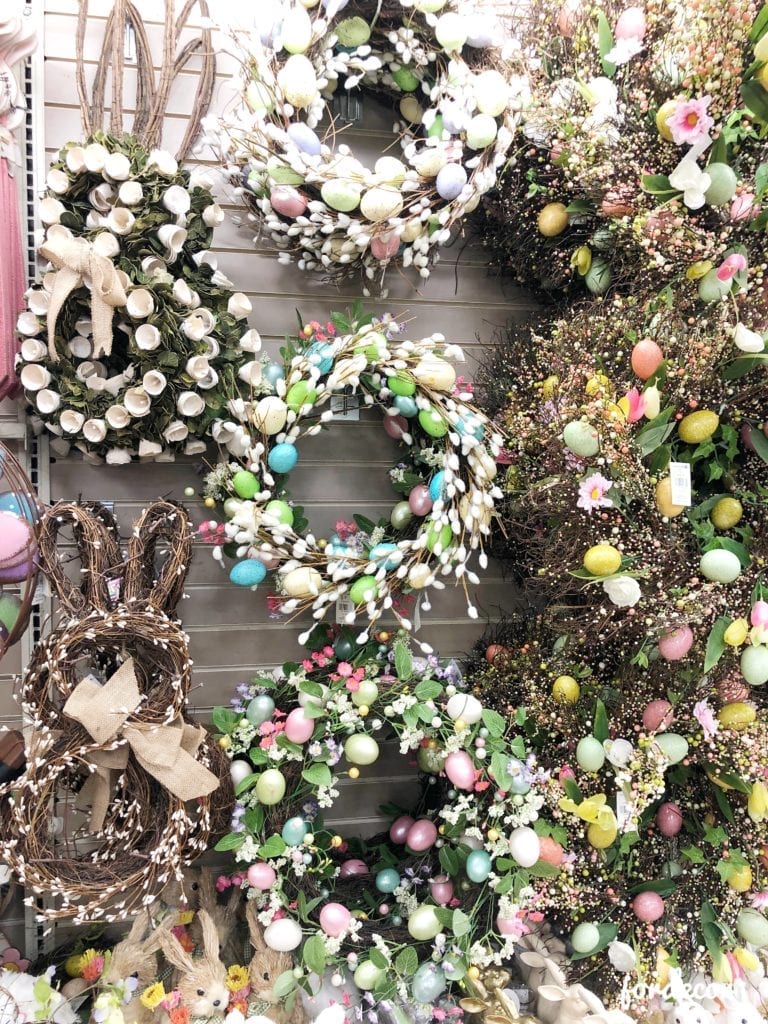
With Easter just around the corner, cute little bunnies are starting to make their way out, don’t worry JUST the decorative ones. We are still only a ONE pet family ;). I love this time of year so much as we eagerly await some warmer weather, days spent outside playing with the kids, breathing fresh air and working in the gardens. I’m so happy to be teaming up with ChristmasTreeShopsandThat!, as well as talented group of bloggers to share lots of decorating ideas for Spring. I can’t wait to see how each blogger adds the wonderful array of products from ChristmasTreeShopsandThat!to their homes. If your here from the lovely Nikki from A Tufted Life, isn’t her home so beautiful? I just love her style!
You guys know I love decorating for every season and holiday, it’s how I express myself plus create a feeling of excitement and love in our home. I was so happy to make a trip to ChristmasTreeShopsandThat! to get ideas for my Easter tablescape. I use these shopping trips to inspire me and get my creative juices flowing for each decorative project. They have so many cute wreaths, signs and tabletop items! Visiting this store is always a treasure hunt to see what you can find. For me it’s about curating a look that’s my own style, choosing things that will work together and fit with the style of my home.
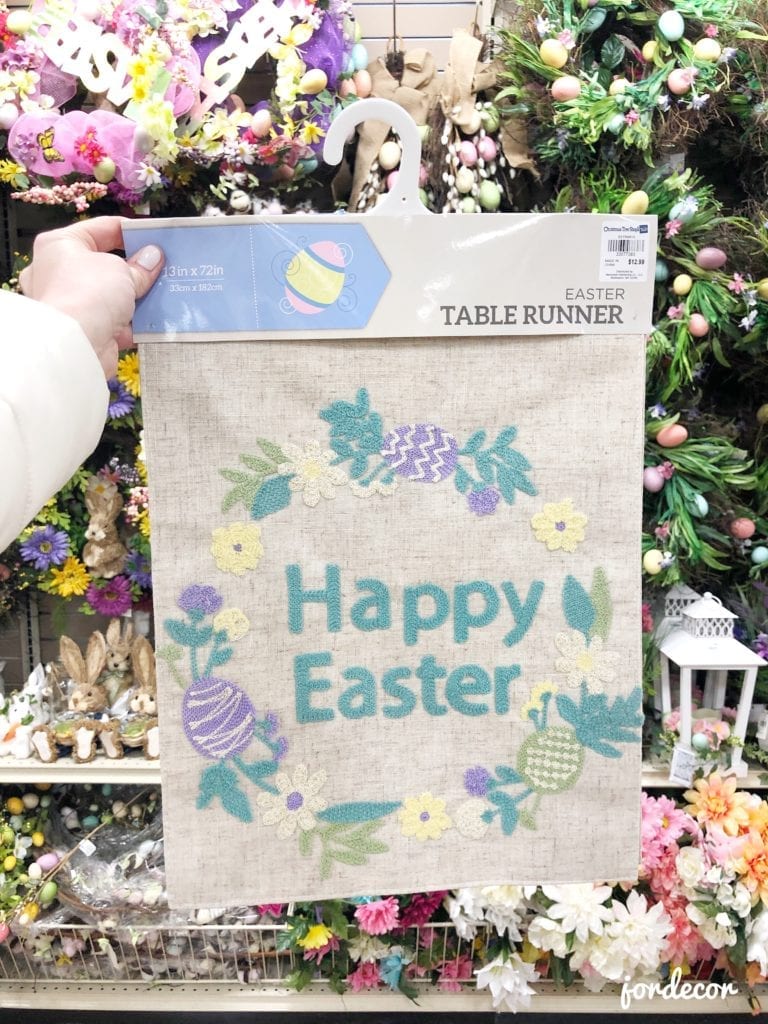
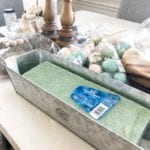
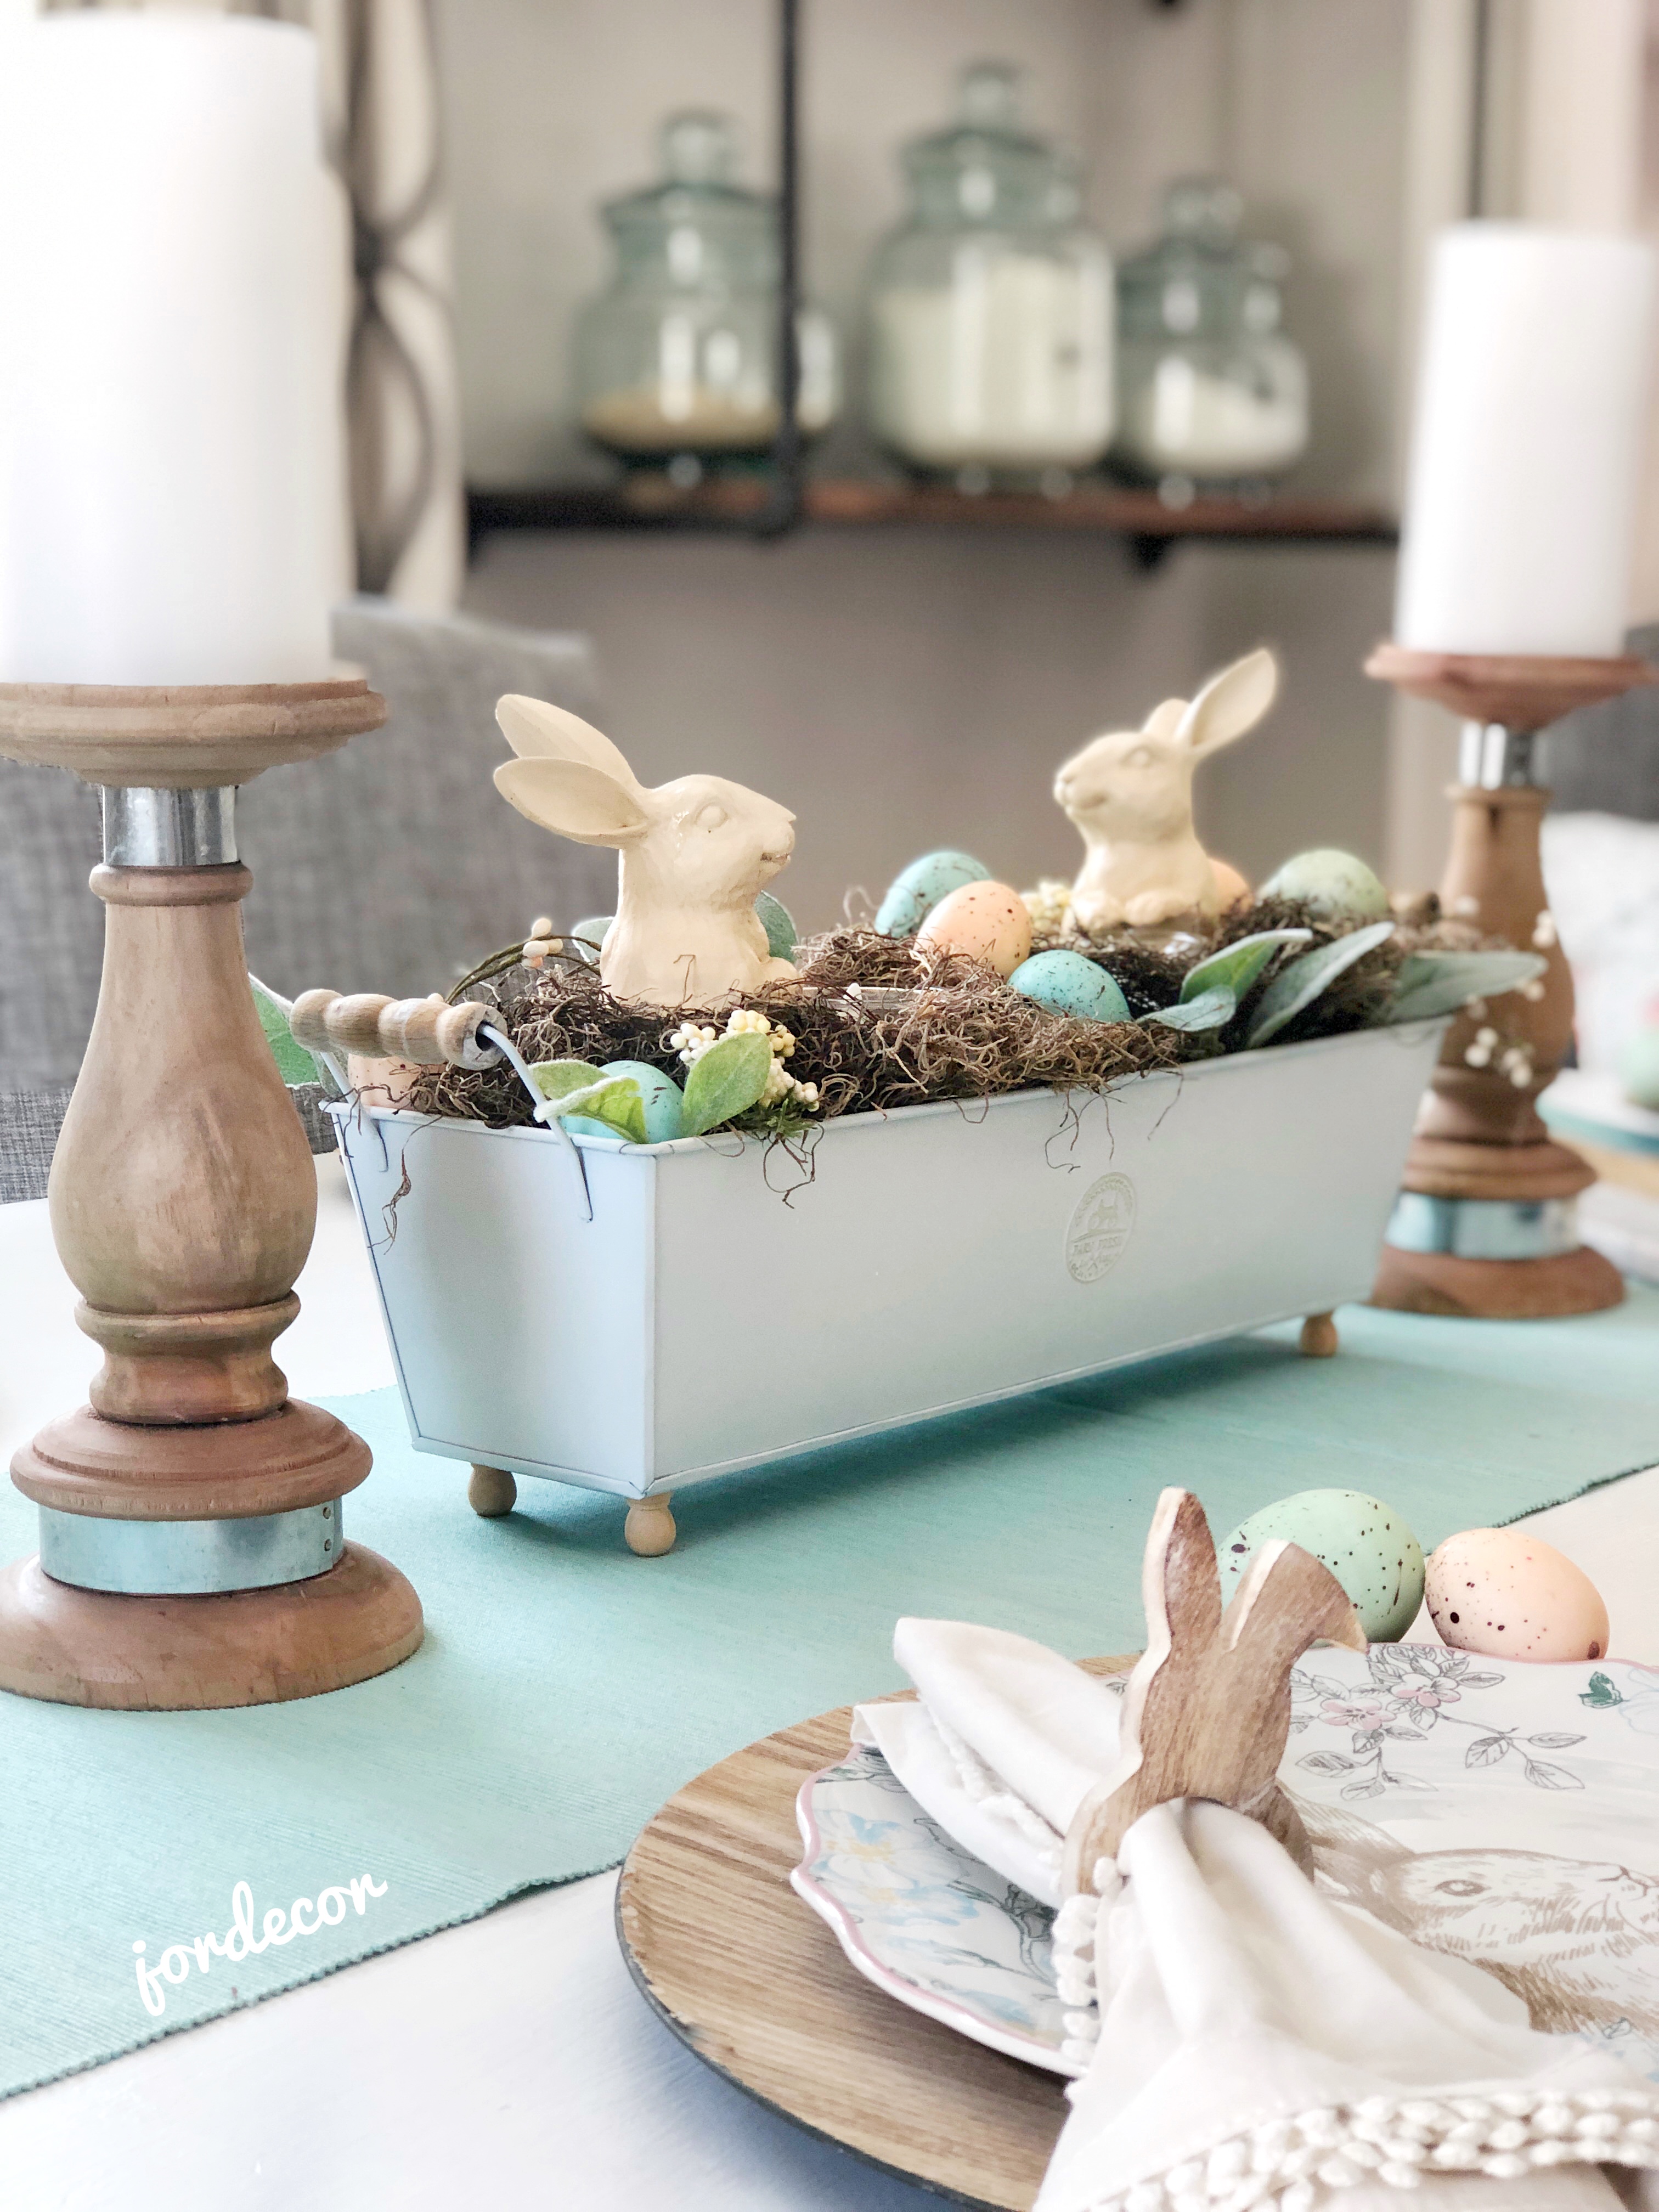
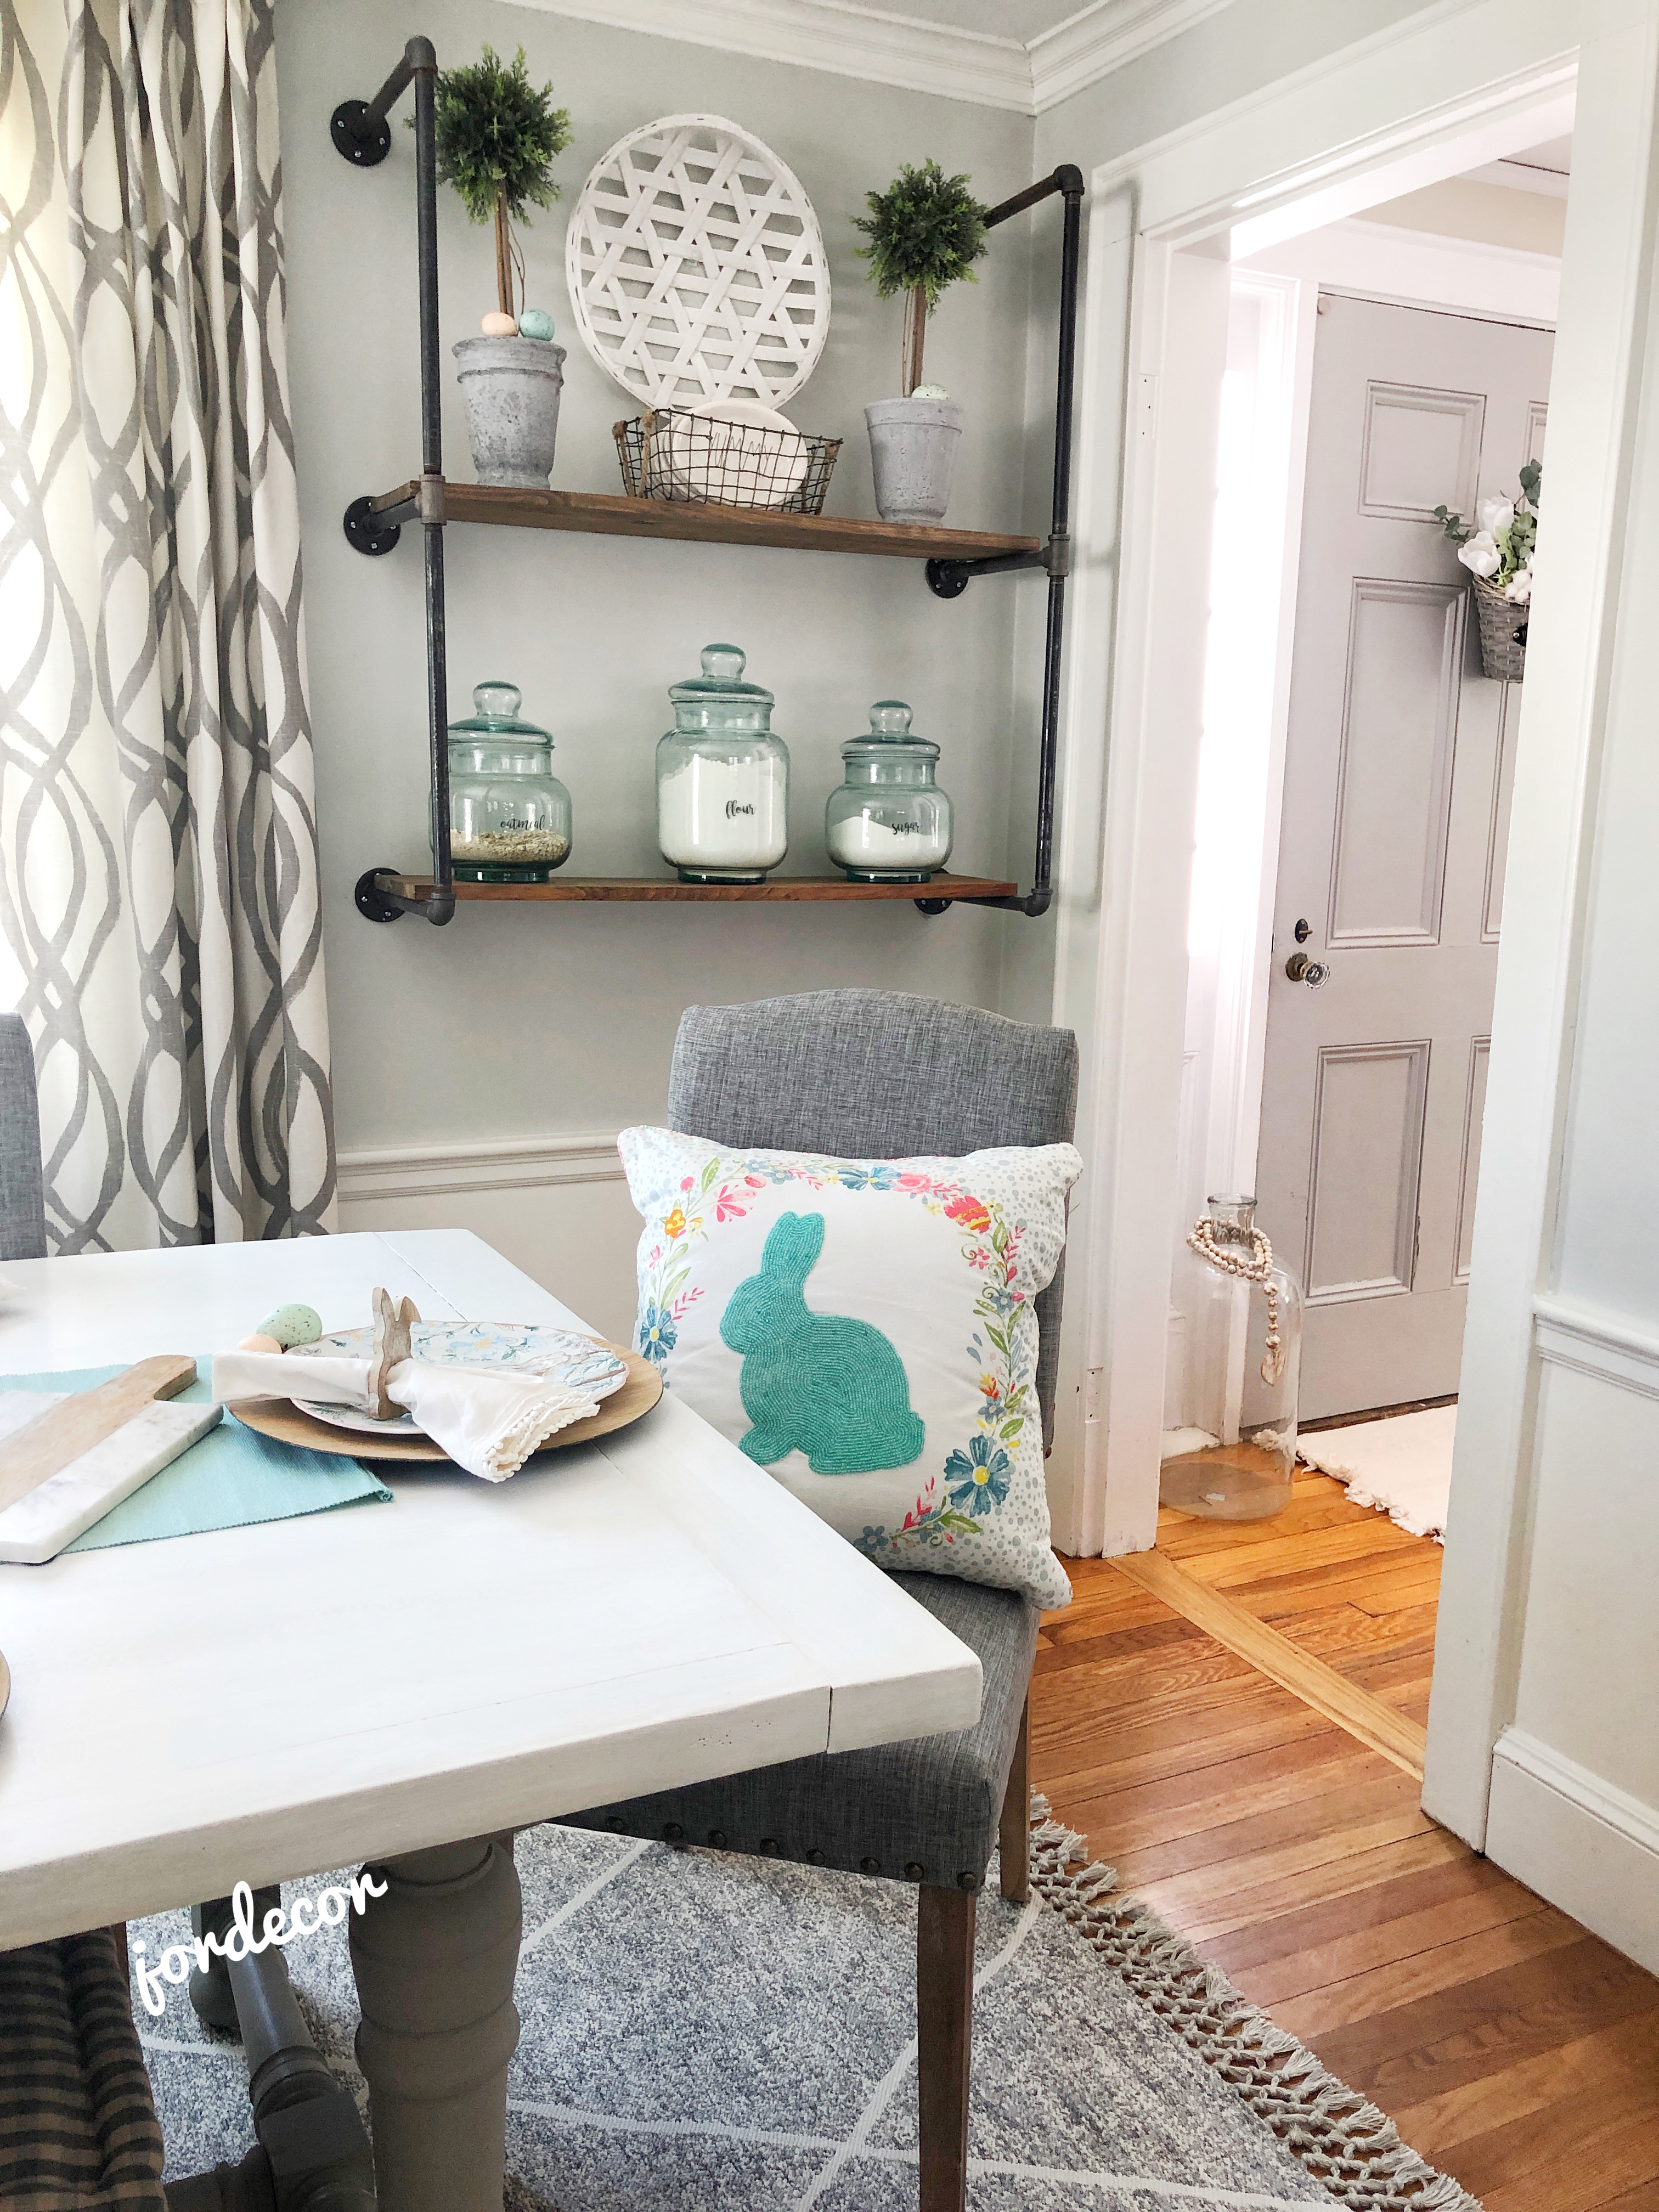
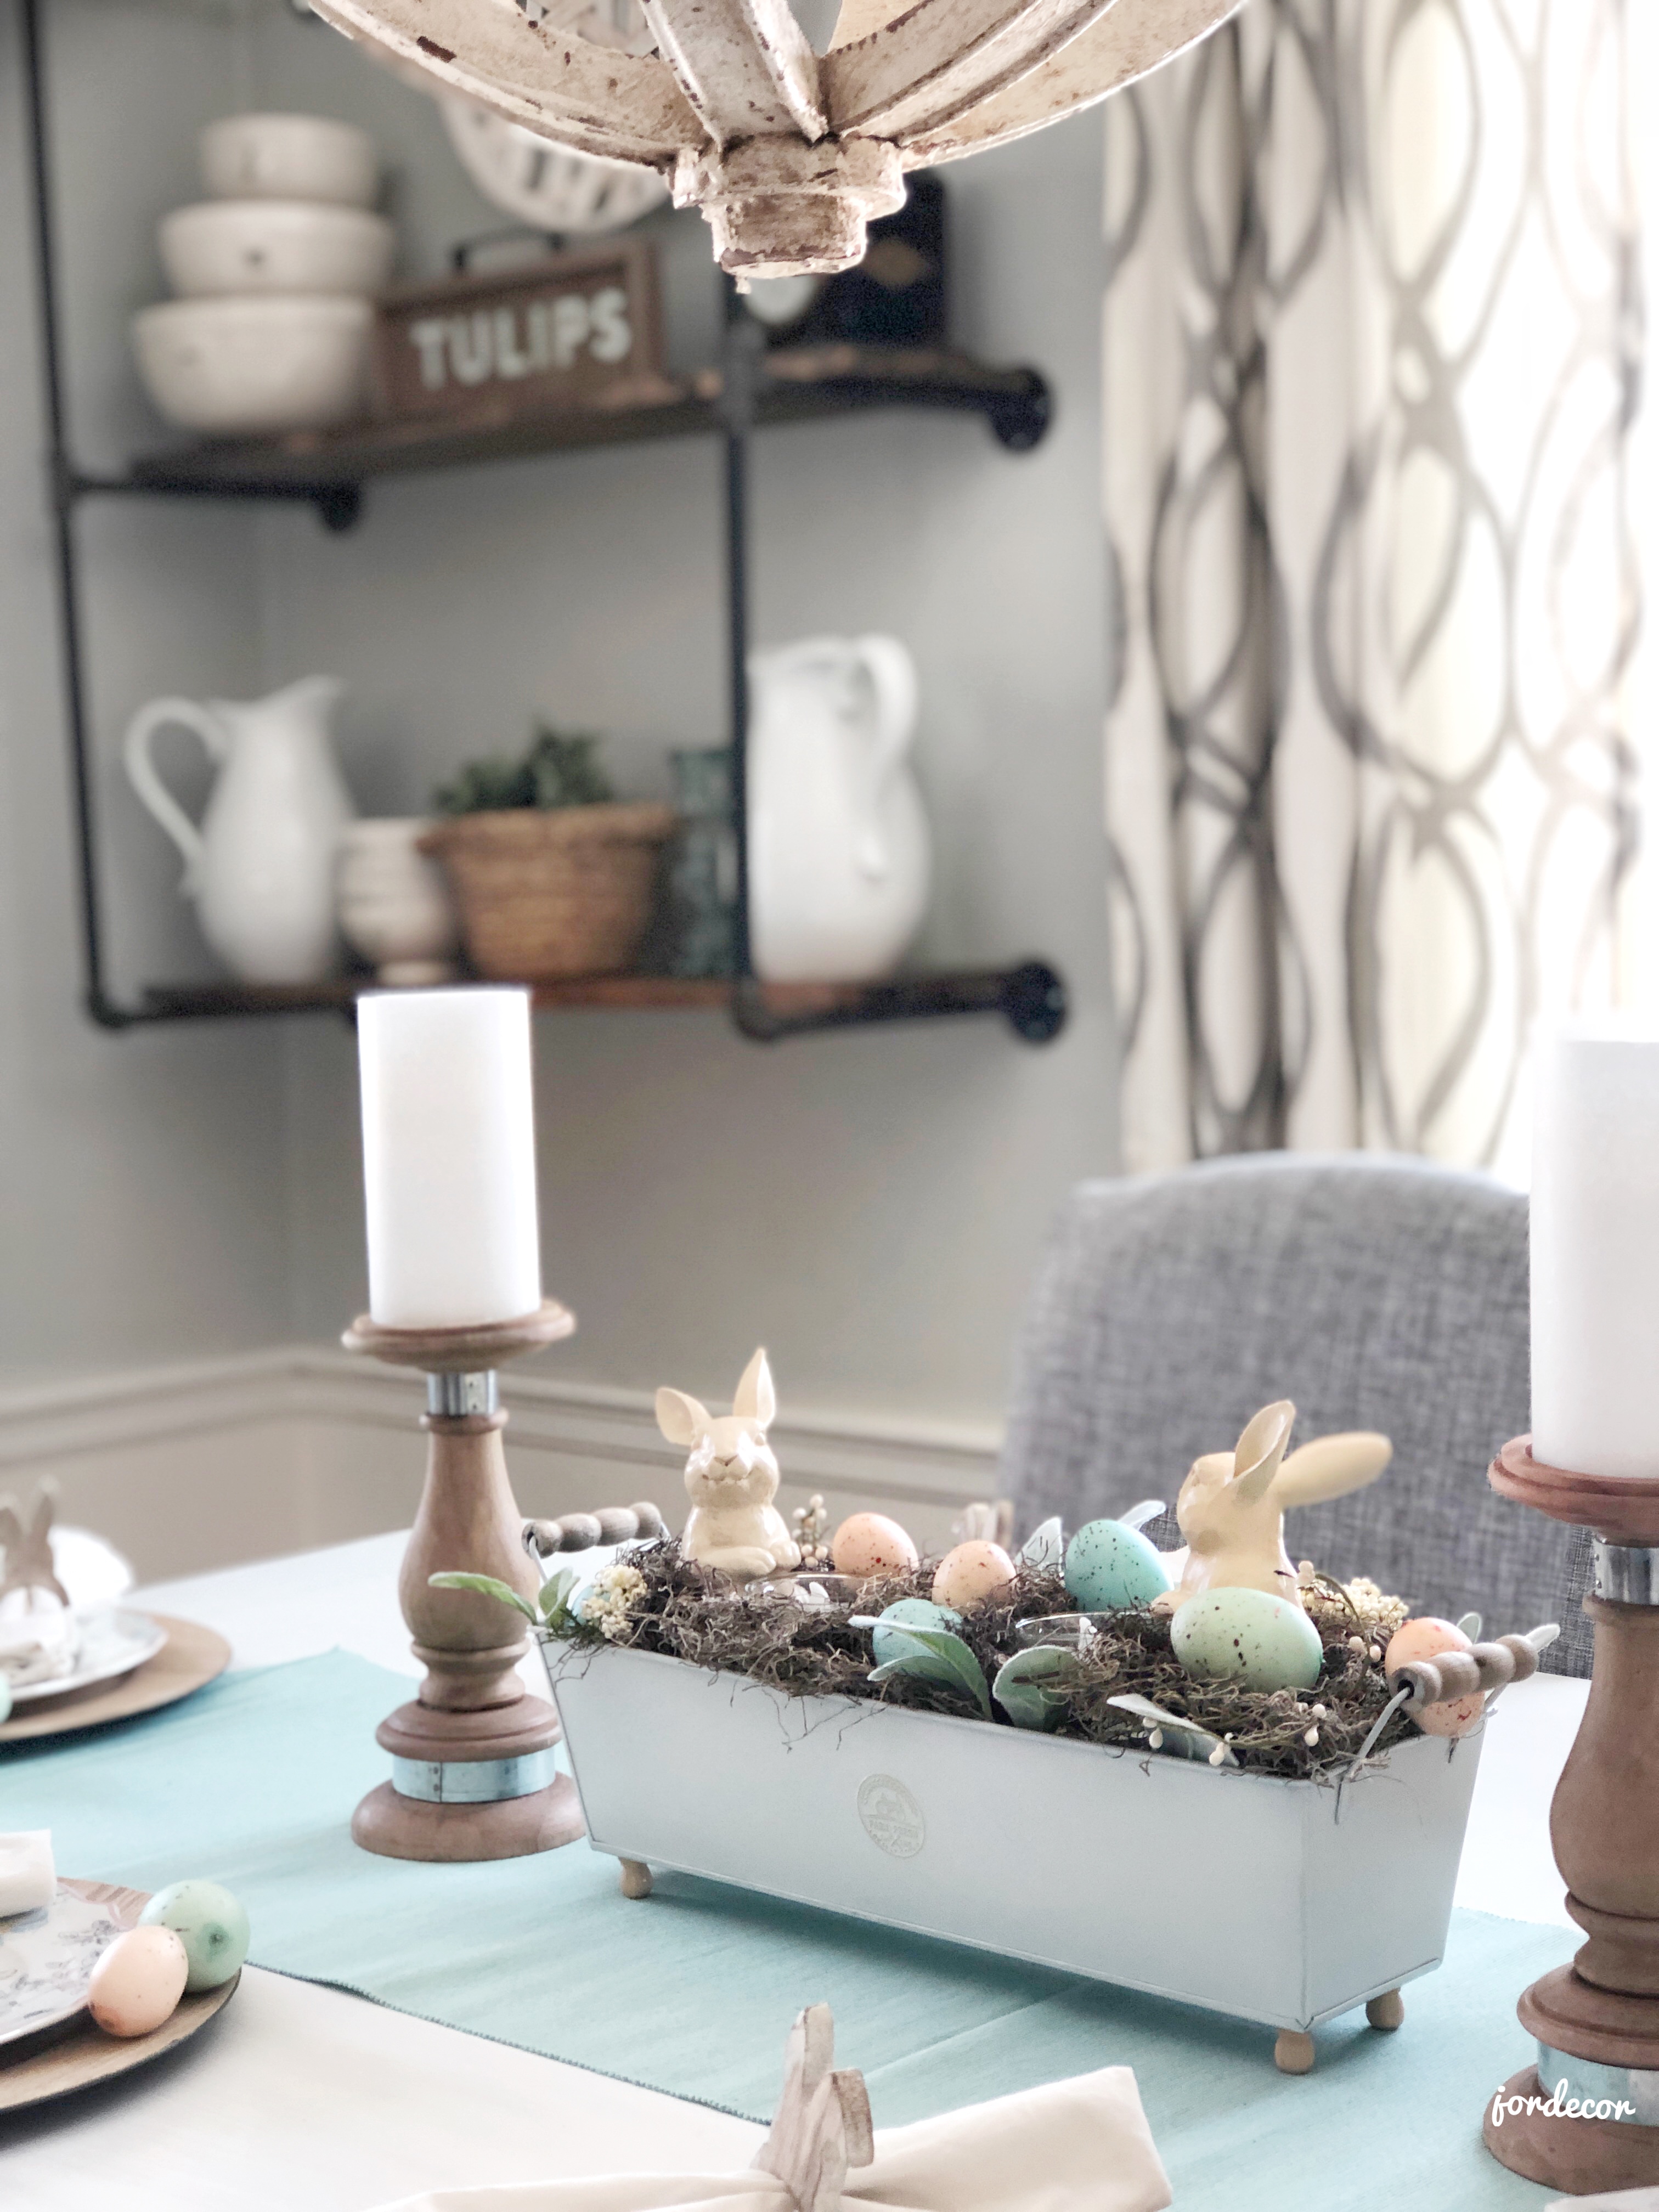
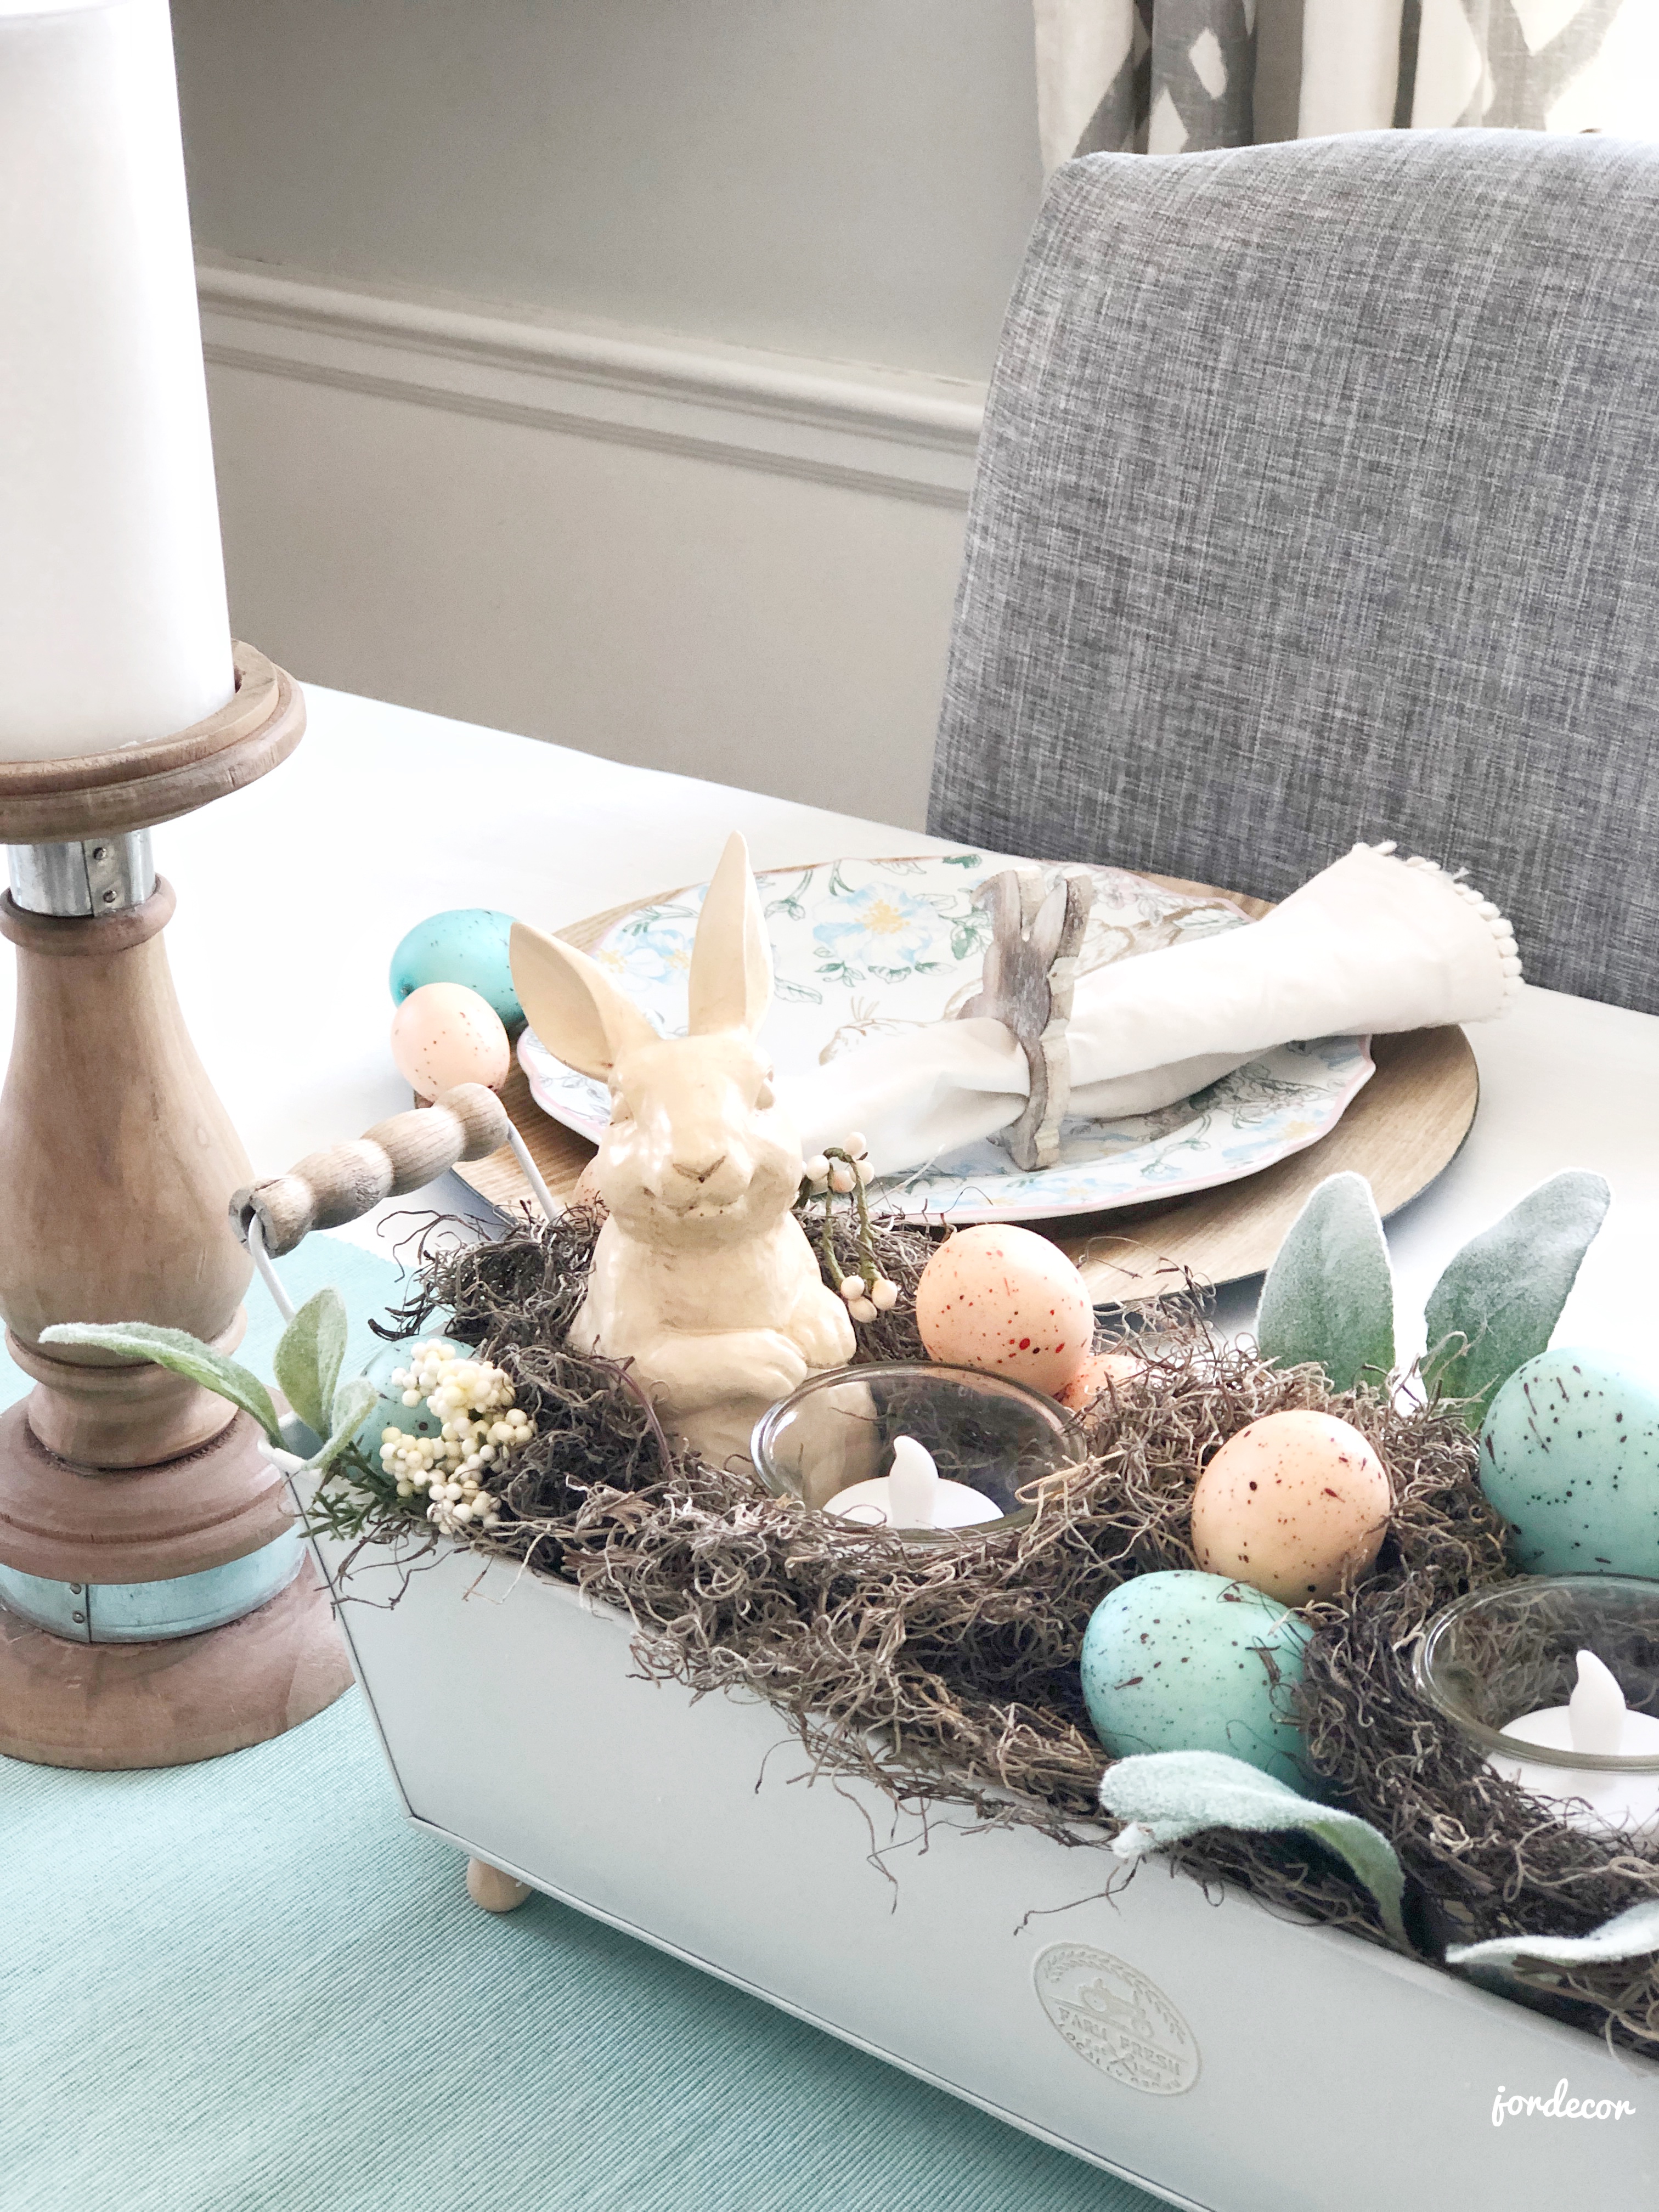
Now to the fun part, what did I pick up? I had great luck (as I always do!). I found the cutest bunny dinner plates, a bunny pillow, napkin rings, wood candle holders, plus so much more that I can’t wait to share! My inspiration led me to create a wood and pastel theme table- I want it to feel a little rustic yet also fresh for spring! First, I’m going to share an easy DIY tablescape idea with you that I made with this metal planter and bunny votives both from ChristmasTreeShopsandThat! I’ll try to LINK the items I can find online however a lot of items you’ll need to go in store to find. However they do have a lot of great spring products online, too!

Easy Easter Centerpiece DIY:

MATERIALS:
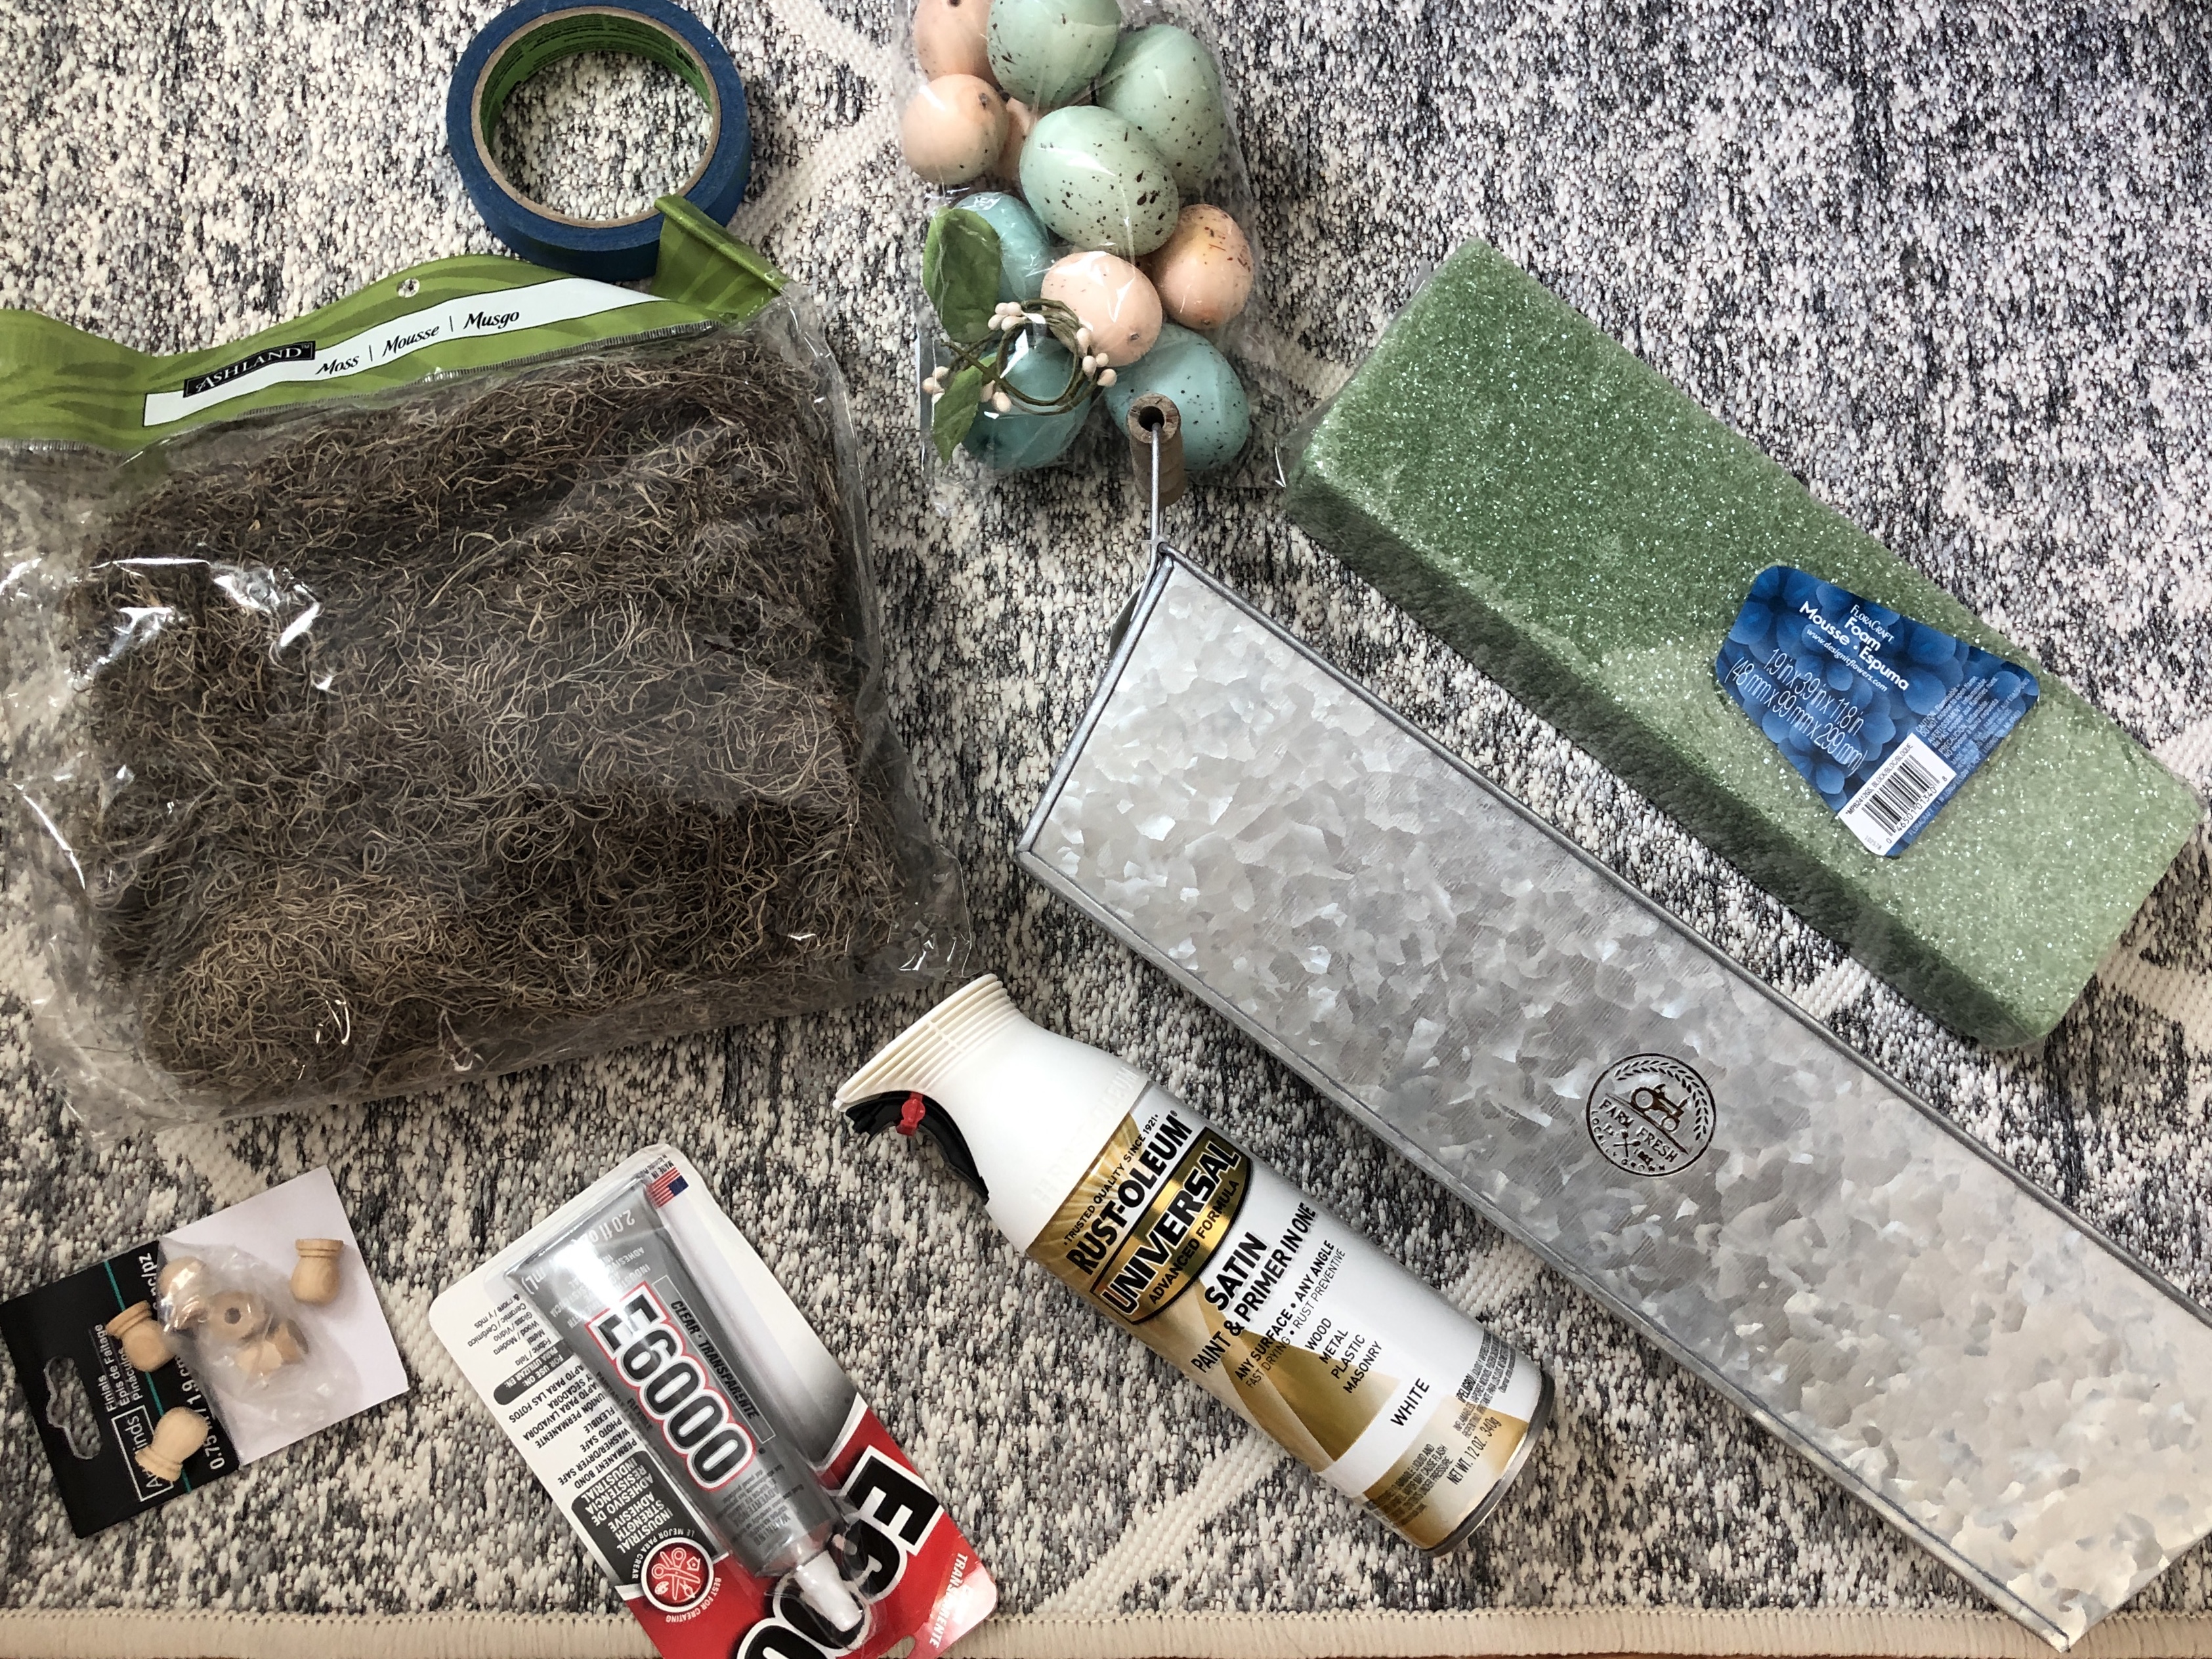
From ChristmasTreeShopsandThat!:
- Metal planter from their Grainhouse line
- 3 packages of egg fillers
- 2 ceramic bunny votives
From a craft store:
- Spanish moss
- Glue (hot glue works fine)
- Wood finials (in the wood section),
- White spray paint
- Floral foam
- Painters tape to cover wooden handles
This centerpiece was so easy to make! I spray painted the long metal planter white. Once it dried I hot glued the small wood finials on the bottom corners to give it height. After that, I layered the floral foam, moss, eggs and some greenery. Lastly, I layered in the adorable bunny votives on either side of the metal planter.
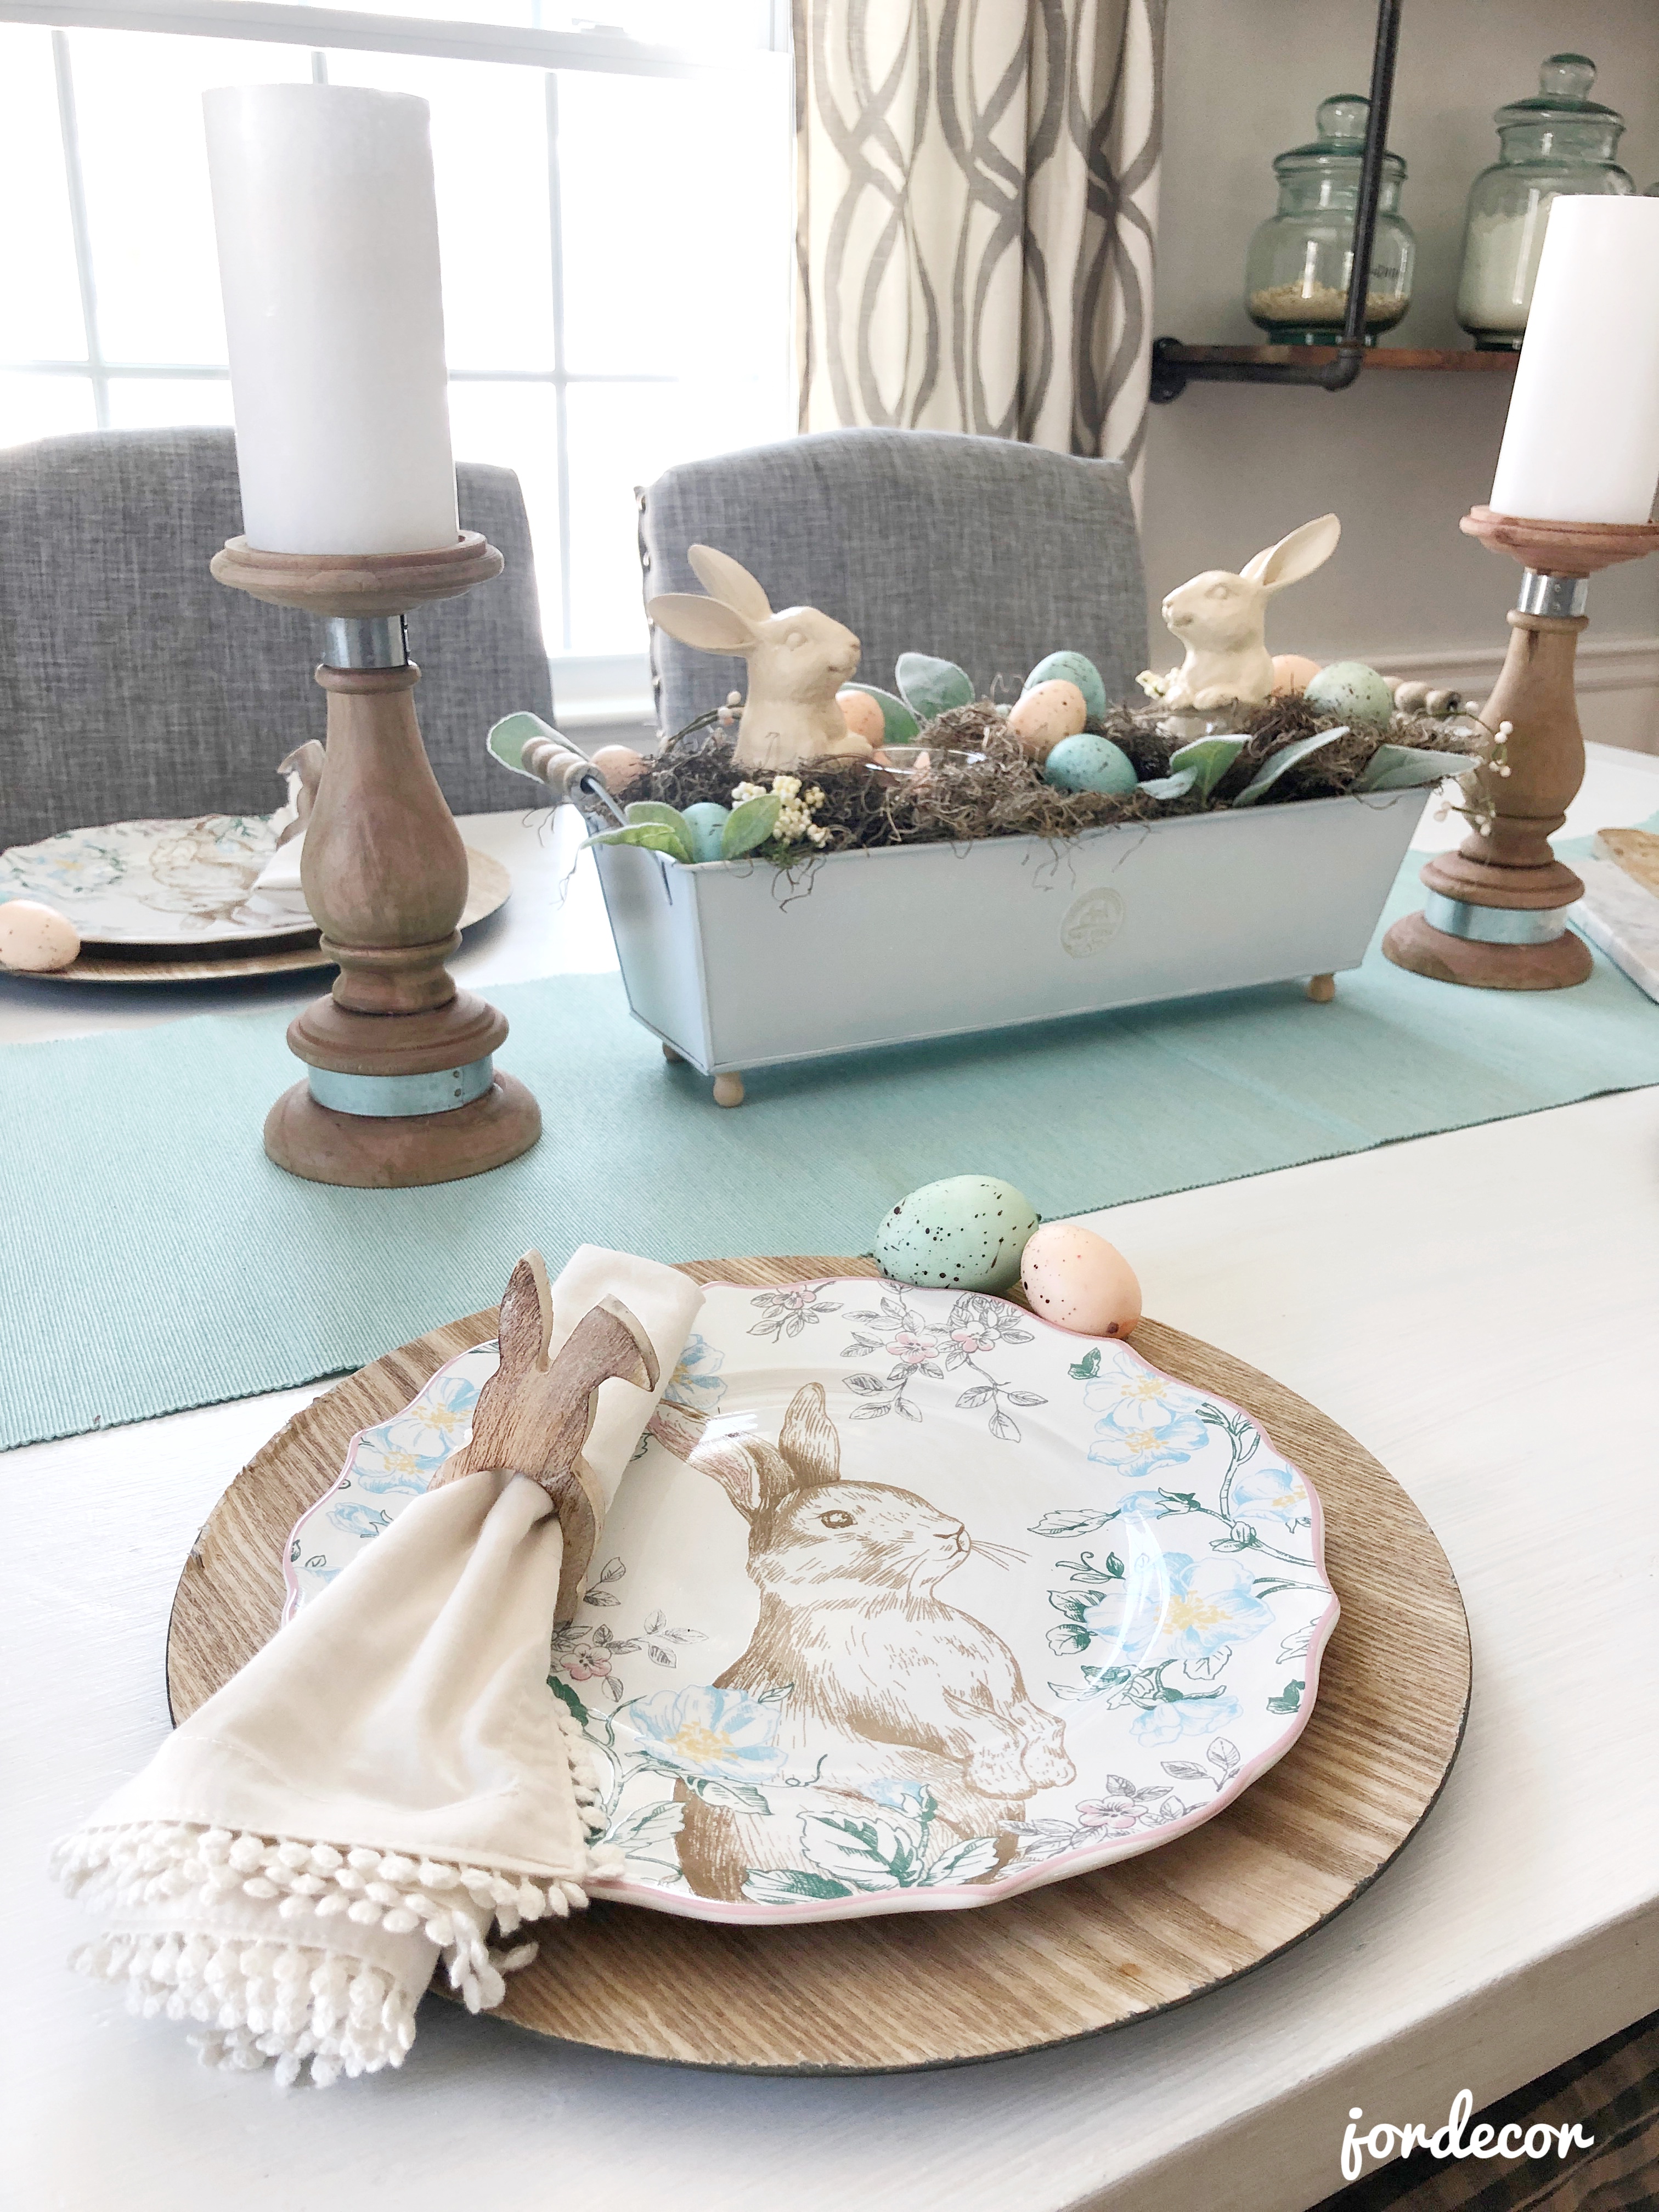
I already owned the pale blue runner, the wood chargers and the white napkins.
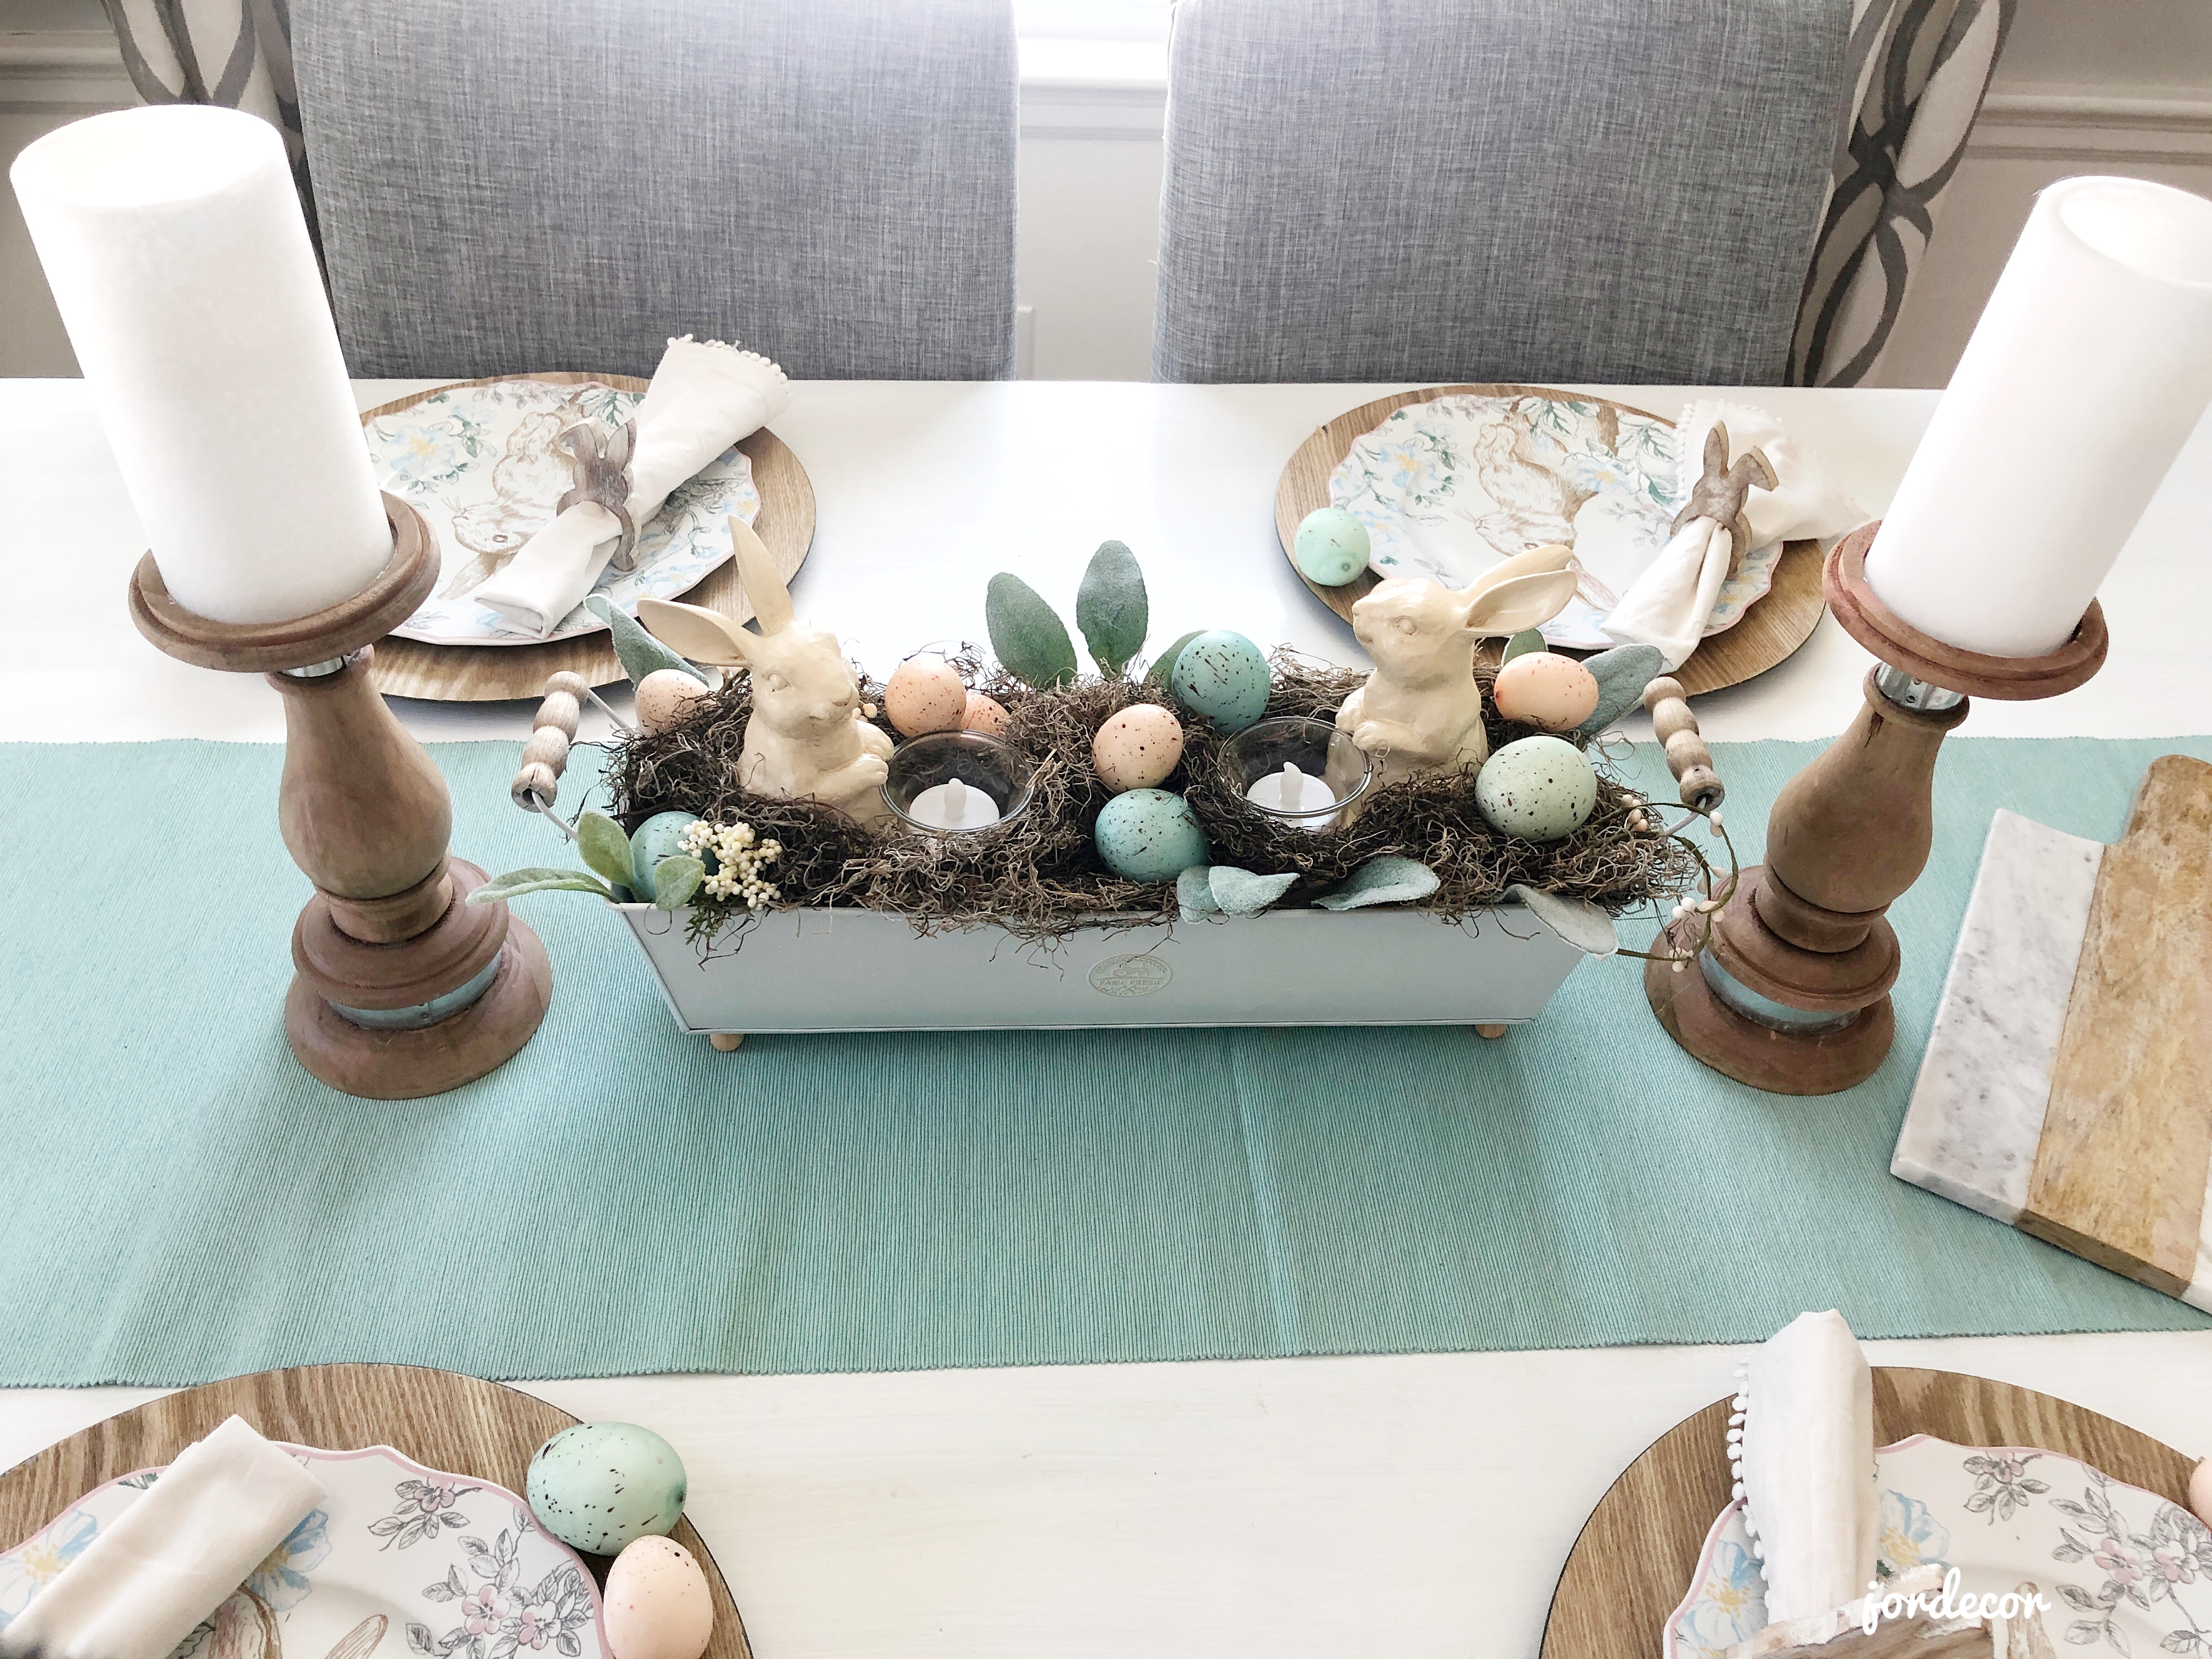
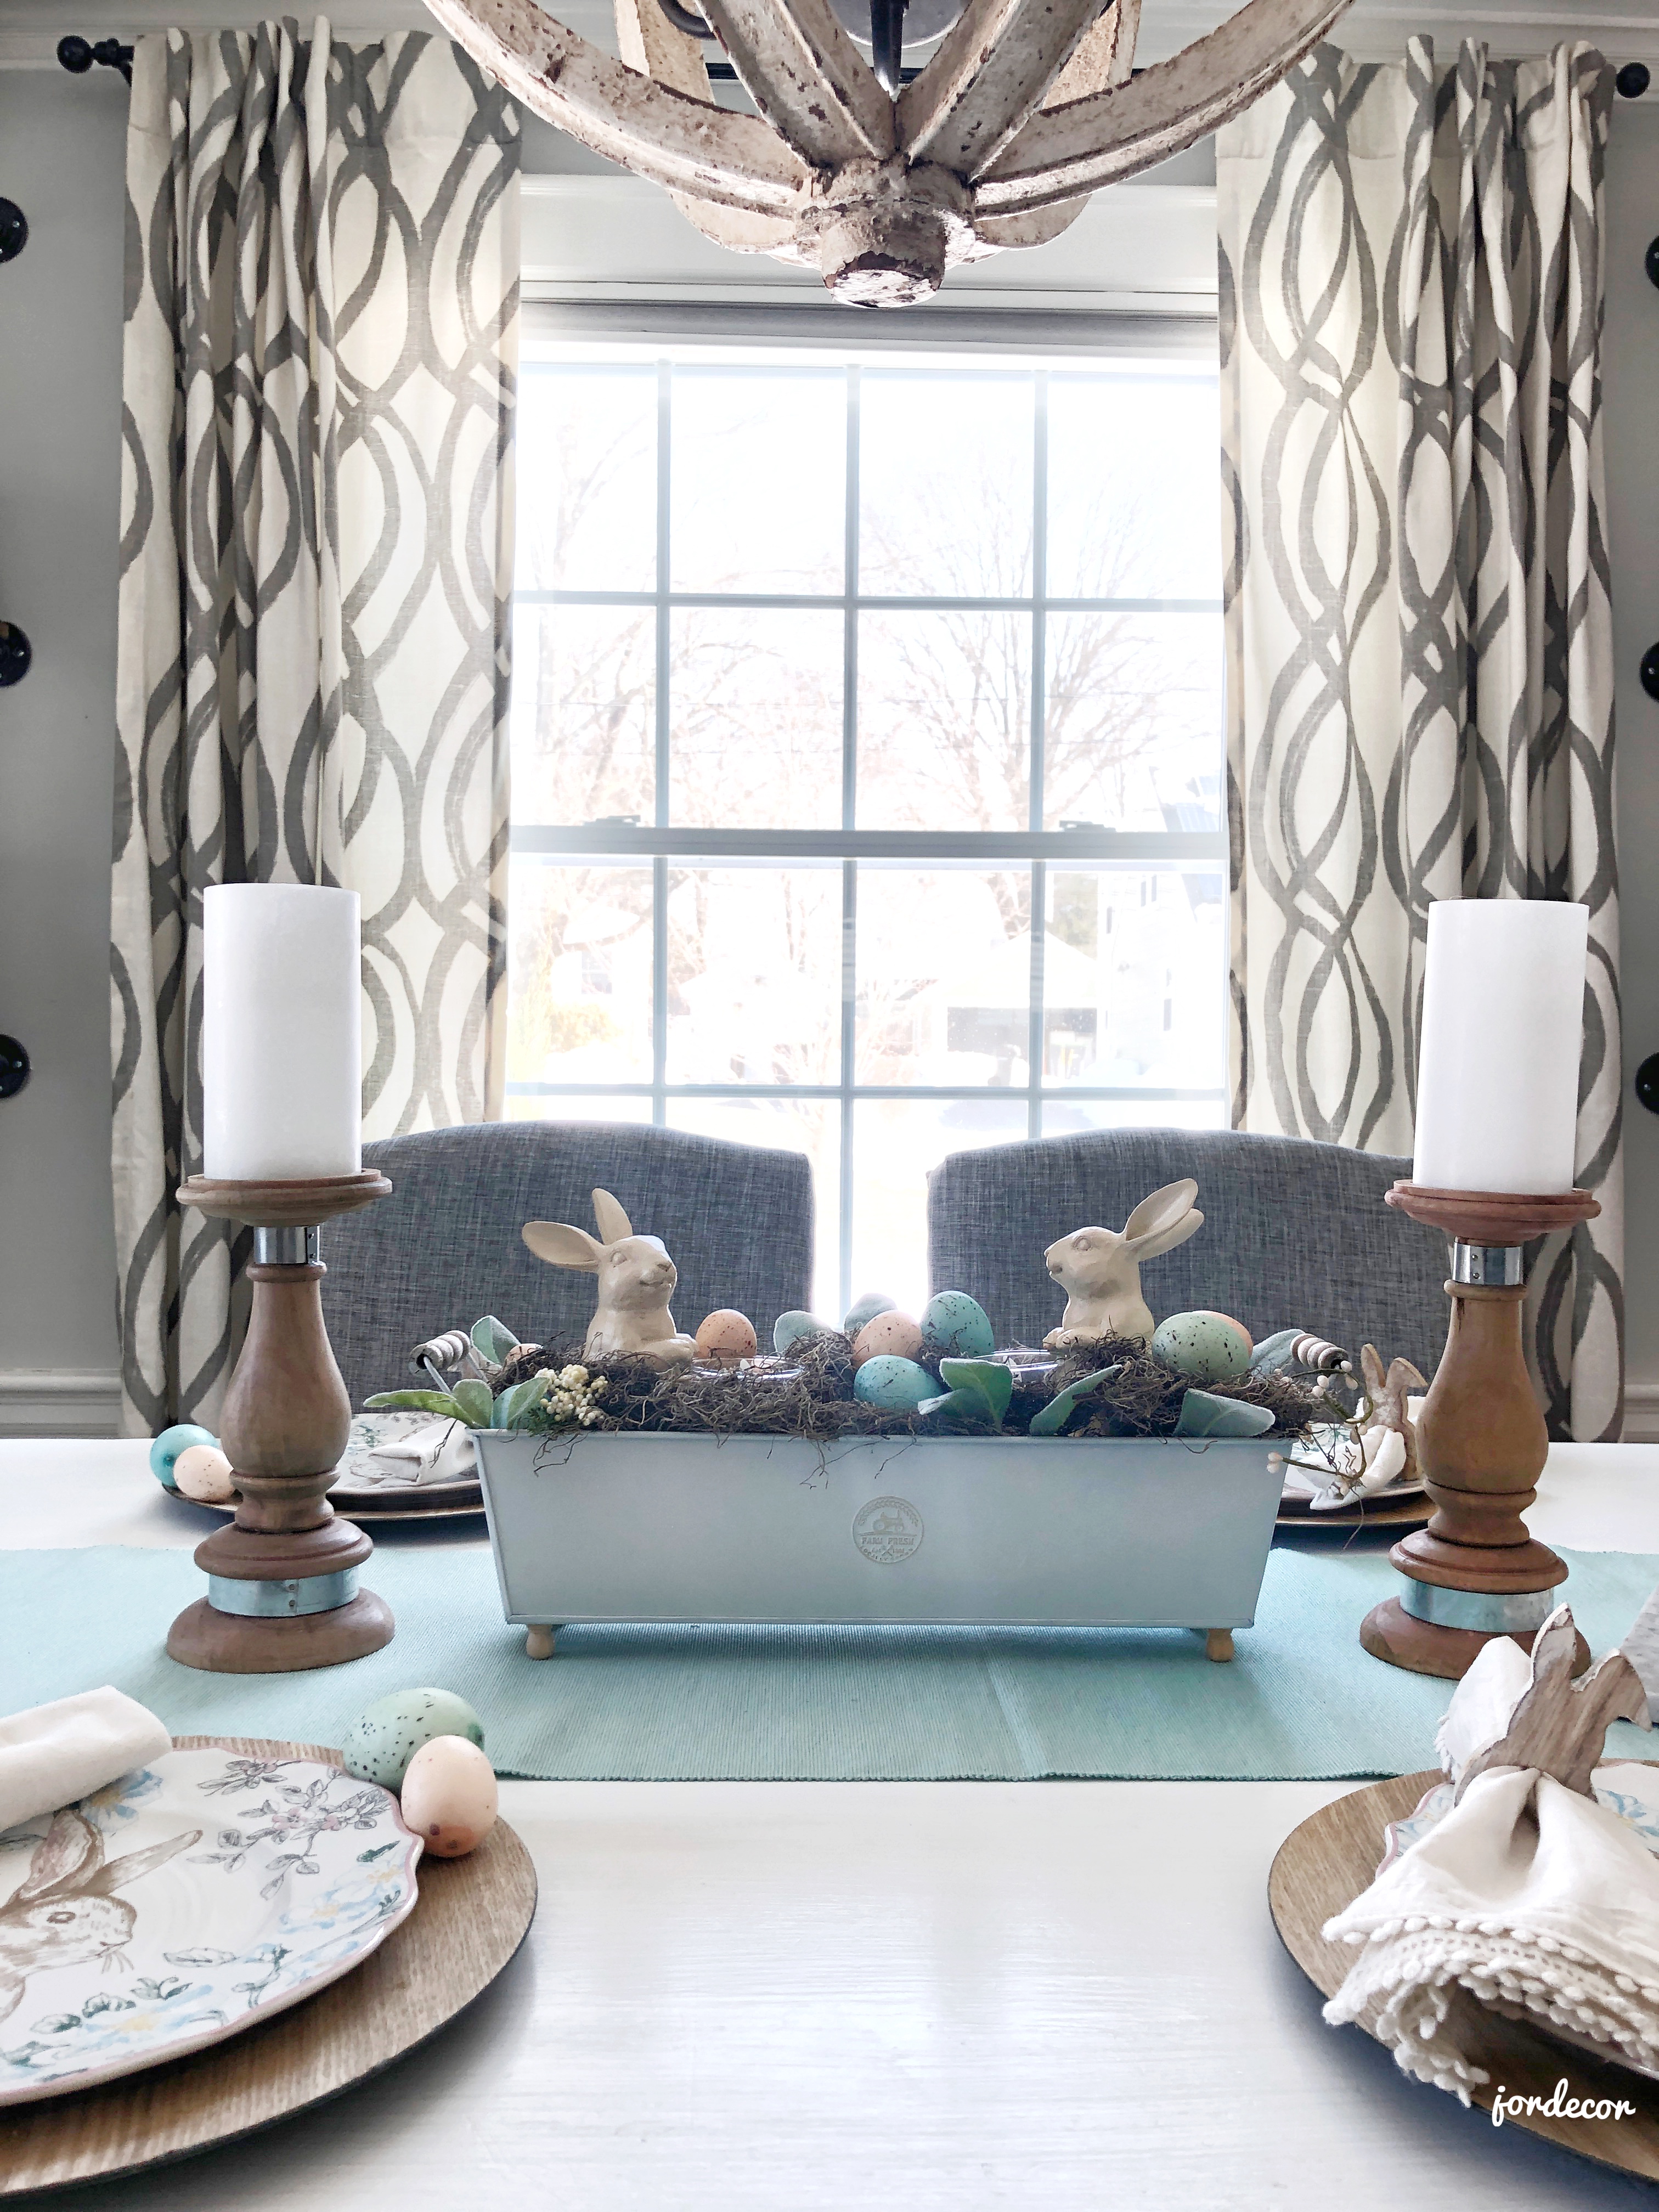
What’s nice about a dried arrangement for a centerpiece is that unlike fresh tulips or florals, which will only last a week or two, this will last the entire season. I like that it is low in height so you can see and chat with your guests across the table. I also love the texture of the spanish moss. I honestly think this may be one of my favorite tablescapes, it’s not too fussy and really pretty/cozy looking. I didn’t set the full table with glassware and utensils because I like how simple it looks and that I could leave it set up like this as Easter approaches.
I’m so happy I chose the wood and pastel tones. I love how they work so beautiful together. The wood really grounds all the colors and makes it feel so warm and inviting. I think these mini bunny napkin ring holders might be my favorite item from the whole shopping trip. How cute are they?!
I love how this pillow adds a cute pop of color in this corner! ChristmasTreeShopsandThat! had so many great spring pillow options and all priced very reasonably.
Spray painting the metal white, makes the pastels and moss/greenery stand out so much more. I love how cute the little wooden legs look too.
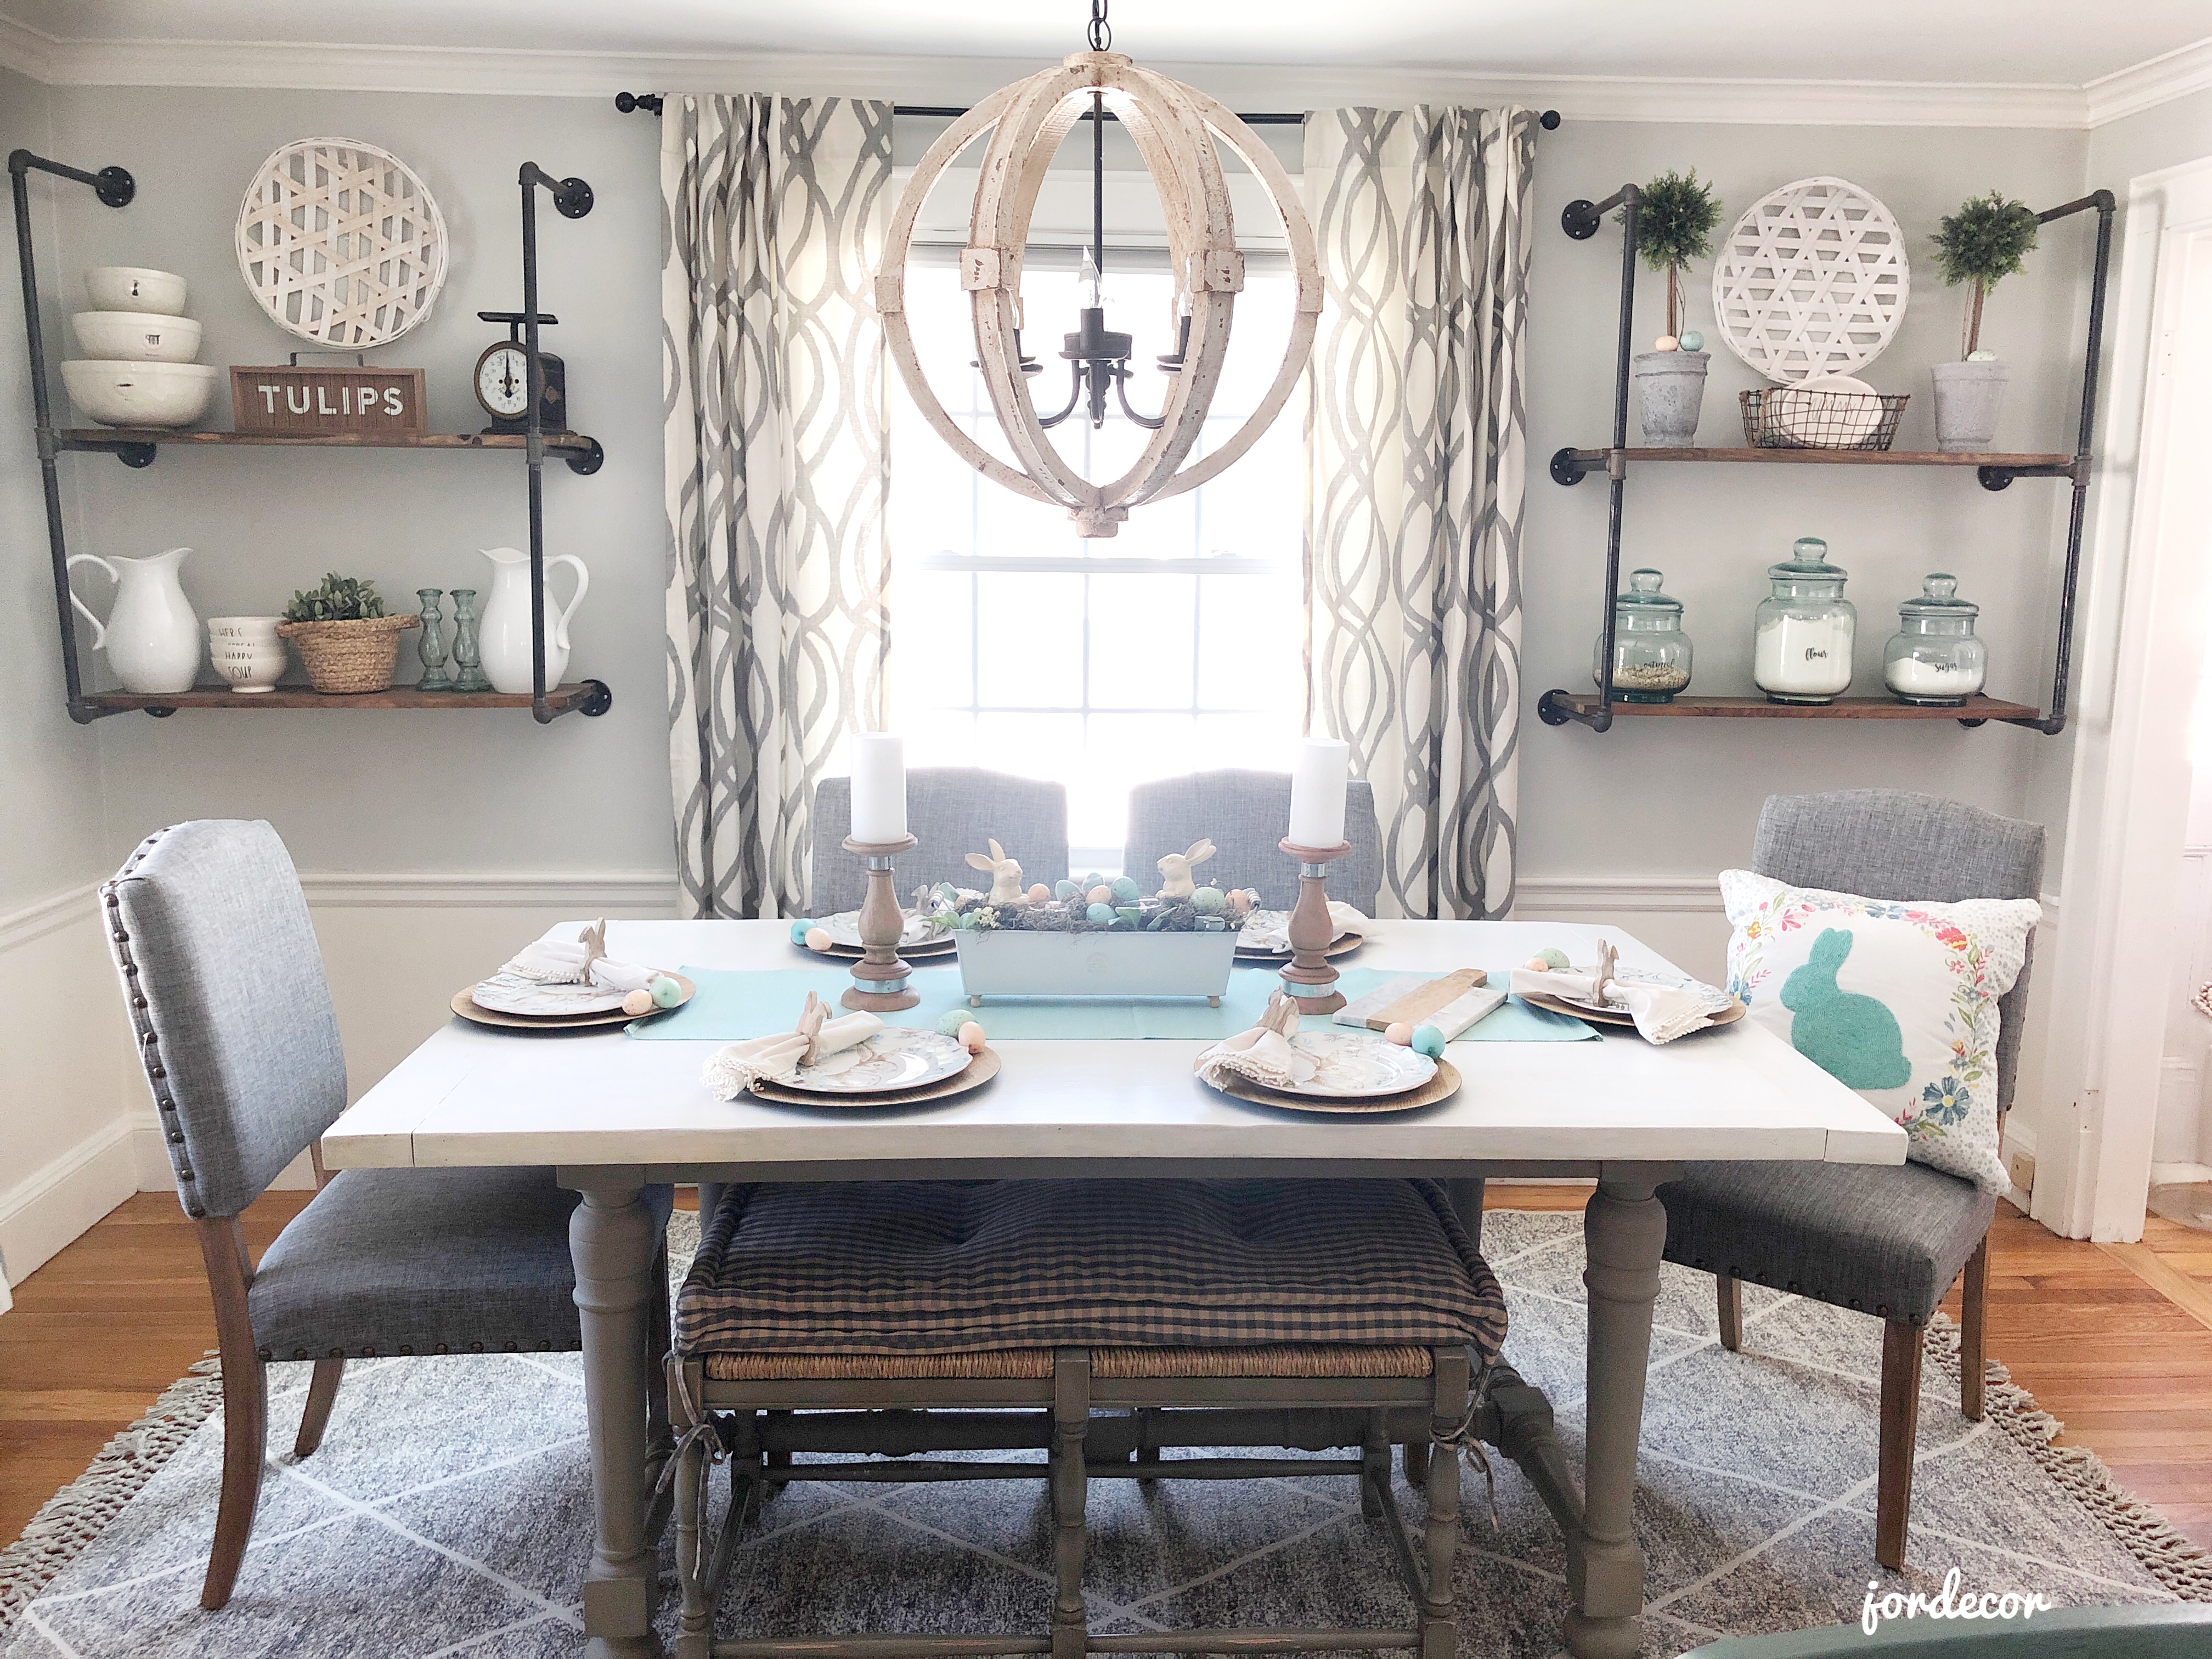
Well there it is, my Spring table with ChristmasTreeShopsandThat! What do you guys think of the wood and pastel combo? It’s soft and subtle and I don’t mind leaving it up all the way through April! I hope you give this simple centerpiece DIY a try this season. It really was so fun to make. Thank you all for stopping by and supporting my blog. If you have a chance please head over to these other lovely blogs to see their creative ideas as well. Next up on the hop is my friend Lindsay from https://www.aratariathome.com
Love,
Jordan


Southern State of Mind | At Charlotte’s House | A Tufted Life | Jor Decor | Aratari at Home
SHOP THIS POST:

PIN FOR LATER:
![]()
read the full post >
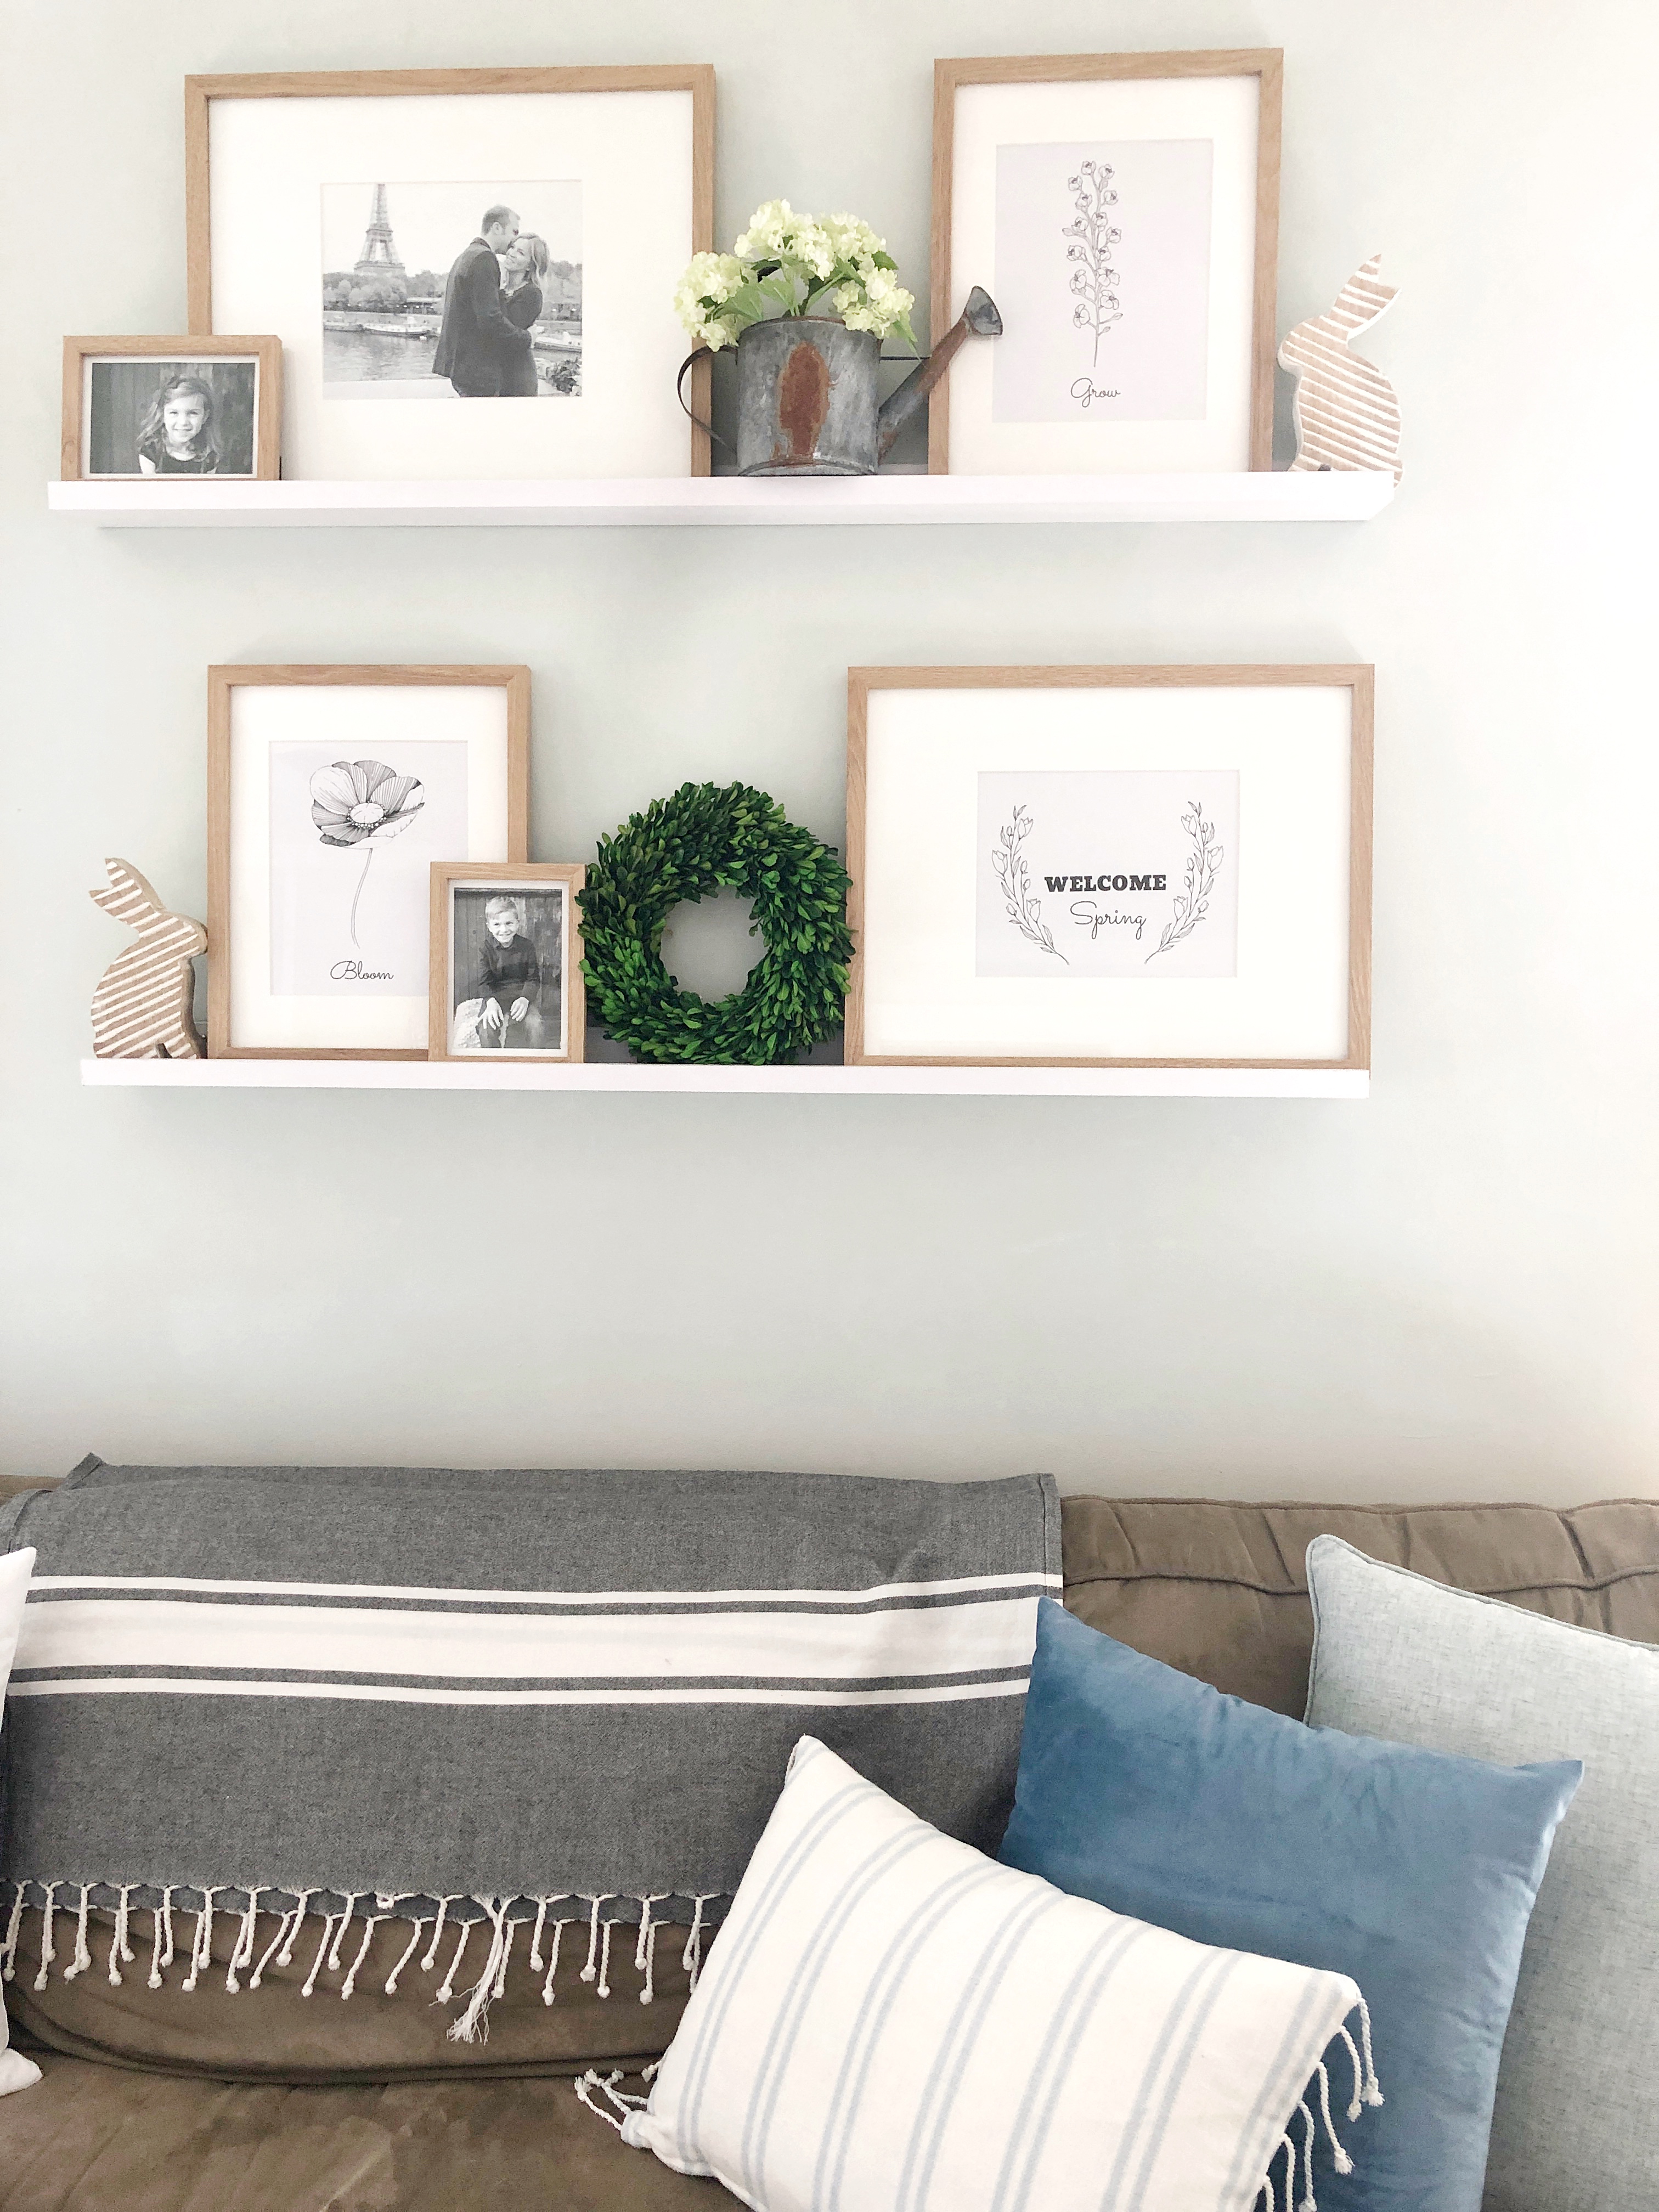
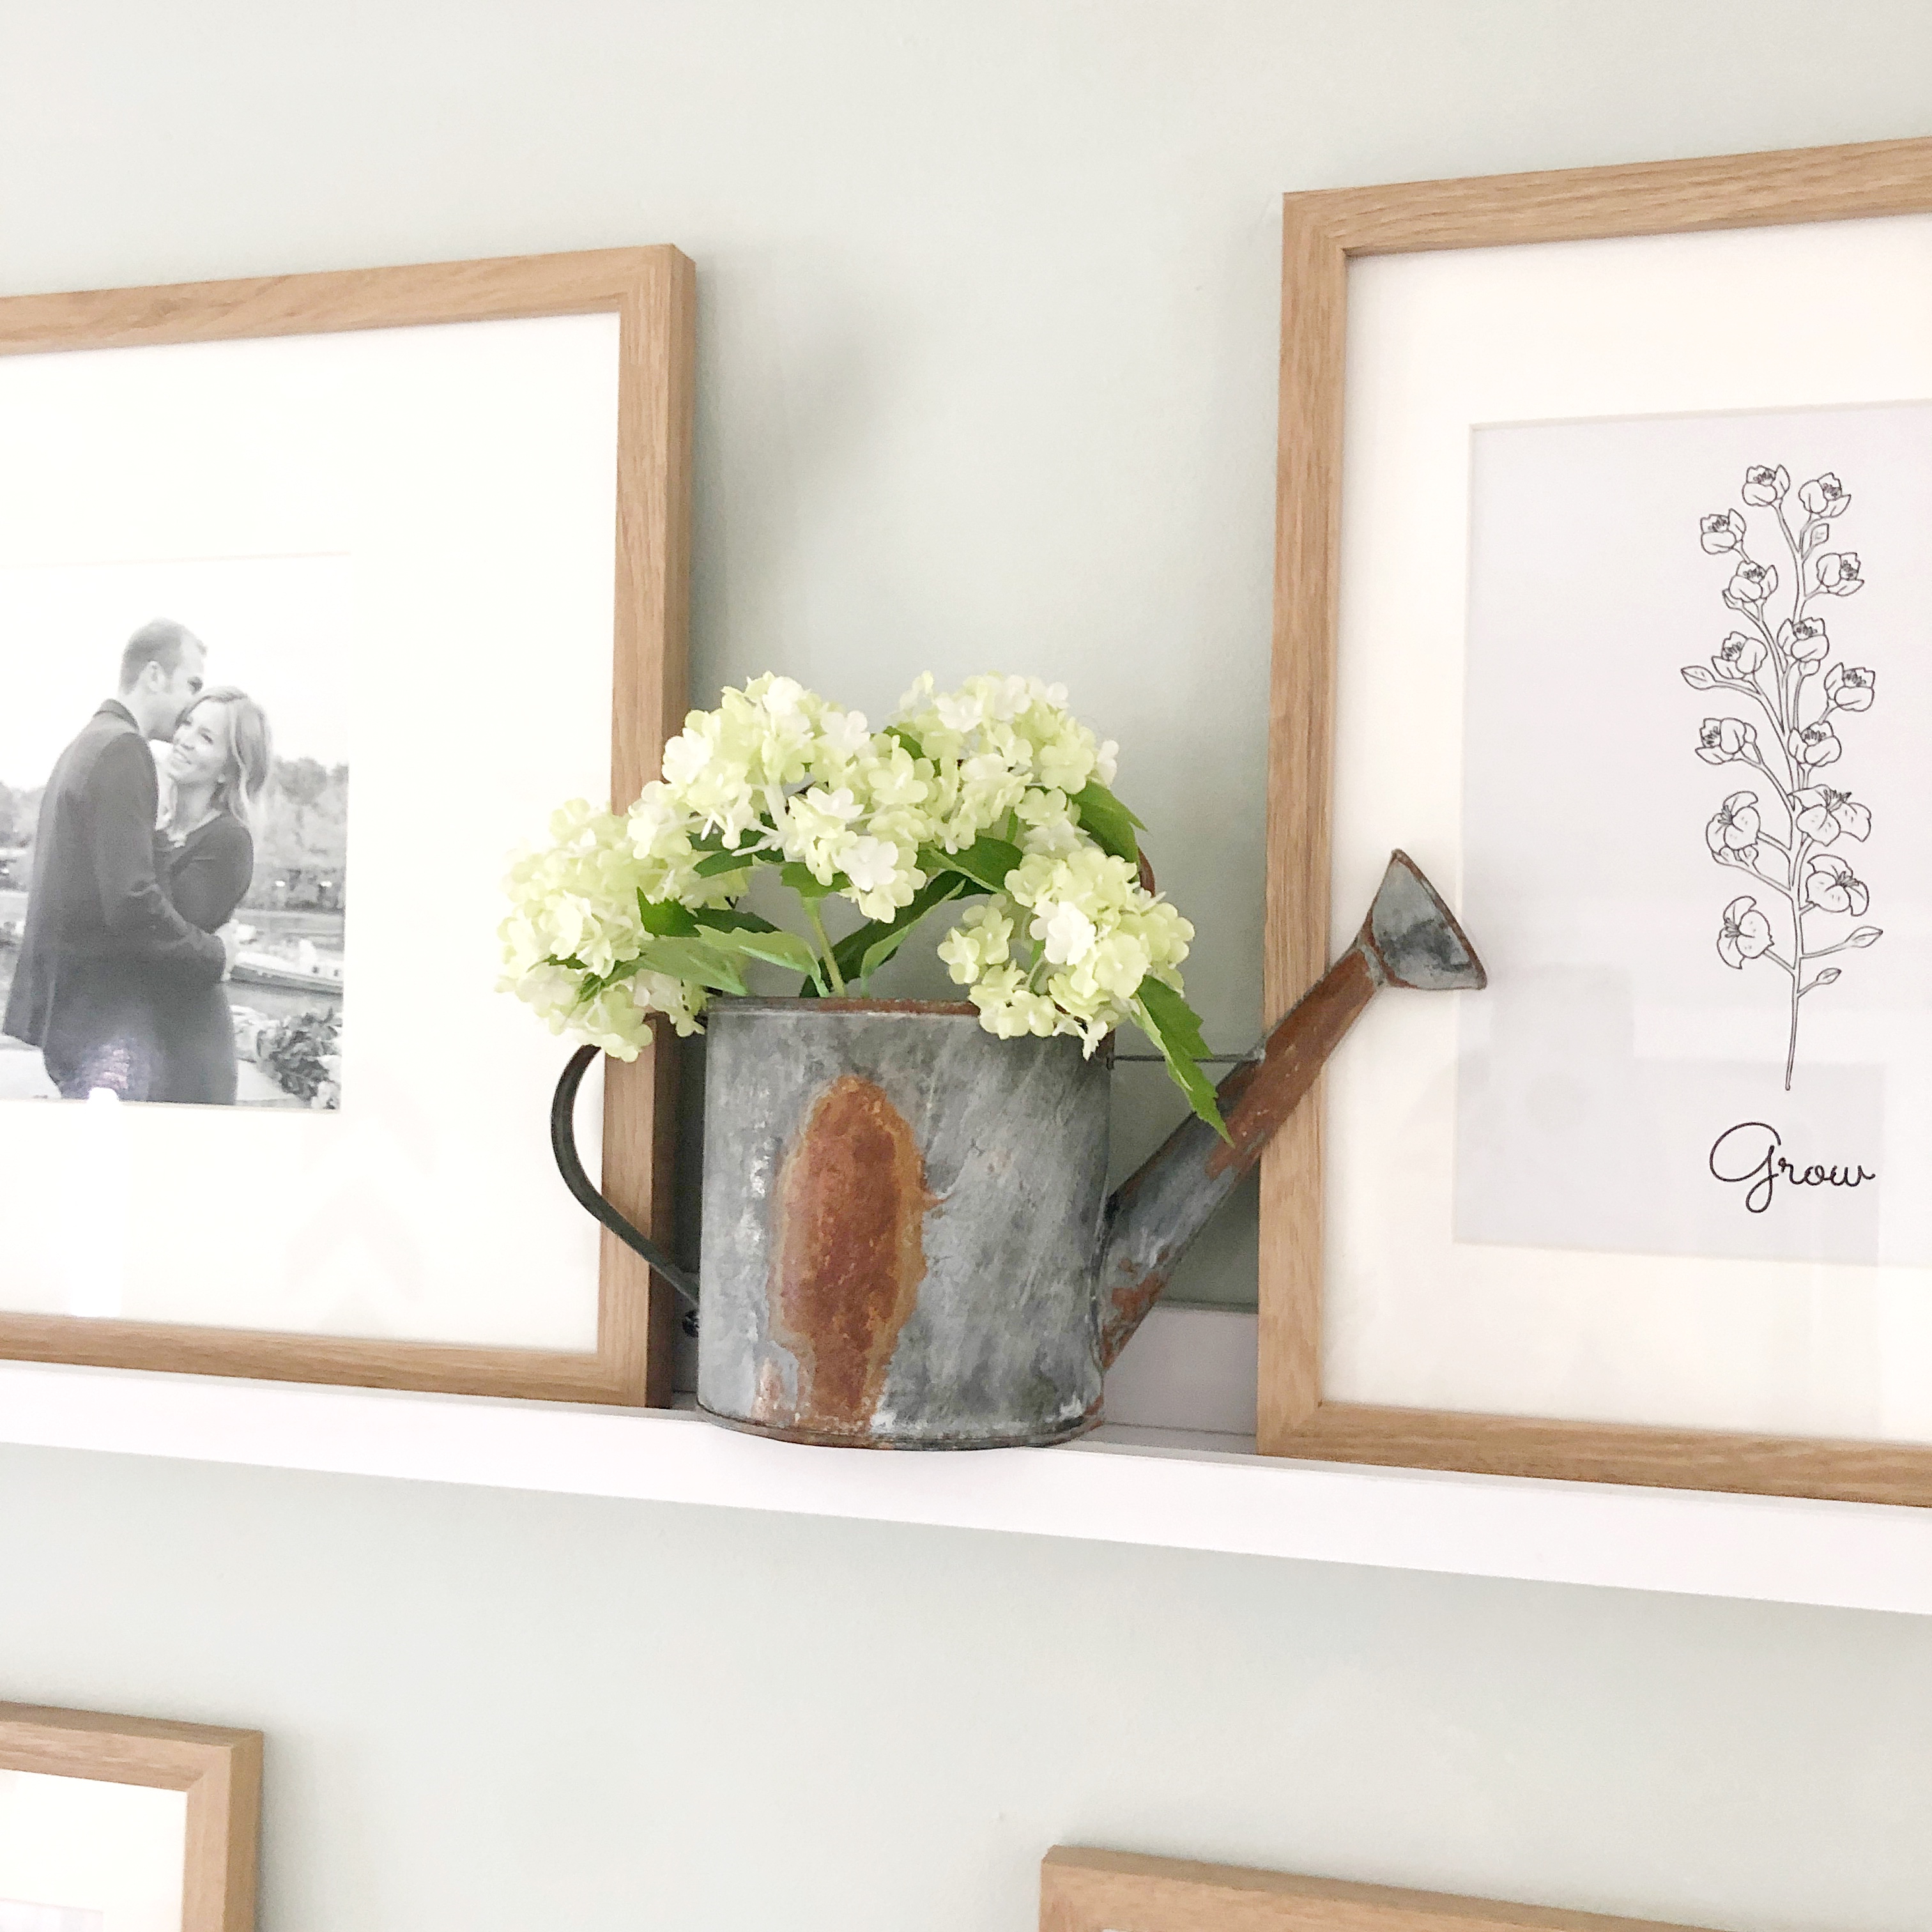
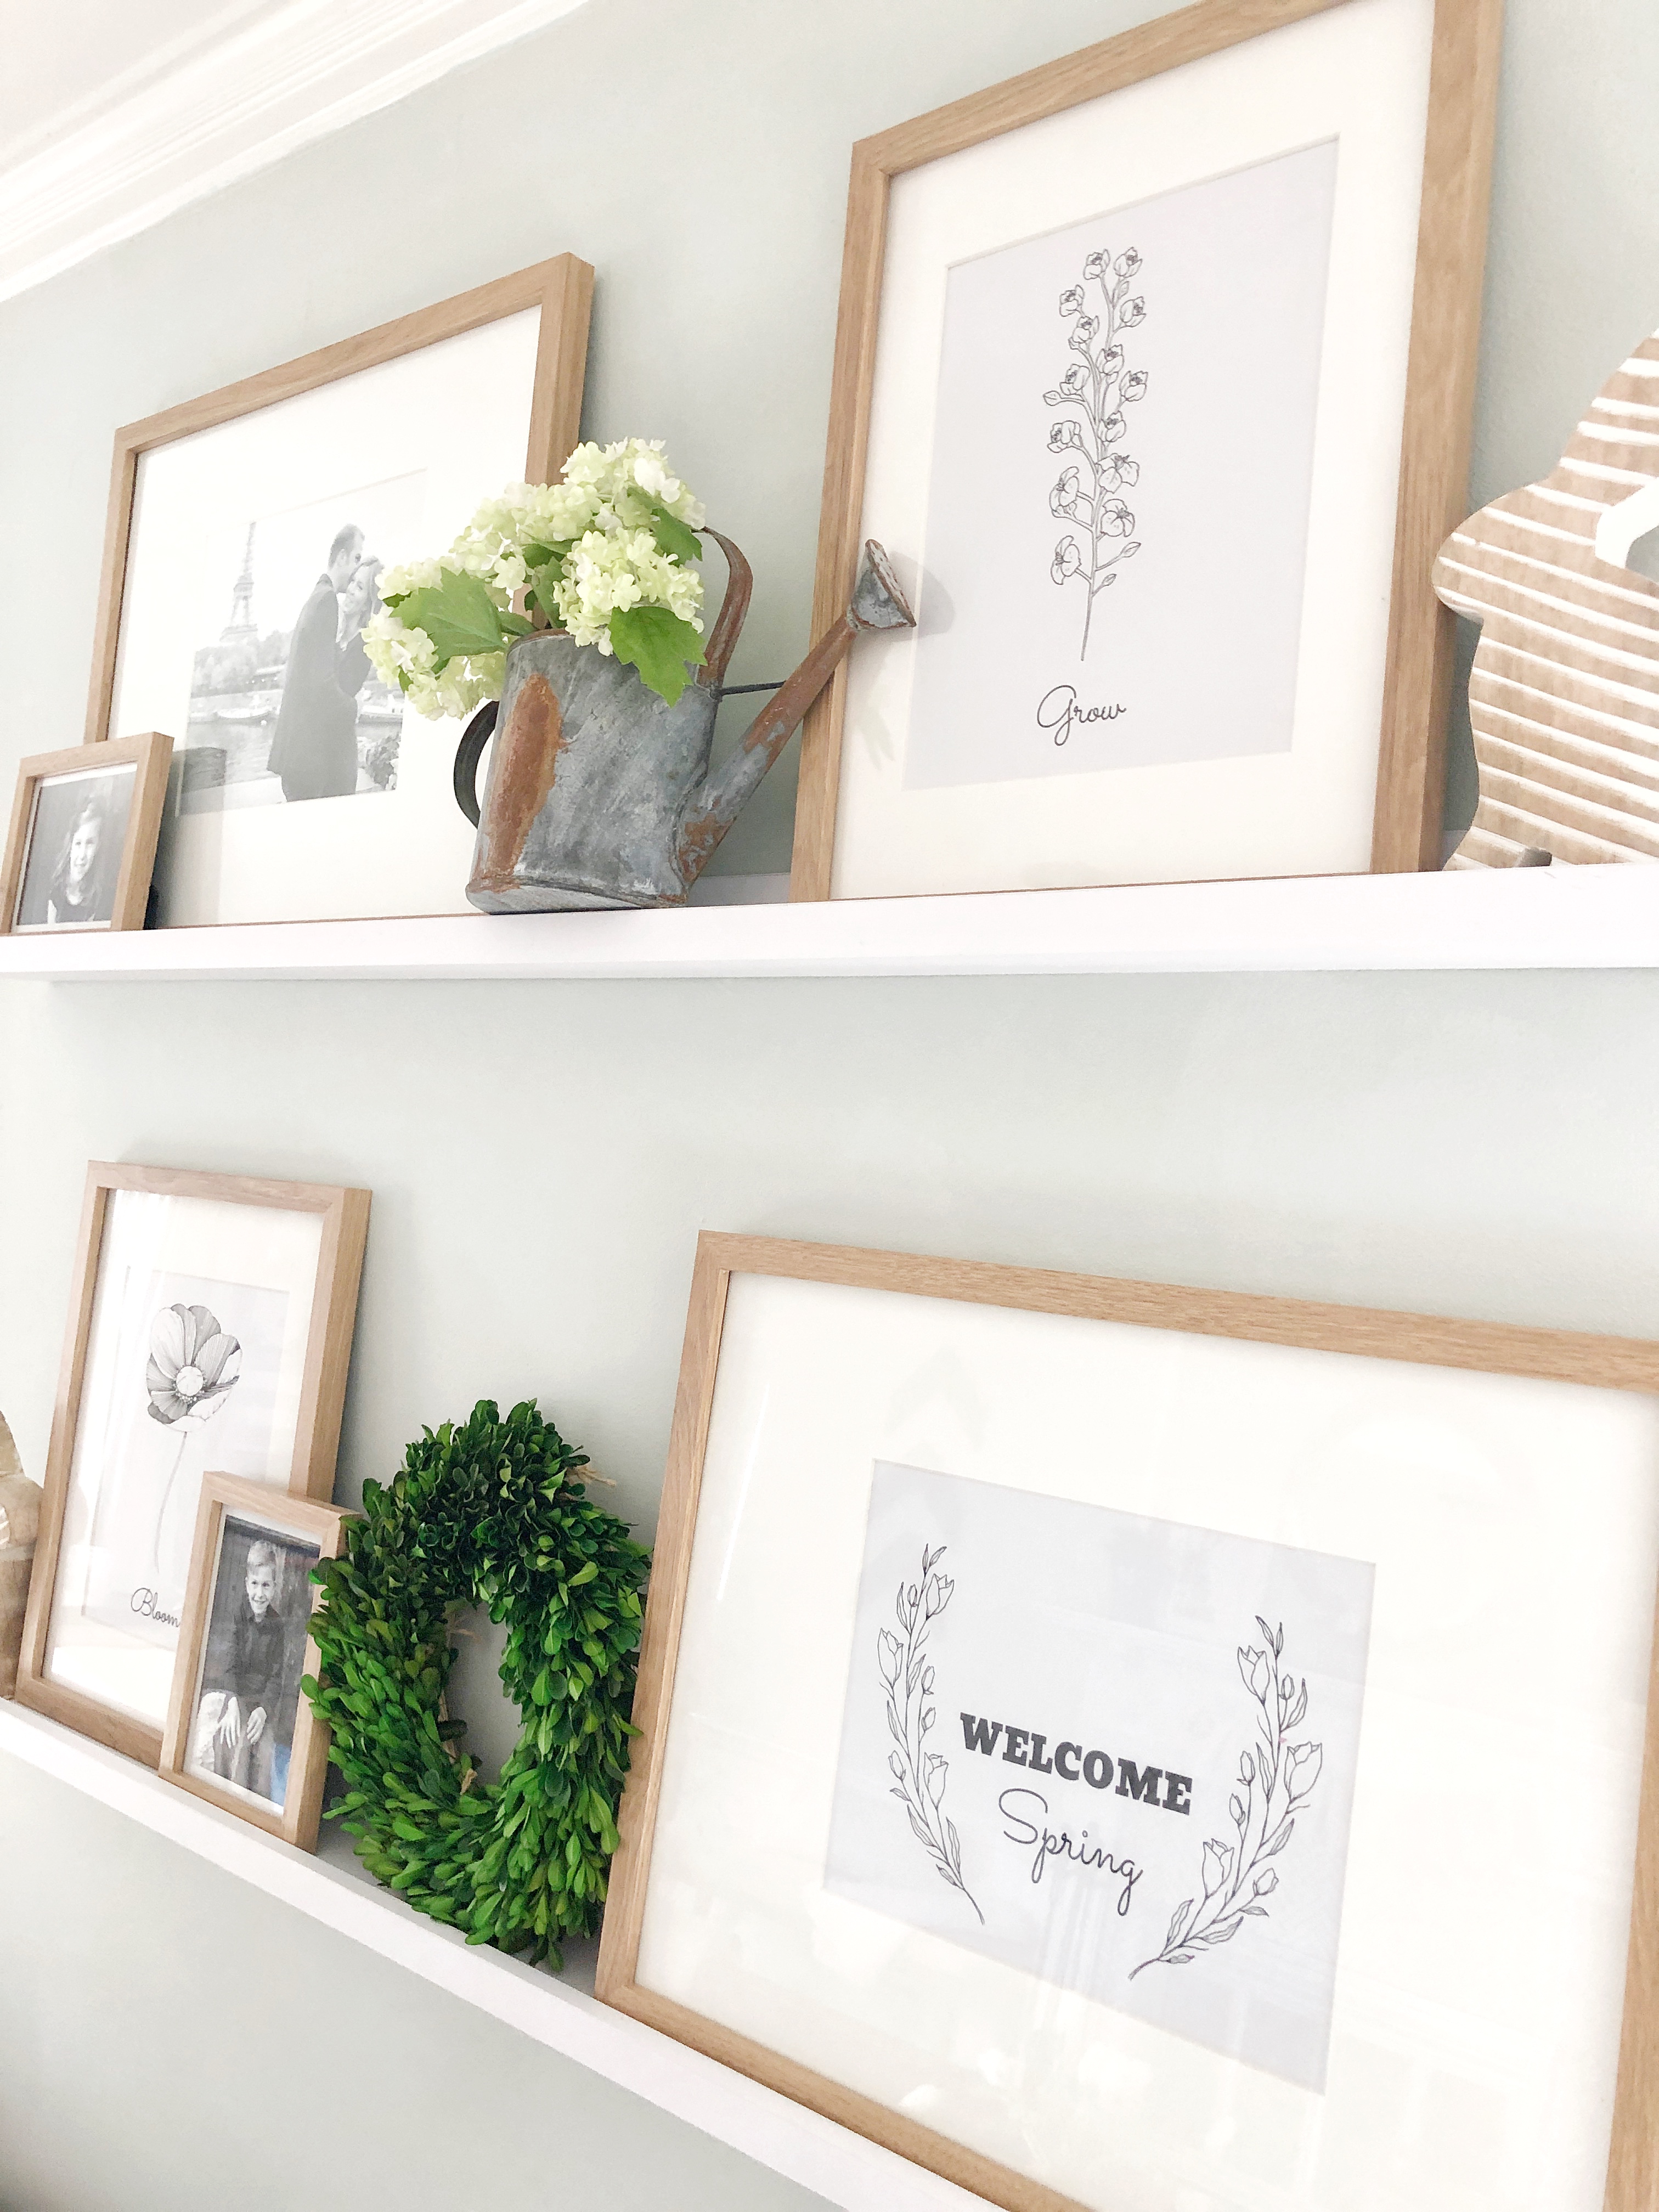
I’m having so much fun styling my new art ledges since we installed them back in January. I love swapping out art/prints from my frames each season. Eventually I want to collect some art from local artists to display as well, there are just so many different ways to reflect your style and be creative with your wall decor. Today I wanted to share with you how I’m styling my art ledges as we near spring, along with a couple simple spring printables I made.
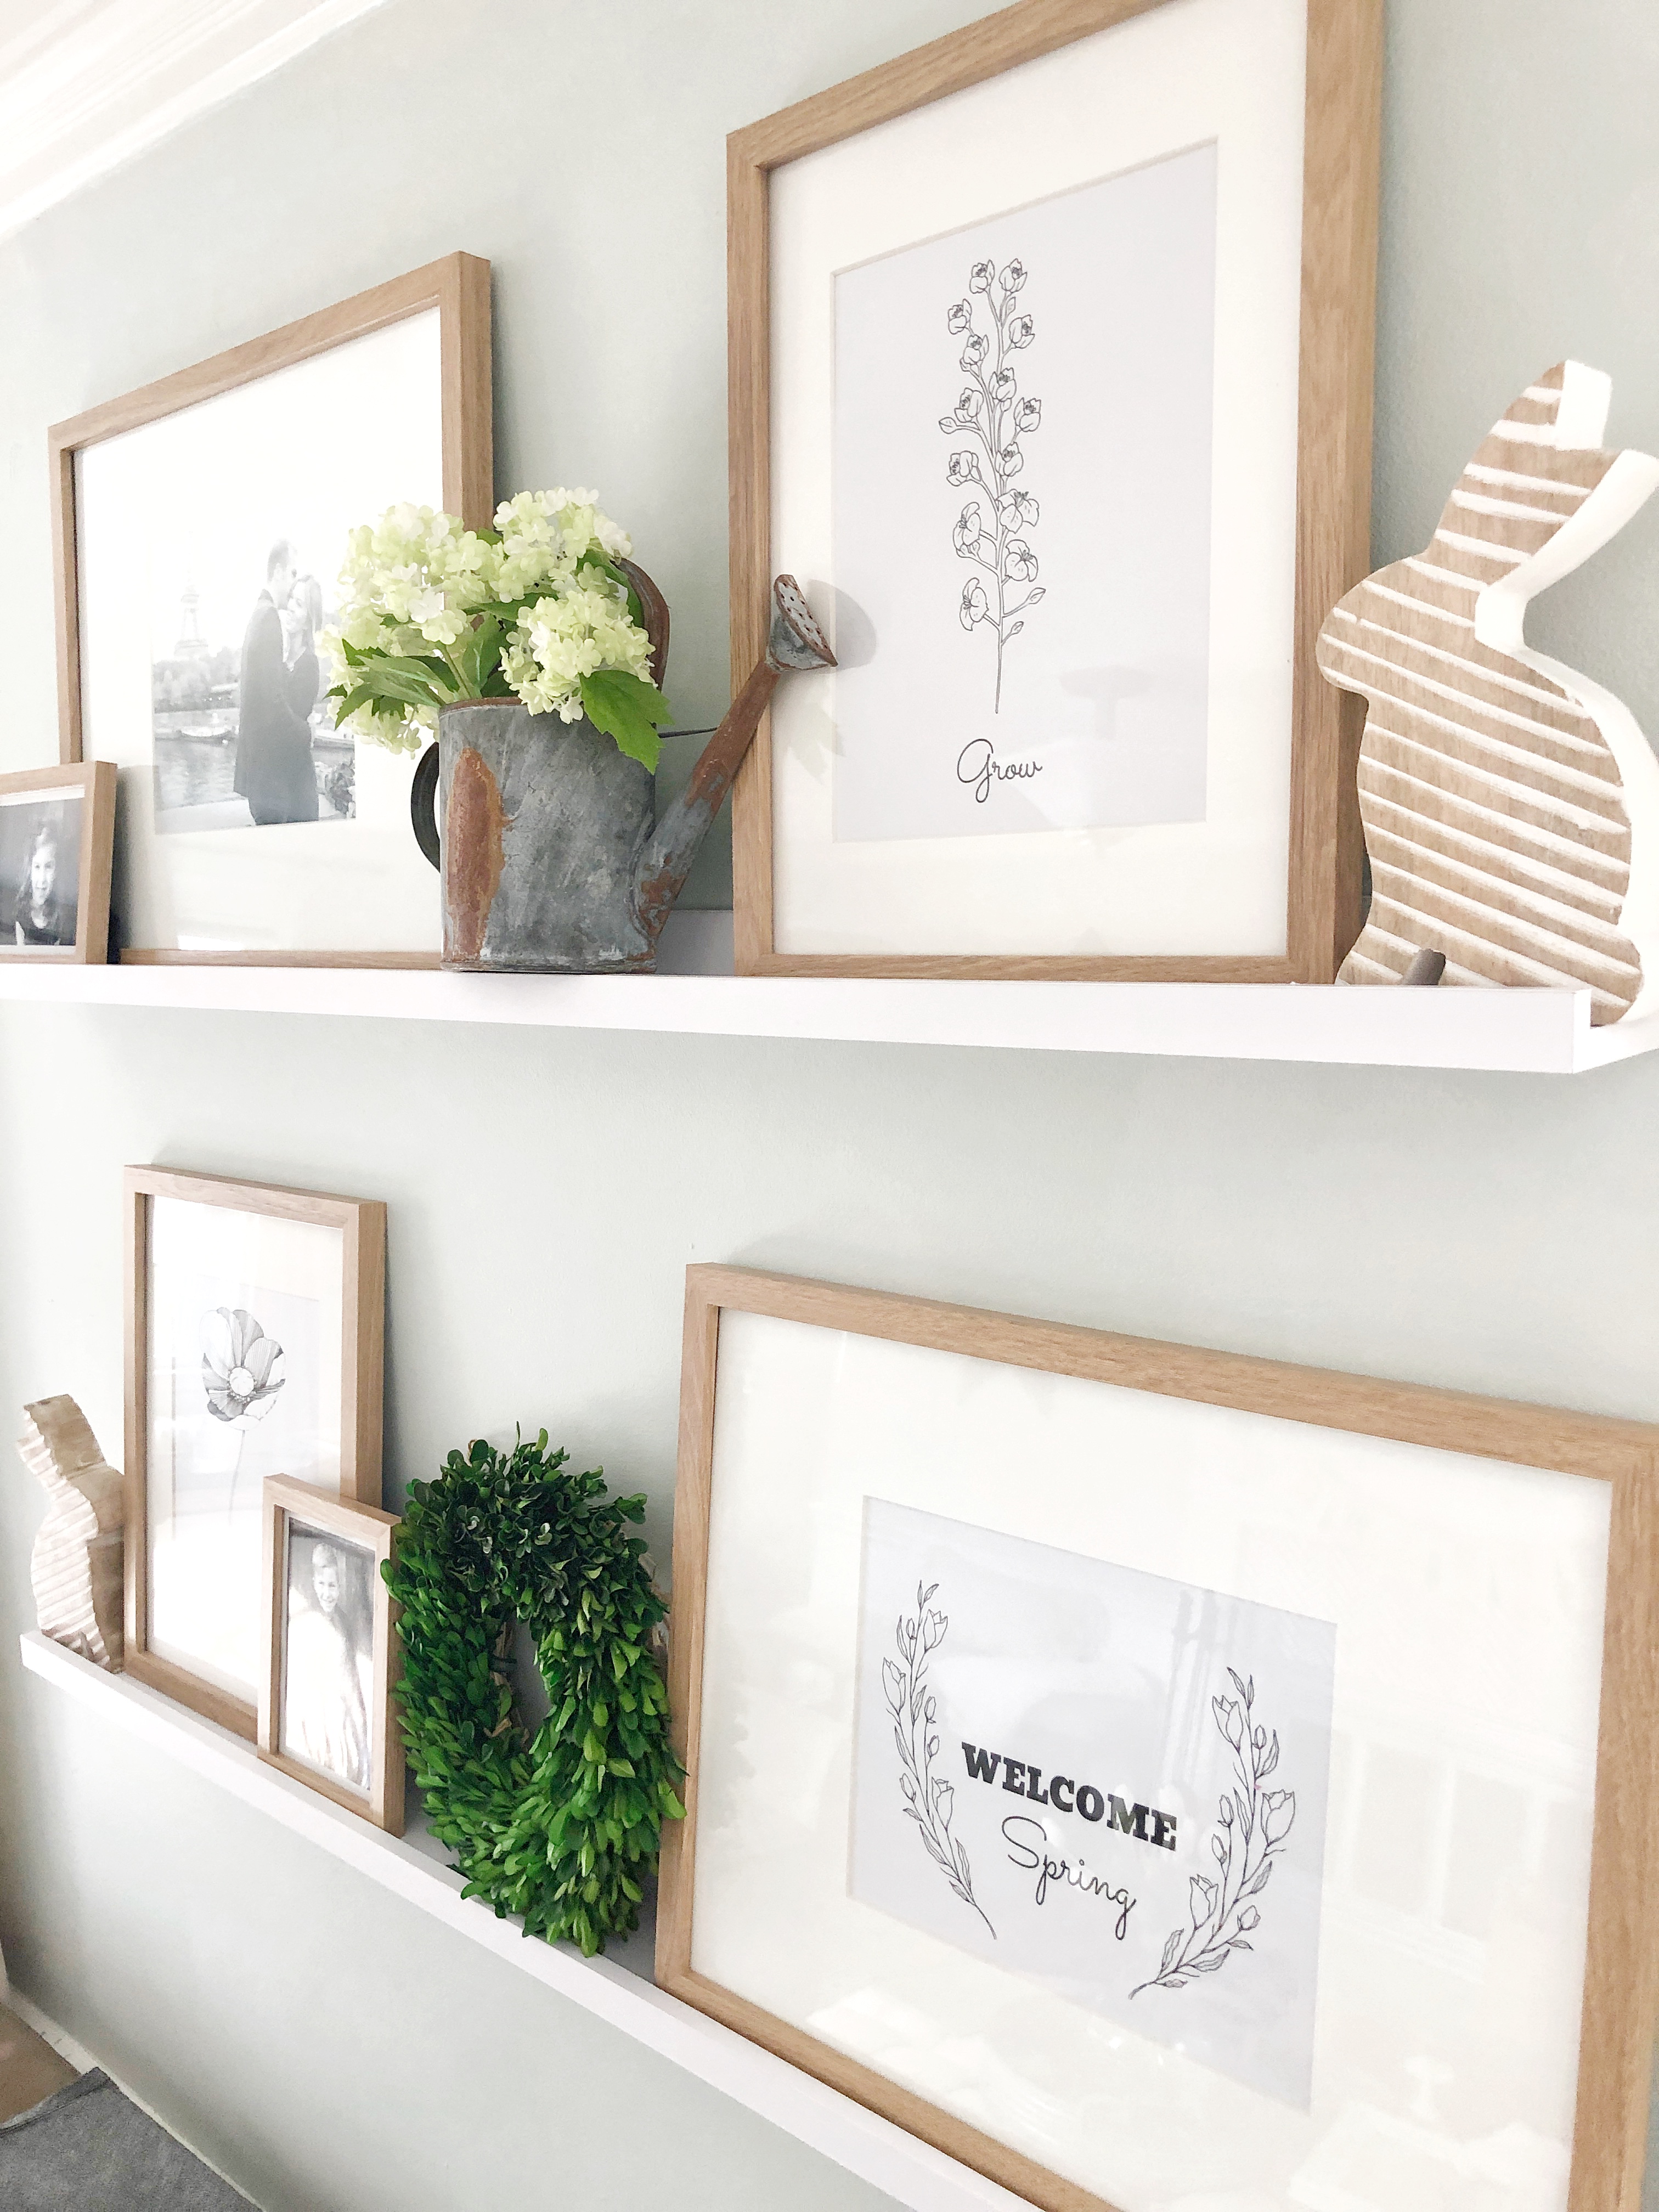
HERE are my art ledges and I ordered them in the largest size in white. I also ordered 6 frames in a wood finish (also linked HERE) I like the contrast of the wood against the white. The larger frames all hold an 8×10 photo size which is great because I can easily print photos at home to pop inside. I decided to keep the black and white photos of the kids and Ben and I in Paris because I love them so much. I wanted do so something in the frames that would look clean and fresh. I found these line drawings of floral stems from stock photos I have access too and added my own words to them in a font I liked. I then printed them on a grayish-blue cardstock paper just to add a little something different than just white background.
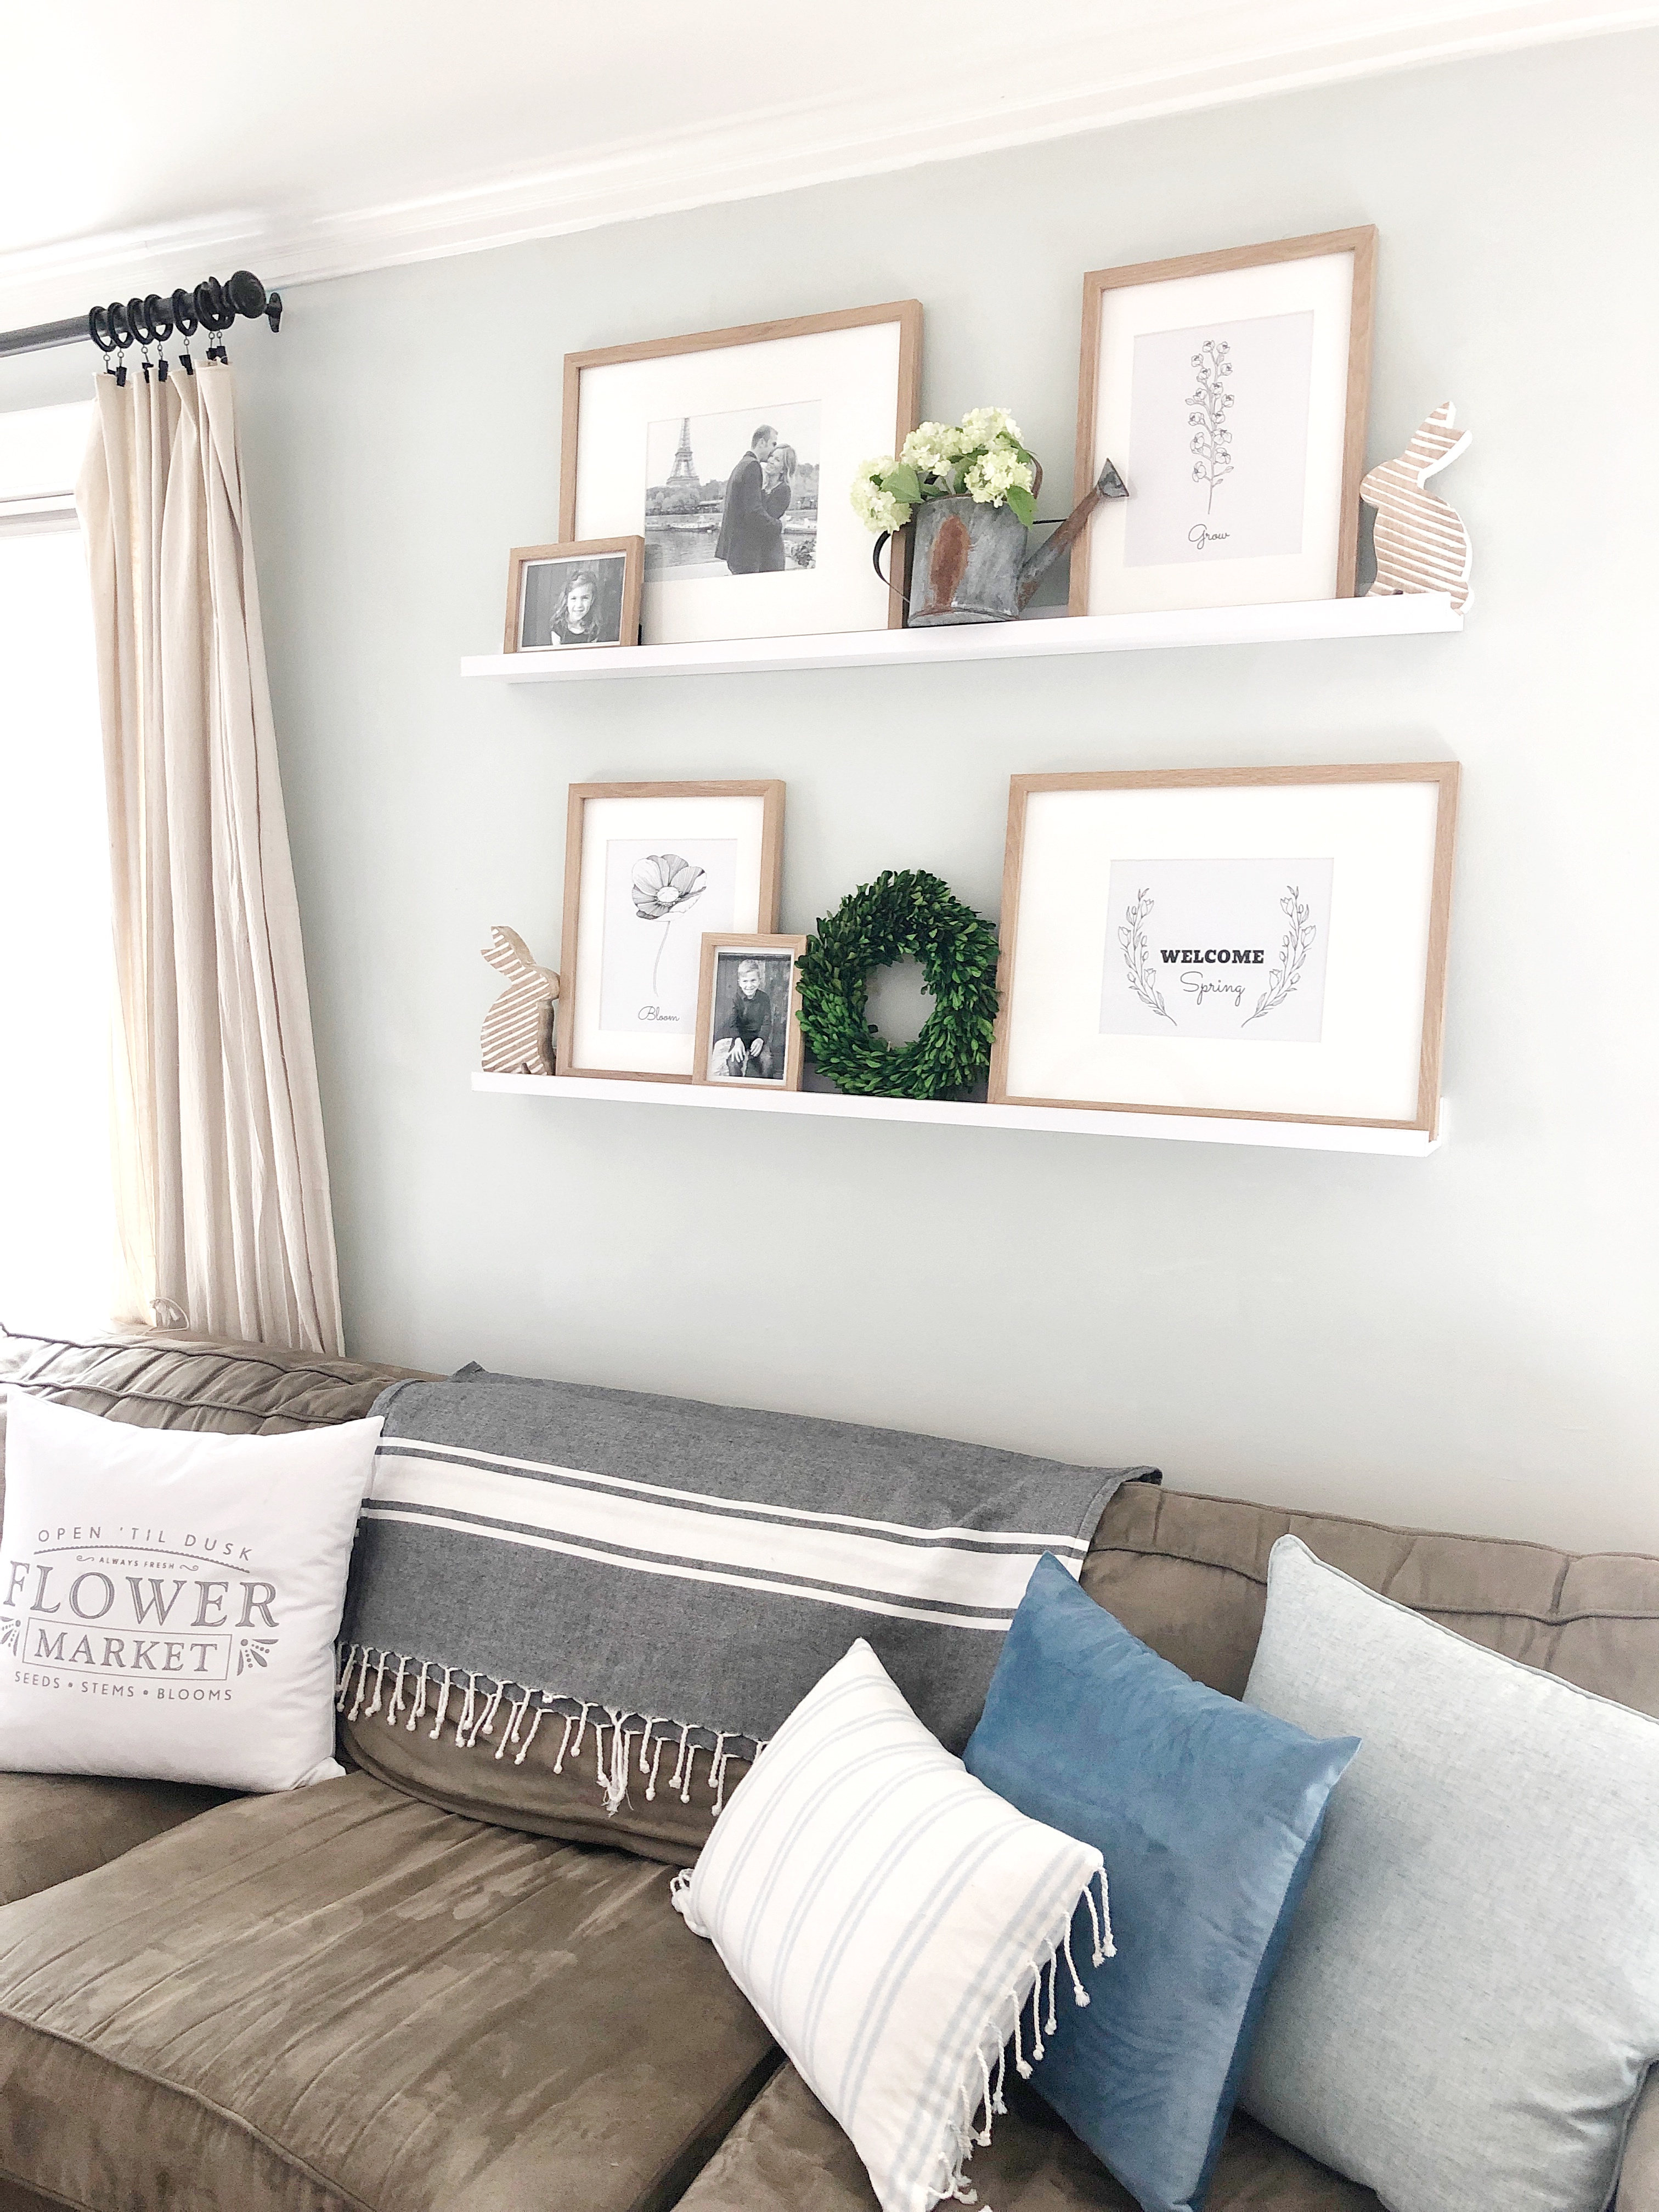
TIP FOR STYLING ART LEDGES:
I like mixing in other elements to my art ledges depending on the season. For early spring/spring I added this adorable metal watering can (it’s flat on the back side). I added some little green blooms but really you could add any floral! I also mixed in a boxwood wreath and some wooden bunnies with a diagonal stripe. I recently found the bunnies at Homegoods/TJmaxx. What I love about these *extra* elements is that they add so much interest to the ledges and break up all the squares/rectangles. I always try to find a little bit of symmetry with layout, yet at the same time not make it too perfectly symmetrical. Does that make sense? 😉
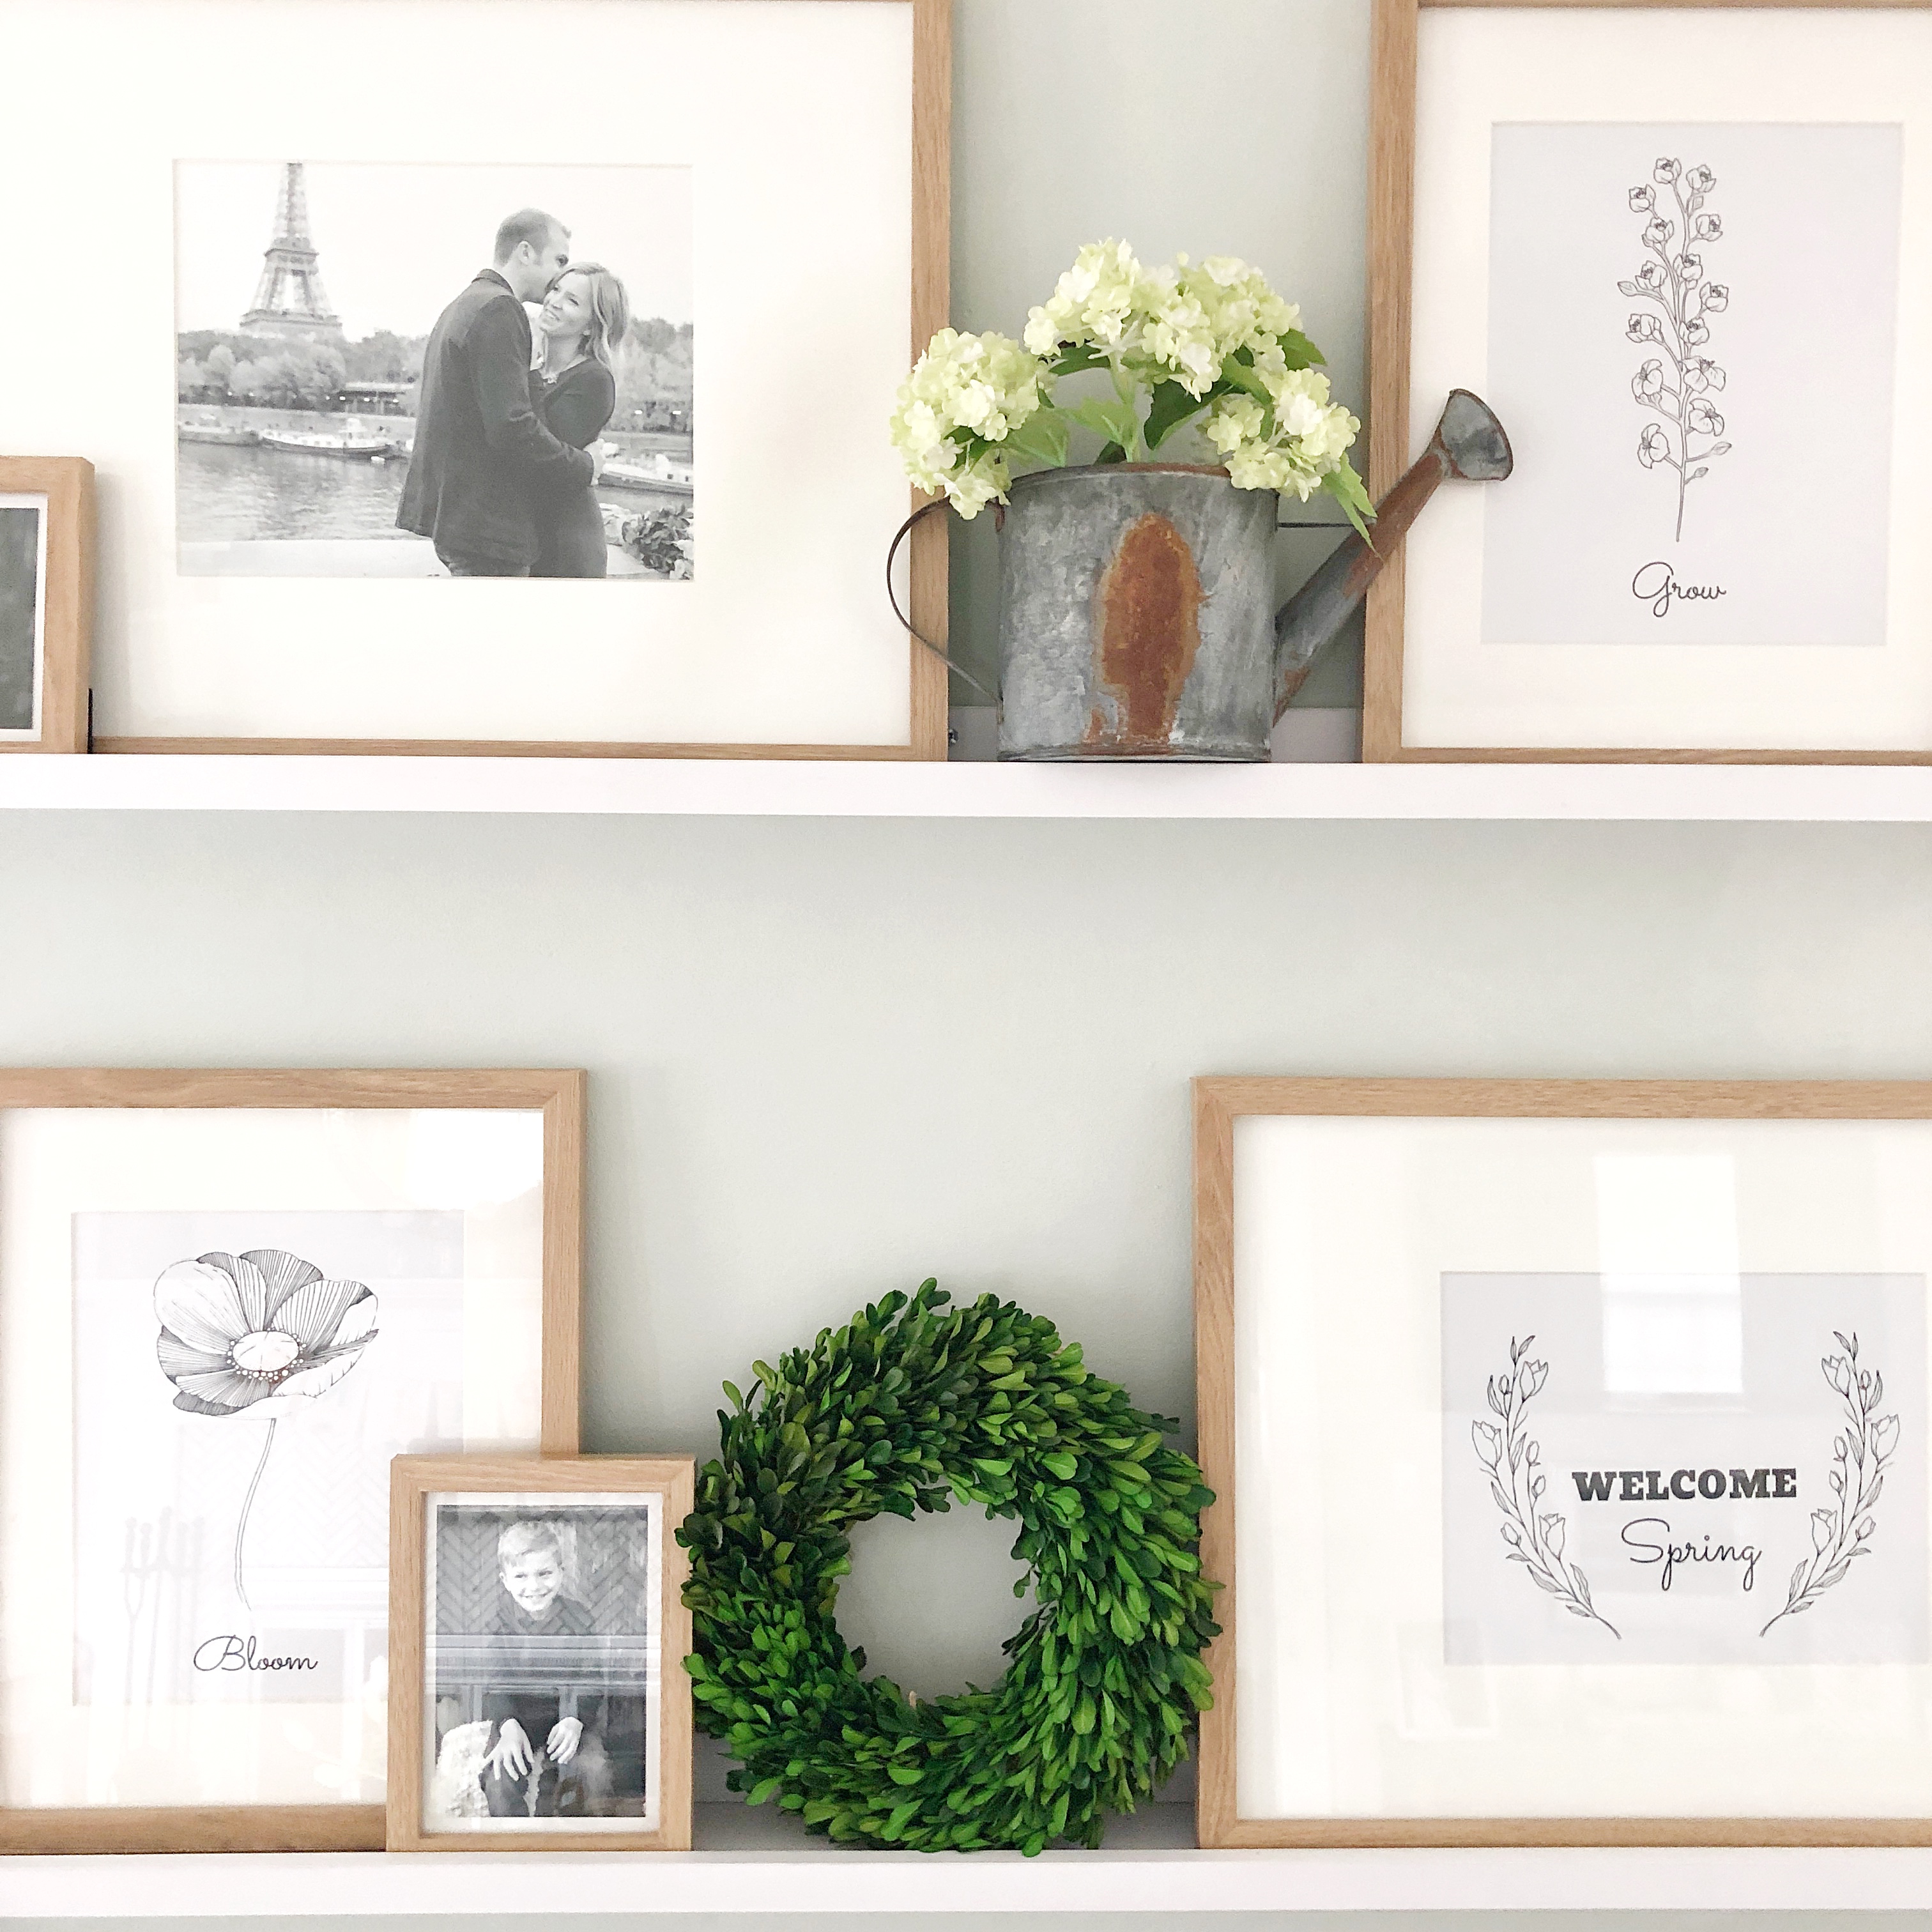
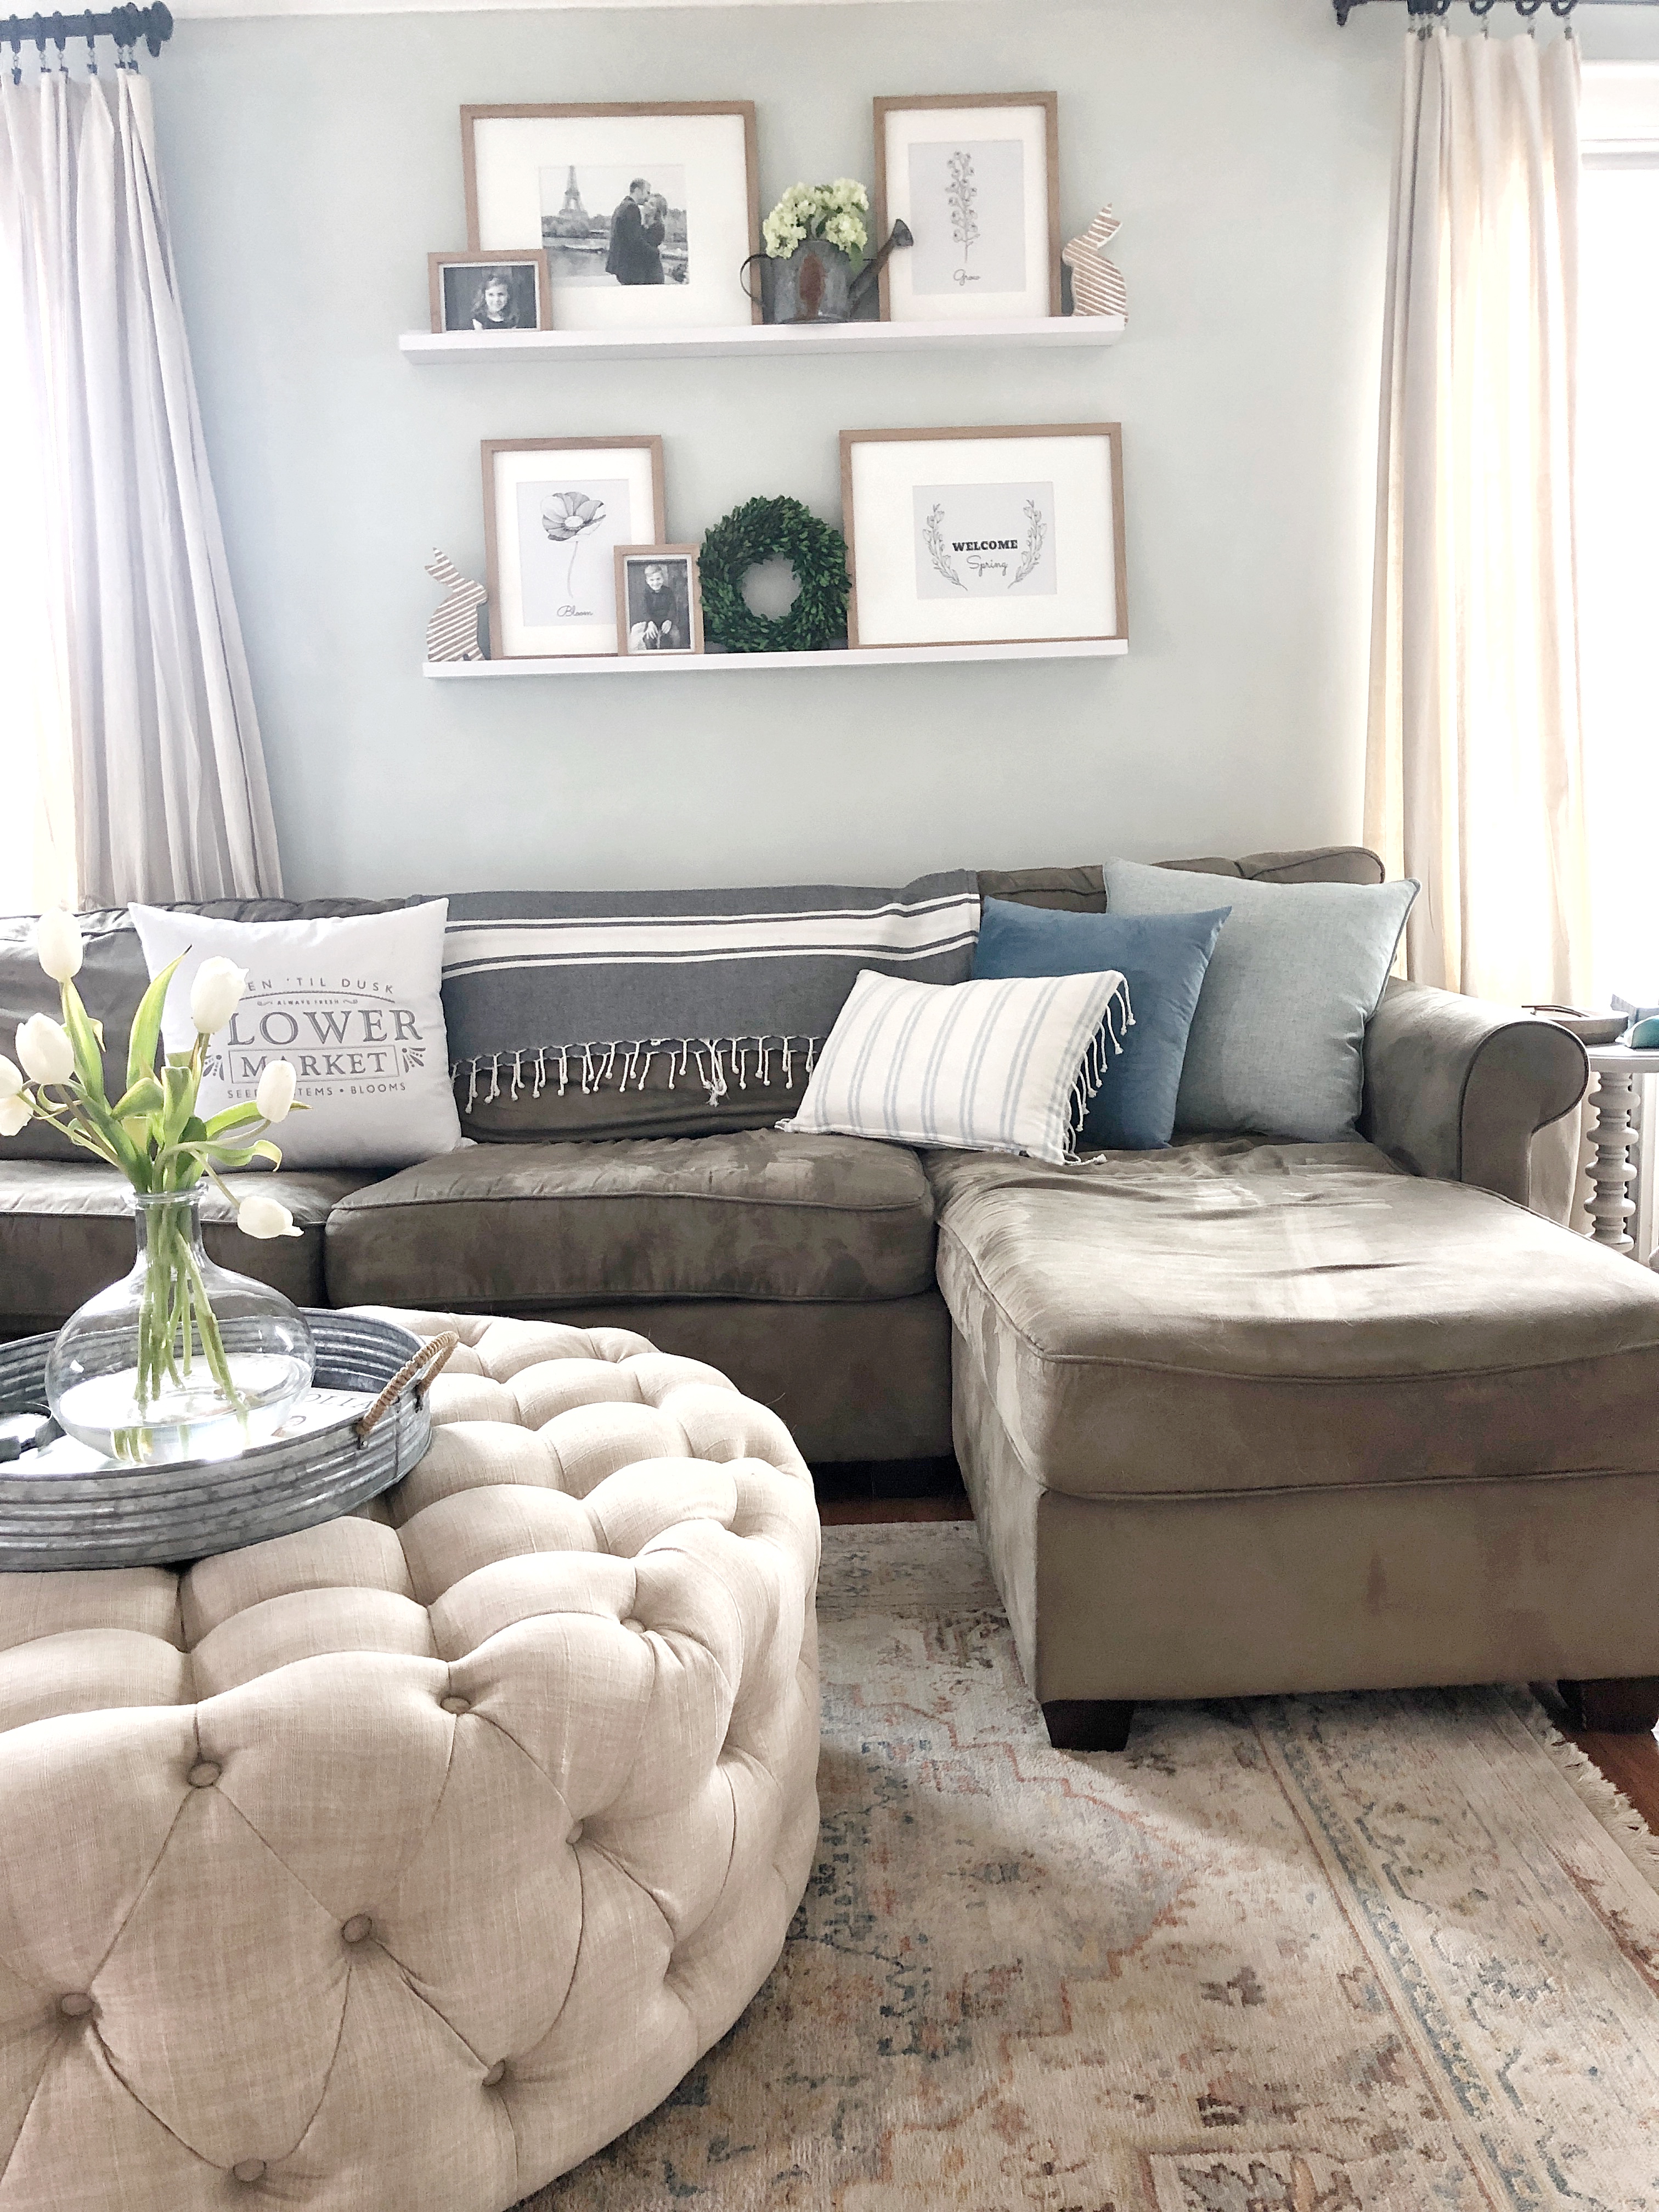
What do you think? Do you like the simple spring touches to the art ledges? It’s neutral but I love the simplicity of the greens and black/white mixed with the blues and the greens in the room. Below are the printables that I created to share with you guys. If you use them in your home please share and tag me! I recommend using a cardstock paper in a soft pastel color or a gray like THIS:
Thank you for stopping by!
JORDAN
SPRING PRINTABLES:


PIN FOR LATER: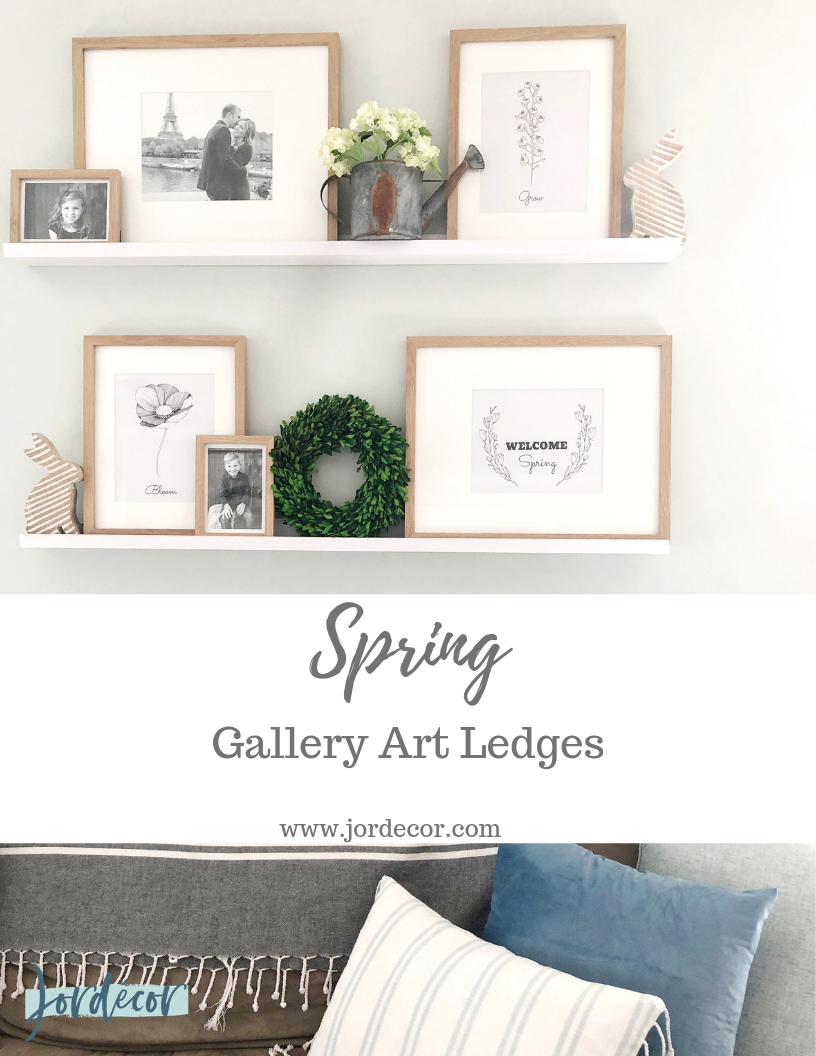
read the full post >
(This post was sponsored by ChristmasTreeShopsandThat!, as always all opinion are my own. Thank you for supporting the brands I love.)
Happy 2019!! I hope you all had a wonderful Christmas and fun New Year celebration. I can’t believe how quickly the holidays came and went. Now that the house is finally settled again, boxes of Christmas decor put away, I’m taking count of the many home projects I want to tackle this year. From as big to renovating our upstairs bathroom to as small as updating some organization and furniture pieces. Whenever the New Year comes along I get that itch to start organizing and decluttering. Anyone else?
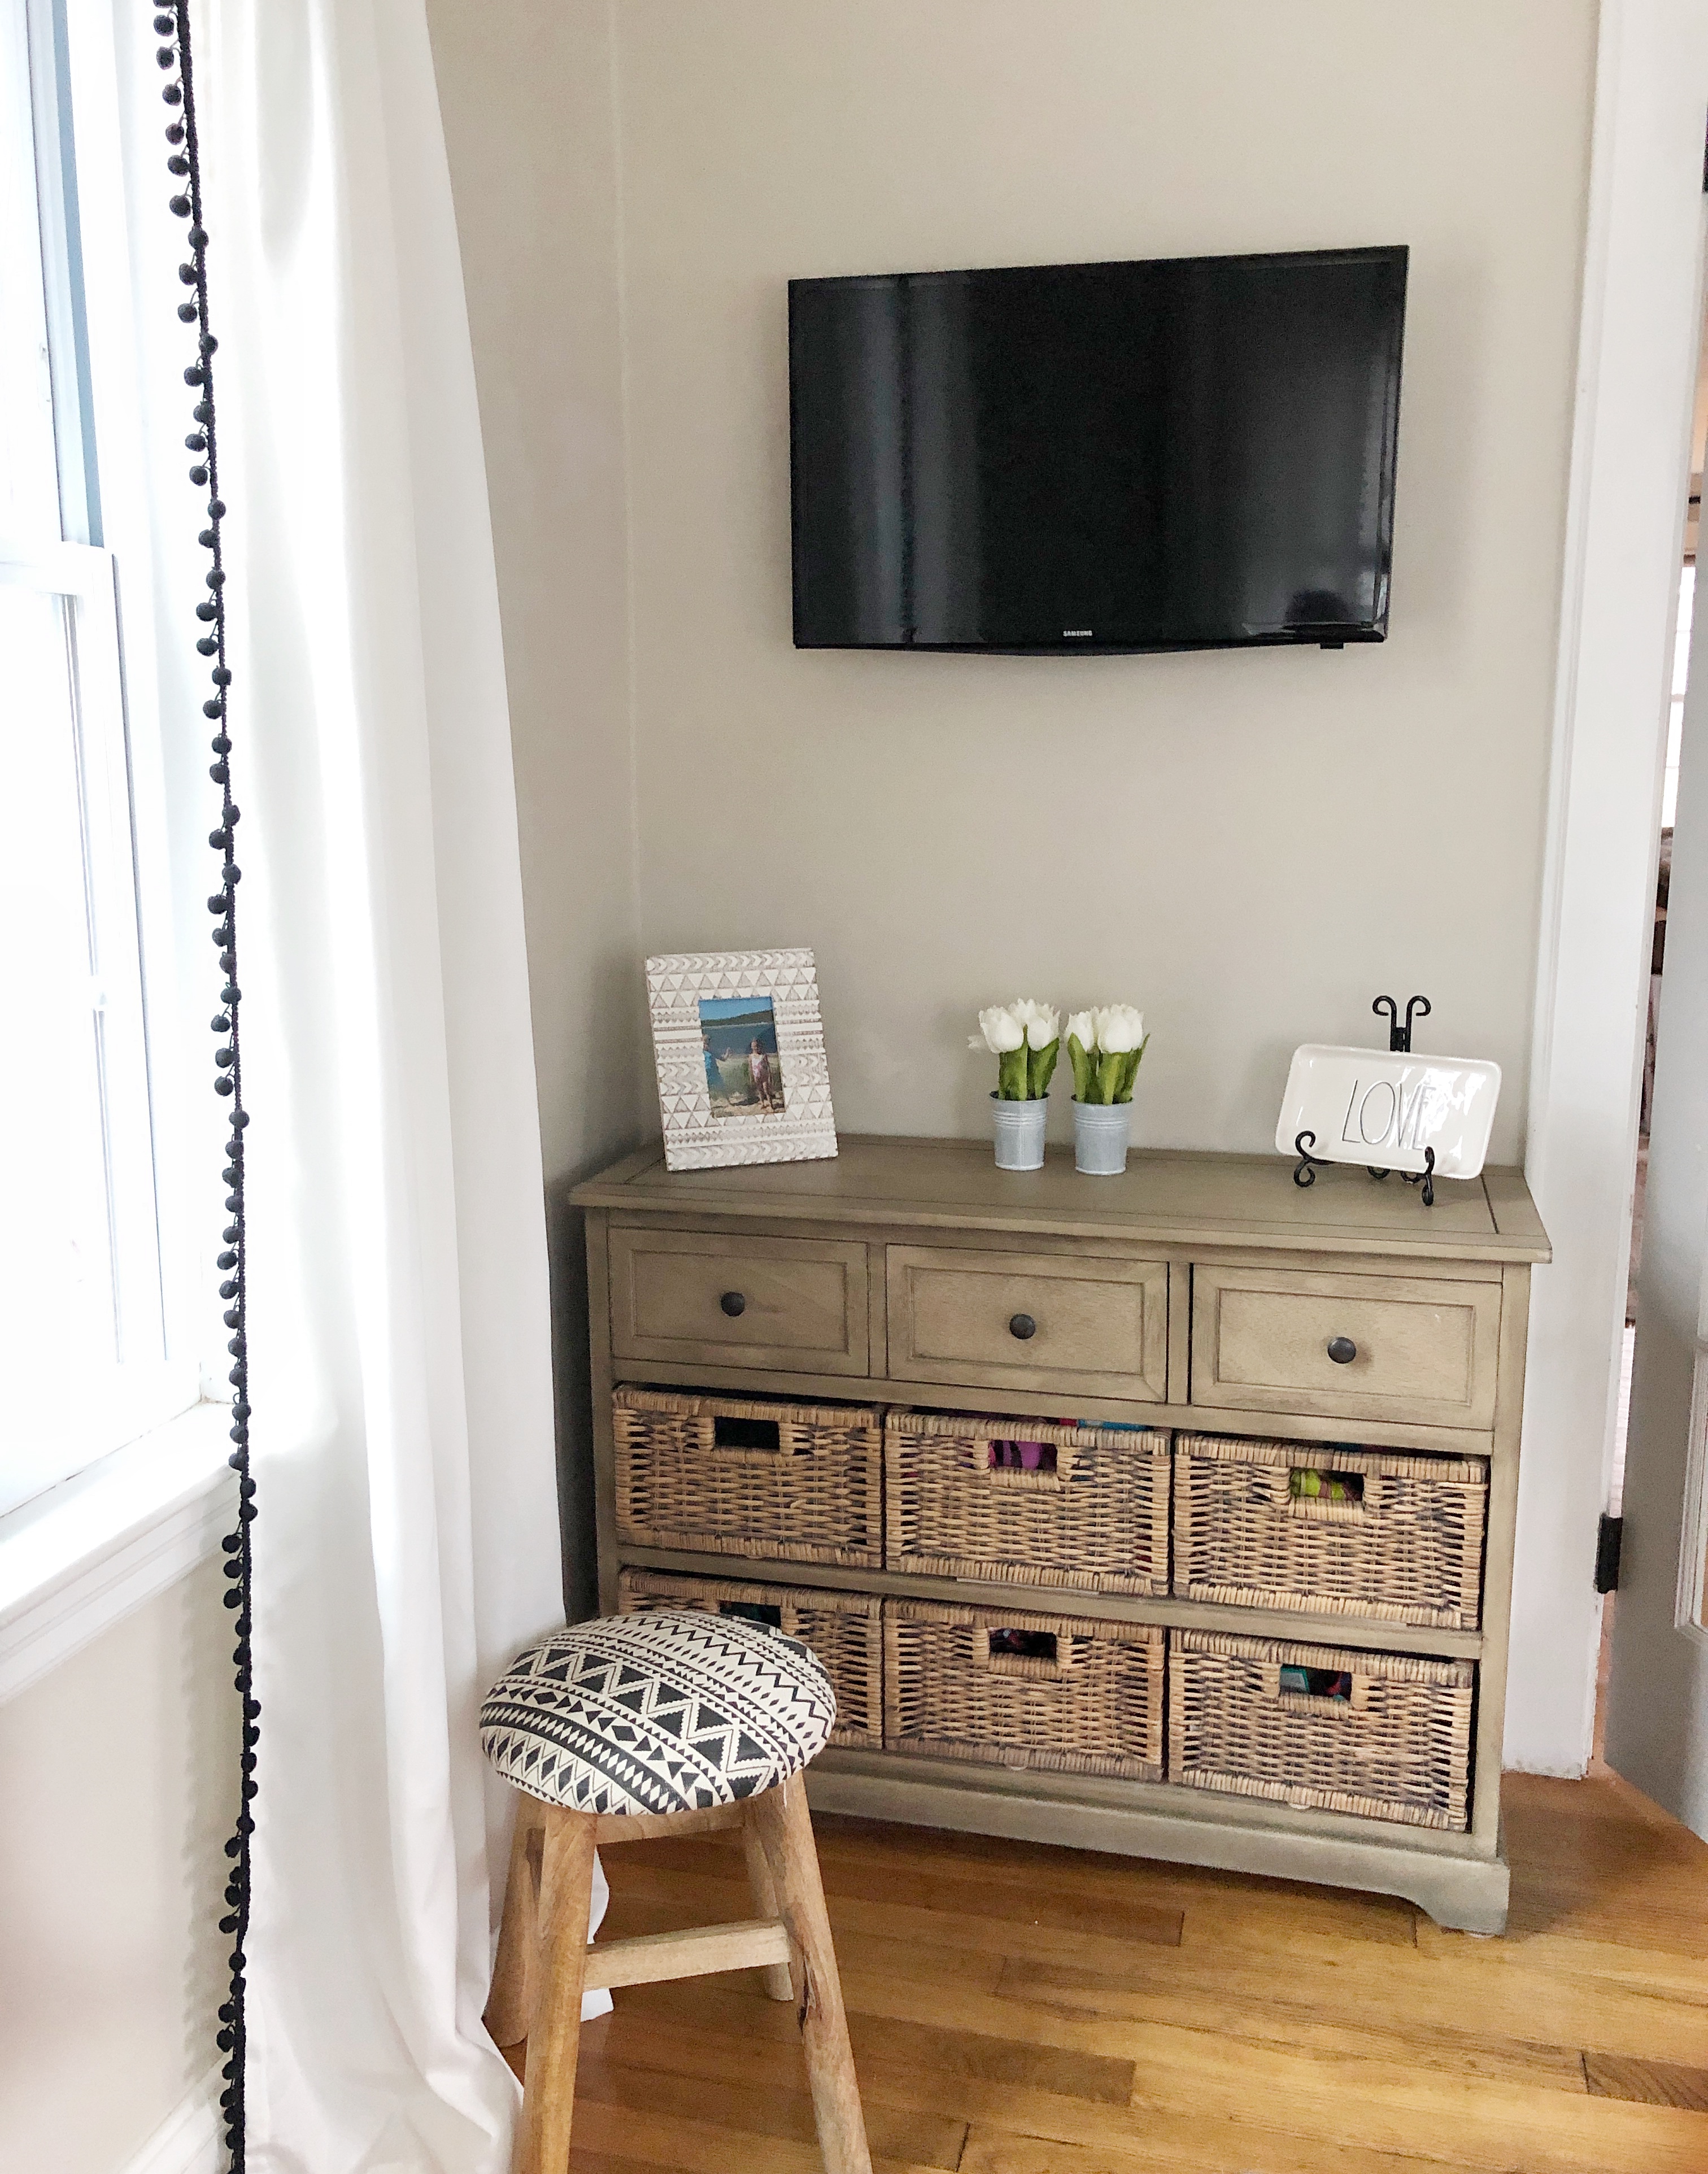
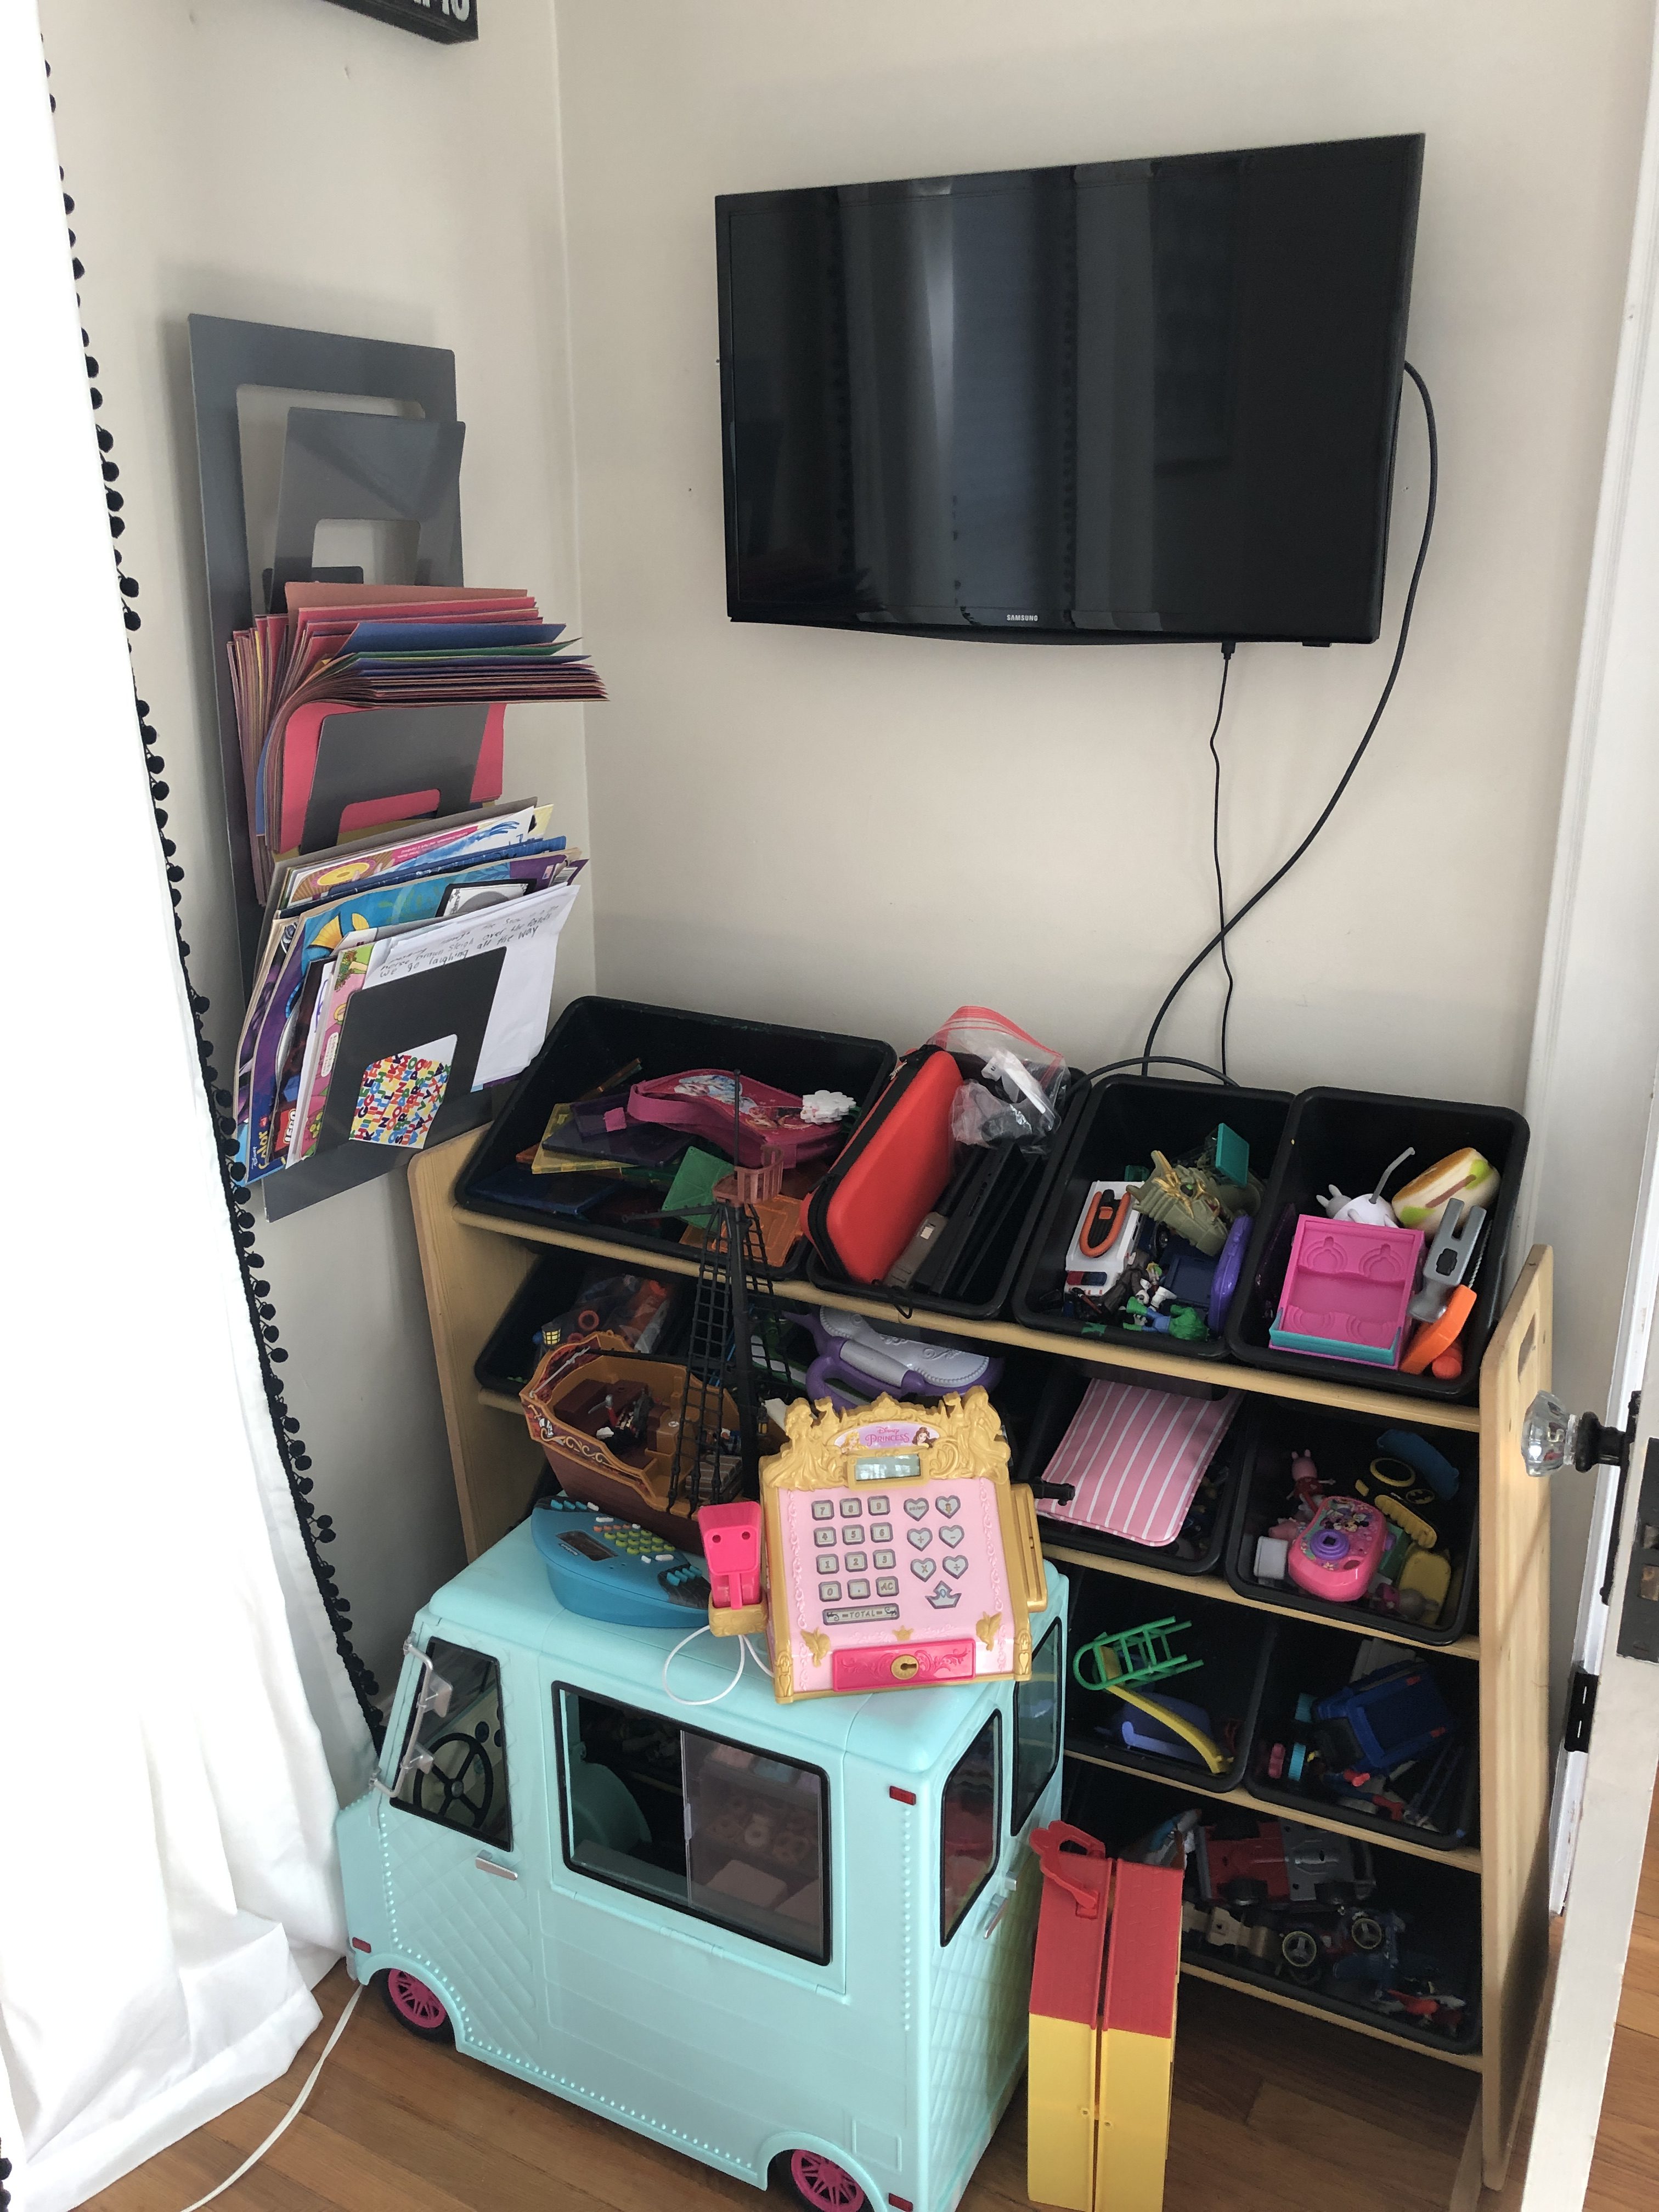
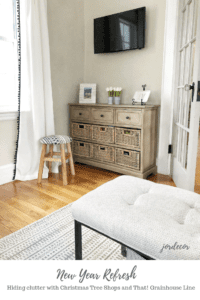
There are a few areas in our home that could definitely use a little help in 2019; our playroom (which is constantly evolving, now into a media room) and our mudroom. What I’m about to show you may actually damage your eyes and break your screen- it is probably the most unloved area in our home as well as most unseen, because why would I want to share this hideous corner. This corner has been very low on our priority list until I just about couldn’t take it anymore. When the kids were babies this type of toy storage just made the most sense. But now they are 7 &5 it’s become clear that this just isn’t a necessary piece of furniture to have. PRAISE THE LORD!
This little corner was the inspiration and motivation for getting my NEW YEAR REFRESH on! I’m really excited to partner with ChristmasTreeShopsandThat! to spruce up this area and get a jump start on some of these projects.
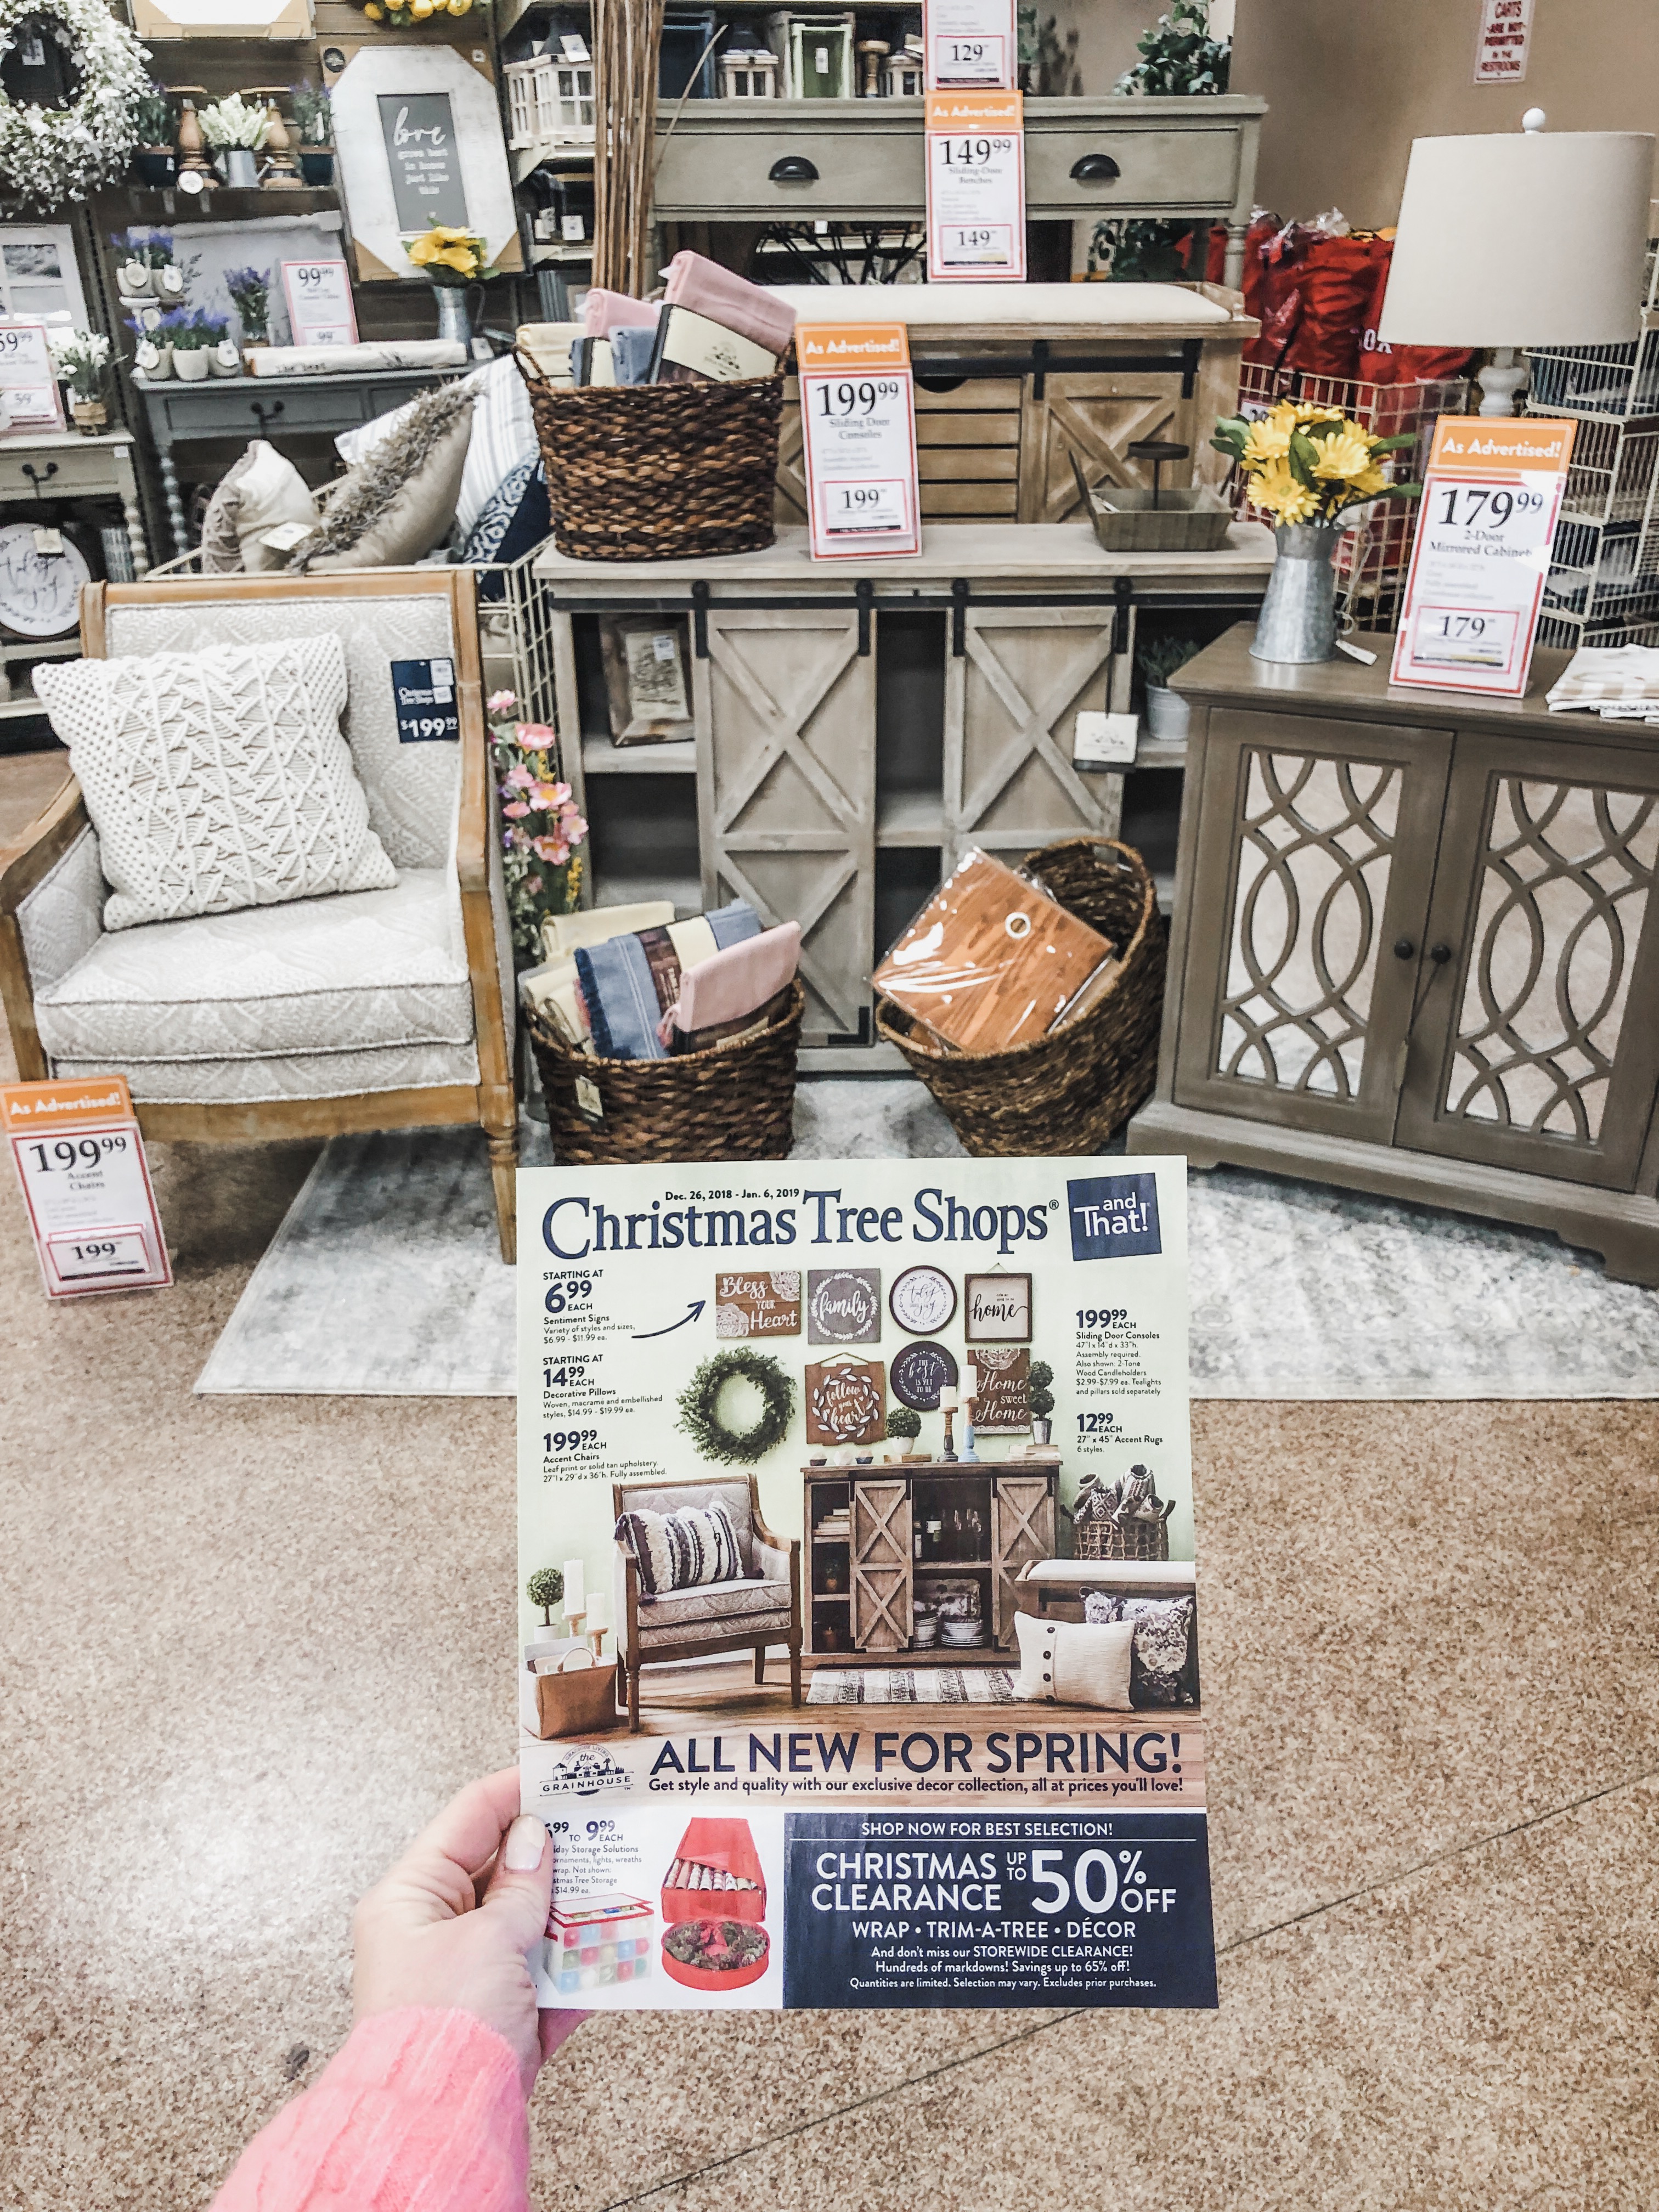
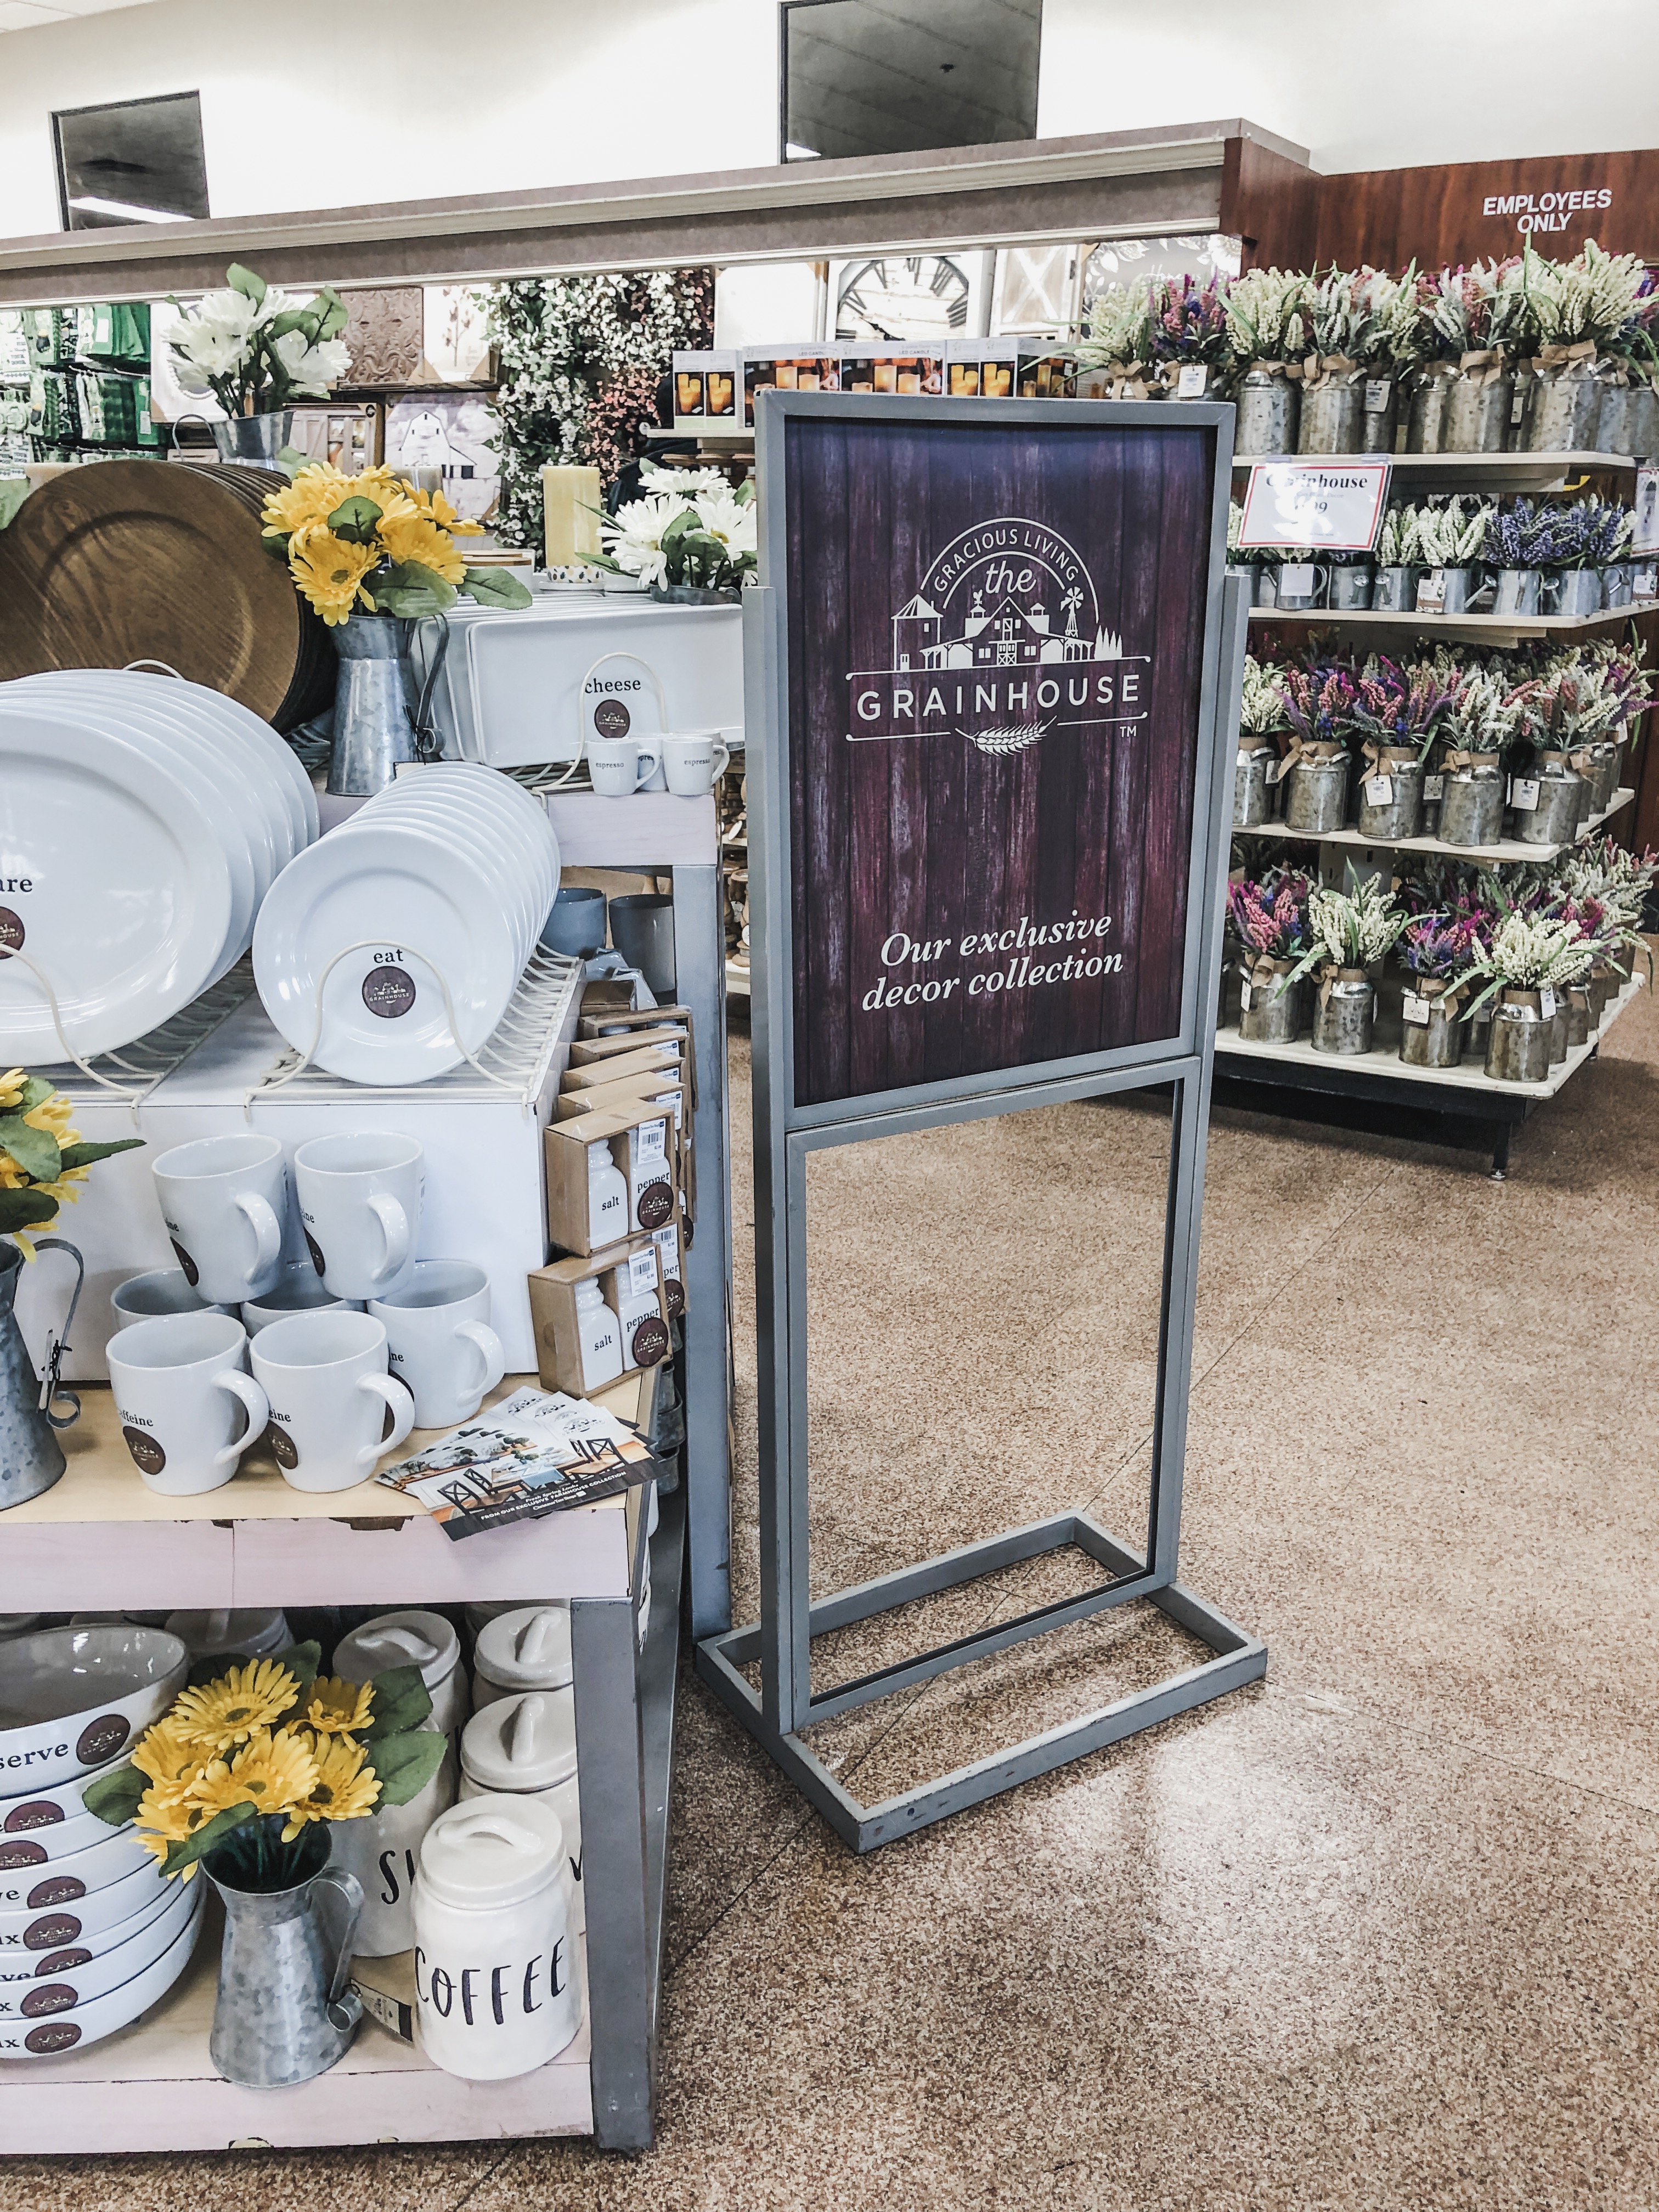
For those of you that aren’t familiar with ChristmasTreeShopsandThat! They carry a variety of home decor, furniture, holiday decorations and much much more. Over the last year they’ve recently released their own farmhouse inspired line, which I LOVE, called The Grainhouse. Not only are their pieces very on trend with the farmhouse style but they are also very affordable. After going into my local CTS I was so excited to see all their farmhouse inspired furniture because I knew I needed to update the above frightening corner in our playroom/media room. Plus I wanted to find something with storage that would hide my kids junk (I say that lovingly, I promise).
Off I went to CTS to see what I could find and I was not disappointed. Look at all that pretty spring decor from The Grainhouse line.
There were so many beautiful decor items from wall decor, to storage baskets, to florals! I loved everything but I set my eyes on two furniture pieces that I knew would make a big impact on our playroom (yah know the scariest image I’ve ever shown you) and our mudroom which just needed a better bench situation.
The first thing I purchased is THIS side table, it’s basically screaming at me to fill it with random figures and cars and puzzles. Plus it was under $200 and came fully assembled.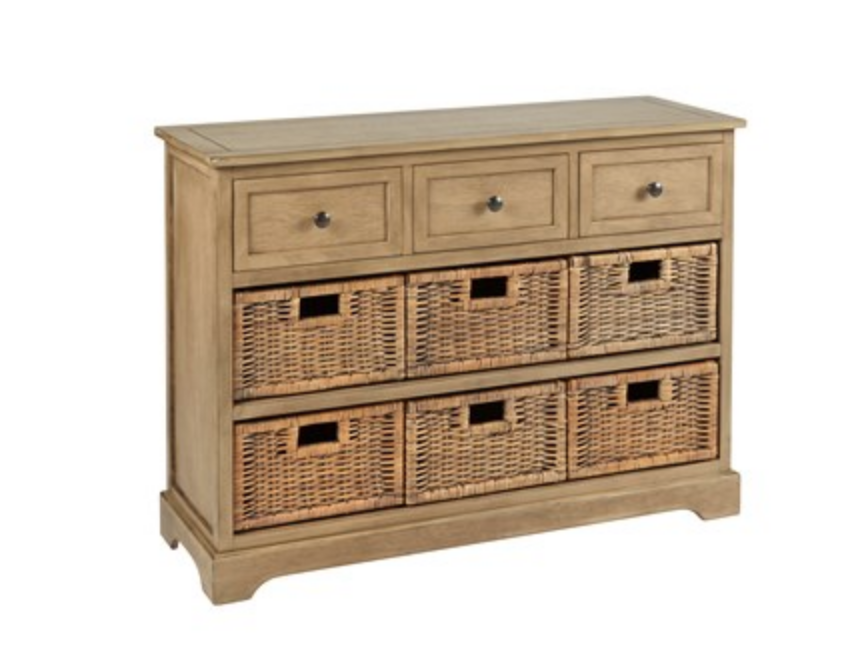 The second piece I had to have is THIS adorable entry bench which was $149 and came fully assembled as well. Plus tons of storage for shoes!!
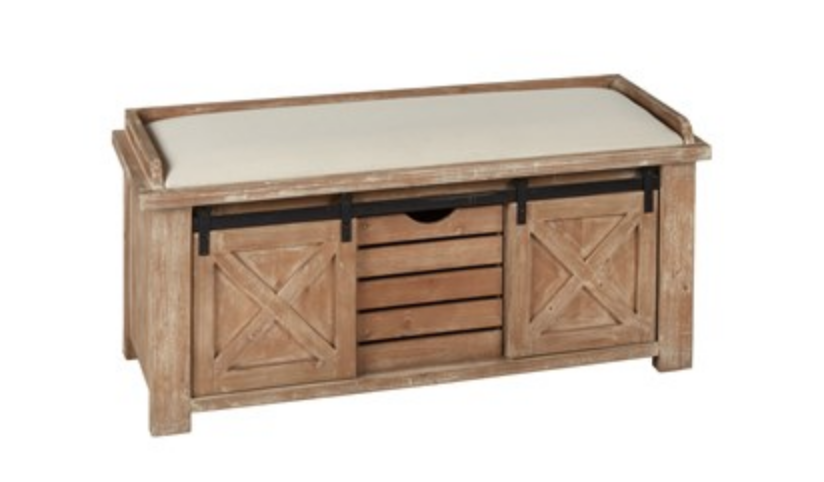
Once I got these two pieces home and put them in their spots- with no assembly required at all may I remind you! I started neatly putting all the toys in to all the bins. Also taking shoes out that we never wear and only putting back the ones we do. Getting all the things ORGANIZED!
I’m so thrilled with how these pieces have completely made two areas in our home so much more clean, organized and stylish looking.
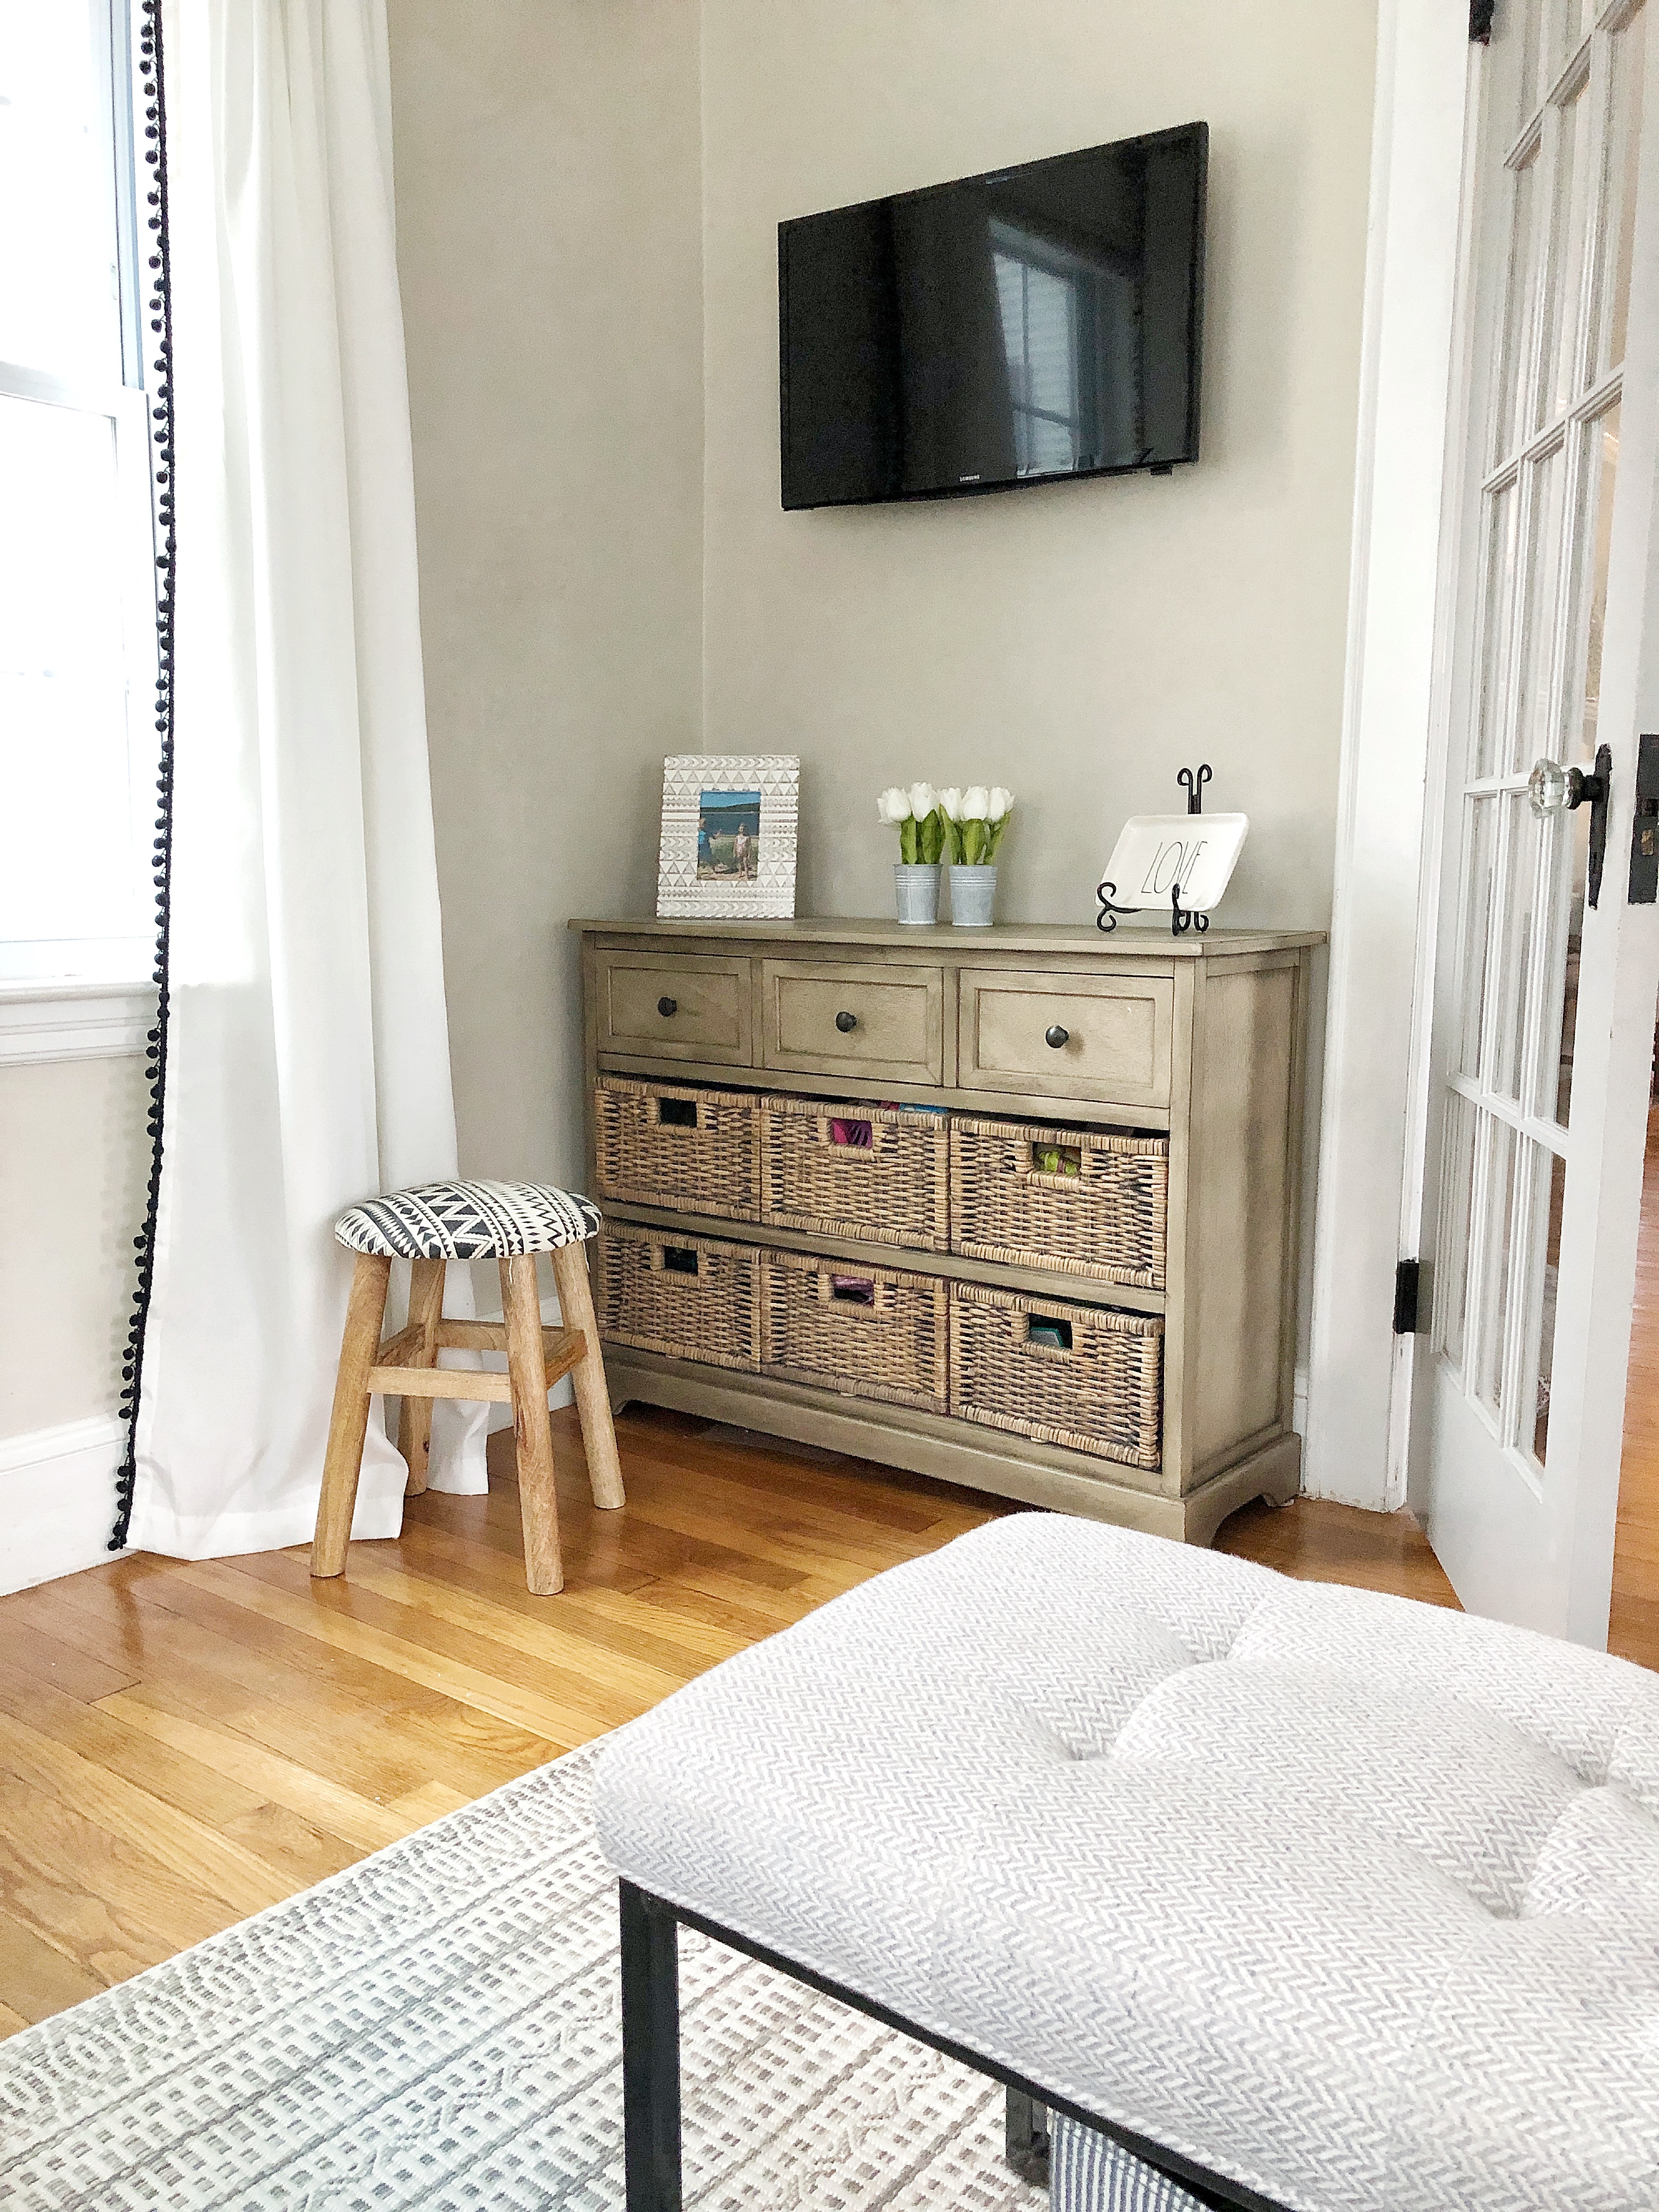
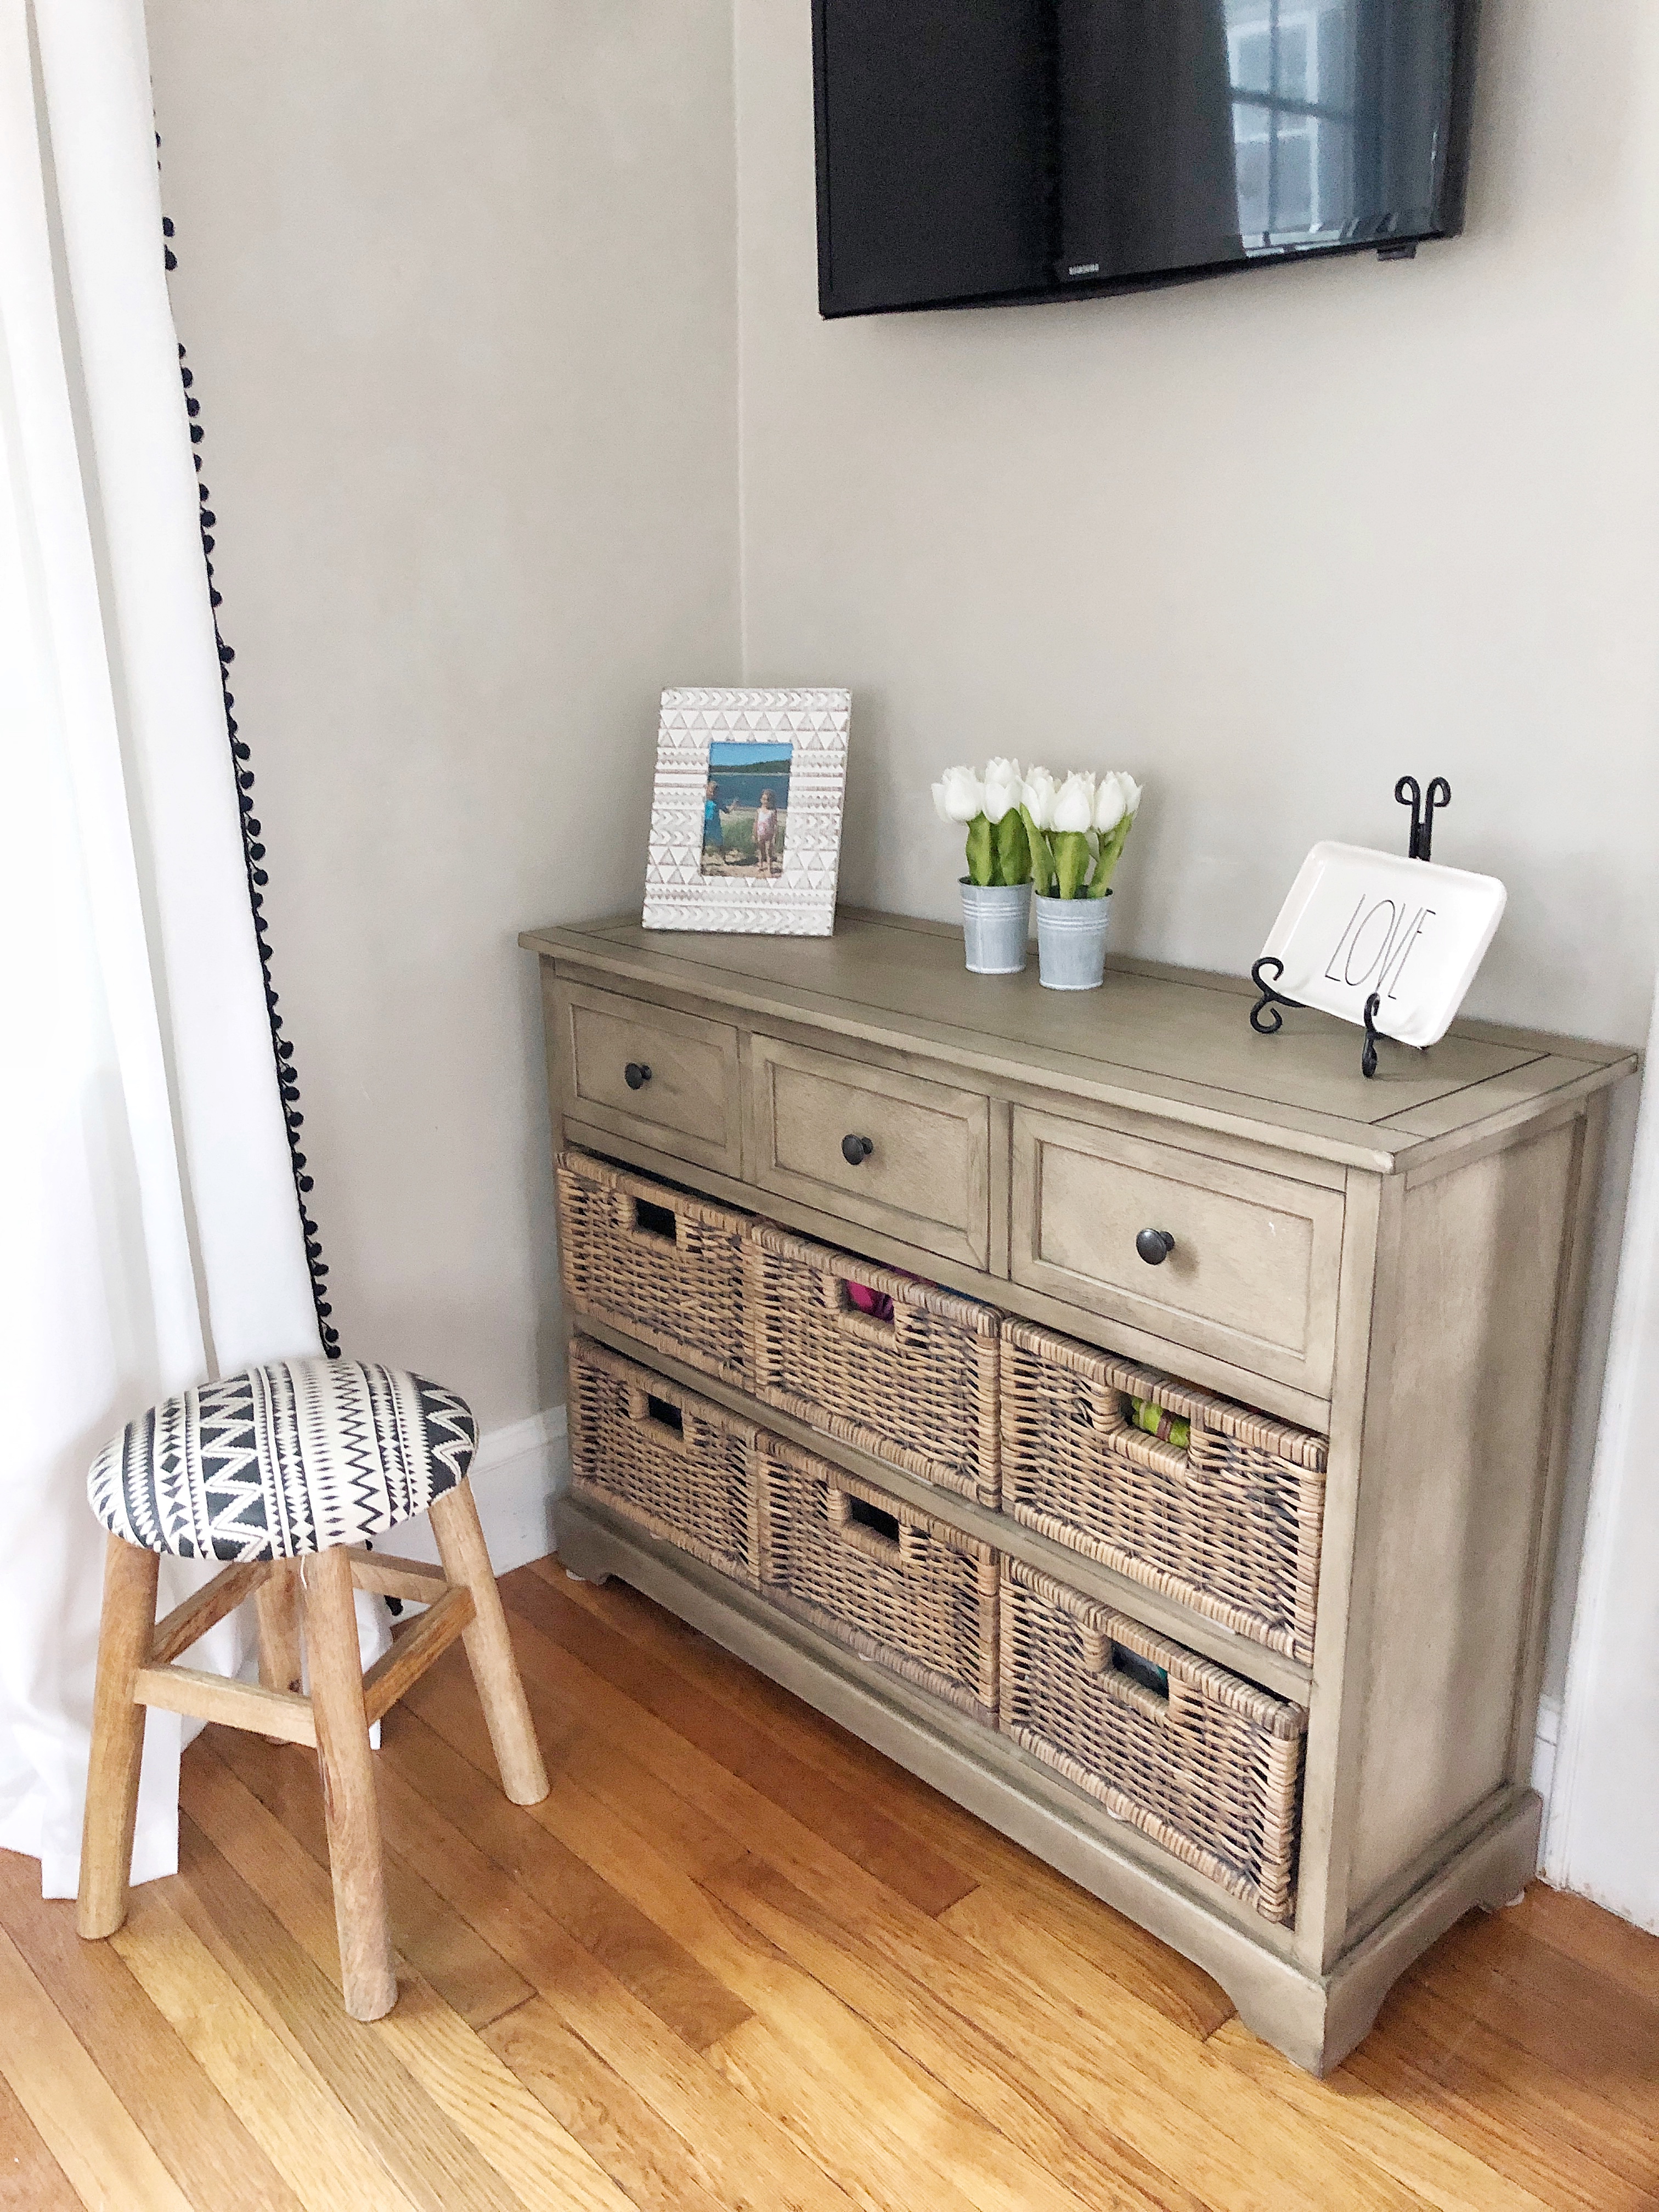
I mean… there are no words. All I can say is why did I wait so long to find a prettier storage piece for this area!?
The second item- the little farmhouse bench is absolutely perfect in our mudroom. I organized all our shoes and it just adds such a great organization to this high traffic area.
The blue floral scatter textile is also part of the Grainhouse line. They had a great selection of pillows and rugs as well. I highly recommend if you have toys, shoes or any kind of clutter going on right now, take a trip to ChristmasTreeShopsandThat! to check out their Greenhouse Line it’s both affordable and stylish. Plus it will help you refresh your home for 2019! Do you have an unloved spot in your home that is just dying for a little TLC? Let me know below.
Jordan
PIN FOR LATER:
read the full post >
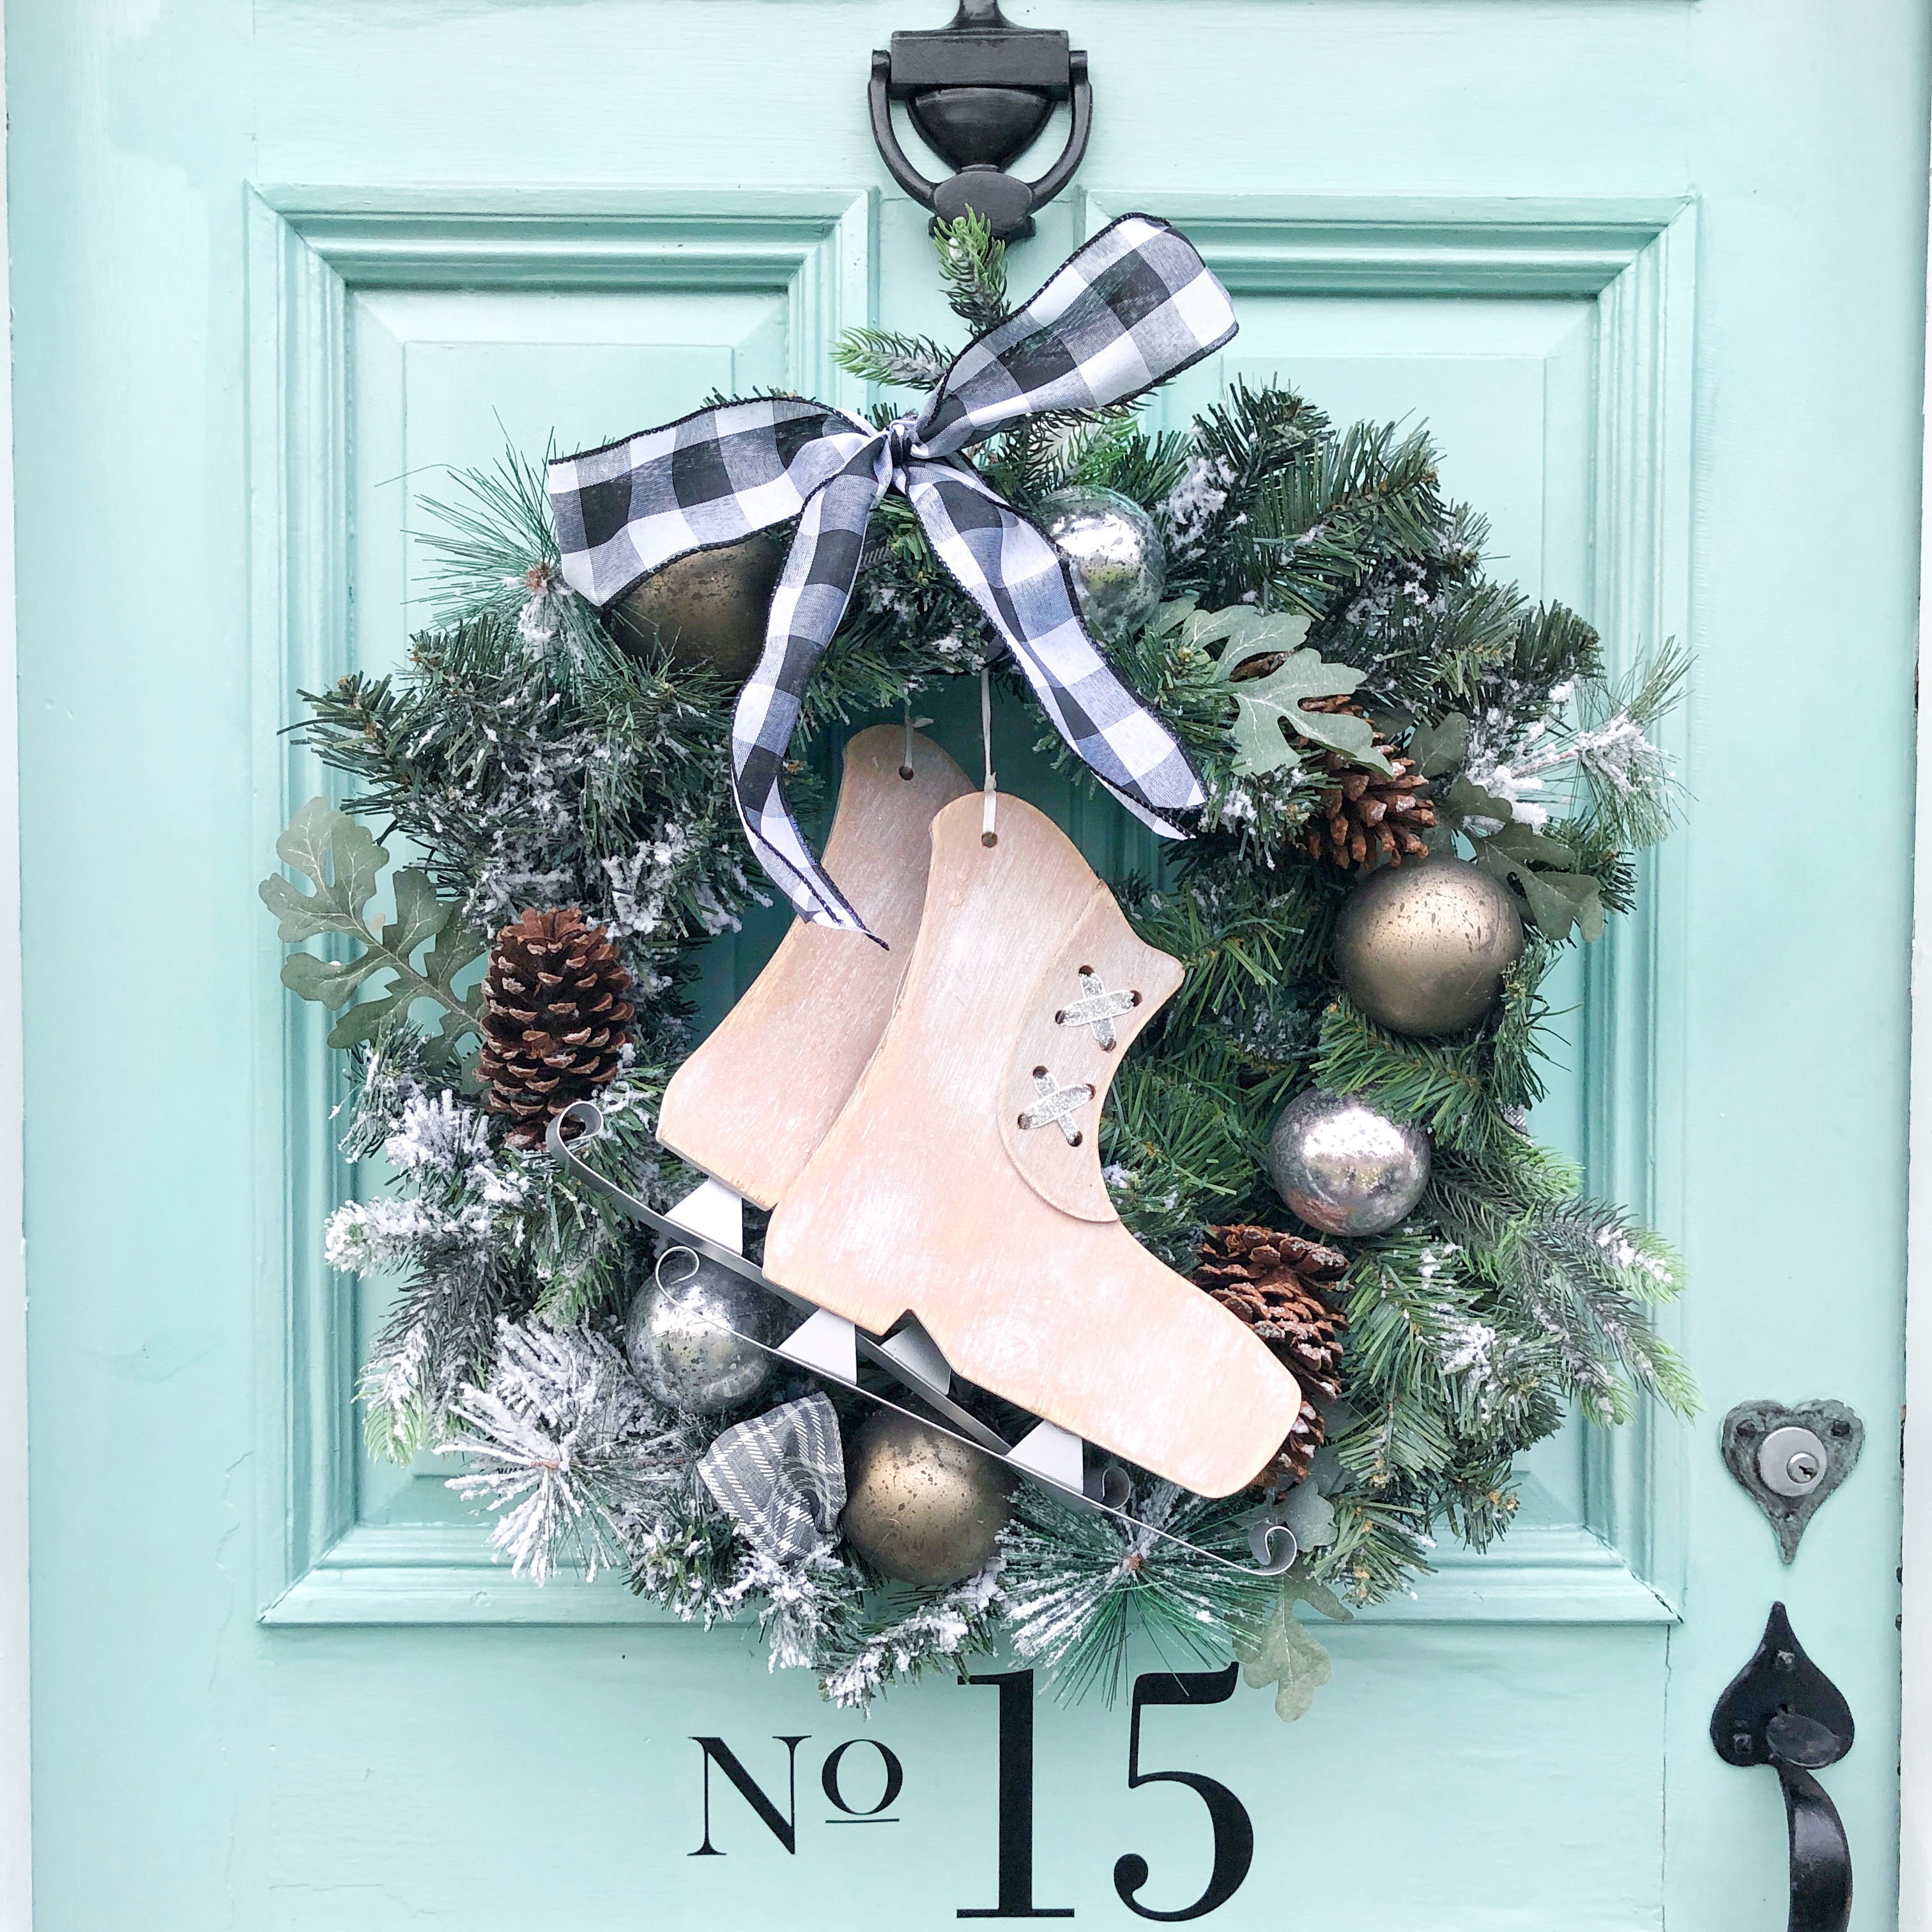
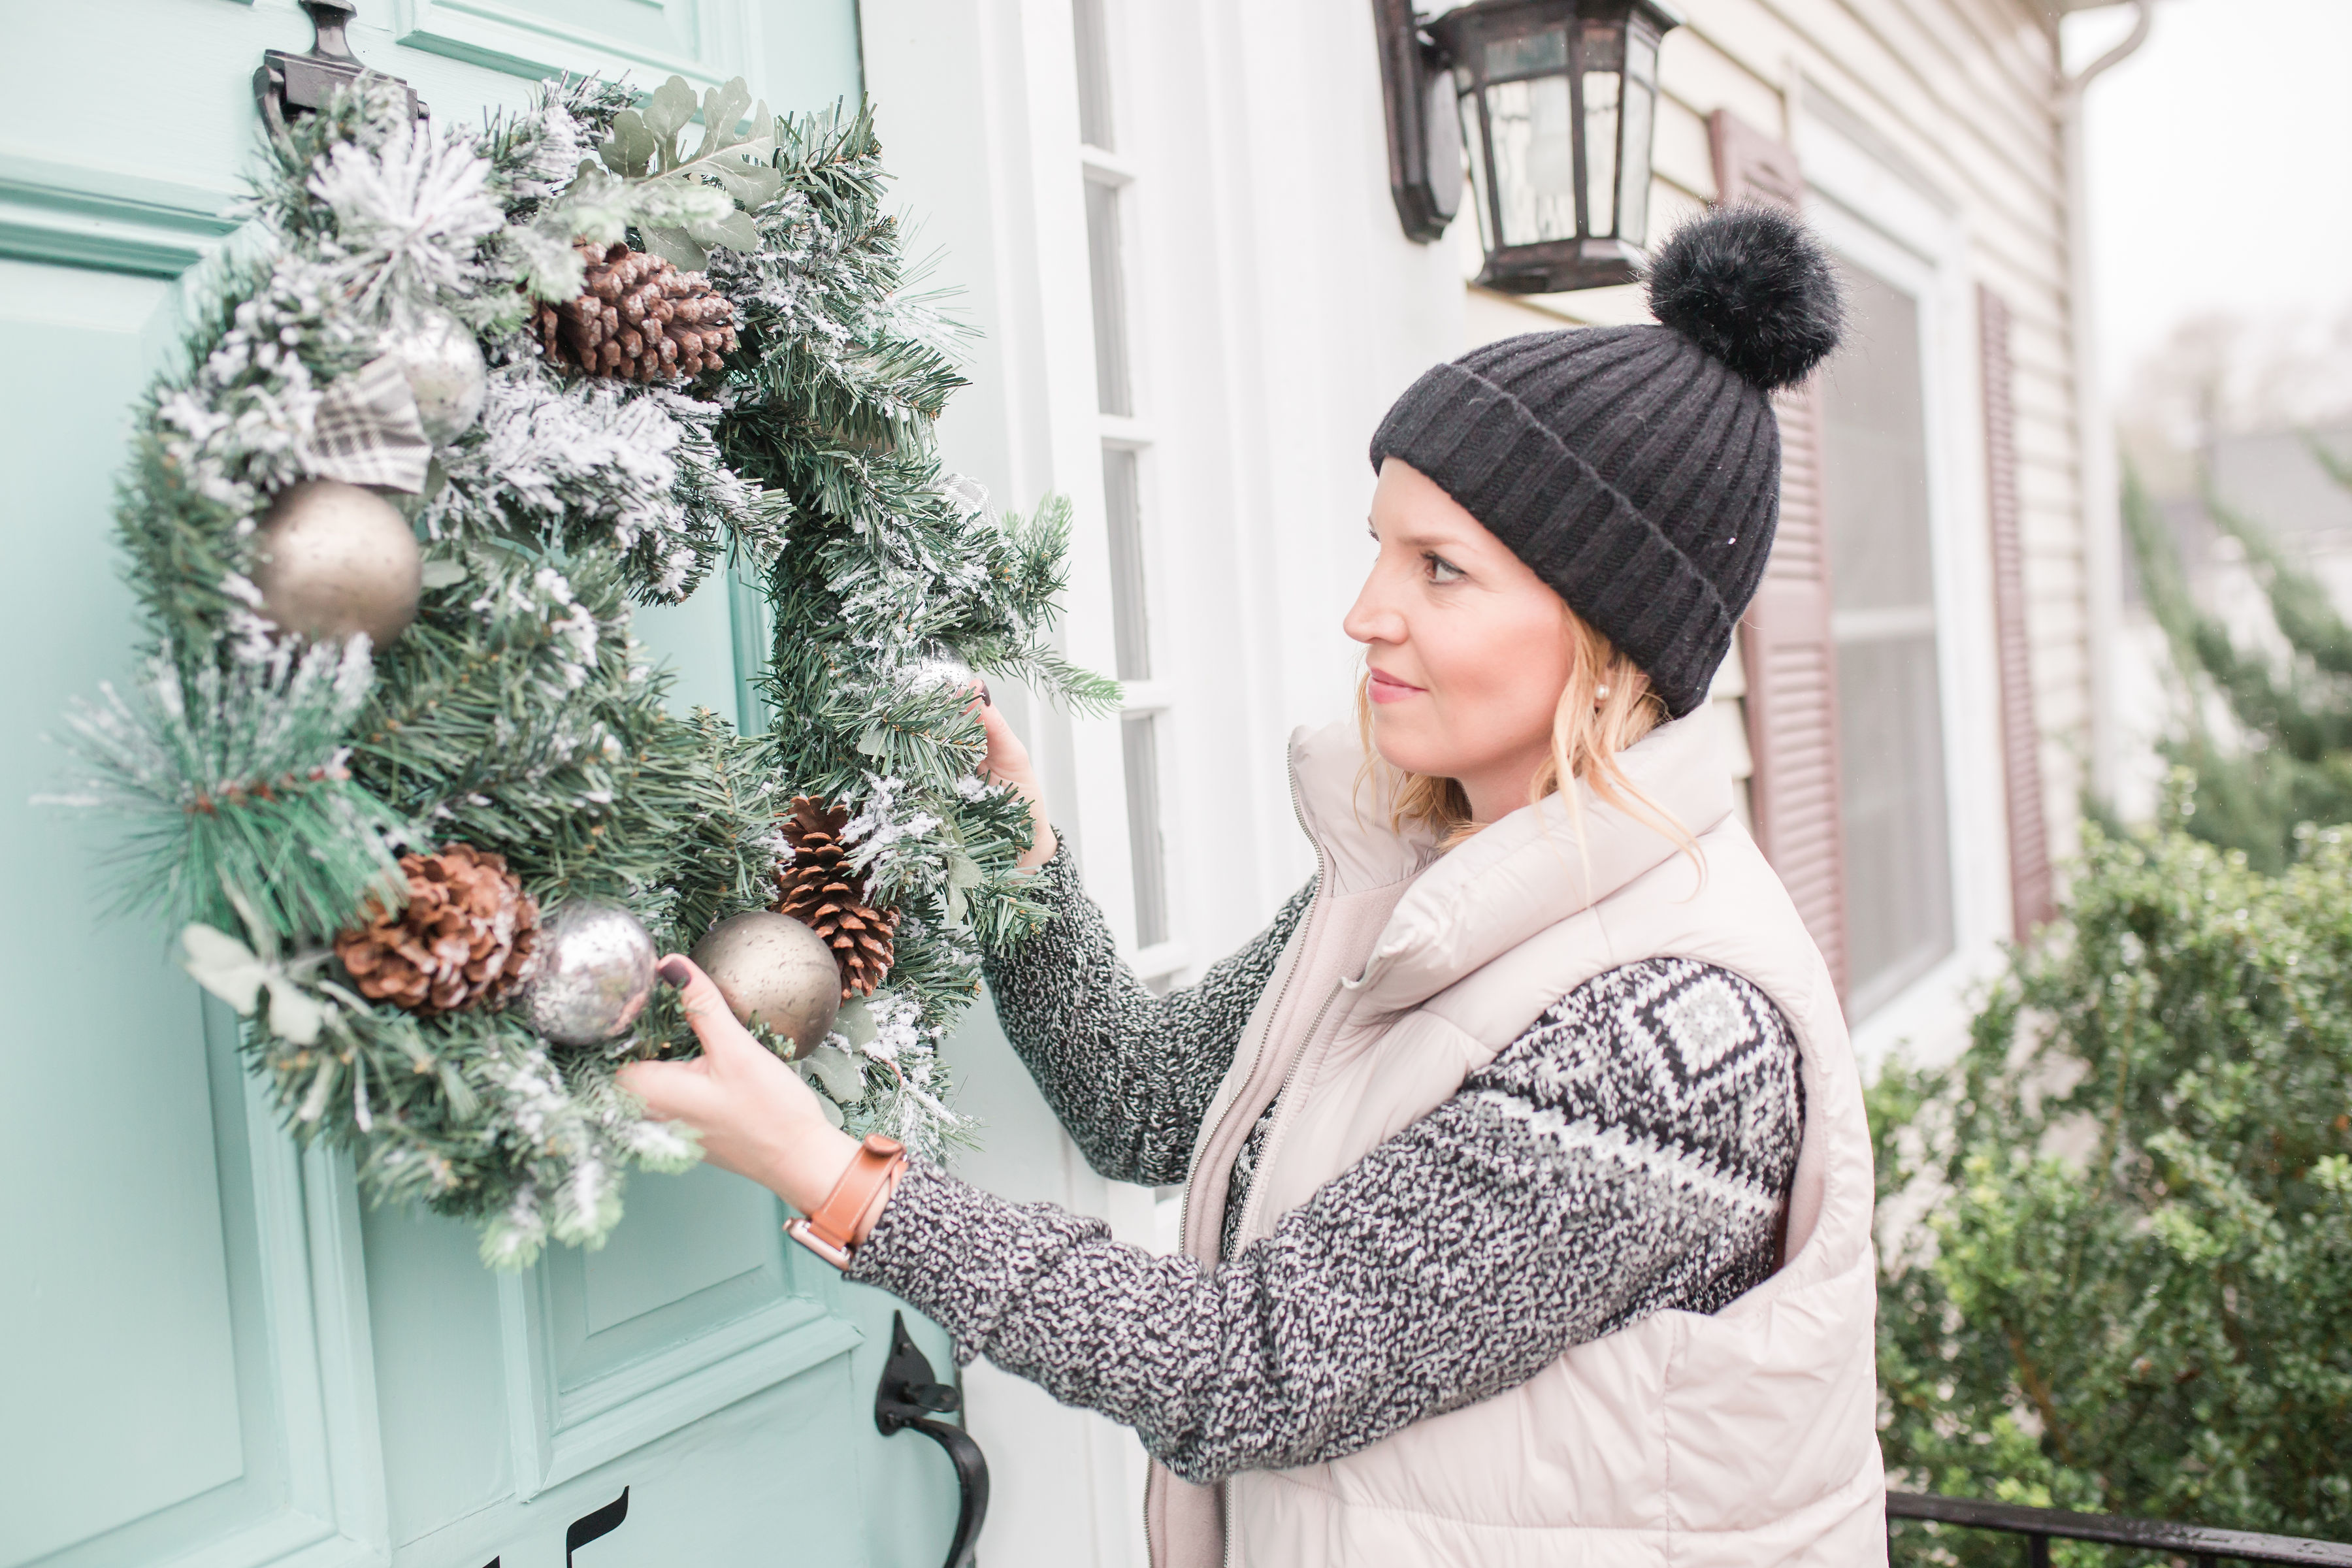
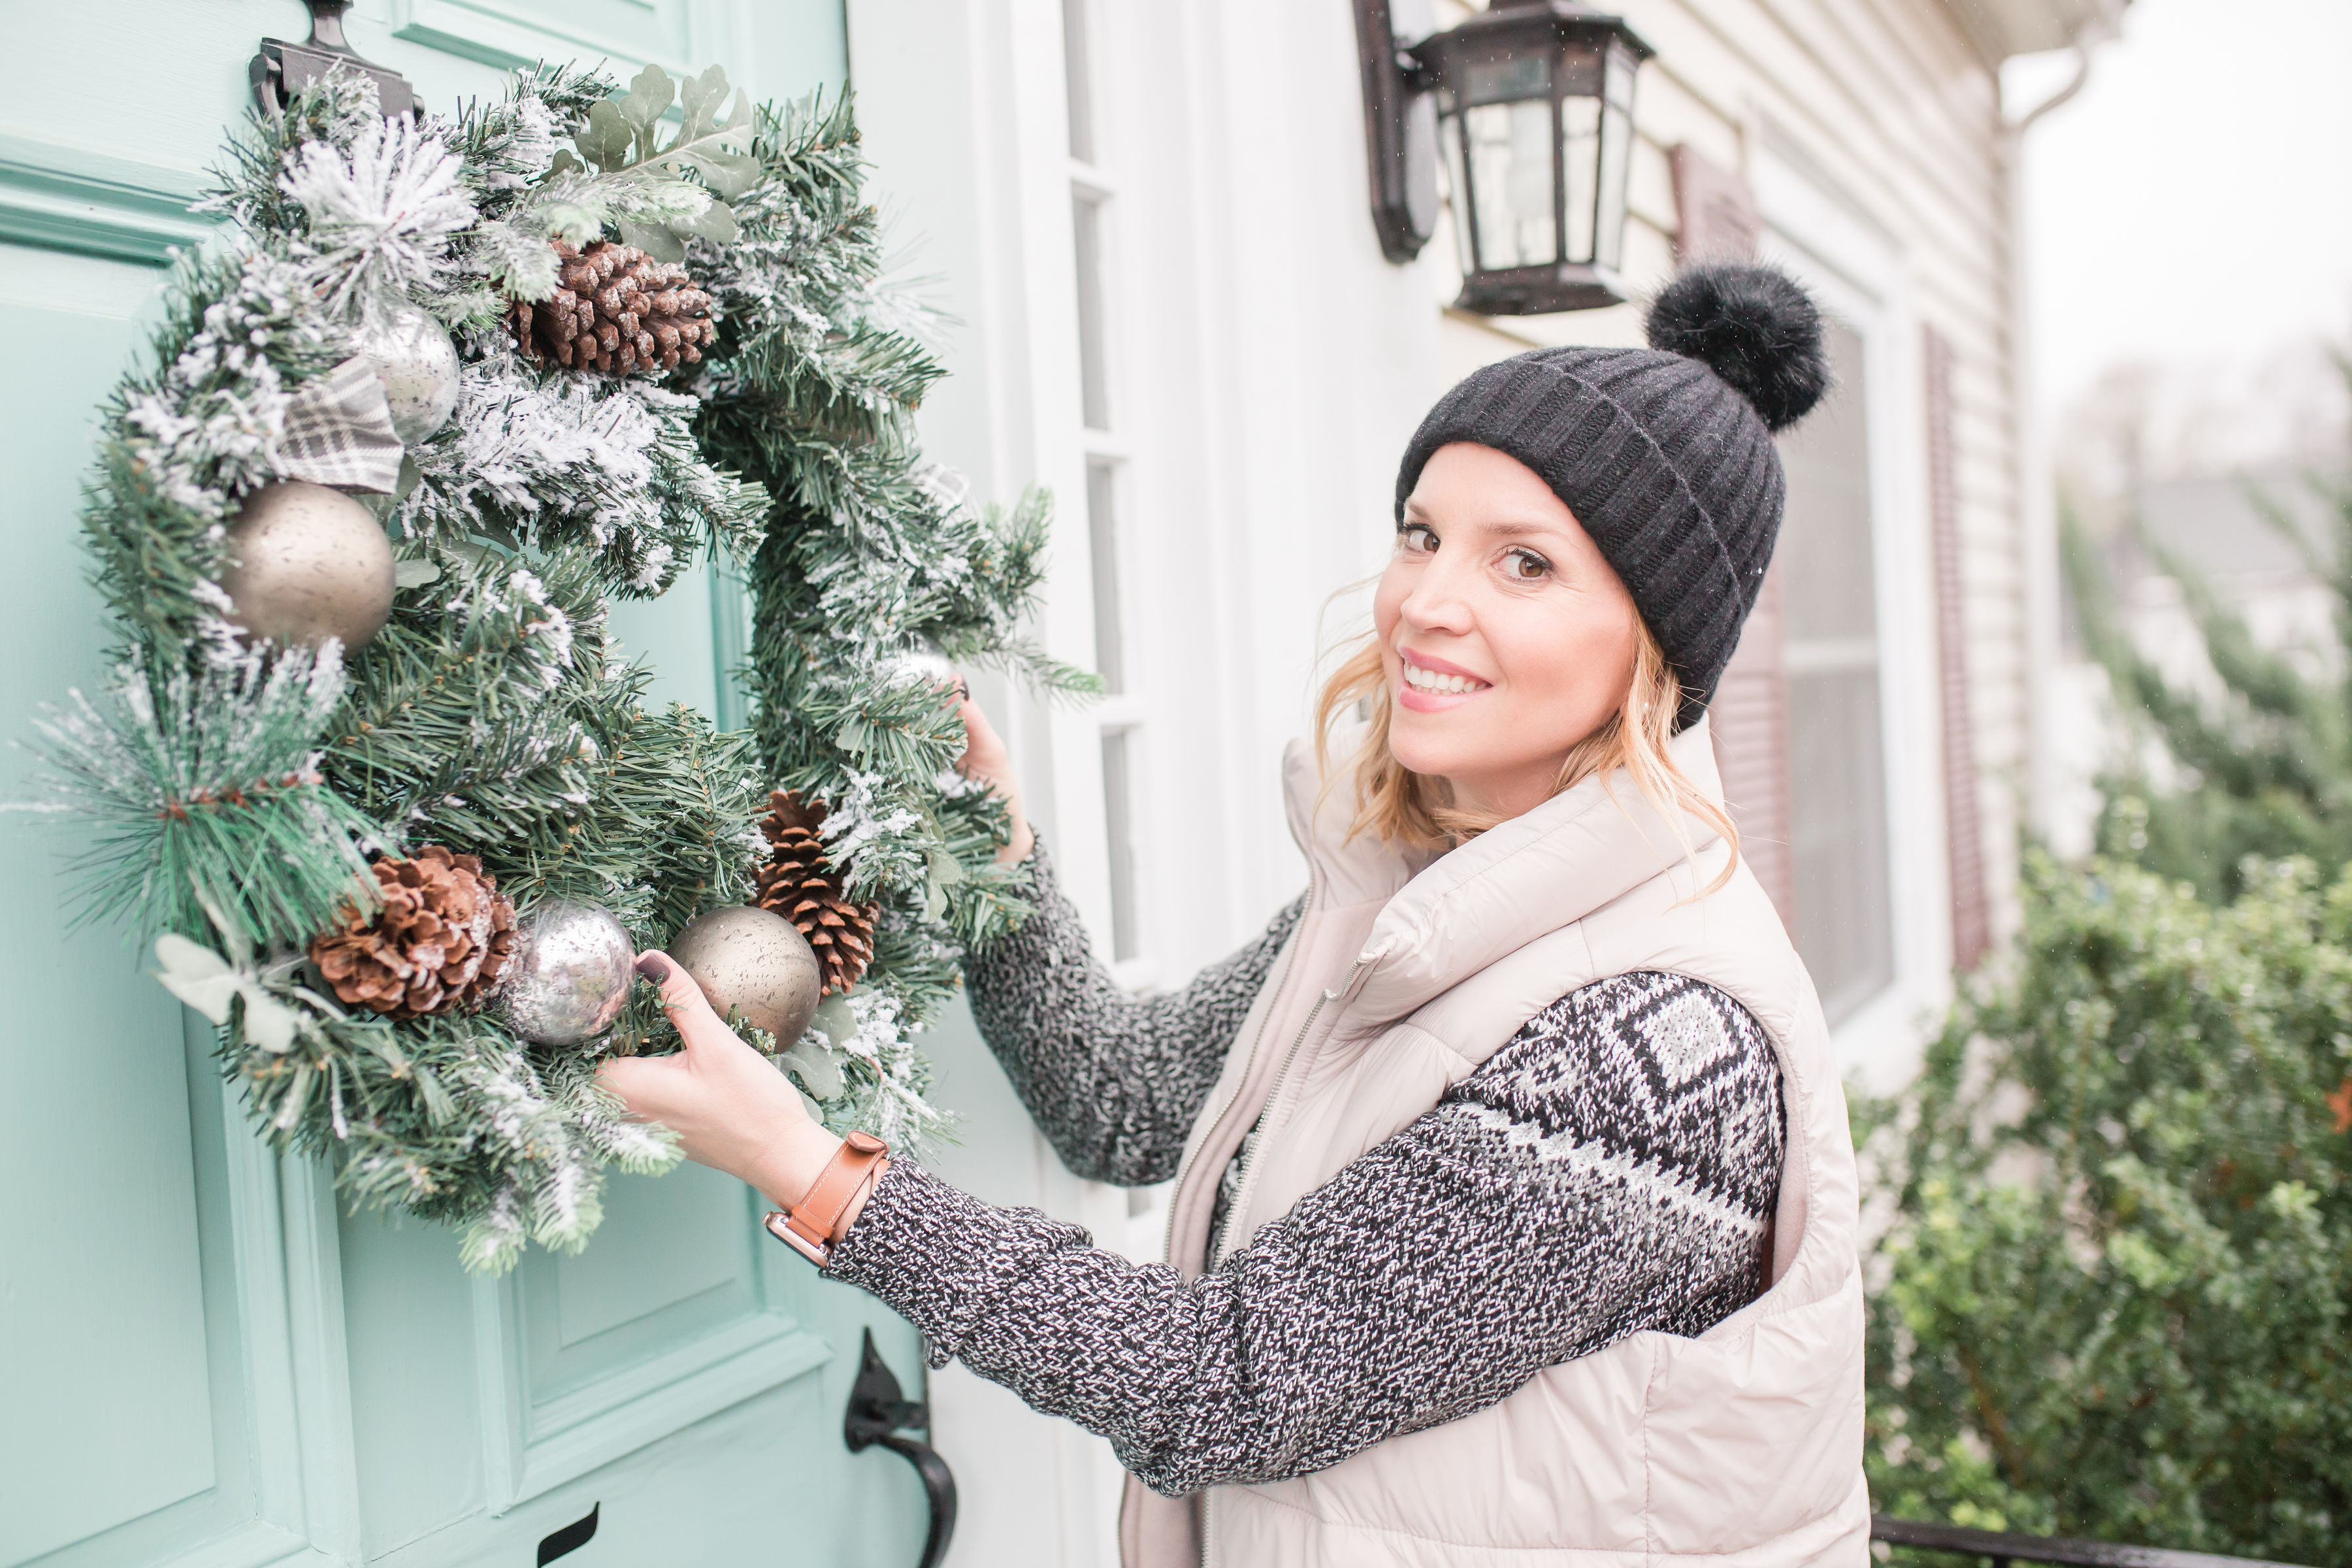
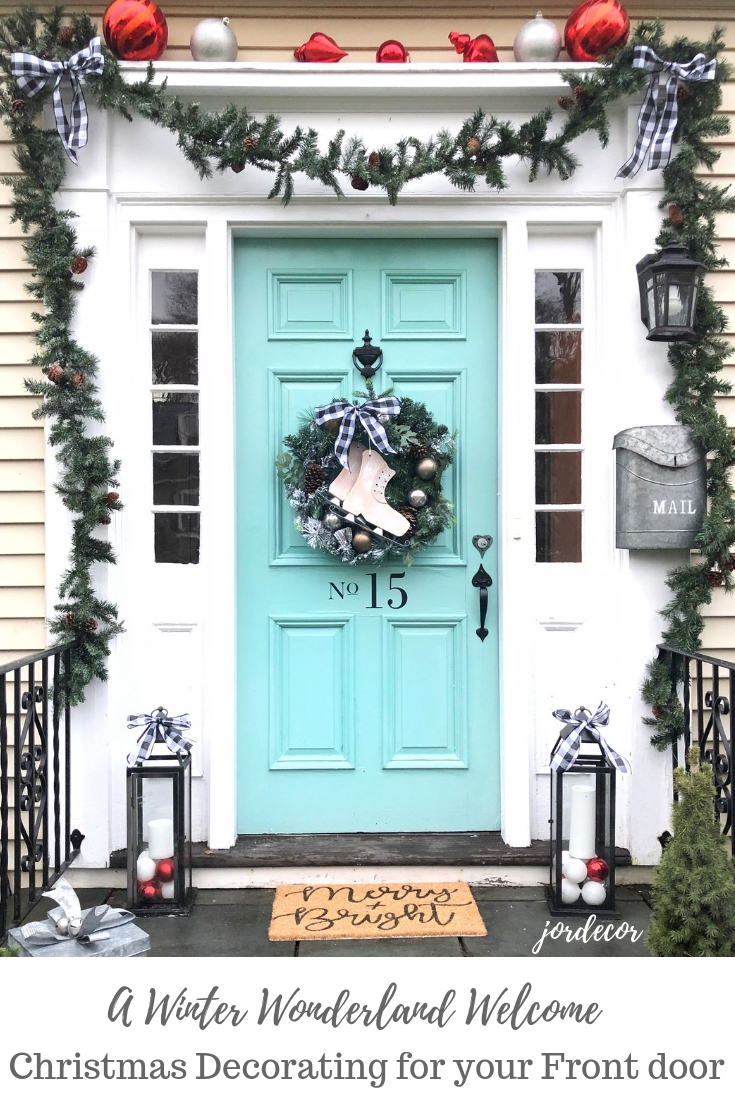
My favorite area to decorate in our home is actually outside our home! You guessed it. It’s our front door! The front door is the focal point of a house, which makes it the most important part. Ever since I painted our door this beautiful pop of aqua (Benjamin Moore St. Lucia teal) a few years ago, it tends to get a little extra attention. It always makes me smile whenever I pull up to our home. Out of all the seasons, I have to say this time of year is my favorite to decorate for. Year round I typically have a simple wreath and a couple lanterns or potted plants but this time of year I like to got ALL. OUT. This year I wanted to go with a farmhouse feel and also a very winter feel with a little Christmas cheer. I love that this look is not sooooooo Christmas-y that I will want to take it down on 12/26. I started by sketching out some ideas… this always helps me get some different ideas going. I actually had my friends over on Instagram vote on these designs, which helped me narrow down my ideas. The inspiration started when I found this wreath at TJ MAXX I loved the snowy look with pine cones, it just felt like something I’d leave up through February! However I love dressing up simple wreaths to make them even more festive. So you can see what I added further down.
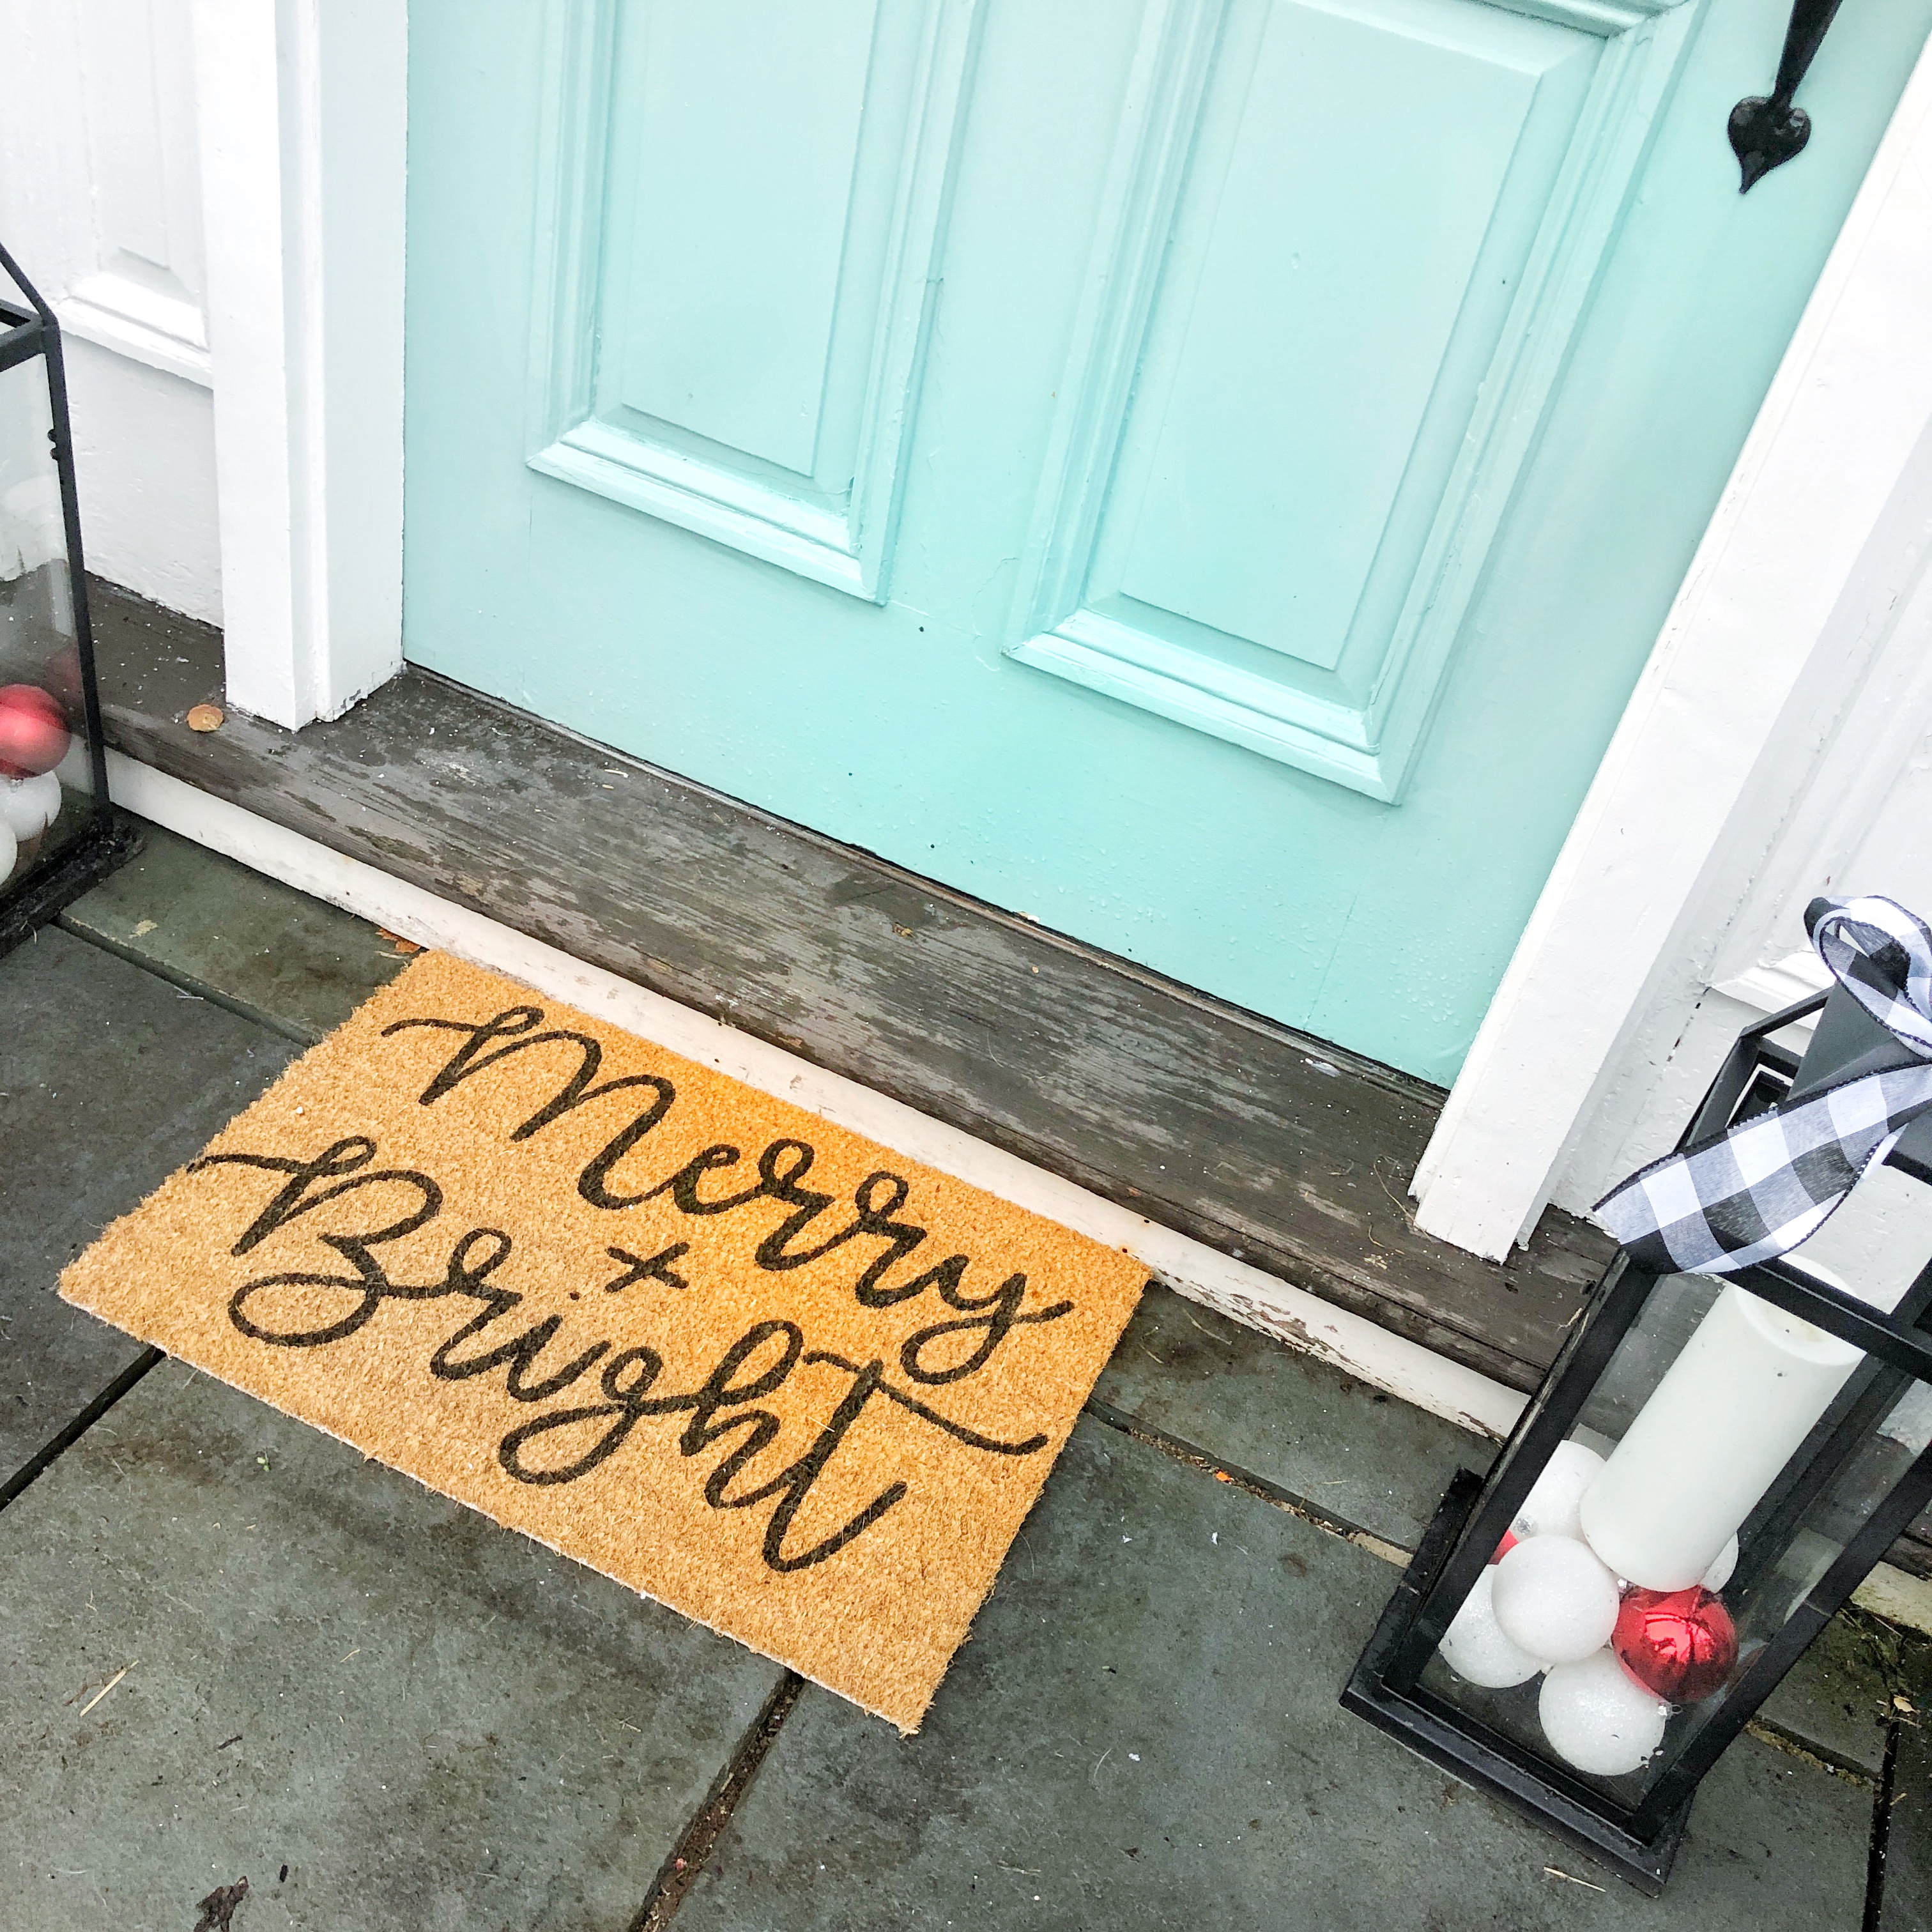
Of course a front entrance isn’t complete with out a door mat. I love when they have fun sayings like this one below.

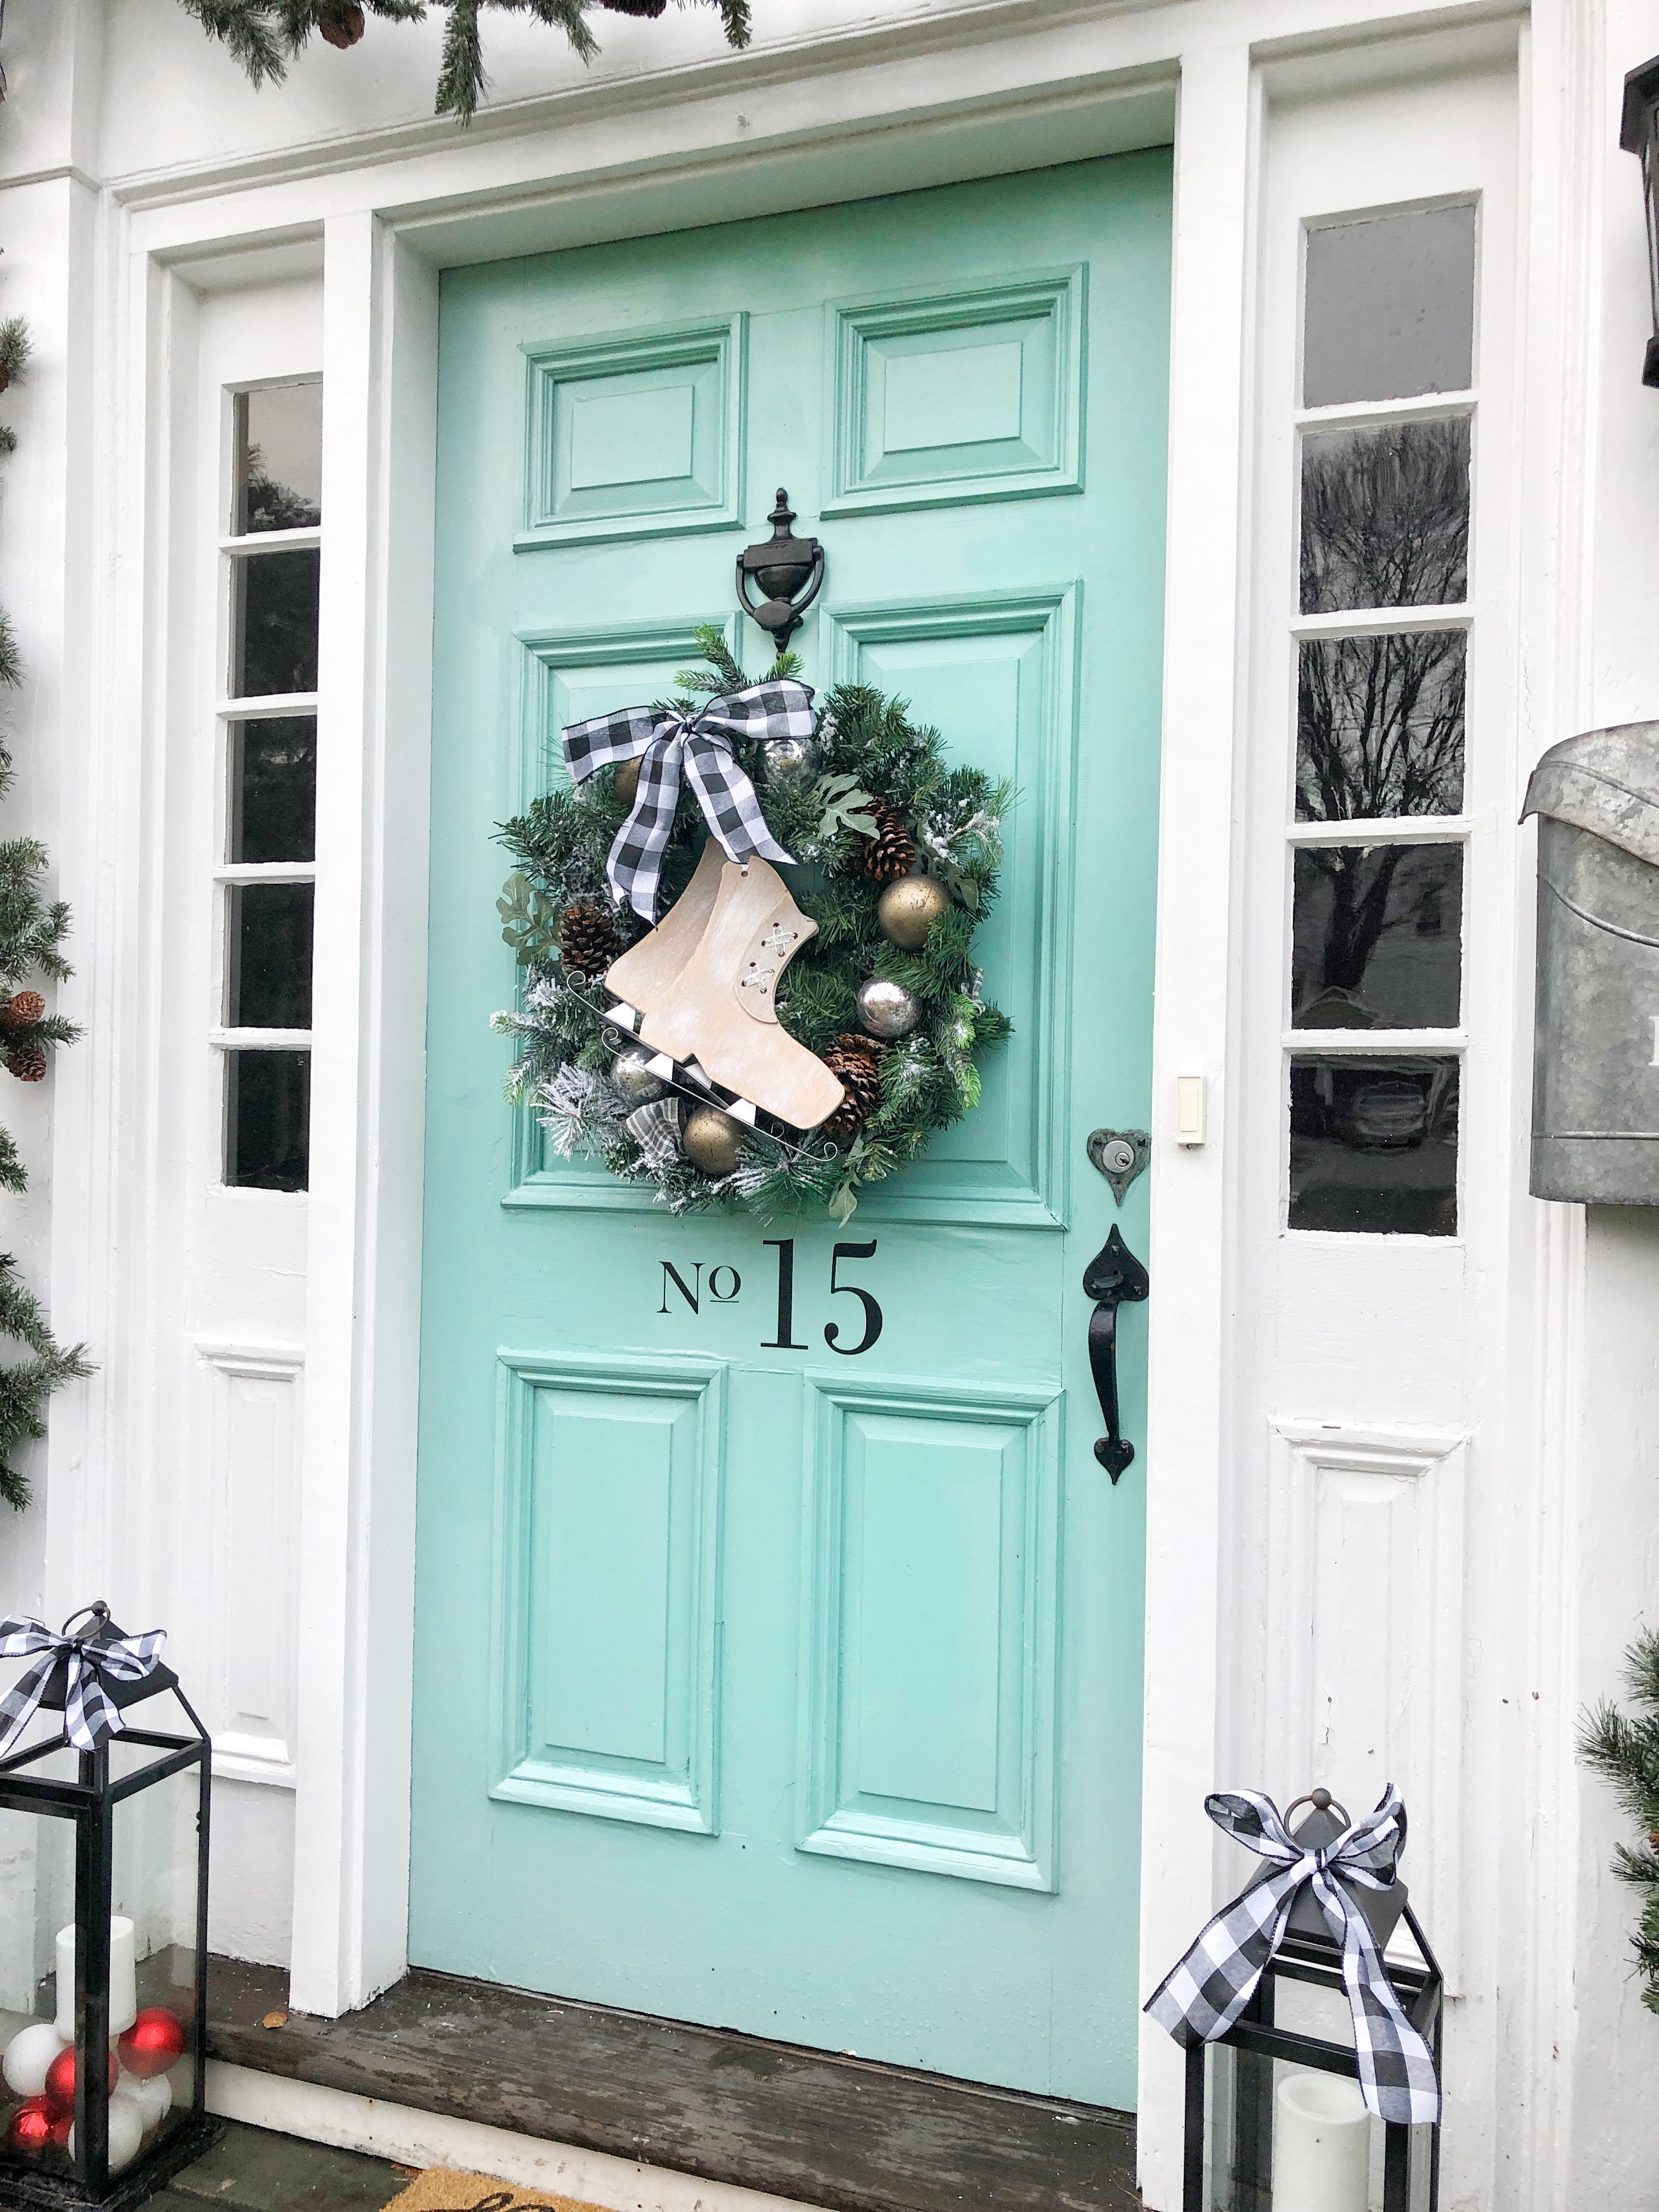
Here I took three long garlands from Michael’s (they were 50% off ) and created a draped look around the door, buffalo check ribbon also from Michaels. The black/silver/red theme started to emerge and I went with it. This color theme is a bit different for me as I tend to go with more traditional reds/greens in the past. I added the bows in the corners of the garland to dress it up a little bit. I added these wood ice skates I got at Target dollar spot last year to my winter-y wreath which gives it that extra something. I incorporated that buffalo check ribbon to that as well. My lanterns are from Pier One and I’ve had them for awhile. I added some ornaments to the base to raise up the faux candles and add some color.
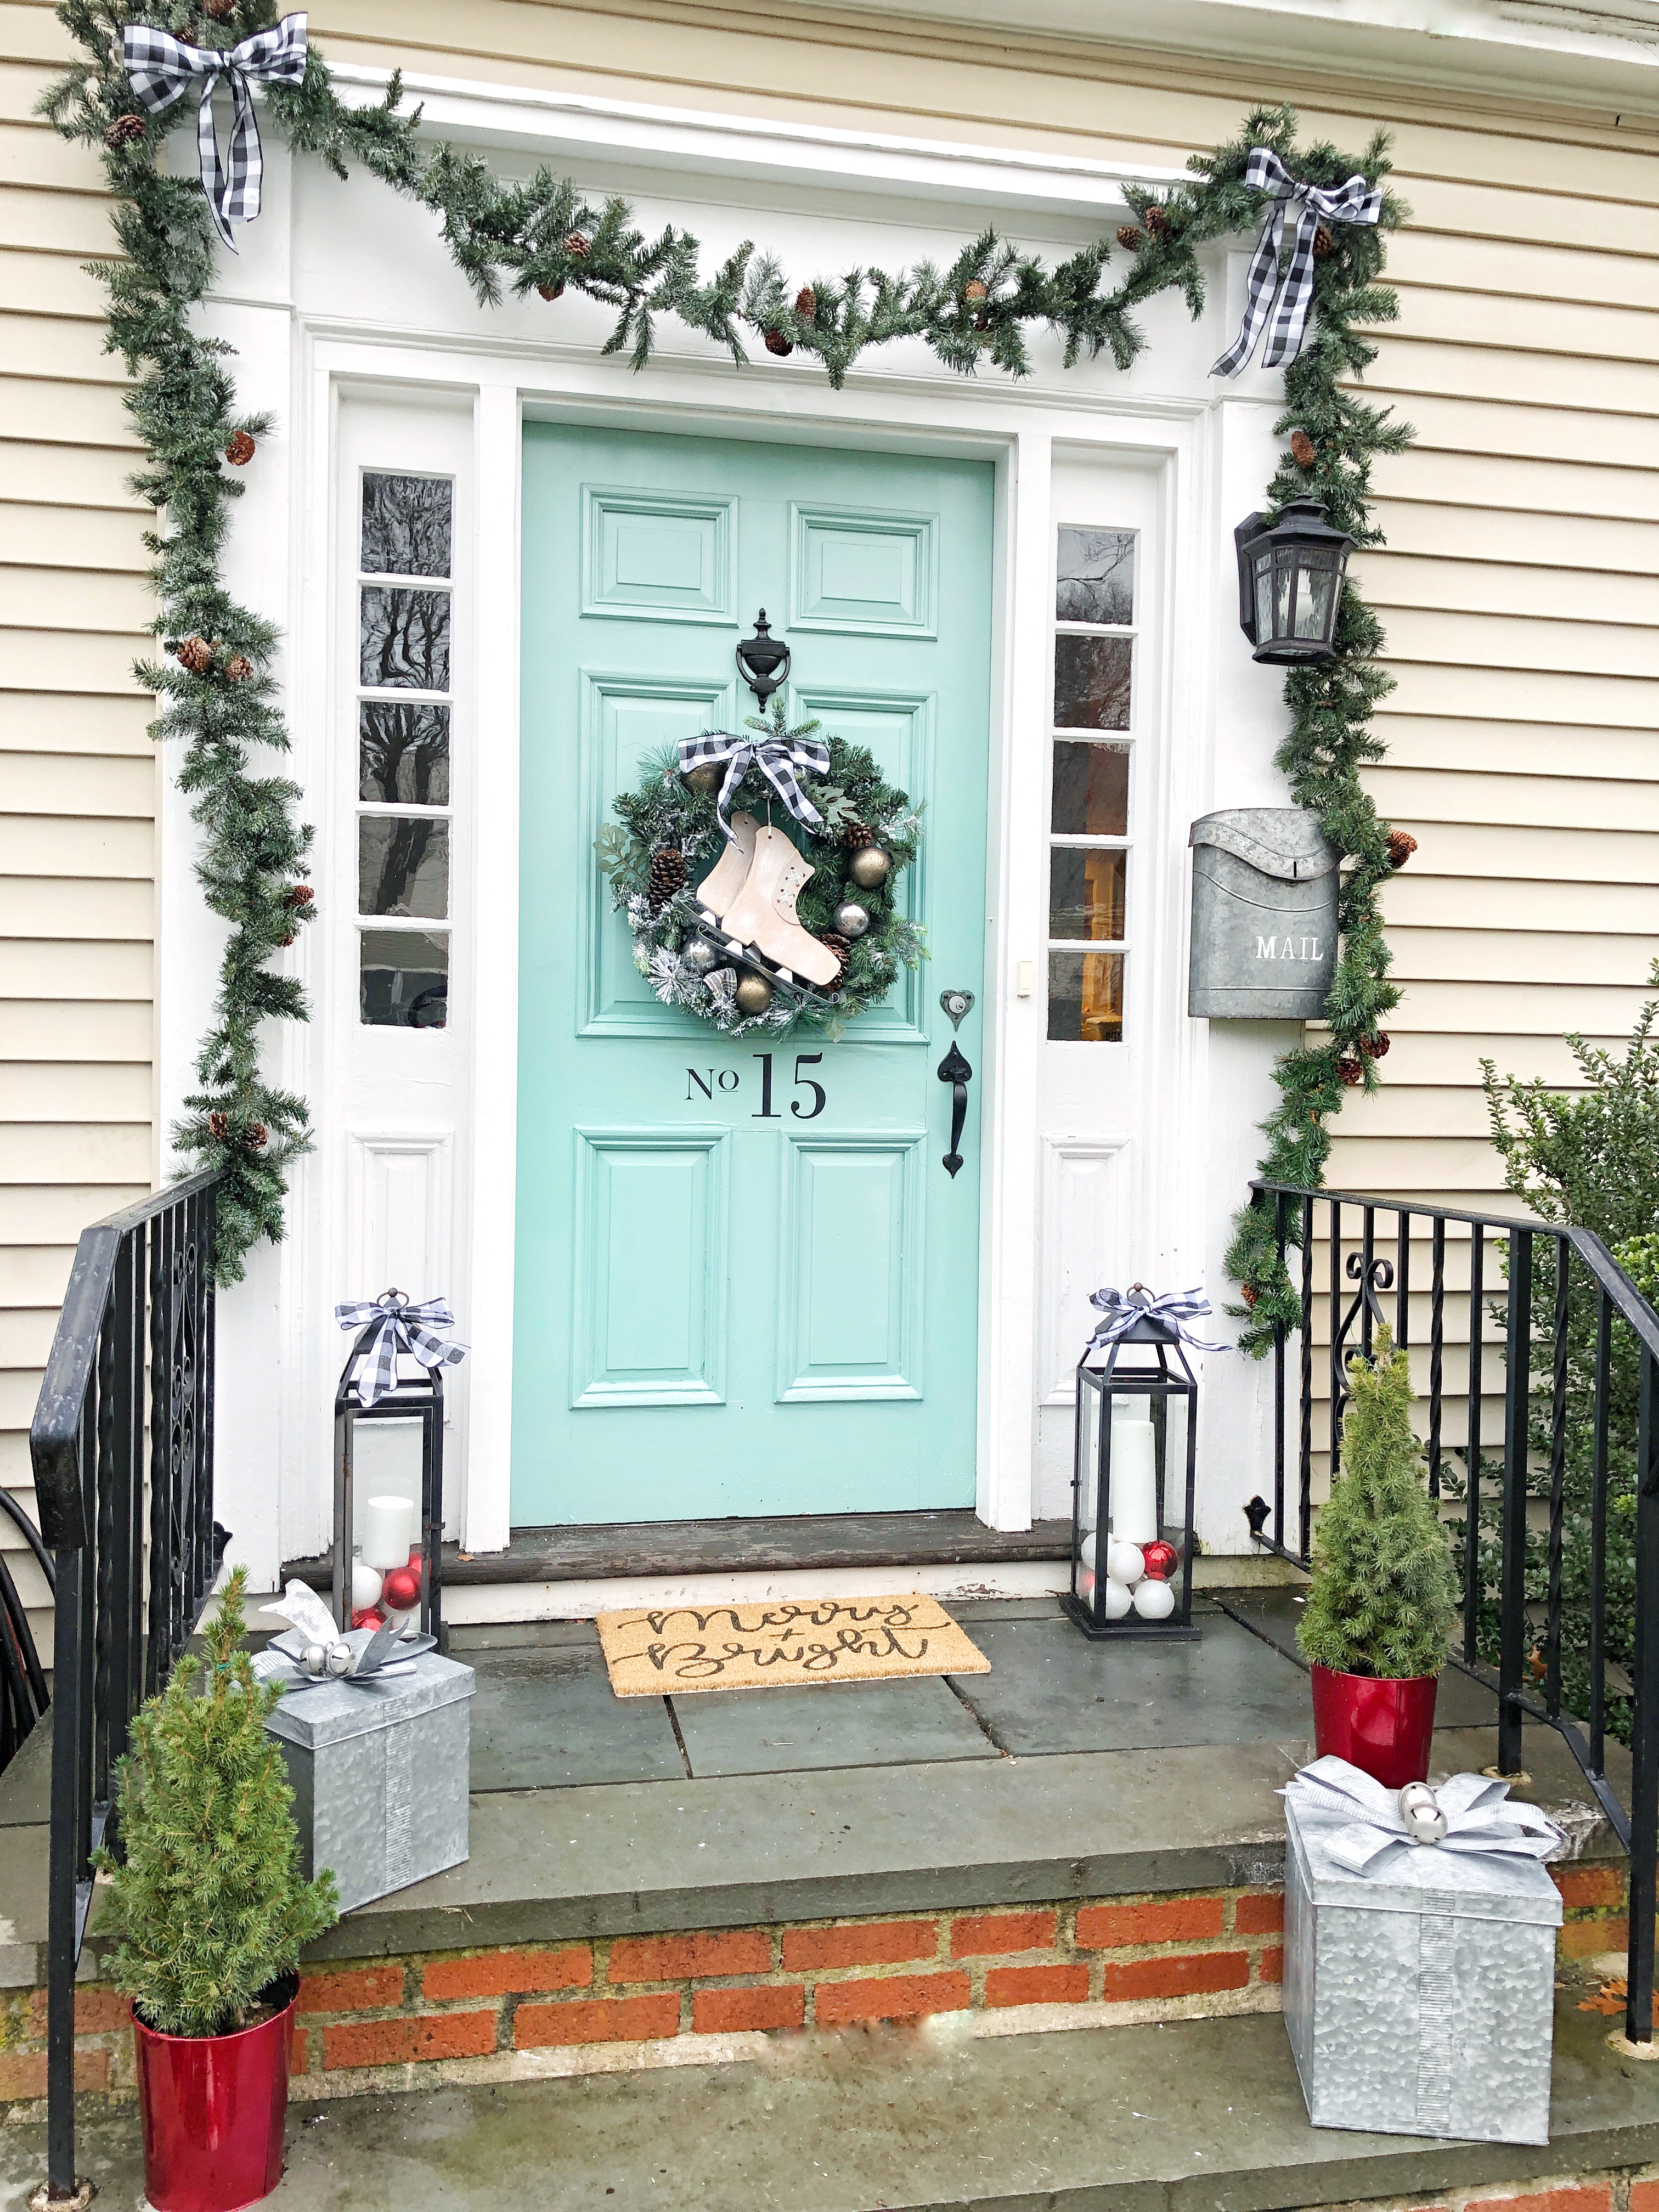
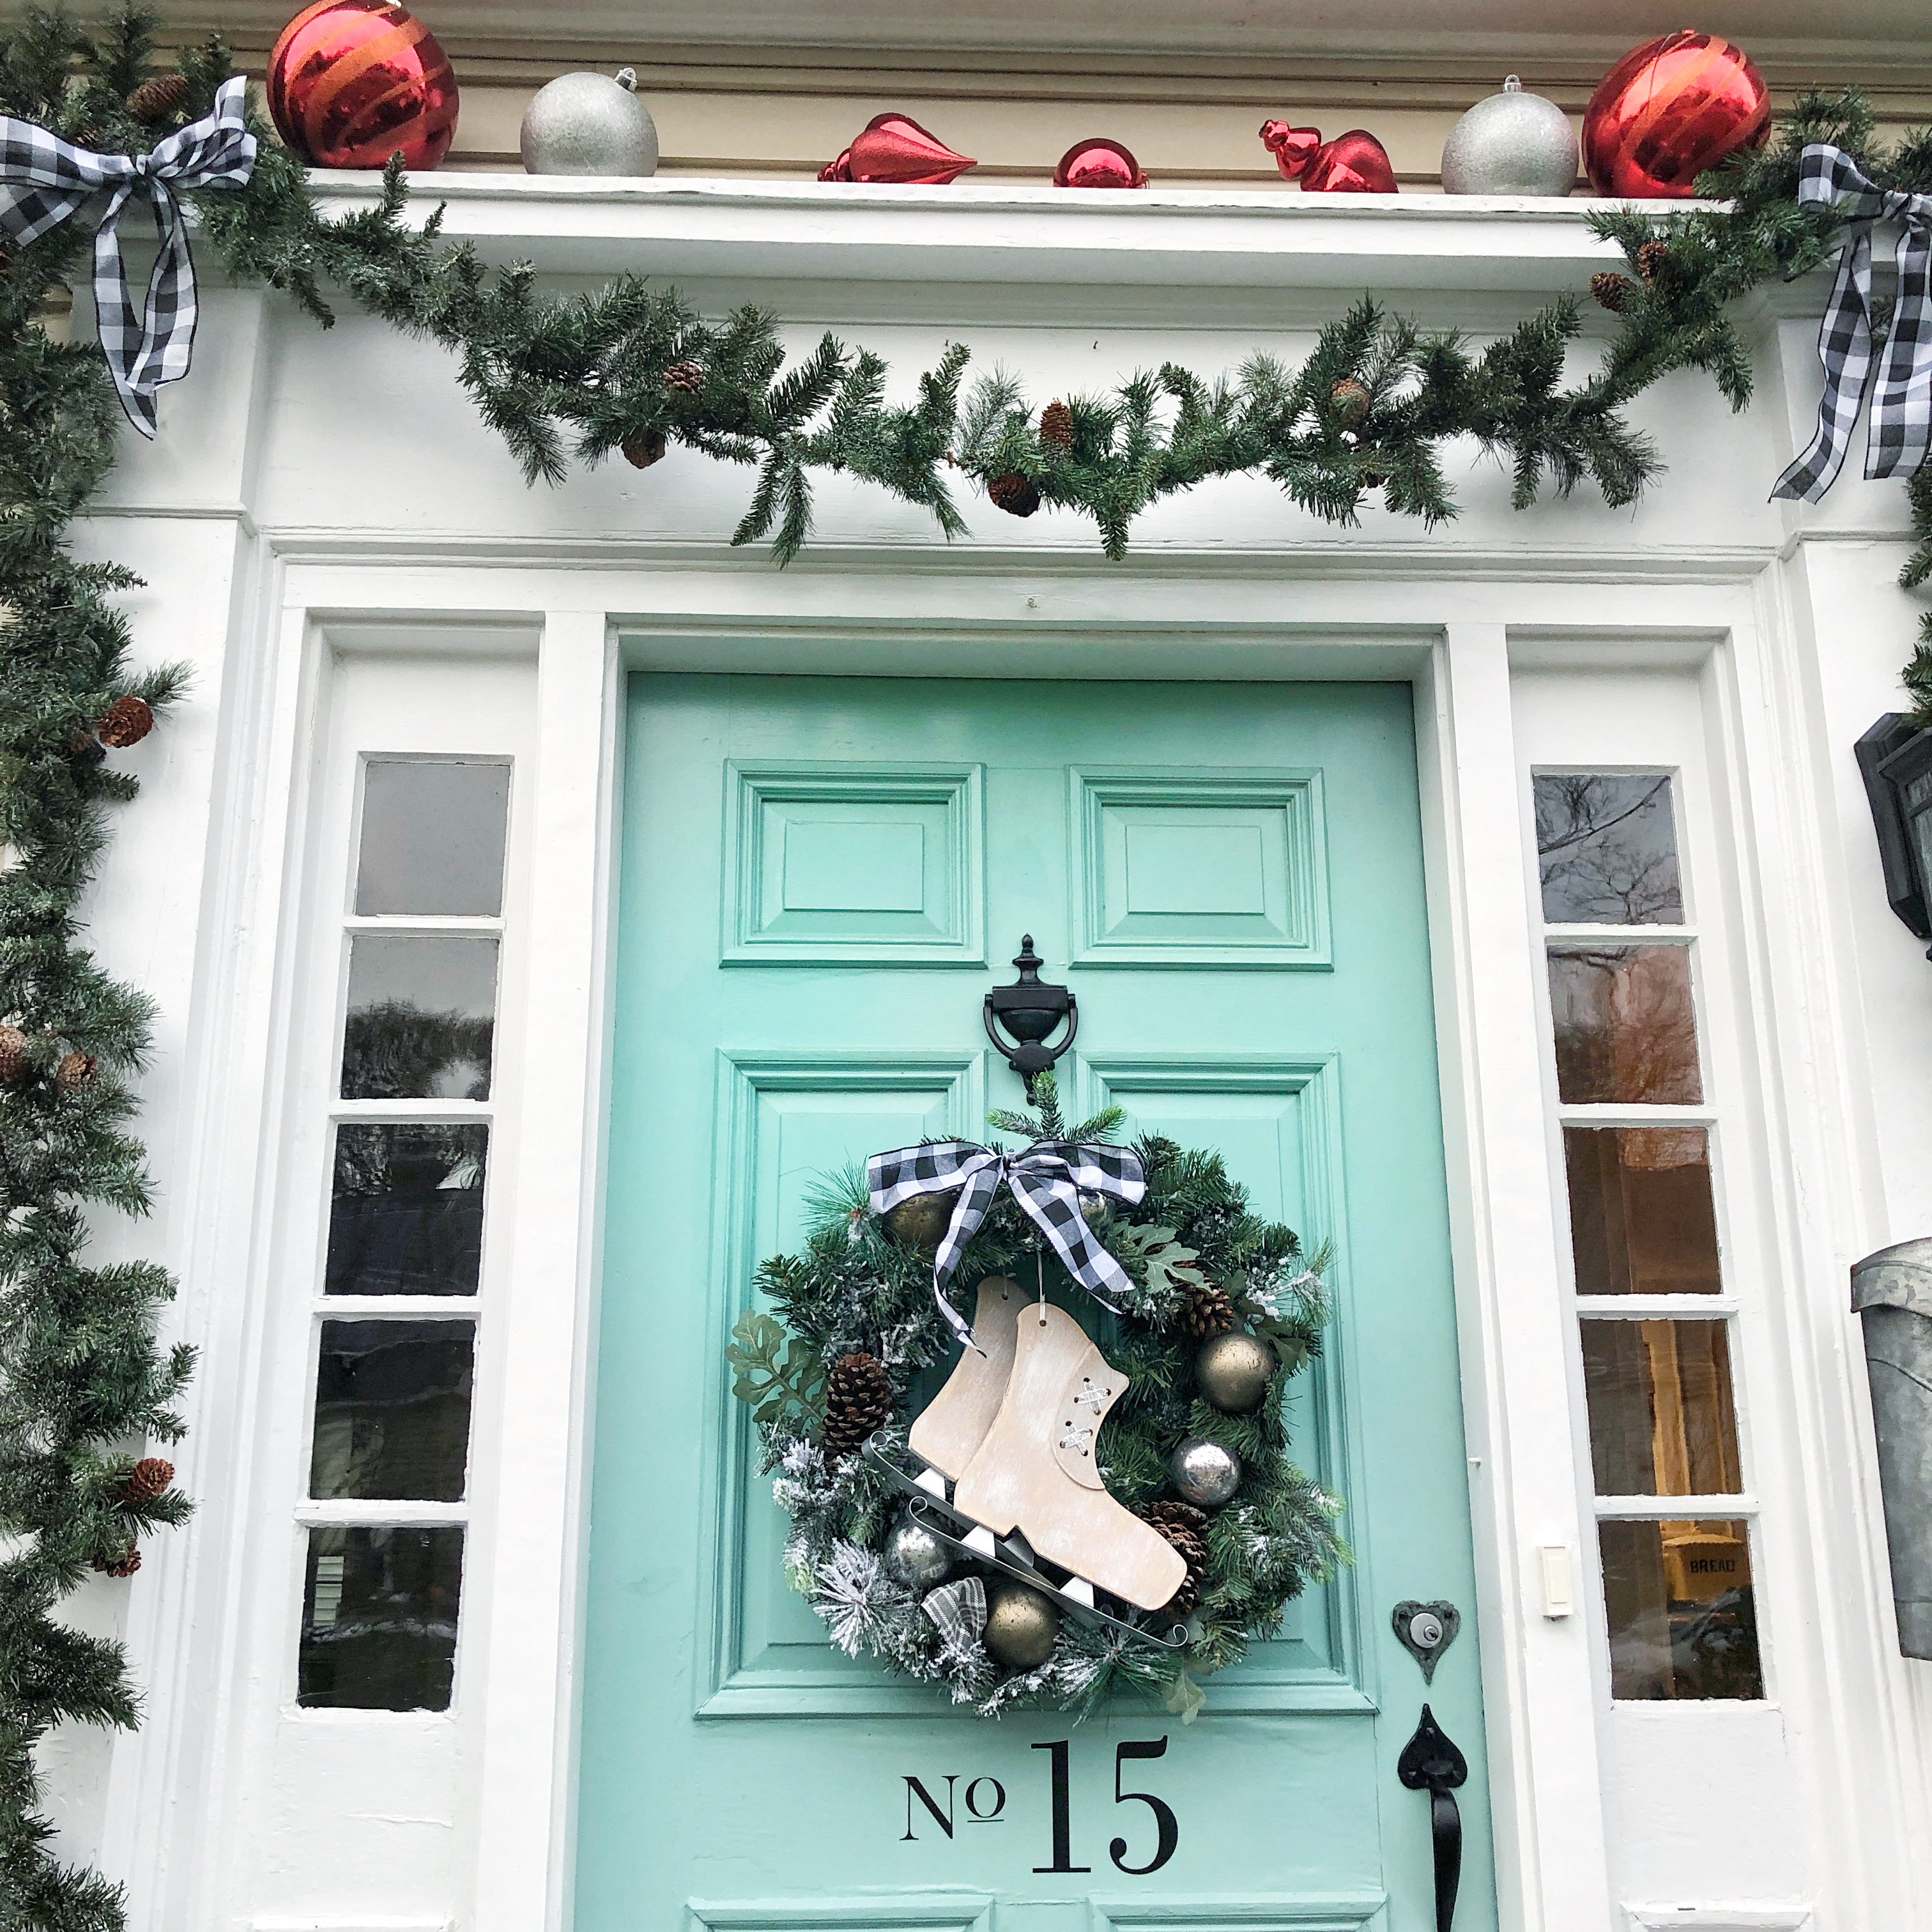

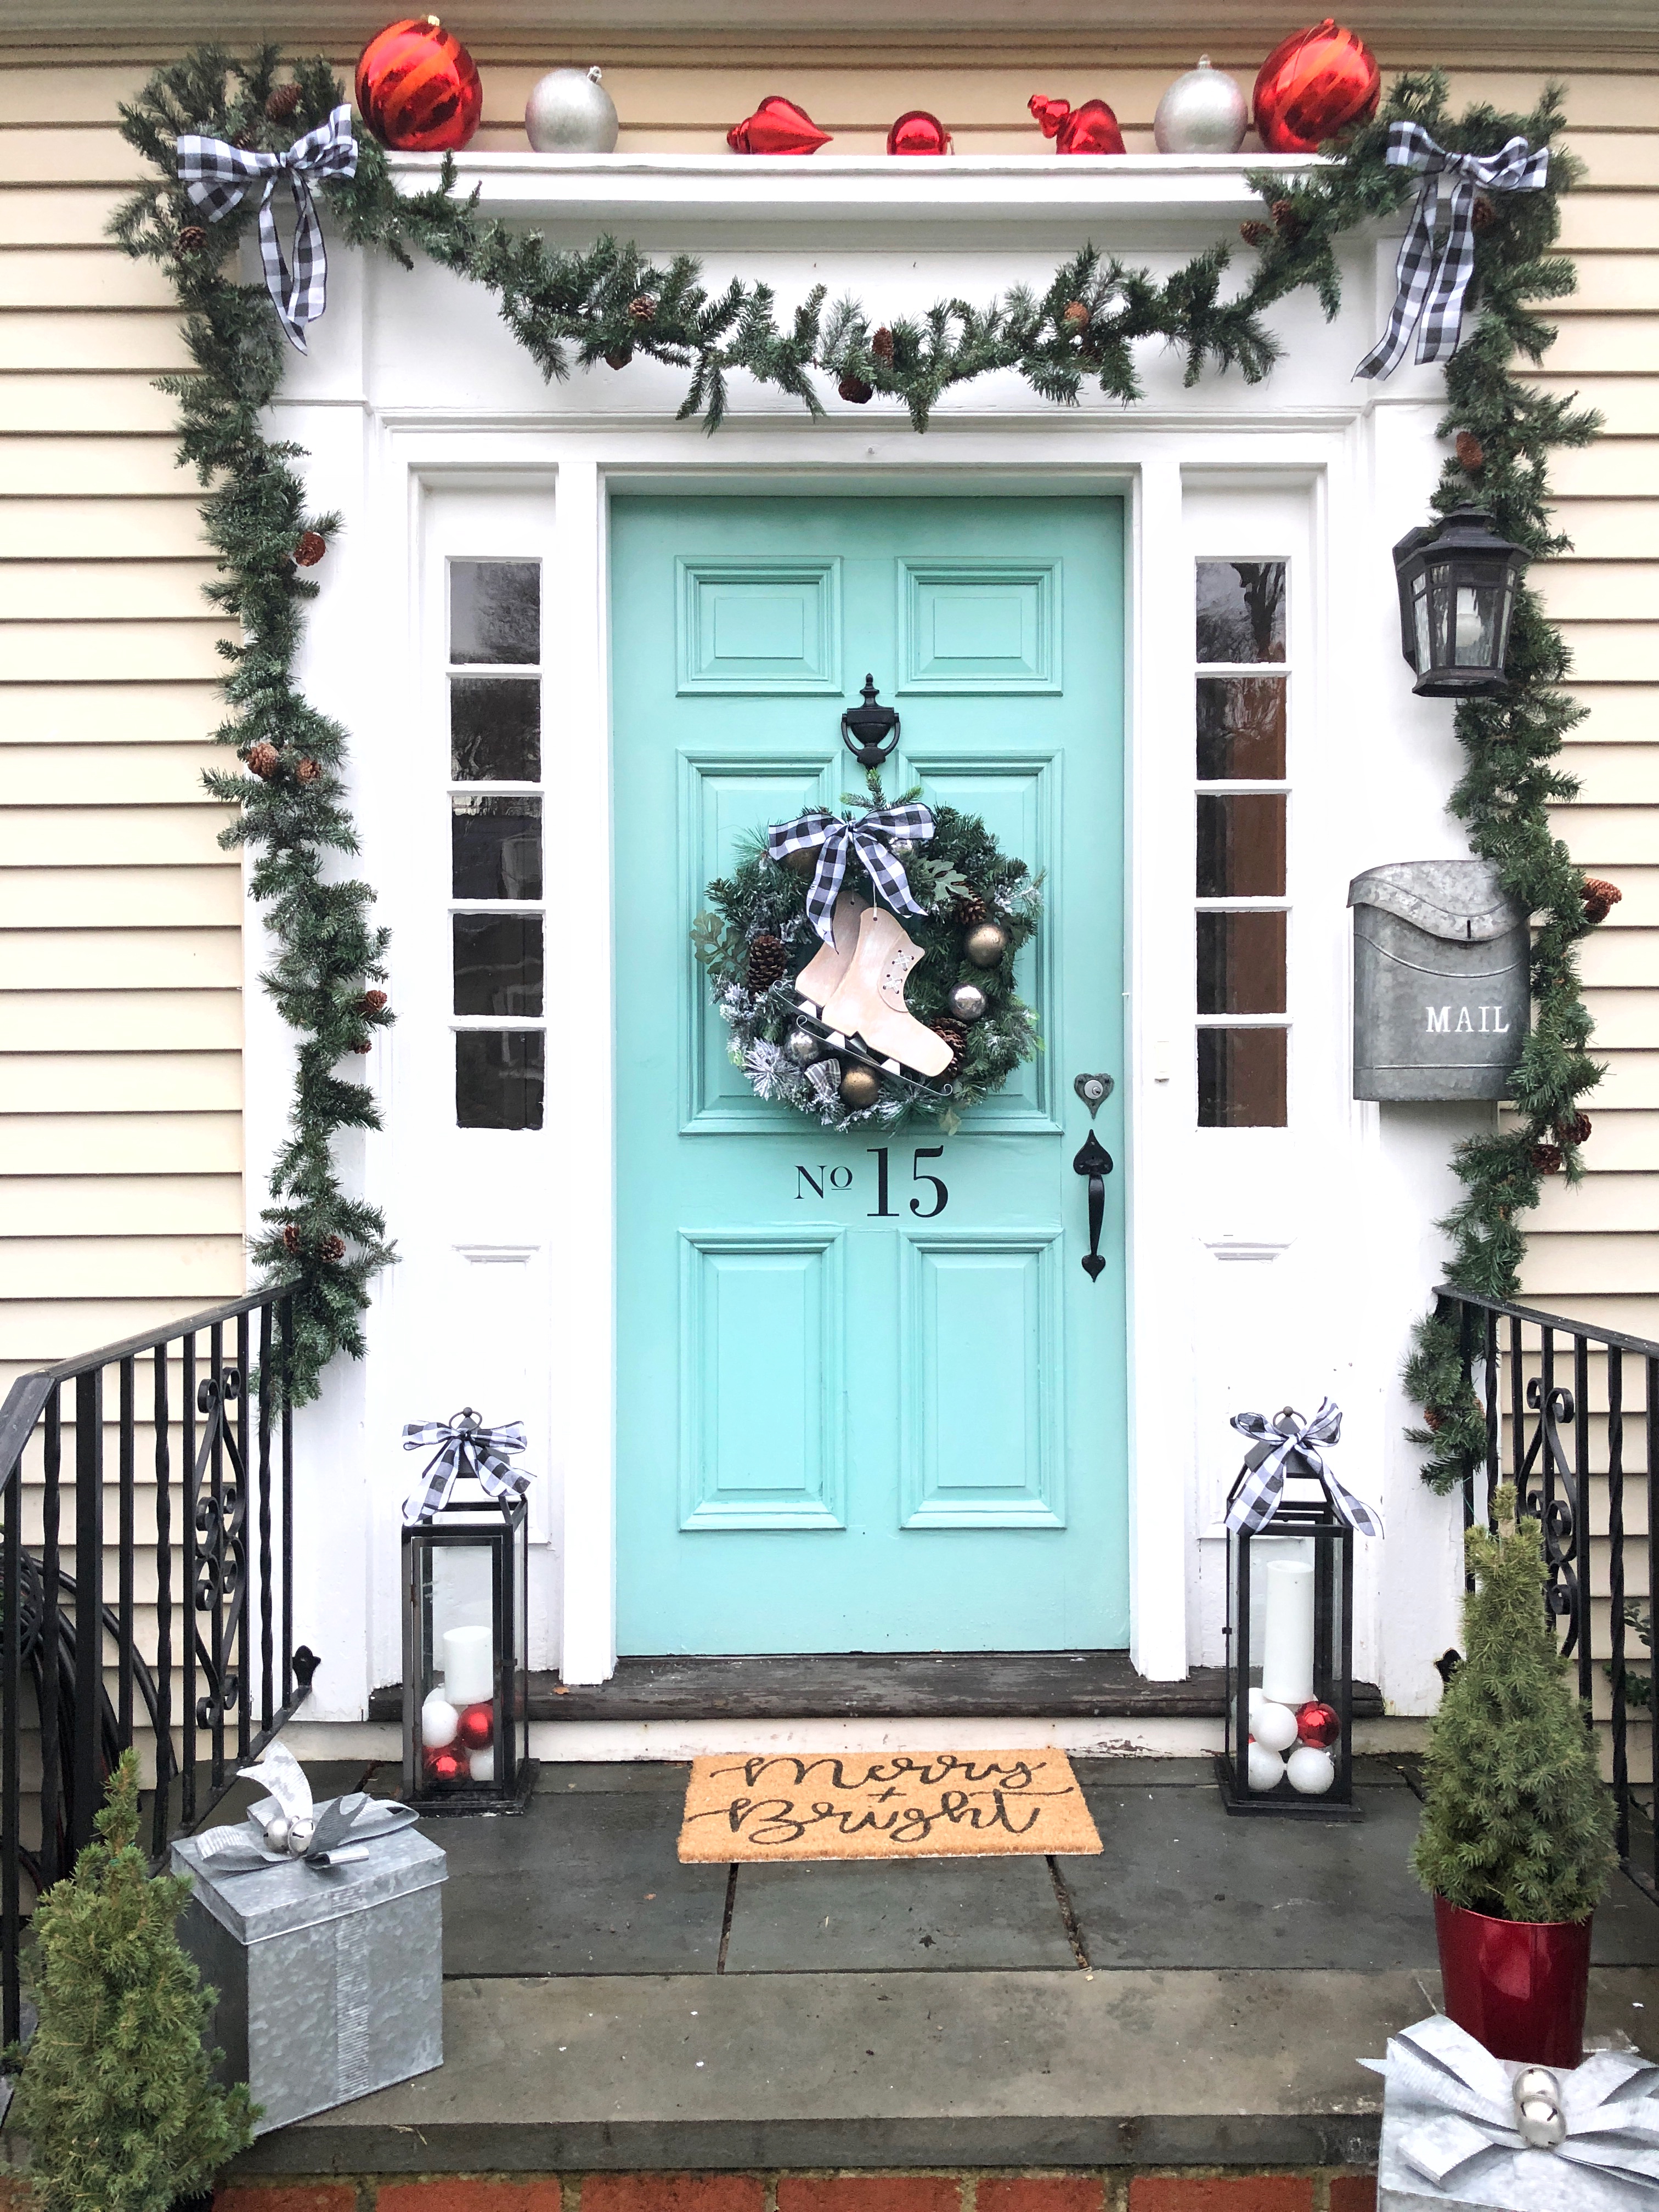
The top part looked a little bare…So I double stuck tape these giant ornaments on the ledge. I was going to hang ornaments down from the ledge but it didn’t seem to work out. I’m going to leave it as is for now. However, I may still tweak. I’d still like to find a larger outdoor mat to go under my “merry and bright” because I really love the layered mat look. I think I may put some more ornaments in the lanterns and add some twinkle lights.
I hope you guys like the start of my outdoor holiday decorating!! Nothing like a winter wonderland to welcome your guests in from the cold. How do you like it so far?
SHOP THIS POST:
PIN FOR LATER:


")

