
Design & DIY

I’m so excited to share this teeny tiny space for our teeny tiny new person (baby boy) coming this September. I really wanted to get a head start on this because the summer is so busy. Plus the further along I get the more tired! If you are expecting or trying to figure out how to make a small space/home work for a new addition I hope this inspires you. We have a home with three bedrooms currently all occupied, because our two older kids are exactly willing to give up their bedrooms or share with a newborn (I don’t blame them!). I wanted to get creative with our master bedroom and make a little nursery nook for this baby. Since we usually keep our babies in our room for the first few months anyways this will give us time to evaluate sleeping arrangements and if we decide to add on to our house (aka another bedroom) or maybe move. We don’t want to rush our decision right now.
Nursery Nook Design Inspiration:
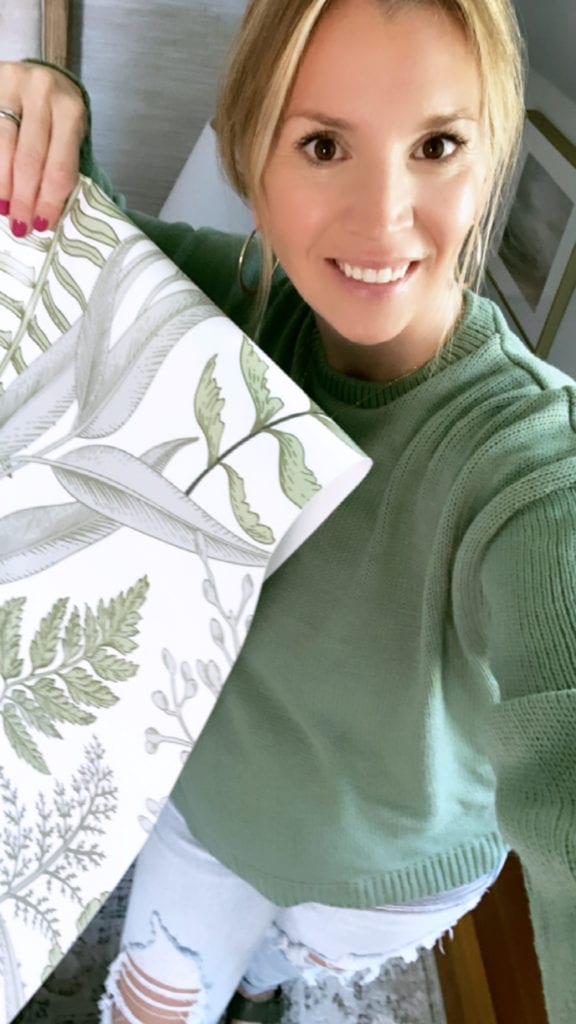
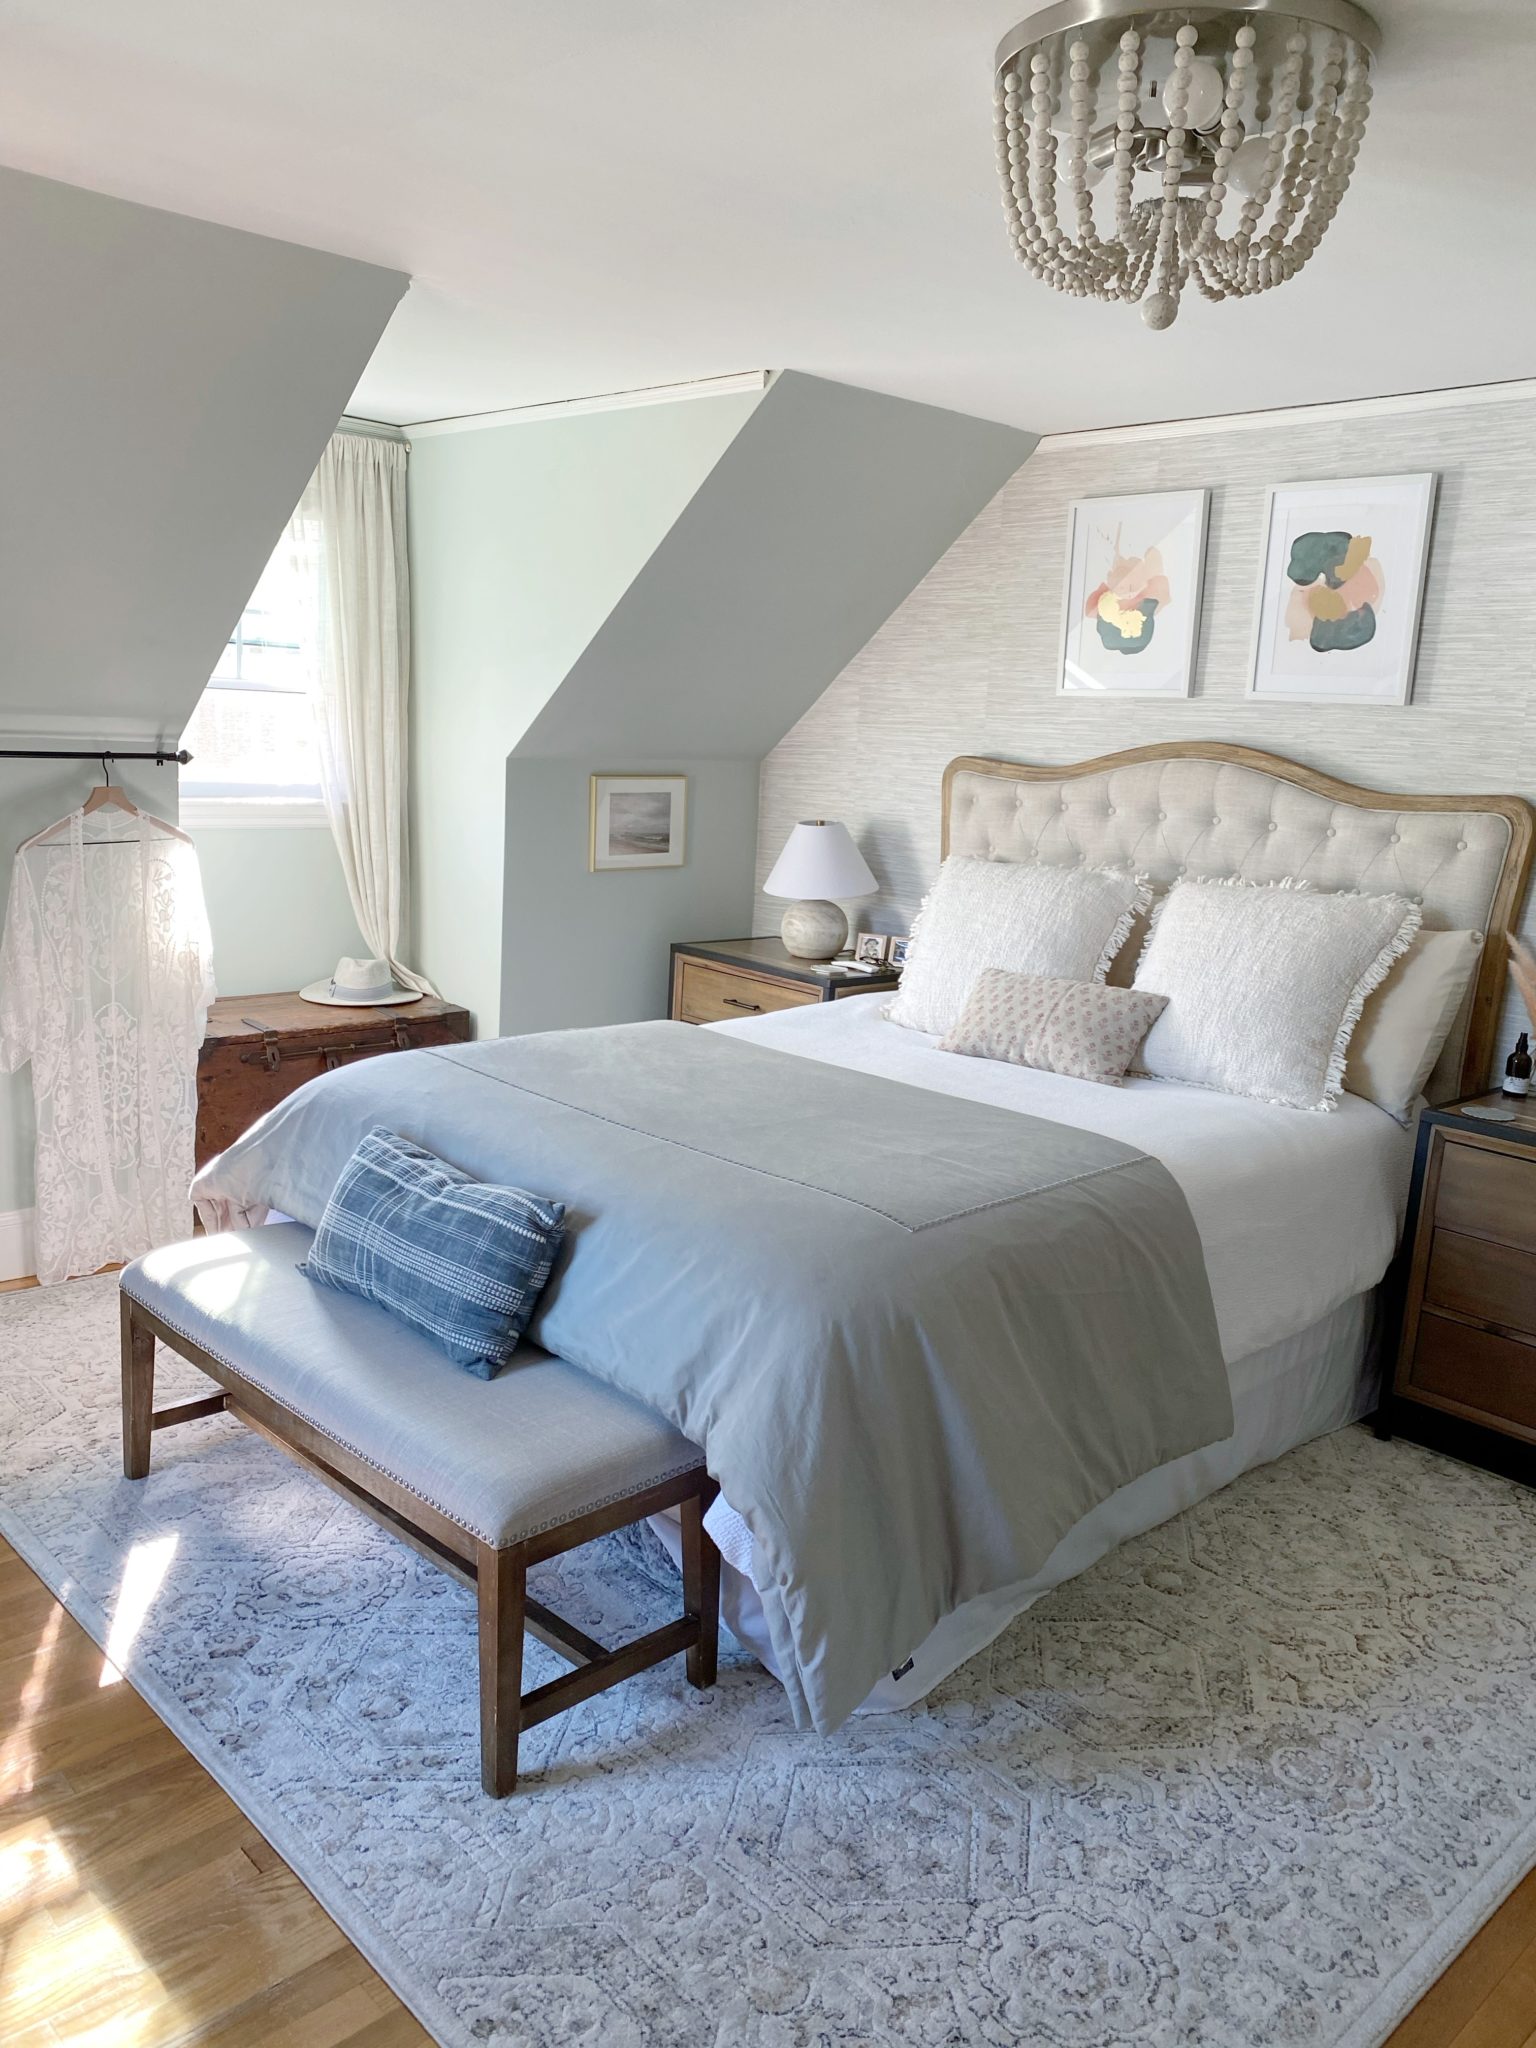
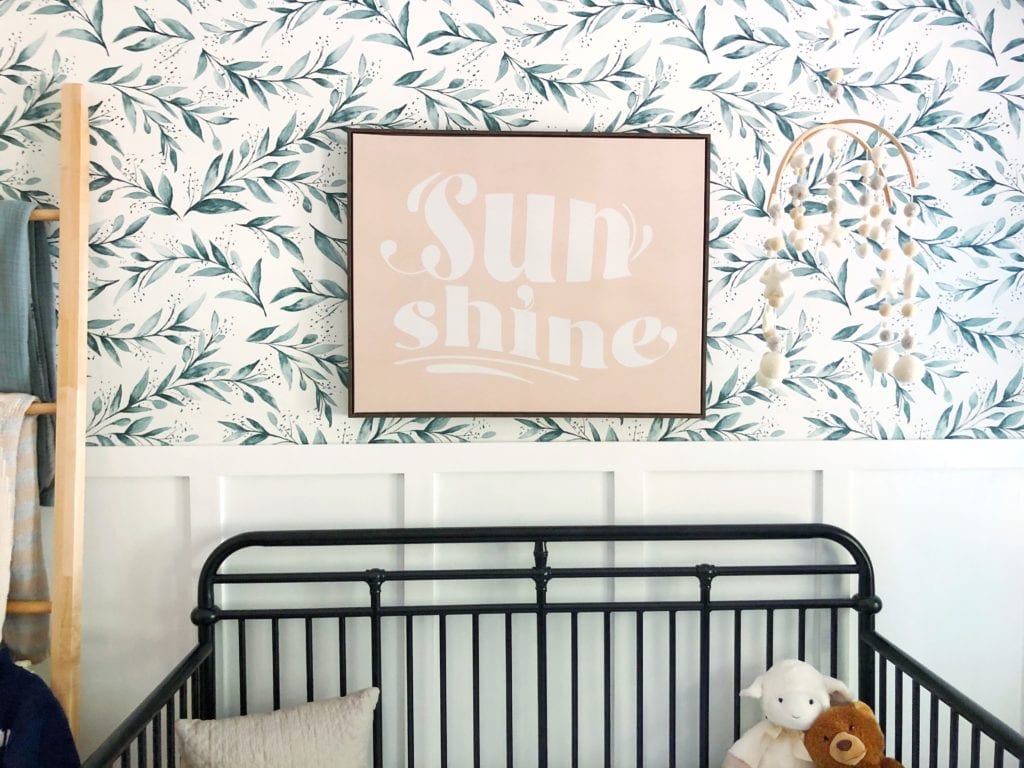
As you can see my initial design was very neutral with white and wood tones. Once we found out it was a boy however, I decided to go with the greens and grays since they flow so well in our bedroom. We still don’t have the bassinet or crib set up, that will be next! I decided to add a peel and stick wallpaper that I found HERE to accentuate the recessed dormer in our master. I wanted it to flow with the rest of our master bedroom which I like to think is a soothing spa atmosphere.
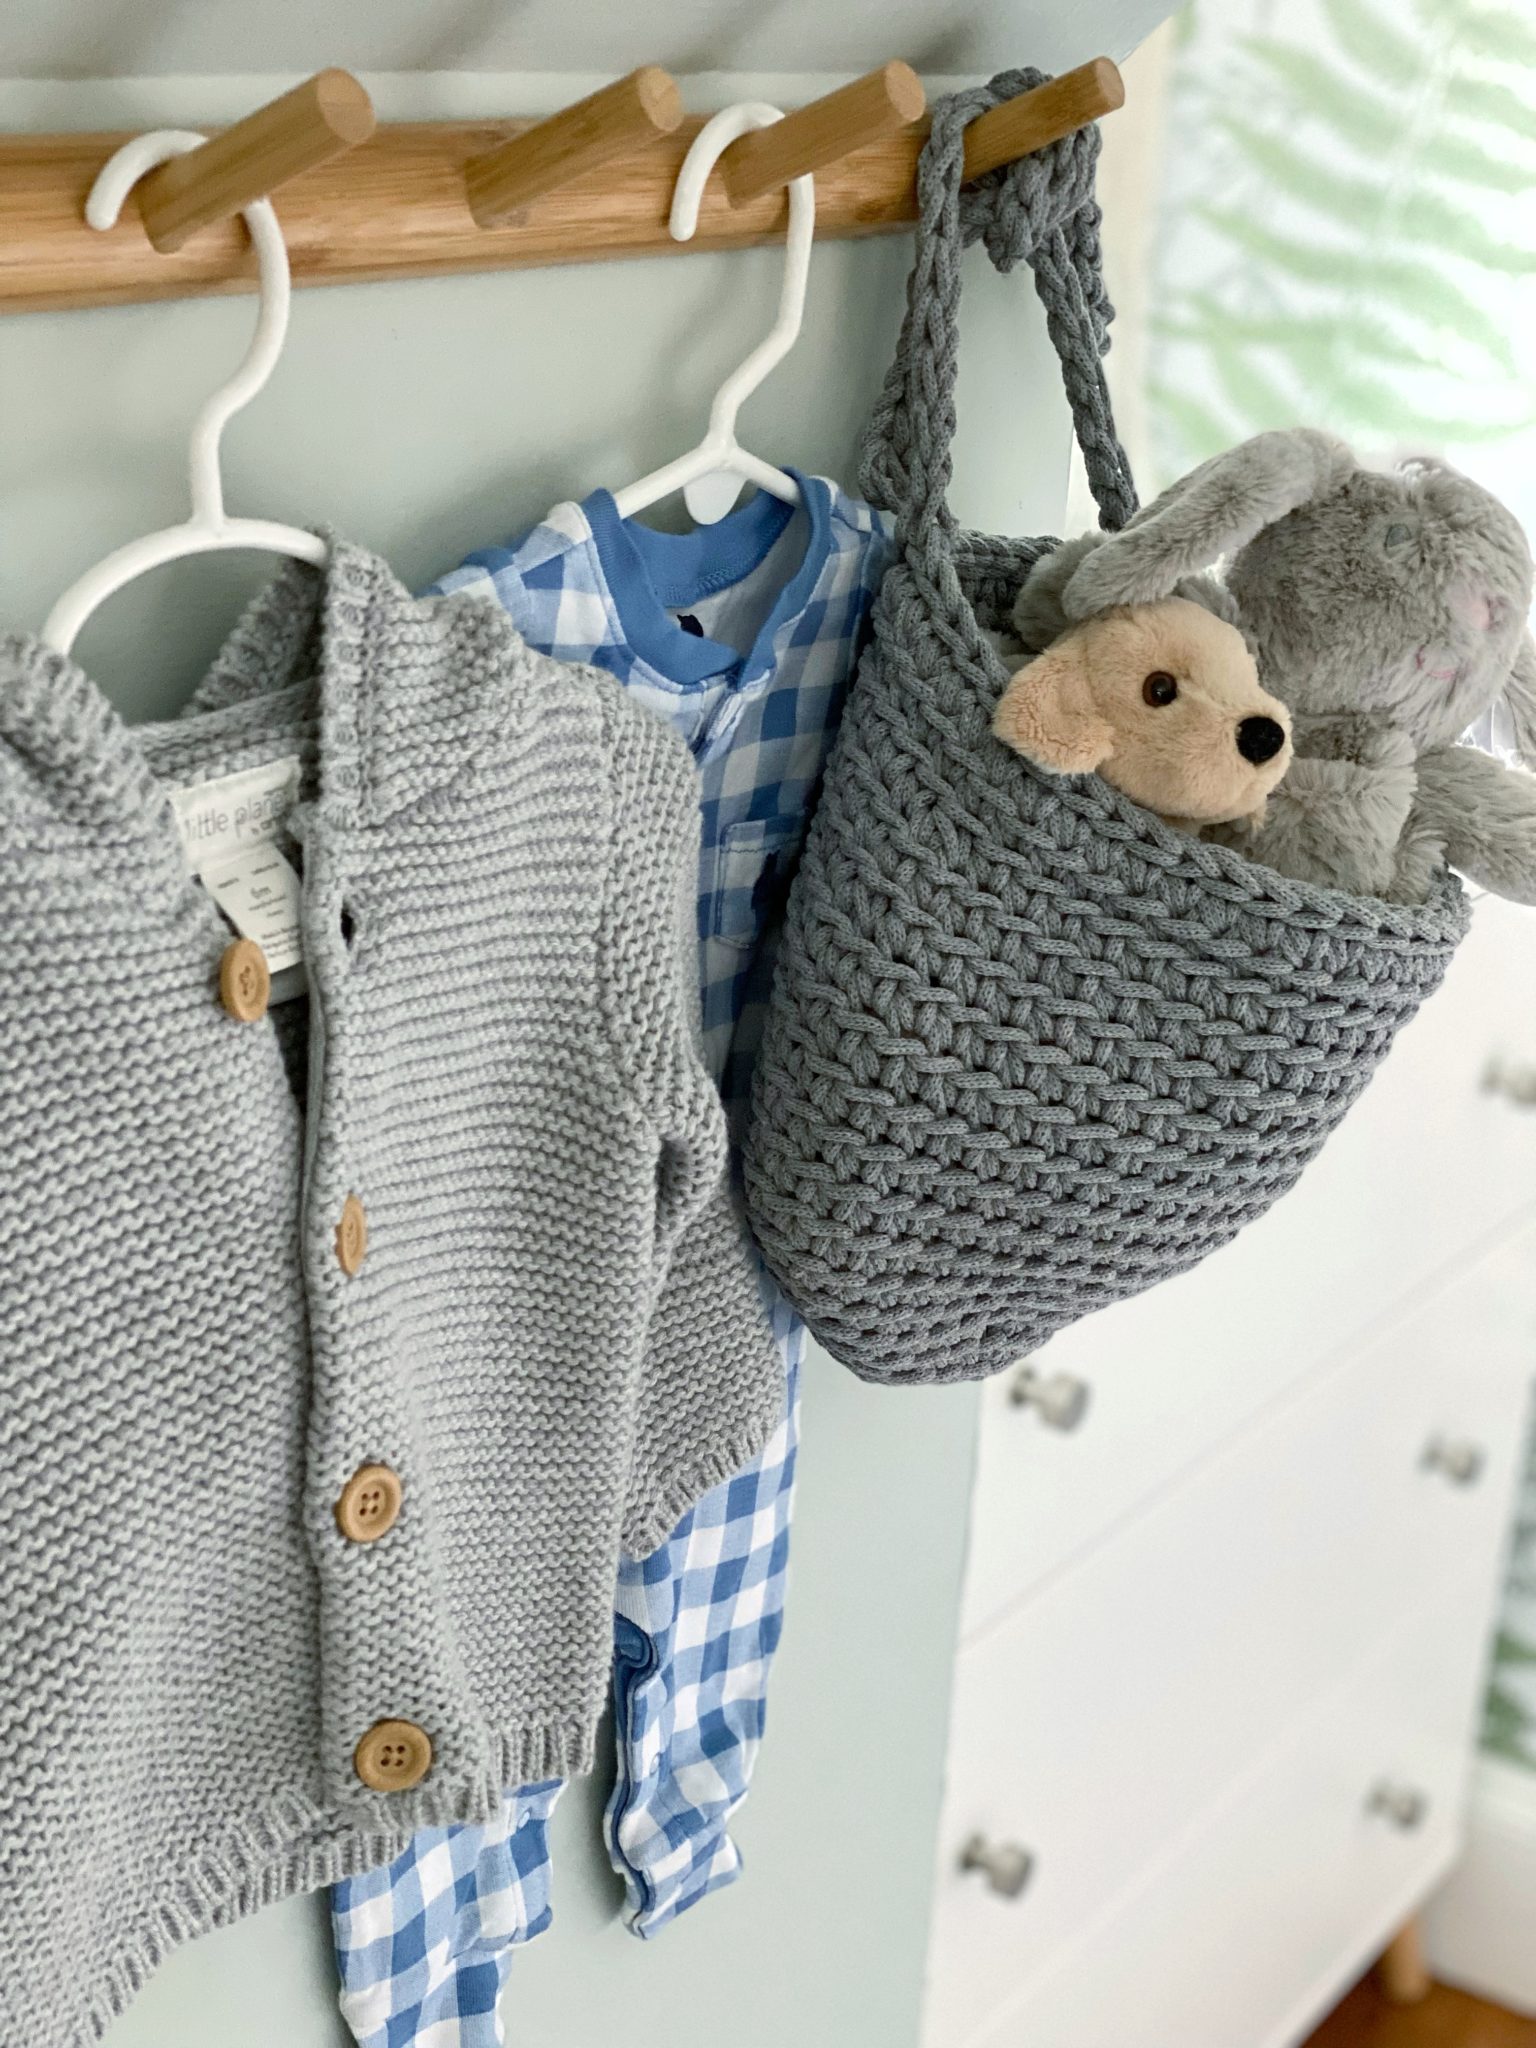
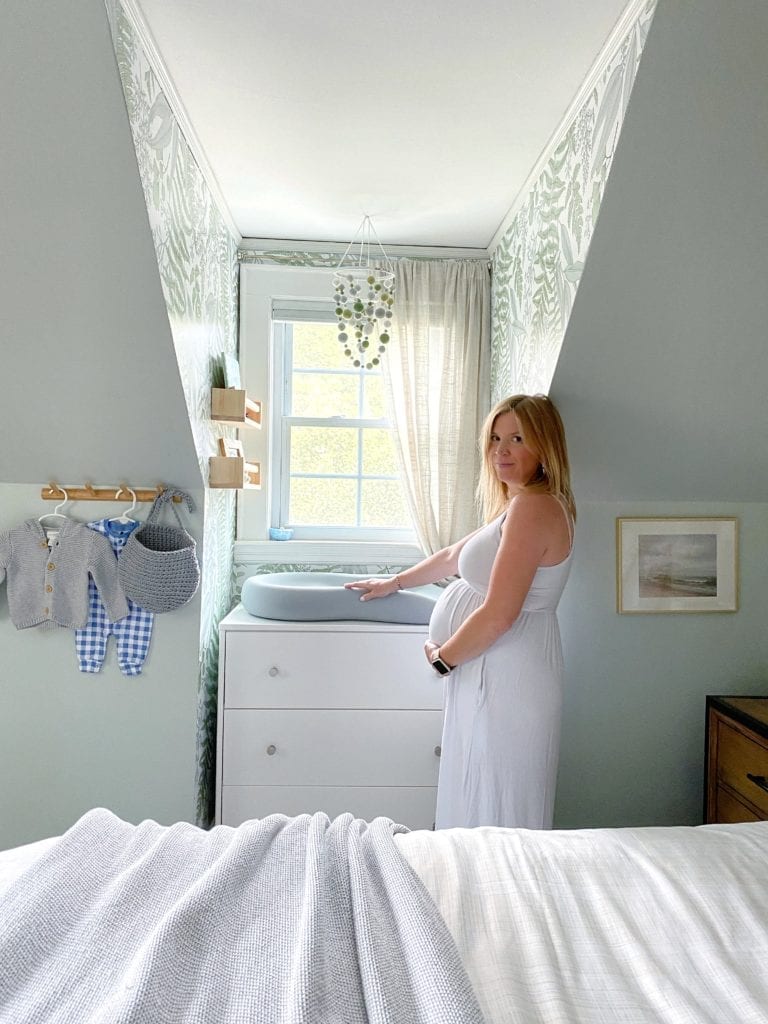
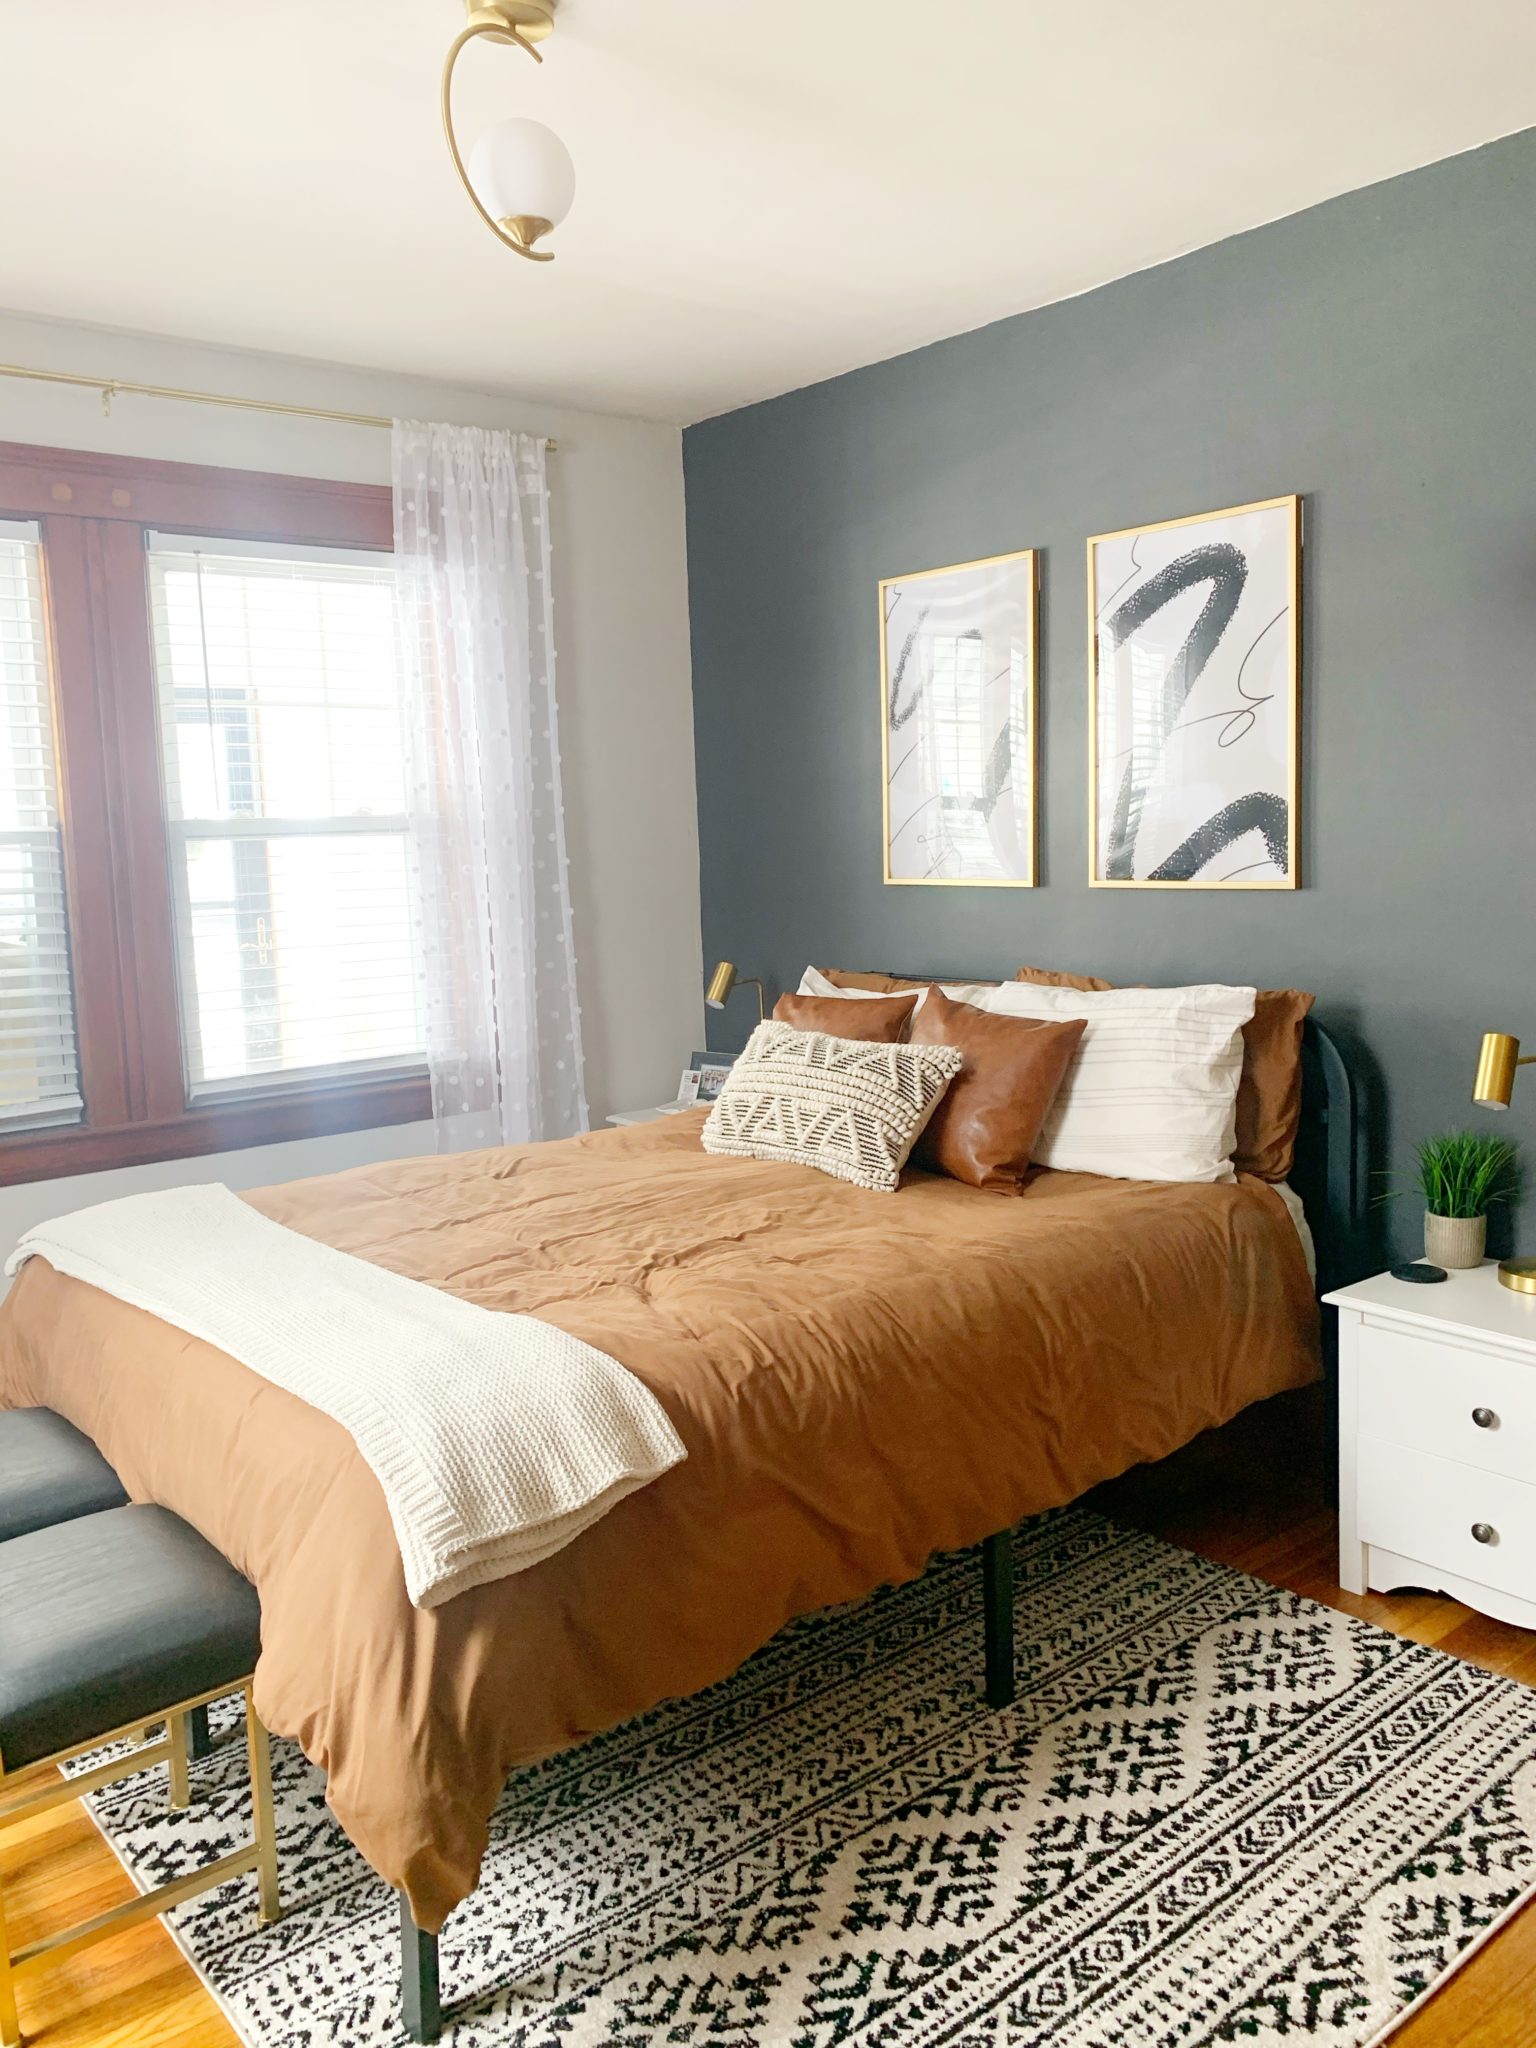
Our master bedroom walls are Sea Salt by Sherwin Williams, the peel and stick pattern I selected brings out those sea-foam gray/green tones and adds some pattern into the baby’s nursery nook. Let me show you how it looked before with just an antique trunk that stored our extra bed linens and pillows. Now it will serve as a place to change baby as well as keep his tiny clothes tucked away. I’m sure he will end up with a lidded storage basket under our bed too!
Nursery Nook Before:
Nursery Nook After:
For the nursery nook makeover we ordered a new dresser, changing pad and an adorable felt baby mobile with colors to tie into the organic fern wallpaper. I made sure to find a dresser that fit this spot perfectly and wanted something simple in design. I measured five times just to be sure I had the exact measurements then looked for something a couple inches less. I was looking for a dresser with specific size requirements which narrowed things down. I also didn’t want to spend a fortune on something. I was able to find a great deal on this one and I love the sleek lines and three big drawers. I’ll share how I organize them with bins in another post soon. You can see how the peel and stick paper picks up the colors in our bedroom wall color really nicely. The pattern is understated yet gives this area its own personality. I love the softness the curtain adds which we already had here. I don’t move it as we have a black-out blind.
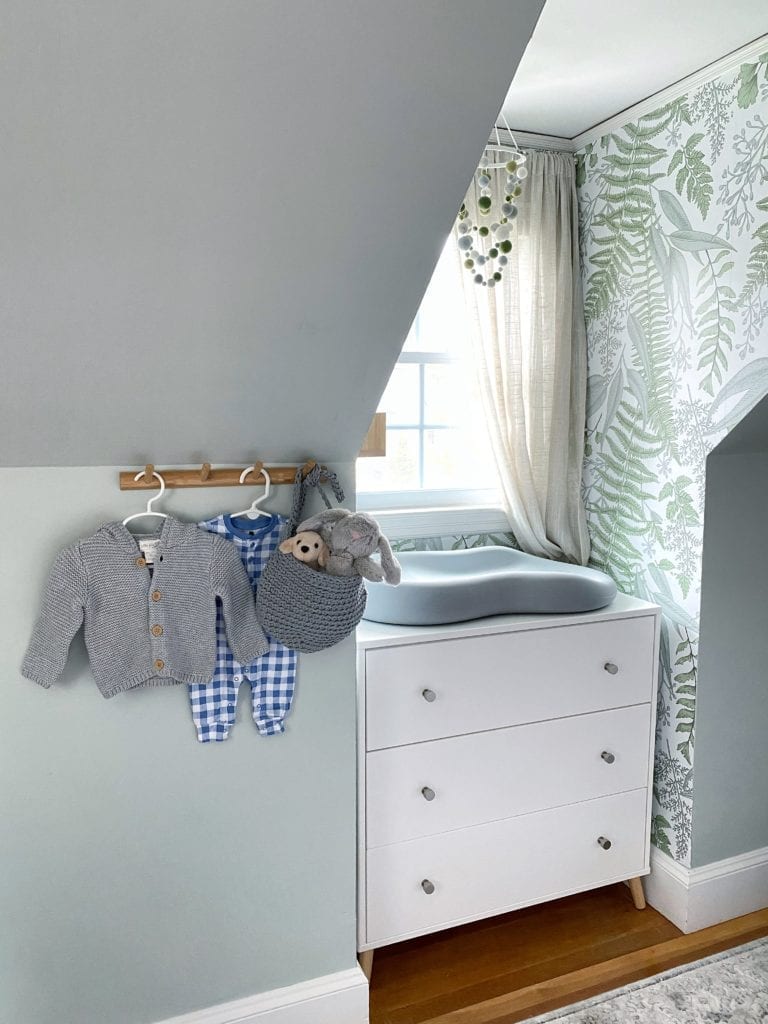
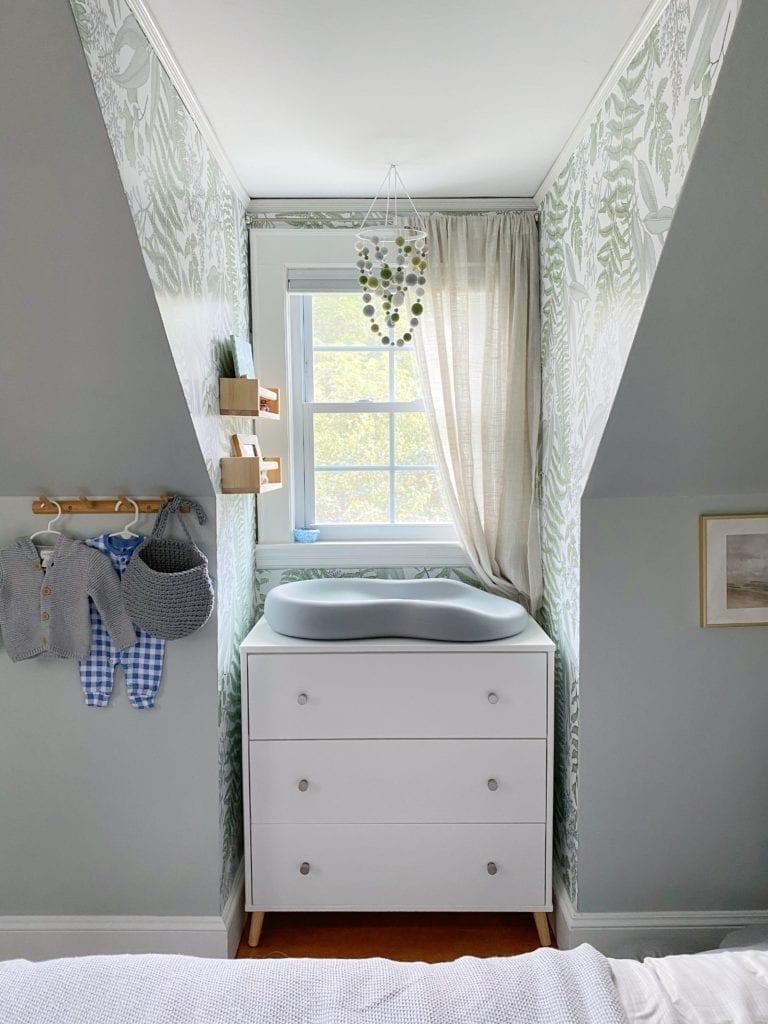
I decided to splurge on the Keekaroo peanut changing pad because I loved the sleek modern design plus the idea of not having to change or do extra laundry with the changing pad covers was so appealing. This wasn’t an option my last pregnancy and it just seemed so cool. We have the strap that we will attach on to it and if its cold for the new baby at first I’ll throw down a swaddle blanket it. I really just love the look of it as well as the convenience of easy clean ups. Since it takes up majority of the space on top I put all the changing supplies inside the drawer which I actually prefer not looking at all that stuff anyhow.
Nursery Nook Details:
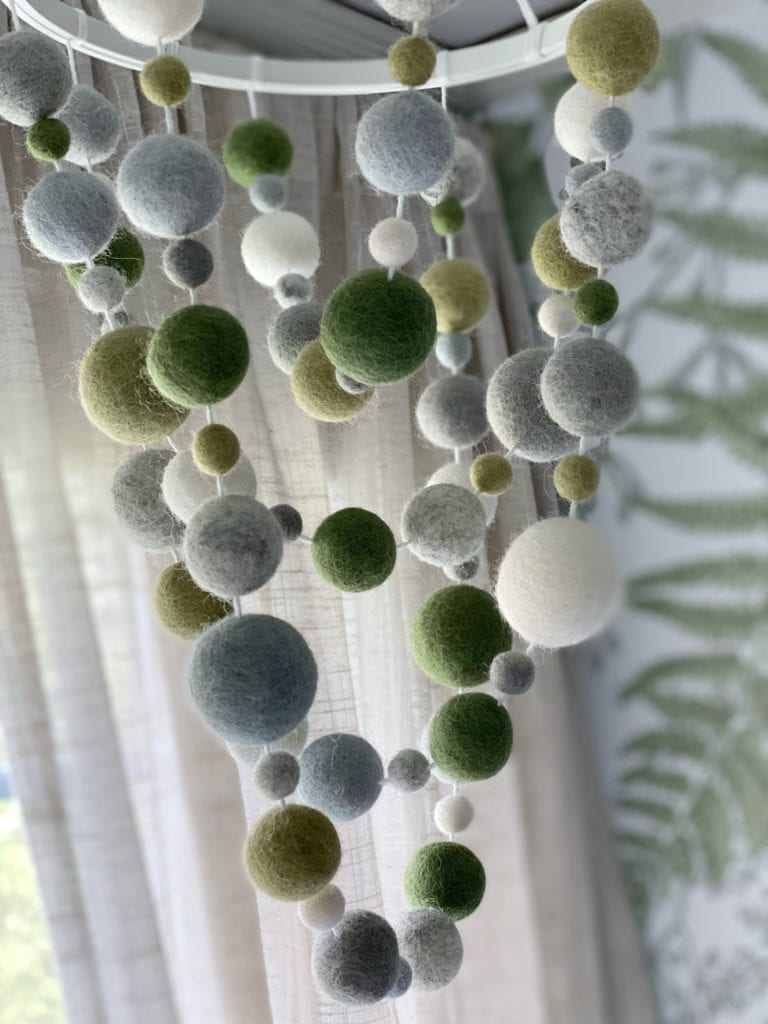
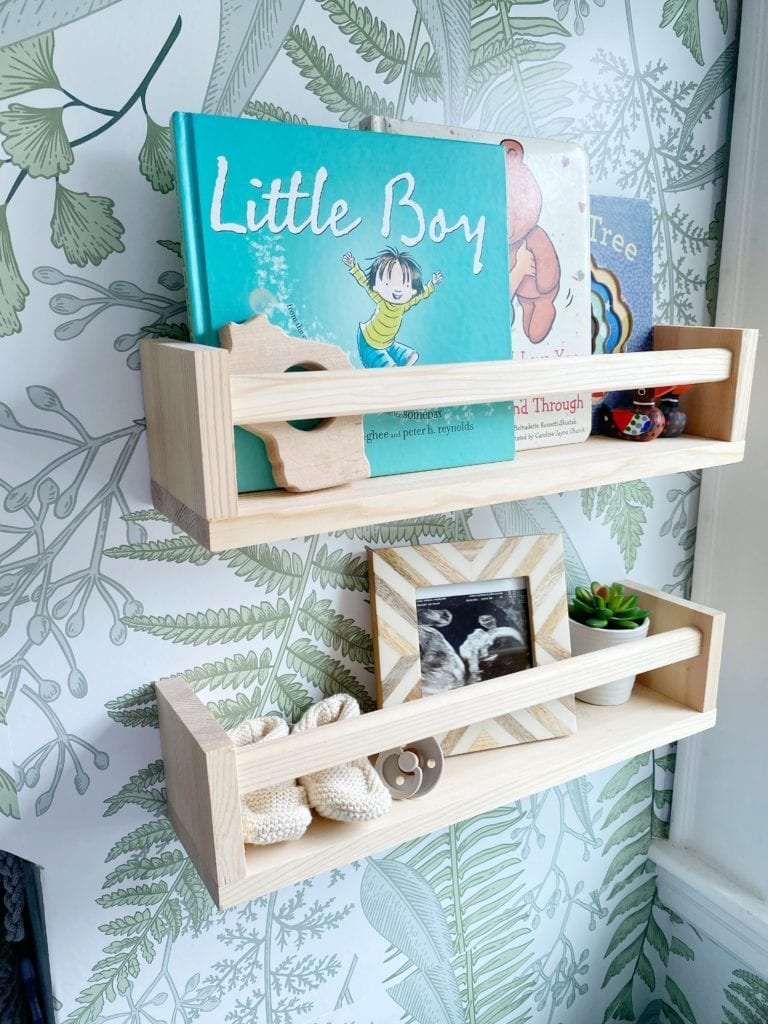
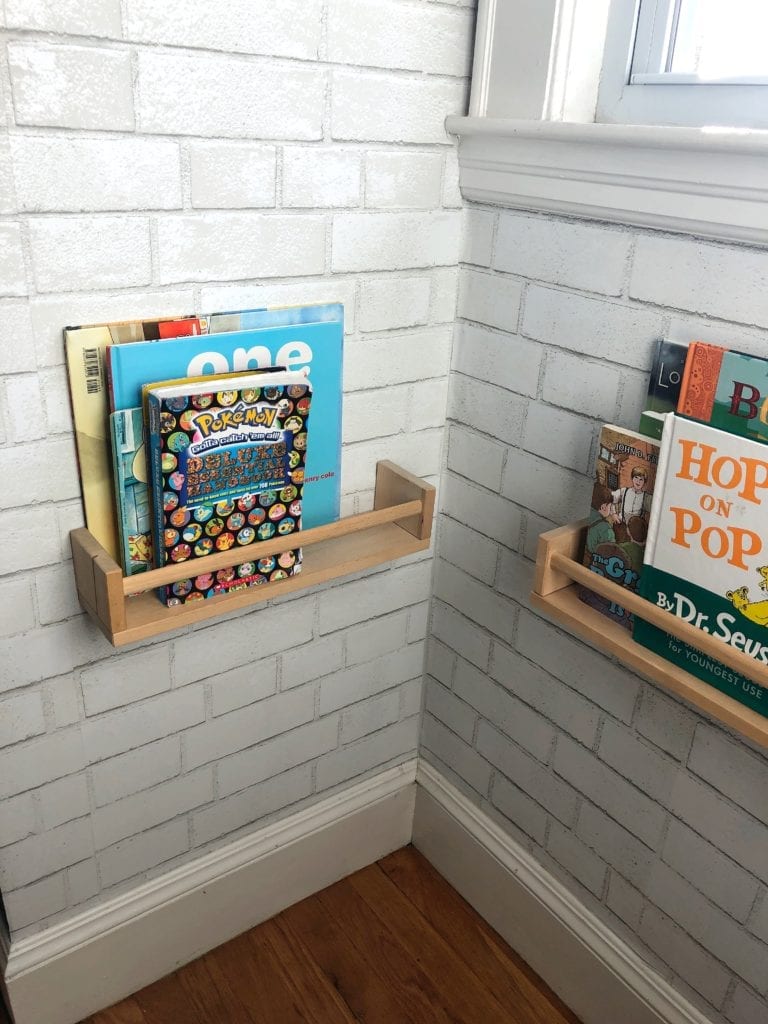
Two wooden shelves on the inside wall are just perfect for adding little books, pictures and accessories to display and makes me feel like this nursery nook is it’s own little nursery! I used these years ago in Griffin’s bedroom to hold all his books and I still love them. I went with the raw wood to break up the white and bring in the natural tones. The custom baby mobile is the perfect little accessory to finish off this tiny space. I worked with Wooly Sheep Dots to choose custom colors that would match the peel and stick wall paper. I love that I was able to incorporate two etsy shops into this design. Once we know baby’s name I have a few more shops I want to order from as well!

I decided to hang a little pegboard set of hooks to hang some baskets for more storage. The trick is to find ways to add storage wherever we can in a smalls pace. I can use it to hang up some clothes for the week, little jackets of his or changing/feeding supplies. I’m sure things will move around a little bit.
*this post contains affiliate links which help support my blog at no additional cost to you. Thank you for shopping through my links!
I hope you enjoyed seeing how our nursery nook turned out! I’m really happy we have this ready for September. The next couple months are so busy with kids out of school for summer that I feel good knowing it’s all set. I still need to figure out the bassinet/crib situation. My sister has a Snoo that I’m thinking I might borrow. She had amazing luck with hers. I’ll share how the rest of the little area looks once we finish it up. I can’t believe in just a couple months we will be sharing this room with our sweet baby boy. We are so excited to meet him. Thanks for reading!
Love,
Jordan
Shop This Post:

Pin For Later:
read the full post >

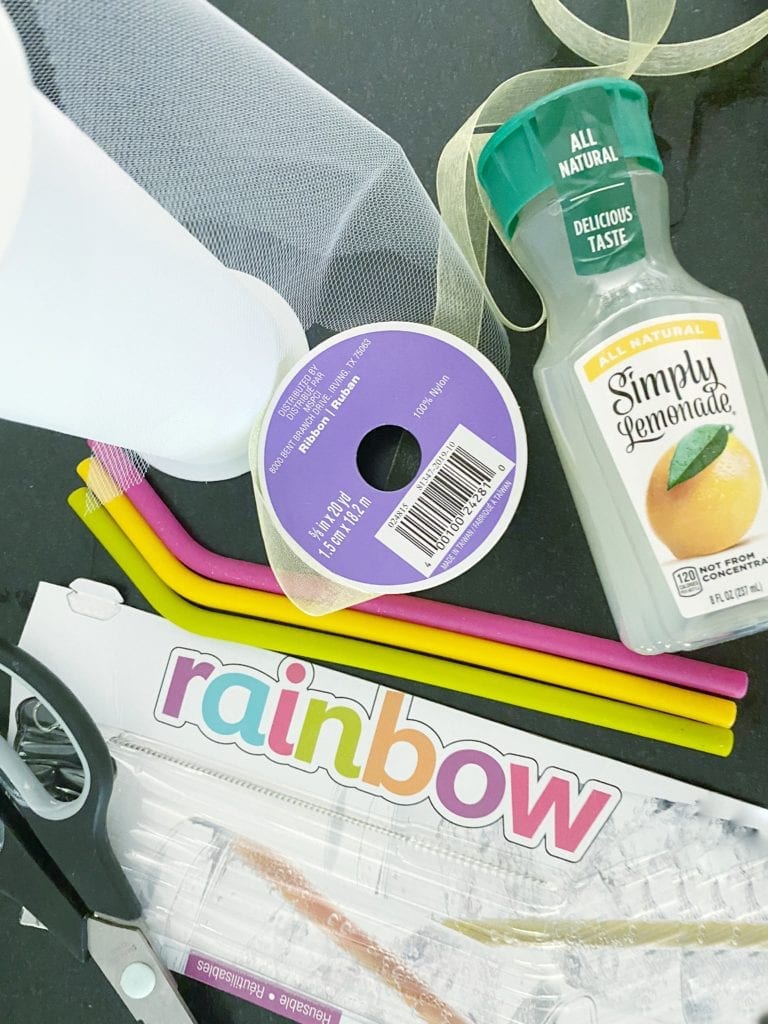
I can’t believe we finally made it to the end of the school year! It was a strange year to say the least and our teachers are real life super hero’s. Needless to say they deserve some extra recognition and love this year for all they’ve dealt with! I wanted to do something that showed our appreciation for all their hard work and dedication through this tough, tough year. I wanted to do something that was cute and that they could enjoy/use. I decided to purchase these mini Simply Lemonade drinks after seeing them in the grocery store and thinking they were so adorable!
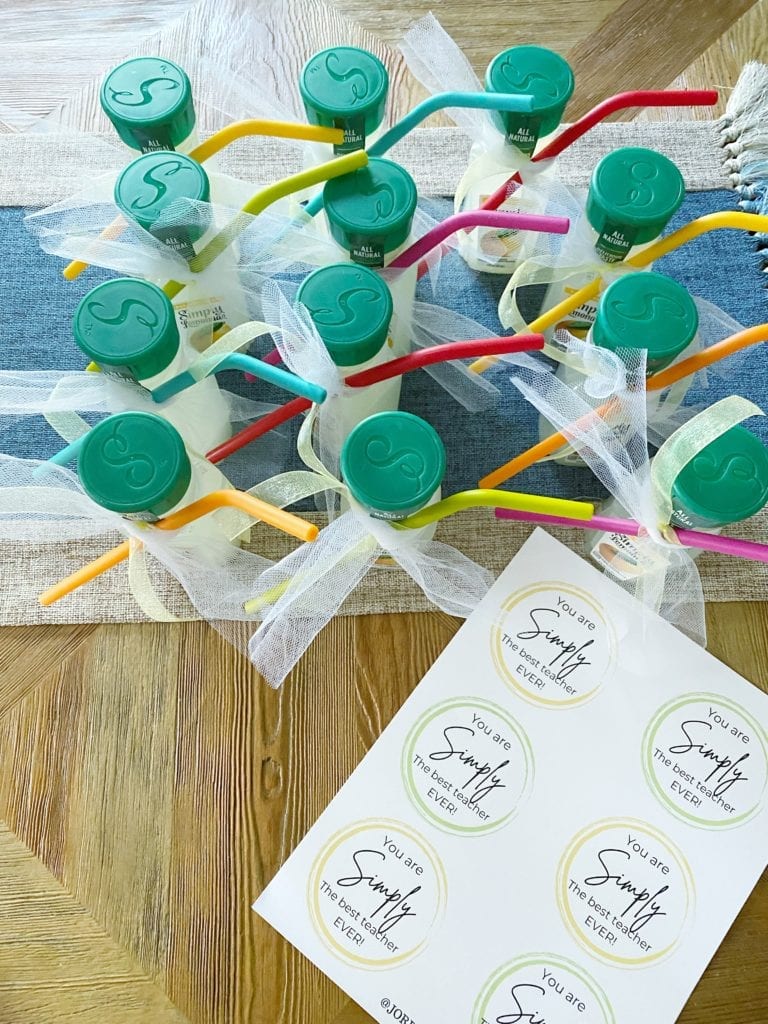
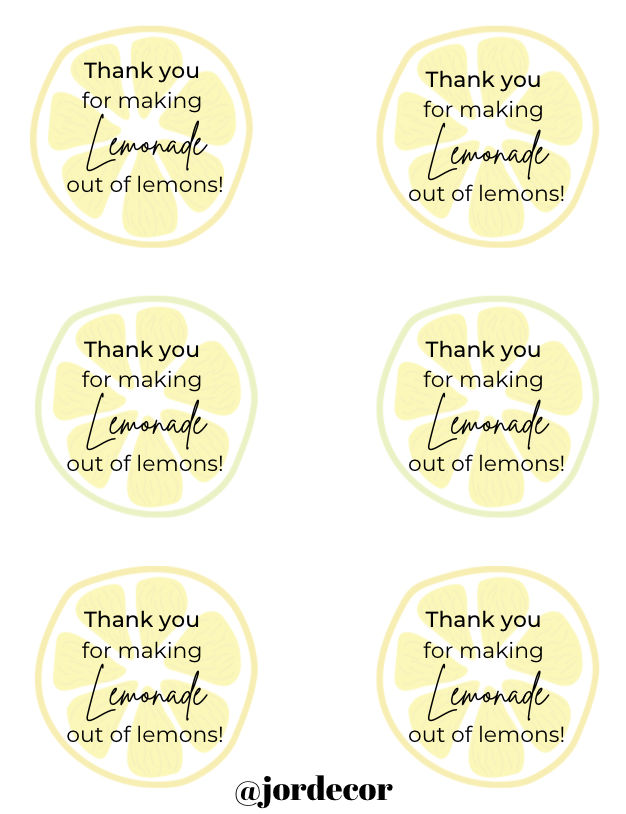
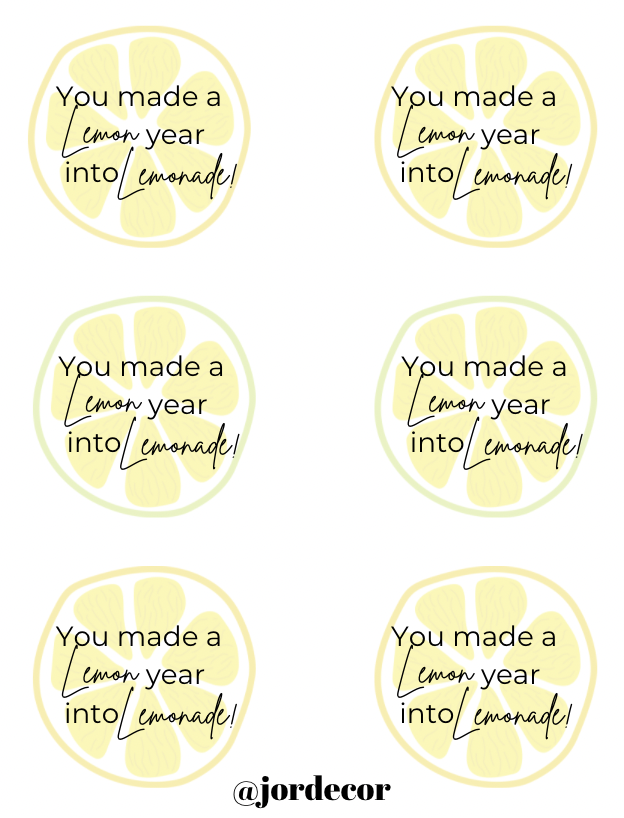
I considered adding little nips or alcohol gift cards to these but thought that might be a little inappropriate for the kids to hand out at school. I’m sure the teacher’s can take matters into their own hands if they’d like to mix these into a cocktails. To add something a little extra I purchased THESE reusable straws to attach as well. I love the different colors and better for the environment too. I made some fun gift tags that say “You are Simply The Best Teacher EVER!”. I printed the labels on cardstock paper, cut them out then added them to the bottles with layers of tulle and ribbon. They look so adorable. You don’t need a big expensive gesture to extend a big “thank you!”


I hope our teacher’s enjoy the refreshing drink and reusable straw this summer. I also hope this idea is helpful for you if you are trying to come up with something quick, cute and easy for your special teacher! Below please find the labels I designed for this end of year teacher gift. I’ll also add an alternative label that you could use with more of a “lemon” theme that is very fitting for this year especially!
Have a great end of the school year!
Jordan
End of Year Teacher Gift Printable:
Simply The Best Teacher gift (2)

Pin for Later:

read the full post >
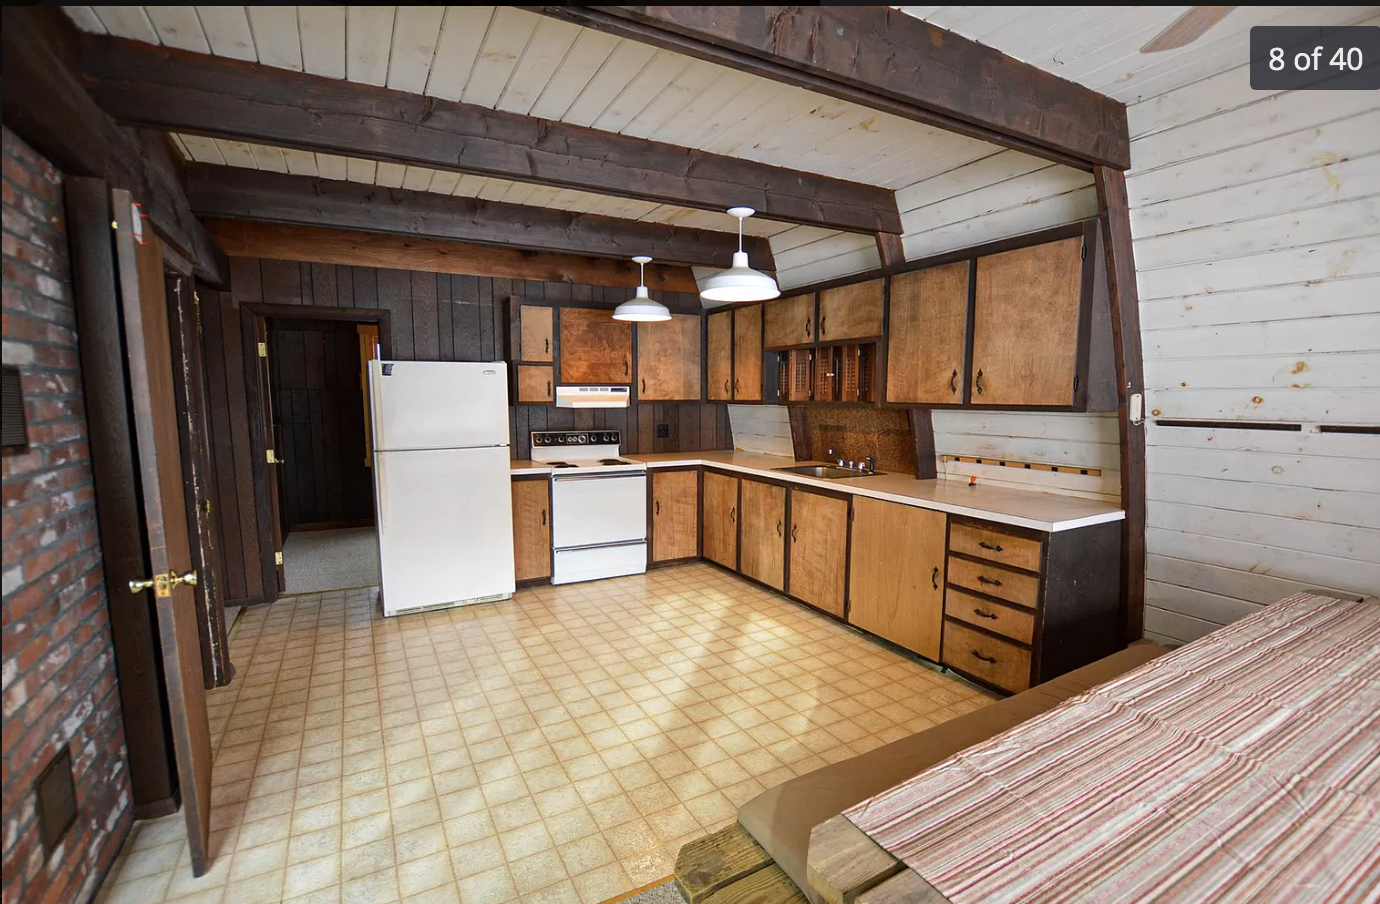
I’m long overdue for a Vermont house update post. Today let’s focus on the bathrooms. If you didn’t know we purchased a cool 1970’s arched ski chalet located in central Vermont. You can read more about it HERE. We have spent the last month calling various trades people to set up appointments for quotes from flooring, painters, contractors, plumbers and so on! It’s been a part time job just trying to line up all the trades people we need to help us. We’ve also been busy ordering and sourcing items for our new Vermont house as well. We are hoping to get as much of the bigger stuff done before late September when baby #3 arrives. I’m not in a rush to finish this house, as I can’t wait to enjoy the process and see how it evolves. But right now, it’s not even livable. Once we can get the place painted, floors done and electrical updated, oh plus the bathrooms in better working order, THEN I’ll feel more comfortable sleeping there with the kids.
Let’s go through what the bathrooms look like currently and the plans to update them with out fully gutting them. Our plumber will hopefully start the end of July. It seems pretty typical that most trades are at the least a booking a couple months out. As much as I’d love to start this ASAP- AKA this month, we will take what we can get! We don’t have to live in these spaces now so that’s good. Plus this gives me time to order all the items he will need to swap out fixtures in the both bathrooms. So far we’ve (and by we I mean BEN) removed all the flooring in the bathroom (old gross linoleum) to be replaced with tile. Budget won’t allow for a full gut job to these bathrooms, but hoping with fresh paint on the paneling, new tile, vanity, toilet and fixtures that they will look brand new!
Bathroom Before:
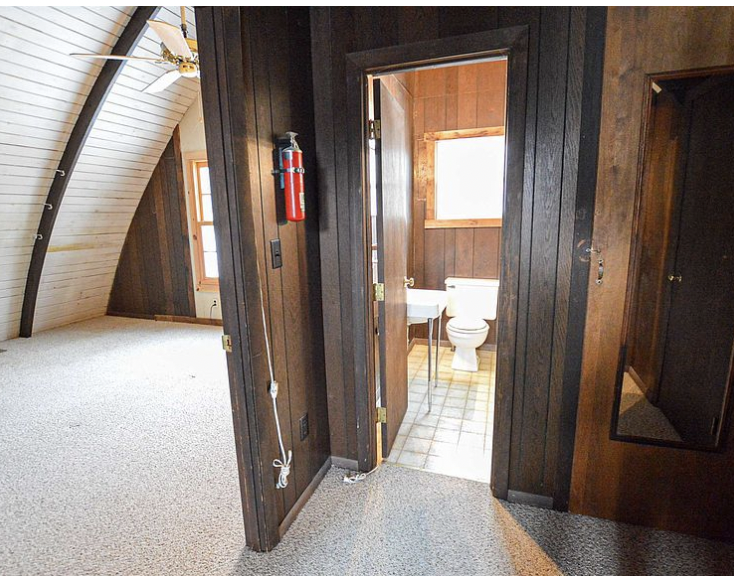
Below is the current state of the bathrooms, it pains me to even share these photos with you. Ugh so ugly! I really hope they don’t crack your computer screen. To give you a sense of the lay out the first bathroom is on the mid floor and is off the kitchen next to a bedroom and the other “master” bathroom is on the third level.
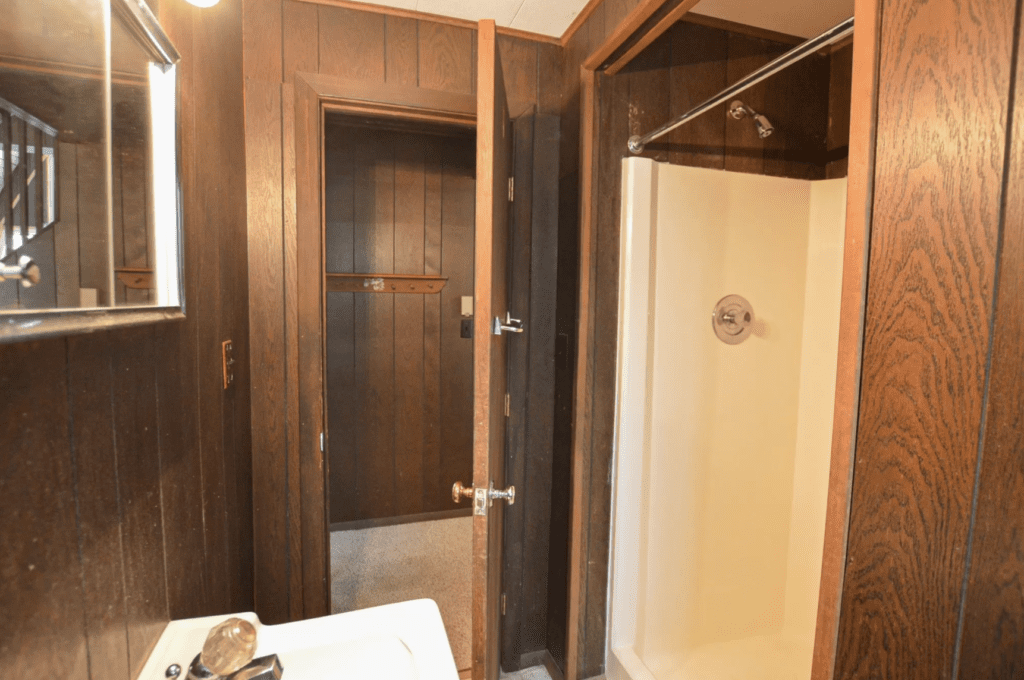
The shower insert in the mid level bathroom is actually fairly new and clean. We are going to leave that for now and get the shower head and lever upgraded as well as a nice new shower curtain/rod to dress it up. Gosh it’s so much BROWN! Imagine white vertical shiplap against nice new modern fixtures in black and brass. Below is another view looking in from the outside. You can see that this bathroom is off the kitchen and guest room.

As you can see the bathroom is very, very narrow. So I purchased a smaller console style vanity that is more narrow which will give guests more space to walk through. I considered a pedestal sink but don’t love that look. A new mirror, light fixture and faucet will also be added. Along with new tile and fresh paint on the paneling. We thought about ripping down the paneling in the bathrooms and putting up dry wall but it’s been so hard to find a contractor and we just aren’t sure we want to get into ripping down walls right now. If we can slap some fresh primer and paint on that wood it might just be ok for awhile. New efficient toilets will be added to cut down on water usage, the current ones go through SO Much water each flush it’s crazy!
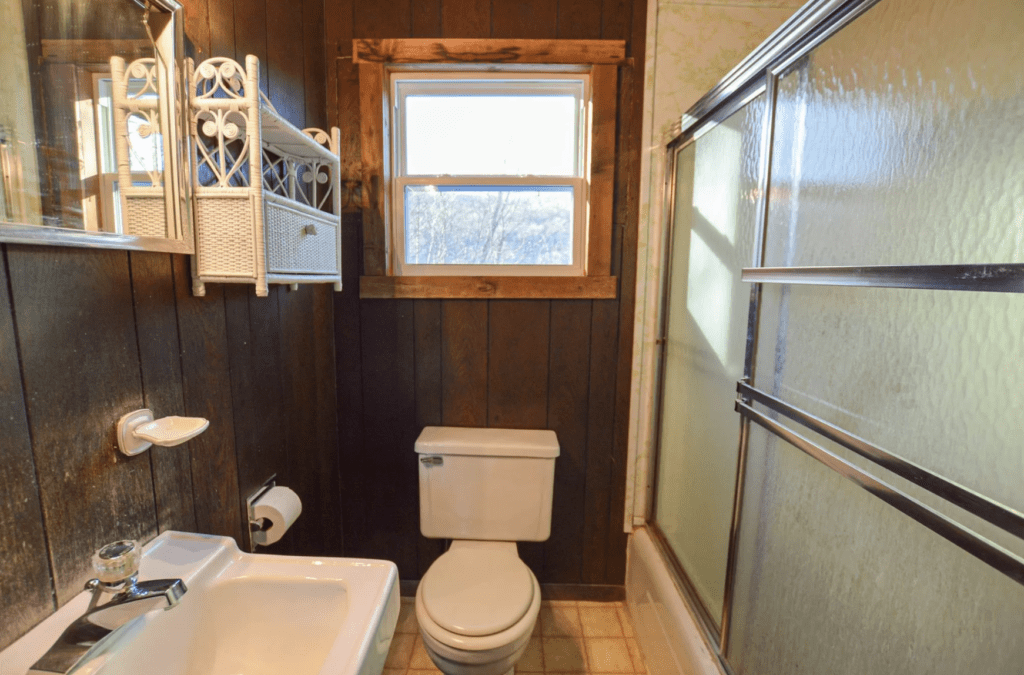
Similar plan in this upstairs in the “master” bathroom. We are keeping it simple and installing the same tile on the floor, as well as the same vanity + faucet. I’ll switch out the mirror and a different light fixture just to make it a little different. We will remove this hideous shower door and take off that vinyl inside the shower tub/shower wall. The plumber inspected the tub and said it was in great shape, with a little fresh caulking, bar keepers friend and heavy duty cleaning it should be fine! So eventually we plan to tile the walls in the third floor bath and just add a pretty simple shower curtain. This paneling will need some serious prep and primer. I’ll most likely keep these painted a light color to make the bathrooms feel a bit larger than they are.
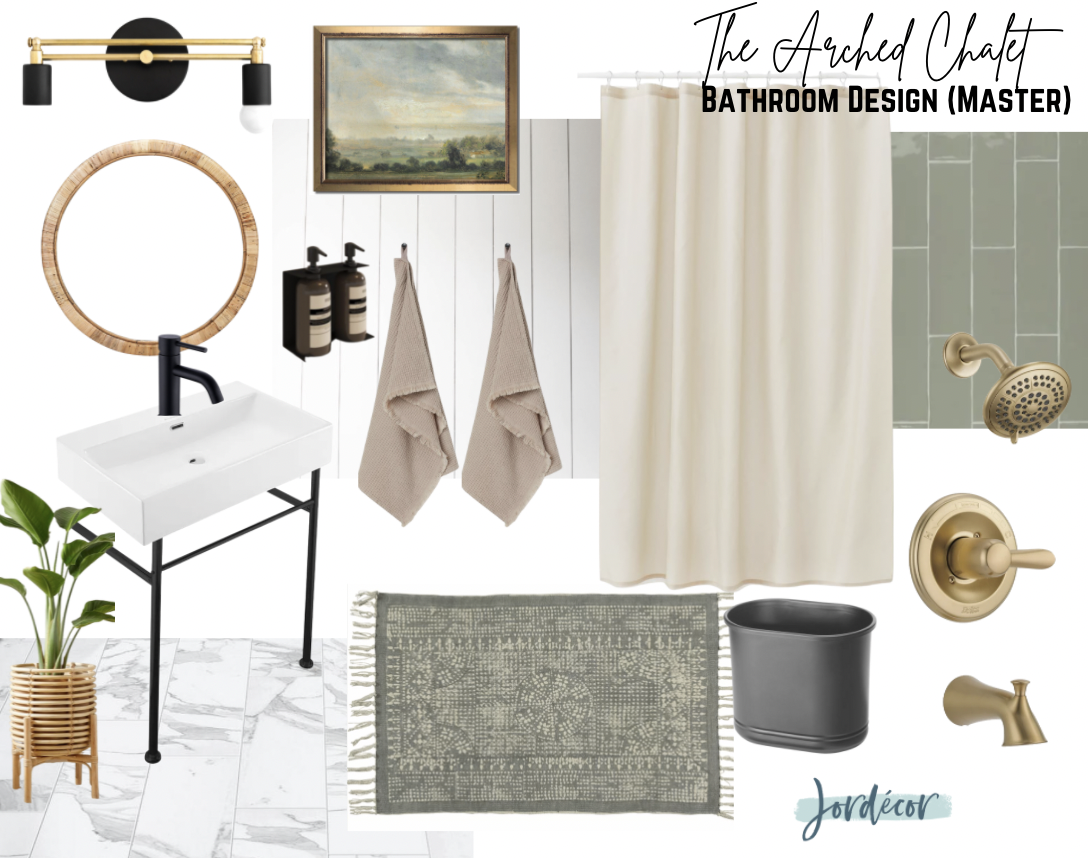
The Arched Chalet Bathroom Design Boards:
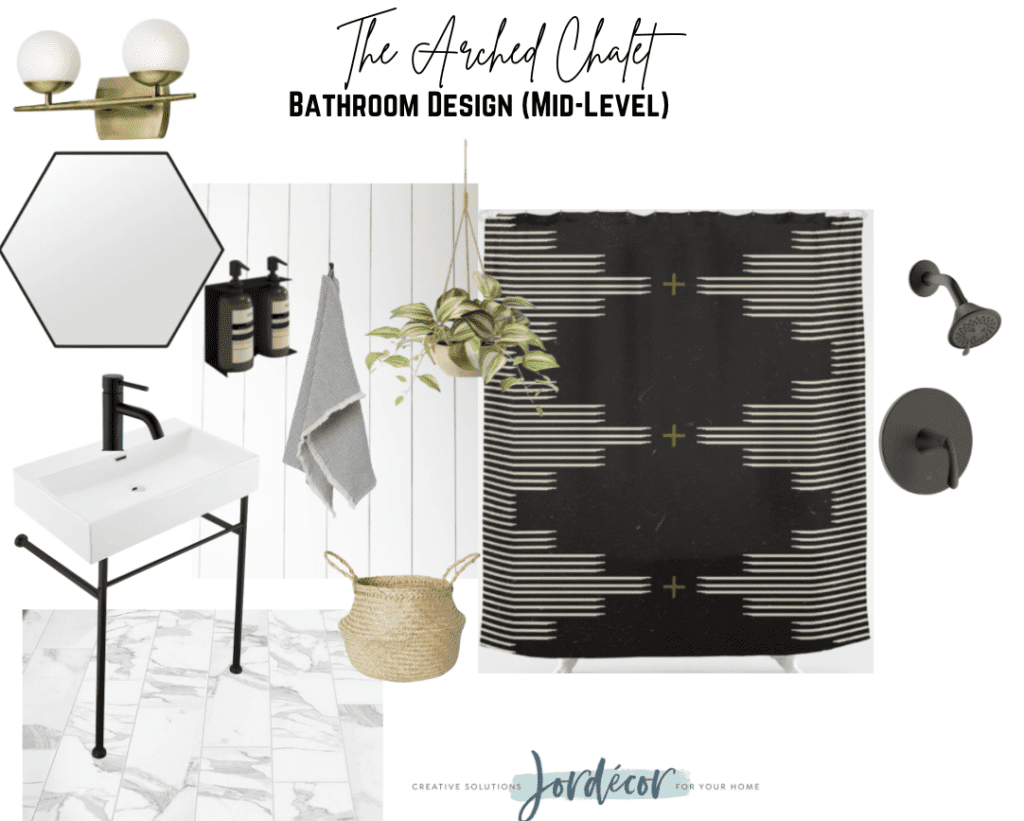
Vanity/ Floor Tile/ Faucet/ Light Fixture/ Mirror/ Towels/ Shower Curtains/ Shower Head/ hanging plant/ Soap Dispenser
For the first bathroom I decided I wanted the shower curtain to be a little fun and dramatic. I’ll differentiate the vibes by changing the light fixture, mirror and shower curtain/decor. I’ll keep the floor tile and vanities the same just to simplify ordering. I really like how they both have the same vanity which is super affordable yet totally different feels. Since there really isn’t a ton of space for soap I’ll add them to the wall in these really cute dispensers. Most likely just a single with a bottle of soap that can be refilled easily. I like the idea of using these woven baskets underneath the vanity to hold extra toilet paper rolls or towels.
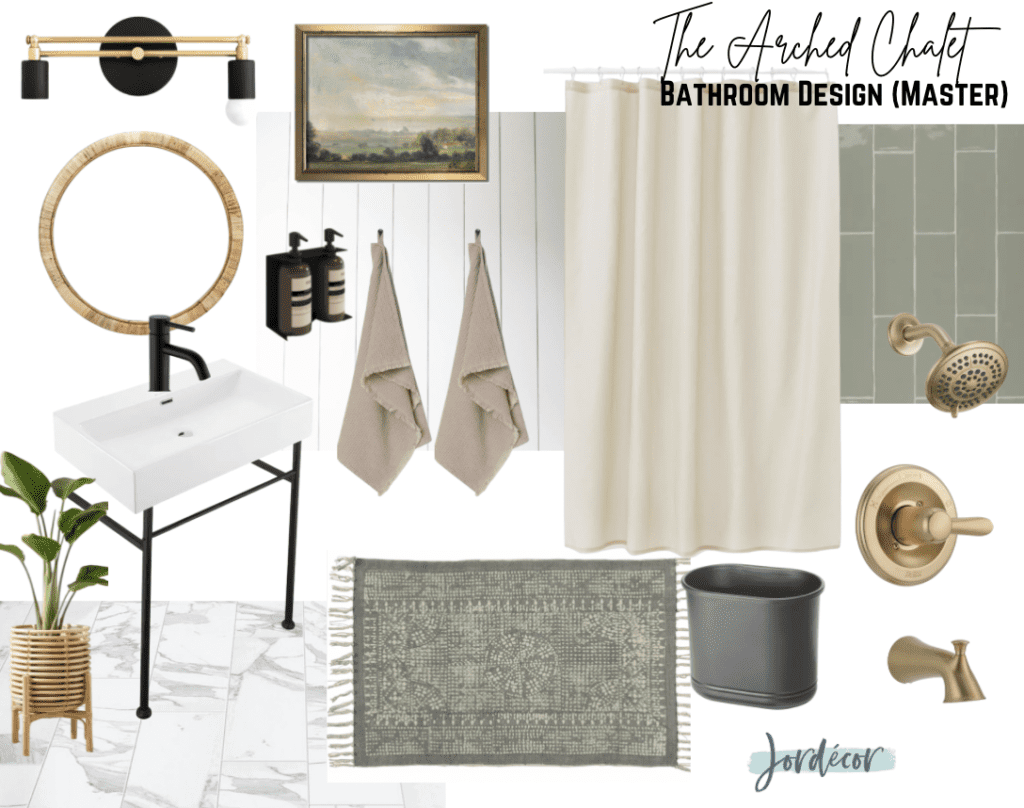
Vanity / Light Fixture/ Faucet/ Shower Kit/ Shower Tile/ Shower Curtain/ Floor TIle/ Rug/ Art/ Mirror
*tap the links above to shop these items or use the images below. This post contains affiliate links which means I earn a small commission from your purchase at no cost to you.
These bathrooms don’t offer much space to add a lot of decor or big vanities for storage so I’ll have to be creative with hooks, baskets and finding ways to add items with out it taking over the narrow space. I’ll continue to mix some brass and black elements but soften the vibe in the master with greens and some natural tones using rattans and softer taupe colors. Amazing how you can use some of the same core elements but by changing a few other details get a completely different look!
What do you think of the two bathroom designs? I’m sure things will get tweaked here or there. First things first is primer and prep work then paint. I’m thankful these bathrooms are small so that the paint process will go a bit faster. I’ll be sure to update here on how things are working out!
Happy Decorating!
Jordan
Shop the Bathroom Designs:
read the full post >
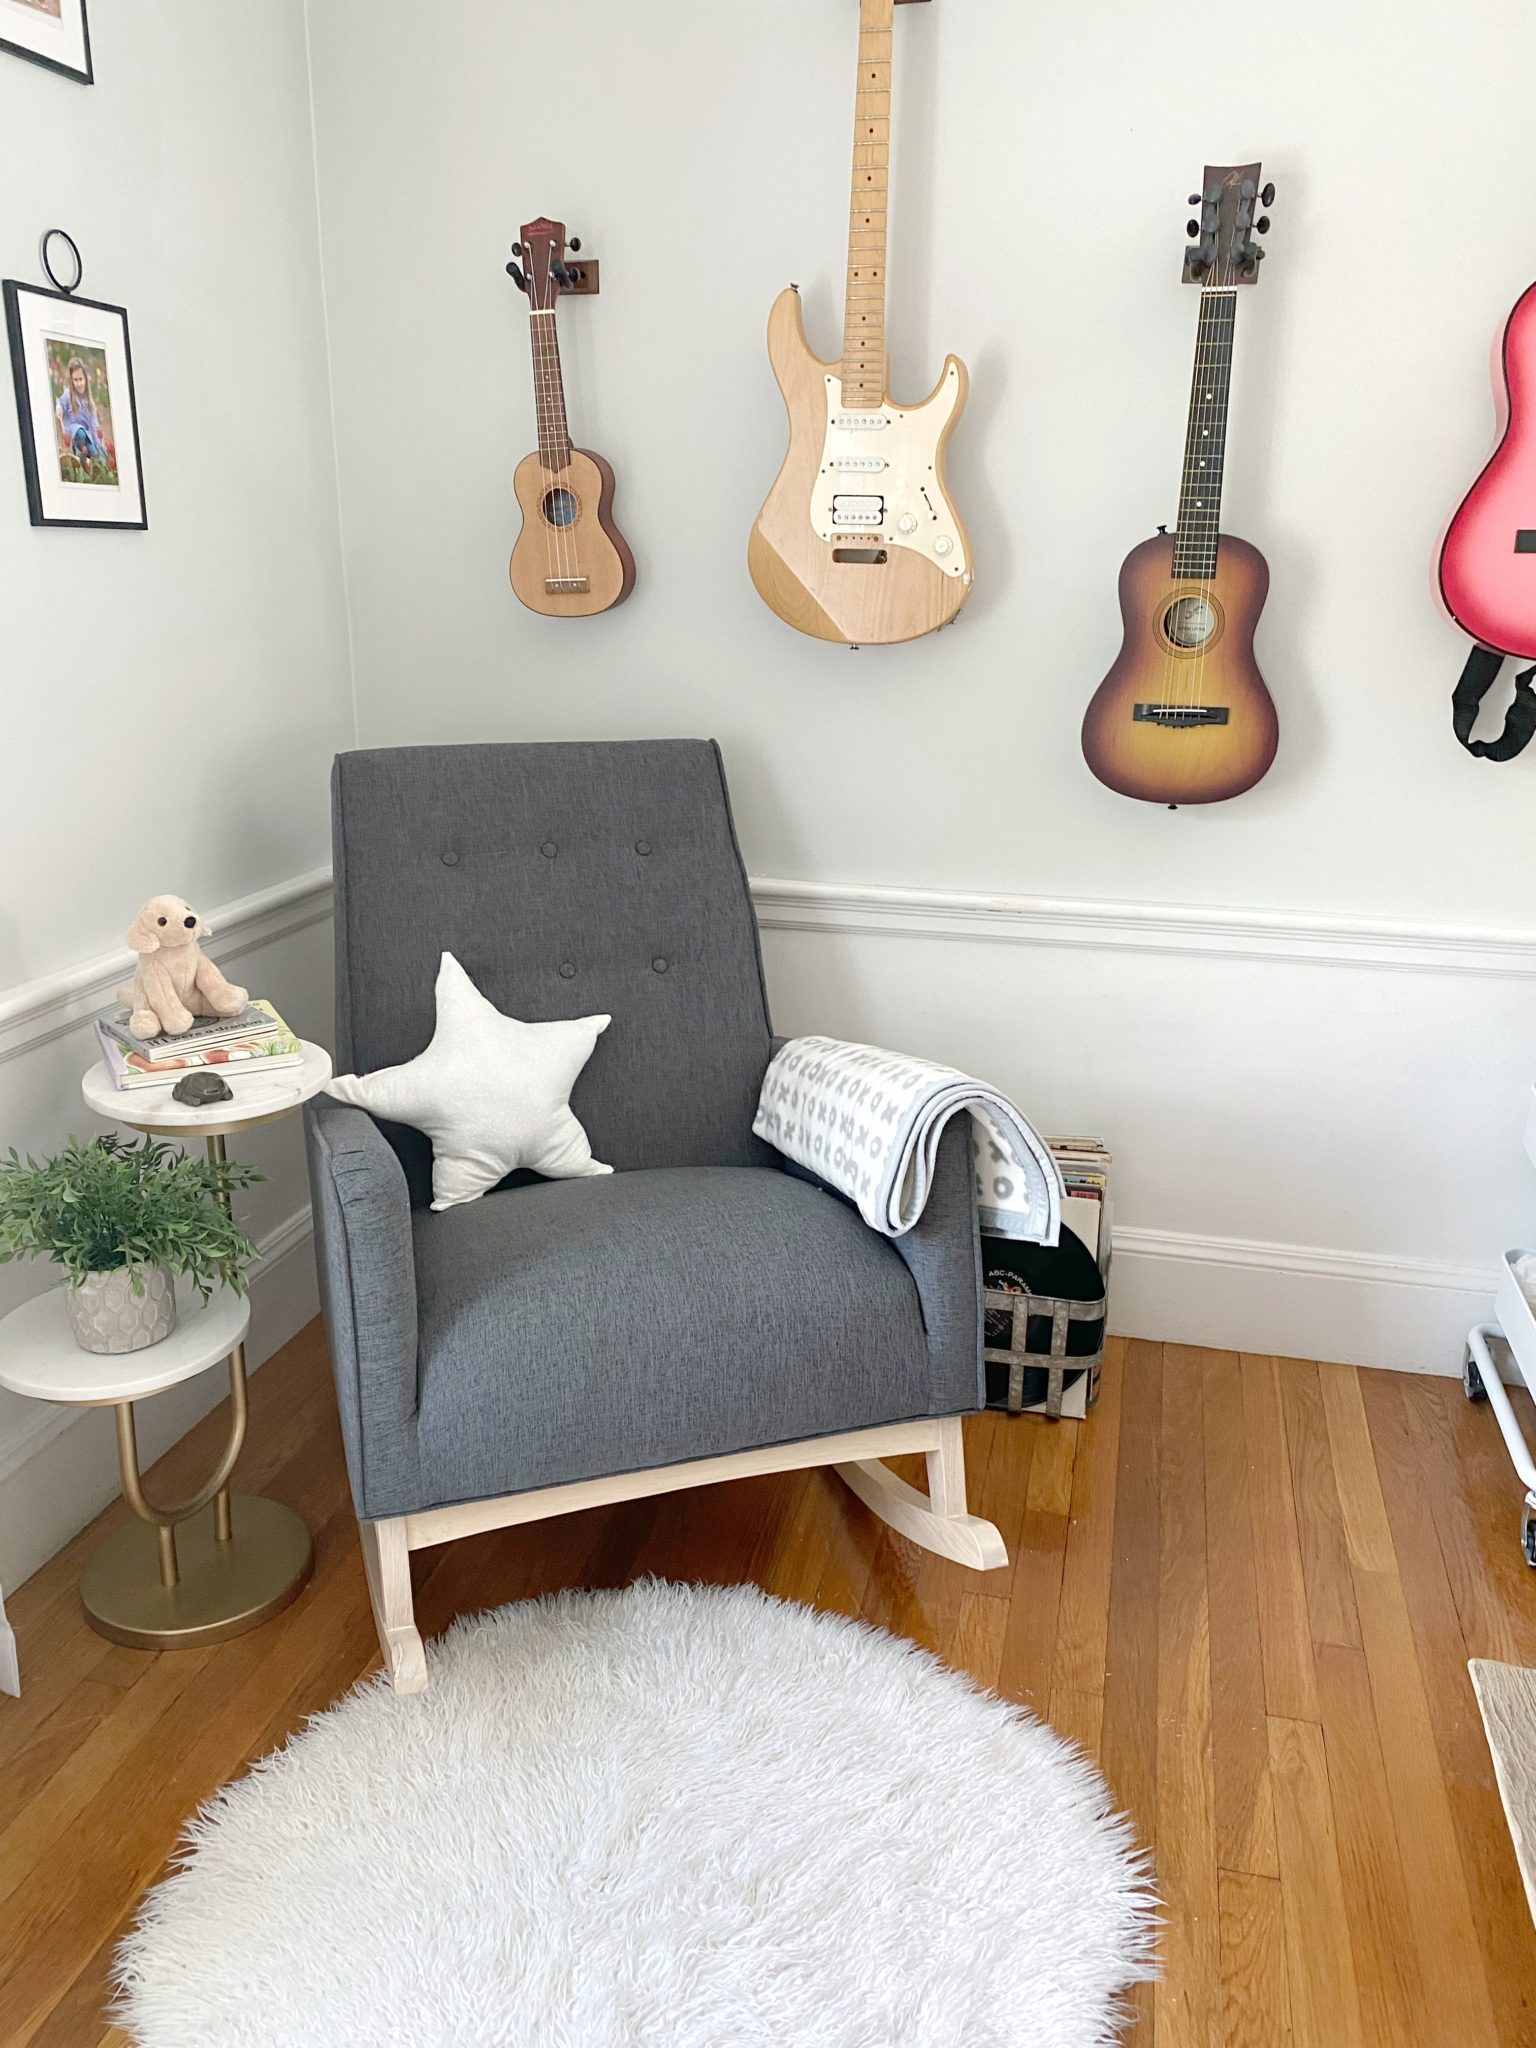
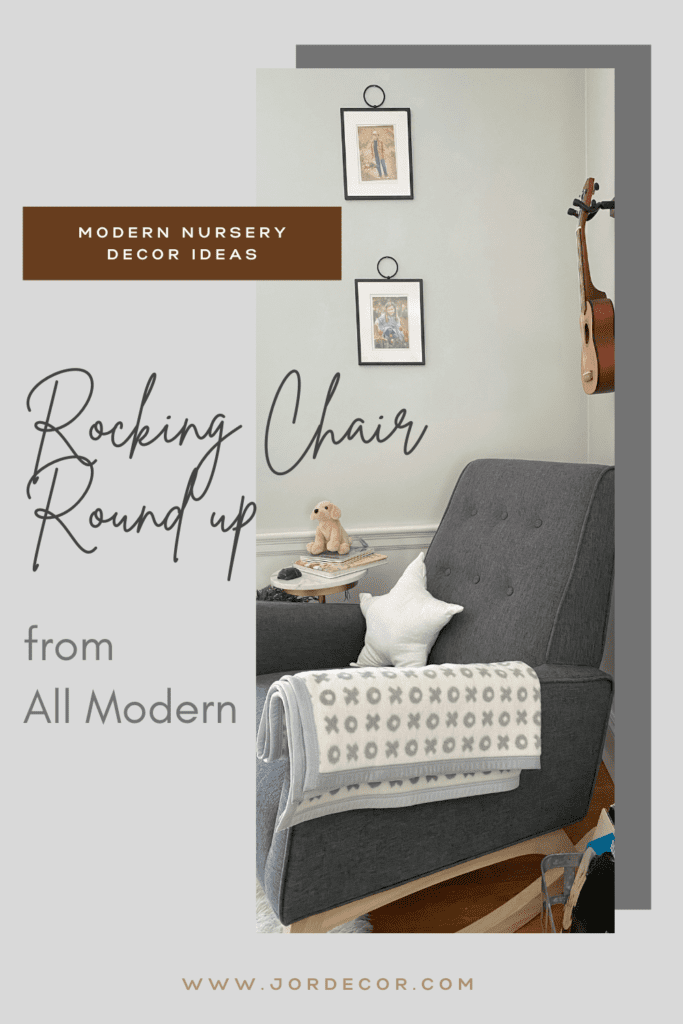
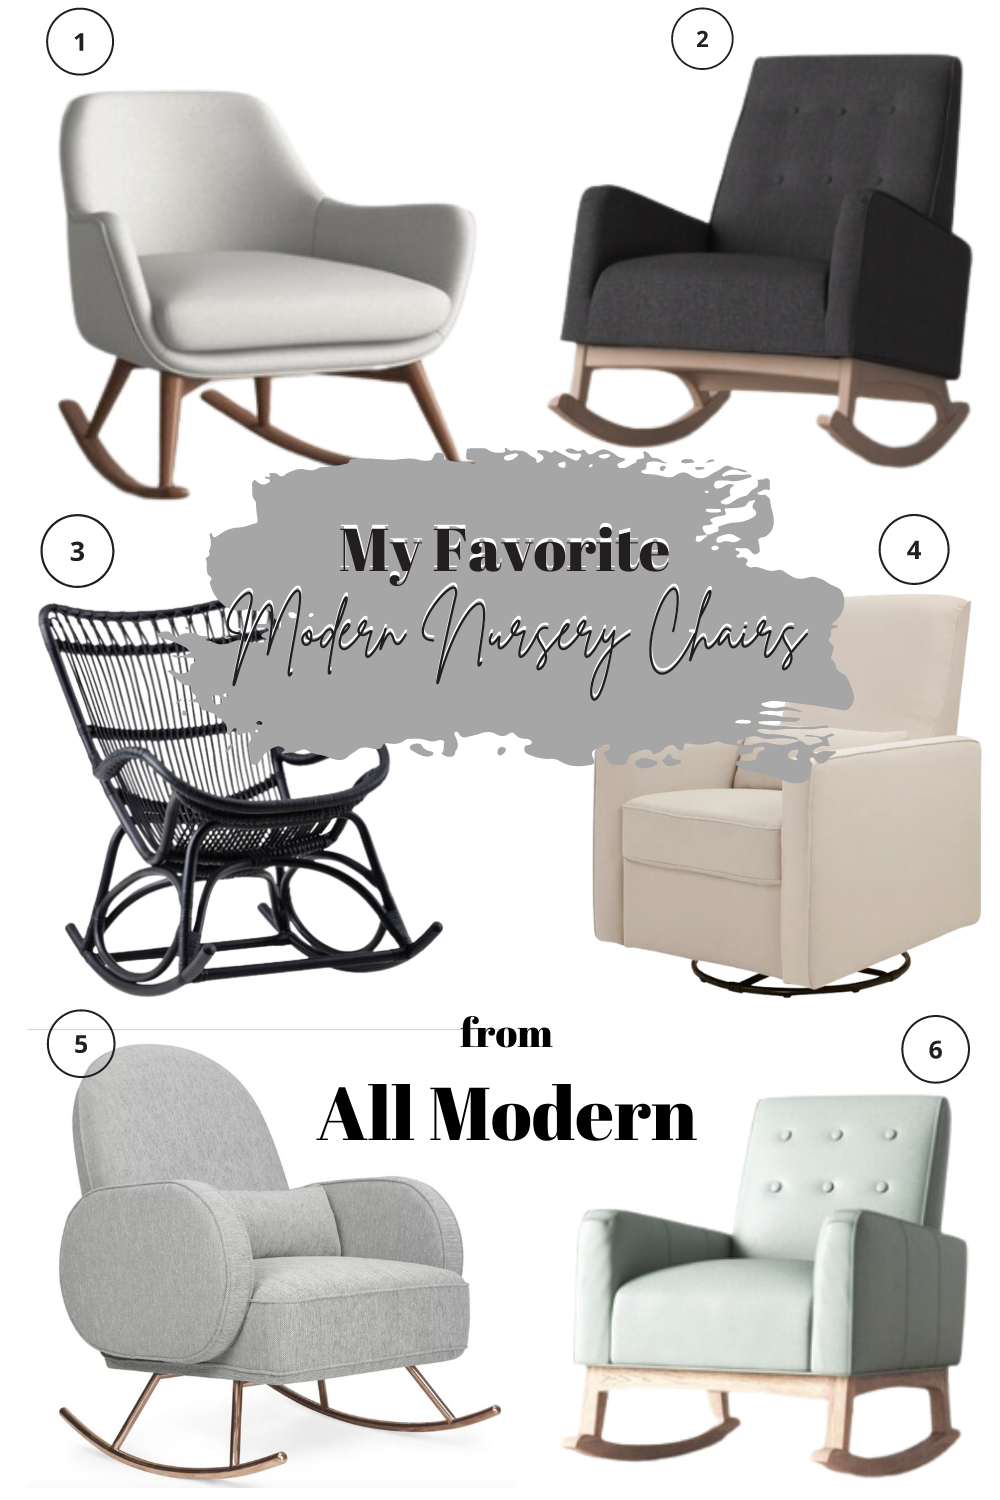
A couple weeks ago I shared a round up of my favorite modern style rocking chairs from All Modern. Thanks to All Modern for sponsoring this post! We are expecting our third baby (a BOY) in September and we’re slowly getting our home ready for his arrival. It’s been awhile since we had a baby in our home. Also, we don’t have an extra bedroom to make into a nursery. So I’m creating little baby zones around the house. This corner of our living room area is one of those zones. I’ve created a baby changing area and diaper/baby cart for easy access to supplies. I love that the cart can be moved around as well and the changing basket looks more like decor than anything baby related. I love that All Modern has rocking chairs that tie in with our living room decor and don’t scream baby. I know we will enjoy countless snuggles, cuddles and reading to our new baby in this chair. Continue reading below to see which one we selected!
My favorite modern rocking chairs from All Modern.

Shop these chairs HERE
Here is what we were working with before:
The chair we had prior is comfy but takes up a lot of space. I knew I wanted something with a bit more contrast here. We have a lot of light color furniture and adding something with a bit of a darker tone is a nice way to break things up and add balance to a space. Since we can’t fit a rocking chair or glider into our bedroom, using this first floor corner for a rocker and changing area made sense for us.
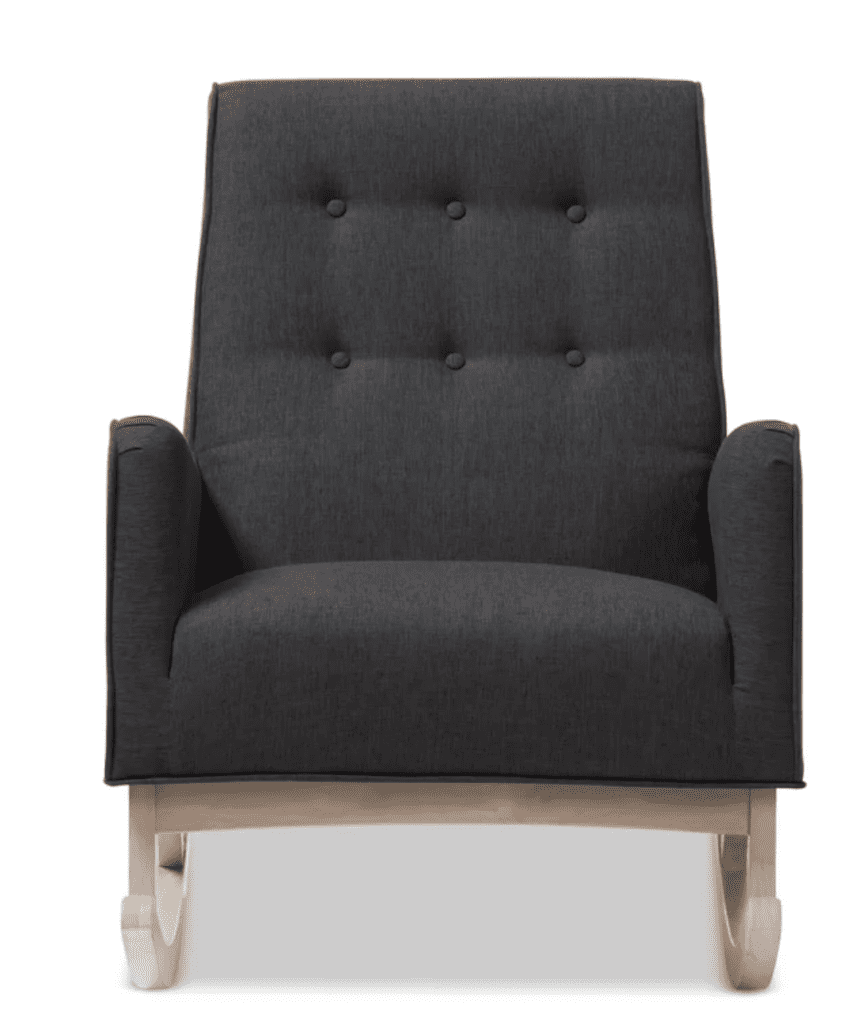
After browsing the selection at All Modern I fell in love with the light wood tone base of this rocking chair, as well as the darker upholstered fabric. The clean lines gives it a more modern feel and it’s also great for a smaller corner as it isn’t super wide.
Our new living room rocking chair from all modern helps us get ready for baby #3!

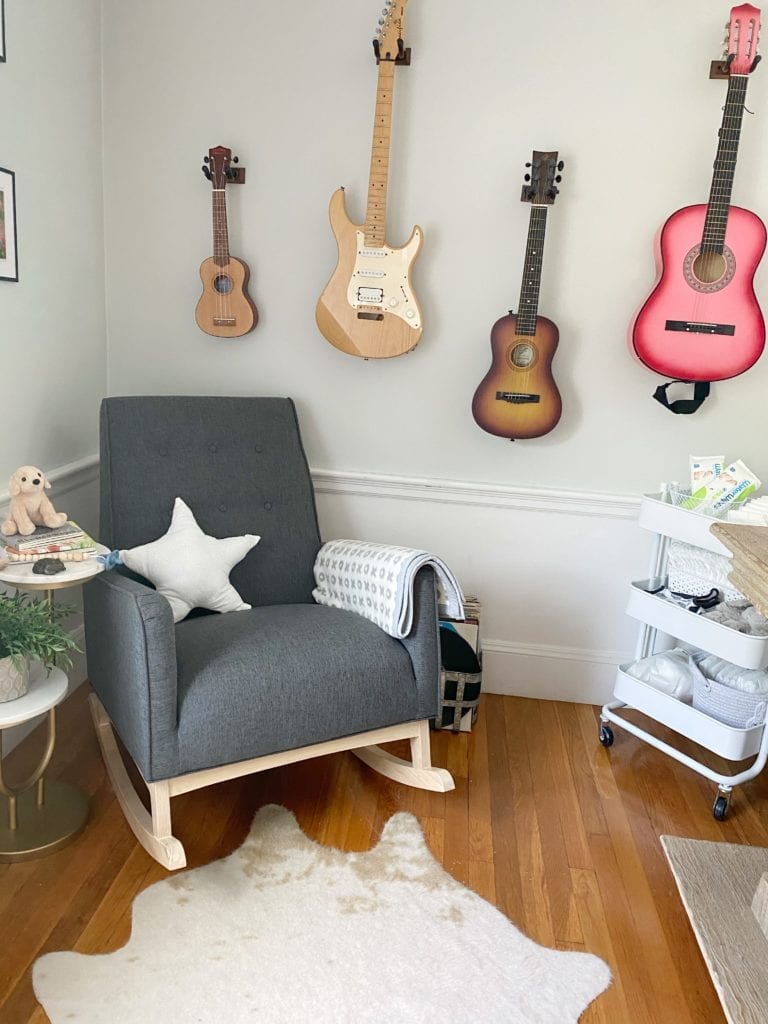
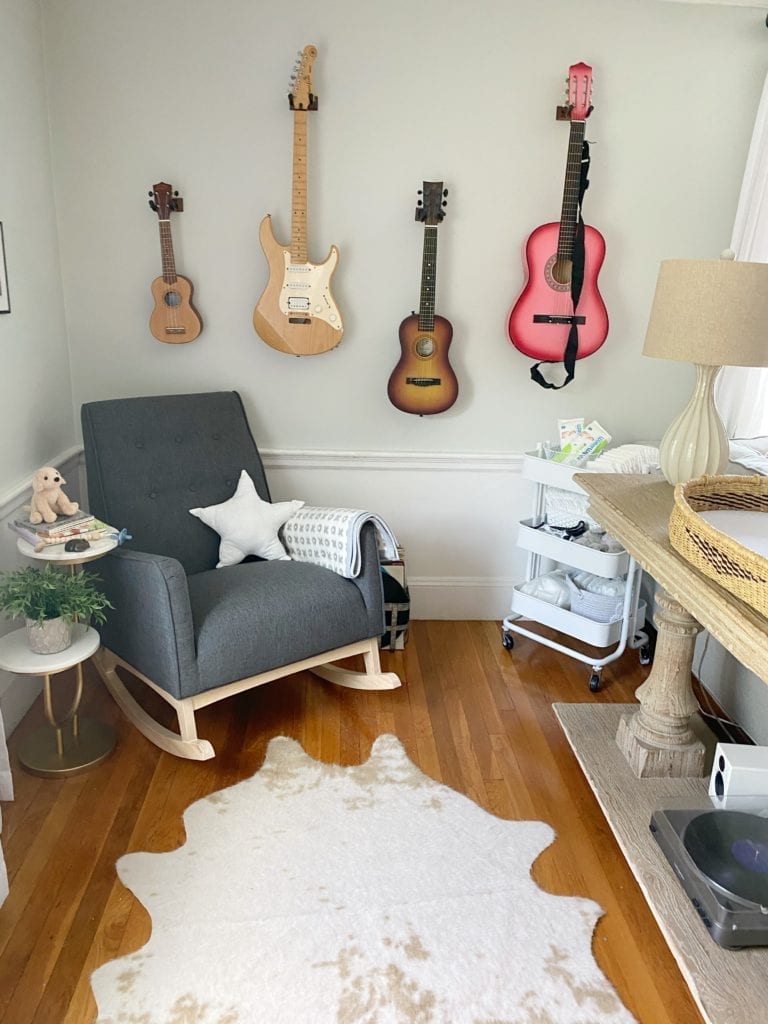
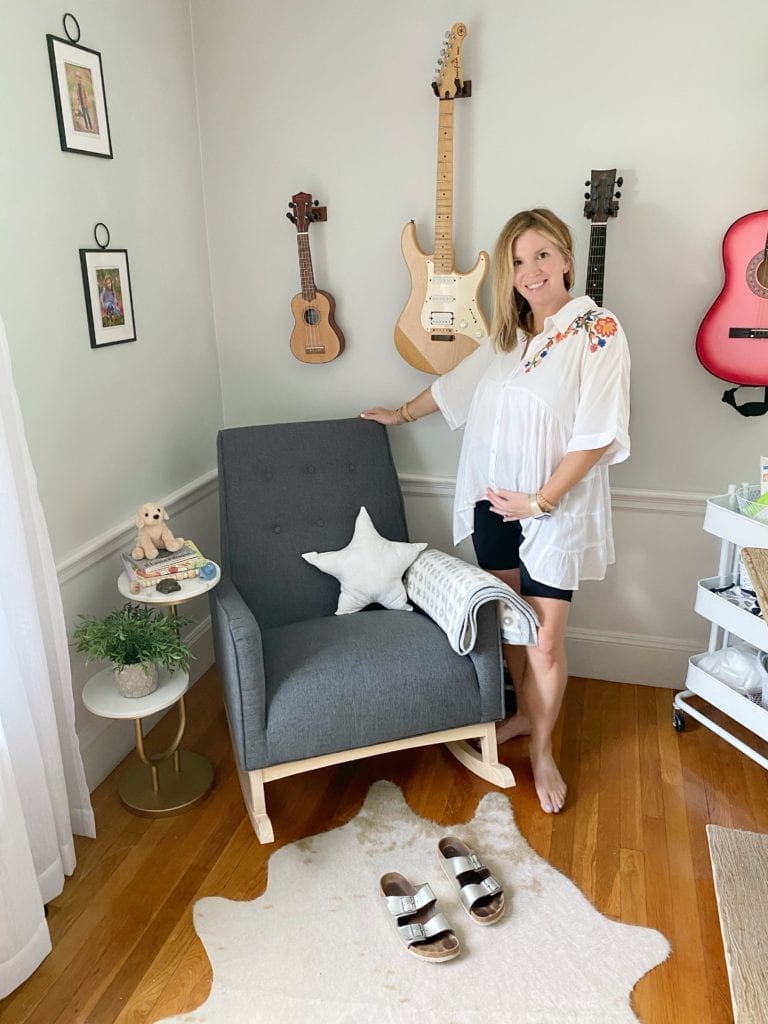
I absolutely love how our new rocking chair fits in this corner. I can just imagine all the snuggles and books we will read together here. It feels like part of our living room and not overly baby-ish. I added a simple start pillow made by my older son and a super soft Chappy blanket. A modern shaped side table is also a perfect addition for those bottles, cups of water and to hold books. I added this faux cow-hide rug for softness and we will probably get a little pouf or stool to put our feet up on too.
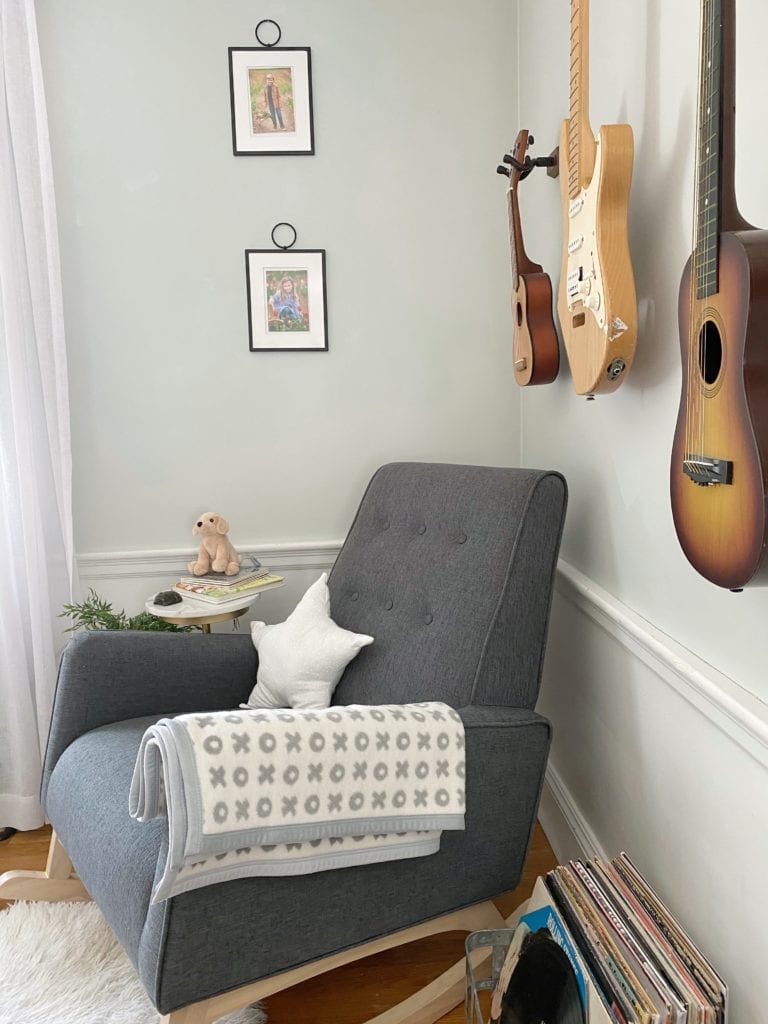

In these last photos I swapped the rug for a cozy shag sherpa rug. I love the pop of white! Either works but it is fun to play around with the decor here until it feels just right! What do you think of the round up of modern rocking chairs from All Modern? Do you like this one here? I think it really is a nice change from the super over-sized light colored chair we had here before. Big thank you to All Modern for sponsoring this post and thank YOU for stopping by and checking out my first baby related decor post!
Happy Decorating,
Jordan
Shop this post:

Pin For Later:
read the full post >
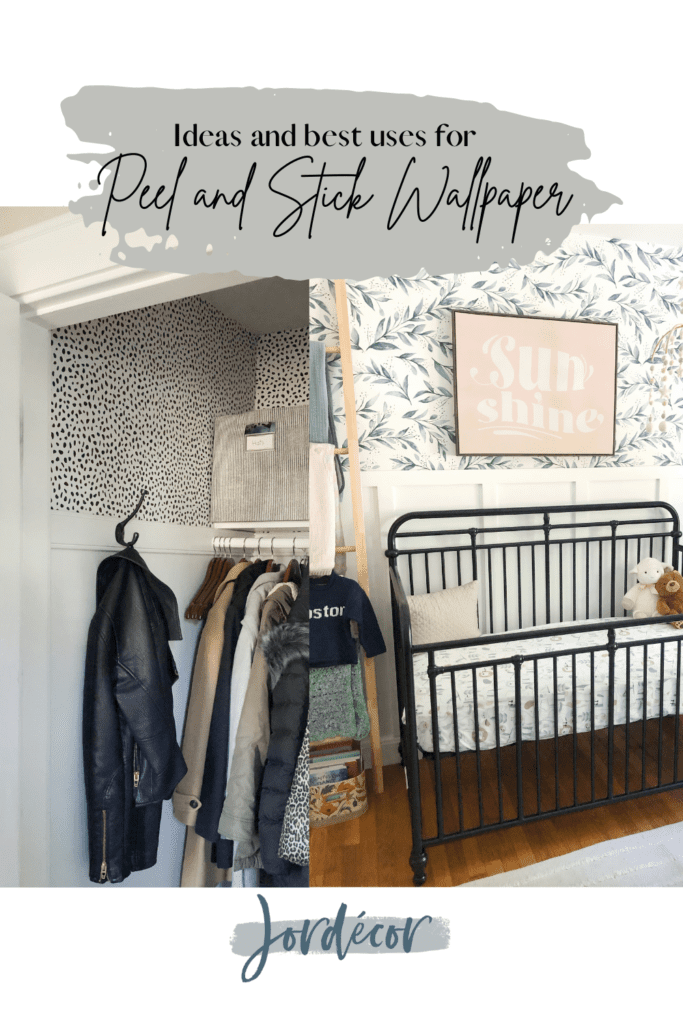
Have you ever used peel and stick wallpaper in your home? Unlike traditional wallpaper, peel and stick is both affordable and user friendly. Meaning, it’s easier to install and remove then traditional paper you may come to think of from decades past. It occurred to me recently that we have used peel and stick paper in quite a few areas in our home. In this post I thought I’d round up some of my favorite peel and stick paper, as well as give you a little tour around our house sharing areas where peel and stick paper was the perfect accent to finish a space.
Pin for later:
Should I use peel and stick wallpaper?
If you are considering peel and stick but are unsure if it may look good or may be too difficult to install, let me suggest to smart small. The common use of peel and stick is as an accent on either one wall, a small space or in an alcove of some kind. Here are a few ideas of spaces you may consider using peel and stick.
Where to use peel and stick?
- Bedroom accent wall behind bed
- Pantry
- Closet
- Small Office
- Laundry room or closet
- Backsplash (for apartment living)
- Nursery accent wall
- Kids space or playroom
- Inside furniture with glass
- On the sides of drawers for a fun pop
Peel and Stick Wall Paper Home Tour:
Closet
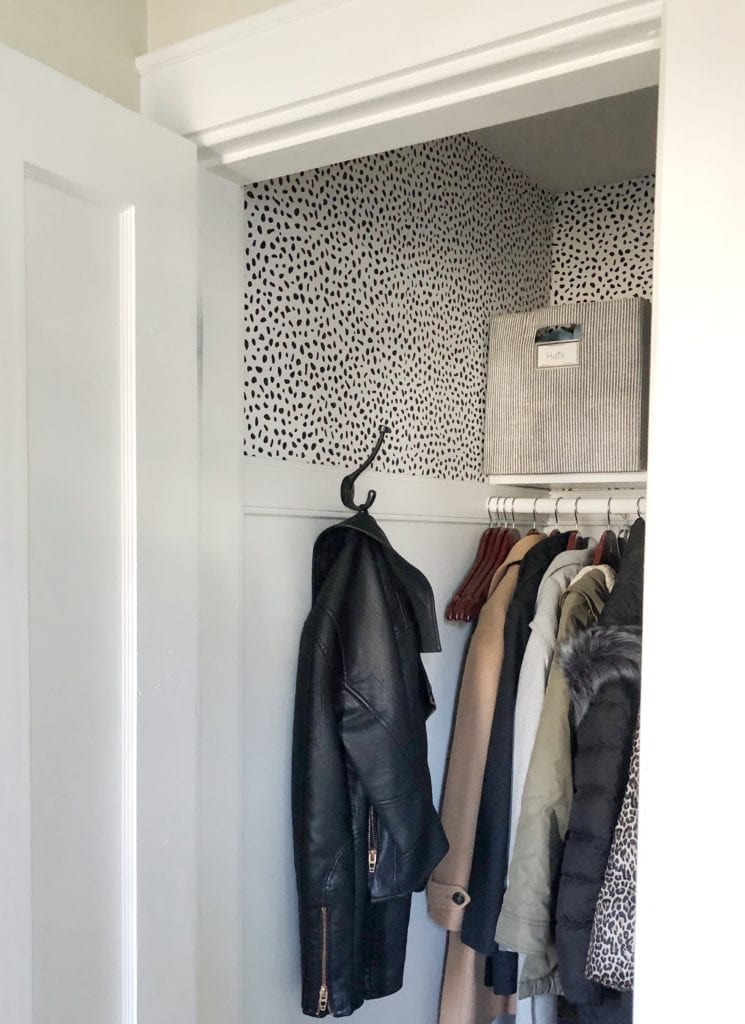
this paper in our entry closet
Bedroom

This faux grasscloth wallpaper in our bedroom
Pantry
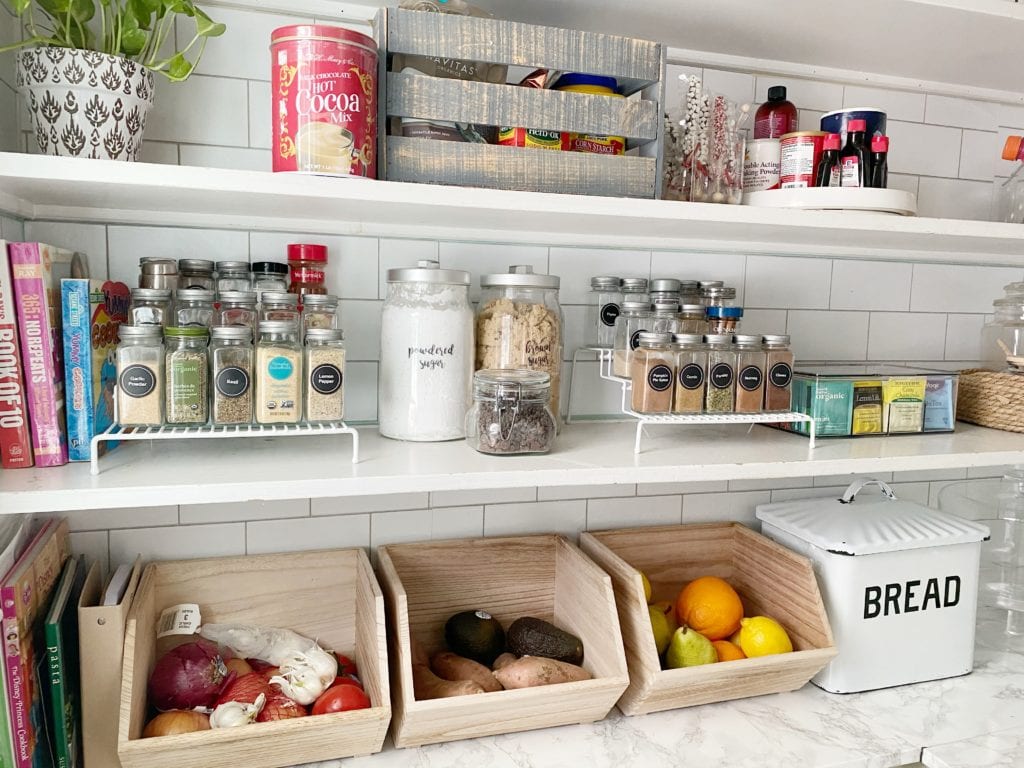
This subway tile for back splash or pantry and this contact paper for covering wood to look like marble.
Boy’s Bedroom
This brick paper to add texture and a bit of urban/industrial vibe to a boy’s bedroom
Nursery
This botanical print wallpaper we used in my Sister’s house. It is the sweetest accent in a nursery and paired with a board and batten treatment it is just enough color/pattern to bring interest to this wall.
I hope these ideas give you inspiration if you are trying to finish off a space and looking for that extra pop that will make your space special. Peel and Stick wallpaper is an inexpensive solution if you want to try to add a little something different and unexpected. Some places I love to shop for peel and stick wallpaper are Amazon, Target, Wayfair and Home Depot. Small shops found on Etsy are a fabulous way to go as well as WallPops, Urban Walls, Rocky Mountain Decals, Livette’s Wallpaper and Wall Paperie.
Happy Decorating!
Jordan
read the full post >
In today’s post sponsored by AllModern I’m going to share some of my favorite nursery rocking chairs and gliders. If you are shopping for nursery decor than I should first offer a big – CONGRATS! A nursery isn’t complete until you find the perfect chair for those middle of the night feeds and bedtime stories. I thought it would be fun to round up some of my favorites that are a bit more modern in design. I love the options available at AllModern because they are affordable while ranging in style, material and shape. I hope this round up of nursery chairs gives you some ideas as you start to design your little one’s new space.
We are expecting our third this September and while we don’t have a nursery I still wanted to select a rocking chair that we can read, rock and feed our baby on in the main living area of our home. I actually selected one of these rocking chairs below for our living room. My plan is to swap out one of our current chairs and update it with one of these. Any guesses which one? It was so hard for me to choose. You’ll have to wait a couple more weeks for it to arrive! Once it does and I get it all set up, I’ll share how it looks in our home!
Keep the Minimalist inspiration going with AllModern for: Minimal Modern Furniture, Minimalist Sofas, Minimal TV Stands, Minimalist Rugs, Minimalist Floor Lamps, Minimalist Table Lamps, Minimalist Chairs, Modern Wood Coffee Tables, and Effortless Minimalist Living Room Ideas
Thanks for supporting the brands I love to work with and for shopping through my website and affiliate links!
Happy Decorating!
Jordan
read the full post >
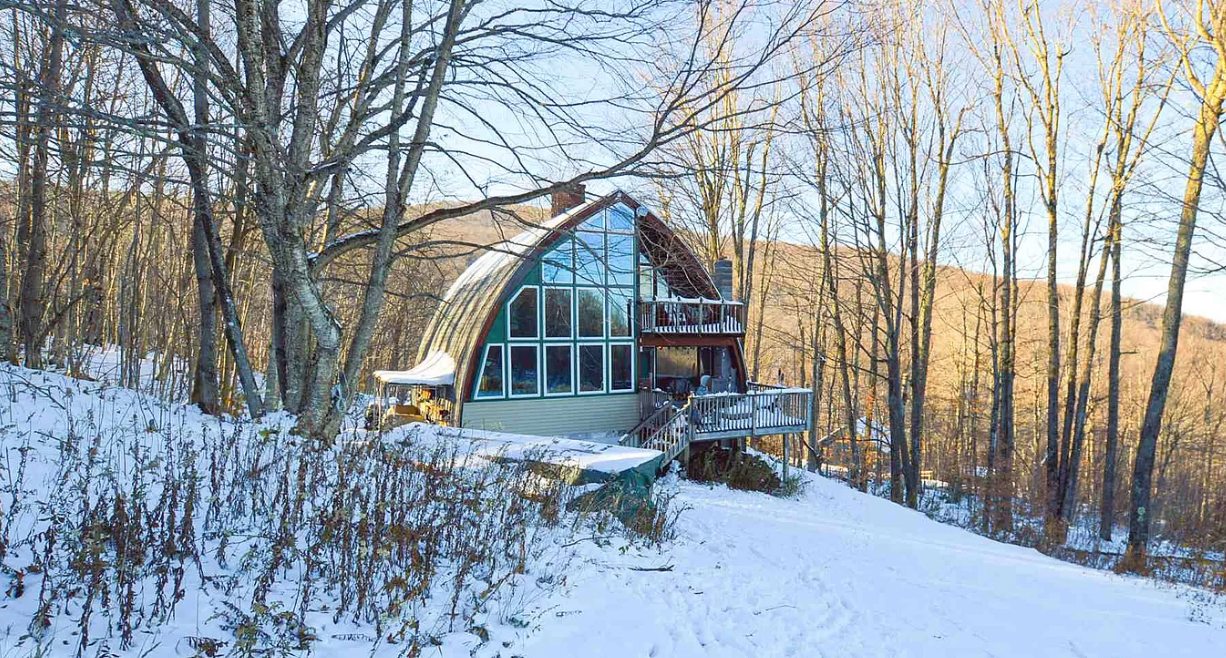
I’m so excited for this post because it really kicks off the more in depth planning and sharing of what we hope to do in our new home! It’s been almost a week since we closed on our vacation home up in central Vermont. It’s so strange that we haven’t even been there yet as the new owners. Over the last few days we are realizing that while the kids are in school and work/life continues on here in Boston area, finding time to make the three hour drive to check in and set up appointments (plus start demo) will be the most logistically challenging part right now. A challenge we are totally up for! My mind has been swirling with all the ideas to make our 70’s arched chalet a little bit more modern and bright looking.
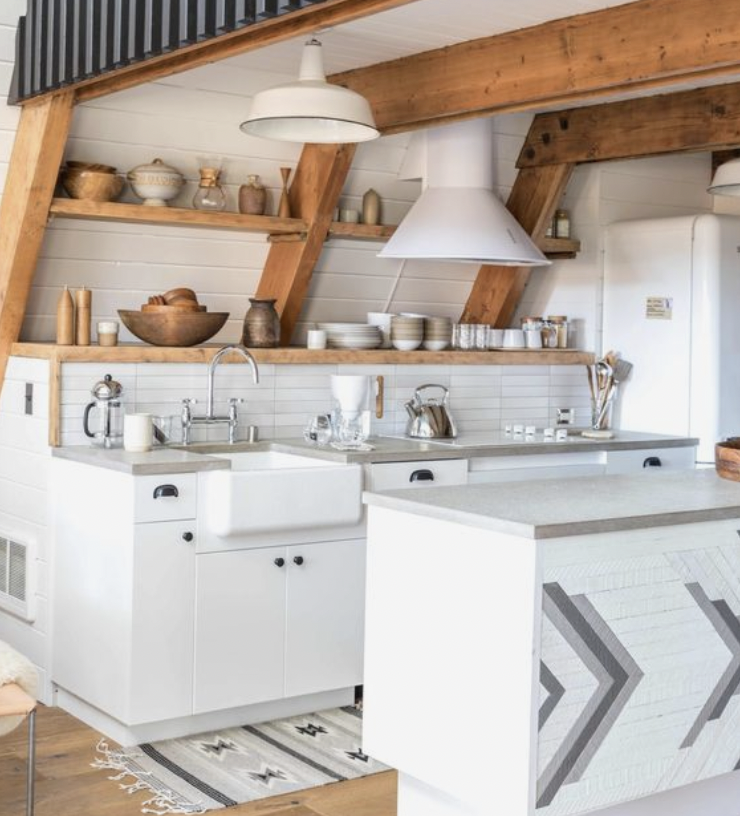
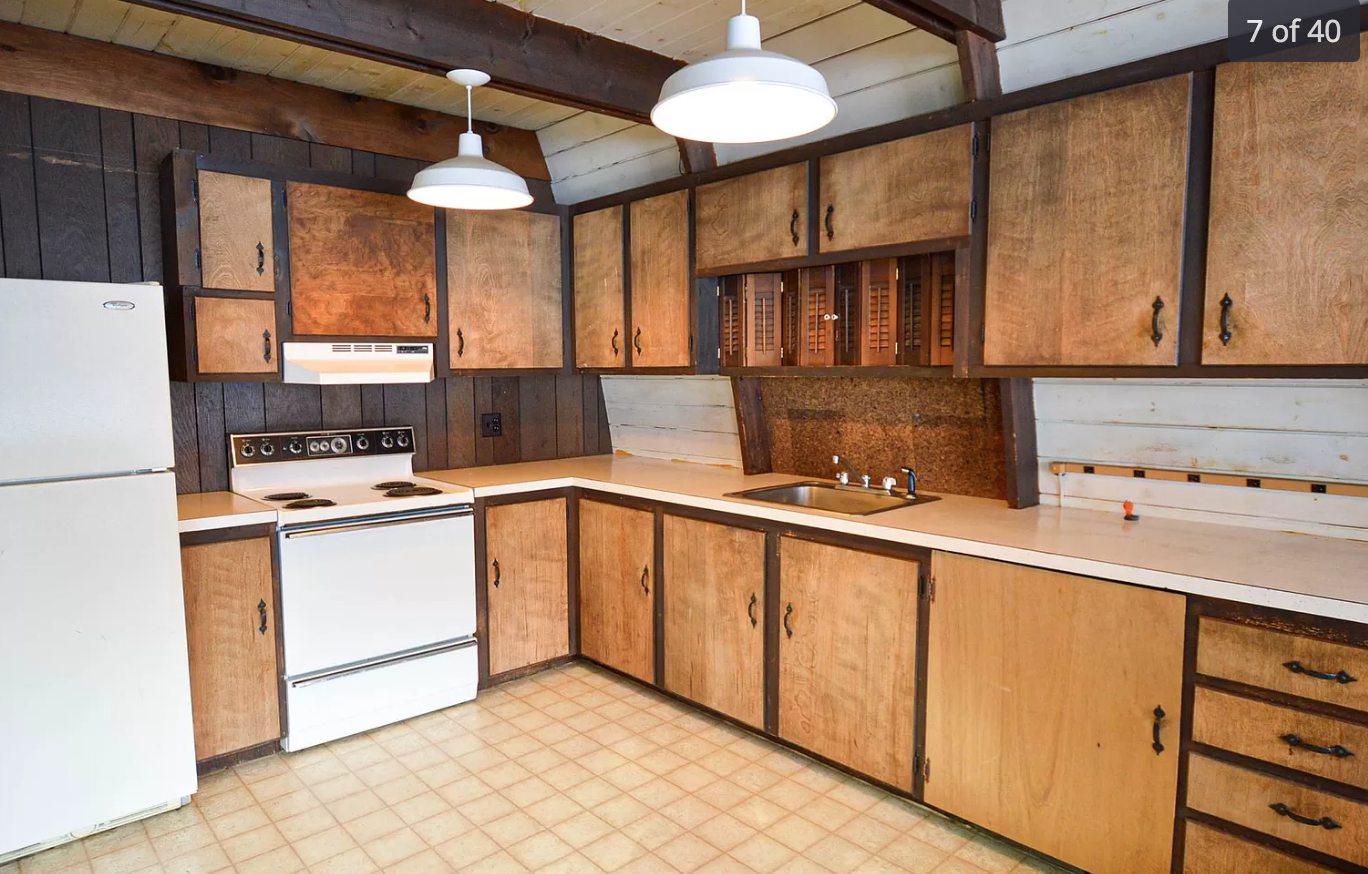
I decided it would be fun to start with the heart of any home the kitchen. So today I’m going to share more photos and inspiration pictures so you can visualize how we hope to give this dated kitchen a face lift. Thankfully we aren’t doing major renovations like moving walls or changing lay outs. This is a full blown cosmetic project, which I think is super transformative! The kitchen is by far the area that is going to cost the most in terms of new appliances, adding a new counter and cabinetry. Before I dive into the details of what we hope to do first let me share some of my TOP inspiration photos I pinned on my CABIN board.
I started searching for inspiration on Pinterest by typing in phrases like “arched cabins” “arched a-frames” “arched chalets” to see what I could find as similar as possible to the style of home we purchased. Not as many homes as I thought came up. However, just enough to really give me some jumping off points. I knew right away I wanted to add a nice window over the sink to let in light and also for the views! I was unsure of how a window would be installed into an arched wall. UNTIL, I saw this photo from Copeland & Co. Interiors, this entire arched cabin renovation is super inspiring. But when I saw how they bumped out a box for the window to go into it was an “AH-HA!” moment. Finding an image like this is so helpful to show a carpenter or contractor because then they can understand exactly what you are trying to do.
Via Copeland & Co. Interiors
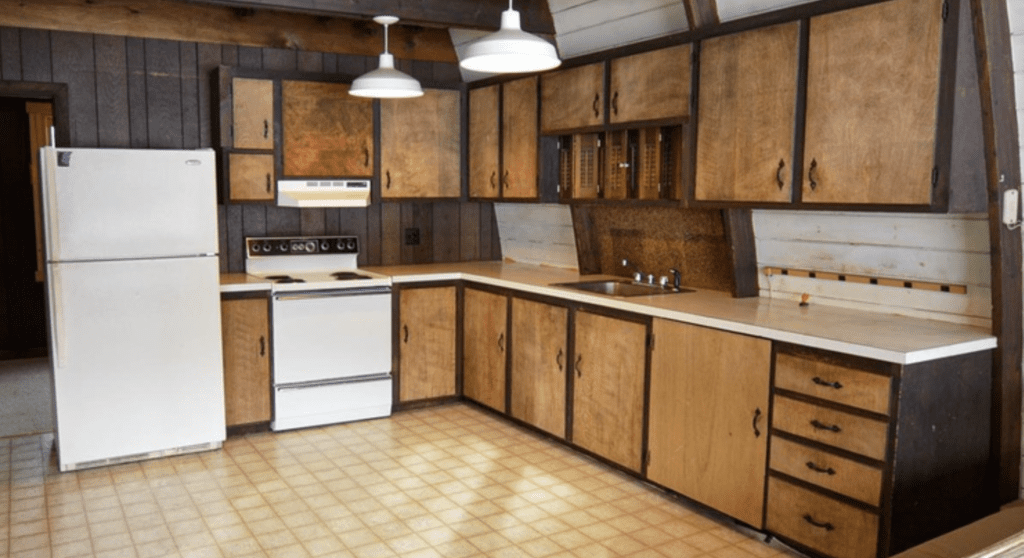
Our kitchen has so much character but it is currently hidden behind the old laminate floors, ugly appliances and out dated cabinets. Initially I wanted all new cabinets. However considering the cost and the time limit of waiting for all new cabinets. I’m honestly starting to consider keeping the lowers and painting them and adding new hardware and potentially some trim to the door fronts to dress them up. I love the wide shaker look of the ones below with the simple knobs. Something about that earthy neutral palette I love. So, if we can salvage the current lower cabinets we won’t have to wait to move along with the counters, sink and appliance install. Meaning kitchen will move along a lot faster. I can’t even imagine how long new cabinet orders are taking to arrive.
![]()
Via rockmystyle.co.uk
Ok I’m a fan of open shelving. I know some folks are and some are not. My thought with open shelving is that everything you need to use is easy to find when staying at a new home your unfamiliar with. We recently stayed at an airbnb that had SO much beautiful cabinetry, but it took 10 minutes each time we needed to find something. I think adding upper open shelving and using it for everyday dishes, mugs, glasses, bowls will get used and cleaned enough to prevent dust. This will also allow the kitchen to feel bigger and less top heavy.

Via Decoholic.org
The elements that inspire me in this photo are the white vertical shiplap and stone backsplash. I don’t really plan to do much backsplash because the arched wall and the fact that there is already a lot of planks and beams going on. However, the idea of having maybe a continuation of the stone or a tile behind the oven to give it a focal point on that wall is something that I’m considering.
Regarding colors, I love that instantly our kitchen will be so much brighter once we paint those dark panels and the dingy arched ceiling/walls too. I’m still deciding what color I want to paint the lower cabinets and I’m leaning towards something in the dark family for a pop or in the soothing grayish/green family- but it is still something I’m thinking about.
The Arched Chalet Current Kitchen:
The Arched Chalet – Kitchen Design Board
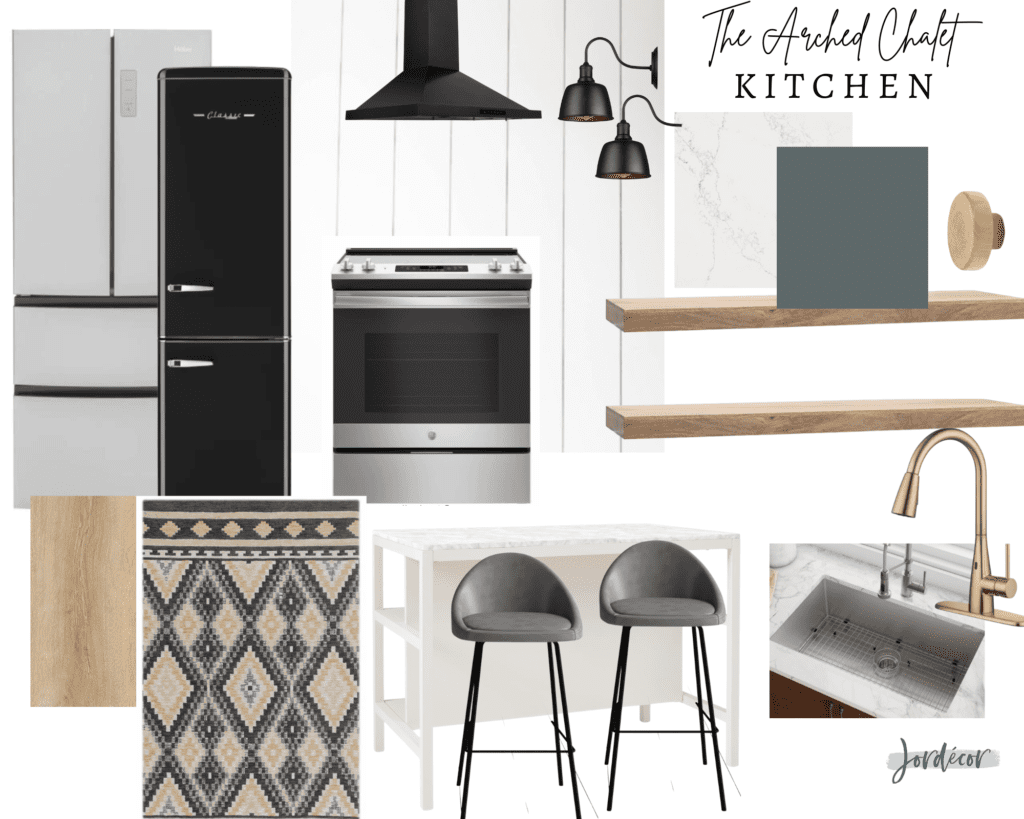
Shop This Design:

Let’s do a quick run down of everything pictured above. First thing first appliances. As soon as I get back up to the cabin I need to know the dimensions for the fridge (amongst others). The old white one is too wide for that area and is driving me nuts. Plus I’m sure it is super old and I’m honestly scared to open it. It has to go. I found a narrow option that is a great price and I’m hoping it works because I love the amount of storage it provides. However I was also considering a little retro option. I know it would be small but I’d probably get another for the basement for beverages. I think it would be fun!
Flooring; I can not not wait to update all the flooring on the mid-level to an engineered hardwood. Imagine something like above going through out the entire dining, living and mid level. I found a free standing island that I seriously love so so much. The price is great and I’m considering buying it ASAP because I feel like all this stuff will take forever to ship. Same goes for appliances and everything really!
Counters; I’m leaning towards a light colored quartz or maybe butcher block counter. I just want something low maintenance and also affordable. A new sink and faucet will freshen things up and imagine a nice big window over the sink in between those two beams.
Color Scheme, All the paneling will be painted a white, I’m considering painting the arched ceiling walls something a smidge darker then white something in the gray/beige family just to hide the dirt and the bleed through. I’ve been looking at Behr colors just to mix things up. I love Le Lux by Bher it feels gray but sometimes blue/green. For something a little lighter I also love Behr Riverdale and Behr Brook Green. I want to do something cool for the knobs maybe wood and painted the color of the cabinets, a natural wood or maybe brass.
So that’s it for now! The big Chalet Kitchen PLANS! What do you think of this direction so far? Excited to share more progress once we finish getting our quotes in.
Jordan
read the full post >

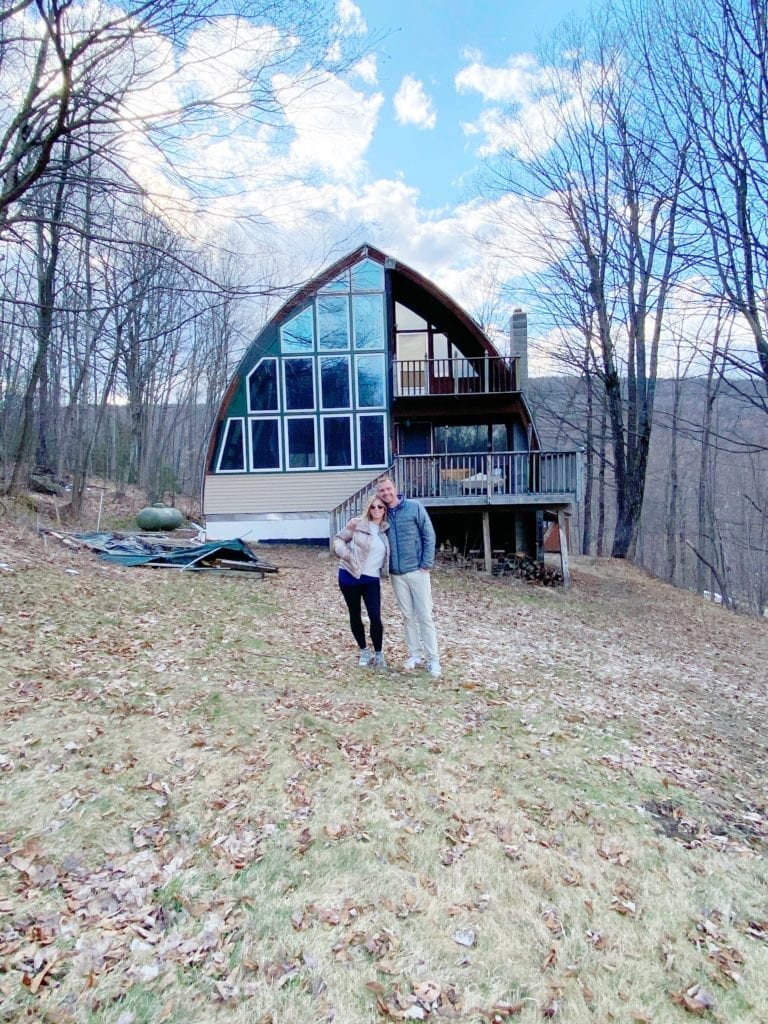
Exciting news to share with you all today. We just officially closed on a Mountain house!! Our dreams of owning a vacation home have come true! Ben and I have had many chats over the years of our hope to someday own a vacation home to fix up, enjoy with our family and also rent out. We love to travel and we’ve spent many, many trips, at Air B and B’s over the years.
Our Air B and B experiences have always been much more comfortable, especially with kids, family and groups of friends than at a hotel. As a decorator, part of me also enjoys the Air B and B experience because staying in different style homes with beautiful interiors excites me. We LOVE the idea of having our own place that we can create memories with our family, friends and of course anyone else that would like a trip to New England (maybe you!). We hope to rent it out at some point as well!
We’ve been researching for a long time! To begin the journey, we narrowed down where in New England felt like a good place for us to start this endeavor. Originally we were thinking a New Hampshire lake house. But Cape Cod has too strong a pull on us during the summer. We pivoted and after lots of long talks going through our favorite things about each state and what we really wanted, we knew we wanted a home we could enjoy in the winter. Also, in a state that would attract visitors from around the country, that felt like a true destination and escape. A place that offered beauty and activity in all seasons. Any guesses where our new home is? If you are guessing VERMONT… you are right! We felt pulled to the Green Mountain state. It’s world class skiing in places like Killington to classic quintessential towns with covered bridges like Woodstock. Our mountain home is nestled in central to many great areas!

The time felt right. Yet it also felt a little crazy (yah know with the whole pandemic thing). With travel restrictions and all the open houses being out of state, our realtor had to take us along virtually. We made an offer with out actually seeing this house in person. I know, I know all a little crazy. But with the climate of real estate as competitive as it is these days, you have to take risks and get offers in early. We made an offer with contingencies to cover ourselves. So that made us feel more confident with moving forward sight unseen. We’ve also worked on a lot of house projects over the years and seeing less than desirable photos of a home doesn’t scare us away. In this case, I think the cluttered, bad listing photos actually helped us out. This home wasn’t moving off market. We saw it’s potential right away! It really is so unique looking and a true diamond in the rough.
It still feels so strange to say the words “our mountain home”. It’s very surreal! We already have so many ideas for fixing this place up because it needs some serious TLC. I’m actually going to be using my Home Planner to help me stay organized. Our goal is to get this house ready to rent by the fall. We know that is going to be tight, winter would also be a great goal to shoot for. Hopefully the rest of spring and summer will give us a good amount of time to start the updates. We have lots of plans for freshening up the exterior as well!
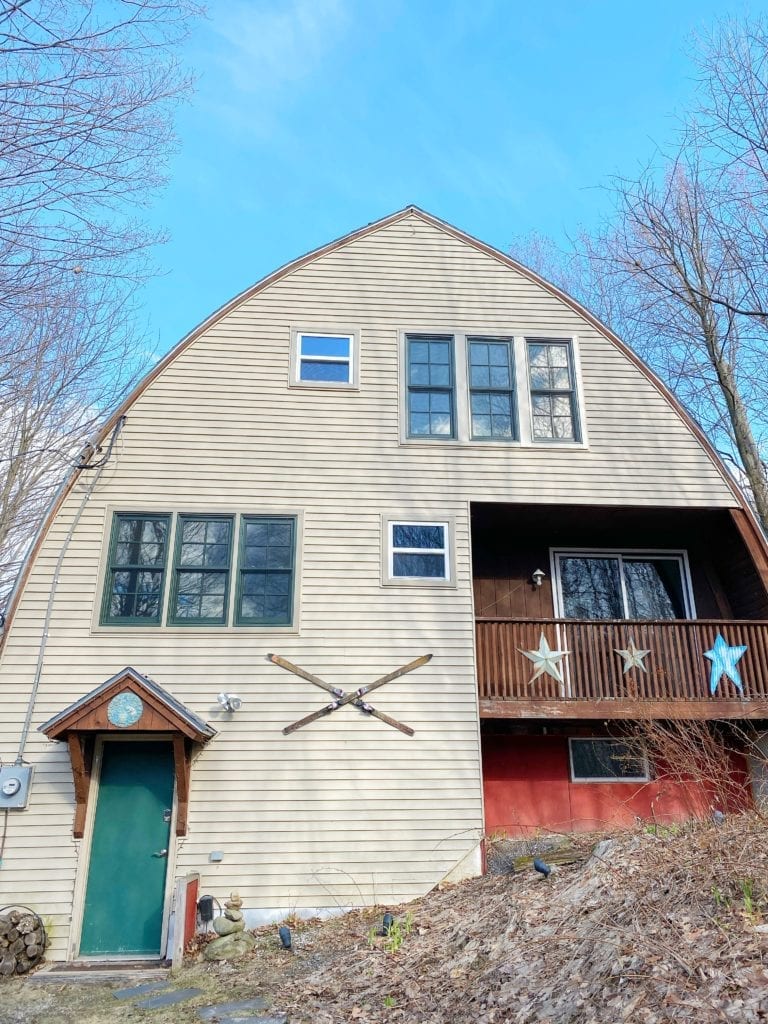
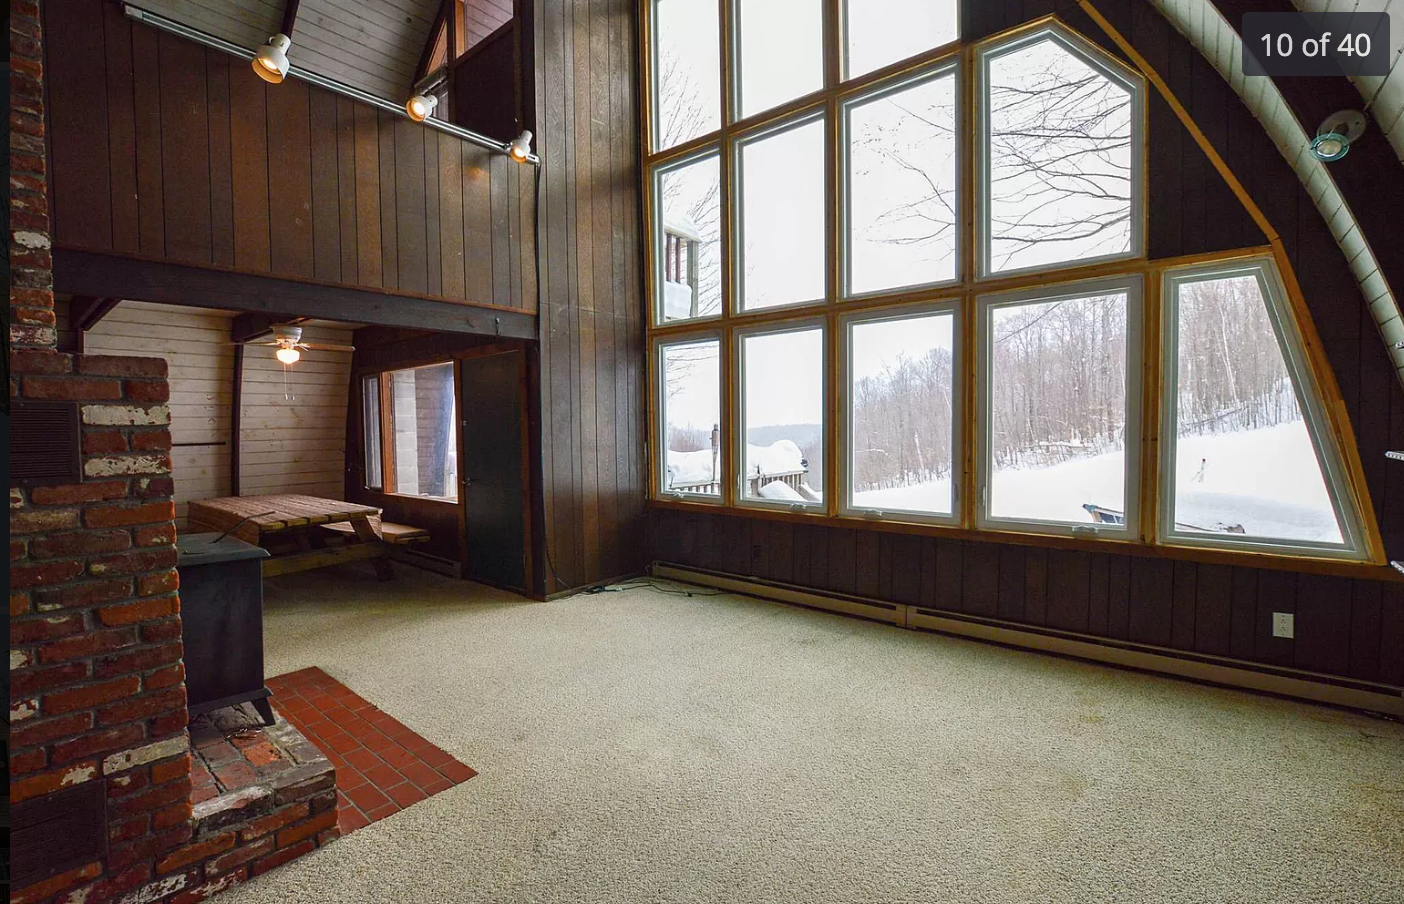
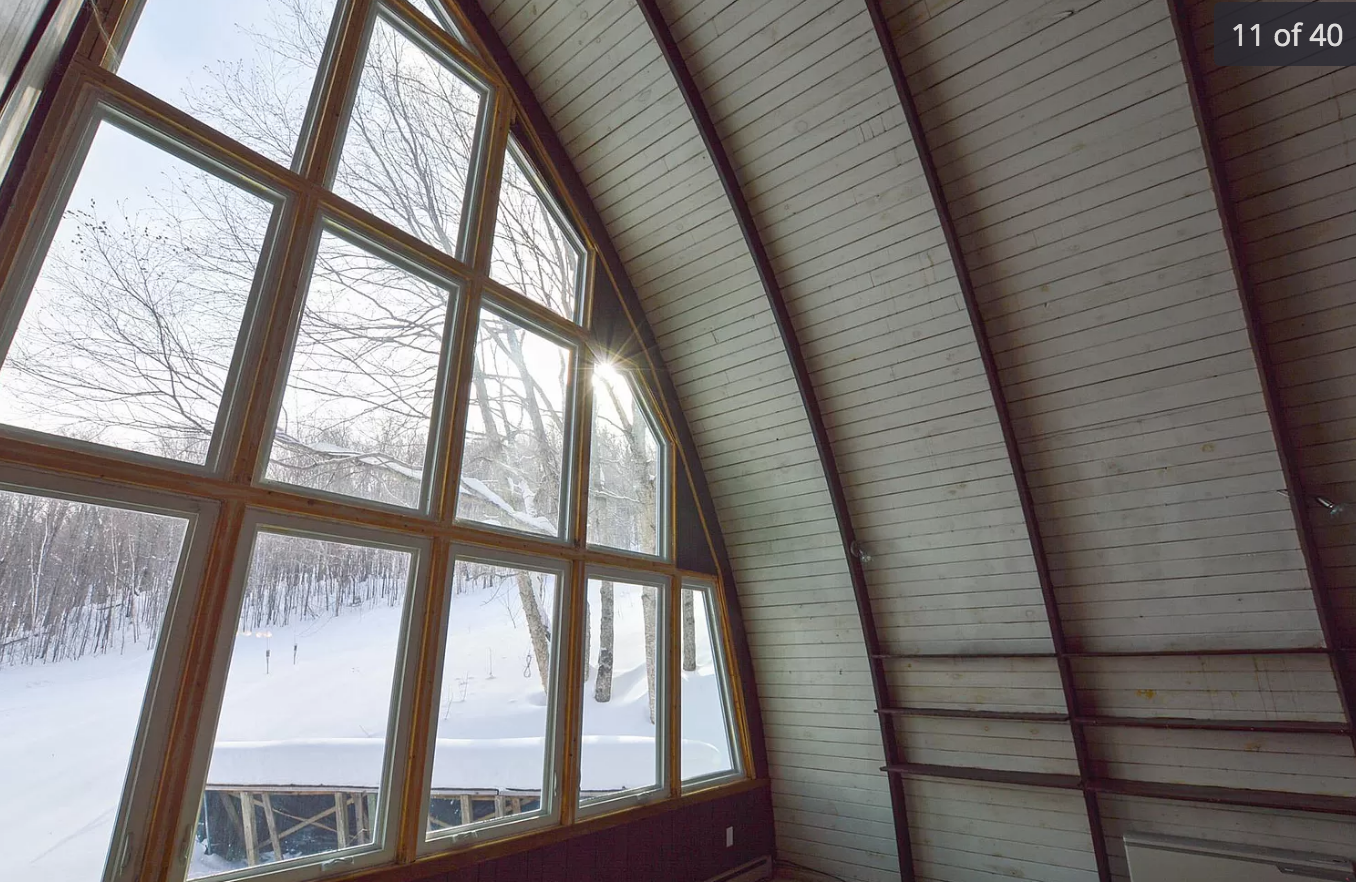
So are you ready for more interior photos??? My favorite part is the back of the home as well as the great room. Before I share photos I’ll share our top INTERIOR projects for giving this 1970’s arched ski chalet a MAJOR facelift.
TOP INTERIOR Projects:
- Electrical– Most important we plan to update all the electrical in the home so it is up to code and completely safe.
- Flooring – Tear out all flooring and add new through out entire house (mix of tile, carpet stair runners and engineered hardwood)
- Kitchen– add window above the sink (HELLO MOUNTAIN VIEWS AND LIGHT), new cabinets, counters, remove upper cabinets, new appliances etc…basically a new budget friendly kitchen!!
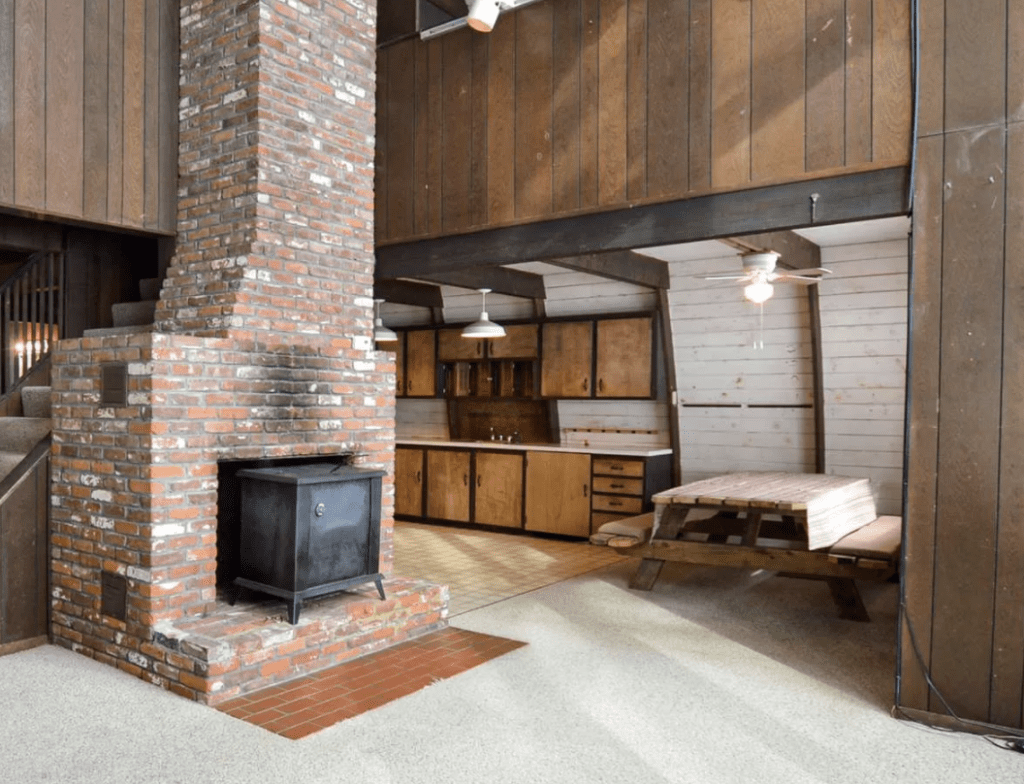
- Fireplace- update the stone for a more modern look as well as the insert removal.
- Paint– A TON of primer and paint to brighten up the dark 70’s paneling which will give it more of a vertical shiplap appearance.
I’ll go into more detail on these things in the upcoming weeks and on Instagram. I’ll also be giving some tours on stories. Once we get back up there. These photos are from the listing and a few from our past weekend in Vermont (the snow all melted).
I didn’t include first level photos. This chalet has three levels. The the first level you walk into has a mudroom, living room and a bedroom. It isn’t truly a basement but it feels like one at the moment because it’s dark and dingy, no bueno! There have been zero updates inside this place since it was built in the 70’s. Ok with out further ado…
Meet The Arched Chalet:

Imagine new lower cabinets, fresh counters, open shelving and a beautiful window above a new sink. The fridge situation also needs to be addressed because it is way too big in that spot. I’m looking at some cool smaller retro ones. I considered moving fridge to the opposite side of the kitchen but because of the sloped ceilings it would not sit flush against wall. Also, we plan to add a new oven and dishwasher too! I also want to find a cool island with some modern seating. The beams will stay a darker wood for now, and of course all the lighting will eventually be updated too!
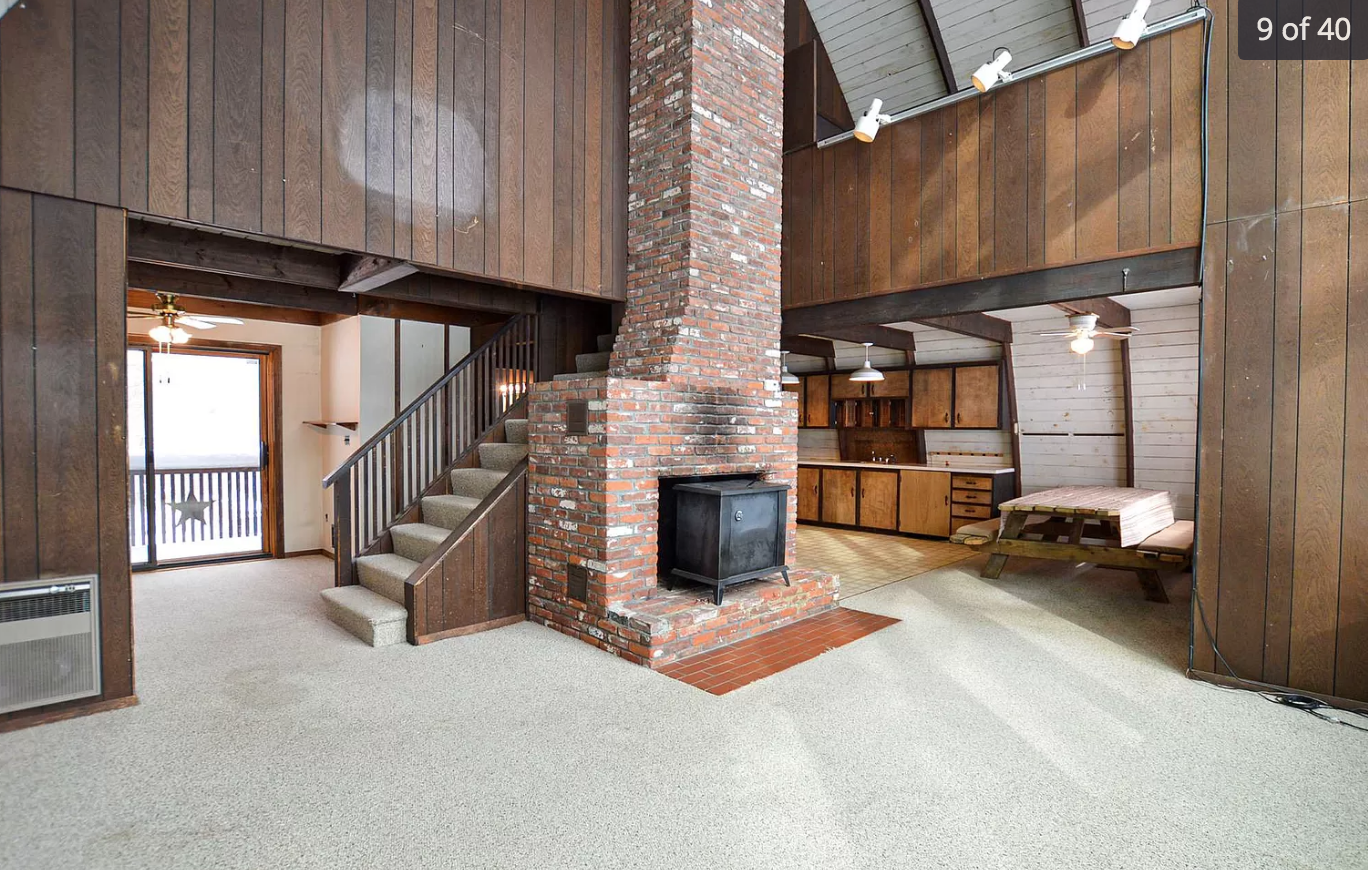
Above the half wall is a loft which has its own balcony. I’ll plan to make that a bedroom with either a day bed or trundle bed for additional sleeping. Can you imagine how much brighter light wall colors and new consistent flooring on this level, PLUS bringing some stone to that fireplace will really enhance and modernize this main floor?


The home has two full bathrooms which also need some updating. I’ll cover that another time. Kitchen, electric and floors are our TOP priorities first.
Master Bedroom: 
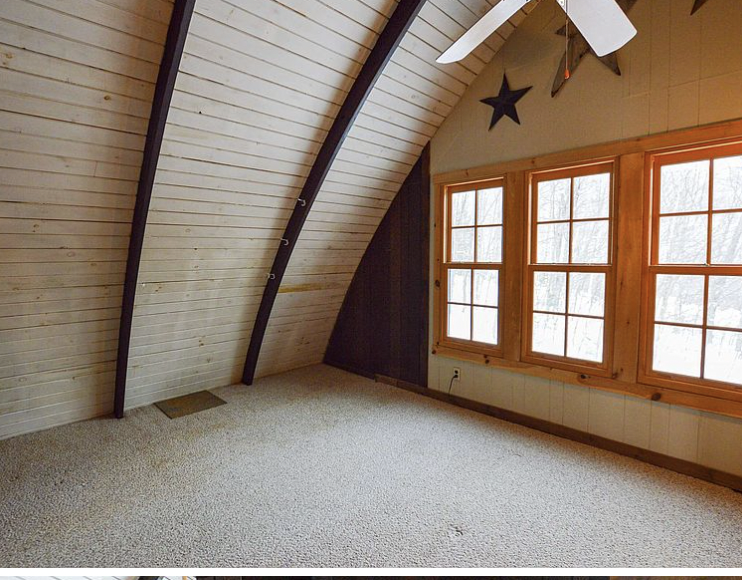
Loft: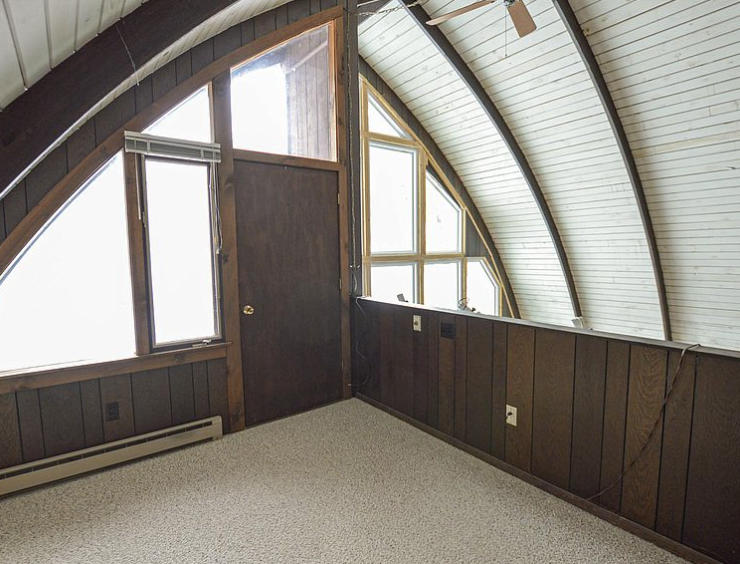
So there she is in all her 70’s paneling glory. We also want to freshen up the white paint on the arch ceilings. Once the floors are updated and we have fresh paint through out, then some nice furniture/decor/lighting it will look completely different! So what do you think of our mountain house- ski chalet – cabin in the woods?!
Interested in Booking The Arched Chalet once complete?
Can’t wait to take you on this adventure with us! Follow The Arched Chalet IG HERE
Jordan
read the full post >

I’m so excited to announce the PRE-ORDER for my new home planner is LIVE! You can officially grab a copy! Planner’s are scheduled to ship in 2-3 weeks. I appreciate you ordering ahead of time, as it gives me an idea of how many to order from the printing press this round!

What is my new HOME PLANNER all about?
Are you the type of person that strives to be organized in all aspects of your life? If so, you most likely have a some kind of planner. Maybe it’s for school, work, teaching, your budget or your upcoming wedding plans? The important and sometimes chaotic areas of your life benefit from some type of organizational system. Right?
But what about those four walls in which you live? How do you manage your aspirations for your dwelling? You know those ideas, projects, budgets, receipts, maintenance checks, trades and shopping to do lists, that are all jumbled around your head. All of these areas can get really overwhelming to remember. Where you dwell is a major area in your life! Your dwelling might be a city apartment, condo/townhouse, fixer upper or new build.
Wherever YOU call home… big house or small apartment, big or small budget; your space is calling out to be your canvas!

I created Dream Design Decorate to help you stay motivated, inspired and organized in creating a dwelling you love. In this planner you will receive contents that go beyond just blank workbook pages (you’ll get those too, for each room!). Inside you’ll find DIY tips, decorating “how- to” pages to take with you on the go and on the journey of making a house a home. When you are stumped refer to it, if you get off track on your projects refer to it again! I get asked all the time where I get my motivation and energy. I gain it from the satisfaction of seeing an idea or design plan come to life. By making your space a beautiful reflection of yourself and family you will continue to boost your confidence and stay motivated in tackling your projects.
Highlights of my planner include:
- Style Quiz:what type of design aesthetic are you most drawn to?
- Ratios to Remember: Important ratios to remember in design.
- Fixtures Figured Out: How to select light fixtures for your home!
- Decorator’s Shopping Guide: My favorite places to shop!
- Home Paint Color Palette Log: To jot down all those wall colors.
- Blank Planner Pages: Will help you plan out your ideas, to do lists and budget for each room.
And SO MUCH MORE! All written by yours truly. Dream Design Decorate is an 8 x 10 wire bound planner, filled with tips and ideas for you to take action on creating beautiful spaces. Planner is $35 which includes shipping. If you’d like to purchase more than one copy use code BuyMore to save!
Let’s get started creating a dwelling you’ll love, together! Grab my planner and meet your new decorating bestie.
Pin for Later:

read the full post >
Hey Friends! If you’ve been following along over on Instagram or on my last blog post, you know we announced that we are expecting number 3 in September!!! We are so excited to add another member to our family and to meet this new little one. We don’t know the gender of the baby yet but will be finding out in the next couple weeks! The last time we had a baby in our home, was our daughter Autumn 7 (almost 8) years ago. Needless to say the baby stuff has been handed down, passed on, donated or tossed! I’m realizing that SOOO much has changed since I last looked into baby gear. I can’t even believe all the stylish and convenient options there are now. From the crib designs, to bassinets and bedding.
I think what it comes down is that yes, babies do require lots of stuff but not as much as you think. My first baby registry I registered for everything under the sun pertaining to baby gear. I wanted to be prepared and ready! This time around I feel more relaxed, I know what’s coming. I don’t need to go out and get all the stuff all at once. I plan to keep it as simple and minimal as possible. Of course we plan to get the essentials; car seat, stroller, crib/bassinet, swaddles, bottles, bibs, burp clothes, and diapers/wipes, etc… I’m sure there will be a bit more than that. But I really do want to try simplify the amount of stuff we have in our home and only purchase what we really need, when we need it.
Once we found out the news of a new baby on the way, the first thing I said to Ben was “where are we going to put this baby?!” Our home is a three bedroom cape style home. If the older two were two boys or two girls it would be a little easier to move them into a shared room, that isn’t the case. We do have a bonus room off our master that we have converted into a home office/walk in closet or as I have dubbed it our “cloffice” read more about our “cloffice” here. Our office/closet is over our garage, it’s not the most climate controlled room in the house because it is over an older garage with barn doors. It can get very cold in the winter, not ideal for a new baby. Regardless of the lack of official nursery at the moment, I still have nursery design on the brain big time.
We do plan to keep baby in our bedroom for at least the first 5-6 months. Depending on what we decided to do with our home and the configuration of space in the future. Potentially adding on or expanding our garage/cloffice into our master which would mean our room would get a hallway and then turn into baby #3’s room. We are far off from that so baby #3 may be in our room for longer. My goal as I start to plan out how to make our bedroom also function as a mini nursery, is to make it just as sweet and pretty as a nursery yet also flow into our bedroom without too much interruption to our space.
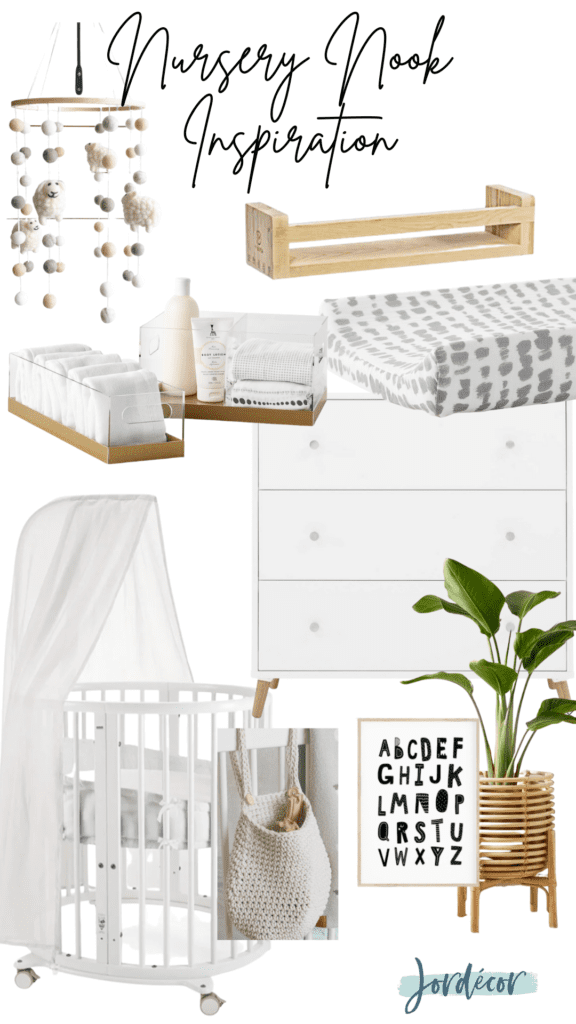
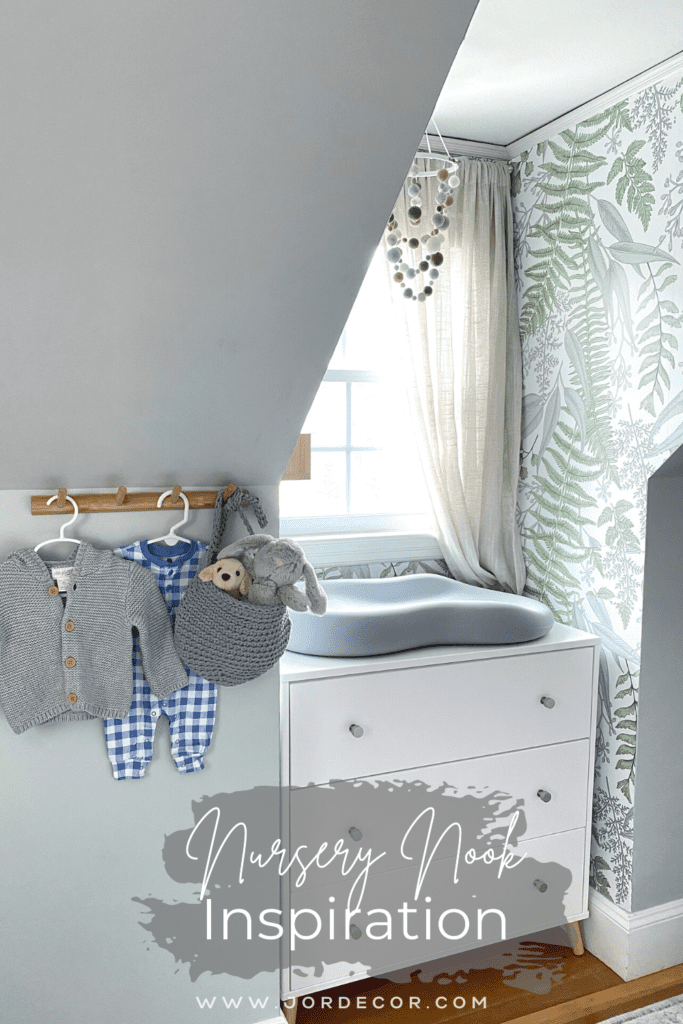
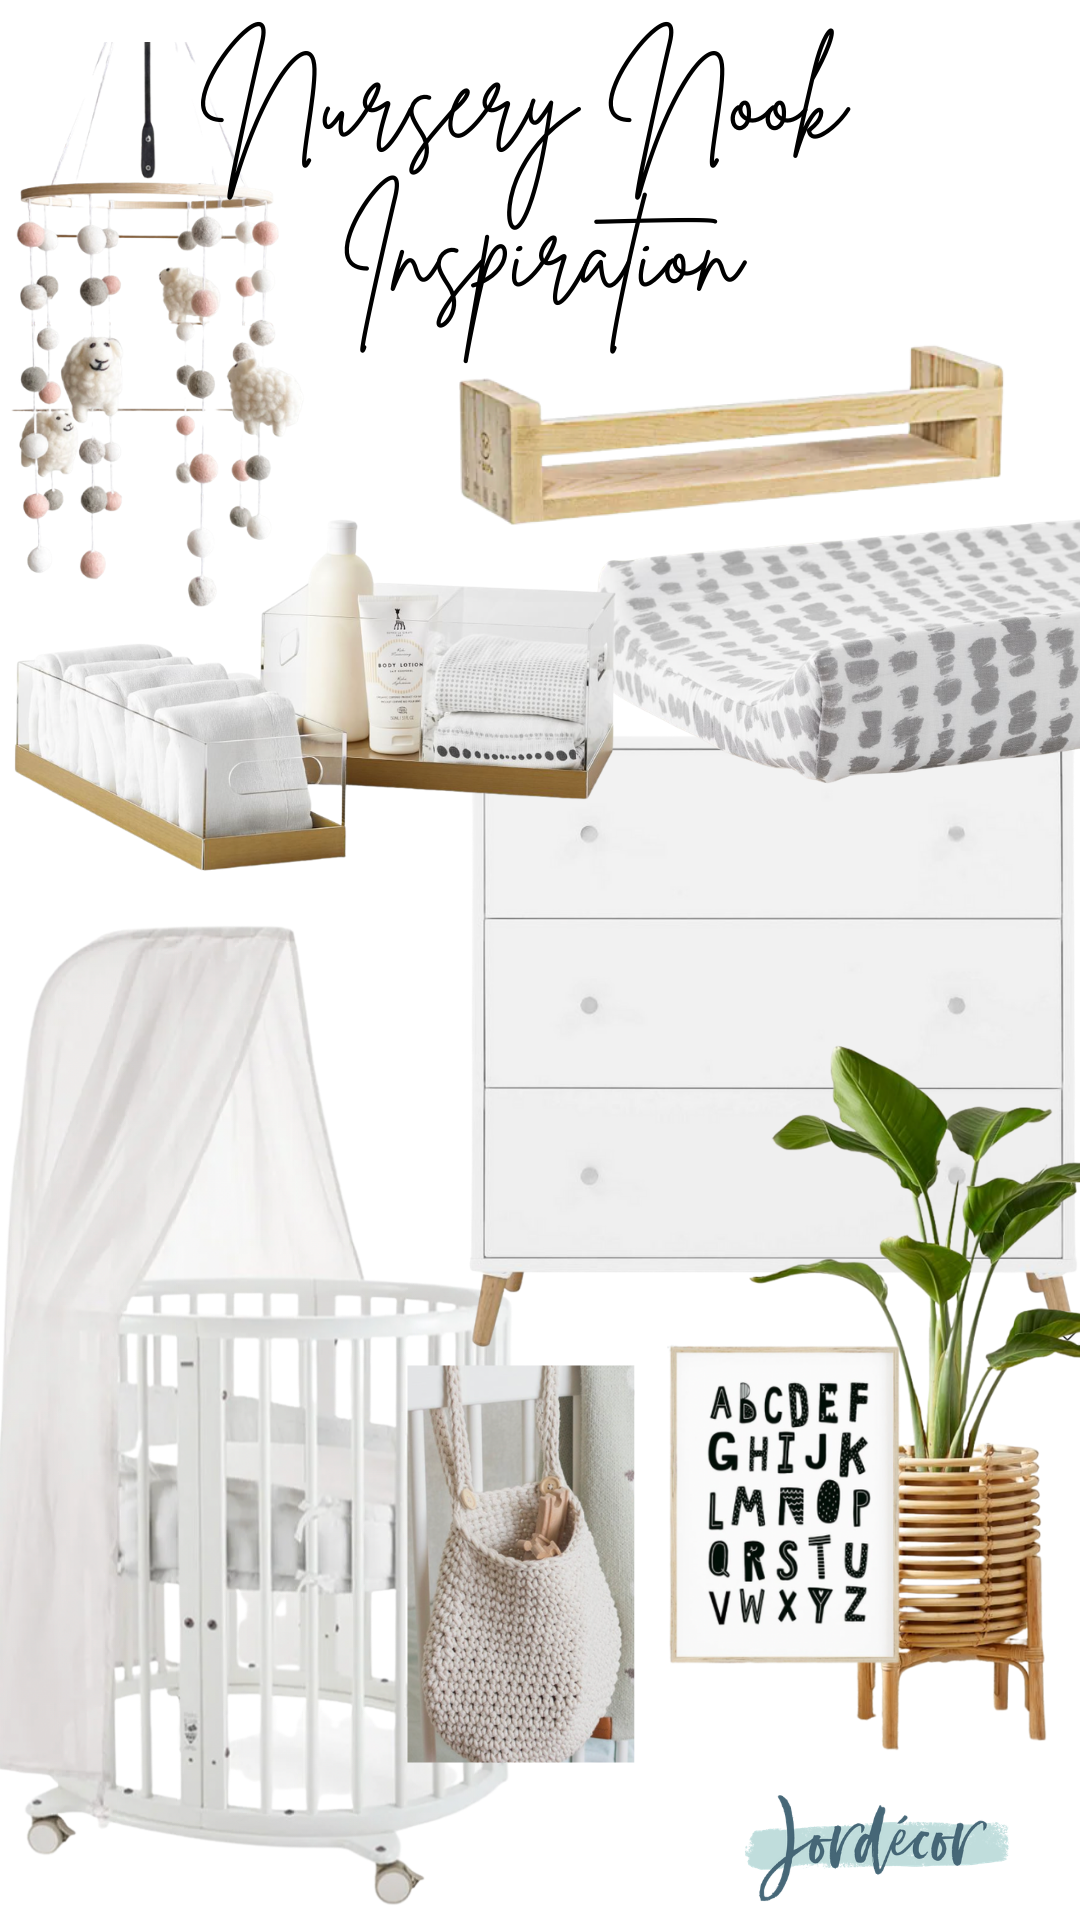
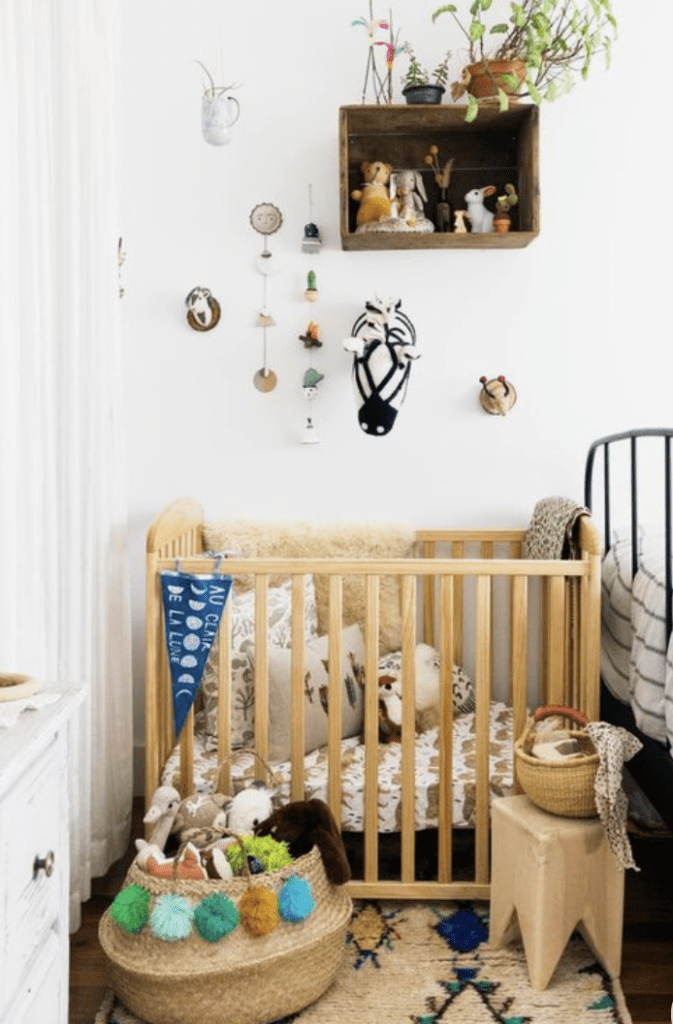
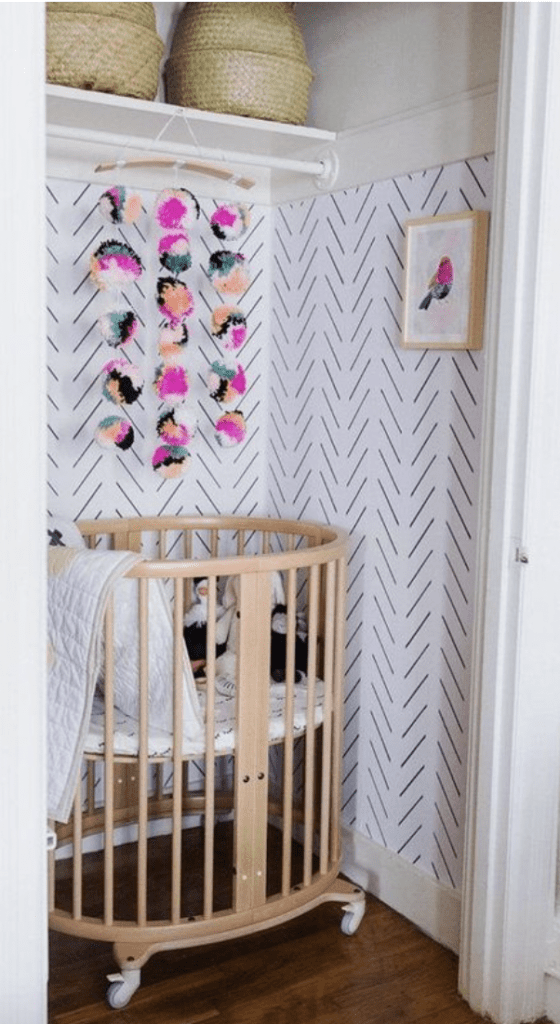
Nursery Nook Inspiration:
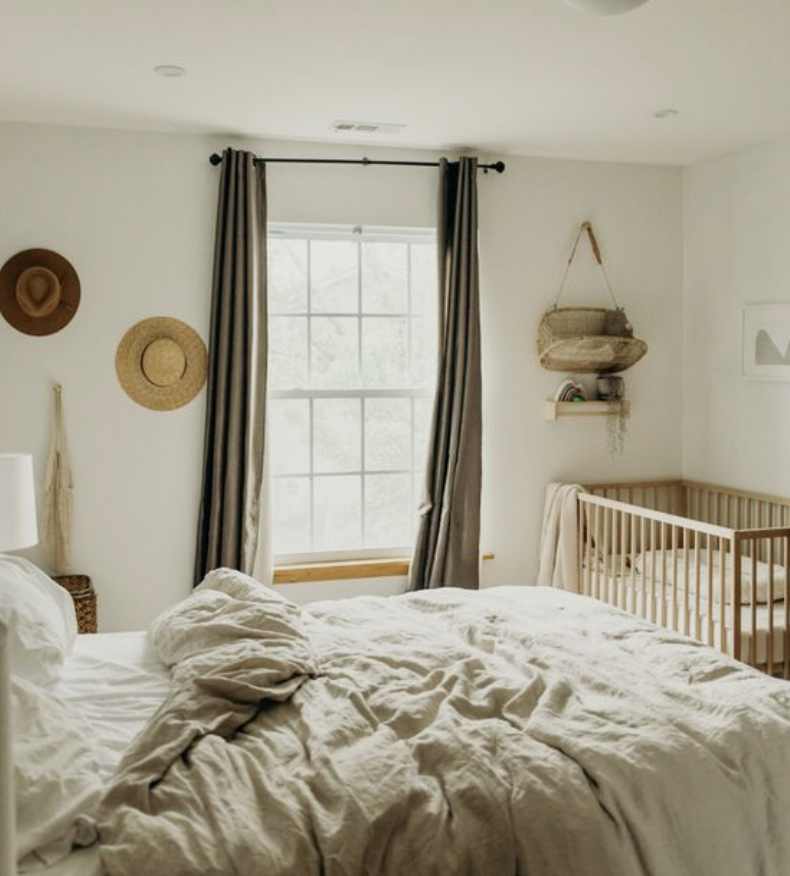
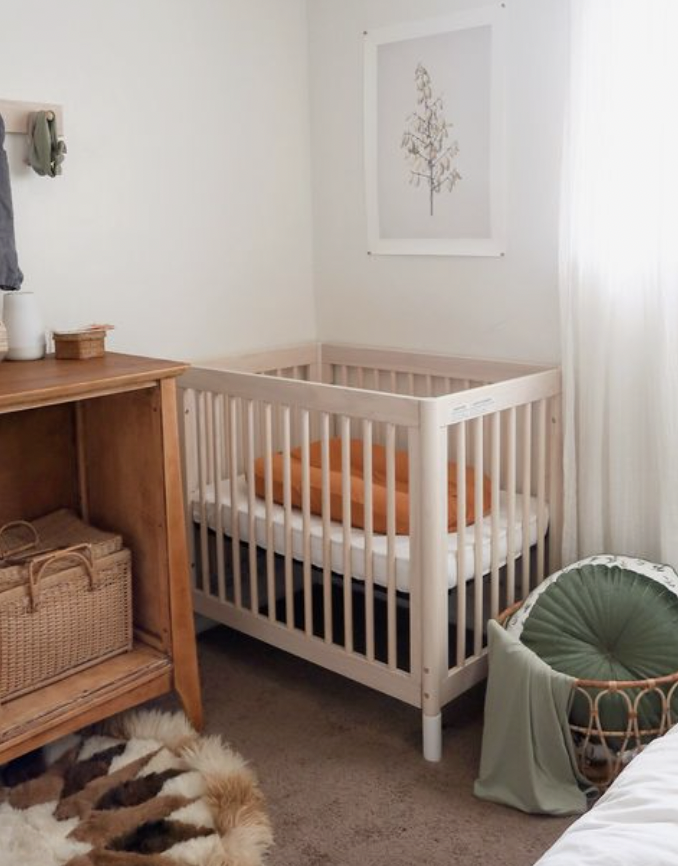
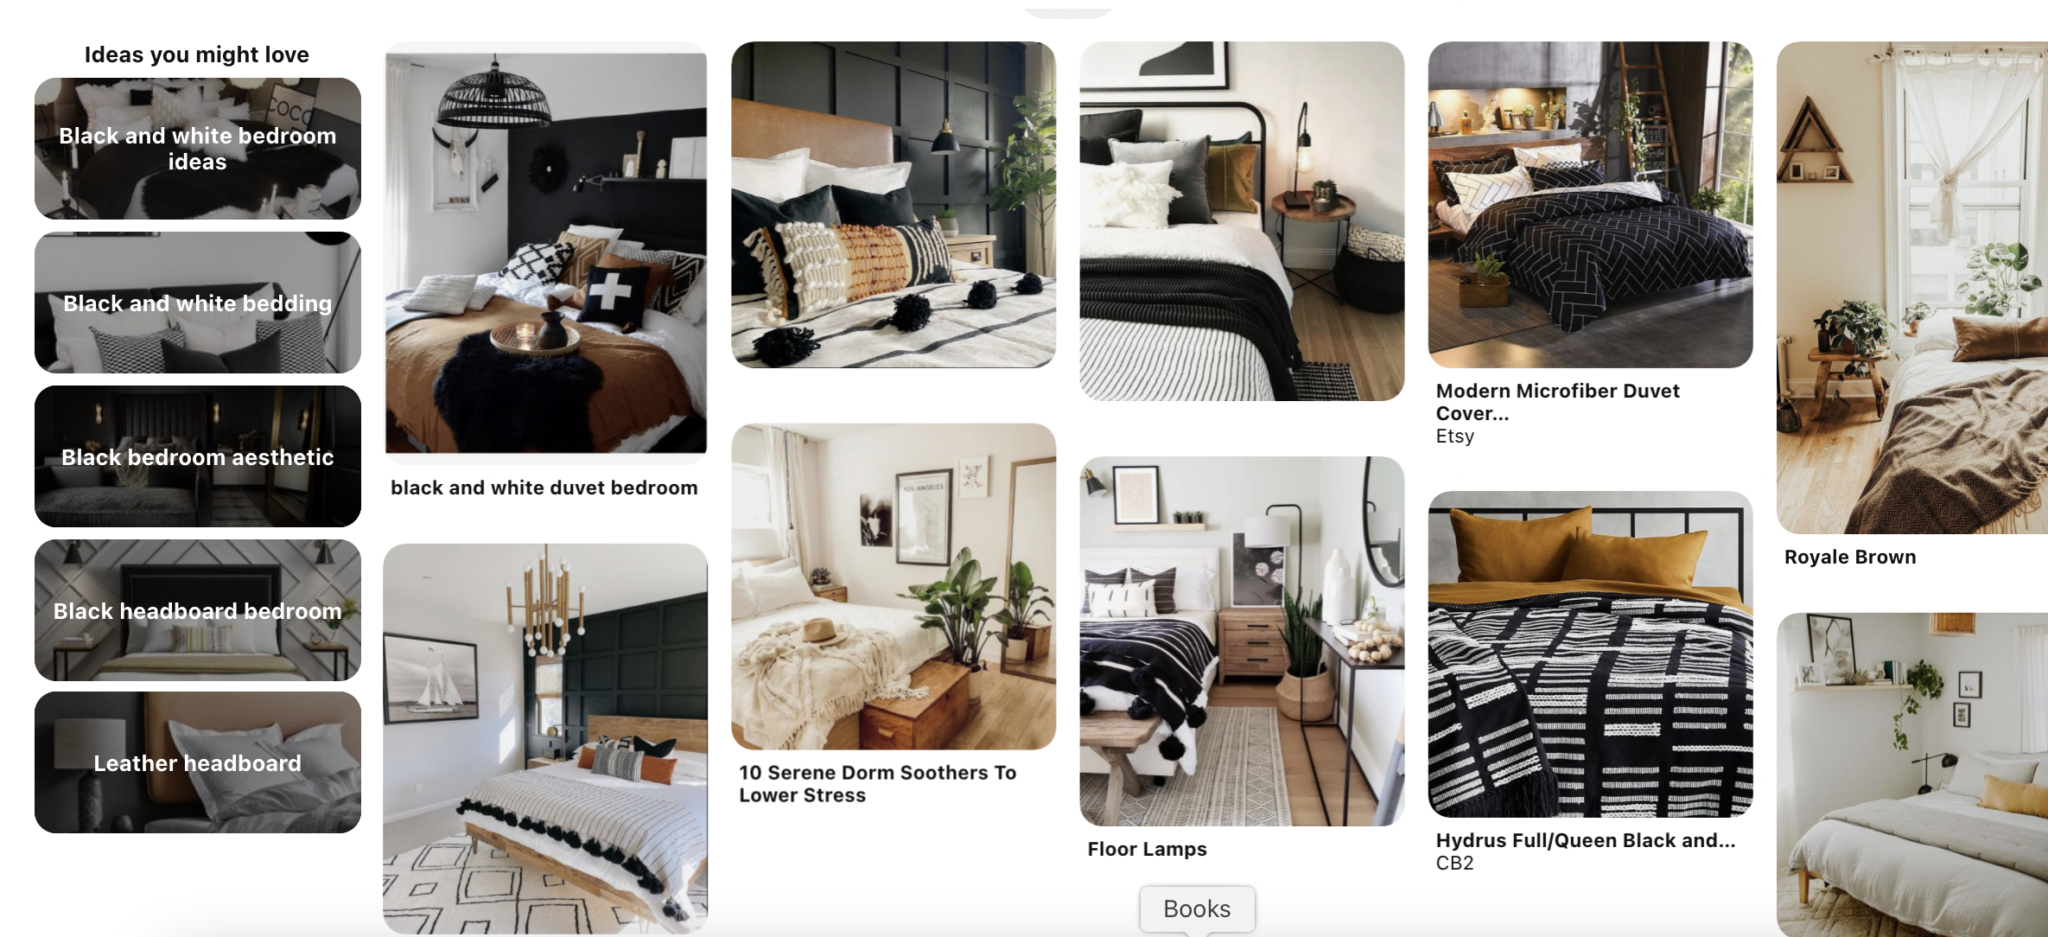
Here are some nursery nook photos I found via Pinterest that inspired me to make the most out of the small space. A space can be small and multifunctional and still be beautiful! Have you heard of a Nursery Nook? It’s a space in the parent’s bedroom dedicated to baby. I know this is not a new concept but I never knew it had an actual name! I think the name makes it more it’s own space- Nursery Nook. We had our first two kids in our rooms as infants for sleep only in a bassinet. All their changing supplies etc., was in their nursery. The baby stuff never really interfered in our bedroom. This time around ALLLLLL the things will be in our room, so hence the minimal approach. I really love how the spaces below seem to make such great use of small space nursery design.
(via Pinterest)
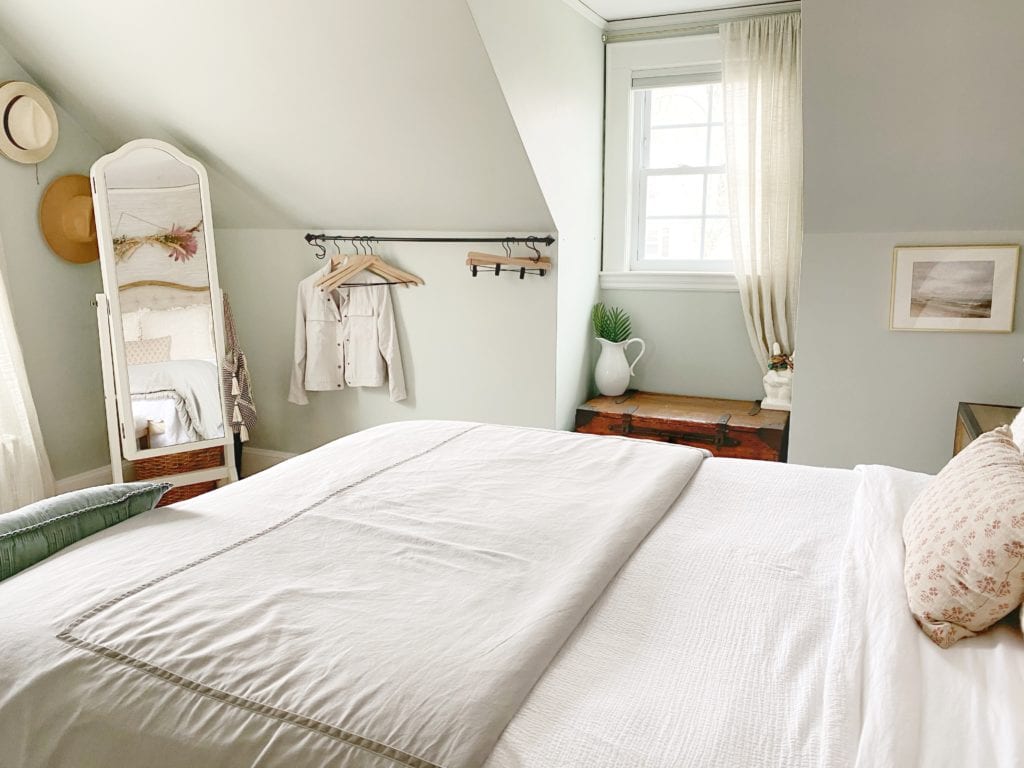
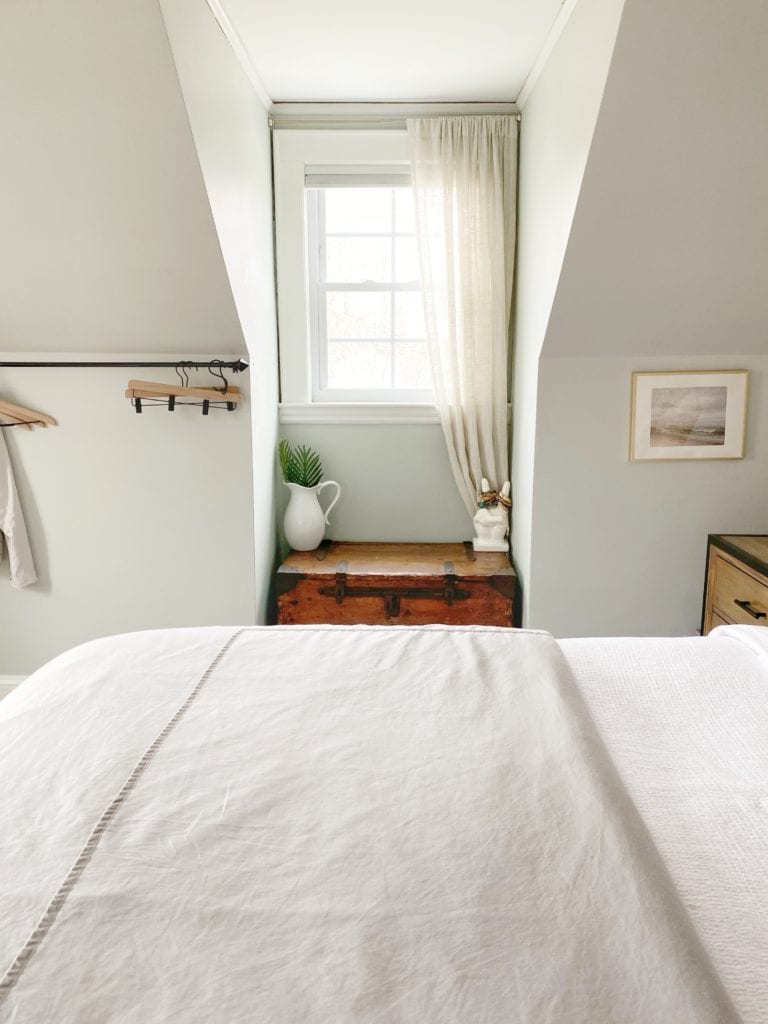
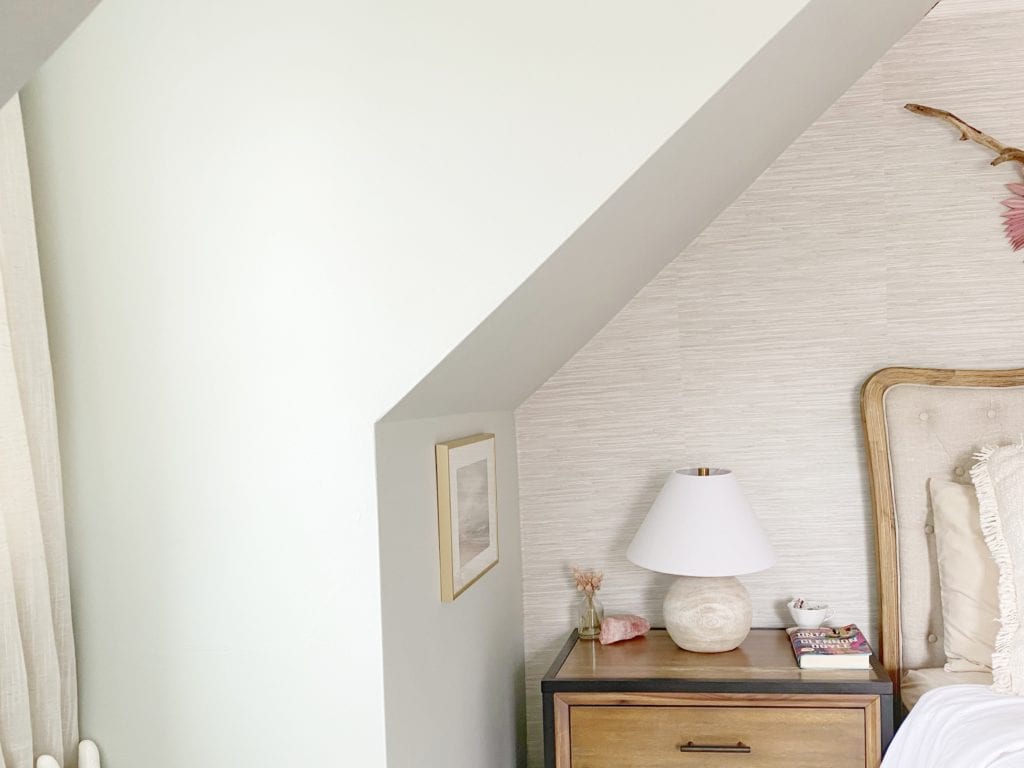
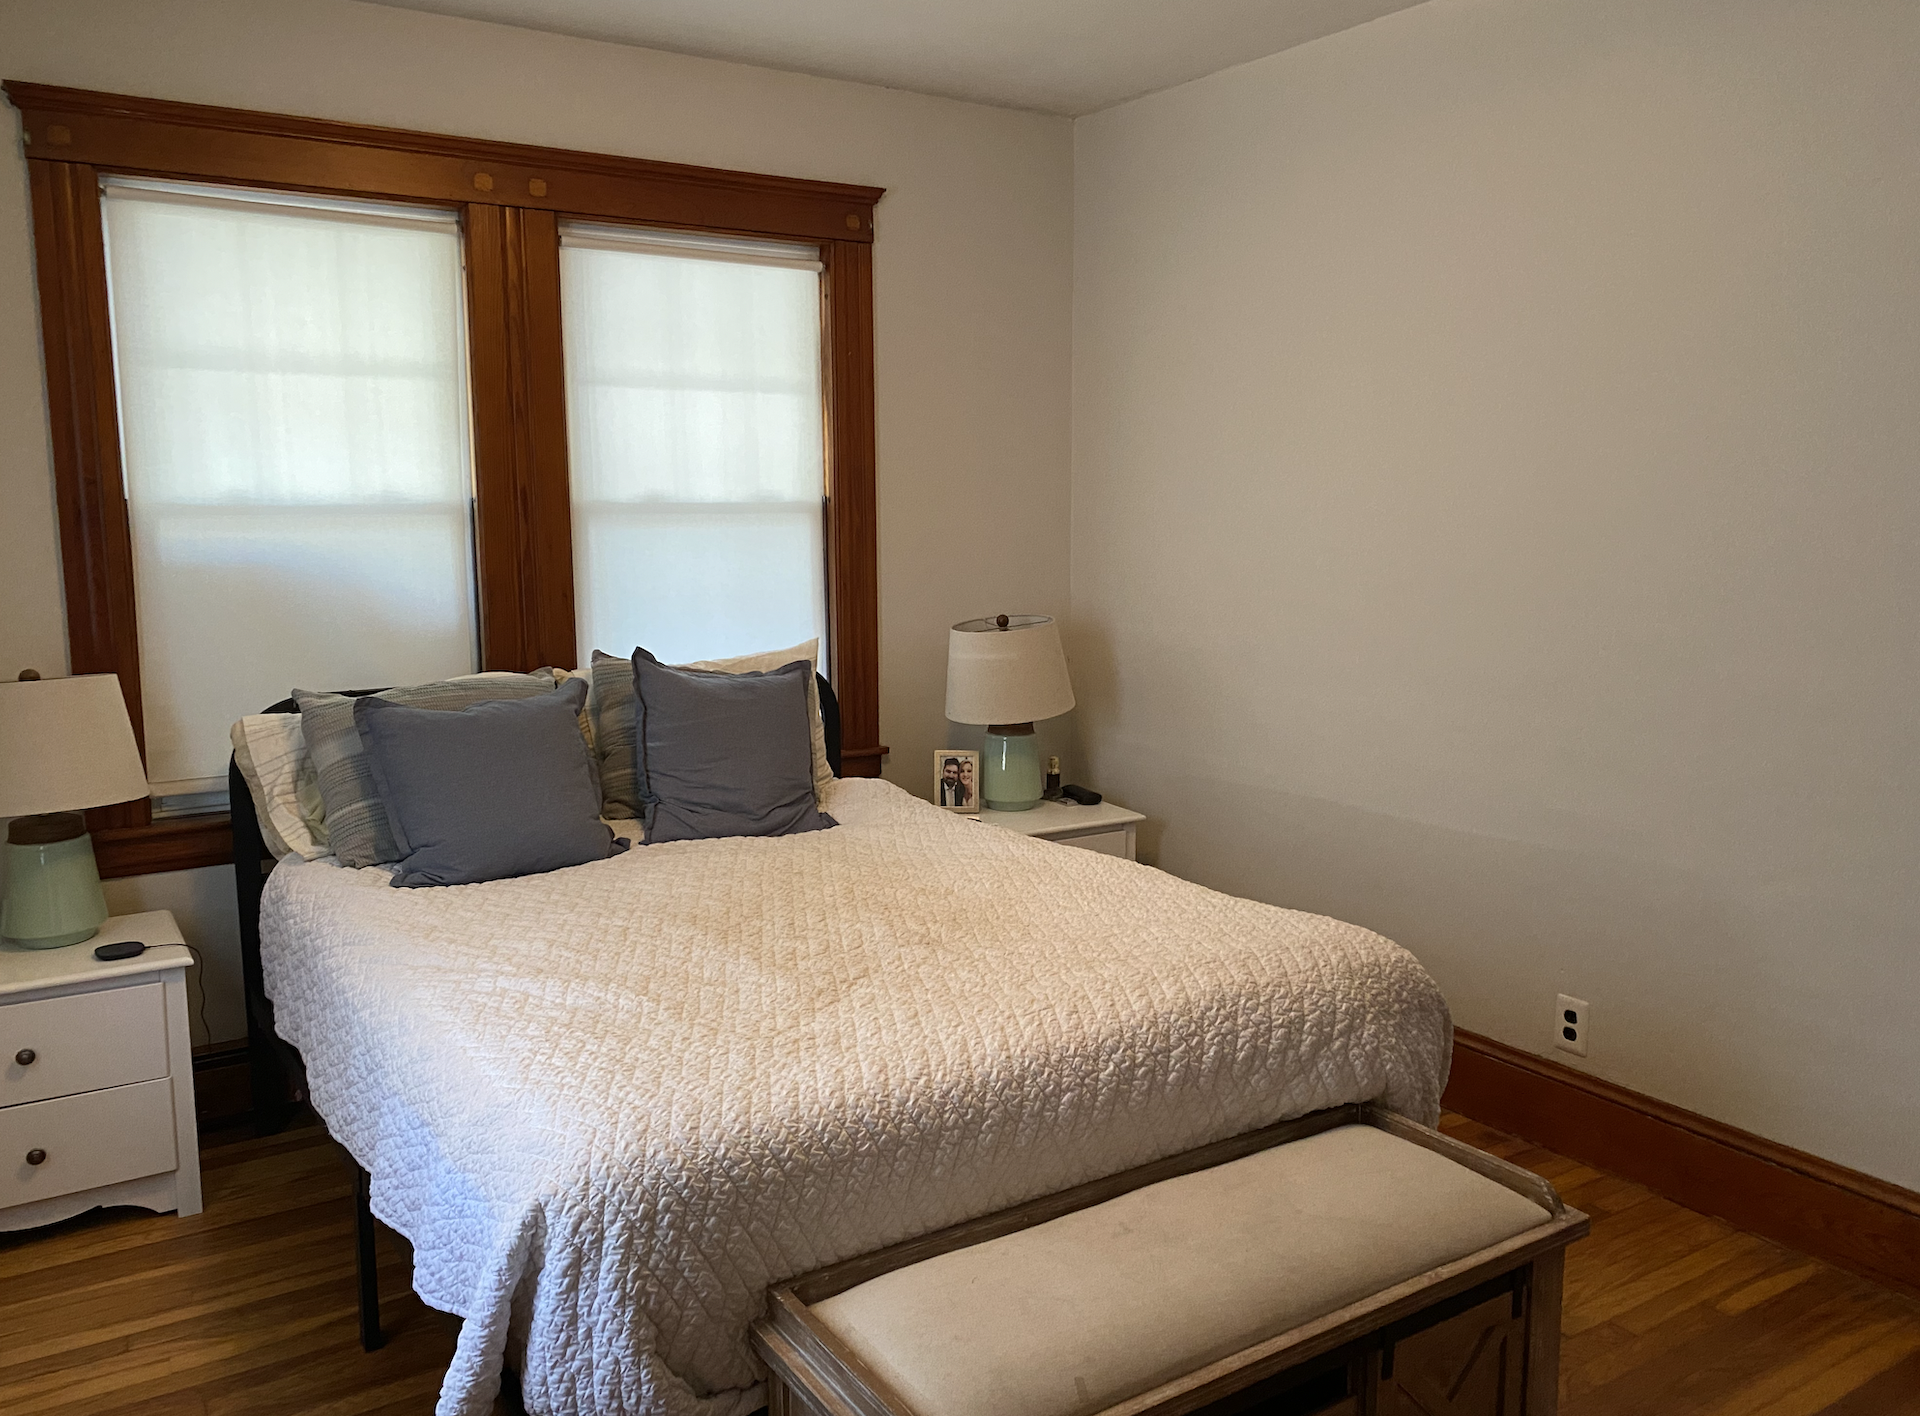
Our Master Bedroom Pre-Nursery Nook:
We do have a nook in between two dormers that I plan to add a changing table/dresser inside which won’t interfere with any of our square footage space. The corner of our bedroom with my standing mirror/jewelry storage will be moved and the crib/bassinet will go there. In addition, maybe a mobile and a piece of art. Above the changing area on those side walls I’ll probably add a small shelf and a piece of art for baby to look at during changes. Once we find out the gender I know I’ll want to start purchasing some clothes, blankets and other essential items. I’ll also go through our kids baby clothes and pick and choose items to bring out. So that is why I decided it’s time to get planning on some items for our Nursery Nook. Here is how it looks now:


Nursery Nook Inspiration Board:
Mobile/ Shelf/ Dresser/ Changing Cover/ Diaper Caddy/ Crib/ Crib Storage Basket/ Alphabet Art Print/ Plant Stand
My inspiration for this really just came from my goal to create a simple, clean and very neutral design (hence the white). Since we aren’t sure of the gender I also wanted to keep it neutral for now. So accent colors could slightly change. This nursery nook needs to flow into our bedroom so using crisp white and gray will help do that. I didn’t want to add in too many more brown pieces since our bedside tables are wood tones.
I love how the crib starts small and can expand as baby grows. I think the round shape also lends itself better to small spaces. These over crib storage baskets will be so helpful in holding blankets, pacifier, swaddles and all those little things we need close by. I decided to not splurge on the dresser, I was looking some in the $700=$1000 price range and settled on this one. Super affordable. It’s more of a temporary piece for now while the baby is little and I need something small to fit in this narrow area. We really don’t need anything fancy for changing diapers and storing little clothes. So I think this will be fine. The reviews look pretty good.
So what do you think of the Nursery Nook concept? I love that this little one will have a sweet spot not only in our hearts but in our bedroom. We are happy to share it (for a little while anyway)! I hope you take away from this post that you don’t need a huge house our a TON of space/bedrooms to make a room beautiful. I’m excited to share how this all comes together over the next few months!
So tell me if you are a parent or soon to be parent what is your top baby essential?!
Happy Decorating!
Jordan
* THIS POST CONTAINS AFFILIATE LINKS THAT HELP SUPPORT THE COST OF RUNNING THIS BLOG. THIS MEANS I MAKE A SMALL COMMISSION OFF THE ITEMS YOU PURCHASE HERE. AS ALWAYS THANK YOU FOR BEING HERE!
Shop The Nursery Nook:

read the full post >
For the last year I’ve been working on a Home Planner which will hopefully launch this spring! This planner will include three sections that will help guide you through the process and steps of identifying your style, designing a space and pulling it all together with decor. Sounds straight forward, right? Yes, it is but in a lot more detail than that. I also share lots of tips to help you with all these aspects in creating a home you love. The great thing is this planner isn’t just for a home it could be for your first apartment, a town house, fixer upper or a new build. The end of this book/planner includes blank pages with prompts to help you stay organized in planning out each space. From goals, to- do lists, ideas, budget, purchase lists, measurements and grids for sketching. I’m even excited to get my hands on one, because I’m looking forward to using it for our future vacation home (I’ll share more about this another day!)
What does this all have to do with my Sister’s Bedroom refresh? I wanted to use her space as an example how Pinterest is a great tool for a non-designer/decorator (even we use them, t00!) in gathering ideas and bringing a space to life based off inspiration found on Pinterest. My Sister didn’t love her bedroom. They had a hand-me-down bed and some hodge-podge decor. She didn’t feel confident enough to get started. However, she had a wonderful Bedroom Pinterest board!! Ah-ha we had a jumping off point to get started! When she sent me the board I could instantly see: a) her style and b) her goals for the end result of her space. Creating Pinterest boards for the various rooms in your casa is super helpful in taking a step towards giving a room a makeover or refresh.
With her budget in mind I started making goals, “to-do’s”, purchase lists and so on using the planner pages… it was a great way to test my own product. I walked her through everything and showed her the planner page so she could also start taking steps towards bringing her Pinterest board to life. Since this isn’t my Sister and her Fiance’s forever home, they didn’t want to do any wood treatment feature walls or wallpaper. We decided to add impact with a painted feature wall. I’ve done this before for my parents bedroom too. It’s an easy way to add some character and experiment with bold color with out committing to a full room of color. Let’s take a look at my Sister’s bedroom BEFORE photos as well as her Pinterest board inspiration.
Bedroom Before:
(this was after she updated the bed to a black sleek frame)
Inspiration Board:
You can see the bedroom lacked any kind of style, it was just thrown together when they moved. Bedrooms are typically the last room you think about but really I think they should be a respite for you and more focused on sooner in the design/decorating process. From the inspiration board I was able to identify her style/vibe for the space, which was very neutral and definitely a minimal/boho feel. Play close attention to some of the details in these photos. The colors, the patterns and textures… with these images I really honed into her vision. You can do this as well.. pay close attention to the details in each imagine you pin. What can you pin point that you love about them? Use that information to help guide your product sourcing/selection online or in store.
I created a purchase/ to-do list to help her get organized which looked like this:
- Accent Wall Paint- Sherwin Williams Peppercorn
- Rug- Modern/Boho graphic style
- Bedframe
- Semi-Flush light
- Bedding
- Throw Pillows
- Curtains
- Curtain Rods
- Bedside Lamps
- Artwork
- Throw Blanket
- Brass Poster Frames
- Blinds
- Boho Lumbar Pillow
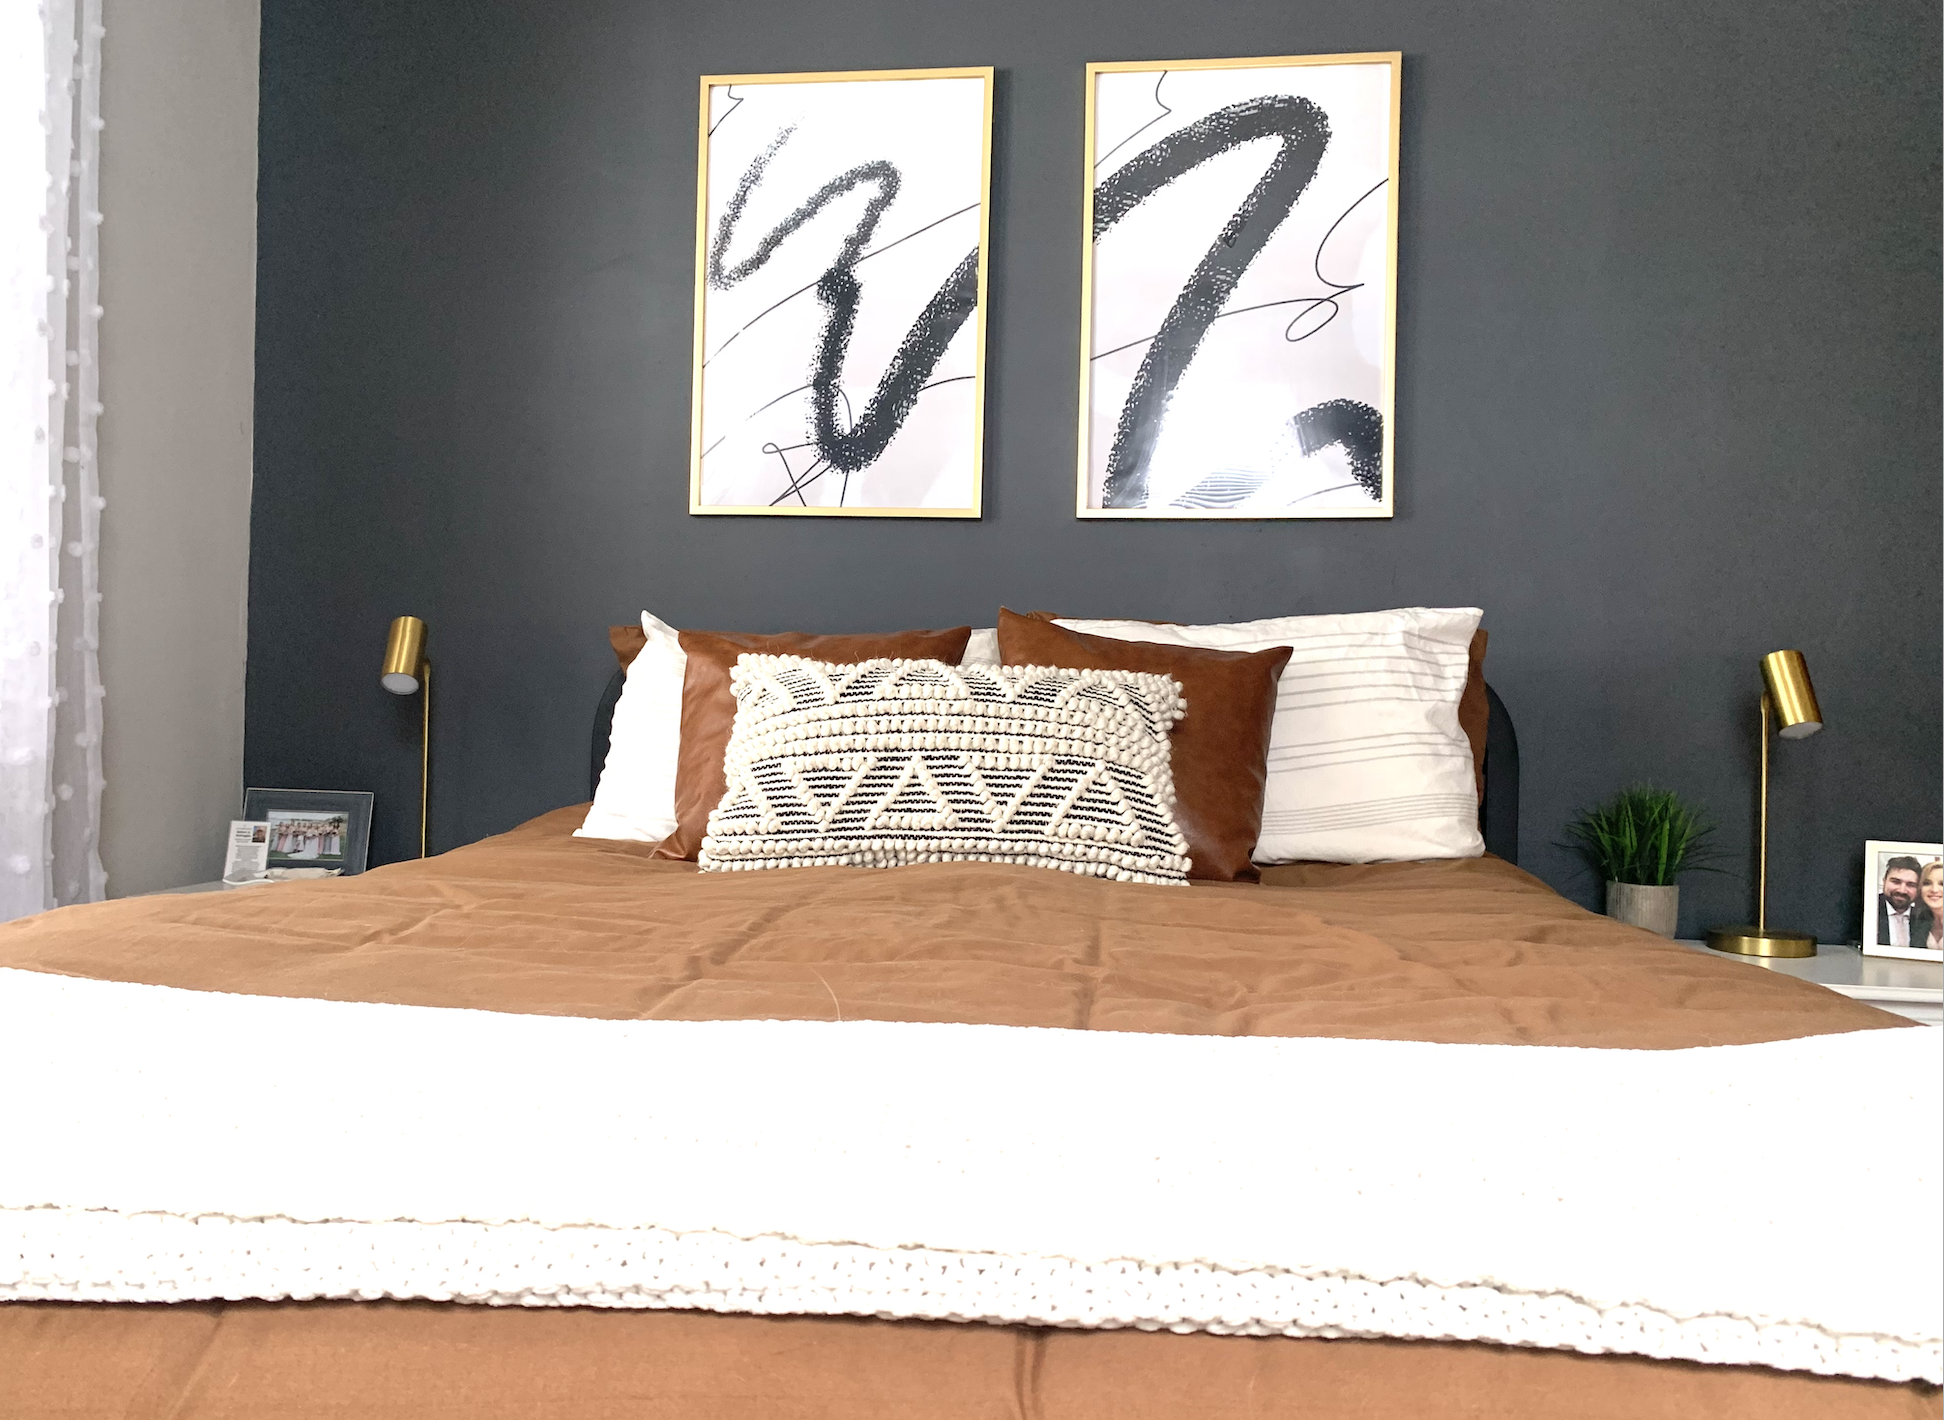
Once we made our above, list than sourced the items we liked with in her budget we ordered everything and were ready to implement the makeover! We started by changing the layout so her bed would go against the largest wall that needed “something” we painted it a dark black to bring out that neutral but modern vibe like in her Pinterest board. The windows now feel more open and airy. Her bed is the focal point on the dark grayish-black wall. We added lots of textures with the bedding, pillows and blankets. Bringing in textures and graphic prints is important when keeping a room really neutral.
This makeover was over the course of about two-three weeks. We painted the wall, updated the lighting, changed the bedding and added the rug.
Bedroom After:

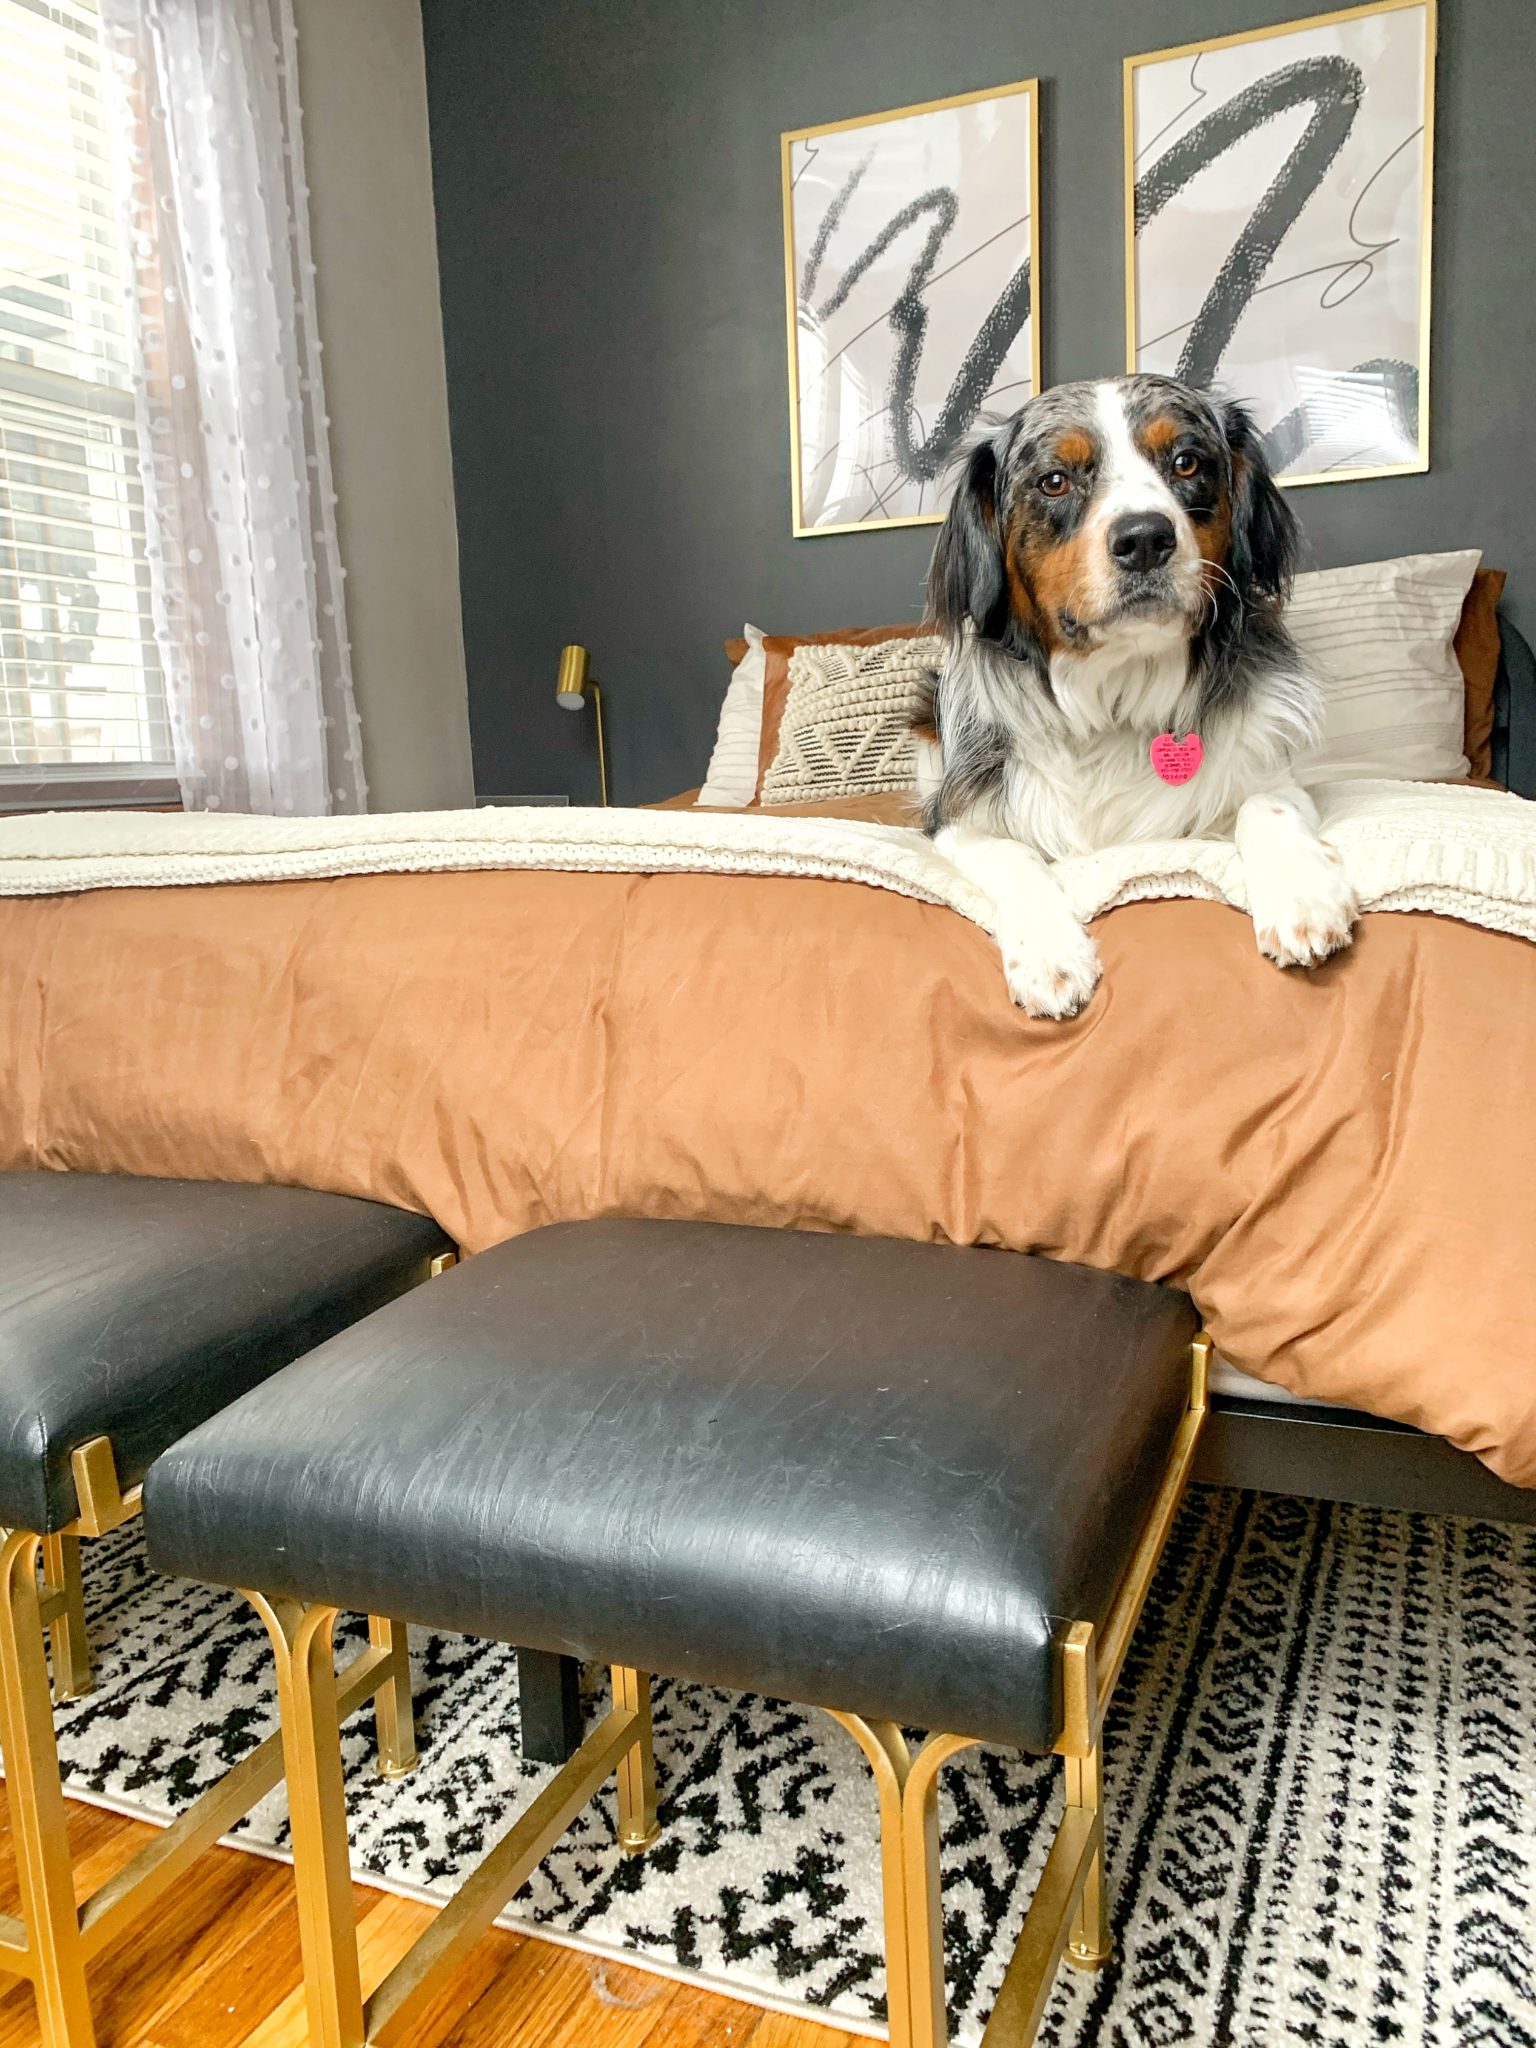
I love how the dark accent wall makes all the brass pop! If you are wondering about the cool graphic art… our cousin has an Etsy shop and creates cool digital art prints!! She actually custom designed these prints for my sisters bedroom. If you are interested in her shop or ordering a custom piece for your home reach out to her on Instagram her handle is Studio_OG.
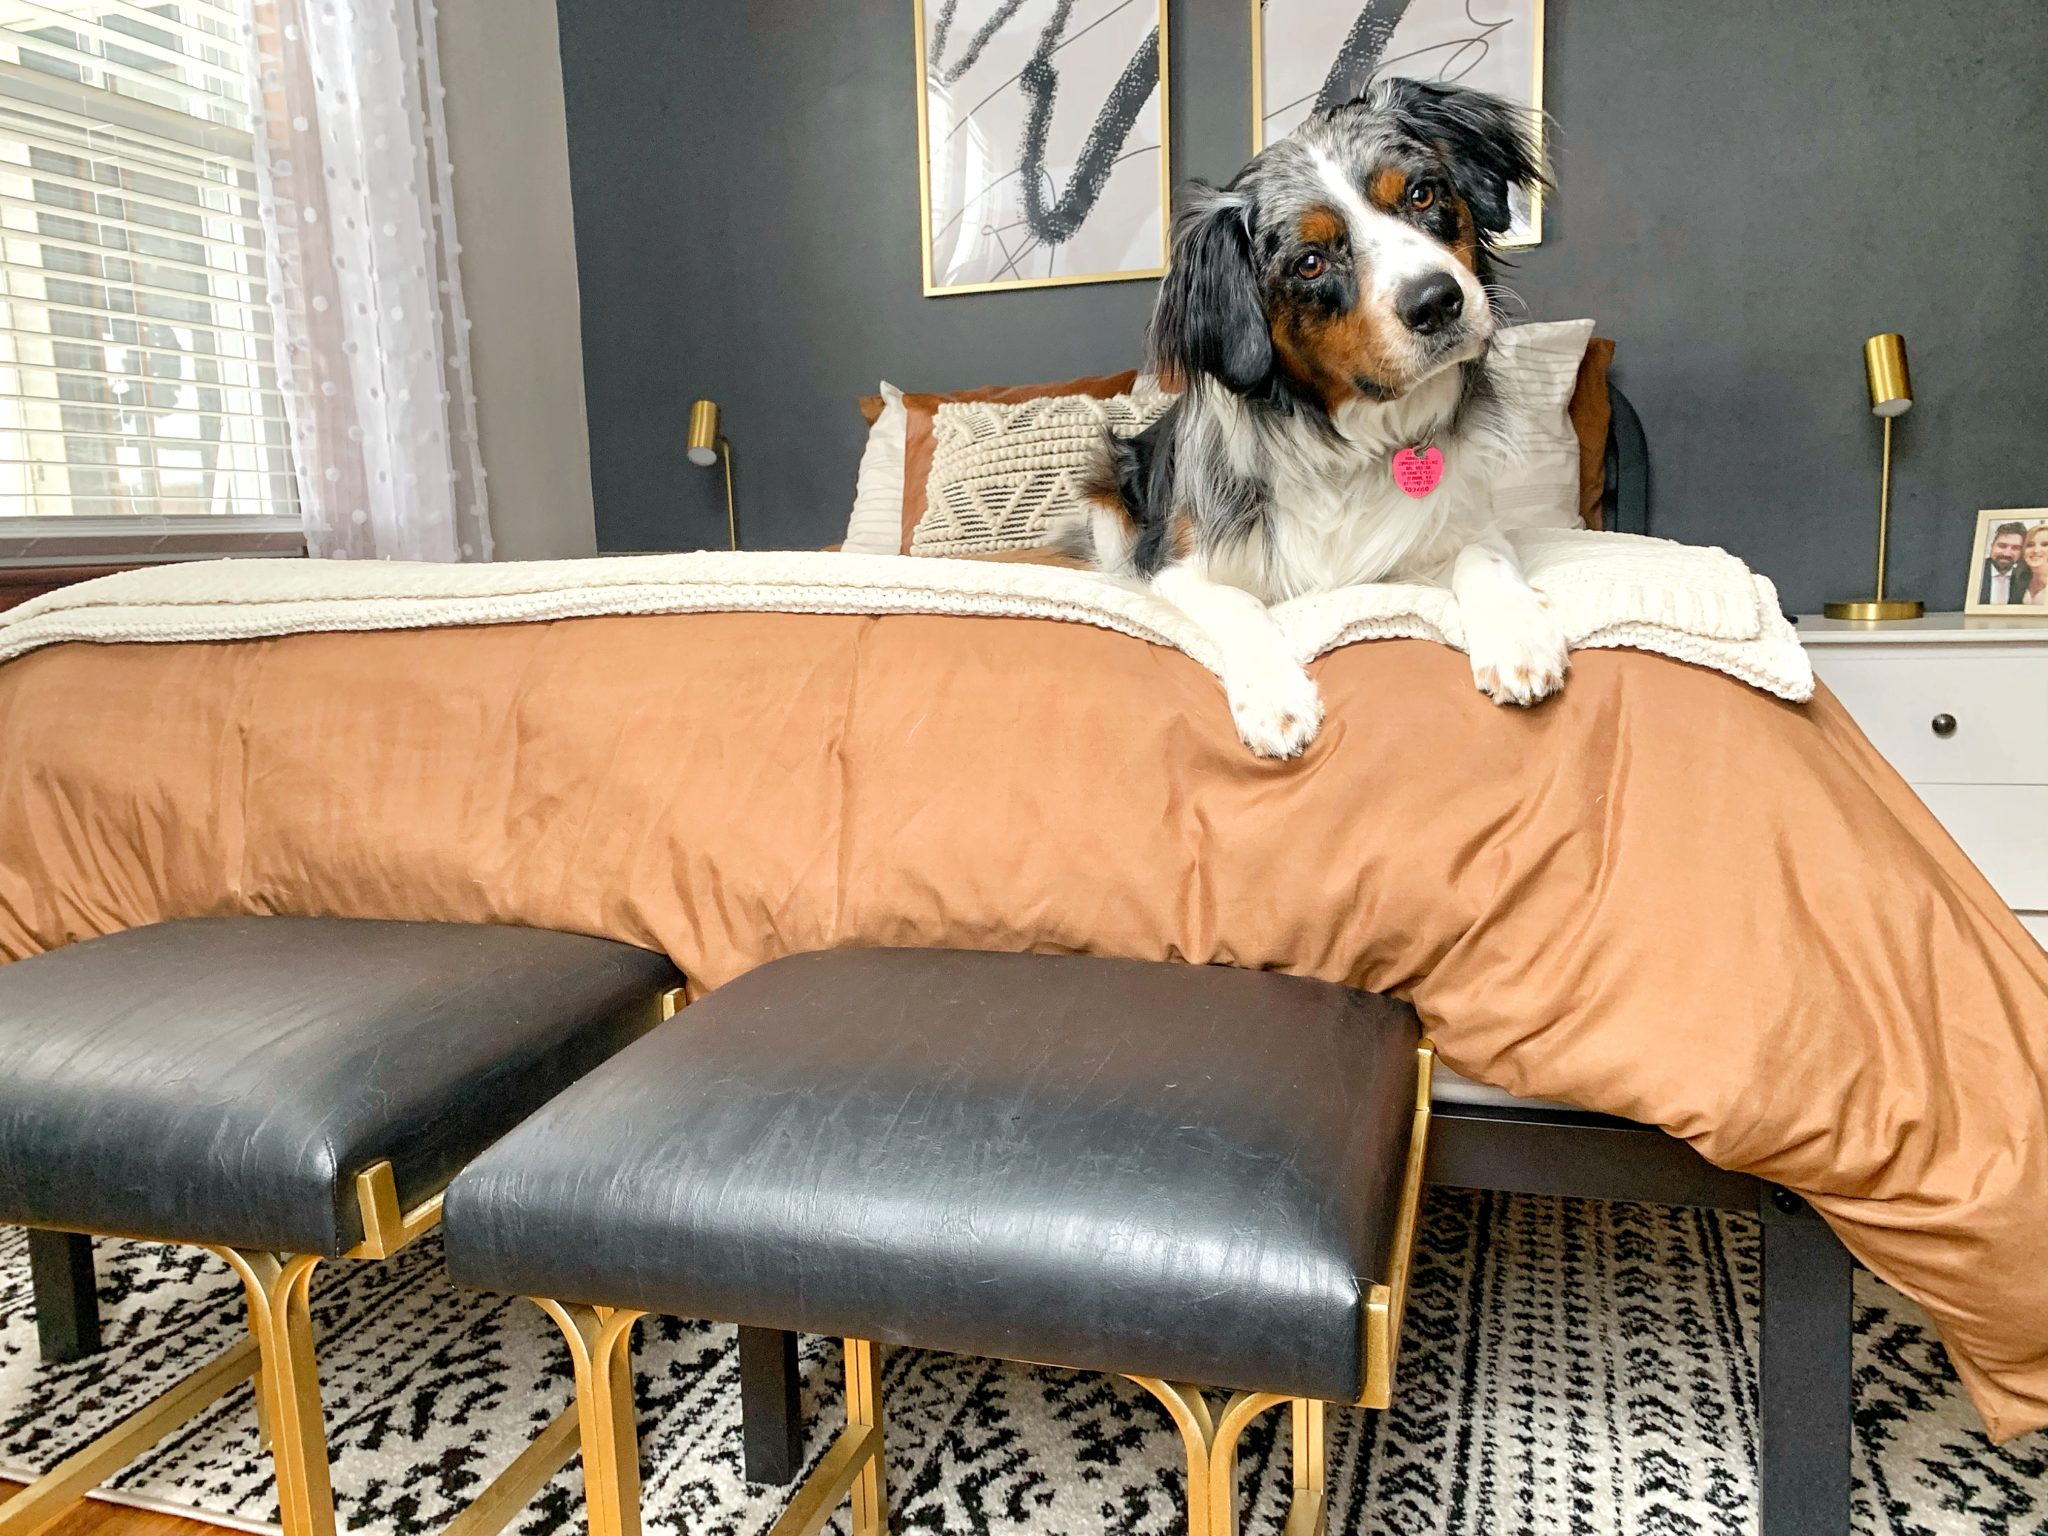
I think her pup Ragnar matches her bedroom perfectly and that wasn’t even planned! He really did steal the show in these photos. Ben helped them out by installing this really cool light fixture that almost looks like a half-moon. She plans to add more pops of greenery or shelving for added storage and a place to put more decorative items.


The black and gold benches she already owned and were previously in her dining-room. I moved them in here because they fit the vibe so much better. She purchased them at At Home stores a couple years ago. I love how the rug adds a ton of interest with patterns. If you are ever feeling stuck with a space and really with design/decorating in general. Join Pinterest (FOLLOW ME HERE I’m always pinning inspiration) and create a board for every room in your house! It will keep your ideas organized and don’t just let it live in Pinterest, bring it to life by creating lists or better yet, purcahse my planner when it is available to stay even more organized in creating your beautiful dwelling!
Happy Decorating!
Jordan
*this post contains affiliate links which help support the costs of my blog. Thank you for purchasing items through my recommended products.
Shop this Post:

read the full post >

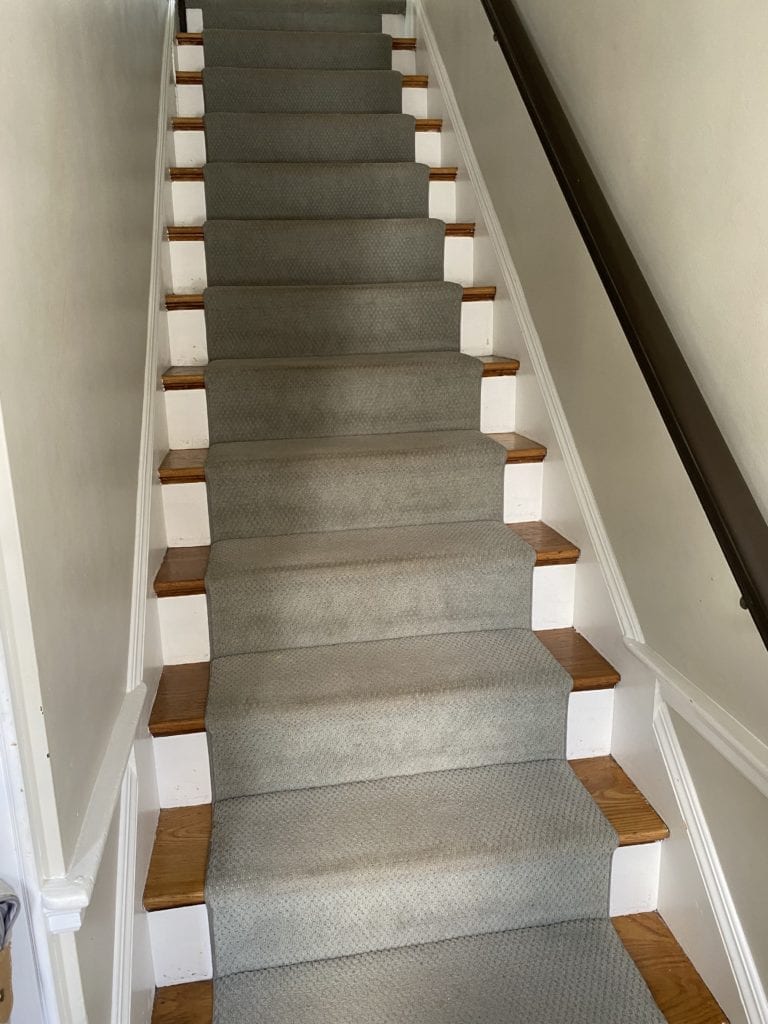
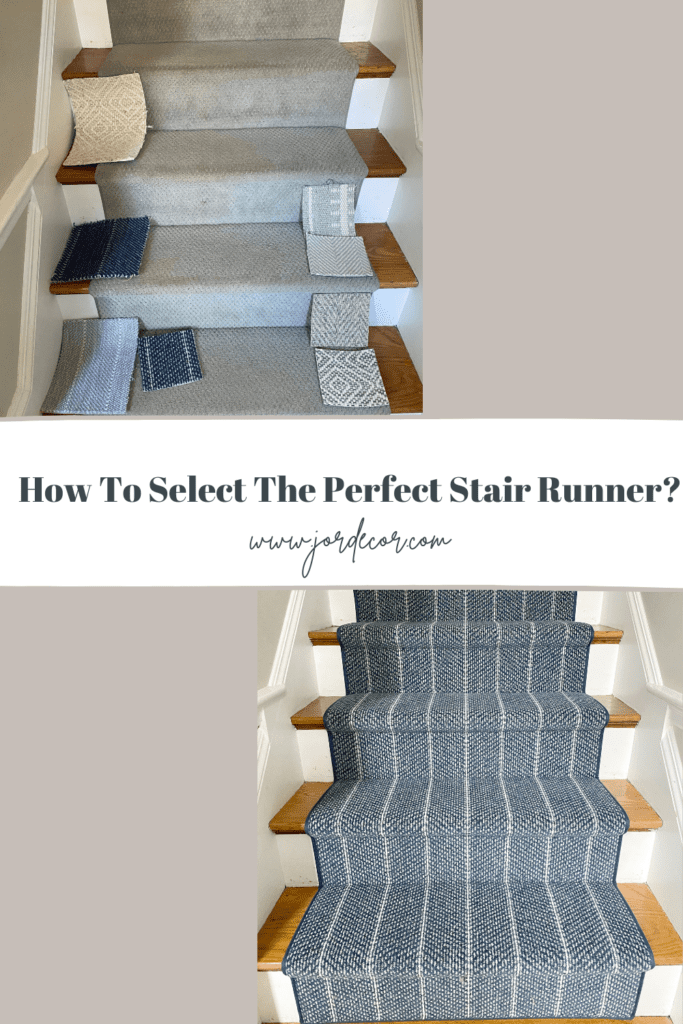
Have you been considering a stair runner for your home? A stair runner is a great way to add style and comfort to your staircase. Also, for families with young children a stair runner creates a softer surface for wobbley little ones that are just starting to walk or bigger kids that sometimes forget how quickly they can move. In this post I’m partnering with The Carpet Workoom to share some tips on how to select a stair runner. All ideas and reviews are my own. Below you will find a special discount code for my followers only! Thank you to The Carpet Workroom!
I’m so excited for this post today! Our stair runner was in desperate need of a refresh after 8 years + two kids + one dog, we were ready to freshen up our staircase. Could we just leave it hardwood? Yes, but we know our kids and they’ve been known to run too fast up or down the stairs and wipe out. While they are young a carpeted stair gives us peace of mind against any trips to the E.R. A stair runner also gives you a chance to dress up and add style to your stairway. I’d never miss a chance to infuse some style to any space. This partnership truly came at the right time!
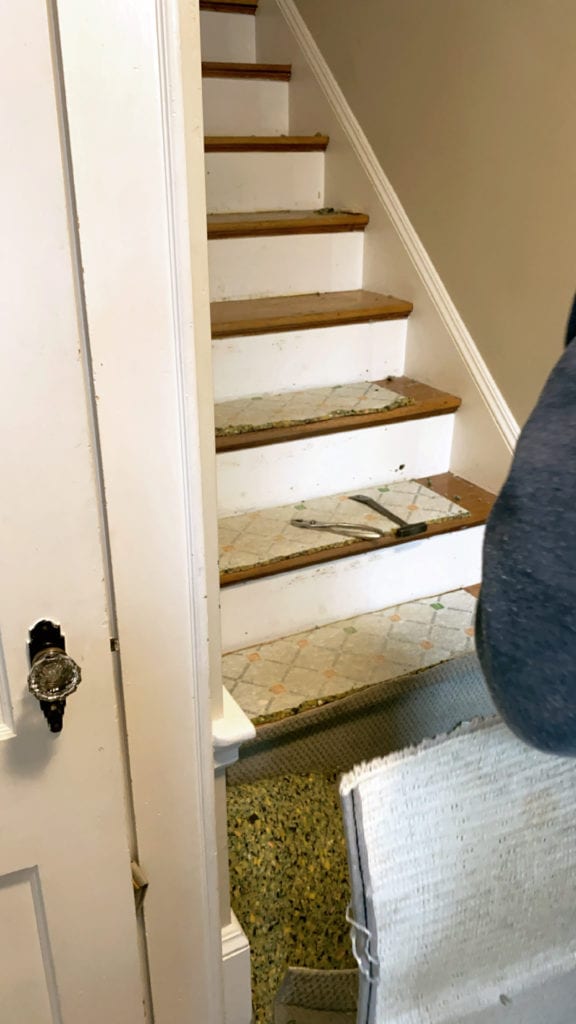
Stair Runner BEFORE:
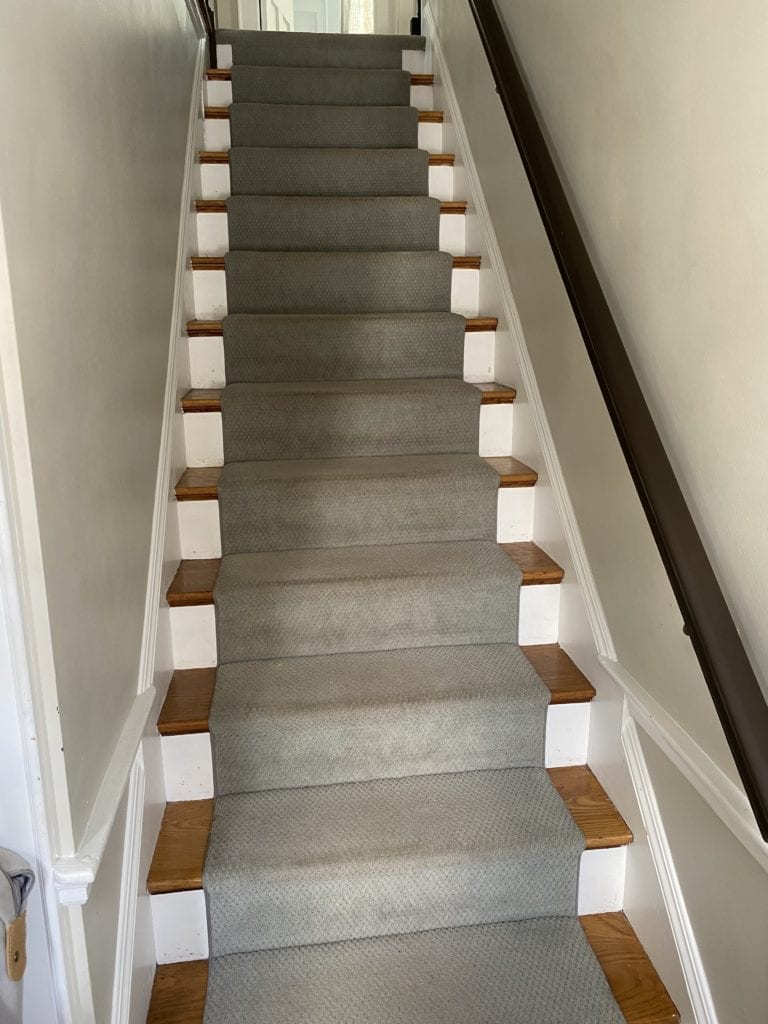
Here you can see what we are working with. Very straight forward, nothing glamorous. Definitely showing signs of some age and overall worn out look. We purchased this about 8 years ago and while it held up ok and definitely kept our kids protected from a couple slips, we were ready for a new look. So let’s get started on the process!
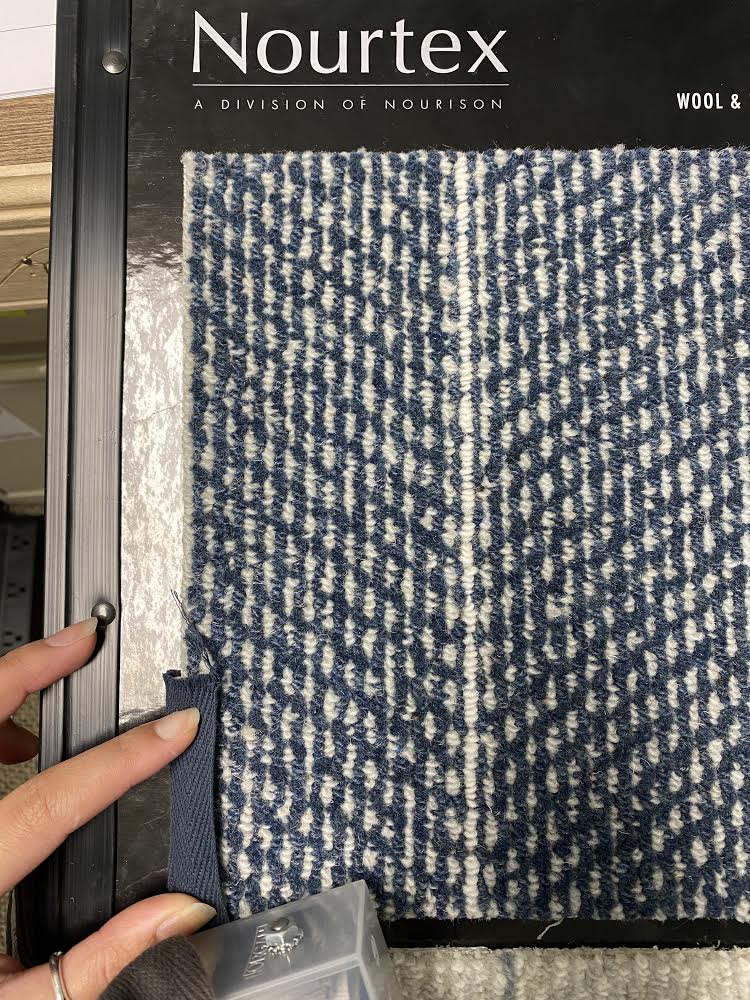
Samples, Samples and MORE Samples!
When selecting your runner you’ll want to grab a bunch of samples to bring home. I browsed The Carpet Workroom’s Instagram to get inspired with fabric choices. You can also book an appointment to browse in person. Either way you’ll be so impressed by the variety of fabrics and patterns they have. Start by selecting your fabric type. You’ll want to select something durable and long lasting (especially if you have a young family/pets). Wool is the best option here as it’s fibers will hold up against constant use. Next, is pile height. Selecting a low pile runner is going to hold up better over time. Plush fabrics with longer pile height will show wear a lot quicker.
Next, consider the color scheme as well as the pattern you want. Below you’ll see some of my favorite designs and colors. I wanted subtle pattern and really loved the grays and blues as I have a lot of gray and blue in my home already. After spending time looking at these samples and struggling with selecting one as they were all so beautiful. Based on how active our home is I decided on one that would hide s much as possible. So the darker blue won and I’m excited to switch up from gray.
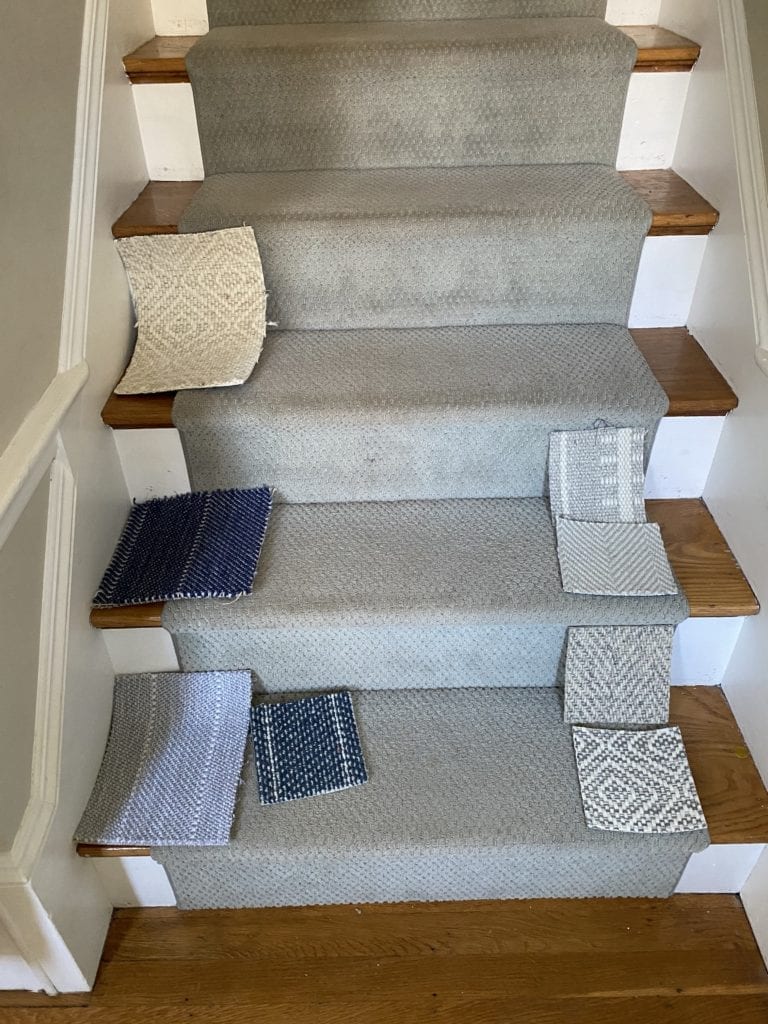
Binding + Install Style
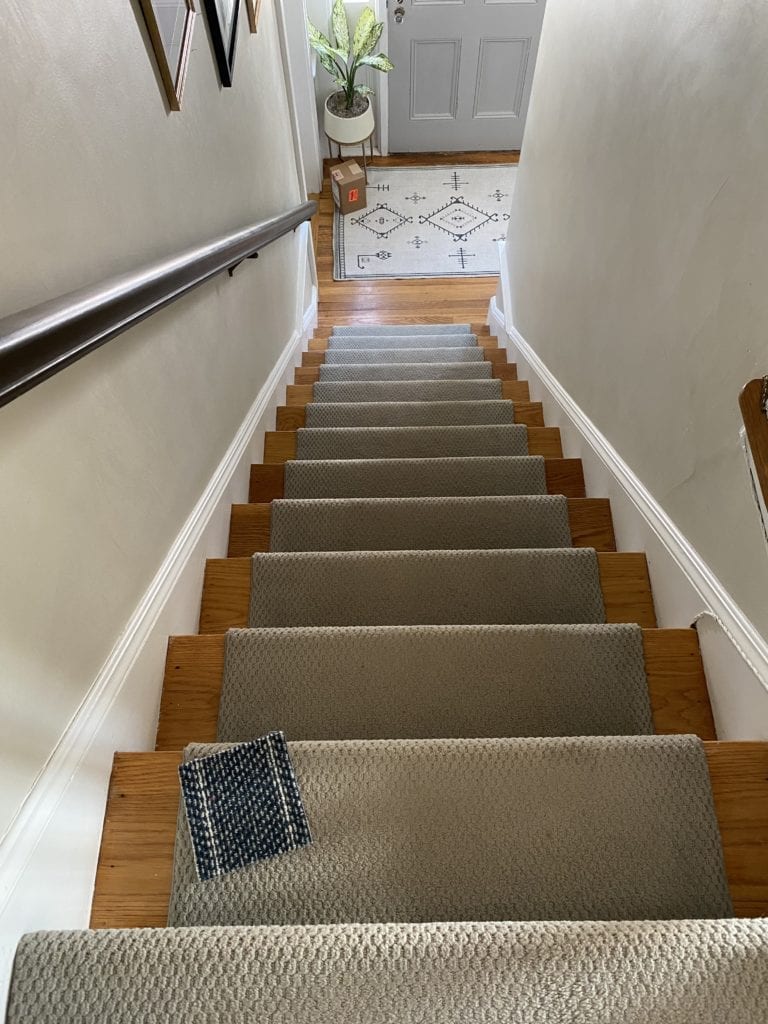
Once you select your fabric you’ll need to select a binding. The Carpet Workroom has many different bindings that you can finish off your runner with. A fun options is adding a nail head detail (which costs additional) to really add a “wow” moment. I wanted to keep things simple so I selected a binding that would bring out the woven blue in the fabric design. Below is the exact fabric we selected.
Installers will also want to know your preference for how the runner will be installed, Hollywood vs. Waterfall style. Click HERE to see the two different options. Since we previously had the Hollywood style, I chose to keep that look. I like the way it wraps around the stairs and shows off the stair shape. It has a more classic and traditional vibe.
Last but not least- What to Budget?!
Ok, the BIG question. You are wondering what do you need to budget for a stair runner? The Carpet Workroom has low priced runner packs that can be installed in the local area for under $1,000, for straight runners and $1,500 for more custom items. Stairs with landings typically price out $1,500- $2,000. Your fabric selection will also dictate cost. Be sure to use my code JORDECOR10 or mention me for a discount.
Stair Runner After:
So before we get to the pretty afterphotos first here is in process shot of the removal. I won’t name names but according to the installer Pete our old runner was one of the worst carpet removals he’s ever done. He also said everything about it was done incorrectly. Our old runner was from a local big box store, that’s all I’m saying! 😉
Ok so let’s see what our stair runner looks like now!!
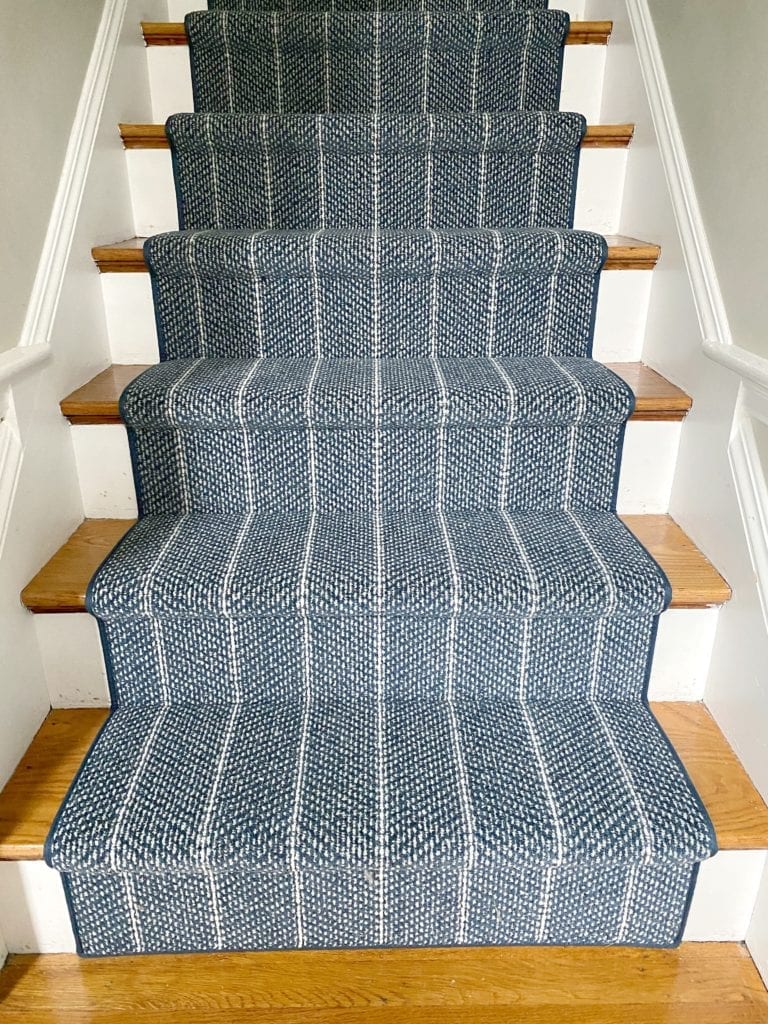
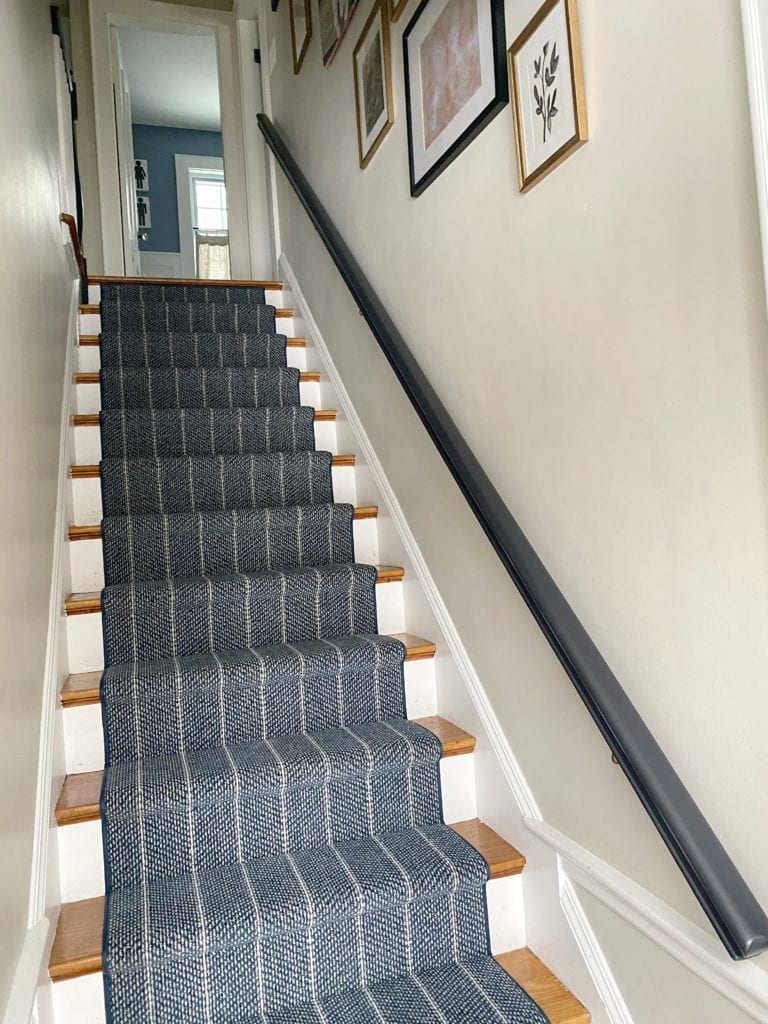
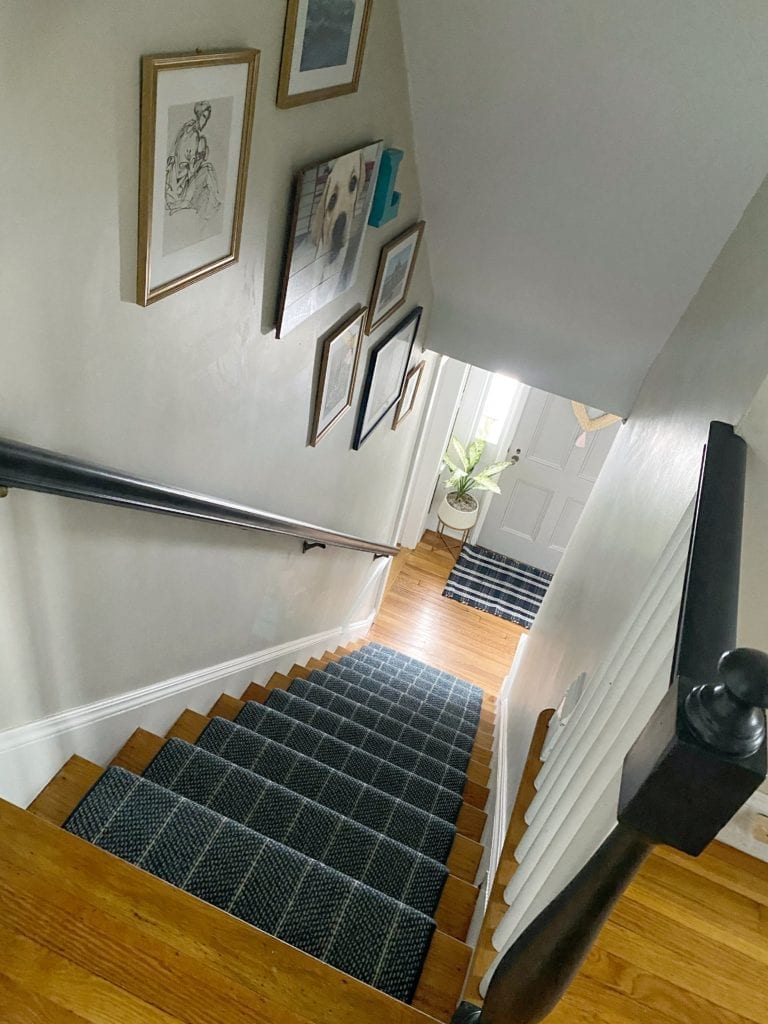
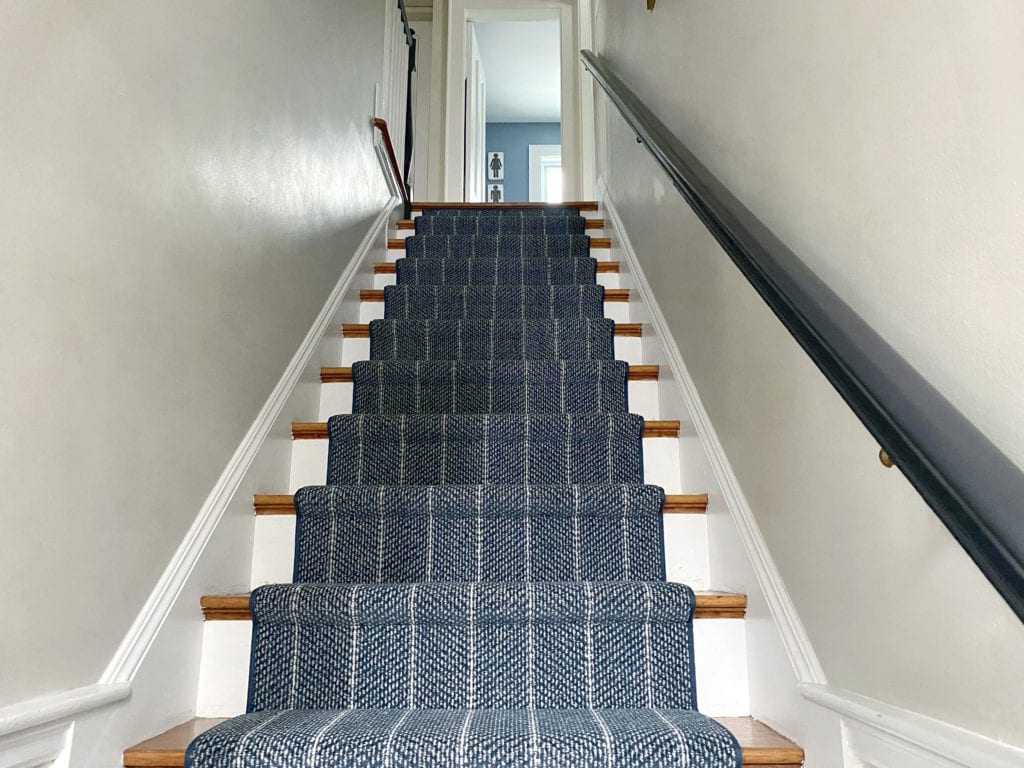
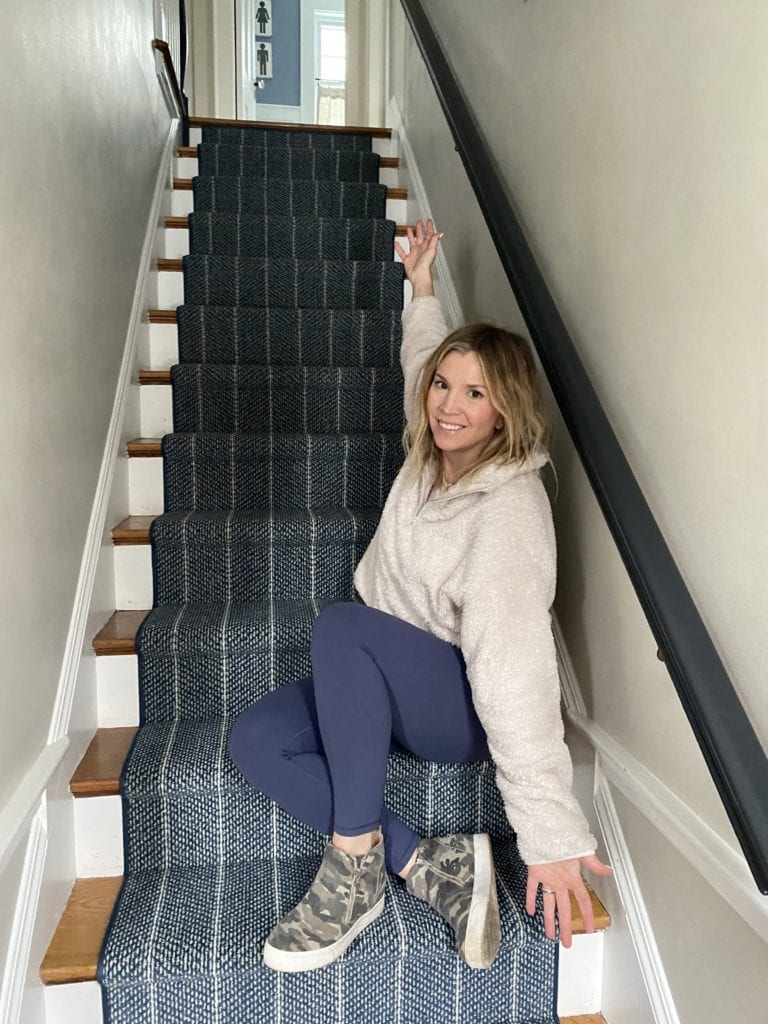
As you can tell I love it! I love the richness it adds and a little pop of color to our staircase. It is so plush and soft to walk on, keeps the old house squeaks to a minimum as well (added bonus!). I love the dark binding and the subtle stripe. It will also hide so much dirt. Look at me, already breaking my own rules of no shoes in the house. Whoops! Thank you so much to my friends at The Carpet Workroom for a fabulous collaboration and I’m so excited they are offering you guys a code; mention JORDECOR10 and they will apply to your order!
I truly hope you found this post helpful and informative. I also love getting to work with local companies that do such beautiful work. I appreciate you supporting these businesses I get the pleasure of working with.
Let me know if you have any questions and if you work with them please send me some photos via Instagram @Jordecor
Happy Decorating!
jordan
Pin For Later:
read the full post >
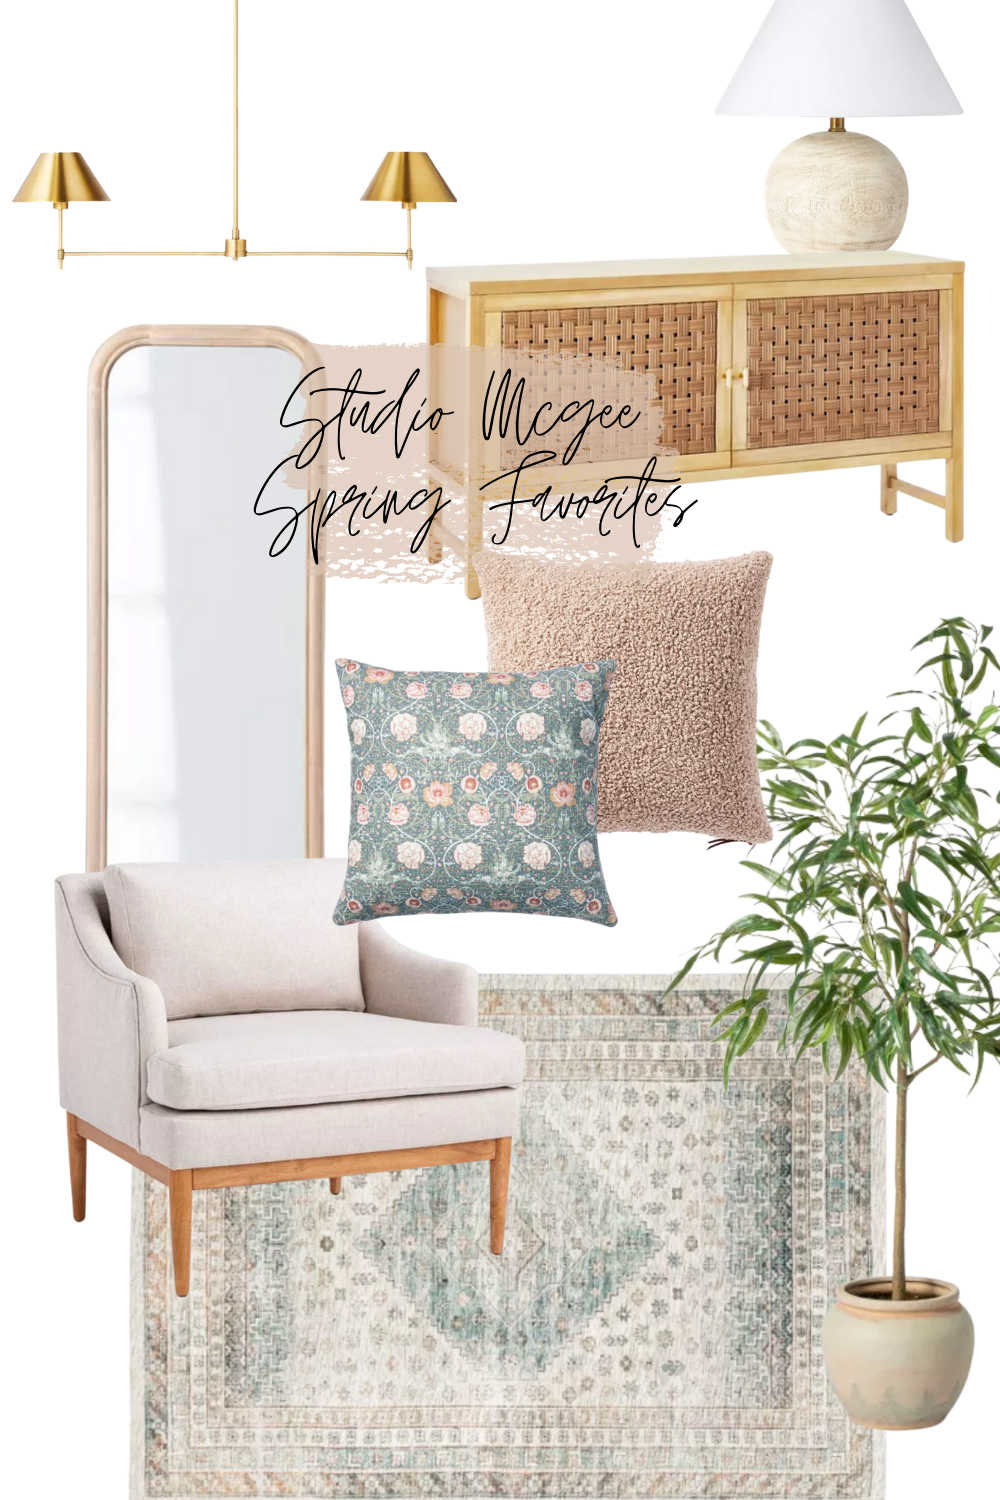
Spring launch is here with the Studio Mcgee collection at Target! These pieces are timeless and classic with an amazing target price point. Pieces sell out fast so if you love something don’t wait! I have the lamp and I’m obsessed. They have a lot of great light fixture options that are gorgeous and reasonable! I love the natural tones with pops of seasonal color in the pillows with a mix of metals and woven materials. Below you will find some of my favorites from this launch, it’s really so hard to choose only a few.
Let me know below if you purchase anything or what your favorites are! Happy Shopping!
Jordan
Rug // Chair // Light Fixture // Tall Plant // Console Table // Floor Mirror // Floral Pillow // Pink Pillow // Lamp
*this post contains affiliate links which help support my blog. Thank you so much for shopping through my links!
Shop my favorites:


")

